What strategies do you use to increase comfort in your daily life?
This site don’t half ask some pretty stupid questions at times. Using this title as a suggestion as if everyone makes a strategic plan to introduce comfort into their life. if you have to plan comfort into your daily routine then something is seriously wrong in your outlook. Give your head a wobble.
It’s my opinion yes, you might disagree, that’s fine that’s your choice, but don’t bother me with “Strategies” when it’s just overthinking and over analysing what is a natural everyday occurrence.
I have obtained some 1.5mm camera seal and have commenced the replacement of the old seal. First thing to do is measure the widths required for each of the 5 pieces needing replacement.
Measuring seal width Measuring seal width on doorMeasure all required seal widths
Easiest piece to seal is the larger segment at the hinge of the door. Setting this piece first allows you to get the start point’s correct for the longer more fiddly sections.
Door light seal replacement
When it comes to the longer runs there are two width measurements. For the seals on the back door they are approximately 2 mm wide and the ones on the camera itself are 1.5 mm wide. I have cut these myself and believe me they are awkward little buggers to get in place, I very much doubt you will do it first time (well done if you do) it’s taken me a number of attempts and to be honest I’m still not 100% happy with the results. The rear door is the second easiest piece to do as you can remove the film guard to give you some space to work.
Rear door with new light seal installed
The camera body is ultra awkward as the seal is so thin. I have put in two lengths and it’s stayed in place overnight but I may well redo it again at a later date. I will run a film through to see if it is sufficient as I suspect it may well be. My trouble is I’m just trying to be perfect but sometimes you just have to lower your expectations slightly. A couple of things I would recommend though:
Use an ultra sharp craft knife
Use a metal ruler
Wet the adhesive as you put it in place as it allows you some option to move it prior to sticking
Be patient, you will have to cut a number of strips
Be prepared to remove re clean and try again
Practice and don’t be downhearted if you fail
Try again
Practice makes perfect 👍
This is going to be a stock camera for me so there is no rush to move it on. Keep a camera spare for yourself to practice on as it will only improve your technique in the long run. This was my first attempt at seal replacement and I have learned a lot from this exercise. Come back to see the results of my test film on this camera.
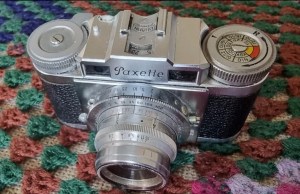
I’ve obtained three new (old) cameras this week to work on. And of the many thousands out there I think I have three lovely examples of good everyday cameras circa 1940-1965.
Halina Paulette, Braun Paxette and an Ensign Ful-Vue
Two of these cameras are 35mm and the Ensign is a 120 film camera. The Ensign needs a refurb and I will dedicate a page to the work that needs to be done on this unit. Fingers crossed the work on the other two cameras will be minimal, hopefully just a clean up however I will assess all cameras when they arrive.
Ensign Ful-Vue 120 film camera
I’ve never had any dealings with these cameras before so I’m kind of looking forward to putting some time in on them.
Halina PauletteBraun Paxette
I think the above two 35mm cameras are little beauties, they have so much character and show the magnificent design ideas of their time. I’m hoping to put film through all three of these cameras that I will develop and scan at home. Fingers crossed as I said earlier that there is not too much wrong with them all.
I’ll update the site with a blog and a small video for each one once work to restore them begins.
Nikon Coolpix L27Nikon Coolpix L27Nikon Coolpix L27 caseHow the camera looked on arrival
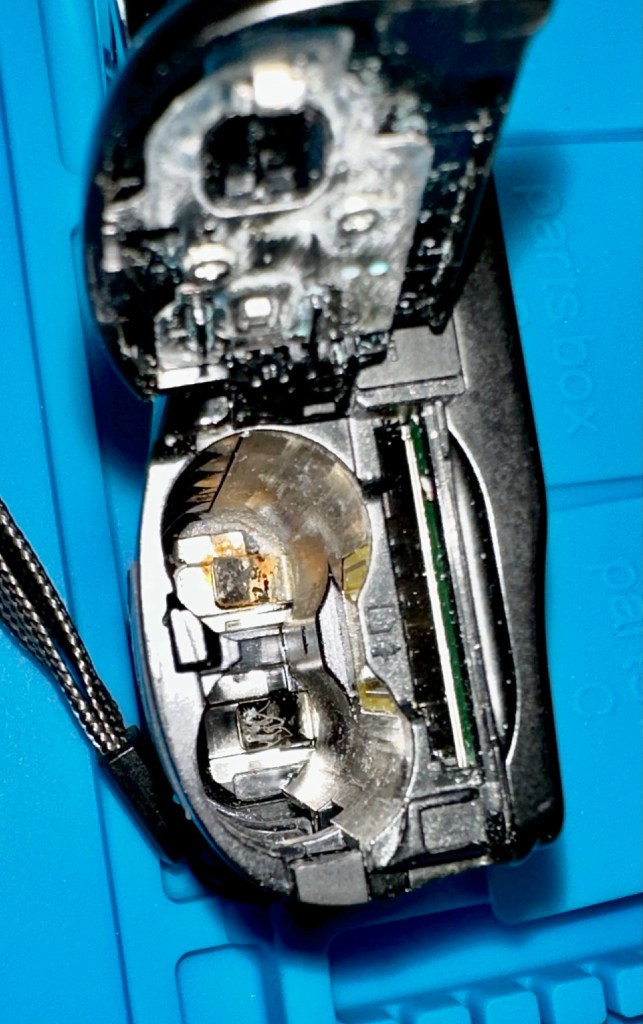
The problem with this camera is that it had a focus issue and currently it is dead electrically. Quite looking forward to getting into this one as it maybe quite a simple fix. That said, it could be that the whole internal circuit needs replacing which will mean the camera could then be added to my ever growing spare parts collection.
On receipt this camera cosmetically is in excellent condition. Even the normally broken battery door catches are in fine condition on this model. The unit is very dead though and it looks as if a battery has leaked inside causing some corrosion. I suspect some of that leakage may have travelled a little further as it seems the wide/telephoto switch on top feels a little rough when it should be a smoother movement. I’m going to have to get inside this one and have a look around.
Battery leakage evident
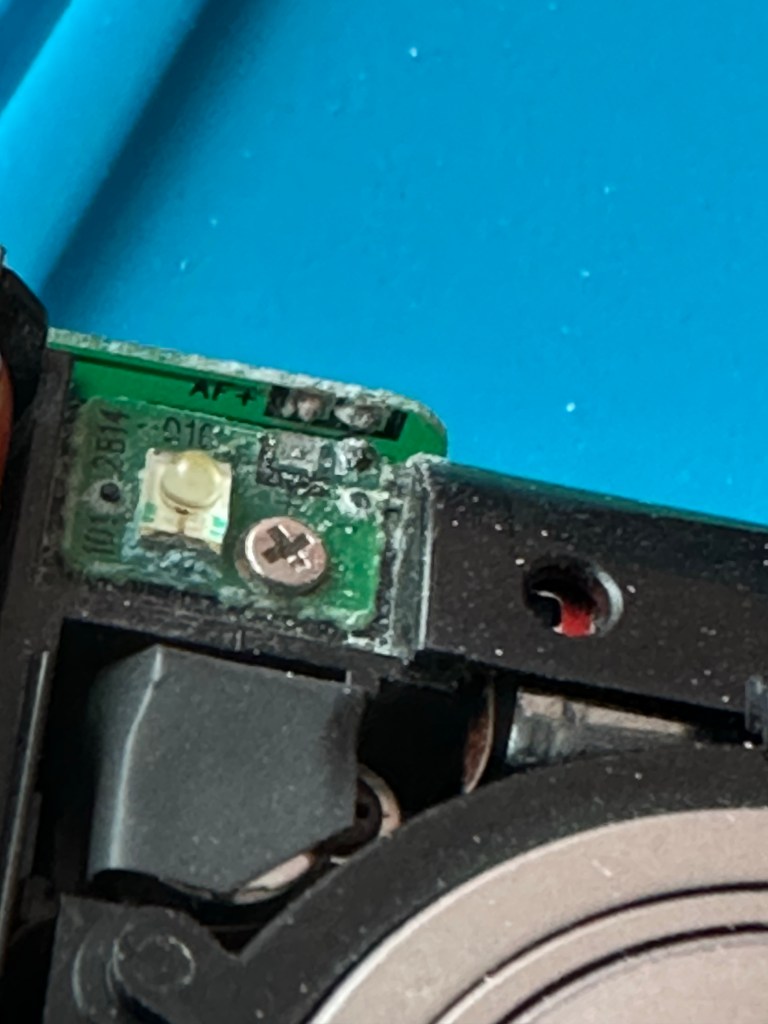
I’m afraid it’s disappointment with this unit. The battery leakage is so severe it has pretty much dissolved a number of components, ruined the board tracking in a number of places and corroded the wide/telephoto switch beyond use. The trusty multimeter confirms that the main circuit board is about as much use as a chocolate fire poker – useless. I’m afraid this unit is resigned to use as a spares donor for another day.
Severe corrosion from batteries evident
As you can see above, the batteries have been allowed to leak causing a catastrophic amount of damage to the circuitry. I have cleaned tested used a specific cleaning solution and scrubbed the circuit to no avail. My friendly multimeter has confirmed the circuit is beyond economical repair.
Wide/Telephoto switch totally corroded
I have stated in earlier posts that there needs to be a greater awareness of the frailties of cheap batteries. There is a particular brand I know of that has adopted the name of a large photographic company I used to work for, and to be blunt their batteries are utter crap. They start to leak very soon after their demise and the acid/alkaline leaks everywhere, they should be avoided at all costs and I very much suspect this specific case is due to such advice being ignored. High use items such as cameras require an adequate battery, please do not cut corners here as it is a false expenditure.
Damage caused by corrosive substances
The saving grace from this unit is that I have a few items that will be put to use at a later date. The body shell with its intact battery locking mechanism will probably earn me more than the whole camera cost originally and that will still leave me more as spare parts. It’s just a shame that cost cutting on the power supply has damaged so much of this unit. I cannot impress on you enough, do not use cheap batteries, you will potentially pay the price of permanent damage if you do.
I have had to seriously clean and decontaminate my work board due to the immense amount of contamination that came from this unit, I’m glad I wore protective gloves whilst attempting to clean this unit.
What I have managed to salvage
I have salvaged a complete body shell with working battery locking door, a lens focusing unit, a rear screen and holder, a number of screws, a flash unit cover and a 330v 100uf photo flash capacitor. As well as a nice leather case.
Unfortunately not every unit is salvageable, however we have parts to assure the next unit may not go to waste. A healthy spares store is always welcome and all I can say is…. Onwards and upwards, bring forward the next repair.
I’m starting to ask why I even chose the name. To be honest I’m from the East Midlands of the Uk and Foxes are rampant around this area, I support a football team who are known as the Foxes (Don’t hold that against me 😂) and to top it all during lock down we built a pub in our garden that is also called the Foxes Den.
Our garden pub with the same overused name..
As I have very little creativity in thinking up suitable names I tend to stick to what I’m familiar with, looking at the number of Foxes Den sites on the web though I think the chances of me getting noticed are next to zero. Lesson of the day guys is to do your research before you take the leap, don’t just jump in gung ho like I did. The word idiot comes to mind ….


You must be logged in to post a comment.