Faux stained glass painting

I’m new to this art medium, I don’t really know what I’m doing, but like everything I do on this site, I’m willing to give it a go, always willing to learn. So here we go.

I was watching a program on TV a week or so back and was watching a stained glass window being repaired. I was fascinated with the expertise and commitment these guys put into repairing these pieces of art. I thought to myself that this is something I would love to try but obviously I just don’t have the expertise, space or ability these guys have.

So I had a look around for simpler alternatives and that’s where I found out about Faux stained glass painting. It’s a whole lot easier, less expensive, and I have most of the tools required already.

I’ve attached a video of the technique that I’m interested in, this video has kind of sold the process to me.

Faux stained glass – Emily Seilhamer

I’m going to give this a go now, let’s get started.

My Subject:

I’ve chosen two simple potential templates that were free to download from the internet. As this is my first attempt I’ve chosen a couple of design templates that will be good for a first attempt at this type of art. I’ve chosen a bird and a simple flower.

The two templates I will be choosing from for my first attempt at this medium

What do I need?

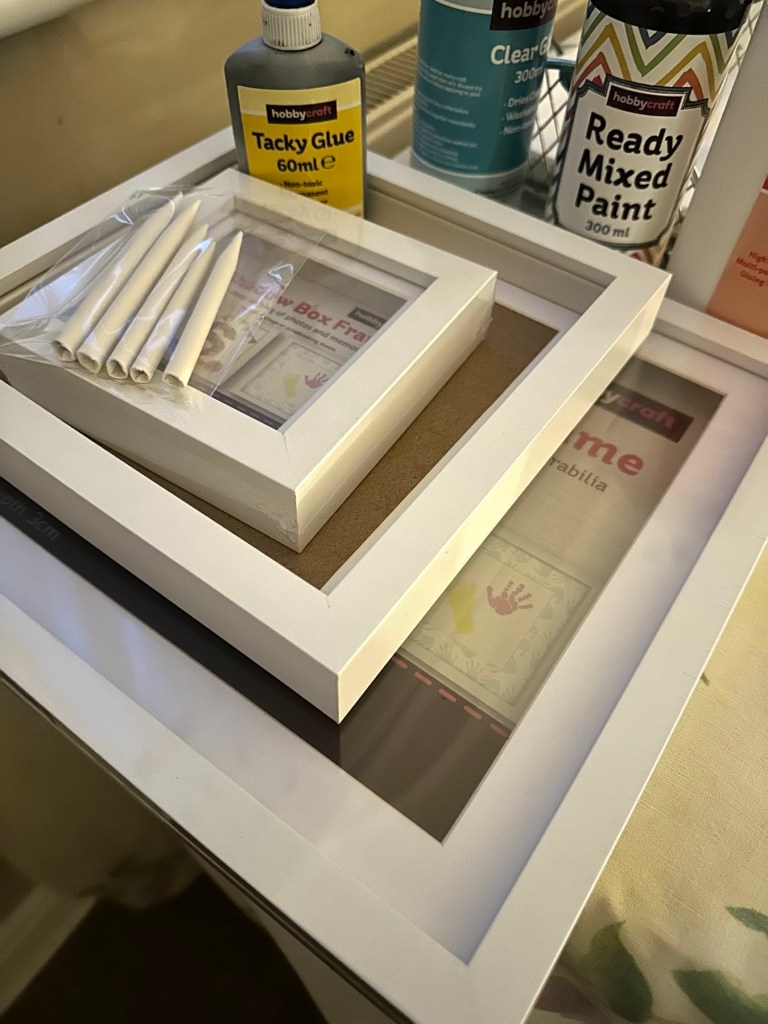
Not a lot to be honest, below is the minimal requirements.

  • Craft PVA glue
  • Craft clear glue
  • Paints – I use acrylic, you can use pretty much whatever paint you have around.
  • An old cheap frame, with glass
  • Brushes, or sponge applicators, some tape and cleaning materials

And that’s basically all you need.

Ive been out and purchased some supplies including some shadow box frames that were on offer. These will be my guinea pigs for the purpose of this post.

Supplies

I’ve chosen the flower template for my first attempt as it is slightly less involved. I’ve mixed some black acrylic paint in with some PVA as this is what you use to form the black “Lead” type outline. I’ve done some samples on plain A4 paper to perfect the technique as it was coming out all blobby and runny, I think I’ve now perfected how much the nozzle needs opening and now I’m quite happy with the outcome.

Let’s go:

Next i tape the template to the rear of the frames glass, i then clean the front of the glass getting rid of finger prints and anything greasy that might stop the ink bonding to the glass.

Paint/glue applied a bit blobby

Using a steady hand you then just add the glue/paint to the top of the glass following the template underneath. Don’t worry too much if you get some blobs and bubbles, the bubbles can be burst by using a needle and the blobs can be dealt with when the solution dries, because the glue can be easily cut or peeled back. Don’t worry too much about little mistakes, just go with it. Don’t worry about making straight lines perfect as the irregularities just add to the authenticity of the piece. You don’t see perfect lines on old stained glass windows, so don’t worry. I use some small paper tortillons just to remove some small smudges and they work fine.

Now we just need to wait for the outline to dry and I’d suggest leaving this for a good eight hours or so.

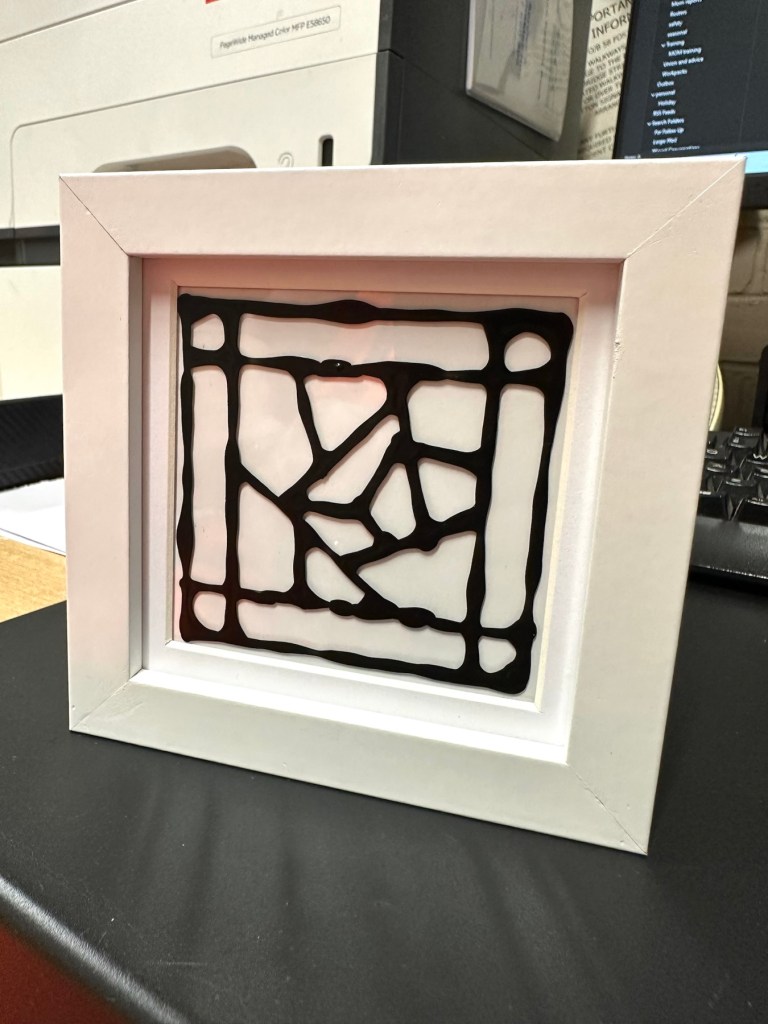
Whilst I’m waiting for this one to dry I’ve done another small one with just some random geometric shapes. I love the way this one has just spread out and gained a great scruffy edged look. Can’t wait to paint it.

There are many ways to do this technique and the video at the top of the page gives yet another two ways to obtain this outcome. These are my first two attempts and I’m going to try the techniques in Emily Seilhamers videos at a later date. Meanwhile back to my two attempts.

For painting you need some clear school glue and whatever your preferred paints are. I’m using some acrylic paints as I have plenty of them around. Using a tiny spot of paint you then add some glue at a slightly greater ratio than the paint, the thinner it goes on the more translucent it will be, if thicker it will be more opaque. Don’t t worry about paint strokes, it will happen as you are painting with glue. The good thing is if you are not happy with the outcome you a can always use a craft knife and just peel the offending colour off. It’s easy.

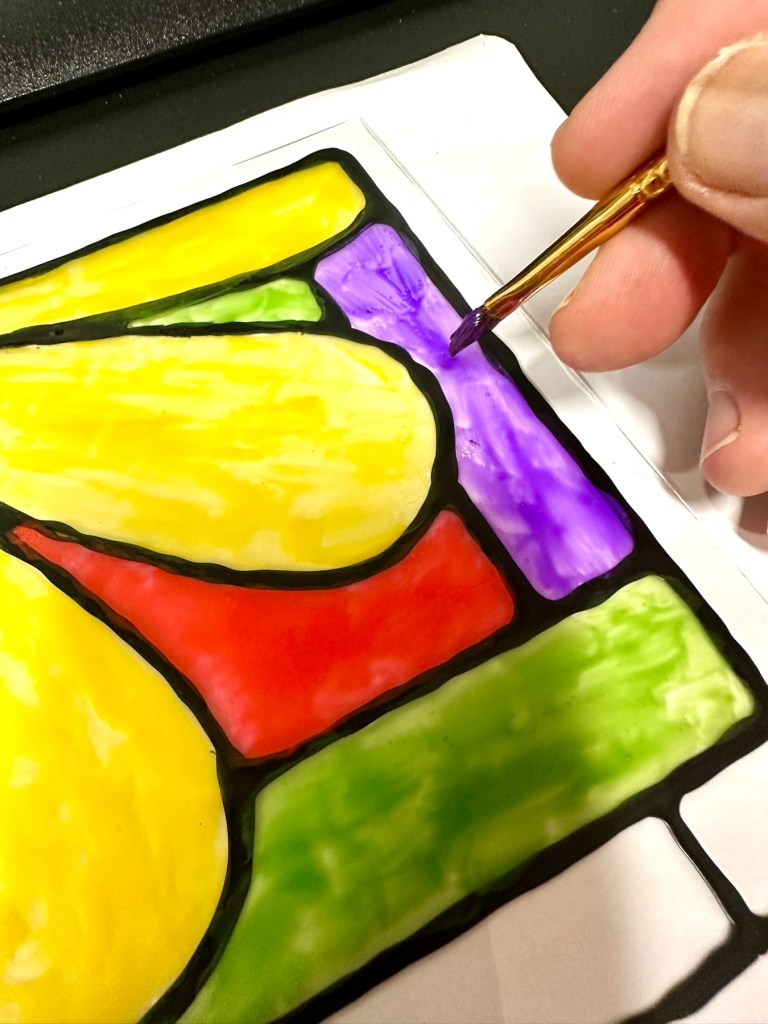
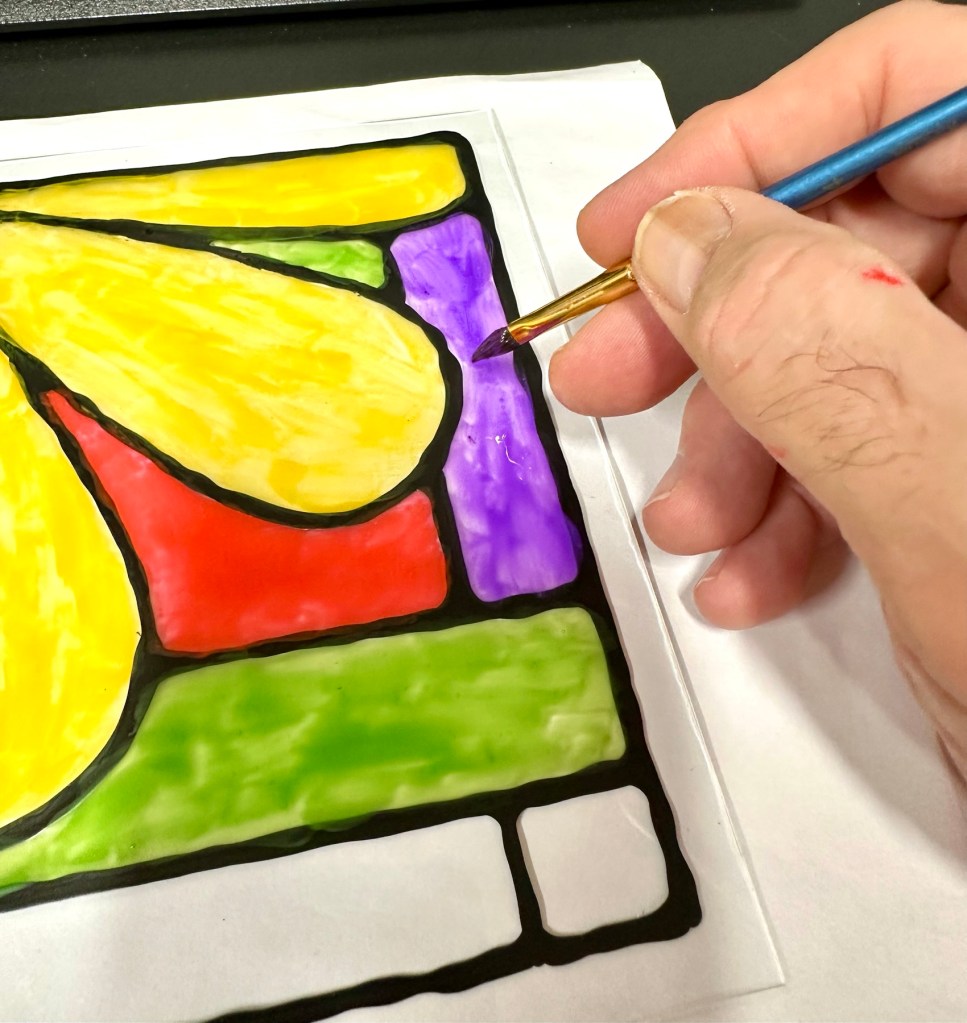
The good thing is that this paint dries really quick and in a warm room it’s probably dry in just over one hour.

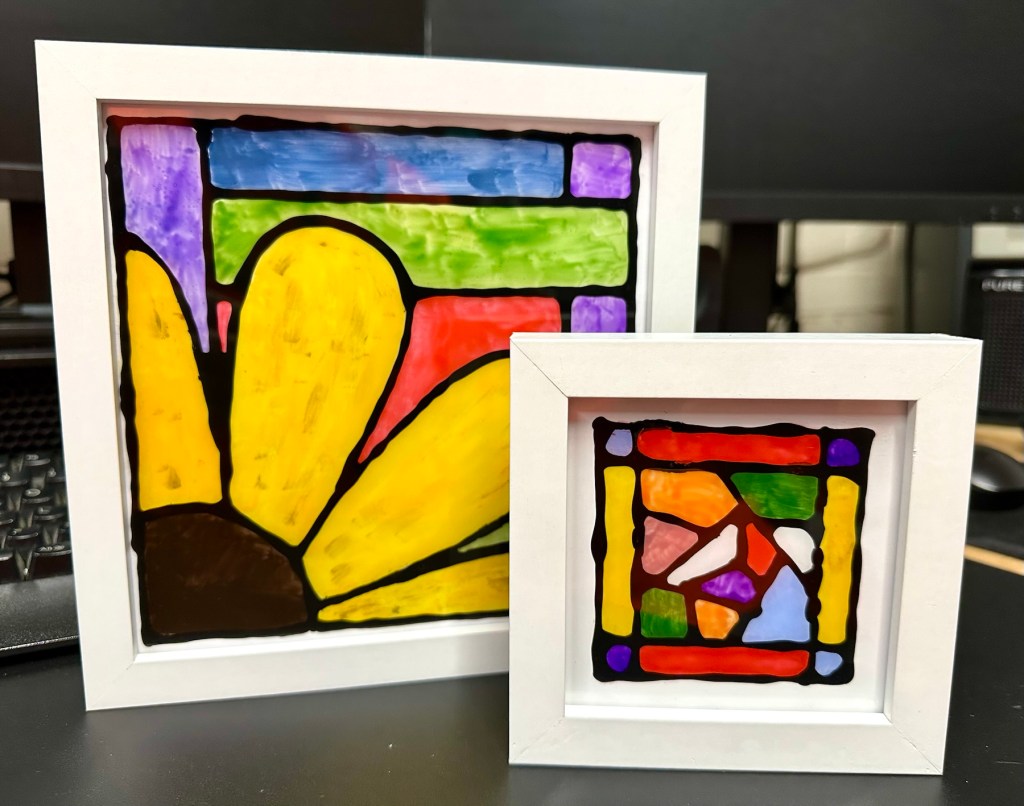
I’m quite happy with my first attempts, there are little mistakes and many things I have learned from trying this medium. I’m not going to make any changes to what I have done as I want to display them as battle scars. You know, a snapshot of what I did at the time and how I have learned from it. The next examples will be better, I have a third one of these box frames and that will incorporate all I have learned from doing these little prints. It will be just like a journey into Faux stained glass in three parts, and they will all be on display.

This project isn’t quite finished yet though, there is one other thing to do. The perfect place to display these items of course is right up against a window just the bare glass, allowing the sun to come through and show off all those lovely colours. However you can also display these pictures within frames and this finishing touch courtesy of Emily Seilhamer, completes that look.

You just need some kitchen foil. Yes you heard correctly. Kitchen foil.

Cut a piece of foil just slightly bigger than the backing cover of your frame. Now scrunch it all up but not too tightly. Just move it around in your hands until it appears to have an even amount of creasing as this is to be come your light refracting layer.

Scrunched up tin foil

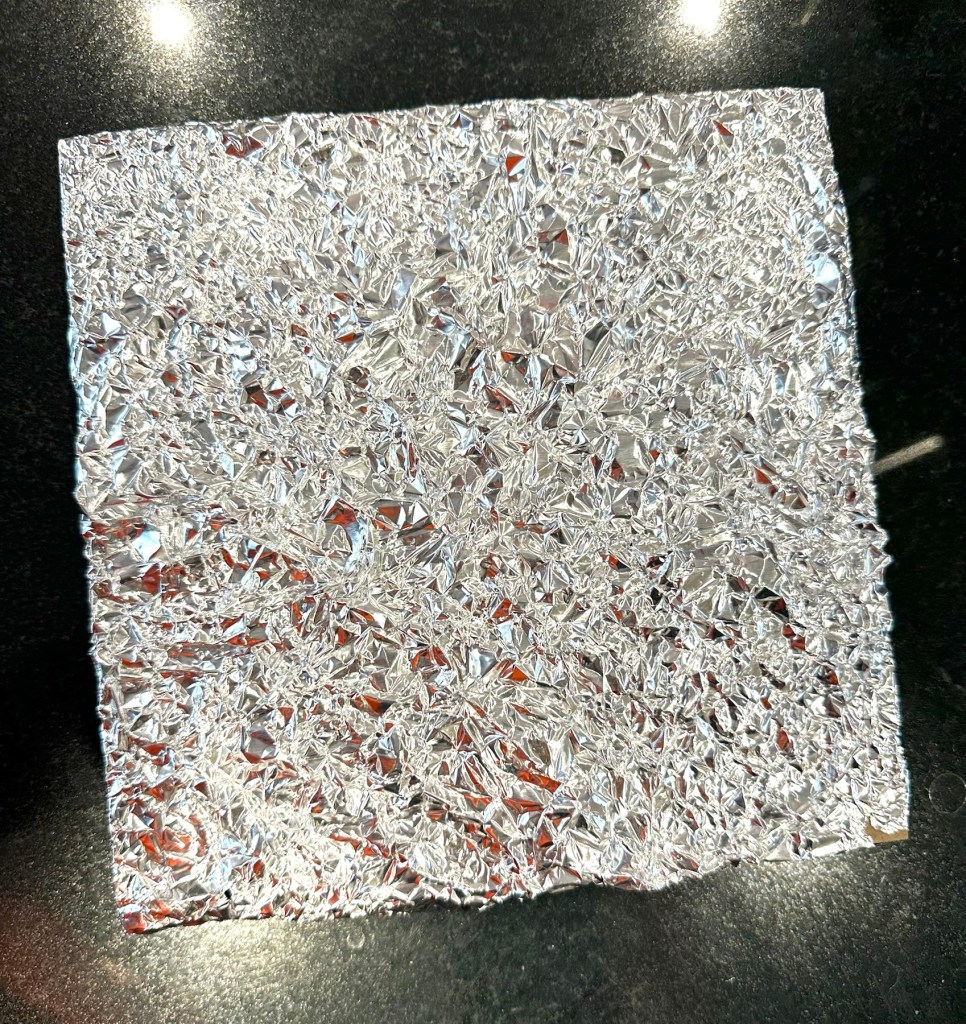
Attach this to the frame back and then secure it back in the frame against the glass you have painted, trim and tidy the foil using tape at the rear of the frame.

Now turn it over

Look at the difference with the foil effect

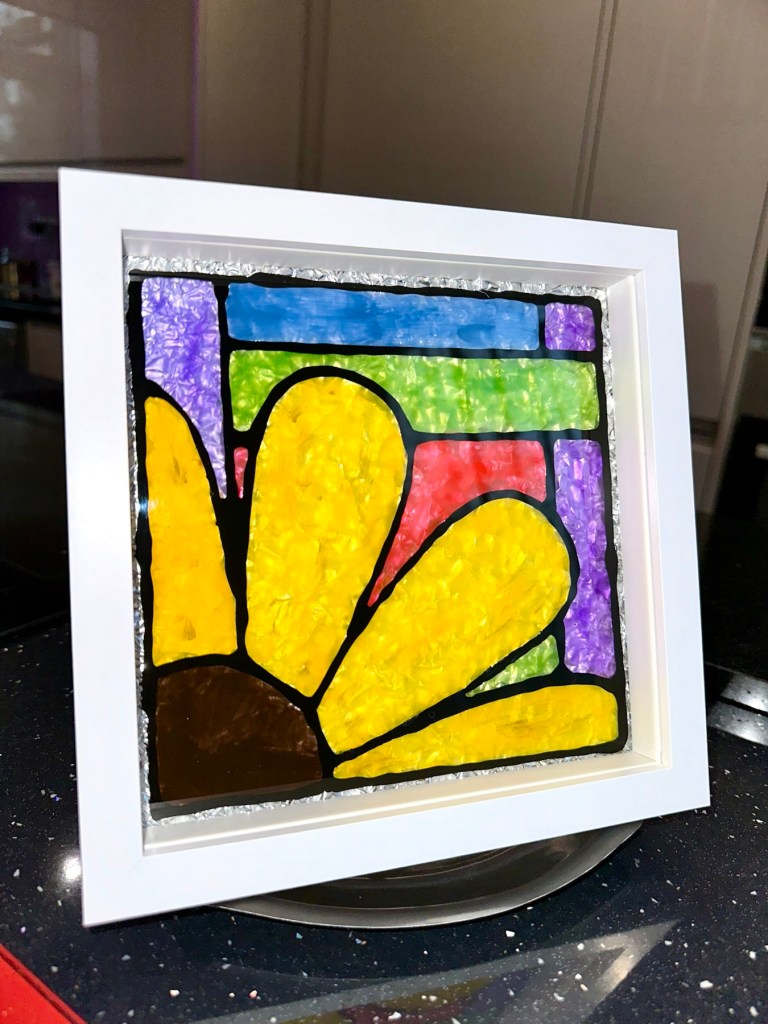
See how that tin foil now reflects all the available light and makes your picture look totally different. The refraction appears to help cover up the brush strokes we discussed earlier, and you can now display your pictures in any area of the house, and any available light will be reflected on to and will enhance your pictures.

On the fire place

I hope you have enjoyed this post, as much as I have putting it together. Thanks as always for passing by. It’s always very much appreciated.

Peace to you all.

Mountain view – Abstract

Mountain View

Another production on an iPad from my 2012 era. God knows what I was on at the time as I was doing some right old tripe. But hey ho, it’s done and it covers a particular time of my life so it has to go out there. Not just showing the good stuff (not that I do any good stuff….). I guess if I had a name such as Picasso or Banksy it would be worth an absolute fortune. But I don’t, and it’s not. Enjoy, laugh, critique, slap your forehead. At least it’s got a reaction 👍

Plastic Gear Repair

An excellent post. I often come across broken plastic gears and they are the Bain of my “Hobby life”

Maybe I need to start repairing my own gears or invest in a 3D printer.

We’ve seen several methods of repairing plastic gears. After all, a gear is usually the same all the way around, so it is very tempting to duplicate …

Plastic Gear Repair

Building a garden

Describe the most ambitious DIY project you’ve ever taken on.

I’ll always attempt anything, but when it comes to plumbing or high voltage electricity, that’s when I get the professionals involved.

In my current home the most ambitious DIY has probably been landscaping the garden. We purchased a rickety old house that’s been a constant project since it was brought, back in 2018. So really that could be the most ambitious couldn’t it?

Anyway, the one I’ve enjoyed most is landscaping the garden, not concreted over with no concerns for wildlife, my garden was designed around the needs of the Hedgehogs and birdlife we have that visit throughout the year. They have easy access to the whole garden, a part that is wilded for them to forage in and plenty of food and water stations as well.

One of our visitors

We also have a feral cat “Tabs” who has lived in our garden longer than we have, she gets on with us, we feed her and she has plenty of weather protection in and around the garden, and she tolerates the hedgehogs, so that’s harmonious.

Some colours in our garden

The garden has been a big project taking about 6 years to reach a maturity with flowers, shrubs and trees all planted to create a little bit of the country side in a city urban environment. I am so proud of my garden come spring time when all the new buds are breaking through, and it is a riot of colours come summertime. And it took a lot of planning as it’s a north facing garden.

The gardens the place i’d rather be, it’s like producing art, art that changes on a weekly basis.

Have a super day.

Another tatt

This time I’ve gone with a basic cross. I’ve always stated there was always a reason behind every tattoo I have and this one is no different. This represents my faith, I don’t push it to anyone it’s very personal, but some times I question it, and go quite deep with it.

We had an old cross in the house and I often looked to that in times of fear and uncertainty. The reason that it is a battered cross, matches my faith and my upbringing. It’s always there in some form but it’s been through some battles with me and is scarred. But it still remains, it’s still there battered and damaged, but still represents strength and hope.

Simple is all it needs to be, such a symbol does not need complexity, and now late in my life I’m happy and confident enough to be proud of my faith and what this symbol means to me, and how it helped me through such a horrendous childhood. I choose this as art that represents a period of my life, and as always if anyone asks me what it represents, I can honestly tell them how this helped me through troubled times.

Peace.

Pinch Pottery Pt:2

Back in September 2024 I wrote this post about pinch Pottery: Pinch pottery

It’s been a few months and I’ve just decided to finish it off and give it some bright colouring and a sealant coat or two. I want it to represent a bright sun if I can, but when I get to actually paint it, it could well turn out looking totally different. Here we go.

This is one of those things I think my wife dislikes but she knows it means a lot to me, even though it is a poor quality and there are probably kids of 5 or 6 years of age that could produce something a lot better. But I made it, it was made at a time when I was grieving and gave me a lot of pleasure. It still does and this will probably remain in my workshop when I eventually get it up and running. It makes me smile when I look at it and i love it. It’s simple, it’s how life should be.

This is how it originally looked:

I started painting the base Yellow, and the inside Orange, with the dog done in white with a black outline. This is what I have so far.

I’m using acrylic paints here. I’m going to put a line of vine type effects around where the yellow joins the orange. At the moment I’m letting the piece dry for the next 24hrs and then I will try some touching up and repainting what I have already done. The yellow coat is quite dull as it is being absorbed quite literally into the clay base. I’m kind of hoping that the next coat will not be absorbed so much, fingers crossed.

Multicoloured madness

I’ve gone with a yellow scheme for the underneath and a red – orange on the inside. I’ve tried the same type of painting that you find on narrowboats on Uk Canals, when they paint the buckets and metalwork with flowers. I’ve used this effect around the rim and from one angle it looks like he is looking over a hedgerow. It’s exceptionally basic, but it’s brightened up a piece of pottery that would otherwise sit in the corner unnoticed, discarded and unloved. You can’t miss this now, it just stands out.

The final task is to give a nice coat of lacquer to protect the acrylic paint. I’m going to use some fast drying lacquer that I have sitting in the shed at home. About two coats will be sufficient.

Before and after
Side decorations

I’m pleased with the outcome, it’s made me happy, and I smile whenever I see it. It’s kept me occupied and busy, It’s special to me and that is all that matters. It’s adult pottering and nonsense at its best. But it’s my nonsense.

Thanks for stopping by.

Alfie Moon

Alfie Moon

Jan 2021, Covid in full effect and I’ve been brought a new set or art stuff for the previous Christmas. Using pencil and pastels I attempt a picture of our dear late family member, Alfie, familiarly known throughout the family as “Alfie Moon”.

Firework night

Firework night

This was another iPad piece I did in 2023. I was experimenting with a new art app at the time and just produced this mess that I titled “Firework night”

Sunspot

Sunspot

Another iPad painting from 2012 when I must have been losing it. I just thought it would be good to do a play on words with “Sunspot” hence the Sun was drawn with a pimple on the surface.

Digital killed the film star

Me having a moment

This picture was painted on an iPad. I did this one back in 2012, I’d just received notification that my pension pot with Kodak had almost halved due to them declaring bankruptcy and moving production back to the USA. Sod everyone else who worked for them worldwide.

We lost out big time and that’s why I had a rant in this obscure painting I did at the time.