Meshtastic

Ever heard of the Meshtastic decentralised off grid communication network? You have now. Dive in and get involved.

What’s that? I hear you say. Well, I’ve been trawling t’internet recently and one of the chaps I follow on YouTube, Gabe, has got me very interested in this particular mode of radio communication. Here’s a video of him explaining Mesh communications in his own charming and extremely enthusiastic way.

Meshtastic – as Gabe sees it

The good thing about Mesh networks are that no licence is required for use, this means the system is truly open to everyone. As a registered radio amateur this system is of interest to me in the spirit of experimentation, and that’s what’s good about this particular mode. Everyone can do it at a very reasonable cost. In the UK it’s been present for a few years now and has an active core of participants. However, usage is very patchy and still developing, and due to the short range and lack of other users to repeat messages, its general take up is going to take a while yet, or in usual fashion it may even be a mode that just dies out due to lack of involvement. It’s not a mass-market tool yet, but a growing niche interest, especially among amateur radio, DIY tech, and preparedness communities. However, that said, in areas with little or no cell phone coverage this could well be a lifesaver. Below is a little bit about Meshtastic.

What is Meshatastic?

Meshtastic is a free, open-source project that lets you create your own decentralized, off-grid communication network using LoRa (Long Range) low power radios. It’s designed to let people send short messages and share data without relying on mobile networks, Wi-Fi, or the Internet.

Open-source & community-driven: Anyone can contribute, modify the software, or build devices with the firmware.

LoRa technology: Uses low-power, long-range radio waves in unlicensed frequency bands (like 868 MHz in the UK/EU).

Mesh networking: Devices form a mesh by rebroadcasting messages. Each device acts as a node that can relay messages to extend coverage.

Meshtastic’s goal is to provide reliable communications when other infrastructure is absent or unreliable and to offer a flexible platform for hobbyists and practical users alike.

How it works

Networking: LoRa radios transmit small data packets over long distances with very low power. Each device forwards messages it receives to nearby devices, forming a mesh network that extends reach beyond single-hop radio range. The network is decentralized — no central tower or internet access is needed.

User interaction: Devices can connect to your smartphone via Bluetooth and use the Meshtastic app to send messages or view locations. Messaging is typically text-based (no voice or high-bandwidth data).

Why use it?

People adopt Meshtastic for many reasons, often tied to availability, resilience, and independence from traditional networks:

Outdoor activities: Hiking, camping, biking: Stay in touch where cell signals are weak or absent. Location sharing: Useful for groups and safety.

Emergency situations: Natural disaster backup, communications can continue even if cellular networks fail. Communities and some groups experiment with using Meshtastic as an alternative communication layer during outages.

Technology and DIY: Education and hobbyists use it to learn about radio, mesh networking, and embedded systems. Integrations with IoT sensors and other projects are possible.

Community and social projects: Enthusiasts set up community networks, share nodes, and even run local meetup groups. 

What do you need to get started?

Basically, Amazon, EBay, and the Chinese suppliers such as Ali express have all you need. Needless to say the Chinese options are far less expensive if you are willing to await delivery. Just type “Meshtastic kit” into your browser to view your options.

As I’m in the Uk I can give some prices for the most basic setups within my country. To be honest, all that is needed is a Meshtastic main board of which there are a few to choose from, a power source and a mobile phone to do the setup. Something like this below.

From Amazon in the uk I can get this board, for £18:99GBP and that’s all I need to get started.

Amazon uk

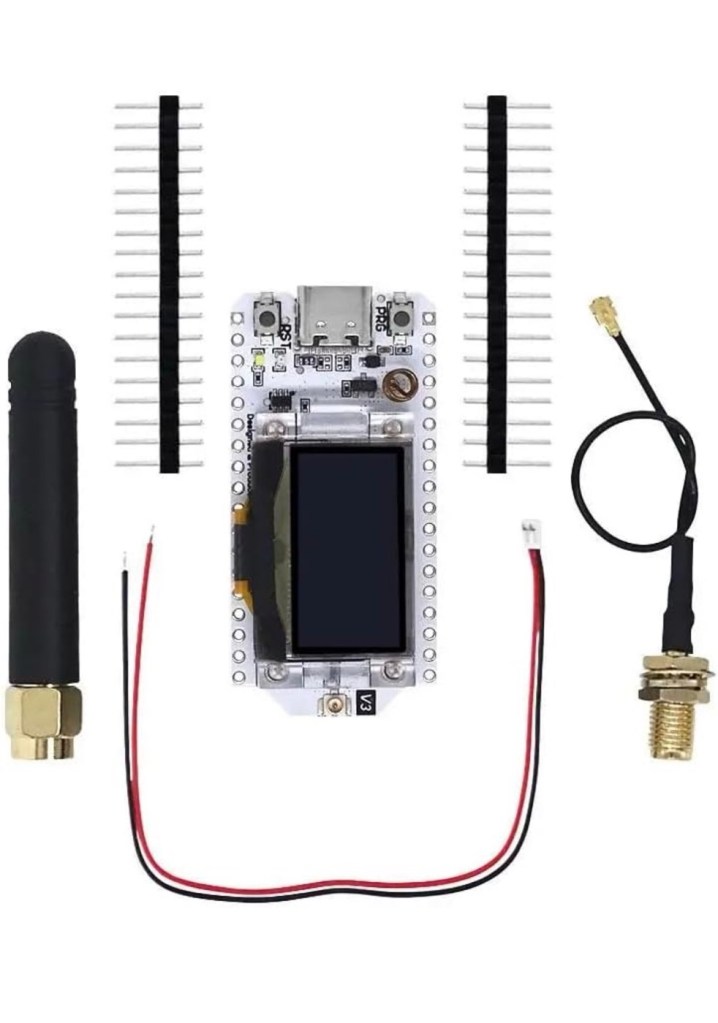
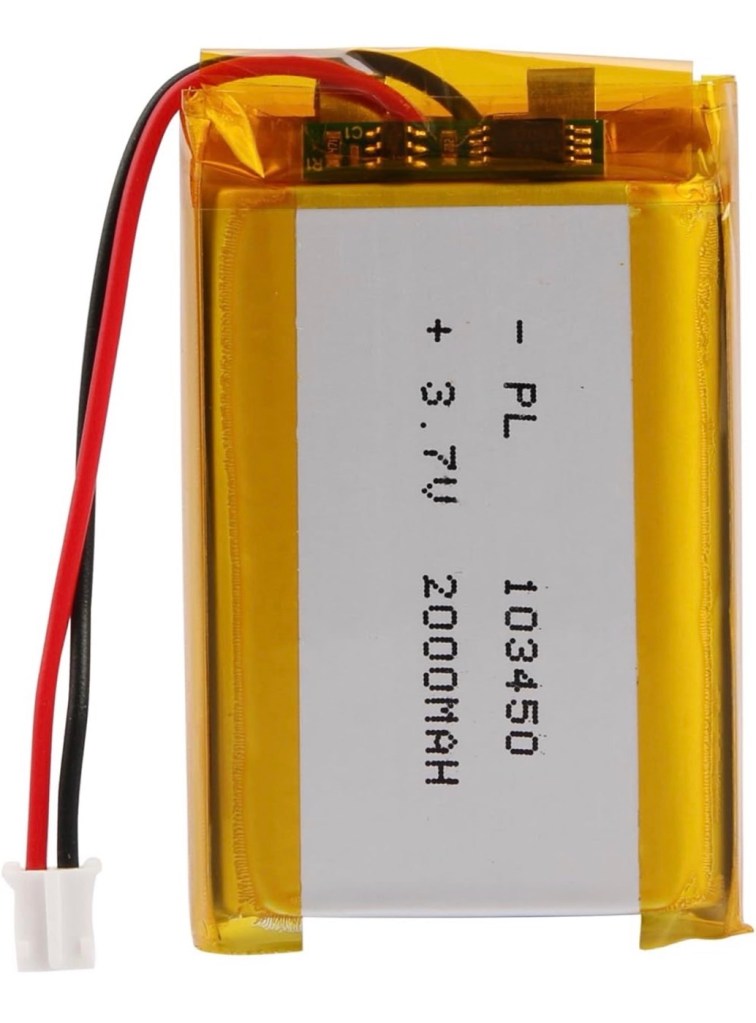
Add to that a small battery and you can probably power this unit for between 24hrs or even a week, dependant obviously on the battery capacity and how you have the system set up. A battery in the uk on Amazon would cost around £6-£10 GBP. You can buy enclosures to make the unit “pretty” or you can even 3D print your own. I think I will print mine when I finally have my printer up and working.

A suitable battery

On the Chinese platforms these items can be purchased at a greatly reduced price, the main board can be purchased for around £3:00GBP, you can even purchase two entire units for less than the one that you get from Amazon. It really pays to shop around.

I’m shortly going to dive into setting up a Meshtastic node, I’m even going to set up an APRS one under my radio licence conditions, but that will be another post.

So hopefully this post may introduce others to an off grid communication mode that may well assist those in remote areas or with extremely limited cell phone coverage. As soon as I’m ready to build and place my node I will write a post regarding its build, programming and eventual usage. It is all very simple technology and worth having a read about on the Meshtastic website : Meshtastic introduction

Text you soon!

Morse code on a Psion organiser

I did my Morse test back in 2003 just after I passed my City and Guilds 765 RAE exam in Amateur radio. It wasn’t a compulsory requirement as it was in the States at that time, but I chose to go with it. I wasn’t the fastest in the world but I enjoyed using it to be able to partake in my favourite part of the hobby, low power QRP operations.

As morse uses such a small bandwidth, distant operations using very low power below 5 watts are very achievable. Wspr transmissions operate in even smaller power ranges, however that’s a whole different story.

So what’s the Psion organiser got to do with Morse?

When you set out trying to master Morse you look at loads of techniques and ways to make your journey that much easier. There are Morse trainers, there are even Morse decoders and encoders that basically allow you to “Cheat”, but what’s the point of that as you’re not going to learn anything that way.

I used a technique called the visual mode technique that allows you to learn Morse by associating the dots and dashes with the actual shape of the letter and number. It works well when translating to paper, however Morse is a sound mode and it is better to use sound association, that will always work the best. I have this on a book mark to this day, as well as having it as screensaver at work. It worked for me. That’s where the Psion also had a part to play in my education.

Visual mode technique

I have a pre loaded data pack that runs perfectly on this old 1980’s machine. I used a very similar program back in the day, but not this actual one (See pictures above). The program and files are extracted and copied from the Interair Airnav pack and i have uploaded a small video below to show it whilst working.

“Peace”

With this program every digit you press on the keyboard is repeated back to you in Morse code. It’s a fantastic way to keep yourself on the ball. There are a few minor errors but the numbers and letters are pretty much spot on. It’s a great way to learn the shape of a word by sounds, and that’s a big part of Morse code, where you use phonics or the sound and shape of a string of dots and dashes to learn particular words or formations of groups of words. I’m probably making it sound more difficult than it actually is, and I apologise for that as it really doesn’t have to be. Each person finds their favourite way to learn, and this worked just fine for me all the way back in the early 2000’s about 22 years ago.

Have a great day and peace to you all or should that be :

.- -././.-/-.-./. (Check above) 👆

Duga radar

What’s that then? I hear you ask. Well since I became a radio amateur (M0ESB) back in Feb 2003 anything regarding radio has fascinated me.

The Duga or – Russian woodpecker issue of the early 80s has always been an item of interest to me. It was allegedly constructed as a Russian over the horizon early warning system and was replaced in the late 80s when satellite systems took over the early warning mantle.

However it obtained notoriety by creating havoc on the airwaves worldwide for quite a considerable period of time.

This video by a fellow Amateur radio enthusiast M3HHY explains quite eloquently, in 11 minutes what the issue was. Some great photos of this absolutely massive antenna array can be seen in this video.

And whilst we are still here this is what Wikipedia has to say:

The duga system was extremely powerful, reaching over 10 MW, and emitted in the shortwave radiobands. It was given the nickname Russian Woodpecker by shortwave listeners for its emissions randomly appearing and sounding like sharp, repetitive tapping noises at a frequency of 10 Hz. The random frequency hops often disrupted legitimate broadcasts, amateur radio operations, oceanic, commercial, aviation communications, and utility transmissions, resulting in thousands of complaints from many countries worldwide. 

Courtesy: Wikipedia

I hope you find this as fascinating and informative as I have. Radio remains to this day special to me. I’d sooner be listening to it in any form rather than watching a tv. In my eyes or should I say ears, it was the most significant invention ever made, if only Marconi knew back in the 1890s just how important this communication method would become he would have been blown away. It has helped to shape so much, our modern day world, and how we communicate with each other on a daily basis.

Slow scan television on an iPhone

There is a form of amateur radio comms that I enjoy and that is slow scan television. Here’s a basic explanation:

A literal term for SSTV is narrowband television. Analog broadcast television requires at least 6 MHz wide channels, because it transmits 25 or 30 picture frames per second (see ITU analog broadcast standards), but SSTV usually only takes up to a maximum of 3 kHz of bandwidth. It is a much slower method of still picture transmission, usually taking from about eight seconds to a couple of minutes, depending on the mode used, to transmit one image frame.

Since SSTV systems operate on voice frequencies, amateurs use it on shortwave (also known as HF by amateur radio operators), VHF and UHF radio.

Wikipedia

In this Instance below I used a digital transceiver and was pointing the aerial in the general direction of the International space station as it passed overhead on a specific date, when the Russian section of the ISS was transmitting slow scan television pictures as it passed over. I used my iPhone to decode the signal and to produce the pictures, using an app I had installed earlier. This was all part of a day celebrating the anniversary of Sputnik, the world’s first man made transmitting satellite.

My setup was totally mobile and so basic that I just about managed to get partial scans via this technique, see the two pictures below. I was literally sitting in the front seat of my car.

Even though my pictures were not perfect I was still able to supply proof that I received the transmission and as a result was issued with the certificate below from ARISS – Amateur radio on the International Space Station, find out more about ARISS Here: ARISS

ARISS certificate

There are many of these types of events that occur all year round where you can experiment with all types of equipment to make contact with distant radio stations. This is the spirit of amateur radio.