Exec Helper 8200 electronic organiser

What the listing stated:

Good condition – with instructions and original box

EBay

No beating about the bush, straight to the point. No messing. Cost me the grand total including postage of £9.94Gbp

What? You’ve never heard of it? Have a google and I think you will agree there is very little information anywhere regarding this unit. There may be a few items on eBay, where you will see a couple on sale (normally faulty) for a very reasonable price, however all are missing two very important items, a box and instructions, the latter being as rare as hens teeth.

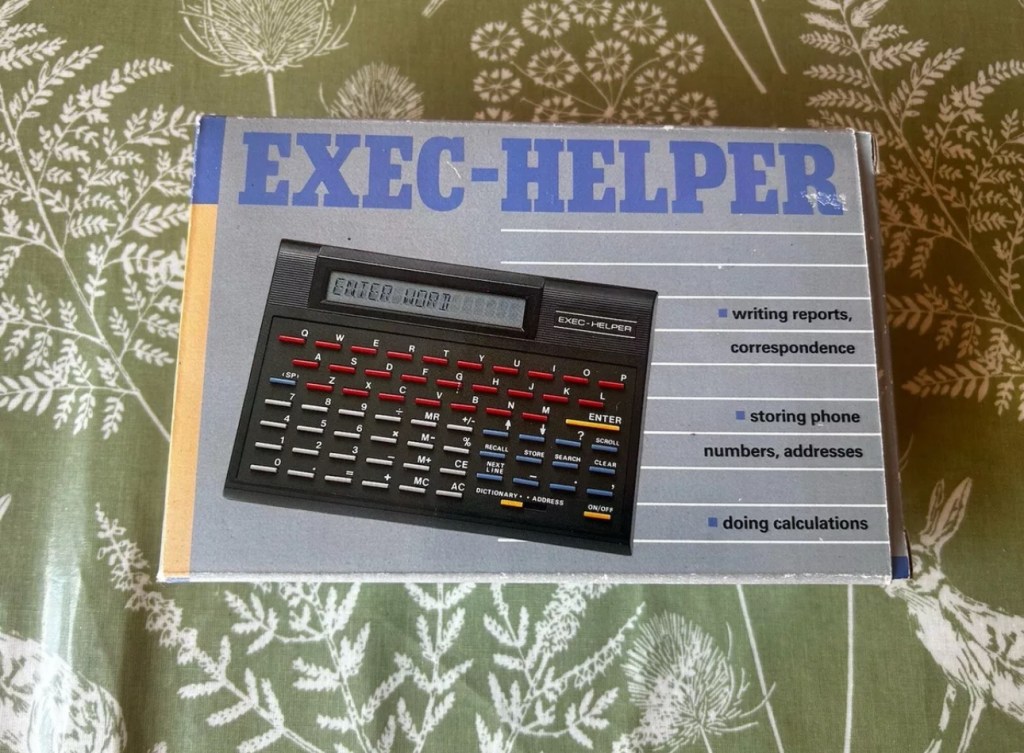
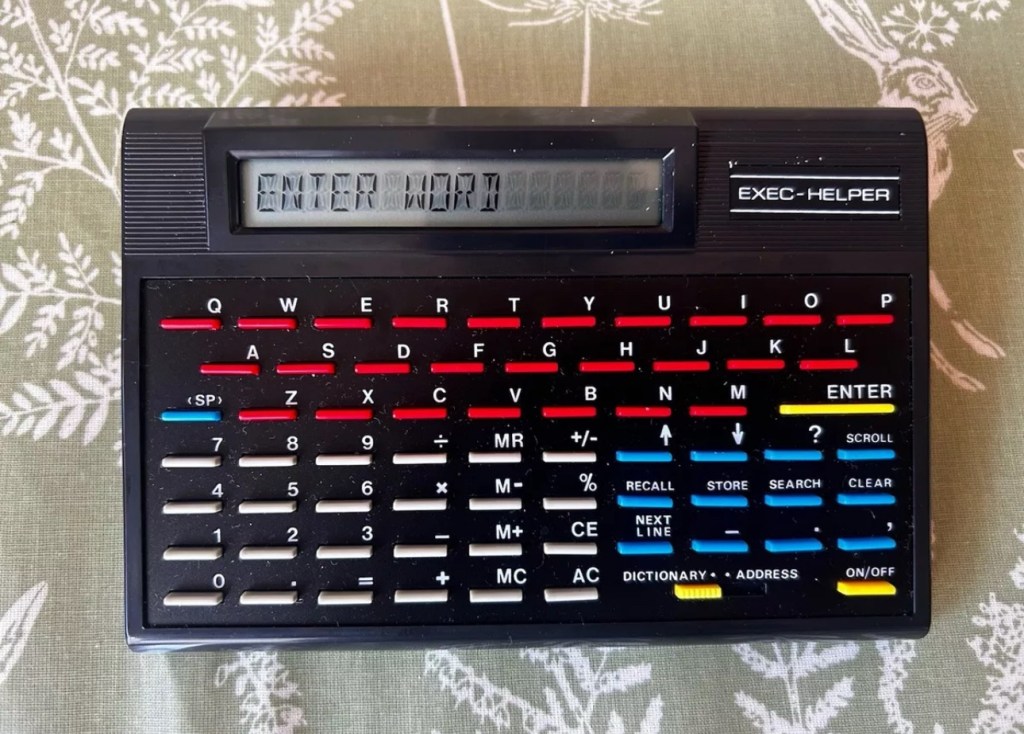
I’m fortunate to have an excellent example now, with both with only one polystyrene insert and not two, a box and instructions. They call it an organiser, that really is an overstatement, because if you read below you will see it is a really difficult unit to get to grips with. However it can be done, it just takes patience. The unit has three functions that are: Dictionary, Address book and Calculator.

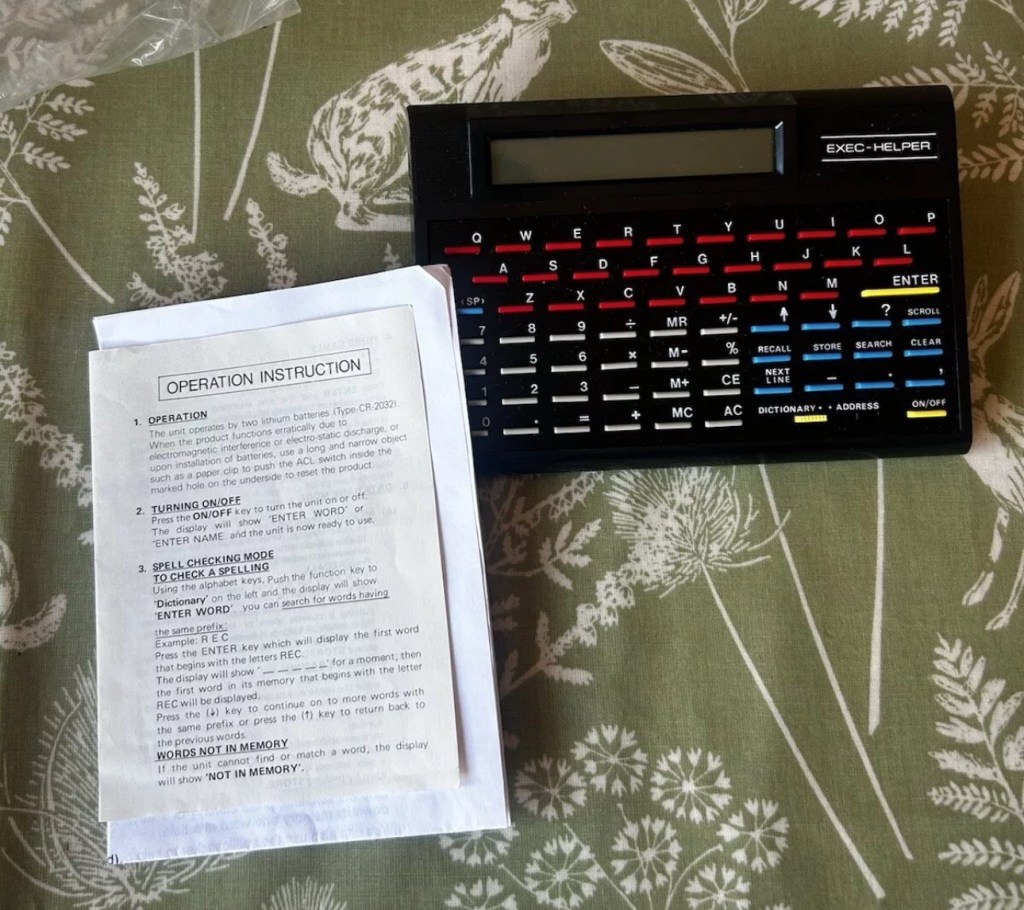
This isn’t a repair video. As there is not a thing wrong with it, it’s absolutely cosmetically perfect. It just requires you to read thoroughly through the instructions, if you are fortunate enough to have some that is, and in this instance I can be very smug. I do have those original instructions, and there are probably more copies of the Magna Carta out there than there are instructions for this unit, or so it seems.

This video was from a chap, who posted it on YouTube a couple of years back. In the video the presenter had no instructions to follow. He also knew nothing at all about this unit. Its origin, age and use was a mystery. Using the Exec Helper 8200 can be both perplexing and frustrating.

Exec Helper 8200

What it does

  • Dictionary

One of the main features of this unit is its dictionary function. Users can Type in a word and press enter to retrieve its confirmation as a valid word. However, the device does not provide definitions or additional information beyond confirming the existence of the entered word. While it does allow scrolling through words, the lack of comprehensive definitions limits its utility as a traditional dictionary. Additionally, any misspelled words will not be recognized, resulting in a “not in memory” message.

  • Address book

The address book feature of the unit offers the potential to store and search for contact information. However, the functionality of this feature is somewhat confusing and not user-friendly. Users are prompted to enter a name, but pressing enter does not submit the entry. Instead, a separate search button needs to be pressed. The device’s scrolling and next line buttons suggest the ability to store multiple addresses, but the precise method of doing so remains unclear. Overall, the address book feature of the unit lacks intuitive design and may frustrate users attempting to utilise it effectively.

  • Calculator

In addition to its dictionary and address book capabilities, the unit functions as a calculator. When numbers are entered, the device immediately switches to calculator mode, allowing for basic mathematical operations. The calculator feature includes memory recall, addition, subtraction, percentages, and other commonly used functions. Unlike the address book and dictionary functions, the calculator feature of the unit appear to be straightforward and functional.

Date of manufacture?

The exact release date and availability of this unit remains uncertain. Judging from its design and styling, it is likely that the device originated from the late 80s or early 90s. However, due to its scarcity, finding a working unit or acquiring one in boxed condition can be challenging. I struck lucky with this one.

That said it probably was once a mass produced piece of tat that failed so miserably, that everyone who owned one threw them away, before they could ever be associated with owning one. They were that bad….or were they? I don’t know, there is so little out there about them that you can’t really make a reasonable judgement or gain constructive feedback regarding them.

It was probably a unit that was killed off in its infancy by one of the bigger names that were starting out around the mid 80’s that had a better, product and presence at this particular time. (Psion for example) A simple case of being in the right place at the right time.

Or is that the right place at the wrong time?

Edit: I have done some digging around and it seems to be that these units were sold via the UK newspaper “The Daily Mail” as a reader offer. I even have the original return form for it however there is no sign of a date. The only thing that ties it to the 90s is that refunds can go either to “Access or Visa. The Access “ Your flexible friend” card ceased in 1991 when the banks involved started doing their own card transactions. So it was definitely very early 90s maybe even late 80s. I’ll update this post if I uncover anything further.

Modified Sega game gear 2110-50

You may wish to refer to this post: Sega game gear 2110-50 where I purchased a non working Sega Game gear and brought it back to life.

The (I thought it was repaired) Game gear

I’m now ready to do some modifications on this unit, and I will save the replaced items for use on later projects.

Pretty much every Game Gear that was ever produced (and that is approximately 10.6 million units) has suffered with the dreaded (Capacitor plague) that I have discussed in an older post. The first job that is recommended to be carried out when purchasing an old Game Gear is to replace the old capacitors, it’s quite an easy task and nine times out of ten will remedy any issues that you have and allow you to continue gaming for years to come.

However there are other issues.

The screen is an old tube powered system that is exceptionally power hungry, you can replace this with much superior LCD versions, I’m withholding from doing this at the moment as I want to get as much use out of the old screen, and to be honest my unit doesn’t require replacement just yet, there’s still life in the old girl. I’m sure that this will be a future project though.

Occasionally after doing the capacitor replacement on the power board, other components such as a small IC and three transistors that control voltages across the system, start to misbehave causing the unit to switch off after just a few seconds. This is currently occurring with mine and I am intending to replace these components to see if this sorts out my issue. I have also ordered a replacement power board from China that is a fraction of the cost of a European one, it may work, it may not but if the change out of components dosen’t work at least I’ll have an alternative option.

There are a few checks we can do prior to replacement of these components on the power board that will confirm the various voltages required by the system. It’s best that these tests are done prior to diving in head first to replace them. You could be just wasting time. You may need a new power board or maybe even consider converting to a rechargeable battery system. It’s all doable.

Expected voltages – photo courtesy Retrosix

Here are the results from my test of voltages on the power board, I’ve injected 9v via a bench power supply to the battery contacts on the board:

  • At the 34v pin I had 0v
  • At the 9v pin I had 8.9v
  • At the 1.28v pin I had 1.28v
  • The three ground pins read as ground
  • At the two 5v pins I had 0v

So as a result I obviously have an issue with the 5v rail and the 34v rail, I believe the 5v rail is the one that affects the boot sequence and the 34v is not an issue at the start up, however, it’s there for a reason and this simple test proves there is an issue. I will therefore only change the IC and three transistors as the capacitors were changed when I did a full recap.

For my modifications I am getting a new clean amp duo audio board with dual speakers instead of the single mono one that is standard. This is an upgrade on the original, extremely efficient and with better sound processing.

I am also replacing the shell with a new Blue case and glass to replace the scuffed old screen, this shell also has dual speaker outlets to compliment the audio board replacement. The shell is already prepped to accept a rechargeable battery system should I decide to install it at a later date.

I shall be getting these upgrades from Retrosix who specialise in supplies and modifications for gaming consoles.

All the items have now arrived and the first thing I’m going to do is sort out the replacement IC and transistors on the power board. The rest is fairly straightforward. However they have sent me the wrong shell, a single speaker one instead of a dual speaker one, so I’ve now got to await a replacement, annoying!

Scratch that, they are saying that they never did have any duo speaker ones even though they were advertising them on their site ( as per picture above..) and after a protracted discussion with the supplier / owner i’ve come to the conclusion that he might think he is a wizard at modding and designing circuitry but is totally and utterly inept at customer service, he wouldn’t know good service if it bit him in the ass. Hey ho on we go, it is what it is.

If you choose to use them in the future then just be aware. They have an uncanny knack of trying to pin their inadequacies and mistakes on you, the customer. Caveat Emptor – as they say.

So now the sound will be original mono, but hopefully improved. I have a spare speaker and mount as a result and I can use the new clean amp duo board in a mono configuration. Should I get a duo speaker shell sometime in the future I can always do a swap out.

Today I’ve taken the empty new shell and installed the new audio card and speaker, as well as the new buttons and silicon pads. I’ve then installed the main board minus the power board that still needs the new components.

I’ve also installed the new front lens on the unit and I must say it looks nice.

New front lens on unit

Let’s get to the difficult bit, replacing the components on the power board. I’m not joking when saying that some of these items are not much bigger than a grain of rice. I suspect a lot of bad language will be used here, as this is a new level of soldering for me. I’ve never replaced anything so small before. If I balls it up I’ll just have to await my cheap Chinese power board.

Ok, the power board from Ali Express got here really quick, to be honest even before I could set some time aside to change the components on the old board, so therefore I’ve decided to try this new board as a straight swap.

I will keep the the components and the old board to use at a later date.

First though I have used the bench power supply to test it is ok, and it’s a big tick on all voltages as per the test I did on the old board. All voltages are stable and consistent, so I have secured the board in place and put the required batteries inside. Works perfectly.

Back together, awaiting the big switch on
Working perfectly

I now have a perfectly good looking updated Game gear that I am exceptionally pleased with. The sound system is a good upgrade, it has a really loud volume (adjustable) and is crisp. The powerboard from China at a total cost of £10.80 is an absolute bargain, and works perfectly with good stable voltages. The case is good, fits well and the lens is clean easy to install and scratch free, the whole thing looks brand new.

Two old rebuilds, rejuvenated

I now have two perfectly good looking and working examples of 90’s retro rivalry in perfect working condition. The plan is to display these in the house, on a custom made display. I’ve really enjoyed working on this little project and I’m made up with the outcome.

The only things left to be done would be to change the power supplies to rechargeable and to change the screens to new IPS/LCD screens, but I don’t think I’m going to do that on these two, I’m keeping them original or as close as possible to original, I want to keep these as they are, to cherish in this condition for as long as I can.

I love them. And they are fantastic.