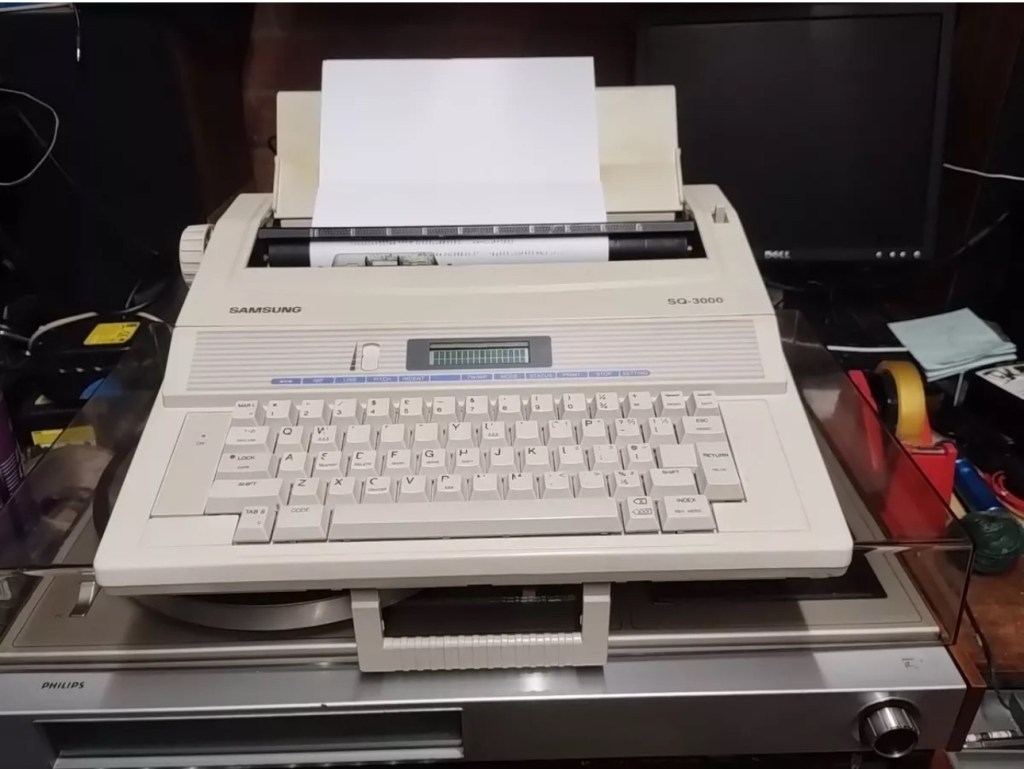
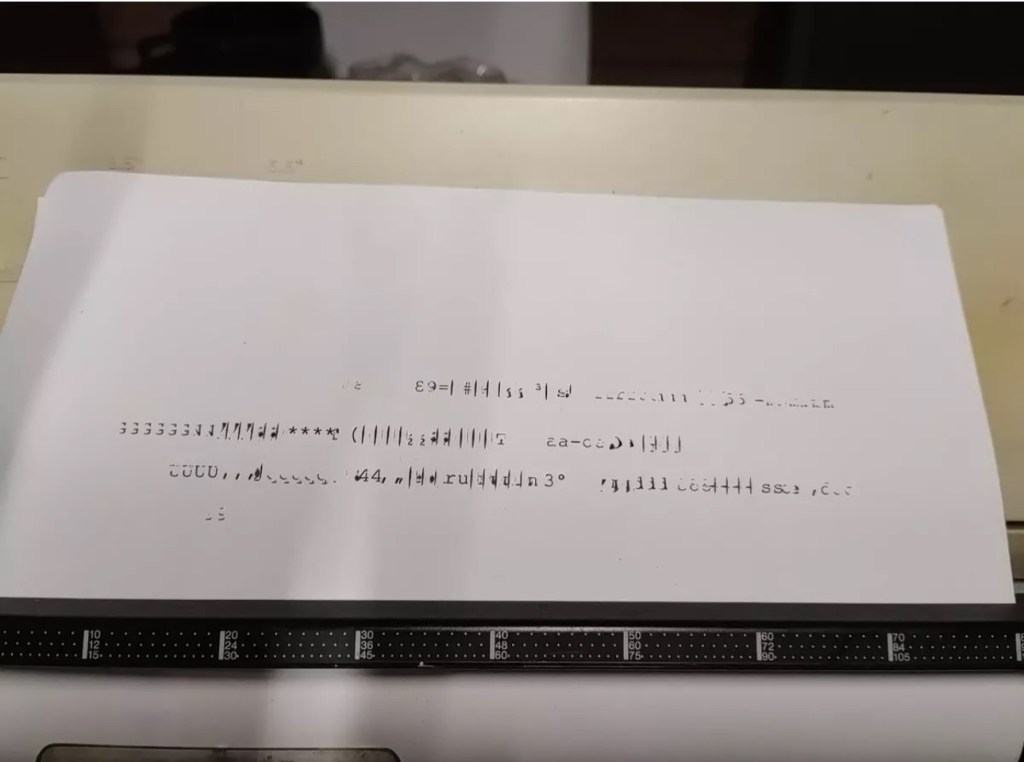
Offered here is a good vintage Samsung SQ-3000 electronic typewriter. It powers up and operates when the keys are pressed. However, the symbols printed do not match the button pressed ! The daisywheel may be out of line. Otherwise, good cosmetic condition. Any questions, then please ask.
EBay
I have again succumbed to purchasing something very retro, a typewriter. Yep it has a fault just as most things I buy have, that’s part of the fun of it all, can I fix it and save another item from landfill? Who knows but I’ll give it a try.
This Typewriter, the SQ3000 was also sold as the Elite S-7500, Hanseatic Europa II, Leader MD, Olympia Textstar MD, Opperman S-7100, Privilege Electronic 2600, Royal RT 7700, Silver Reed EX-133 MD, Smith Corona Wordsmith 200 and Welco EX 260 DS. It was manufactured sometime between 1990 -1995 and was a mass produced low cost typewriter of the time. Personally I think it was around 1995 as this was when regulations insisted that electronic items such as this required wired in power supplies, and this unit is a hard wired unit.
Samsung loosely translated/stands for “Three Stars”Apparently the three represents “Something big, numerous and powerful” and the “Stars” represent “Everlasting and eternal” so there you have it, that is today’s history lesson.
I loved using typewriters prior to the word processor/Pc rendering them useless. There is just something special about them, I can’t quite put my finger on it.
This item looks to be in fantastic cosmetic condition, and I have also checked that the consumables are available, they are so I might have struck lucky. From what I can see in the pictures a number of letters have worn off the keys, hopefully I can source replacements, or decals or I may even repaint them myself.
I have had to download the instruction manual for the Smith Corona Wordsmith 200 as it is the exact same unit under a different name, Samsung just don’t seem to have anything listed or historically available for download.
Looks niceSeems clean and tidySeems to be a potential daisywheel problem
I think I’ve bagged a bargain (if I can get it working) I’ve paid a grand total including the postage of £13:14 GBP and that was after knocking the seller down a few pounds from the original price. He bit my hand off to be honest, so we’ll just have to wait and see what arrives. If all else fails I can certainly use it for spare parts in the future.
Anyway, this now gets added to the long list of other items I have, that need to be repaired. Please check back to view the “Assess and repair” post that will follow, explaining what arrived, its condition and what I will be doing to get it back in working order.
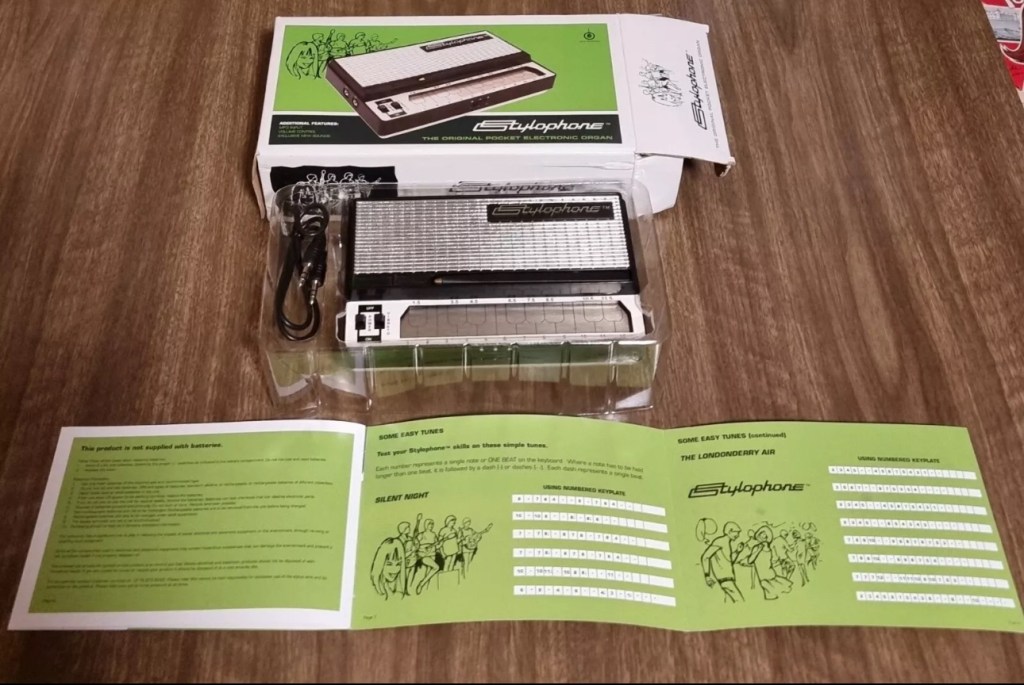
A BRILLIANT RE-pro of an iconic Stylophone Pocket Organ from 1968.
Bought for me as a birthday present back in 2008. I packed it away and placed it in my loft.
I’ve just found it again and have added 3 Duracell Plus AA batteries to test it for the first time. (Included in sale)
All works extremely well.
The unit is as new, the box has very minor wear.
EBay
We will just have to wait for delivery to see just how true this listing is… however I have spoken with the seller today, he’s a lovely chap and my mind is at ease that this is a genuine good purchase.
Unit differs slightly from the 60s oneIn general looks similar All looking good, original packaging
Anyone that pays the slightest bit of interest to my blog will know I love retro electronic equipment, especially if at sometime in my life it has meant something to me. Well, the Stylophone was a very basic synthesiser/toy that popped its head above the parapet originally in the late 60s, but was super popular in the mid 70s and that was when I first got my hands on one. It was a cousins unit, not mine as my parents wouldn’t pay out for toys like that as they were just a fad. (How wrong were they?). So envy struck once again as I was never able to have one…..now fast forward 50 years and I’ve now purchased a good example of one.
The Stylophone is a miniature analog electronic keyboard musical instrument played with a stylus. Invented in 1967 by Brian Jarvis, it entered production in 1968, manufactured by Dubreq.
Some three million Stylophones were sold, mostly as children’s toys, but they were occasionally used by professional musicians such as John Lennon, Kraftwerk and David Bowie.
Wikipedia
Back in the day a chap called Rolf Harris was constantly on the TV advertising or playing these units, however the less time talking about this fellah the better, he was a right wrong ‘un.
This particular unit is not an original, I’m still after one of those. This unit was a reissue in 2008 so it’s about 17 years old now. But I’m happy with that. And it works, and for me that’s unusual as I normally only buy broken ones to repair, maybe the original one I’m after will fit the bill, if I can find one that is not completely overpriced. The original unit ran off a single PP9 9v battery, these newer units have improved circuitry and operate off 3x AA type batteries using half the original power. I’ve said before retro electronics are rapidly become the antiques of tomorrow, and people are out of their heads with the prices they are demanding even for something that is completely wrecked. They all need a reality check for the prices they are demanding. The total I have paid for this one is £20:00 GBP and that includes the postage and batteries, so in all I think I’ve got a bargain if it matches the actual listing.
I’m actual going to record a video of learning how to play this unit, just to see how easy or hard it is, and this creation will also be the subject of a later post, Here: You were warned
In the meantime prepare your ears for an assault to the auditory system as someone with no ability to hold a tune tries to play a toy/instrument from the 1970’s, you are truly blessed 😂
What’s that then? I hear you ask. Well since I became a radio amateur (M0ESB) back in Feb 2003 anything regarding radio has fascinated me.
The Duga or – Russian woodpecker issue of the early 80s has always been an item of interest to me. It was allegedly constructed as a Russian over the horizon early warning system and was replaced in the late 80s when satellite systems took over the early warning mantle.
However it obtained notoriety by creating havoc on the airwaves worldwide for quite a considerable period of time.
This video by a fellow Amateur radio enthusiast M3HHY explains quite eloquently, in 11 minutes what the issue was. Some great photos of this absolutely massive antenna array can be seen in this video.
And whilst we are still here this is what Wikipedia has to say:
The duga system was extremely powerful, reaching over 10 MW, and emitted in the shortwave radiobands. It was given the nickname Russian Woodpecker by shortwave listeners for its emissions randomly appearing and sounding like sharp, repetitive tapping noises at a frequency of 10 Hz. The random frequency hops often disrupted legitimate broadcasts, amateur radio operations, oceanic, commercial, aviation communications, and utility transmissions, resulting in thousands of complaints from many countries worldwide.
Courtesy: Wikipedia
I hope you find this as fascinating and informative as I have. Radio remains to this day special to me. I’d sooner be listening to it in any form rather than watching a tv. In my eyes or should I say ears, it was the most significant invention ever made, if only Marconi knew back in the 1890s just how important this communication method would become he would have been blown away. It has helped to shape so much, our modern day world, and how we communicate with each other on a daily basis.
This years birthday, I’d hinted that I wanted to build an RC model boat from scratch, and that’s what I got. A good friend of my wife and I came up trumps and brought me this nice little wooden boat starter kit. I’m fairly experienced at building balsa gliders and planes from plans and have done quite a few. I’ve never ventured into boats though so this is a first for me. It all stems from going on holiday to Norfolk, where we normally stay in a place called Gorleston where there is a nice boating pond that two of my brother in laws sail prebuilt trawlers that they have brought, i’ve always said that I’d join them on one of our trips, jokingly saying I’d get a submarine or battleship to blow them out of the water. However i wouldn’t do that, and this is the first stage of venturing into the world of model boats. I’ve now just got to build it.
Boating pond at Gorleston
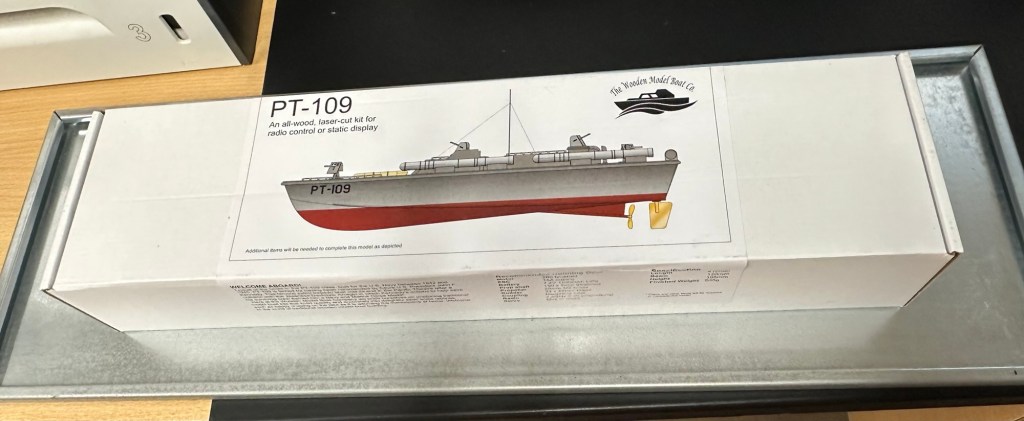
The boat that i have chosen is made by the wooden model boat company distributed in the Uk by JPerkins models. It is a PT109 torpedo boat modelled on the one that John F Kennedy sailed in, in the Pacific theatre after a collision with the Japanese Destroyer Amagiri in which Kennedy’s actions to help save his surviving crew earned him a Navy and Marine Corps Medal. I’m going to put my own touch on the paint scheme though and not go with the traditional all green or grey. I’m going to mix it up a little by highlighting and brightening up the look of the boat a bit.
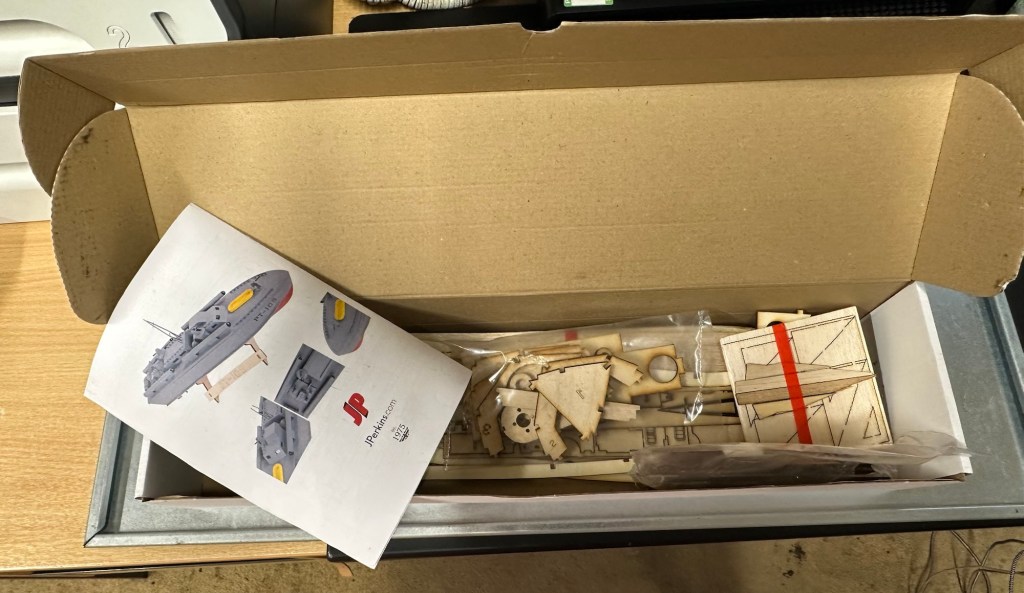
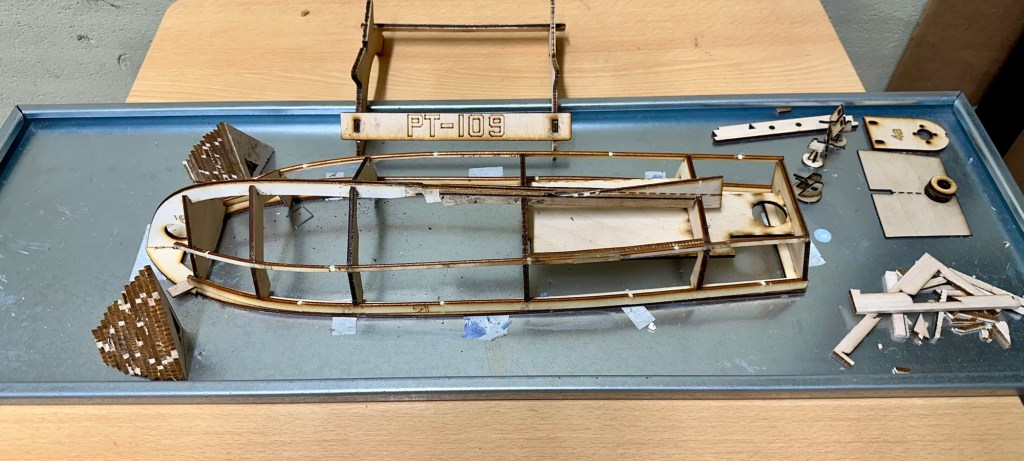
The boxed kit
Bitsand pieces Instructions Inside the box
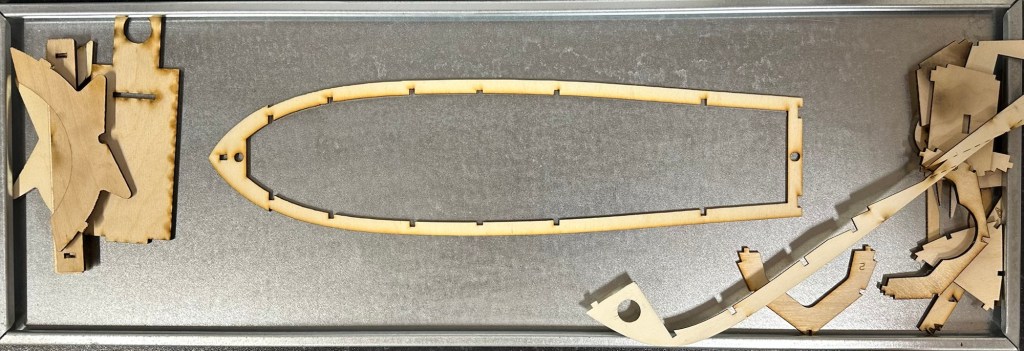
These kits have laser etched parts, its my first experience with them and my only gripe so far is that some of the parts are so small and delicate that this process cremates the object because of its small size. I have had to make some of my own parts for this kit as in some cases it’s just like trying to press out burnt wood from the etched parts. Not good in my honest opinion, and as this is a starter set it’s more than likely liable to put a beginner off of the hobby to be honest. Not everyone is able to easily replicate the missing/damaged parts.
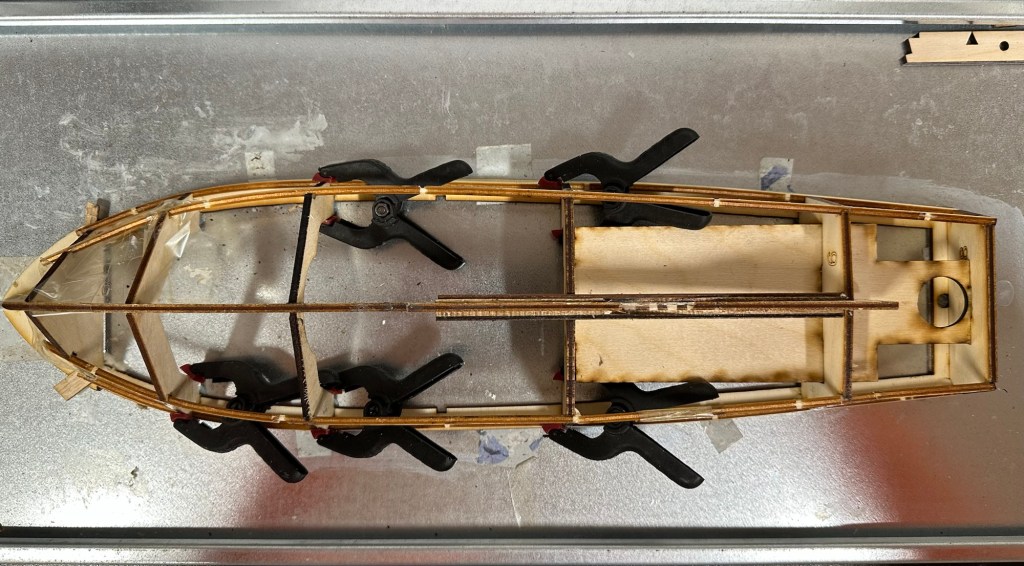
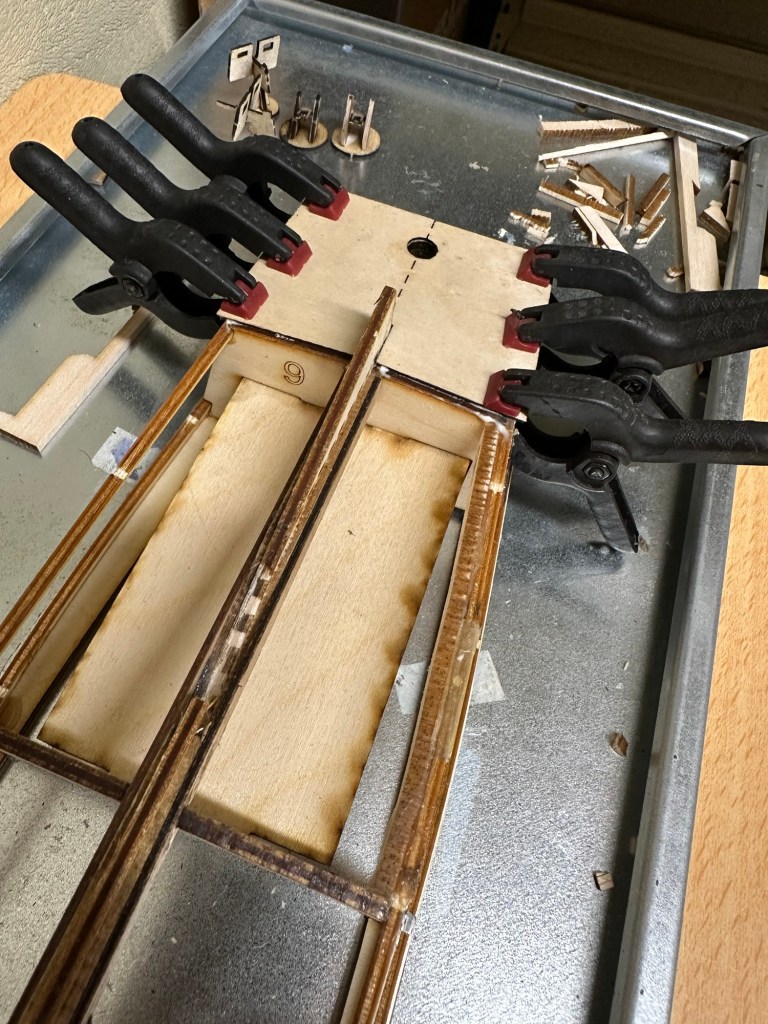
Firstly you have to secure the deck frame to a flat surface using some double sided tape. This is so you can start building the hull frame and prevent warping. I use a small steel shelf for my base that can easily be moved around and stored between sessions.
Secured to flat baseHull frameClamping strengtheners CuringMy shelf working space
There is a lot of time between sessions where you just have to leave parts to dry, you can quite easily try to do so much and potentially ruin all the good work you have done. Patience really does have to be a big part of what you do in build these models, the old adage of measure twice, cut once needs to be used so mistakes are kept to a minimum. You can make tiny adjustments when in the finishing process but for the time being you need to adhere to instructions as much as possible. Check and double check and always dry fit prior to gluing in place.
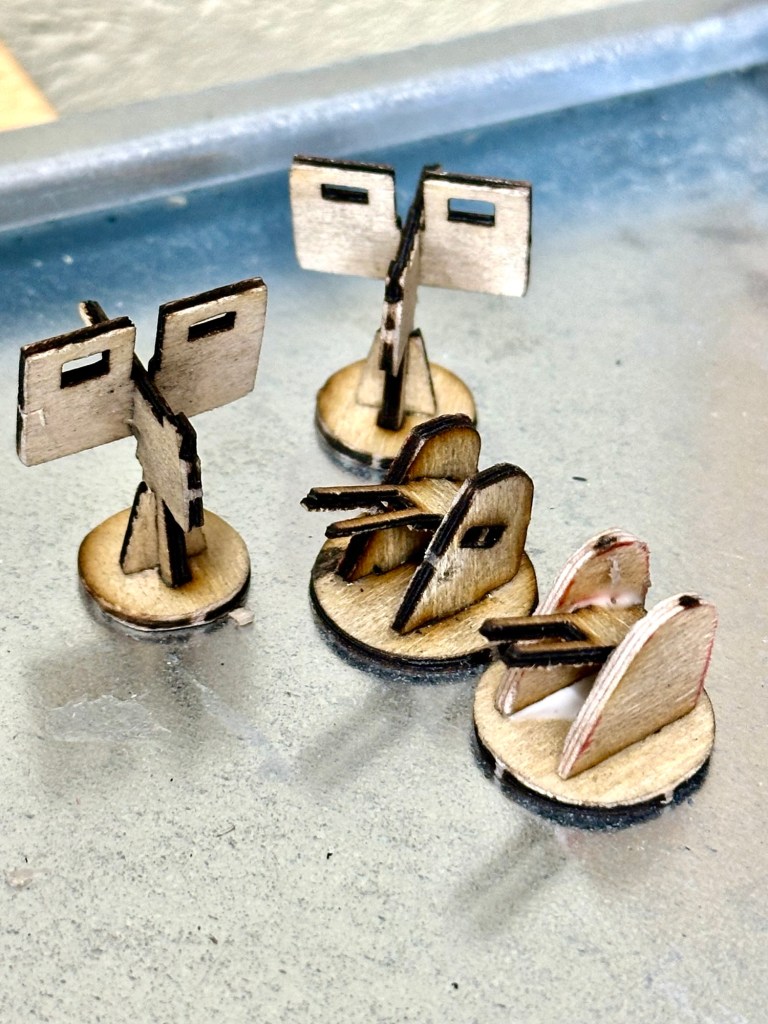
HullFormers to shape the bowRudder base in place
If you look at the picture below you will see how the laser etching burns really small parts. This doesn’t look good however they will look a lot better after they are sealed and painted, if I left all the parts like this the whole project would look as if it had been in a fire. I’ve had to build some of these parts from scratch as the kit itself had insufficient parts pre cut.
Burnt small parts…to be finished
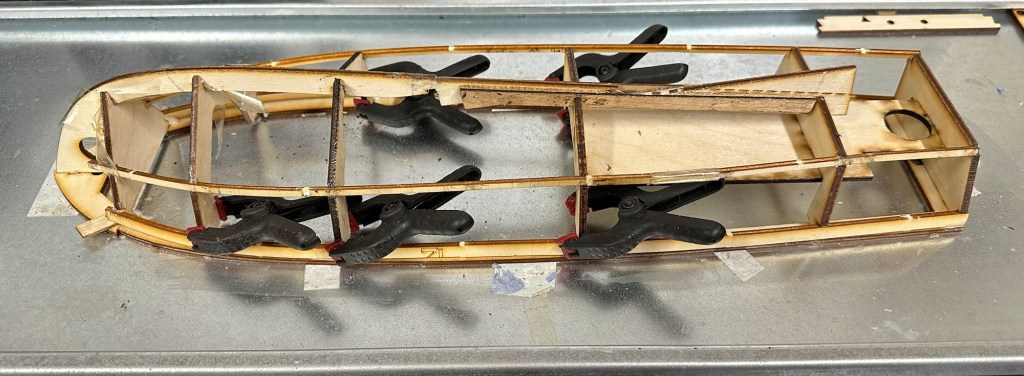
The hull framework is now complete, next stage is to get the outer skins on, the bow formers in place and then hand sand, fill and sand again until the whole hull is ready to be sealed. Again there are issues here with the kit as one of the hull skins is two times thicker than it should be, hence the amount of bending required to shape the hull is not achievable. I have brought this up with the supplier and within a few days I have had a new set of replacement hull skins sent free of charge. Their customer service has been superb and it is good to see that some companies do still try their utmost to keep their customers happy. I will now progress with completing the hull.
These four boards form the outer skins. At 1.5mm they are very flexible. However you can see the second one from the left is twice as thick and not pliable enough. These were replaced by the supplier within a few days of notifying them of the issue.
Below is a small video of the completed framework. It has probably taken about 8 hours in total to get to this stage (plus many more hours to allow glues to cure)
The hull framework complete
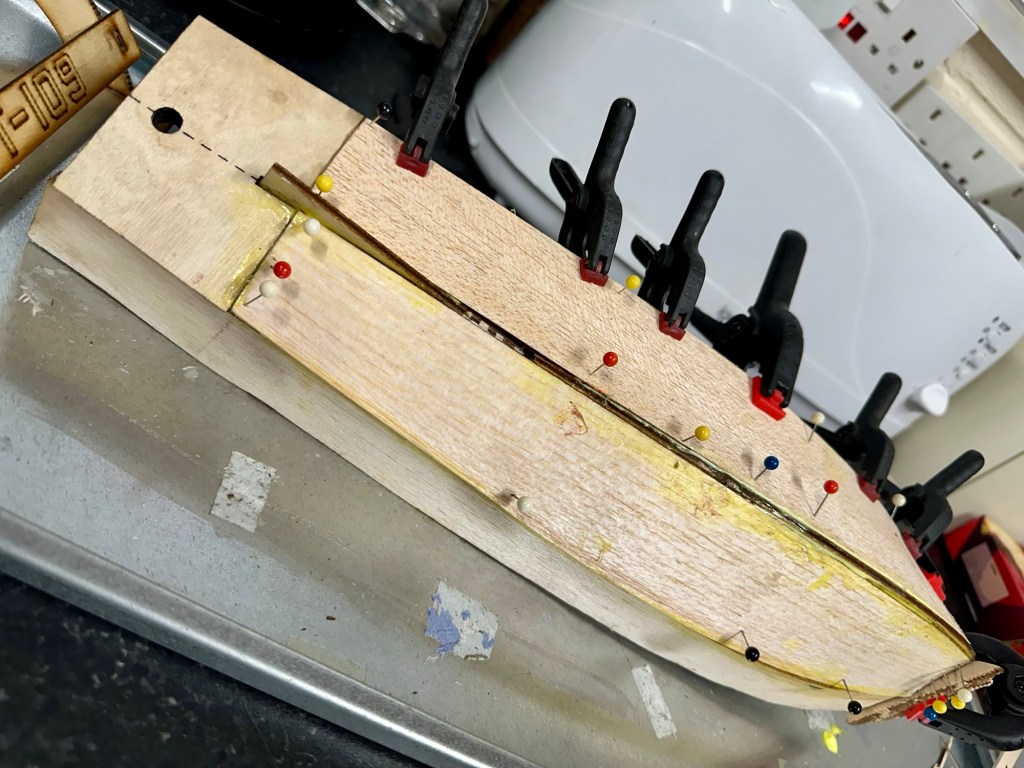
So tonight over a period of about 8 hrs I’ve managed to get the 4 balsa skins that form the hull into place. I’ve had to do a bit of re shaping and minor alterations, and the final bend of the skin would have bust it under the strain if I didn’t decide to wet it first. Wetting balsa allows the inside edge of the sheet to bend in, making these big bends in the hull shape possible. That as well as plenty of pins and clamps with epoxy resin ensures the skin stays where it is put. I left about an hour between each skin placement before moving on to the next one.
First skin Second skin Third and fourth skins in place, when dry I can commence light sanding and filling.
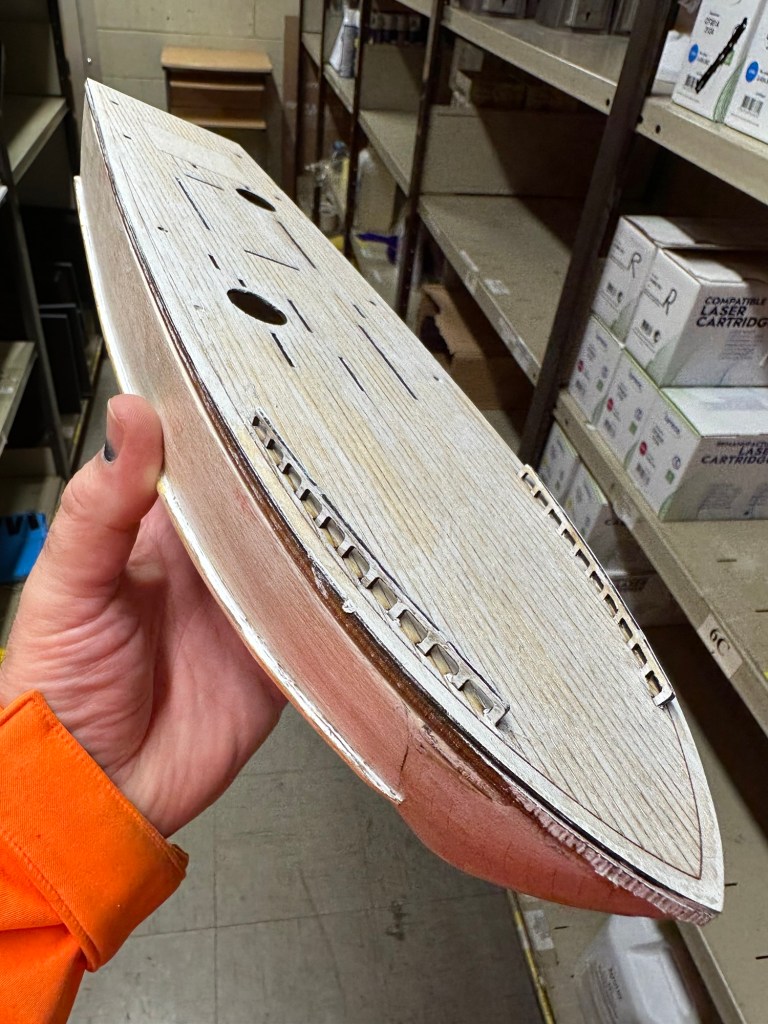
Here is the hull, assembled ready for sanding filling and all the other fun stuff required to make it look good and waterproof.
The hull ready for sanding, waterproofing and painting.
Tonight I have given the first heavy sanding with a course paper. This has really brought the hull up lovely. The former’s that were put in place have now been sanded to form a good bow profile. See photos below.
Before shaping After shaping
I now have to do a small bit of filling with balsa filler and then I will sand with a finer paper.
Looking more like a boat
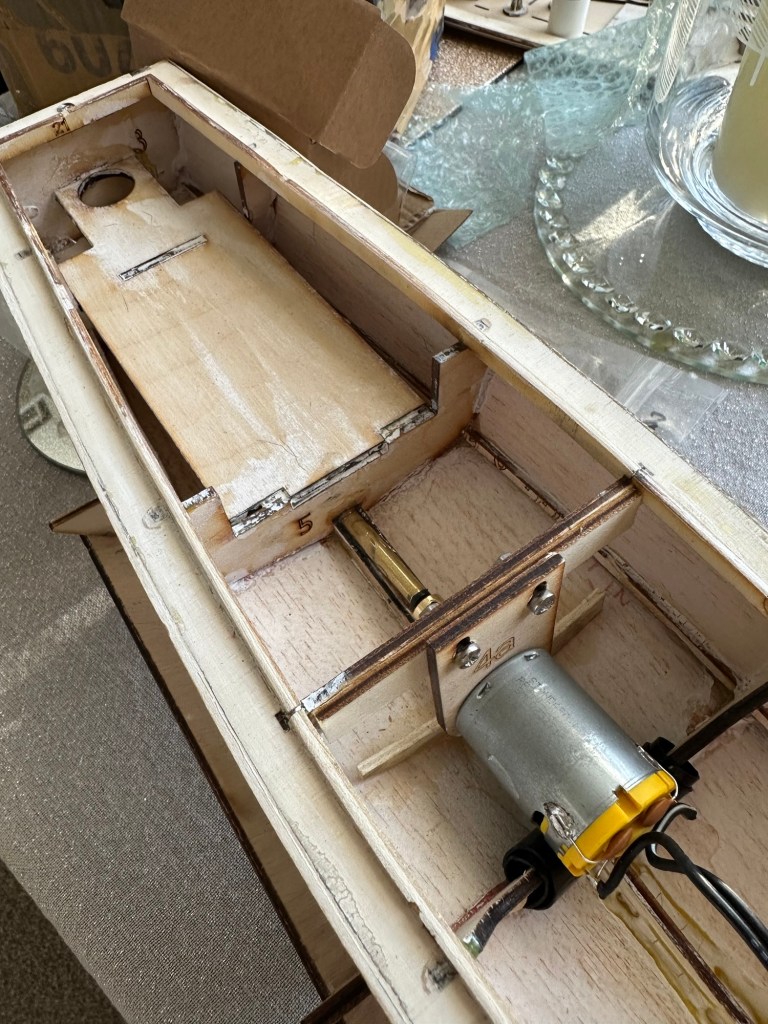
Once the final sanding has been done I can then look at sealing the exposed wood and then begin the waterproofing and painting. The installation of the radio gear will go in place towards the end of the build. In the meantime I just have to build the superstructure on to the top deck. This will require some small bits to be painted before being put into place.
I’ve built the superstructure and that has been set aside to cure. There will be a lot of sanding and painting needed. I have attached the deck now and all those items will attach to it, and i must say it’s looking quite good.
Deck in placeHull structure now completeJust needs superstructure cabins adding once it has been sealed and painted.
I’ve now detached the deck and gone around with some balsa filler and hopefully tomorrow once it’s dry I can give it a sand with some fine paper and then I can look at putting on a coat or three of sanding sealer.
Sanding sealerTo be sandedAll superstructure sand sealed
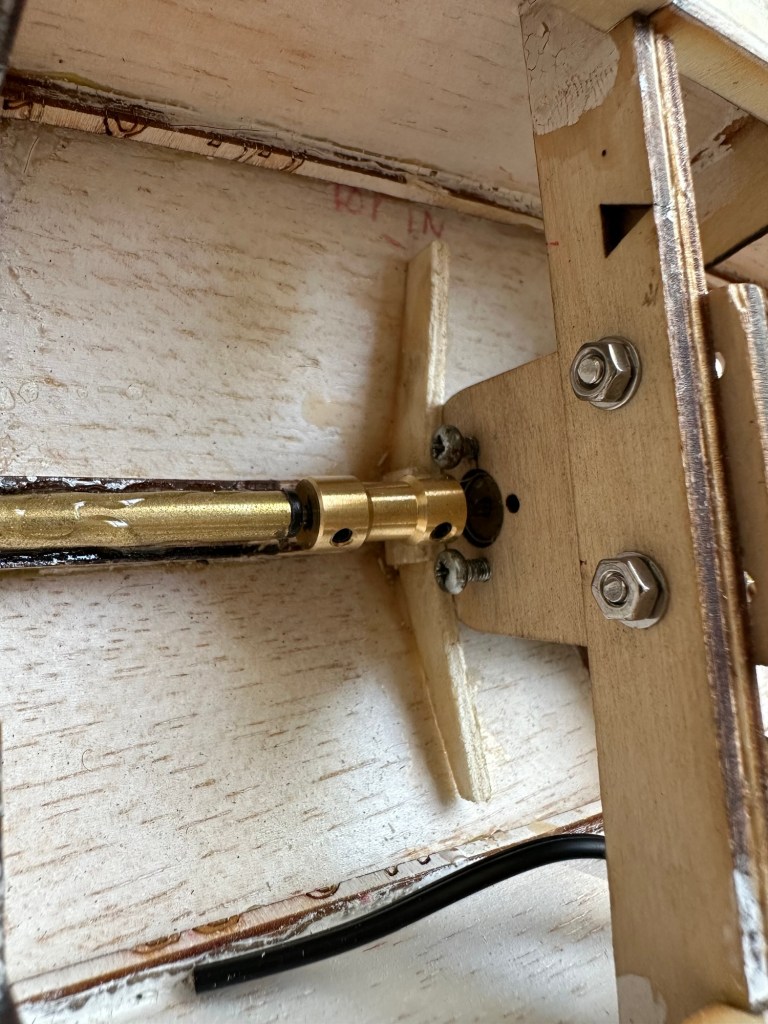
I’ve tonight managed to get coats one and two of the sanding sealer applied with sanding after each coat with a fine sandpaper. The torpedo tubes have been assembled along with other items and we are now very close to getting the painting started. However first I will give a final sand to the structure to see if it is ready for the primer. If not it will mean applying some balsa filler and applying coat 3. There really is no rush. I need to now get the prop tube in place and permanently positioned prior to any painting. I am considering a number of different paint combinations at this stage, but they are changing on a daily basis. I wonder what colours I will go with?
Rudder checks doneEngine in placeDrive connector in place
I’ve done the all the sanding and I’m now happy to commence the undercoat of the hull. I’ve fitted and removed the rudder and engine to test they fit ok, the boat is now bare and ready to paint. I’m going to individually paint the guns and superstructure before fixing to the deck. I might paint the deck with a dark varnish, I haven’t quite decided yet.
Part 2 of this post will cover the painting of the boat. Coming sometime in Feb 2025.
Interesting to read this. I passed my RAE exam back in December 2003. We didn’t have to master Morse code but I did take it on and even today I’m ok at deciphering it, if a tad slowly. I could transmit it at about 8 words a minute, and if I’d stuck at it I’m sure I’d have become better.
But like most things i just didn’t have the time available to further it. I do still like to put the radio on occasionally and listen to slow Morse on the amateur bands.
If you were in Tunisia in October, you might have caught some of the Morse Code championships this year. If you didn’t make it, you could catch the …
Here’s another interesting blog I’ve read today. Interesting to me as a few months ago I obtained a knackered Yamaha PSS 260, not on the same level as the DX7 but all the same the blog post fits the bill for instruments from the 80s. I’m awaiting a few components to complete this fix and hopefully I will get it posted in the next couple of months. Meanwhile enjoy the post from :Hackaday
Although there might have been other music produced or recorded in the 1980s, we may never know of its existence due to the cacophony of all of the …
Yep that’s it. The good old EBay untested. Anyone who buys from here knows that this can mean anything from working to totally wrecked, or even should have been binned because a good portion of it is missing.
But I try to remain positive… some people call it stupid.
Cheap, probably broken
Here I have purchased two of the same games for the grand total of £1.49 GBP. About 75 of your finest British pennies each. My suspicions are such as the guy who posted is selling a couple of “tested” game cartridges (the same game) for a considerably higher price. I just don’t understand how he couldn’t test these two. I suspect they are knackered to coin a phrase.
Anyway, let’s await the mailman.
I’ll apologise in advance for how easy this fix was. They arrived and both game cartridges looked ok. I then loaded them into the unit and one worked and one didn’t.
Both Cartridges tested
I decided to just clean the contacts on both cartridges with a bit of IPA and hey presto. Two working game cartridges for next to no cost.
2nd cartridge up and working
So again, I apologies for the simplistic fix, I was hoping I would at least be opening the cartridge and doing a bit of trace repair, but sometimes that is all it takes. I’ll keep one, and the other i will move on with another unit that I’m currently repairing.
But most importantly they are not off to landfill. Result.


You must be logged in to post a comment.