Phew, the donor camera arrived costing me the grand total of £3 sterling. It was badly damaged and I was doubtful that it would be any use due to its state.
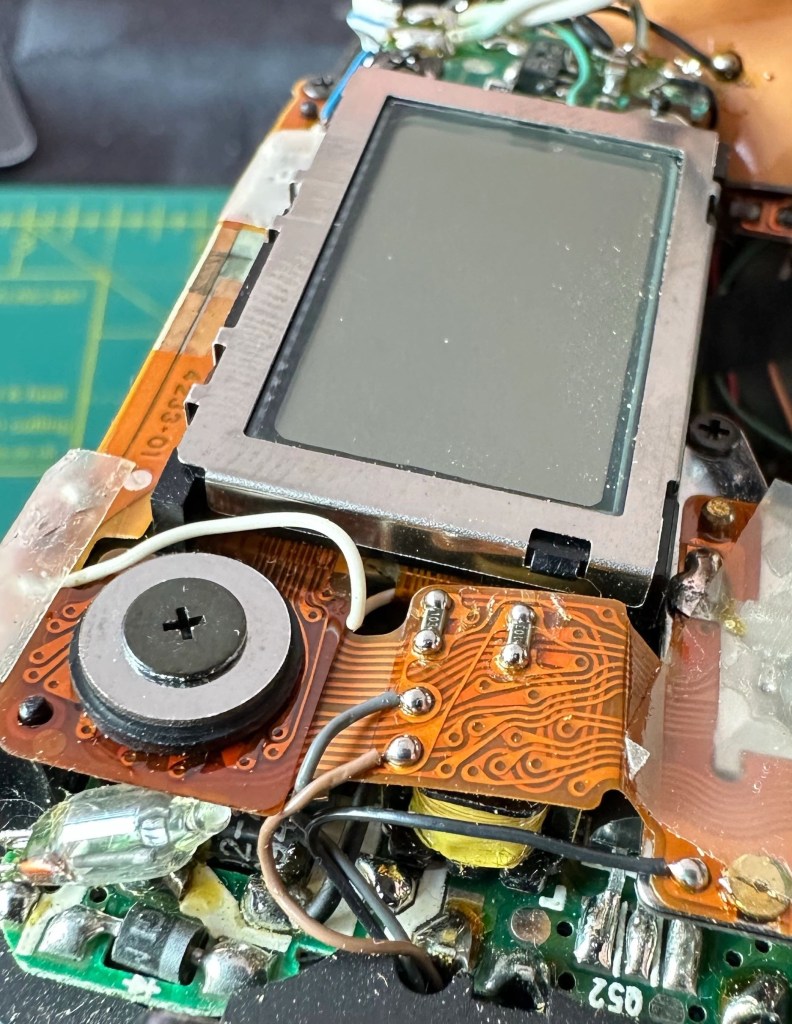
Donor camera board
However the pcb area and the lcd screen looked ok and after much cursing and burning of the fingers whilst de soldering and re soldering I put the battery in and there it appeared as if by magic…all clicked and clunked as it should and the battery indicator appeared on the screen.
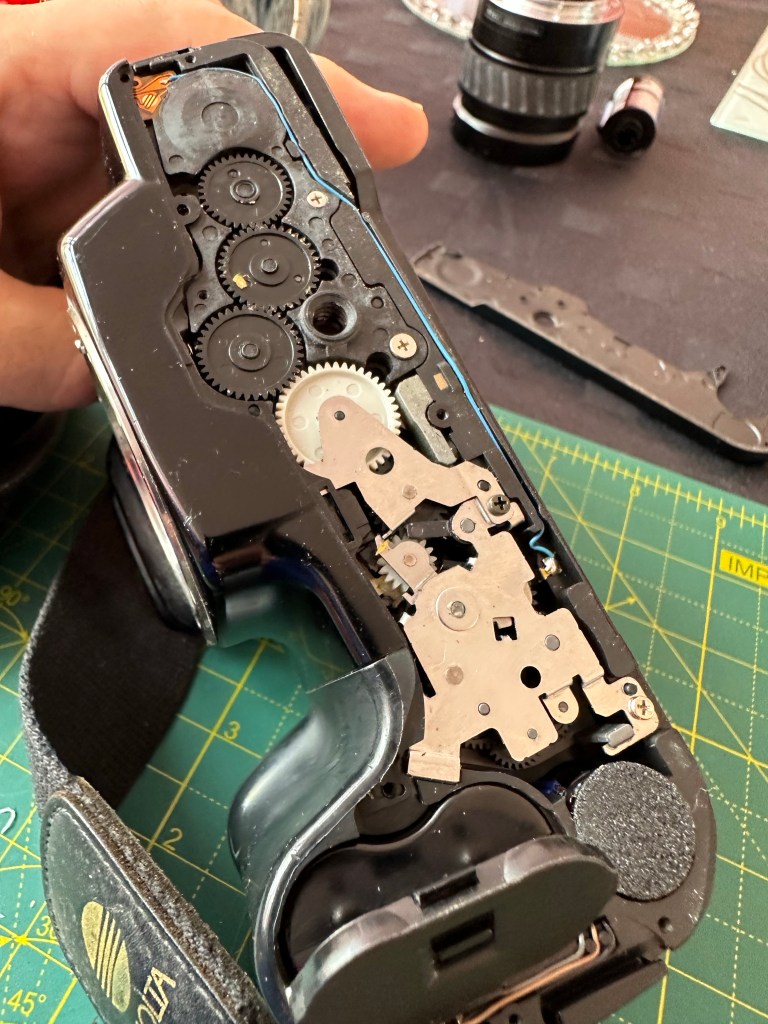
New pcb and screen Repaired Minolta Dynax 5000i
I put the case back together and secured all the buttons to the frame and then connected the lens. Turned it all back on and hey presto all working fine. Focus’s well, flash works as it should, all counters and indicators doing what they should.
I’m happy with this camera now, just going to give it a wipe over and I now have a super little SLR for my collection. Will run a film through it when I get the time.
I can now say this camera is complete and in perfect working order.
Job done👍
(As an aside to this repair, the original owner was so surprised I got it working that he has asked if he can buy it back? That would be rather cheeky of me so I’ve just asked him to refund the cost of the battery and the damaged donor camera. He wants to get back into analogue photography, everyone’s a winner here, and a camera destined for the bin gets a new lease of life.) I’m happy 😃 👍
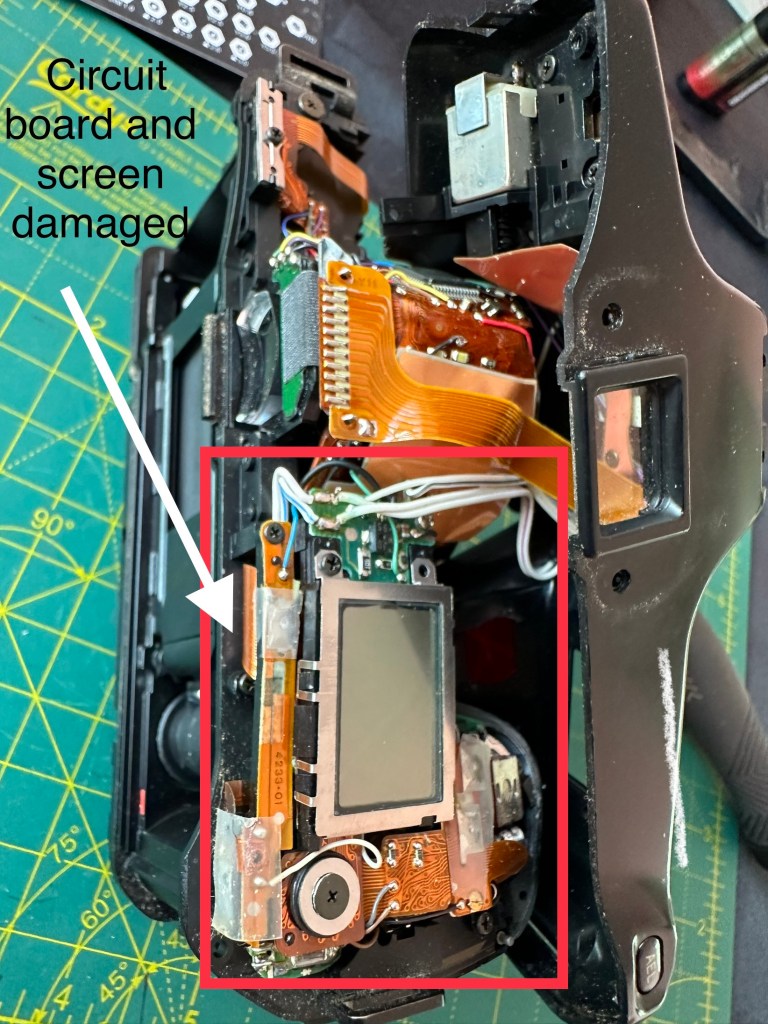
Well that’s annoying. I’ve stripped down the Dynax 5000i and found a terminal diagnosis for the power PCB and display screen.
There is a short circuit, severe corrosion from an old battery as well as the display screen being damaged where some of the fine contacts are destroyed rendering the unit useless at this stage.
Strip downStrip downFaulty board
Ok. I can strip down to individual parts, gain another 150 or so new screws and some parts that I may be able to use or sell on – or I can be a total numpty. I’ve decided to head down the numpty route and purchase a donor camera to repair this one. I’ll still get a load of spare screws following this route.
Faulty board and screen
I’ve purchased a unit, it has cost me next to nothing and fingers crossed I can get one of them working and gain some spare parts for future use. I didn’t really want to pay out more but I take issues like this as a challenge and I’m committed to get this up and running.
My wife calls me gullible, what would she know bless her 😂
I’ll let you know exactly what arrives when the postman pays a visit.
I have been waiting for some leatherette to complete this camera. I had some left over from my last project so why not use it here?
BeforeAfter
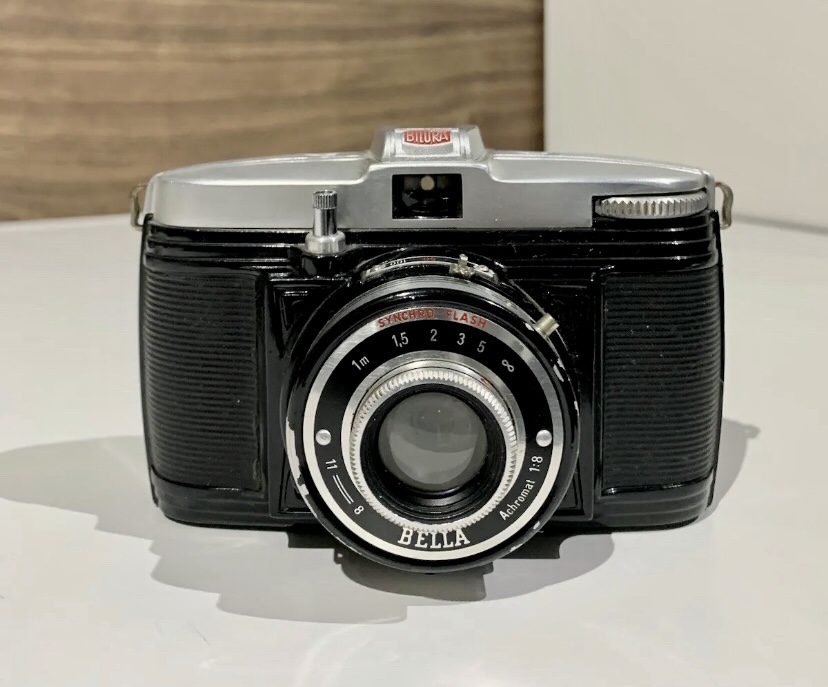
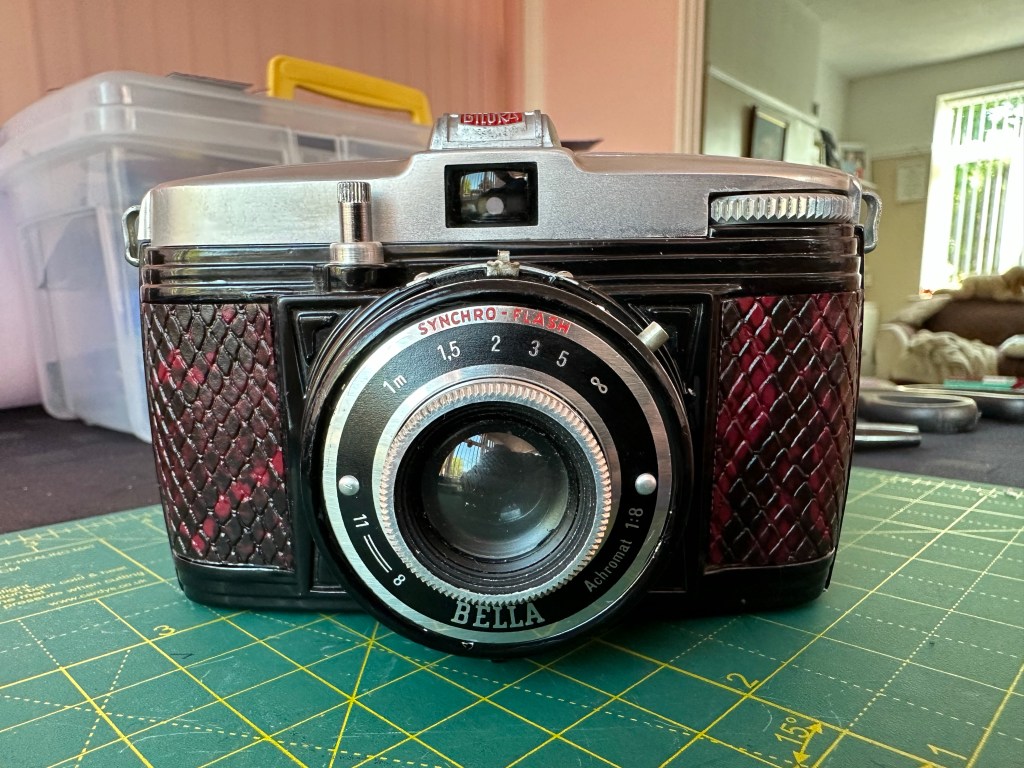
This is a lovely looking camera that I fell instantly in love with, great design made of tin pot metal basically and uses old 127 film.
It has been completely stripped down and rebuilt and is a lovely specimen in my eyes.
Bilora Bella templates for leatherette
I have today made templates for the new skin and these have gone on lovely.
Bilora Bella complete Bilora Bella complete front and rear view
So for now I’ve done all I can do on this little beauty, it will now be vacuum packed with silica gel and put into my collection for use at a later date maybe when I get a roll of 127 film. Been a pleasure working on this camera, she’s taught me plenty and I am already putting that to use. Knowledge is king 👑
Now I’ve reached a point that I can now say, time to wrap this job up and put it to bed.
If you remember back a couple of weeks I had this camera given to me by a family member. Not used in about 20 yrs still had a film in it as far as they were aware there were no issues with it.
I beg to differ…..
In lay man’s terms I think the term that should have been used is that it’s knackered (not working, kaputt a non existent camera)
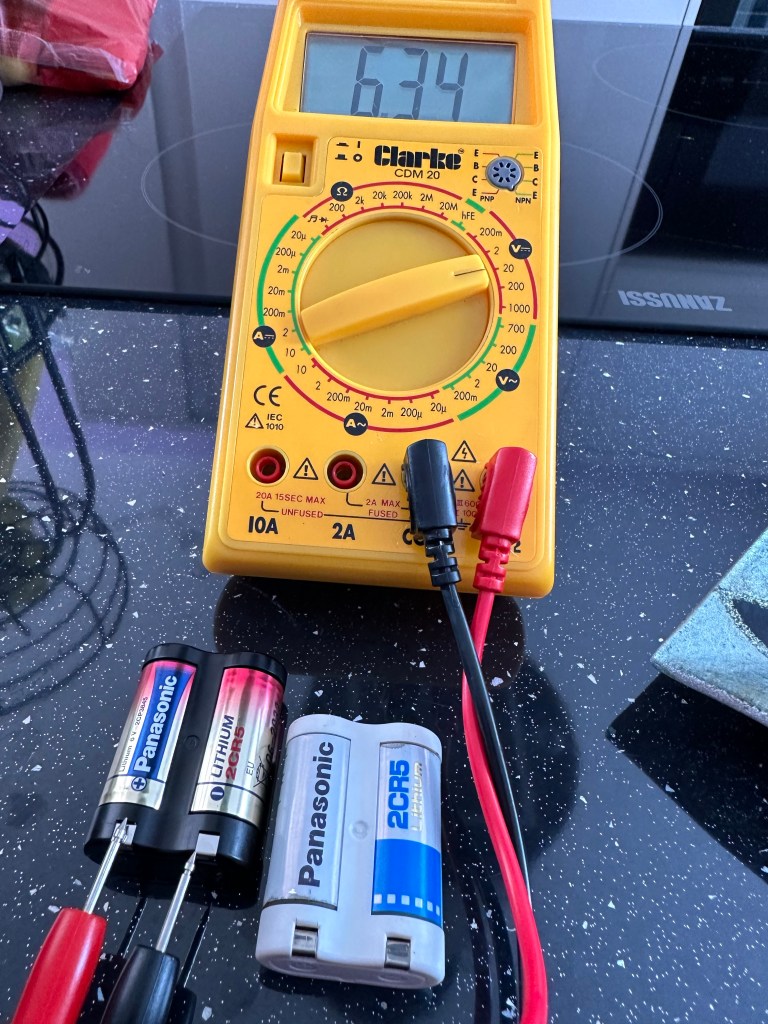
Battery deadBattery very much aliveTesting old and new batteries
I purchased a new 2CR5 6v Lithium battery from a well known supplier named after a rain forest. Motor buzzed, but no display or any other operation was available, first thought was to test the battery was not a dud, using the multimeter I proved this was not the case compared to the old battery.
So. What to do?
General census of opinion is to ditch this as mass produced tat and get another one on eBay for a couple of quid, the electronics are a known issue for many models of cameras from the 80s.
However, this site is not about just dump and run, I’m going to dig in and look to see if I can remedy the problem. I like a good electronic problem and hopefully I can sort this. If not, I’ll recycle the parts I’m definitely not throwing it away.
It’s a learning opportunity, and knowledge is king.
Thanks for passing by. You know it’s always appreciated 👍
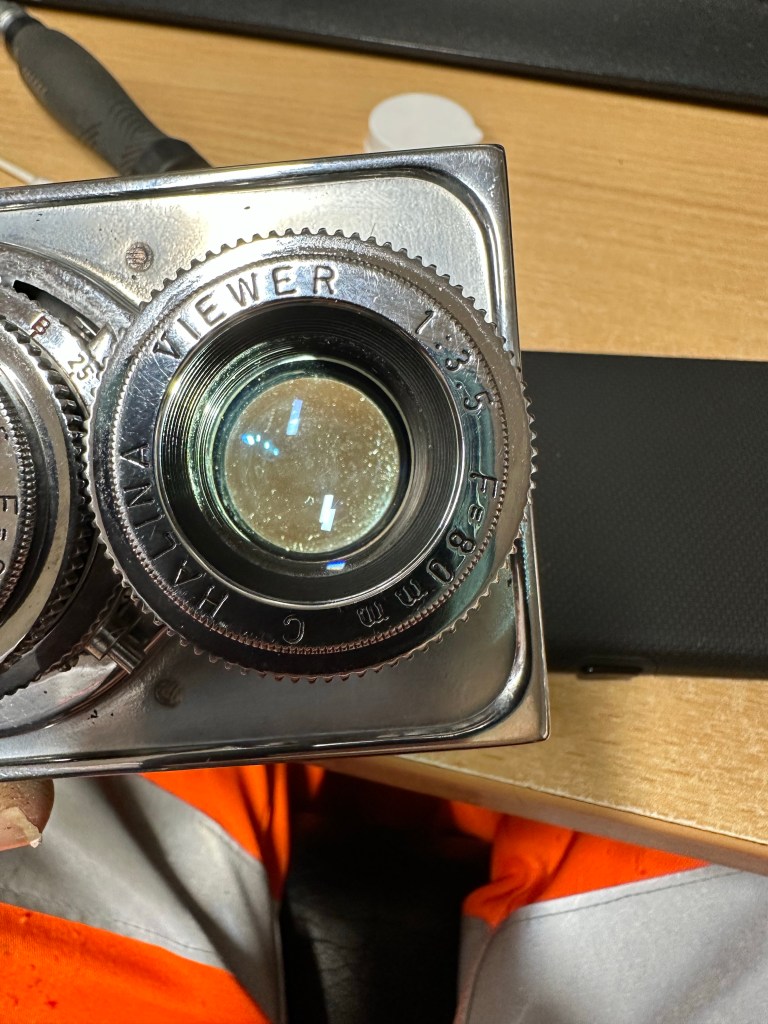
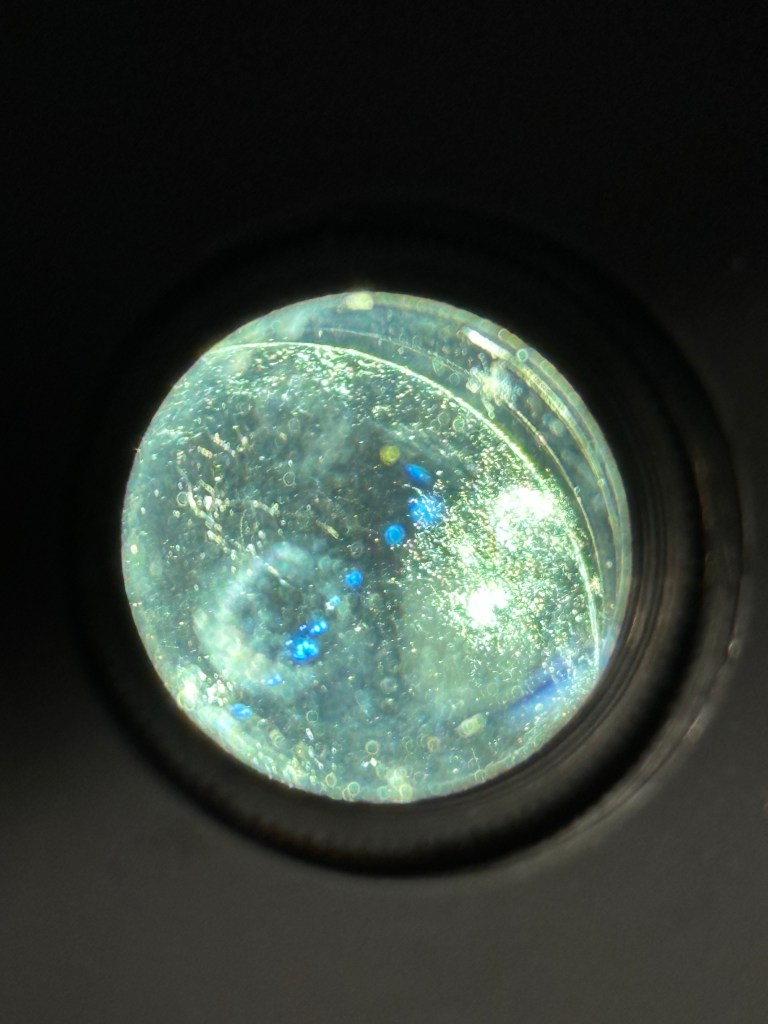
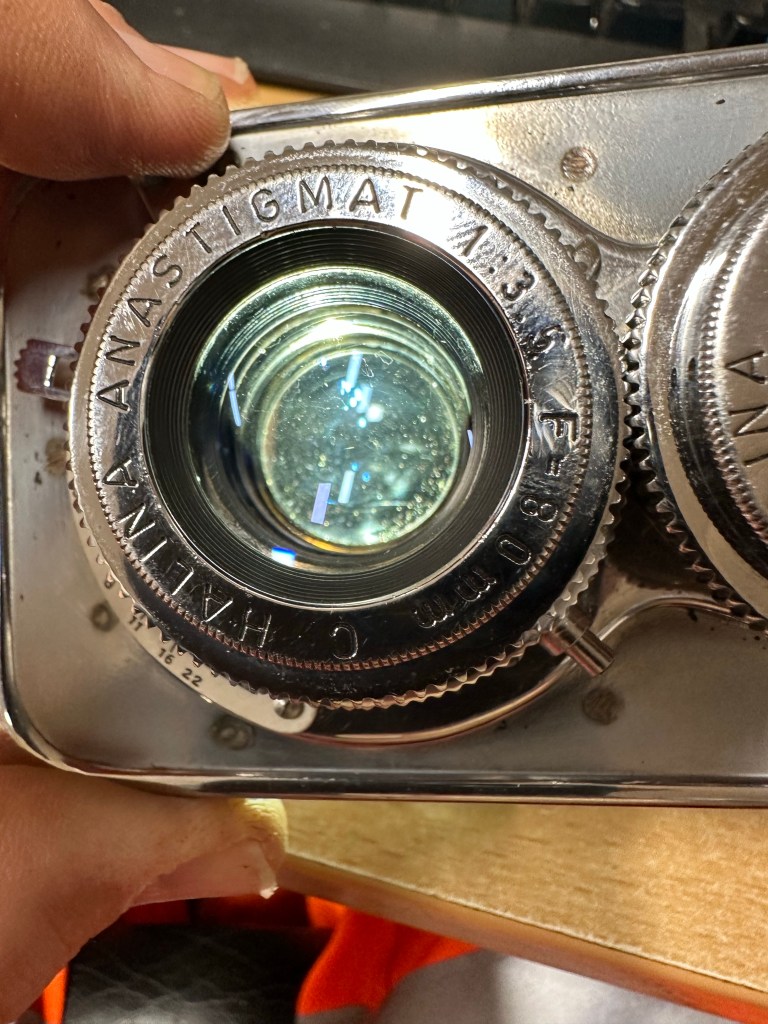
So tonight I have brought my smallest set of screwdrivers and other tools in to work to continue work on the old Halina project I have been immersed in. Tonight between jobs I intend to deal with the fungus issue on the taking lens.
Fungus removed with peroxide Halina A1 Reflex viewing lens
I have previously removed the camera faceplate and the two lenses are connected to this. On the rear of the faceplate is a brass connector that when removed allows you into the back of the taking lens into the shutter curtain and aperture curtain.
This allowed me to dry clean as such both curtains and I used a little graphite dust (tiny tiny proportion) to lubricate both curtains and finally after many years allowing the shutter to work as it should. A good blow with some compressed air dealt with any remaining dust.
With the setting on “B” I was able to access the lens element in front of the curtain, this was cleaned with a 50/50 mix of peroxide and distilled water to remove the offending fungus. I allowed this to dry and lightly polished the element with a cotton bud when dried. Again compressed air was used to finish.
Halina A1 Reflex Lens fungusHalina A1 Reflex taking lens minus fungusBefore and after
I repeated the above for the other two elements of the lens (this is a three element lens) and then did the same with the viewing lens.
When reassembling it’s important to ensure the elements are fully dry. The elements were all wiped over before reassembly and given a last blow prior to being resealed and checked with a bright light.
Fungus removed from Halina A1 Reflex
This was the job I was most concerned with but thankfully it went well and I am pleased with the outcome. The fungus issue has now been eradicated and hopefully it will stay away. Just a couple of little jobs to do now prior to reassembly of the camera and we can then put the new leatherette on the body.
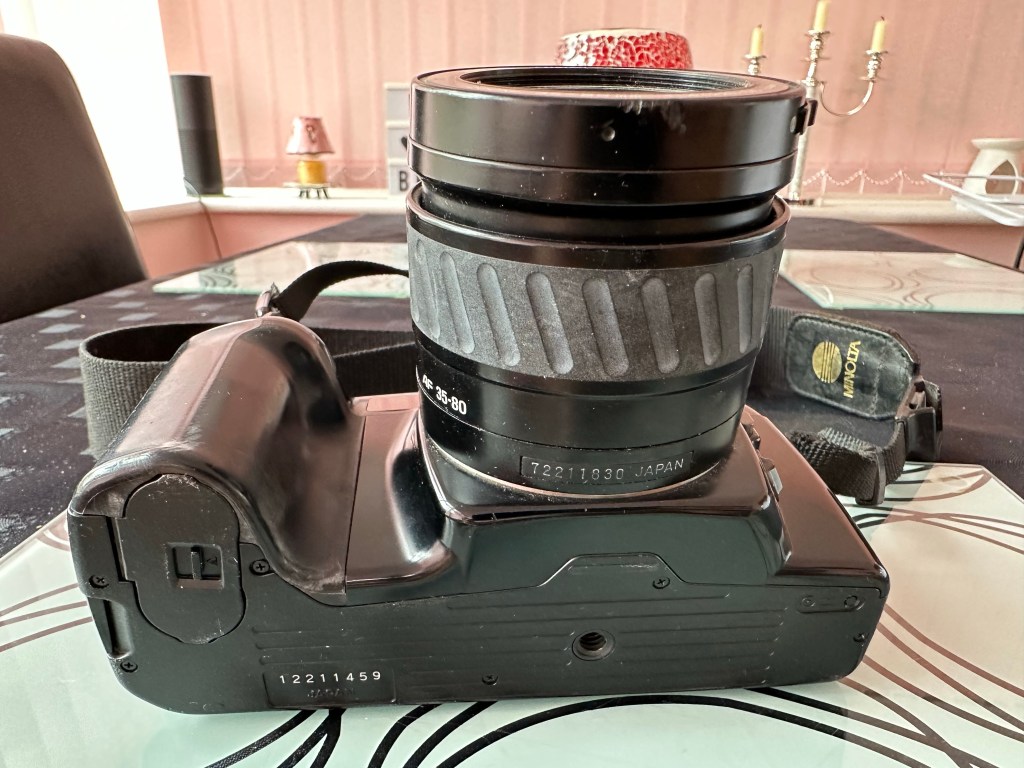
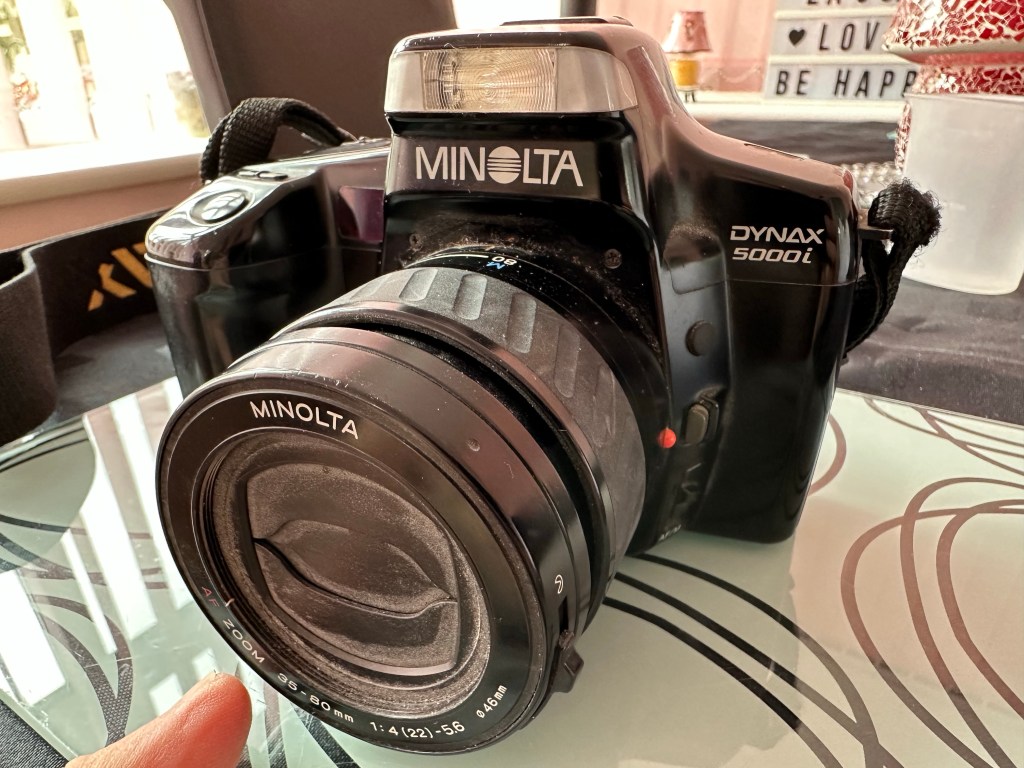
Found this on my doorstep when I arrived home from work today. After making some enquiries it transpires that a family member donated it to me as they haven’t used it in about 20 yrs. Knowing that I mess with cameras at the cheaper end of the spectrum he thought that I may find a use for it. I have gratefully accepted this gift.
After speaking with the donor he doesn’t remember there being any issues with it, he wasn’t aware there is already a film in it so I will process this for him and see what if anything comes of it.
This camera was circa 1989 and was a strange beast in that the programmable modes we take for granted on SLR cameras today, had to be purchased as individual plug in cards for this camera. I guess was kind of like VHS versus Betamax back in the day and as things developed in the market I guess Minolta put this idea back to bed as a non starter.
This camera looks in great condition apart from wear and tear dust/dirt and initial checks of the lens show no evidence of fungal damage, the camera does not have that musty smell associated with age so I can only presume it has been stored correctly.
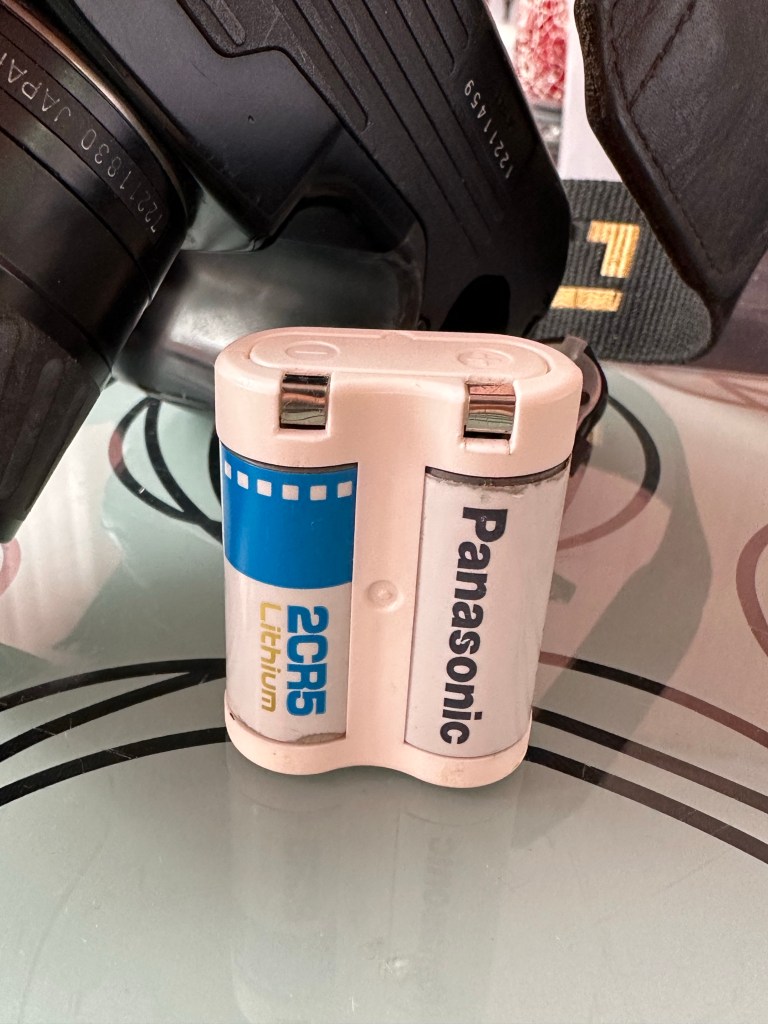
These cameras also work off a 6v lithium battery the 2CR5. Still available it retails for around £6-8 gbp. Again Minolta could have used a rechargeable but this was probably just at the beginning of that technology becoming widely available.
2CR5 6v Lithium battery
Information regarding this camera can be found here Minolta Dynax 5000i courtesy of Camerawiki.org
So, apparently these cameras are popular in the Lomography world. I’m going to give it a good clean/overhaul get a new battery and run a film through it to test. Not a lot to do so hopefully I’ll fit it in somewhere along the line soon. Keep checking back to see how things progress.
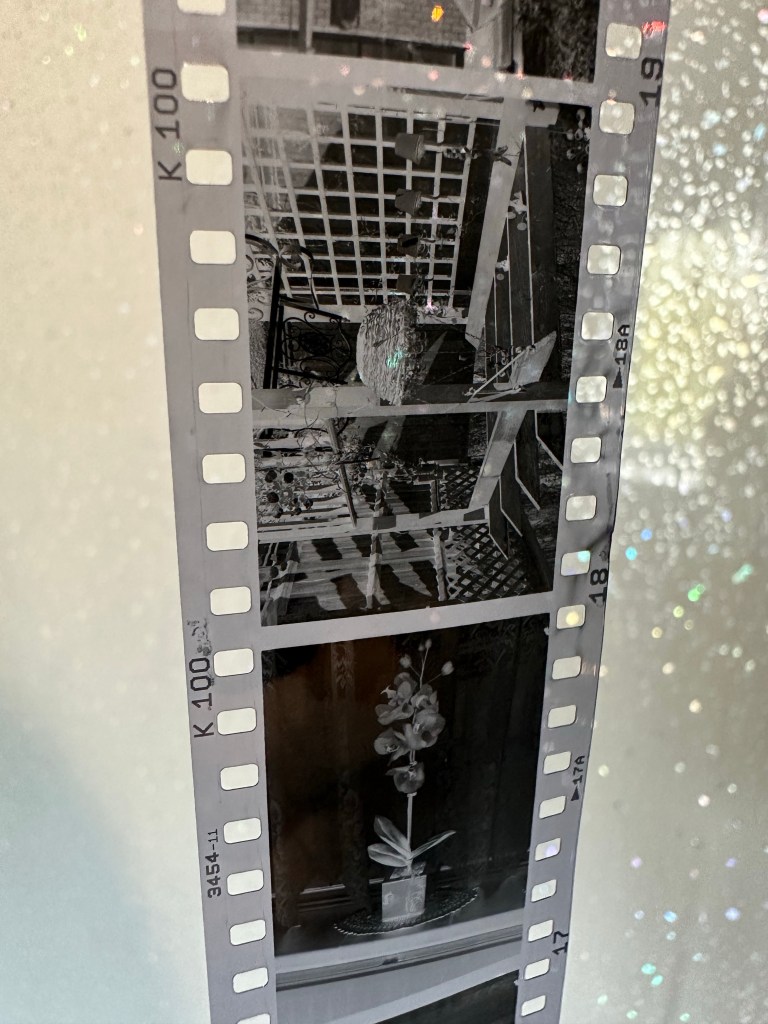
I have processed the roll of Kentmere 100 at home today, it’s currently drying in the shower and I’m really pleased with what I’ve seen so far. The carriage of the camera is working well with even spacing, exposures look promising and no sign of fogging proving the new light seals are good.
Kentmere 100 through Olympus 35ECRKentmere 100 through Olympus 35ECRCheck my gallery’s to see these results
I’m yet to run the negatives through the scanner, still waiting for them to dry but when they do I will post a gallery here. Gallery – Olympus 35 ECR trial roll
The camera in my eyes is now in good working condition, all that I did with it has proven beneficial and I’m adding this into my personal collection.
Olympus 35ECR now in storage
I’ve now packed it in a bag with all the air extracted and a couple of silica bags to stop any potential moisture. I do this to all the cameras I store for their protection and to save me having to go through the whole process of maintaining them again.
I’ve enjoyed this little project and am now happy to say….
Just an update of what’s going on with the old Halina TLR.
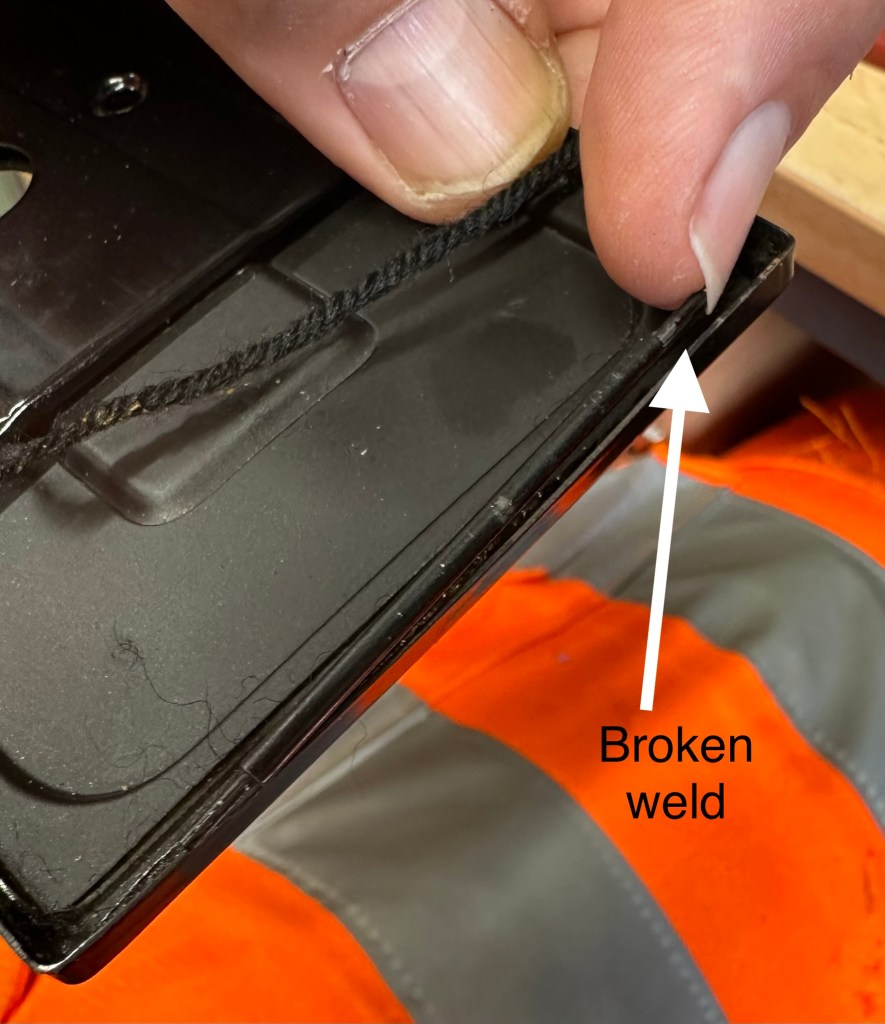
Today I have tinkered with the ground focus screen, and hood and related springs and hinges. the majority are fine but I’ve found a hinge on the rear door that has a broken weld on one side, I discovered this as I began to clean the old light seal around the back door prior to putting some fresh seal in place. I’ve stopped at seeing this as I am going to put a repair in place so as not to stress the other side of the hinge that seems to be holding. Another head scratching moment whilst I seek a solution.
Halina A1 Reflex broken door weld
The focus screen required me to remove a couple of 60 year old springs, this went well, they are ok and I’ve cleaned them as well. The ground glass screen has been cleaned as well as all surrounding metalwork and hinges and all looks good. All went back together with no real issues.
Just preparing for cutting the new leatherette for the camera, today I have just made some templates and measurements for the eight pieces that need to be cut for this camera.
Halina A1 Reflex new skin templates
Stage one of ridding the case of the dank musky smell has begun today. It’s sitting in the sunniest place I can find on a shelf at work, and in a week or so I will be placing it in an airtight bag with some silica gel packets and some suggested fragrance for a further couple of weeks to see what happens.
Currently still awaiting the right time to open the lens up and start removal of that lens fungus.
I have used many brands of film processing chemicals over the years, mixing batches of over 500 litres right down to the smaller amounts used with Patterson tanks for home processing and that’s where I am today.
For the next few films I process at home I will be using a set of chemicals I’ve not really used before however I have heard some good things about them so I’m willing to give them a try. If it doesn’t work I can always default to my previous plan of using my old reliable setup I’ve used in the past.
Thinking of processing your own film? Check this link below at Digital truth to see process times for all kinds of films in all kinds of developers – it’s an incredible source of information for photographers of all abilities.
I batch mix my fixer a litre at a time as it stores well in collapsible bottles and I should be able to do a good few films and reuse the chemicals, you just need to monitor the time it takes for the fixer to clear the film as this indicates if it needs replacing or not. General rule of thumb is it should clear almost instantly on fresh chemicals, however give it at least 4 minutes to clear the film, and as the time increases to take between 8 – 10 minutes to achieve the same result, then it’s probably worth mixing a new batch. Disposal of spent chemicals should always be done responsibly following local guidelines.
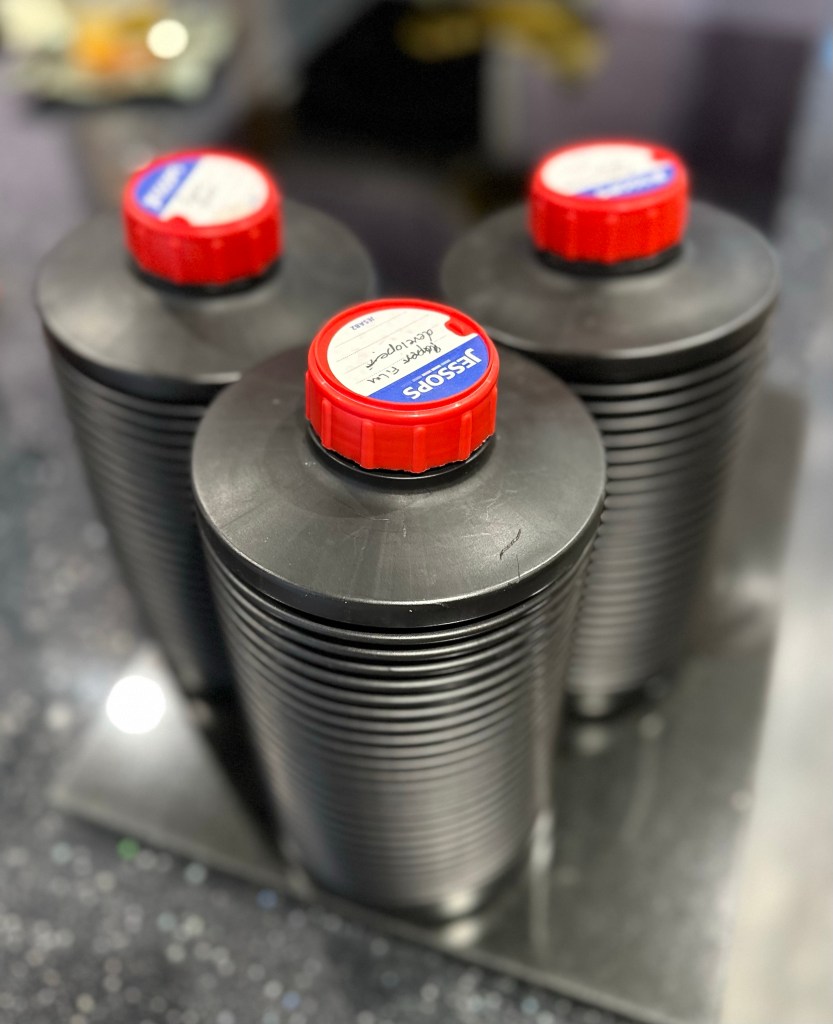
Collapsible film chemical bottles
I’m not too concerned if the new setup doesn’t get the desired results, I’m using some old film to test the old cameras I’ve fixed, so I’m happy to go back and reshoot some pictures if I have to, it’s a classic case of suck it and see.
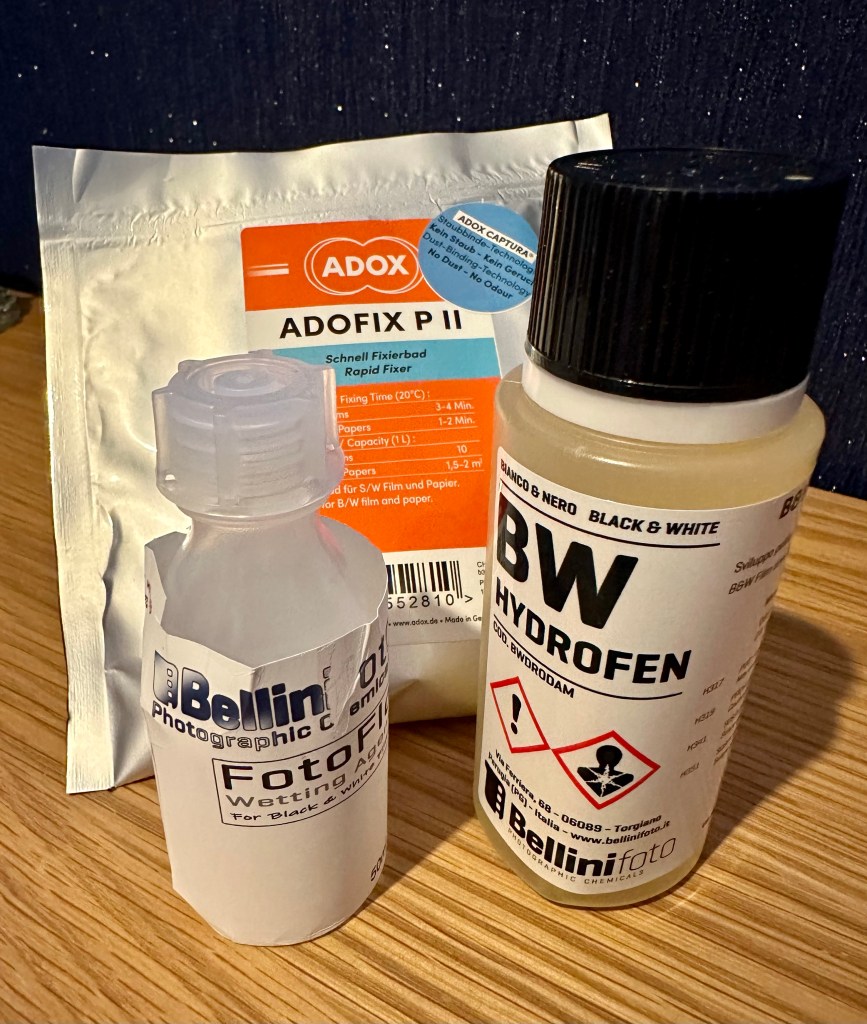
The developer I will be using is Bellini Hydrofen, (comparable to Kodak D76 or Ilford ID11) I mix this as and when needed in quantities of around 300ml (for a single 35mm film) as it doesn’t store, and needs to be used on the day as such. I don’t usually use a stop bath as such I just use some water. I will also be using their photo flow as a uniform drying solution but to be honest this isn’t really necessary.
New processing chemicals
The fixer I will be making in a 1L batch is Adox Adofix P, it’s a simple enough mix so I’ll quickly go through it with you.
Developer
Mix is 1-39 so if I need 300ml I just divide that figure by 40 (300 / 40 = 7.5) so I know I need 7.5ml of solution and then just top up to 300ml with water in the measuring jug. Simple – that’s the developer made. Just ensure it’s at 20 degrees centigrade temperature wise.
Stop bath
Simple, just water – let’s move on
Fixer
Again this is easy. I have a pouch of powder to make 1L of solution. Put approx 700ml of water at a temperature between 20-26 degrees Celsius in your measuring jug, mix in the powder and when this has dissolved just top up with water to the 1L mark. Simple – then decant into your storage bottle and the job is done.
So that’s the chemistry done, now to put it all into action to process the first film I have used to test a recent camera I have worked on. The camera is the Olympus 35 ECR and the film will be a roll of Kentmere 100 B/W that expired about 4 years ago. I will cover this in a later post. Thanks for browsing my ramblings 👍
The little Olympus I’ve been working on is now ready to be tested. It’s all working as well as I can see and has new battery adaptors and a new light seal around the camera. Has been cleaned as best as I can however now is the time to give it a proper run out. I have a roll of Kentmere 100asa B/W film that expired about 3-4 years ago so hopefully I’ll get something from this barring disaster.
Sunbury on Thames
Going to be in Sunbury on Thames for a few days so I’m hoping I can get some nice pictures of the Thames and surrounding areas.
When I get back I’ll develop the film at home and scan it myself for results. Fingers crossed 🤞 it all performs ok, if not then it’s back to the drawing board.


You must be logged in to post a comment.