A little explanation of the differences between the light sensors of two vintage point and shoot cameras produced 12 years apart
I’ve recently purchased two old point and shoot cameras as a lot. One was from 1960 and the other one was from 1972 only 12 years apart, but a world away in technology regarding light sensing ability and technology.
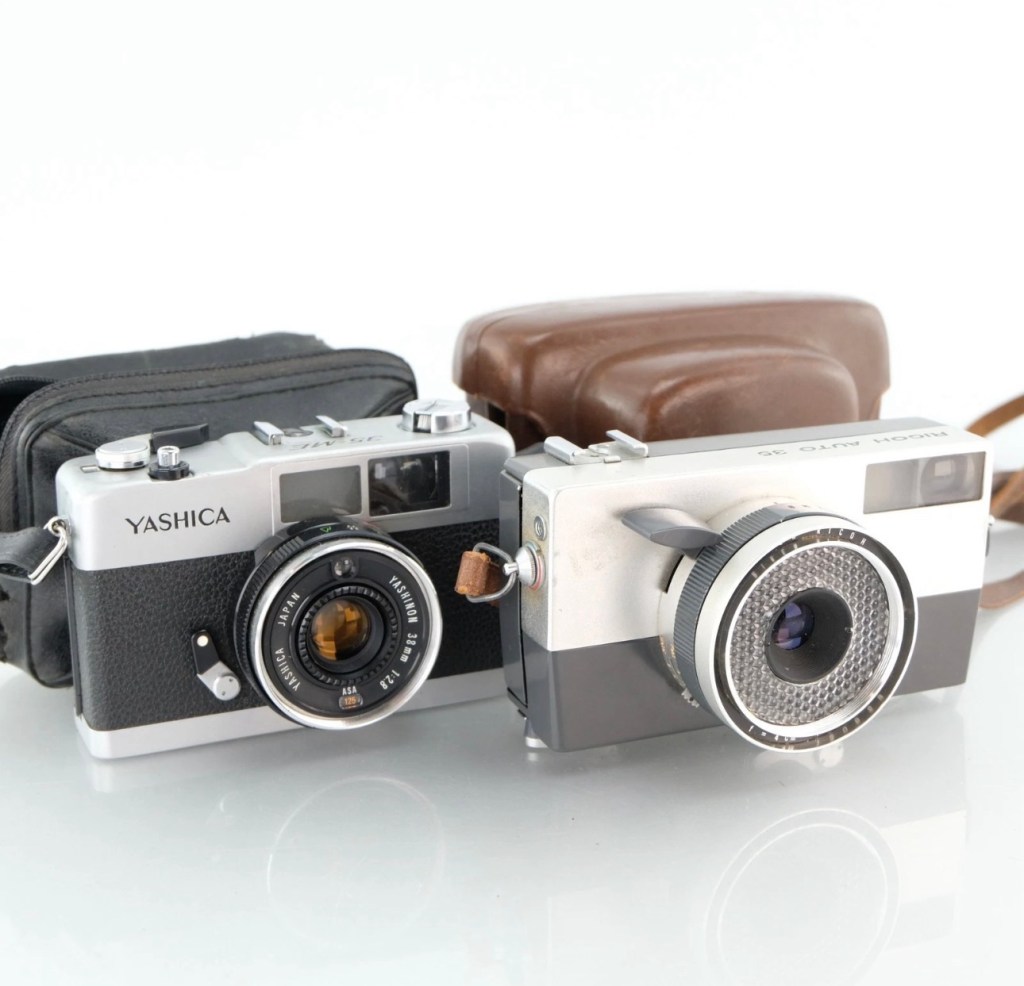
Yashica 35 ME & Ricoh Auto 35
These two cameras only cost me £4:99 In total, they were sold as spare parts, and I suspect the issues could be around the light metering, as to be honest there isn’t a great deal else that could go wrong with them. Here’s a quick breakdown of the metering methods on each camera, followed by a more complex explanation around just what each method of metering involves.
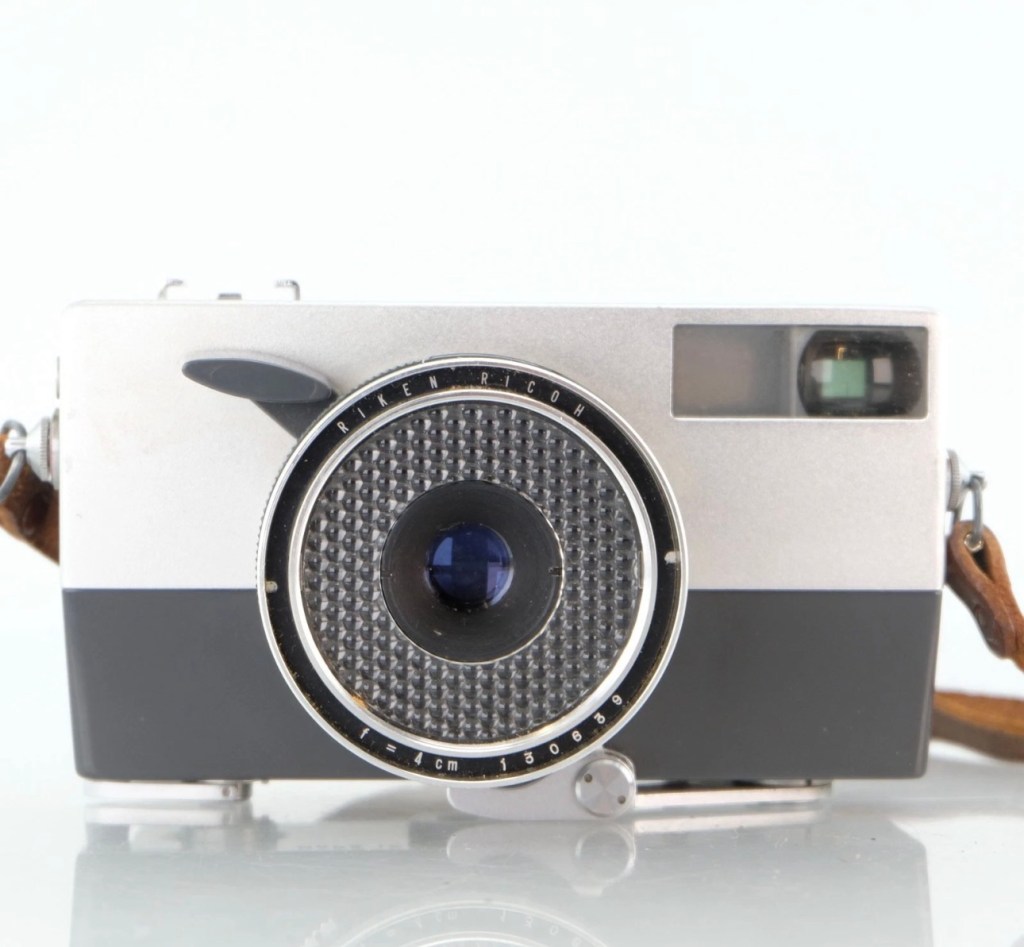
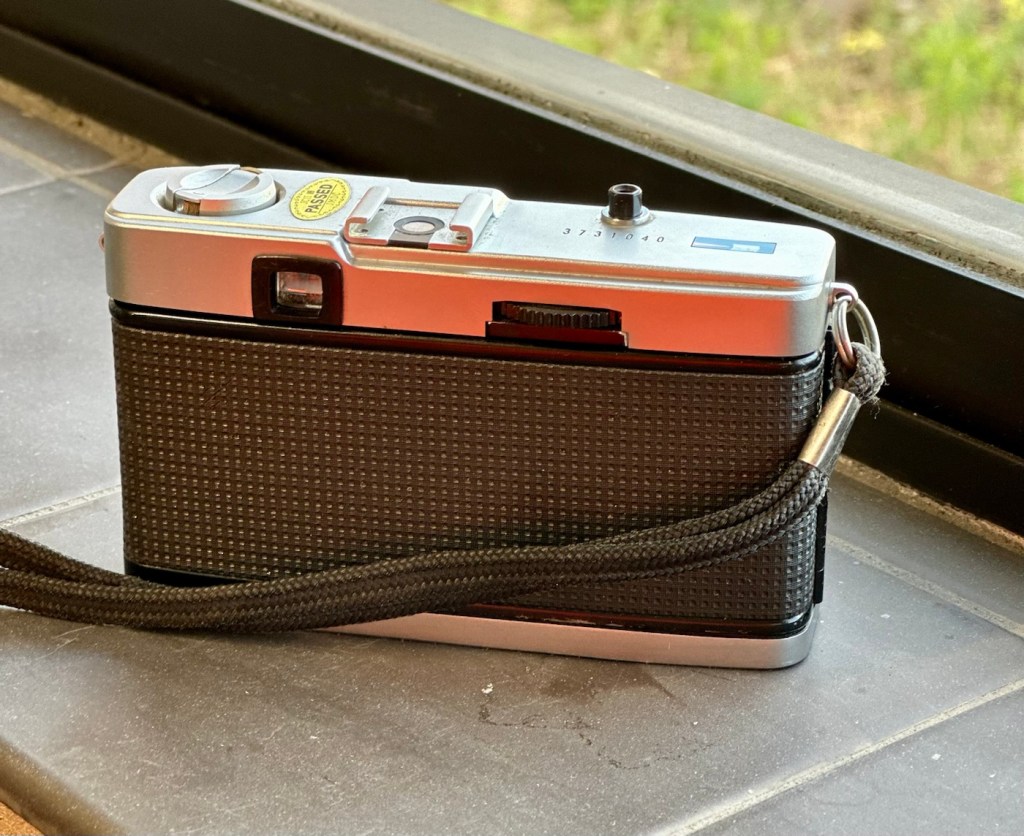
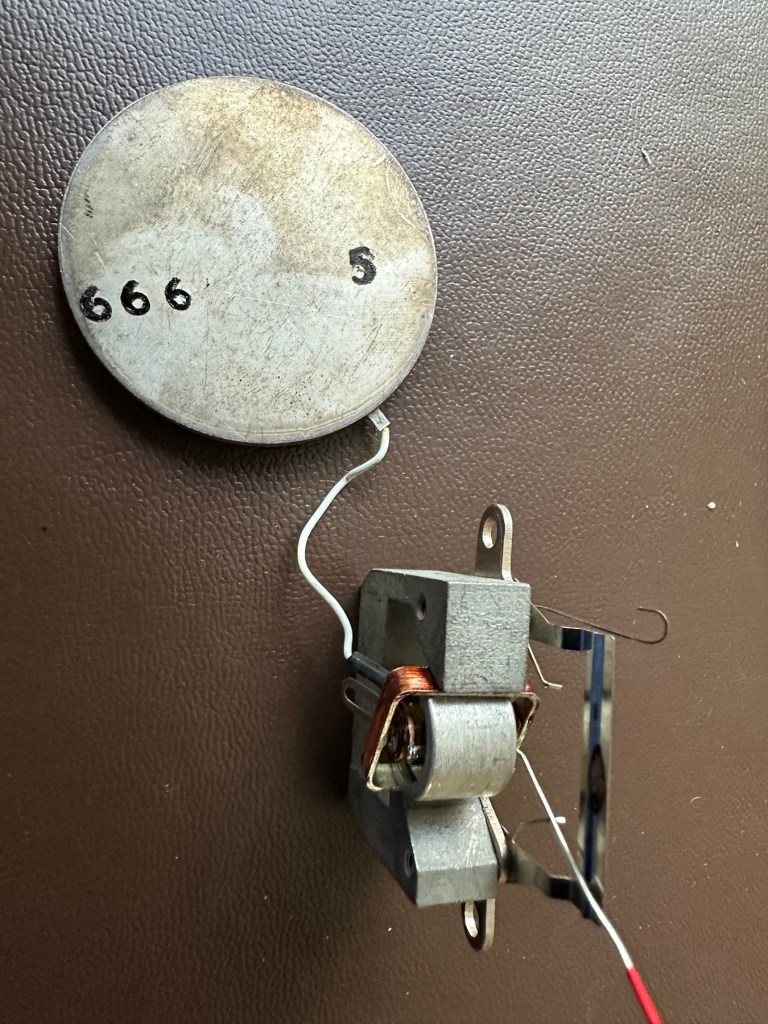
Ricoh Auto 35 – Circa 1960
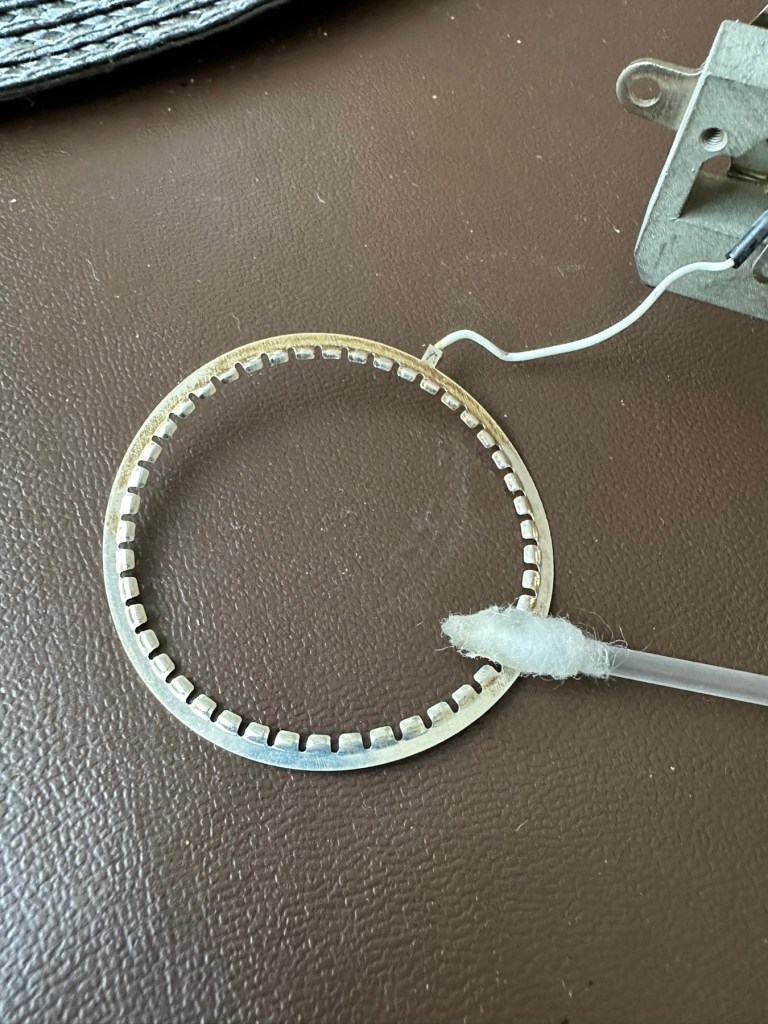
The older camera, the Ricoh, dates from 1960 and just by looking at it, you can see its light sensing system is built around the face of the lens barrel, it’s that glass honeycomb concoction that is so typical of a number of cameras and light meters of this period. Here is a post I previously made regarding Selenium light meters – (Sangamo Weston Master V light meter) The meters were known as selenium meters, there was no electrical components such as batteries, it was a little bit of scientific magic, here we go with a little explanation….
How the Selenium Cell Works in This Camera:
A selenium light cell operates on the photovoltaic effect (similar principle to modern solar panels):
The cell contains a thin layer of selenium coated onto a metal base. A very thin transparent conductive layer (often gold or another metal) is placed on top. When light hits the selenium, it generates a small electrical current. That current directly drives a tiny moving-coil meter needle.
The honeycomb ring is the selenium cell, light hitting it generates a small electrical current of approximately 0.5v. That current directly moves a needle inside the camera, the needle mechanically links to the exposure system. On the Auto 35, the meter is coupled to the shutter/aperture system, meaning that in “Auto” mode, it helps set exposure automatically. In manual mode, you match the indicator.
No battery is used — it is entirely self-powered by light.
Expected life span:
The Ricoh’s selenium cell is now about 60+ years old, so condition varies.
Typical selenium lifespan:
Originally: ~20–30 years
Many survive 40+ years
After 60 years: often weak or dead, this one probably is
Common Conditions Today:
✅ Still accurate (rare but possible)
⚠️ Works but underexposes 1–2 stops
❌ Needle barely moves or is dead
They usually fade gradually rather than fail suddenly.
So that gives an idea of how 1960s light metering works, and to be quite honest it probably means that as this camera is now over 60 years old the metering cell is long dead. It does not mean the camera is useless though, it can be used manually using a third party light meter or you can always use the “Sunny 16” rule.
Yashica 35 ME – Circa 1972
Now moving on 12 years to 1972 and the selenium meters have now gone only to be replaced by the CdS system- Cadmium Sulfide sensor, otherwise known as an electrical photocell. The sensor can be seen at the top of the lens ring, a little glass bubble. The downside with these sensors are that they contained Cadmium which is a toxin, replacements are no longer available so modern cameras use photo diodes instead. Here’s the explanation of CdS technology:
Unlike selenium (which generates electricity), CdS works by changing resistance:
In bright light → resistance drops
In dim light → resistance rises
The camera contains:
A CdS photoresistor, A battery, A small electronic circuit, A meter or automatic exposure mechanism
The battery sends current through the CdS cell.
Light changes the resistance, which changes the current.
That signal controls the exposure system, and a 1.3v battery cell is required to power the meter.
Why CdS Was an Improvement:
Compared to selenium cells, the CdS photocell was much better in low light, it was smaller, more accurate and required a battery that could be replaced to extend life whereas the selenium cell in time would naturally just die away.
CdS cells generally last a very long time — often decades — and usually outlast selenium meters.
Hopefully this gives an explanation regarding the two types of metering sensors that were present between the 60s and 70s. It is always worth considering when purchasing such cameras that the light meters may not, and will probably never work again, the camera itself is probably fine, you’ll just have to find other ways to ensure your lighting conditions are sufficient, and that really is no big issue, it’s easy and second nature to most camera users. As stated earlier just use the “Sunny 16” rule. Just enjoy your photography, experimentation is half the fun.
Reviews on these cameras will be following soon.
Thank you for passing by, it’s always appreciated.
This lot is being sold for PARTS / REPAIRS, it is currently NOT in a working condition
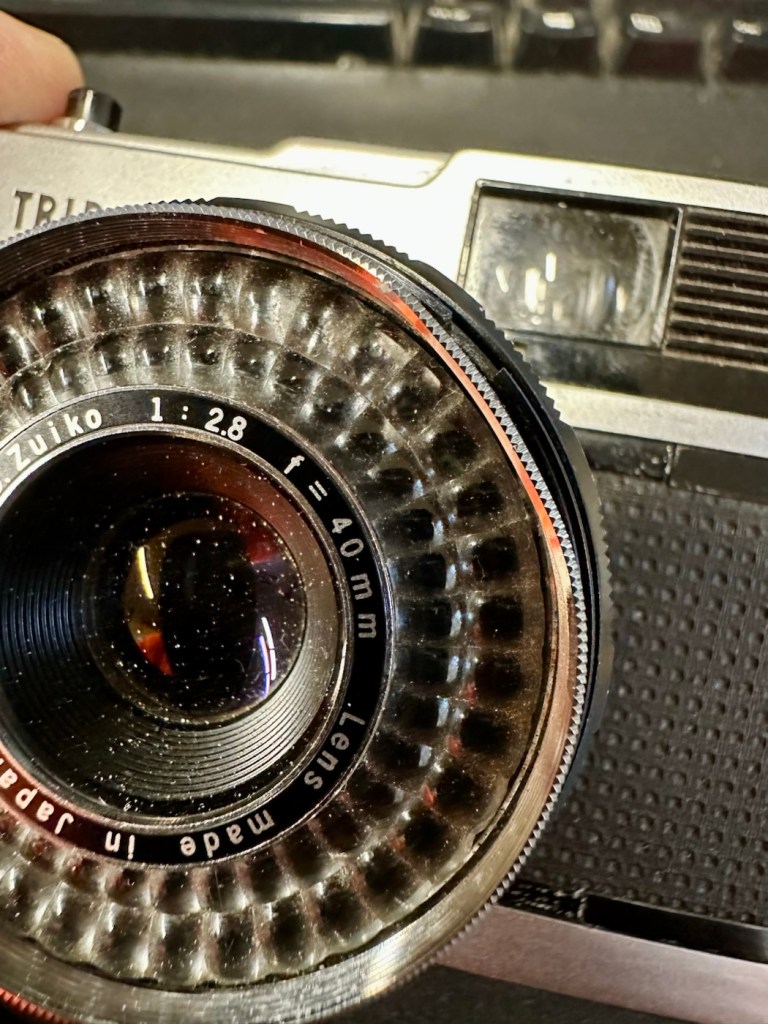
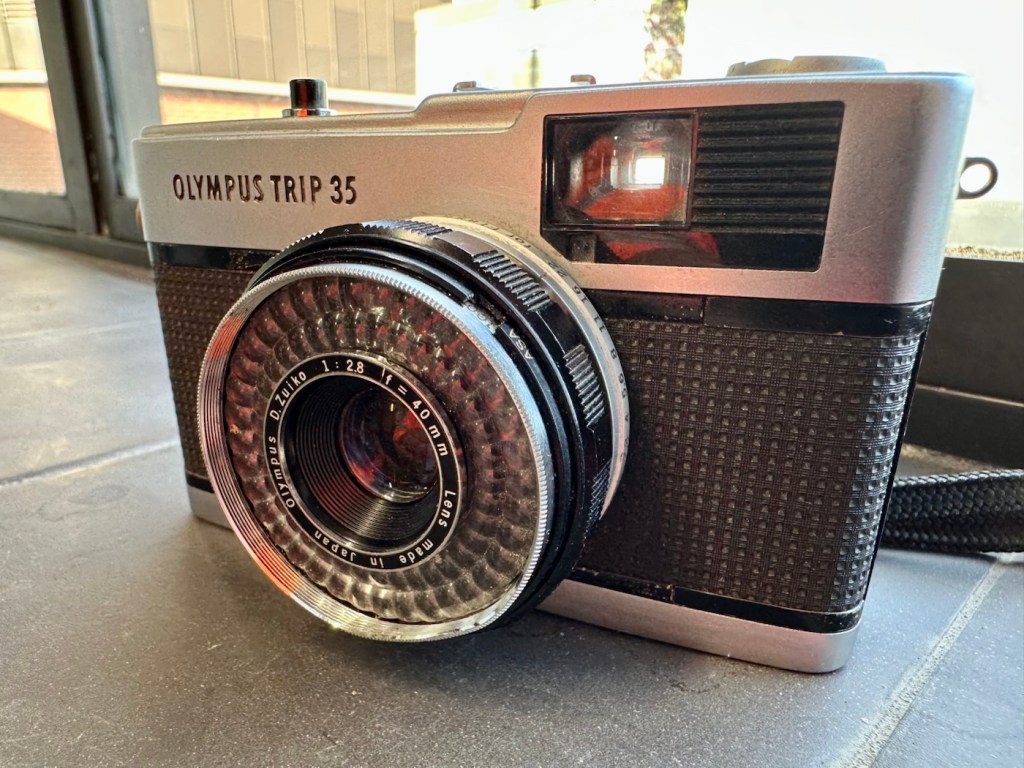
Olympus Trip 35 w/ D. Zuiko 40mm F/2.8 Lens & Original Lens Cap
EBay
Olympus trip 35
I brought this item along with a Canon A1 as a job lot. The full detail of what was in the auction and how it progressed can be found here: Not the lottery, but for me – just as good
The page regarding the repair of the A1 can be found here: (Still in draft – coming soon)
Meanwhile here is a little history about the Olympus trip:
The Olympus Trip 35 is a 35mmcompact camera, manufactured by Olympus. It was introduced in 1967 and discontinued, after a lengthy production run, in 1984. The Trip name is a reference to its intended market—people who wanted a compact, functional camera for holidays. During the 1970s, it was the subject of an advertising campaign that featured popular British photographer David Bailey. Over ten million units were sold.
The Trip 35 was a point and shoot model with a 40 mm ƒ/2.8 lens, solar-powered selenium light meter, and just two shutter speeds. In ‘A’ mode, the camera operates as a Program automatic, choosing either 1/40 s or 1/200 s. The camera could also sync with flash, and has a range of aperture settings, from ƒ/2.8 to ƒ/22. In flash sync mode, the shutter is set at 1/40 s. Apart from a simple four-position zone focus system, and an ISO setting from 25 to 400,[2]the camera has no other photographic controls. The camera has a Prontor-Compur sync connector and a hot shoe. Its lens was a coated Zuiko 40 mm ƒ/2.8, with four elements in three groups.
The camera has an ISO range of 25–400, as films faster than 400 were uncommon at the time and delivered reduced image quality. 25 speed allowed the use of Kodachrome, while 400 speed allowed use of Kodak Tri-X and similar fast materials under low light. Earlier models, from the first few years of production, have a maximum ISO speed of 200.
The use of a selenium photocell to select the shutter speeds and aperture let novices use the camera as a “point & shoot”. No batteries are needed to power the camera.
The lack of more than two shutter speeds was not a problem. At 1/200 s and ƒ/22 with 400-speed film, the camera could deliver correct exposure in full sunlight, while at 1/40 s and ƒ/2.8, correct exposure could be obtained under bright fluorescent light, without a flash.
Wikipedia
And who could ever forget the series of star studded television adverts, featuring the photographer David Bailey, put together to promote this camera.
David Bailey
I never really got to use one, I admired one from a distance instead. My brother in law, Jim had one around about the mid to late 70s and he took some fantastic snaps with it. I wasn’t into photography at that time as I was still more interested in LEGO and Tonka trucks. However he did let me try it a couple of times, it really was that easy to use.
I’m not really sure what the problem is with this one, as the listing was not really clear on its issues. I just really wish sellers would just take a few seconds to describe the problems, it really could be an instant decision for the buyer – is it repairable or not? I’ll just have to wait until it’s arrived, and then i can do an assessment of its condition.
Assessment:
Well, it’s arrived and cosmetically it looks fine. However, zoom in a tad and the issues become apparent. It’s been dropped at some time, the lens has a little bit of wobble and you can see the outer ring of the lens has an obvious dent in it.
Drop damage
It does wind so that’s a bonus. The exposure button works and it clicks as it should, and the old selenium exposure meter appears to be responding, the red flag appears in low light and thus the exposure button will not depress. This is good.
Exposure indicator in viewfinder
When you half press the exposure button you would expect to see the relevant shutter leaf aperture close down, to the corresponding f- stop reading, this occasionally happens. If you move the lens barrel slightly it does have an effect, but it looks as if there is also some contamination on one of the shutter leafs, all of this is probably as a result of that tumble that has occurred sometime in the past.
Obvious lens wobble
I will definitely have to remove the whole lens housing from the camera to see if I can do anything regarding that wobble. This is going to be quite some task, and I’m not confident I will succeed, but who knows.
Let’s attempt to get inside.
Repair:
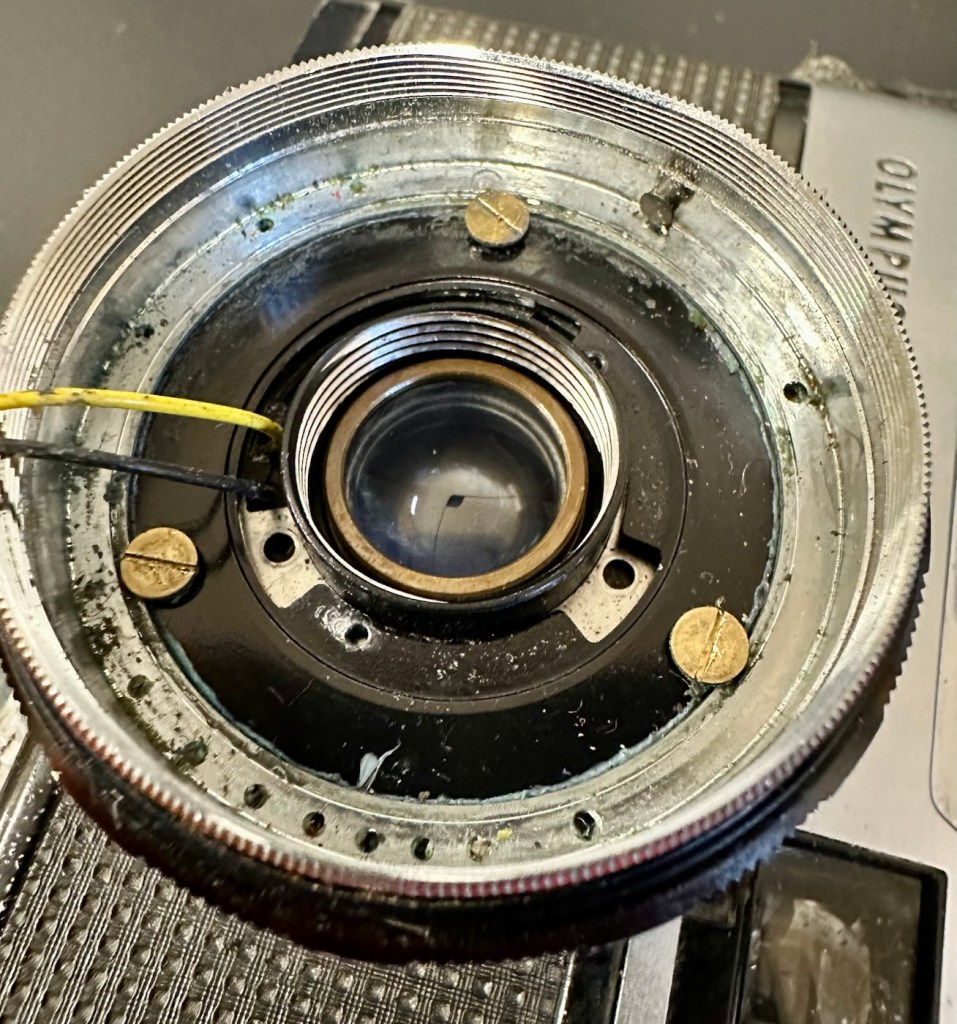
To get into the lens there are three tiny screws on the inner turret bezel that have to be removed that sit around the edge of it. This then pulls out and the lens optics can then be unscrewed.
Here are then two more screws that allow you to remove the selenium light sensor. Below this are three brass screws that hold the body to the lens. One of these screws were loose, hence the wobbly lens, this must have occurred when it was dropped.
Removing the sensorThe three brass body screws
I’ve pretty much had a cleanup here, applied a tiny drop of camera grease to the ring mechanisms, and tightened all these screws, and now the turret is nice and tight. I’ve just given the shutter blades a wipe with a soft brush and that is all it really needs. I’ve reassessed the camera, and tested its operation and it’s all good, working just as expected.
Result:
The dent in the ring remains as it’s causing no issues and is a subtle reminder of its past. The lens issue and its movement has been repaired and this in turn has cured the issue with the sticky aperture blades.
I haven’t touched the inner workings in the top of the camera such as the light metering, as it’s working fine and what’s the point in fixing what’s not damaged?
All repaired and looking good
I’ve still to run a film through it, and this will be done shortly as I have quite a backlog of film cameras to be tested. As soon as I have photos available I will link through this posting.
Really pleased with how this has gone, a nice easy fix but I can’t believe just how small those screws are around the lens bezel. I need my eyes testing that’s for sure.
Thanks for passing by, as always it’s very much appreciated.
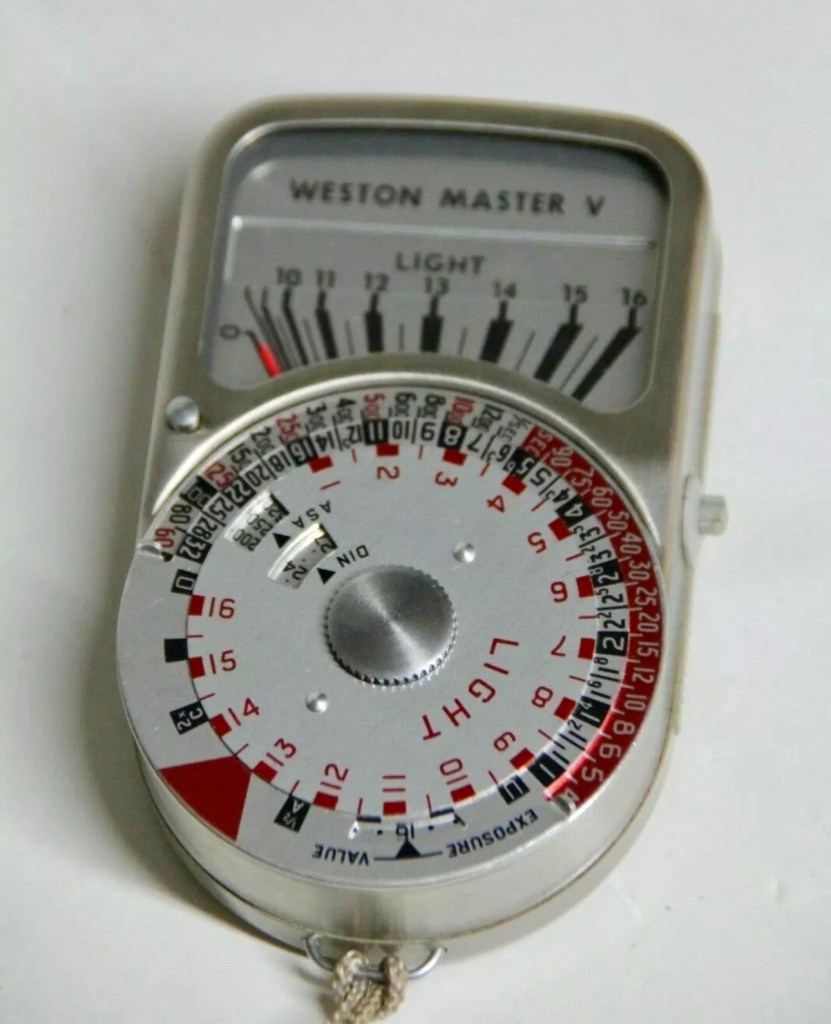
Sangamo Weston Master V Exposure Light Meter includes Invercone & Cases The exposure meter is not working The invercone will also fit the Weston IV
EBay
Weston V light meter and Invercone
I have brought a little item from my past history here, going way back to the days when you had to work out the light levels in photography for yourself. The exact date of this unit is unknown, however it was manufactured between 1963 and 1972. That’s two years prior to my birth and up to the age of when i was 7 years old. And I was using them when I went into photographic work approximately ten years later. These units were made to last and did their job well, hence their longevity. I’ve paid the total cost of £8:40GBP and that includes postage. I’m surprised to be honest as not only is it the light meter, but also an Invercone (I’ll explain later) and two cases. An absolute bargain in my eyes as the Invercone itself, in a case can sell for more than I’ve paid for the entire package today. Oh, and it doesn’t work and to be totally honest I don’t think I will be able to get it working ever again, as the suspected component fault is one of those little things that are only dealt with by specialist craftsmen. Add to that the problem of locating a replacement piece, as they are nigh on impossible to obtain, or in layman’s terms, as rare as hens teeth.
But I have read about people reviving these parts and I’m going to give that a try. If I’m unsuccessful it will be a nice piece to get mounted into one of those box frames as a historic photographic memento.
What is this part you’re referring to?
A light meters main purpose is to react to available light and direct the photographer toward making a decision regarding the settings for his camera. Things like ASA, shutter speed and f stop settings.
Therefore it needs something to sense the light. It’s not a solar panel, these were not invented back then, but it was a similar system and it was called a selenium light sensitive cell. When exposed to light, the cell generates a small electric current that deflects the needle of an ammeter coil within a strong magnetic field. The whole system is basically a Selenium cell, a resistor and the ammeter coil. The lightmeter is entirely dependent on the light sensitivity of the selenium cell for accuracy. Over many years the selenium cell ages and degrades to the point that it just stops working. It dies. Its main cause for demise is usually moisture getting into the workings and causing degradation at the contact points on the Selenium cell.
There are a number of posts/sites I have visited that claim you can revitalise these items, however I am sceptical at this. There seems to be only one person in the uk that seems to totally replace these items and that is a guy called Ian Partridge, who I believe charges around £90GBP for a repair and his site can be found Here. A fully working serviced unit can sell for up to £189:00GBP.
I’m not doing that. No way. I’m going to see if I can even get it slightly working, I’m never going to use it seriously again but I’d at least like to see the needle moving without causing any damage to its original design.
Is that the only potential issue?
No of course not. There is one other potential reason why it is not working and that is related to the ammeter coil, the axis on which the needle moves, sometimes it can become stuck, if this is the issue then happy days, the fix would be a lot easier. However this is me, and things are never that easy for me 😂
There is also a fine tuning screw on the rear that someone may have been a little bit too enthusiastic with, in the past.
And of course. The pointer lock on the side of the unit could have been simply left on. Now wouldn’t that be nice and easy?
So what’s this Invercone thing you’re going on about at the beginning?
It’s that weird shaped piece of plastic with a bit of metal on it, in the pictures above.. it assists greatly in incidental lighting conditions where there is a back lit scenario.
The inverted cone shape is designed so that as the meter is angled to the light source, the readings remain accurate which they would not do if it were a dome. And because backlight effects the exposure, a small part of the invercone sticks-out beyond the top of the meter case to pick any such light up.
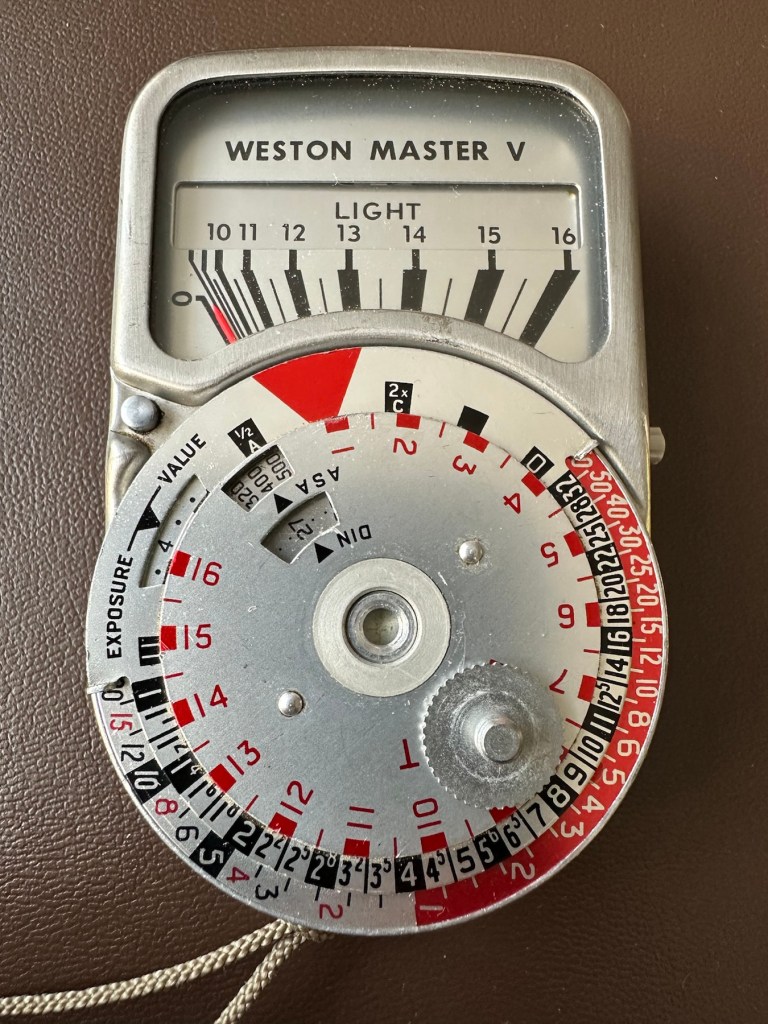
Sangamo Weston was a company that made light meters, among much other electrical equipment. It is particularly known for the Weston Master series of selenium meters.
The Weston Master V was produced in the UK from 1963 to 1972. It was Model S461 in the UK and Model 748 in the US
Weston was founded by chemist Edward Weston—no relation to the famous photographer—who held many patents for electrical inventions, from permanent magnets through cellulose manufacturing, dynamos, arc and filament lights and the magnetic-drag speedometer to electrical measurement instruments (and even US 895218 – a fruit box!). Weston’s son, Edward Faraday Weston, applied for a U.S. patent on the first Weston exposure meter, granted as No.2016469 in October 1935. This was a cylindrical case with an electrical meter at one end, and an iris at the other; an adjustable scale around the meter opened and closed the iris, and showed the exposure.
Sangamo was originally “Sangamo Electric Co.”, in Springfield, Illinois. It set up a British subsidiary in 1921. Sangamo acquired the Weston Electrical Instrument Co. in 1936.
Since Weston was one of the first makers of light meters, before film speeds were standardised, Weston had its own film speed scales.
At some point, Weston products were distributed by Ilford in the UK. The company was bought out by Schlumberger in 1976, but still exists, making electrical timers.
The EuroMaster light meter, very close to a Weston design, was later made by a company called Megatron.
For those who have made it this far, well done and thank you. Let’s have a look at what has arrived and assess the overall condition. It’s taken some time to arrive what with there being two recent bank holidays closely placed in proximity to each other in the calendar. Translated that means the UK comes to a halt during this period, whilst everyone gorges on poorly cooked barbecued food in bad weather whilst drinking too much alcohol.
And some of us are just working. Most annoying.
Anyway enough of the whining, here’s the assessment:
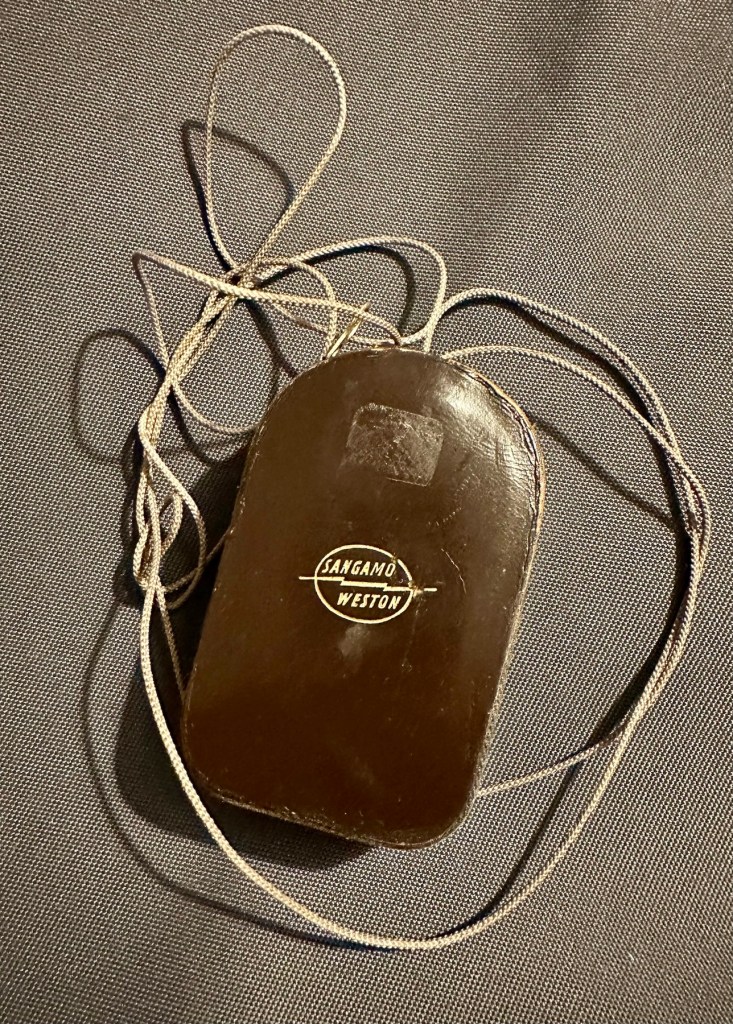
The meter has arrived and is in an excellent cosmetic condition, it came in a small leather case with a lengthy string neck strap. It’s all original and is still marked up with the original owners details on a small label. The Invercone is just what it is, a piece of shaped nylon/plastic and not much to rave on about. It is as it is, in good condition and also in a small leather case.
Original caseExcellent cosmetic condition
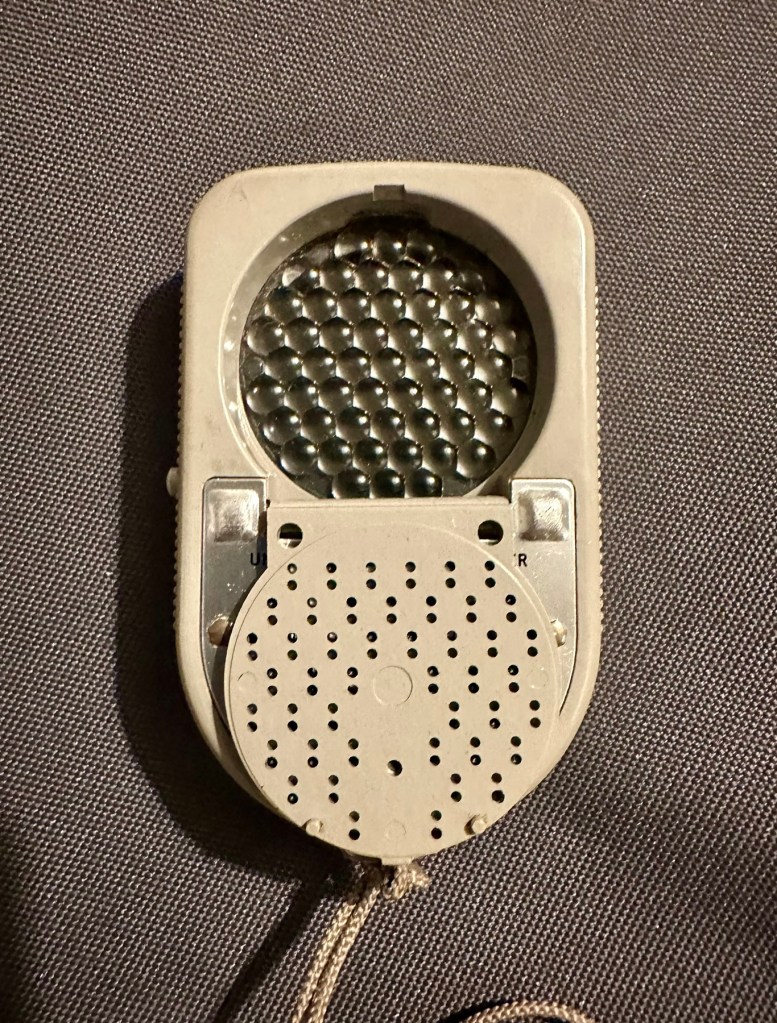
The calculator panel on the front is undamaged and in full working order, the light baffle on the rear is also operating as it should and the info panel under the viewing glass changes as the baffle is operated. The pointer lock is operating as is the fine tuning screw on the rear.
Baffle closedBaffle open
There is a very slight movement when exposed to intense sunlight with the baffle open or closed however it is only very slight. It struggles to move past the zero indicator on the scale, hence as described it is safe to say that it is not operating as it should. We will have to look inside to see if there are any obvious issues, however I strongly suspect it is related to the Selenium cell. I would like to see if we can get this operating, I’m not overly worried about its accuracy as I’d just like to see it move through its entire range. It would be good to see if it is at all possible to revive a “dead” light meter. We can only learn from dismantling and investigating such items.
Repair:
I’ve left the unit in sunlight for a few days, as this has been known in some rare cases to just kick start it back into life. That doesn’t seem to have worked in this case so let’s have a look inside.
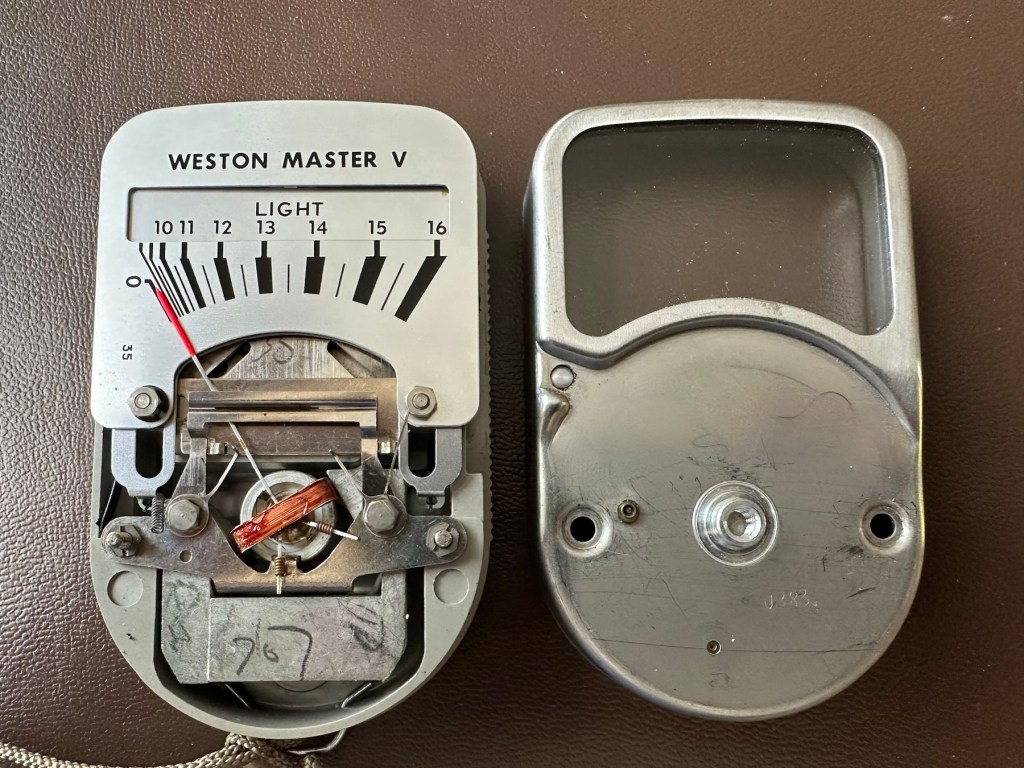
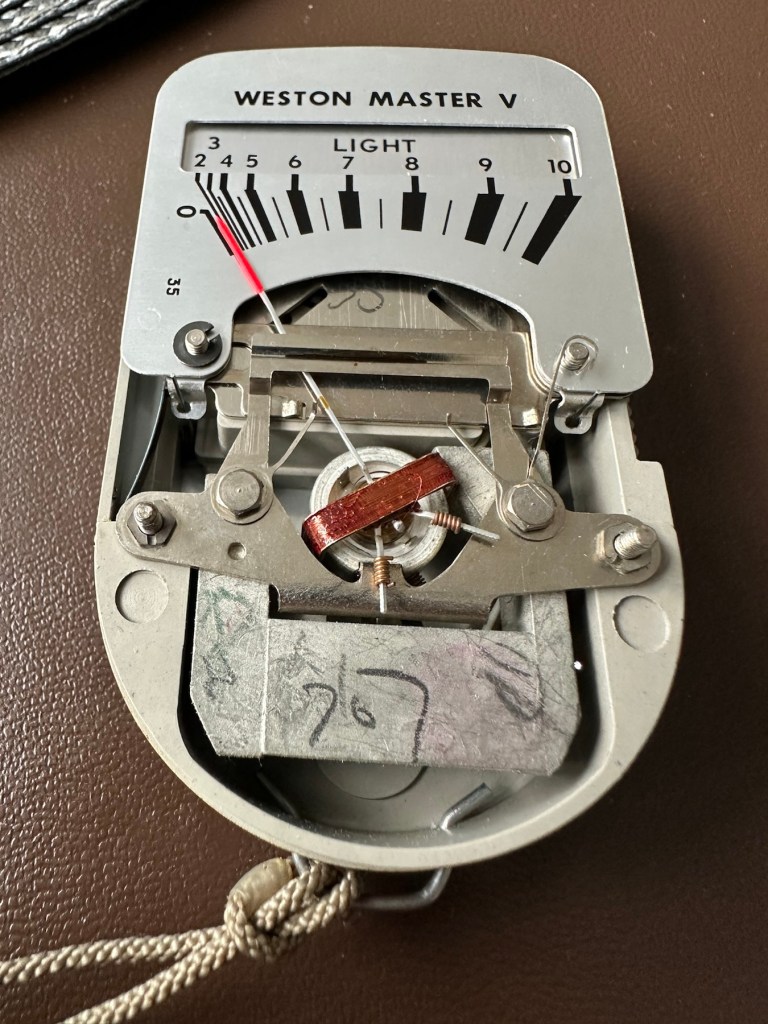
Remove securing thumb screwRemove two nuts Case lid lifts offCarefully remove fascia platesRemove sliding needle lift mechanism and expose selenium cellCell, armature ring and ammeter coil removedCell connecting ring cleanedCell contact ring, cleaned and renewed
The whole unit came apart quite easily to expose the selenium cell deep in its workings. Using a multimeter on the cell, indicated life in the item as values changed as the cell was moved from the dark into the light and vice versa so I am confident there is some life still present in this cell, but is it sufficient to power the meter? I have then used the lowest Ohms setting available and put the negative lead on the magnetic case (Ground) of the ammeter coil and the positive lead on the wire connected to it and there is no movement at all. This indicates to me that the ammeter coil is at fault and unresponsive to any voltage, I believe this is the problem and at this point the repair is not possible. I have cleaned the cell connecting ring to the point that it is now shining and free of any age related contamination. The contact ring on the cell itself I have revitalised with a metallic silver pen. I have checked continuity and that is also good and acceptable. One thing I did not see in this model was the use of a resistor that is used in most selenium cell light meters between the cell and the ammeter coil, maybe there was never one used within this range of meters, I’ll have to check that out. I have checked this out via numerous sources and it appears the Weston light meters never had a resistor placed in line at any point, so that has cleared that question up. This unit is dead due to a faulty ammeter coil.
Result:
The unit is cosmetically very good and I believe the actual selenium cell is functioning but at an exceptionally low level. The tests on the meter ammeter coil have come back negative indicating that there is no life in this part of the meter. I suspect the fine wires on the coil are possibly damaged. The only way I can get a working unit would probably be to obtain another faulty unit to transplant parts, I may well do that in a later post.
I hate not getting the fix done, however this unit is in excess of 50 years old and to be honest the odds were stacked against me from the start. I did state that I may actually mount this item in a frame as a photographic art piece, that may still happen but I’d love to prove the original cell is still functional if I can. Maybe I just might buy a donor unit to test my theory on.
I’ve learned a lot from this post on the repair and dismantling of these units so that is a big positive. Knowledge is always king as they say.
It will not go to landfill. It will be reused in some form, you may even yet see a follow up post regarding it.
Thanks for passing by, it is always very much appreciated.


You must be logged in to post a comment.