

What the listing stated:
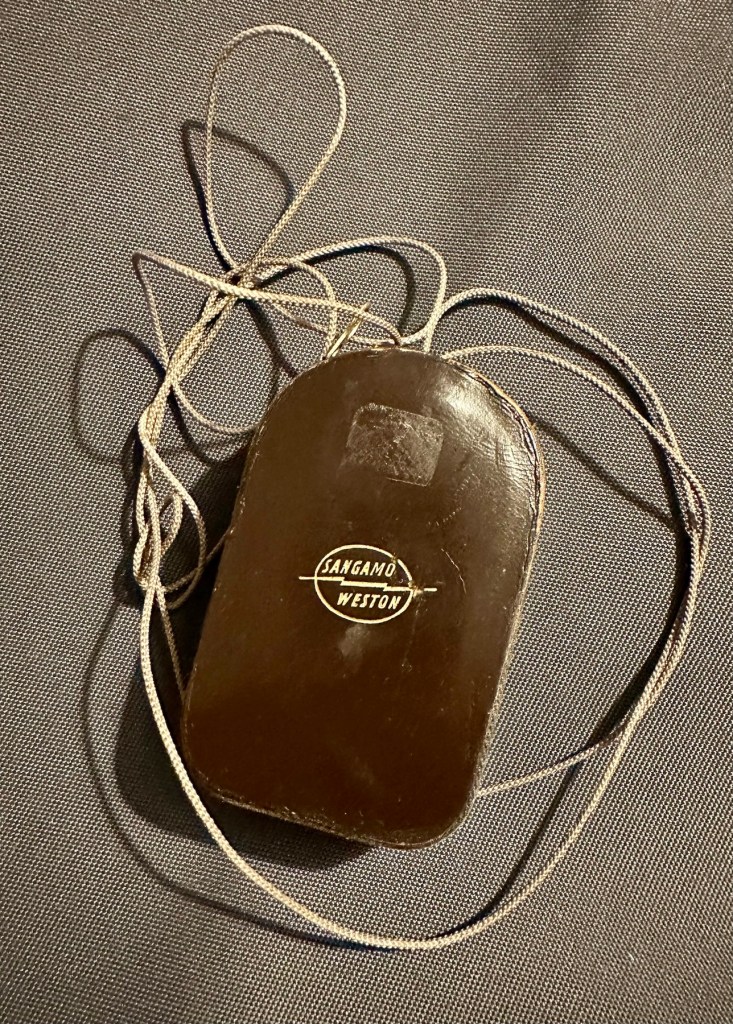
Sangamo Weston Master V Exposure Light Meter includes Invercone & Cases The exposure meter is not working The invercone will also fit the Weston IV
EBay


I have brought a little item from my past history here, going way back to the days when you had to work out the light levels in photography for yourself. The exact date of this unit is unknown, however it was manufactured between 1963 and 1972. That’s two years prior to my birth and up to the age of when i was 7 years old. And I was using them when I went into photographic work approximately ten years later. These units were made to last and did their job well, hence their longevity. I’ve paid the total cost of £8:40GBP and that includes postage. I’m surprised to be honest as not only is it the light meter, but also an Invercone (I’ll explain later) and two cases. An absolute bargain in my eyes as the Invercone itself, in a case can sell for more than I’ve paid for the entire package today. Oh, and it doesn’t work and to be totally honest I don’t think I will be able to get it working ever again, as the suspected component fault is one of those little things that are only dealt with by specialist craftsmen. Add to that the problem of locating a replacement piece, as they are nigh on impossible to obtain, or in layman’s terms, as rare as hens teeth.
But I have read about people reviving these parts and I’m going to give that a try. If I’m unsuccessful it will be a nice piece to get mounted into one of those box frames as a historic photographic memento.
What is this part you’re referring to?
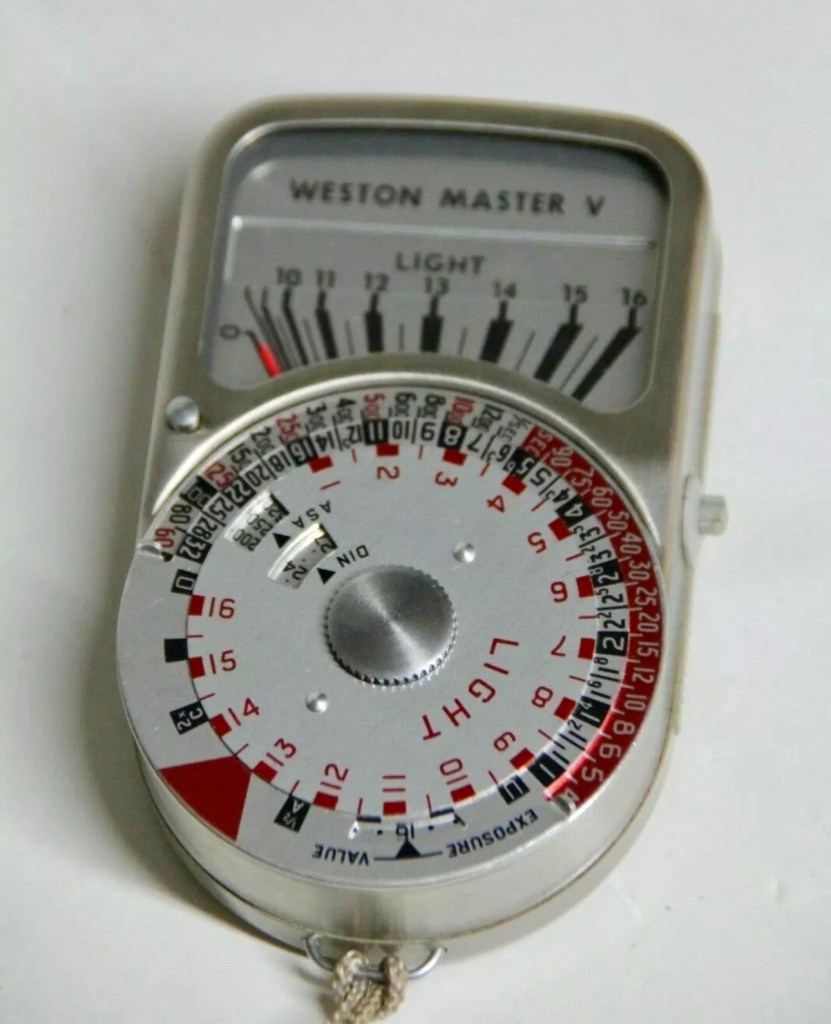
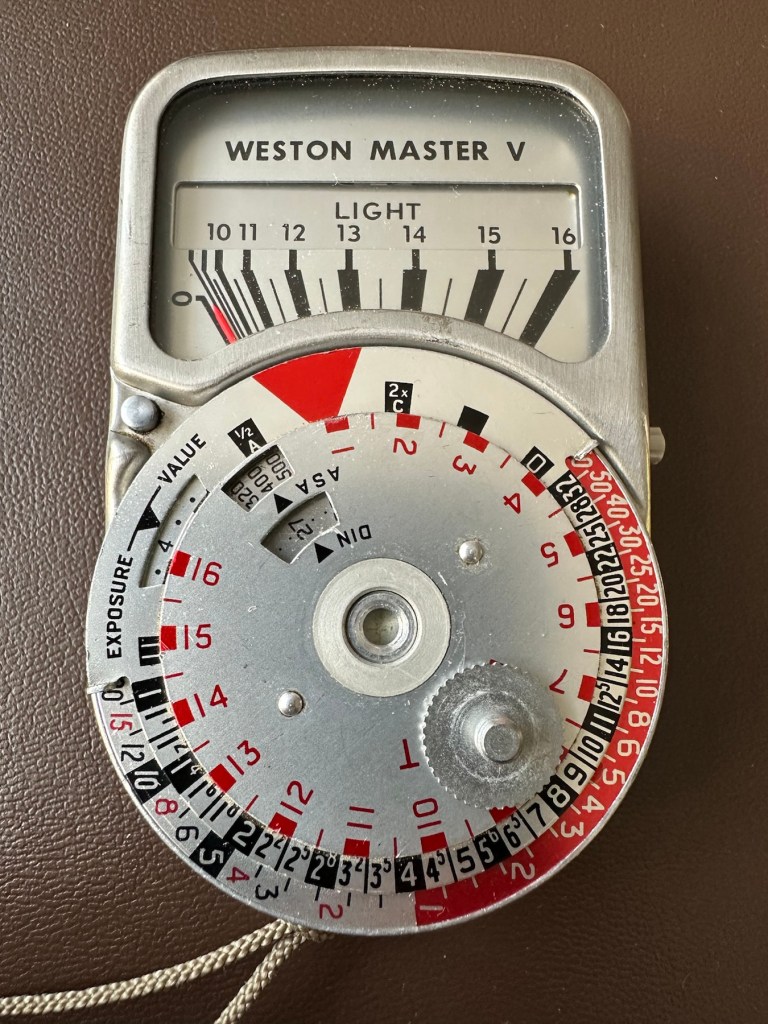
A light meters main purpose is to react to available light and direct the photographer toward making a decision regarding the settings for his camera. Things like ASA, shutter speed and f stop settings.
Therefore it needs something to sense the light. It’s not a solar panel, these were not invented back then, but it was a similar system and it was called a selenium light sensitive cell. When exposed to light, the cell generates a small electric current that deflects the needle of an ammeter coil within a strong magnetic field. The whole system is basically a Selenium cell, a resistor and the ammeter coil. The lightmeter is entirely dependent on the light sensitivity of the selenium cell for accuracy. Over many years the selenium cell ages and degrades to the point that it just stops working. It dies. Its main cause for demise is usually moisture getting into the workings and causing degradation at the contact points on the Selenium cell.
There are a number of posts/sites I have visited that claim you can revitalise these items, however I am sceptical at this. There seems to be only one person in the uk that seems to totally replace these items and that is a guy called Ian Partridge, who I believe charges around £90GBP for a repair and his site can be found Here. A fully working serviced unit can sell for up to £189:00GBP.
I’m not doing that. No way. I’m going to see if I can even get it slightly working, I’m never going to use it seriously again but I’d at least like to see the needle moving without causing any damage to its original design.
Is that the only potential issue?
No of course not. There is one other potential reason why it is not working and that is related to the ammeter coil, the axis on which the needle moves, sometimes it can become stuck, if this is the issue then happy days, the fix would be a lot easier. However this is me, and things are never that easy for me 😂
There is also a fine tuning screw on the rear that someone may have been a little bit too enthusiastic with, in the past.
And of course. The pointer lock on the side of the unit could have been simply left on. Now wouldn’t that be nice and easy?
So what’s this Invercone thing you’re going on about at the beginning?
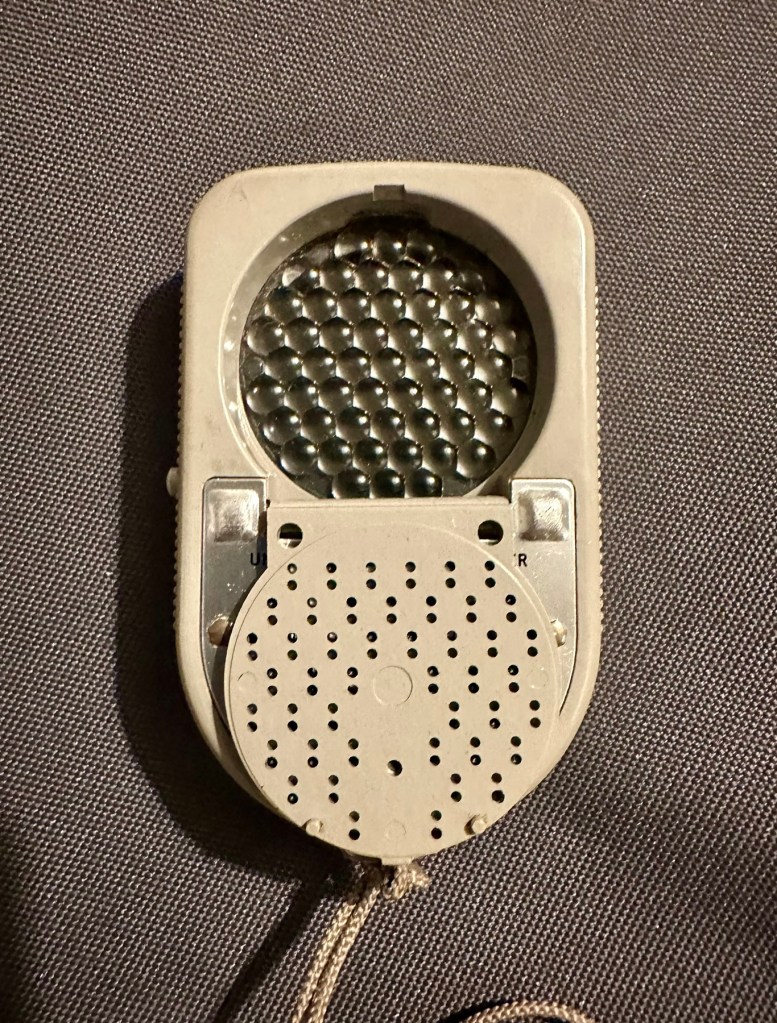
It’s that weird shaped piece of plastic with a bit of metal on it, in the pictures above.. it assists greatly in incidental lighting conditions where there is a back lit scenario.
The inverted cone shape is designed so that as the meter is angled to the light source, the readings remain accurate which they would not do if it were a dome. And because backlight effects the exposure, a small part of the invercone sticks-out beyond the top of the meter case to pick any such light up.
A little history lesson…
Sangamo Weston was a company that made light meters, among much other electrical equipment. It is particularly known for the Weston Master series of selenium meters.
The Weston Master V was produced in the UK from 1963 to 1972. It was Model S461 in the UK and Model 748 in the US
Weston was founded by chemist Edward Weston—no relation to the famous photographer—who held many patents for electrical inventions, from permanent magnets through cellulose manufacturing, dynamos, arc and filament lights and the magnetic-drag speedometer to electrical measurement instruments (and even US 895218 – a fruit box!). Weston’s son, Edward Faraday Weston, applied for a U.S. patent on the first Weston exposure meter, granted as No.2016469 in October 1935. This was a cylindrical case with an electrical meter at one end, and an iris at the other; an adjustable scale around the meter opened and closed the iris, and showed the exposure.
Sangamo was originally “Sangamo Electric Co.”, in Springfield, Illinois. It set up a British subsidiary in 1921. Sangamo acquired the Weston Electrical Instrument Co. in 1936.
Since Weston was one of the first makers of light meters, before film speeds were standardised, Weston had its own film speed scales.
At some point, Weston products were distributed by Ilford in the UK. The company was bought out by Schlumberger in 1976, but still exists, making electrical timers.
The EuroMaster light meter, very close to a Weston design, was later made by a company called Megatron.
Assessment:
For those who have made it this far, well done and thank you. Let’s have a look at what has arrived and assess the overall condition. It’s taken some time to arrive what with there being two recent bank holidays closely placed in proximity to each other in the calendar. Translated that means the UK comes to a halt during this period, whilst everyone gorges on poorly cooked barbecued food in bad weather whilst drinking too much alcohol.
And some of us are just working. Most annoying.
Anyway enough of the whining, here’s the assessment:
The meter has arrived and is in an excellent cosmetic condition, it came in a small leather case with a lengthy string neck strap. It’s all original and is still marked up with the original owners details on a small label. The Invercone is just what it is, a piece of shaped nylon/plastic and not much to rave on about. It is as it is, in good condition and also in a small leather case.

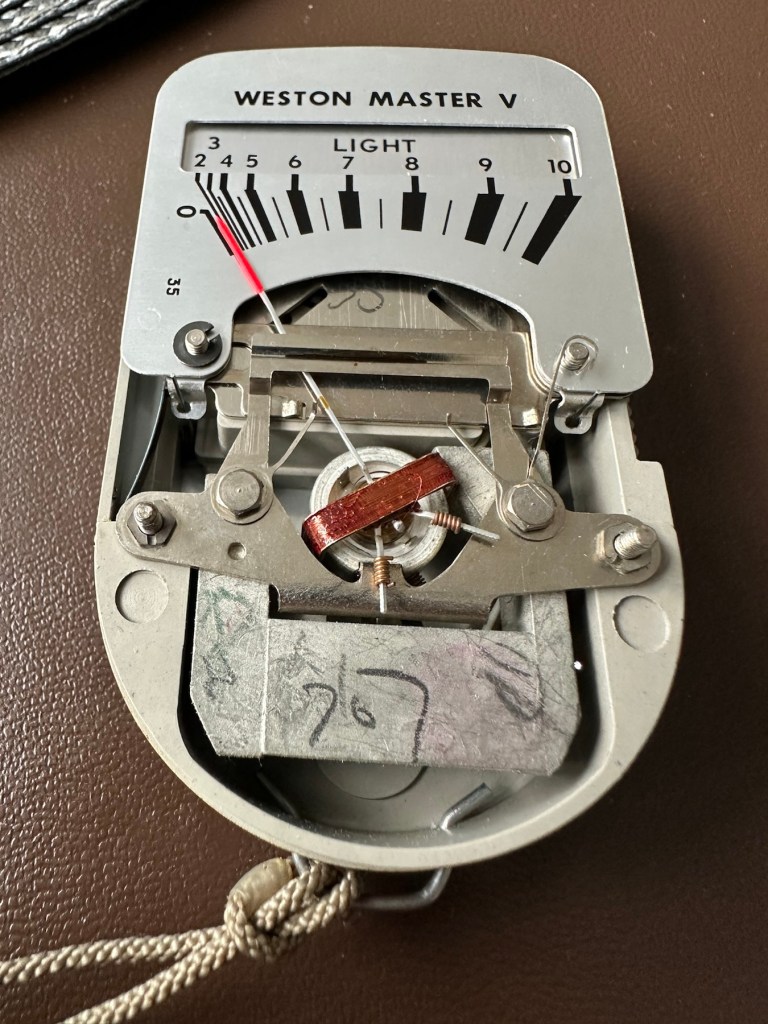
The calculator panel on the front is undamaged and in full working order, the light baffle on the rear is also operating as it should and the info panel under the viewing glass changes as the baffle is operated. The pointer lock is operating as is the fine tuning screw on the rear.

There is a very slight movement when exposed to intense sunlight with the baffle open or closed however it is only very slight. It struggles to move past the zero indicator on the scale, hence as described it is safe to say that it is not operating as it should. We will have to look inside to see if there are any obvious issues, however I strongly suspect it is related to the Selenium cell. I would like to see if we can get this operating, I’m not overly worried about its accuracy as I’d just like to see it move through its entire range. It would be good to see if it is at all possible to revive a “dead” light meter. We can only learn from dismantling and investigating such items.
Repair:
I’ve left the unit in sunlight for a few days, as this has been known in some rare cases to just kick start it back into life. That doesn’t seem to have worked in this case so let’s have a look inside.

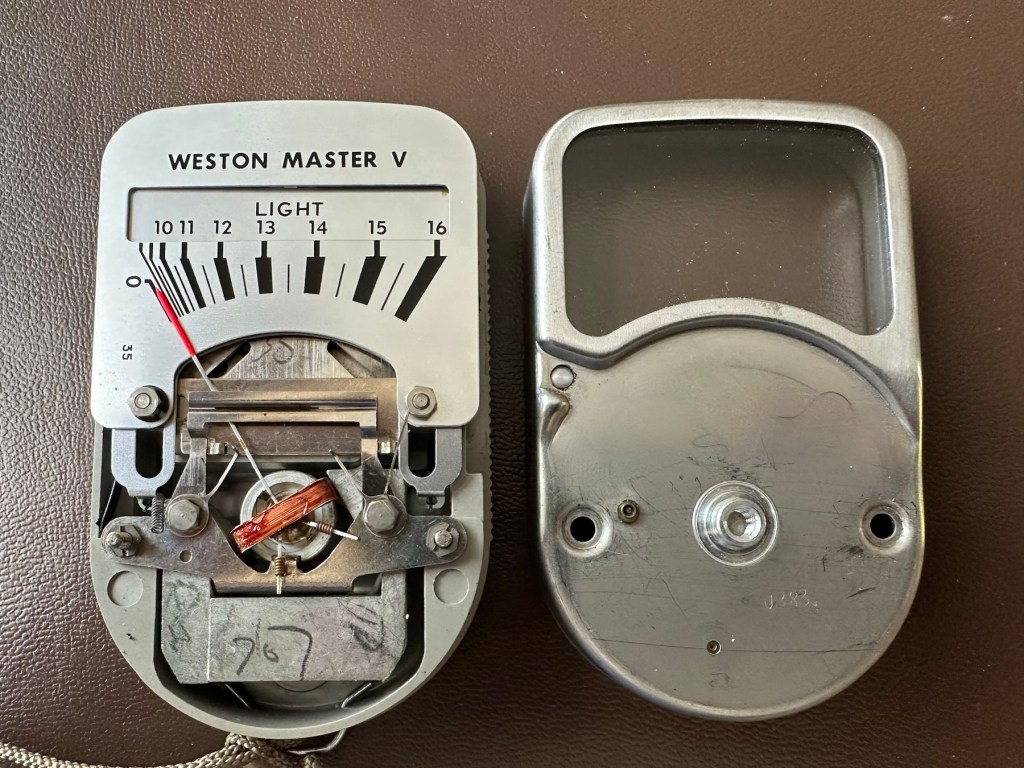


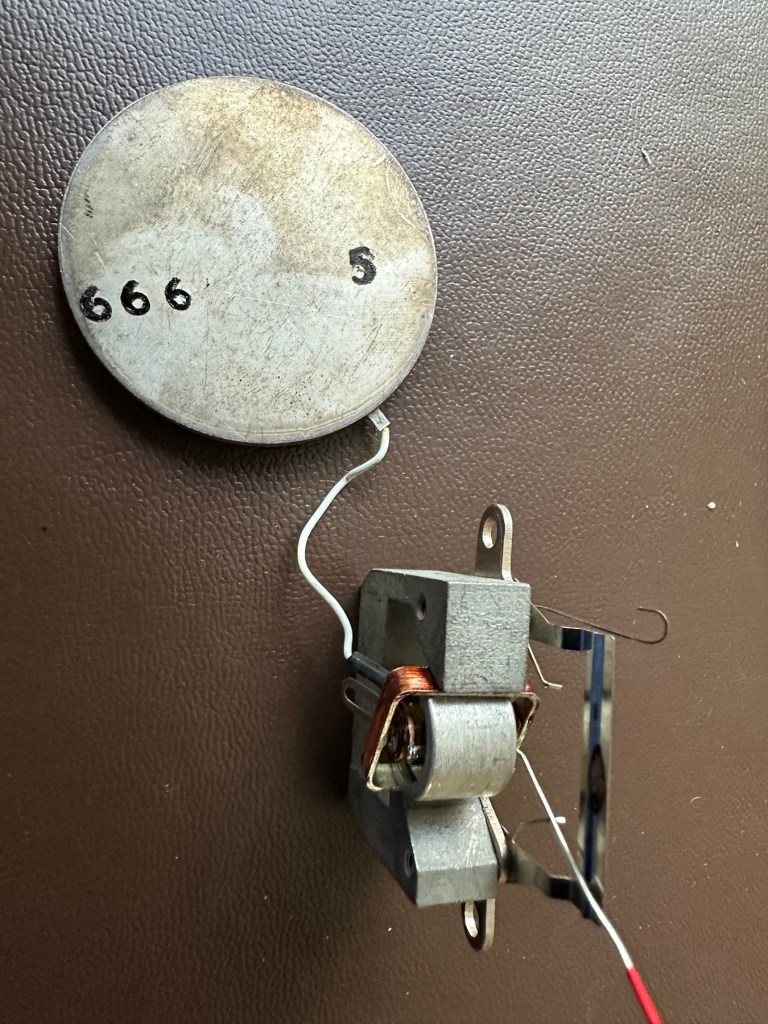

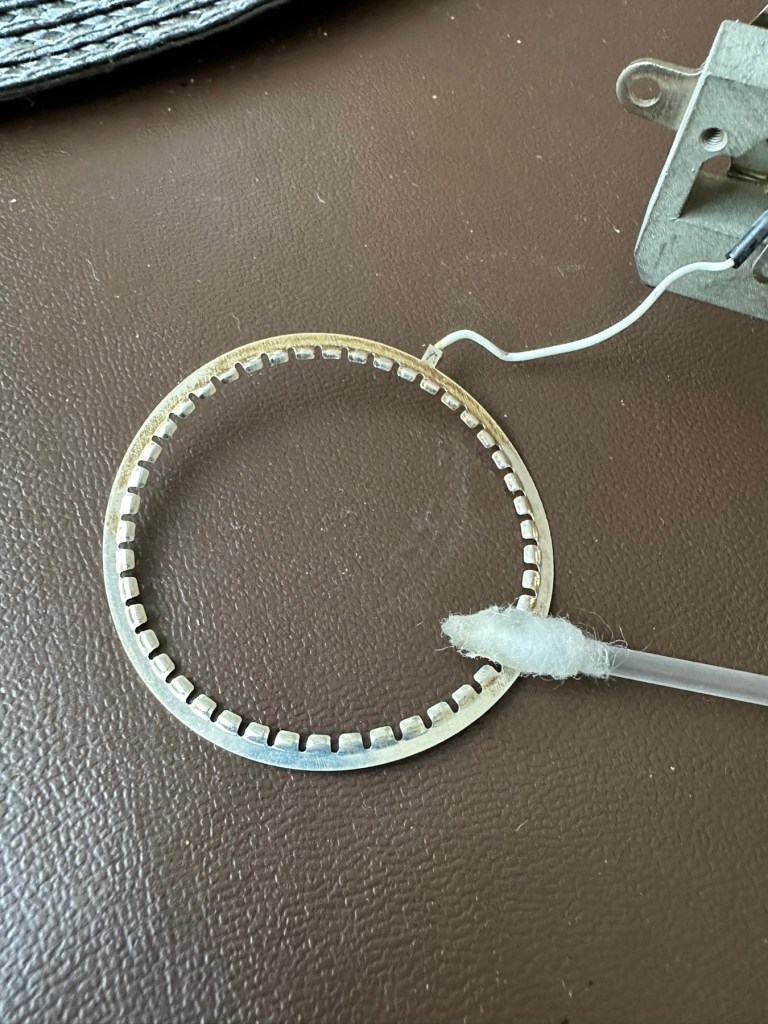

The whole unit came apart quite easily to expose the selenium cell deep in its workings. Using a multimeter on the cell, indicated life in the item as values changed as the cell was moved from the dark into the light and vice versa so I am confident there is some life still present in this cell, but is it sufficient to power the meter? I have then used the lowest Ohms setting available and put the negative lead on the magnetic case (Ground) of the ammeter coil and the positive lead on the wire connected to it and there is no movement at all. This indicates to me that the ammeter coil is at fault and unresponsive to any voltage, I believe this is the problem and at this point the repair is not possible. I have cleaned the cell connecting ring to the point that it is now shining and free of any age related contamination. The contact ring on the cell itself I have revitalised with a metallic silver pen. I have checked continuity and that is also good and acceptable. One thing I did not see in this model was the use of a resistor that is used in most selenium cell light meters between the cell and the ammeter coil, maybe there was never one used within this range of meters, I’ll have to check that out. I have checked this out via numerous sources and it appears the Weston light meters never had a resistor placed in line at any point, so that has cleared that question up. This unit is dead due to a faulty ammeter coil.
Result:
The unit is cosmetically very good and I believe the actual selenium cell is functioning but at an exceptionally low level. The tests on the meter ammeter coil have come back negative indicating that there is no life in this part of the meter. I suspect the fine wires on the coil are possibly damaged. The only way I can get a working unit would probably be to obtain another faulty unit to transplant parts, I may well do that in a later post.
I hate not getting the fix done, however this unit is in excess of 50 years old and to be honest the odds were stacked against me from the start. I did state that I may actually mount this item in a frame as a photographic art piece, that may still happen but I’d love to prove the original cell is still functional if I can. Maybe I just might buy a donor unit to test my theory on.
I’ve learned a lot from this post on the repair and dismantling of these units so that is a big positive. Knowledge is always king as they say.
It will not go to landfill. It will be reused in some form, you may even yet see a follow up post regarding it.
Thanks for passing by, it is always very much appreciated.


You must be logged in to post a comment.