Canon power winder “A”

A very corroded Canon power winder “A” from the 70s

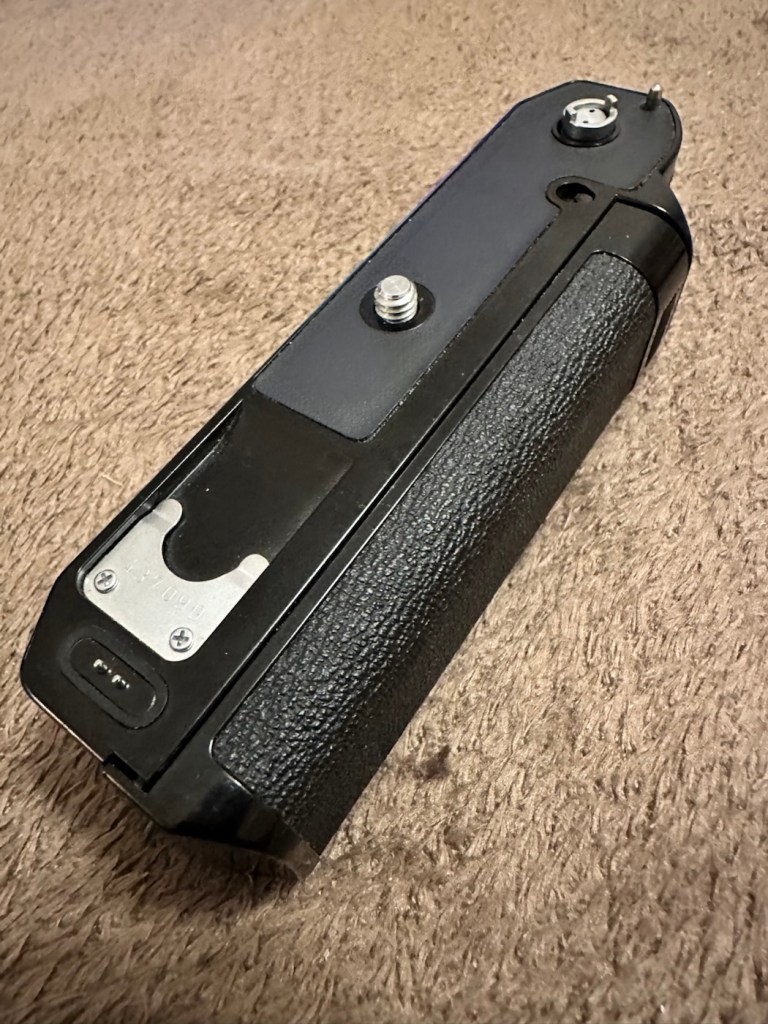
This is what it looks like externally, looks fine, but as this post goes on, you will notice a very marked deterioration in quality. It’s a horror story of battery acid contamination.

Looks nice

This unit is part of a bundle that was donated to me by my good friend Jon, see here: Cameras…i need more!

It was part of a Canon AE1 combo, the Camera i have previously posted about here: Canon AE1 35mm SLR, however the batteries within it had been left for such a long time that they had started to dissolve into the unit, leaving quite a restoration project behind. Here’s some history about this unit:

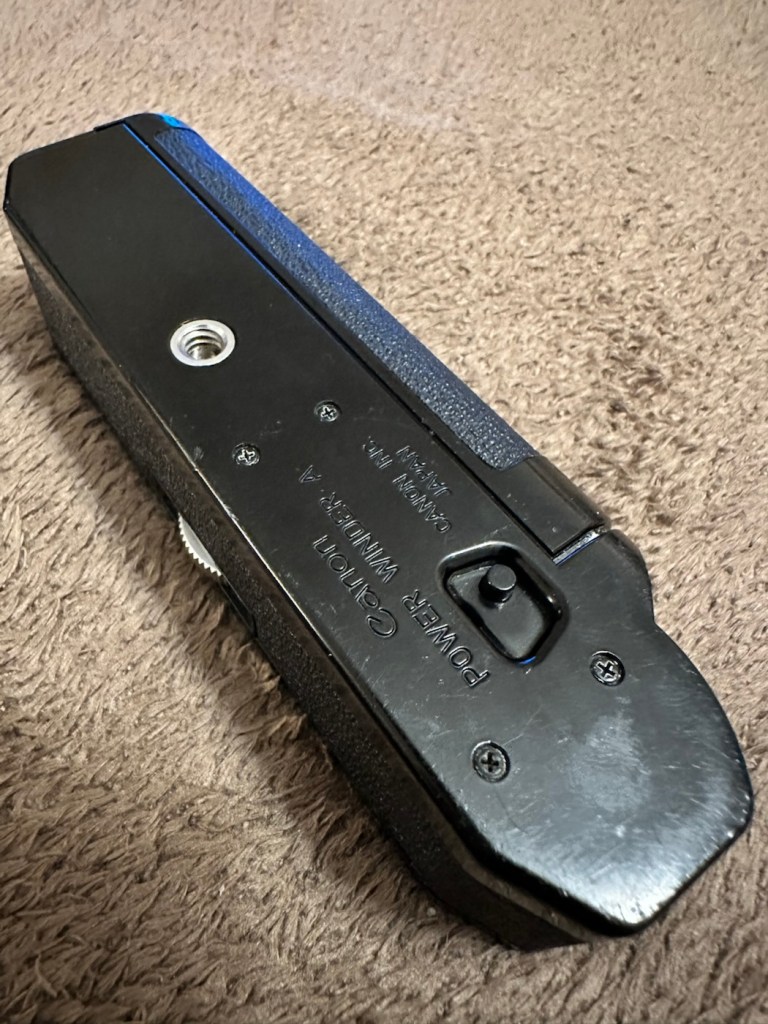
The Canon Power Winder A was originally introduced with the Canon AE-1 camera in 1975 but it also can be used with all the A series models (in fact, it is applicable to use the Winder A with the professional class Canon F-1(n) system SLR camera but without power rewind feature). It is an automatic film winder which greatly increases the automation and mobility of these manual focus cameras. Its exceptional versatility, due to its compact design provided by the principal control circuit built into the electronic circuitry with most of the electronic models such as AE-1, A-1 or AE-1 Program etc, and allows it to be attached to any models mentioned earlier and provides for its use without any special adjustments. 

Winding Speed: Approximately 0.5 seconds.
Operation: When the shutter button on the AE-1 is pressed, the winder will function. 
Shutter Speed Coupling Range: 1/50 to 1/1000 second for continuous photography. “B”, or 2 to 1/1000 second for single frame photography. (When the winder is set at “B”, AE photography cannot be performed).
Film Counting: Is performed by the frame counter on the AE-1.
Automatic Cut off Circuit: When the film roll is completely wound up or if the batteries should run out, the winder will automatically stop and the warning lamp (LED) will light up.
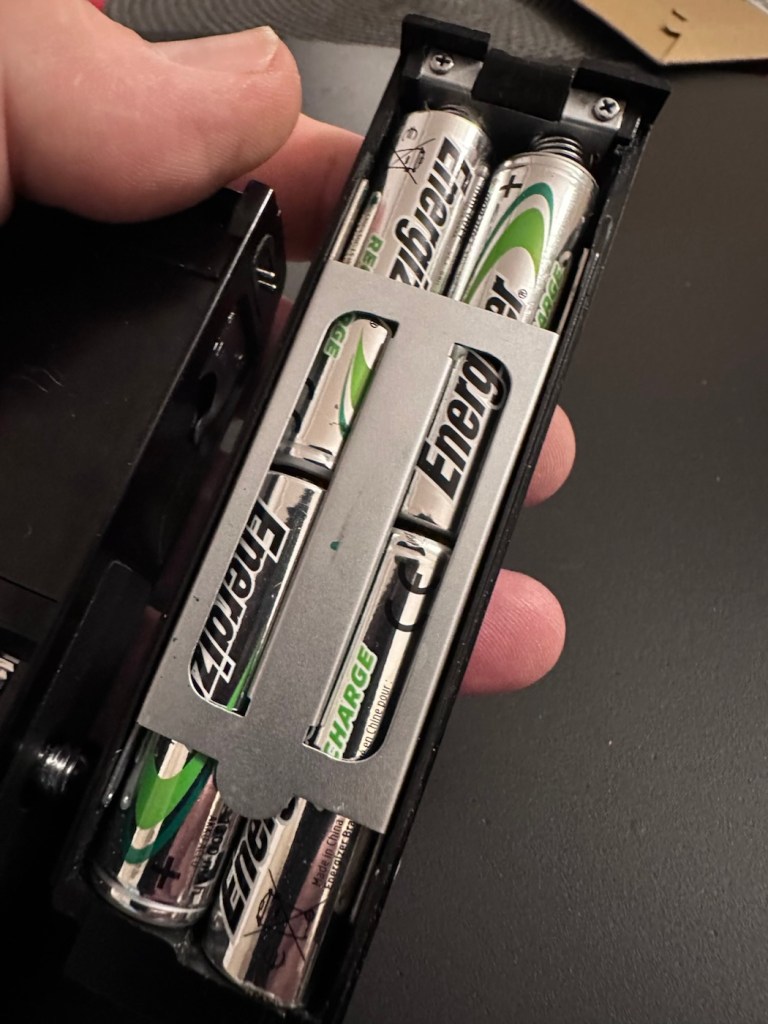
Power Source: Use 4 size AA batteries. (In normal temperatures they can take more than twenty rolls of 36-exposure film).
Attachment: Take off the winder coupler cover on the bottom of the camera, and mount the power winder using the tripod socket.
Size: 141 x 42 x 34mm (5-9/16″ x 1-5/8″ x 1-5/16″) 
Weight: 3009 (including batteries) (10.9/16 ozs.)

Mir.com

I already have one of these winders on my A1 that I am currently repairing, however that’s away in storage at the moment until I get get my workspace back up and running when we eventually move home.

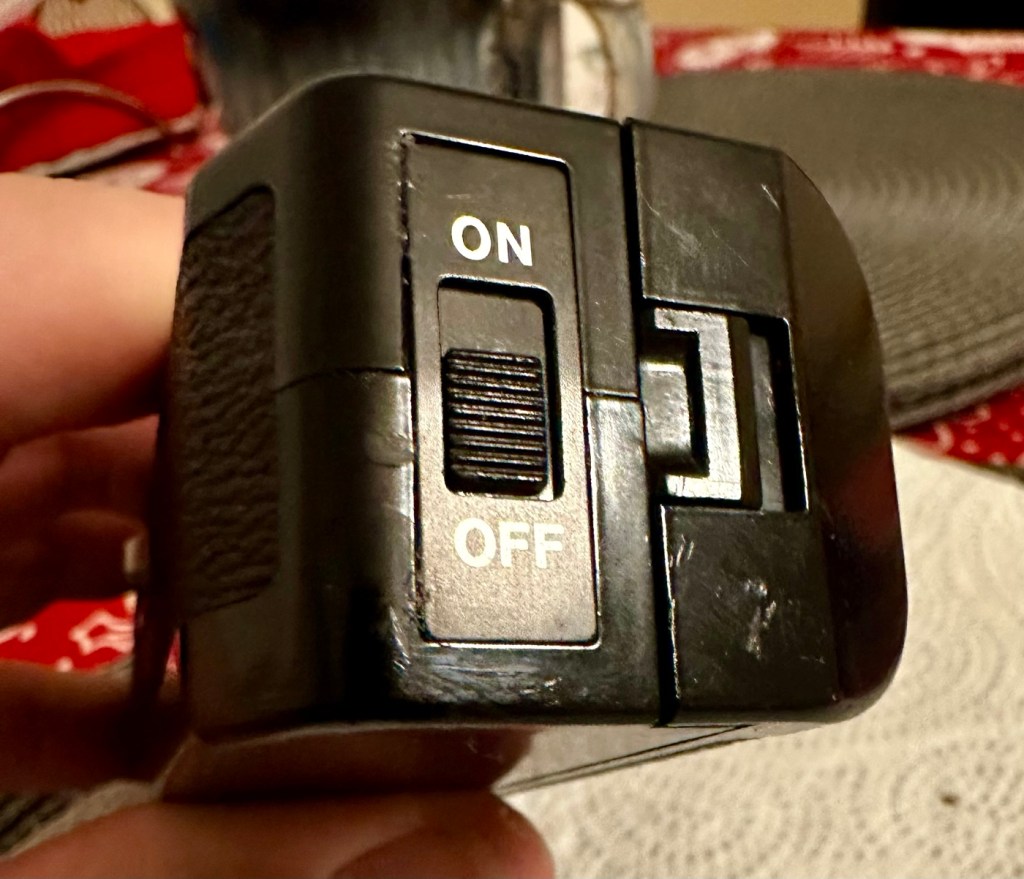
Im aware that these winders can take a max of two exposures per second if the lighting and conditions are right, meaning you could crack out a 36 exposure roll of film in under 20 seconds! They don’t do auto rewind either, you still have to do it manually, it would be a couple of years yet before that option became available. The red light on the case indicates one of two things, the battery is low, or the end of the roll has been reached, time to rewind!

They are quite reasonably priced if I wanted to buy one, but why would I do that? The purpose of this site is to repair and recycle, so that’s what I will attempt to do. It will be quite a task with this one I think.

Assessment:

As stated above, and from the outside, all looks well.

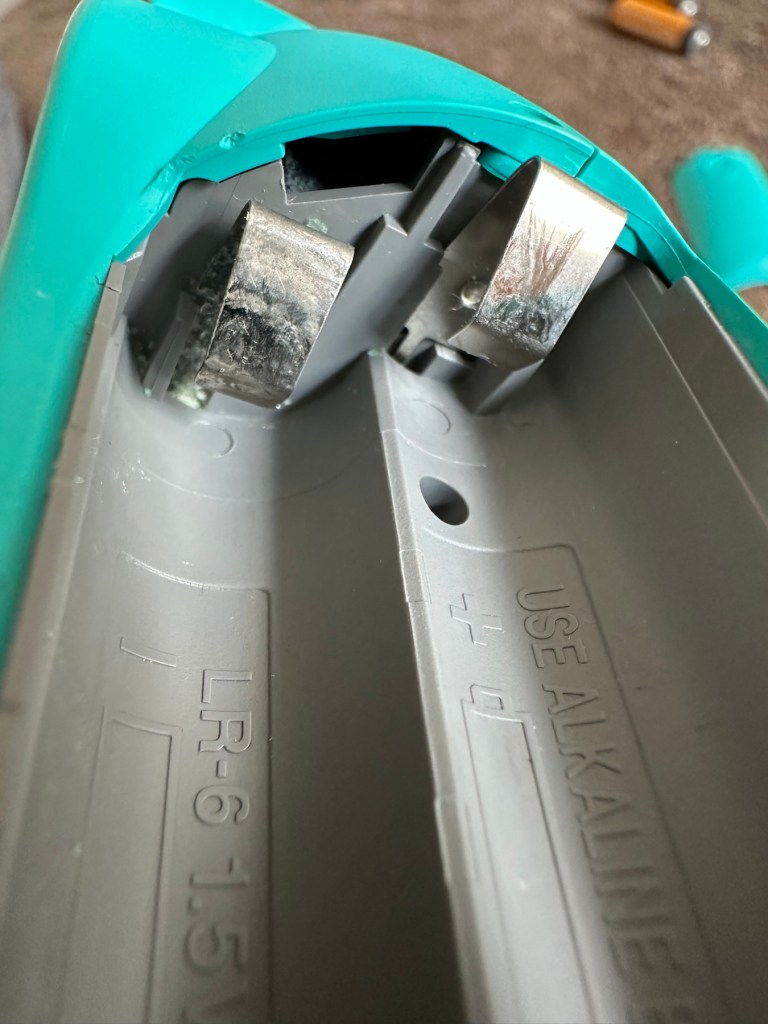
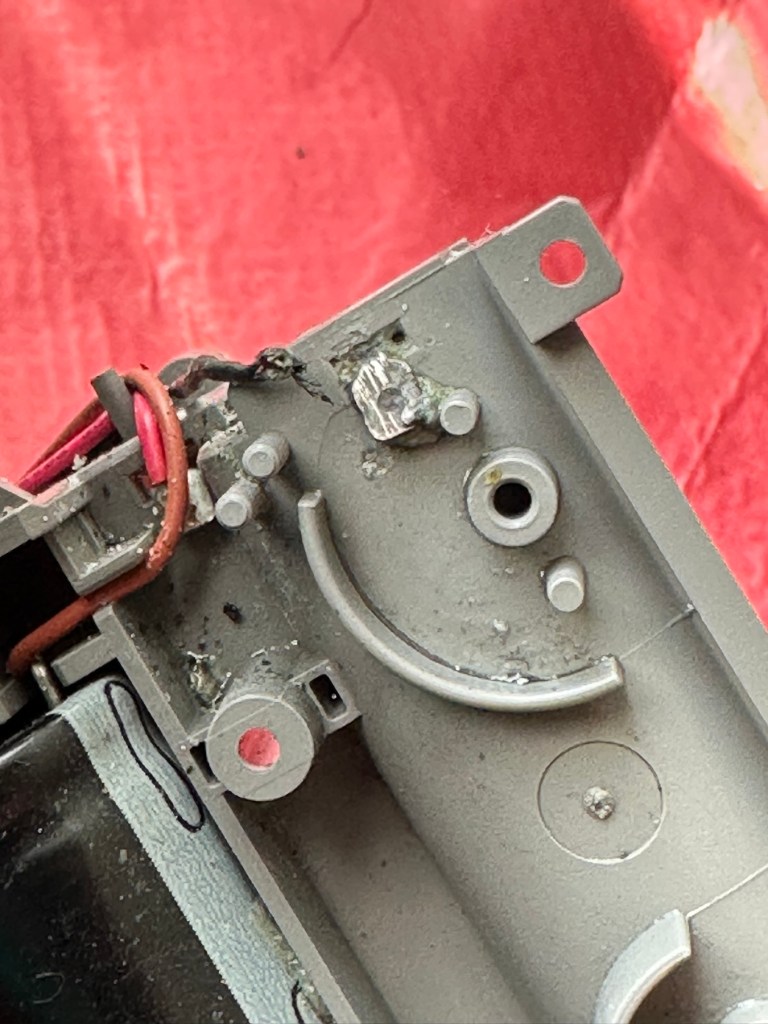
However there are a couple of giveaways that alert you to the immediate issue. Firstly there is an aroma, a kind of metallic musty smell that instantly alerts you to “Corrosion”. Secondly near the switch there are some “blue” granular stains that confirm corrosion.

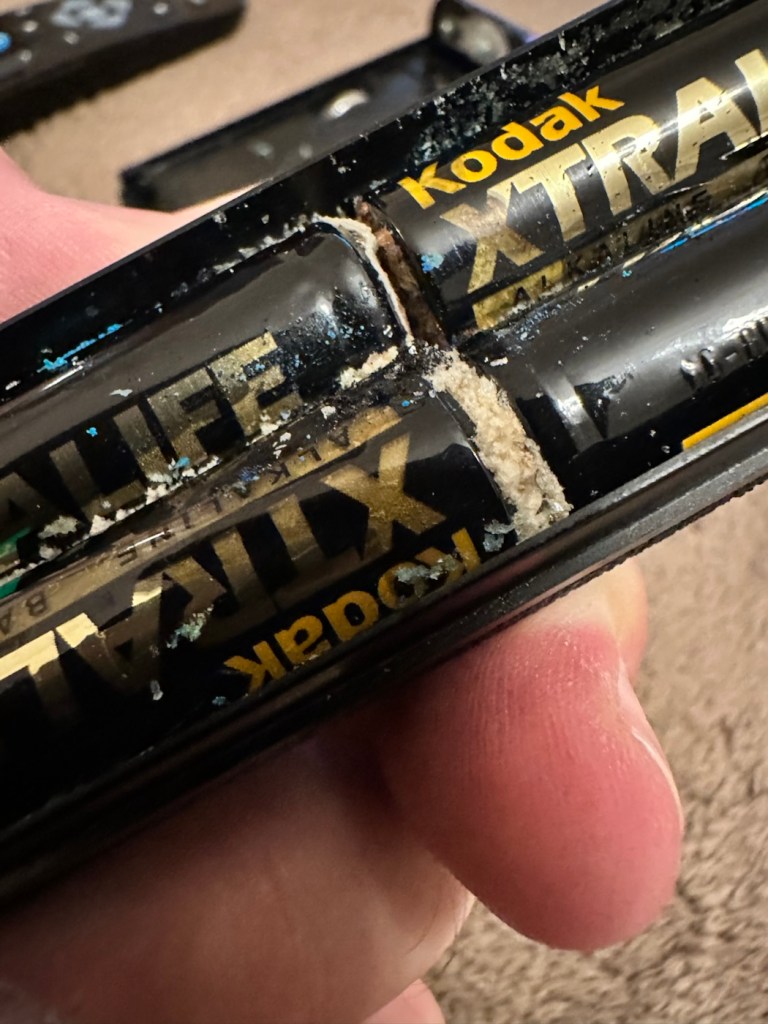
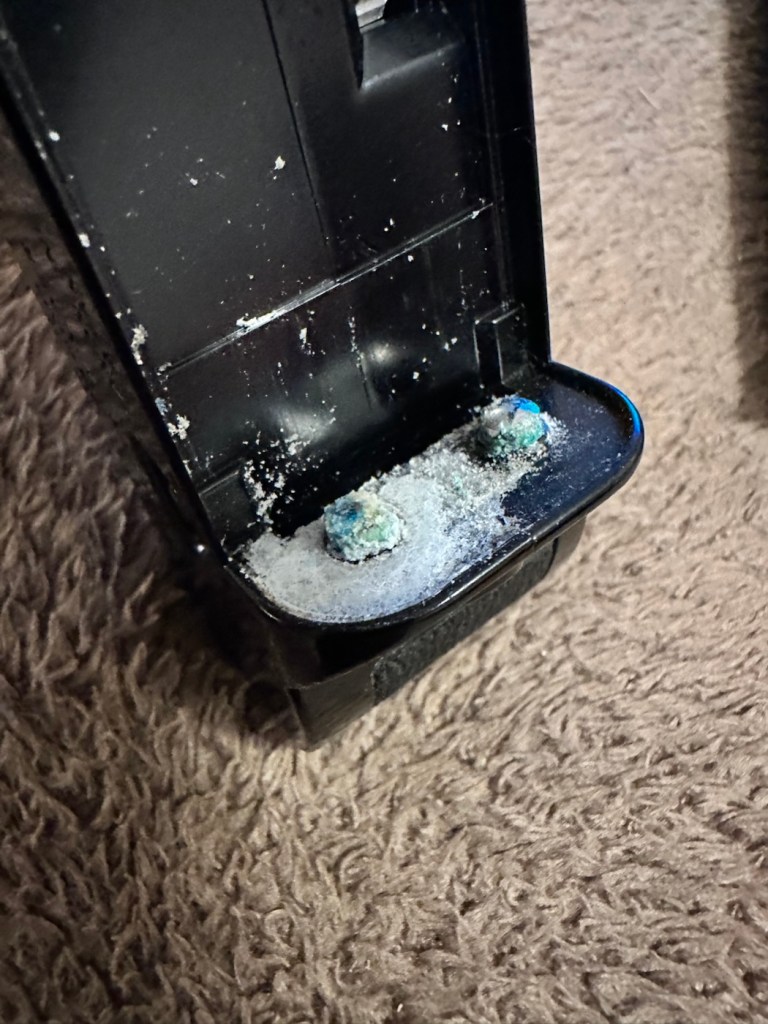
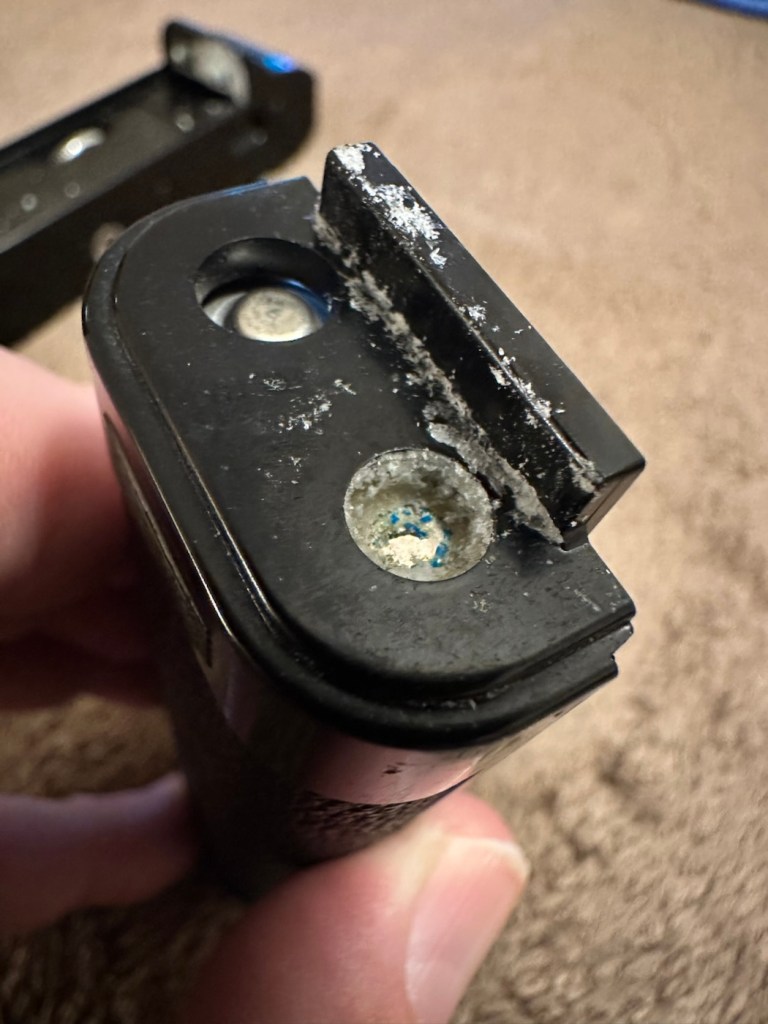
It’s pointless even putting batteries in here yet as they will not work, the damage is too extensive for the batteries to work. To be honest we now need to do a good clean and decontamination before we can even start to look at the extent of the contamination.

Repair:

First we have no choice but to get rid of the corrosion, this will involve brushes, a pencil grinder, and copious amounts of isopropyl alcohol. Let’s get started.

I attack the contact end of the winder with a sonic brush and some IPA. After about 10 minutes and multiple applications, using a small scraping tool i was able to remove the corrosion that had started to eat away at the chrome on the contacts, a small rub with some fine sanding paper restored the metal as best I could. I’m not going too over the top here as the corrosion could have well gone past this point into the internal workings, I’ll tidy up once I can get it working as it should.

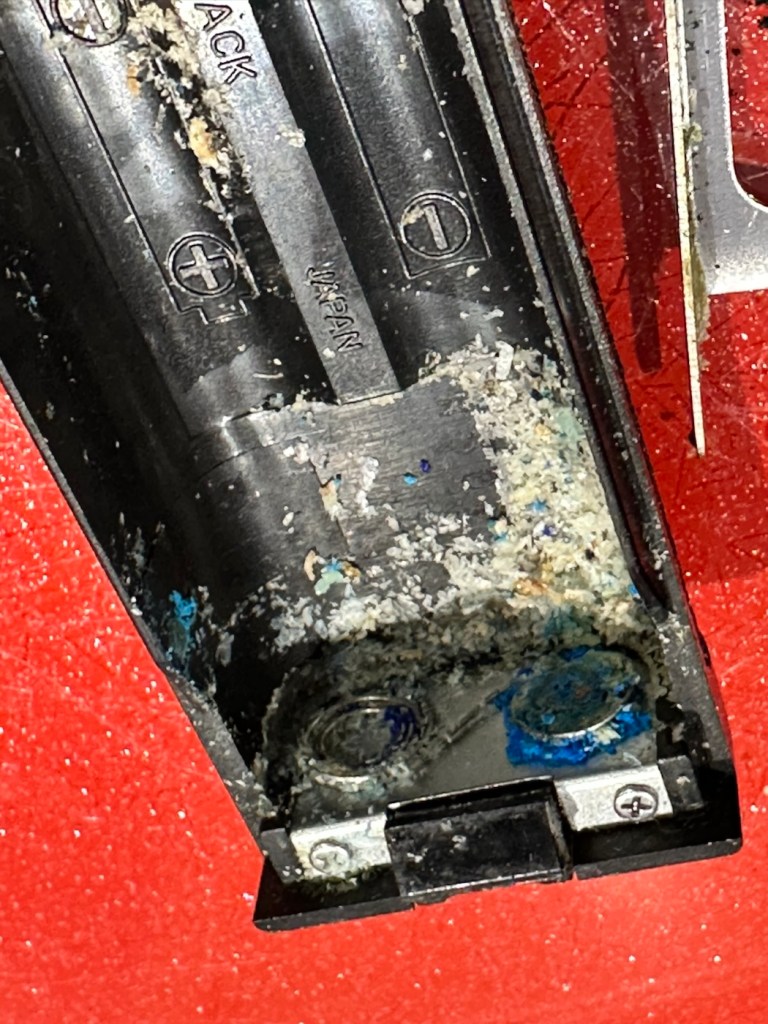
The battery compartment was cleaned using a similar process. However the contact end that used to have springs mounted for the batteries, have all rotted and the springs have had to be removed. I will replace the springs later, it’s not required for testing purposes just yet. All this contamination and blue staining has to be removed completely, if you leave contamination behind, it can start to attack the unit again at a later date, take your time and ensure you get as much off as you can. Clean, clean and clean again. It’s a boring part of the process but essential for long term results.

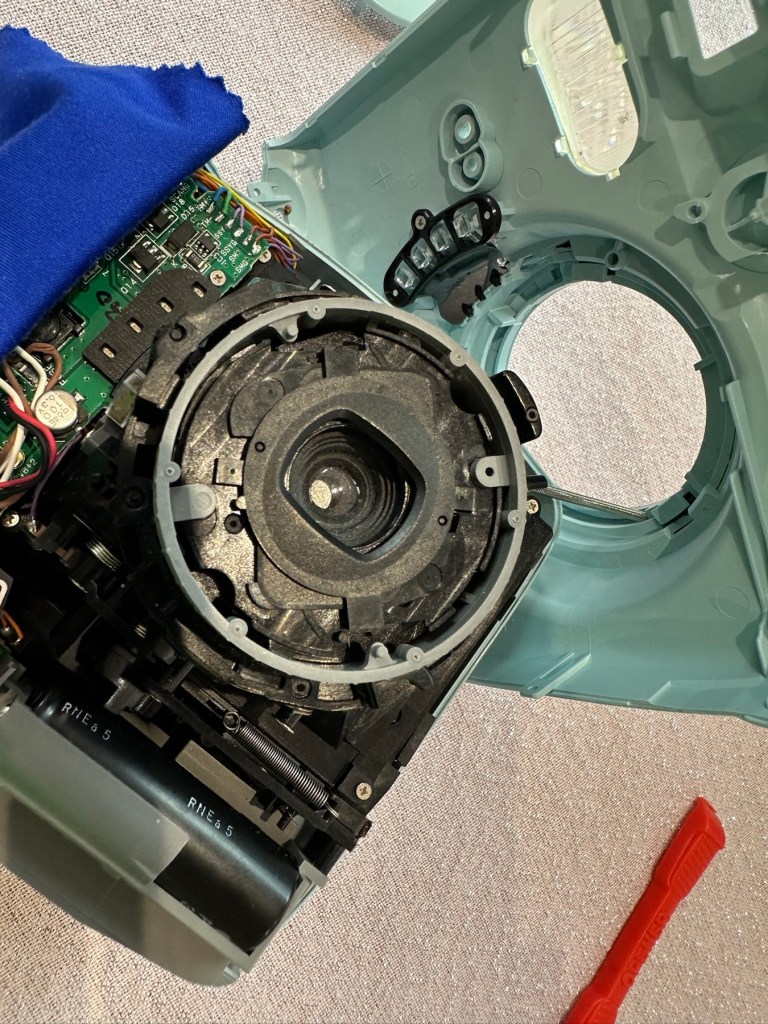
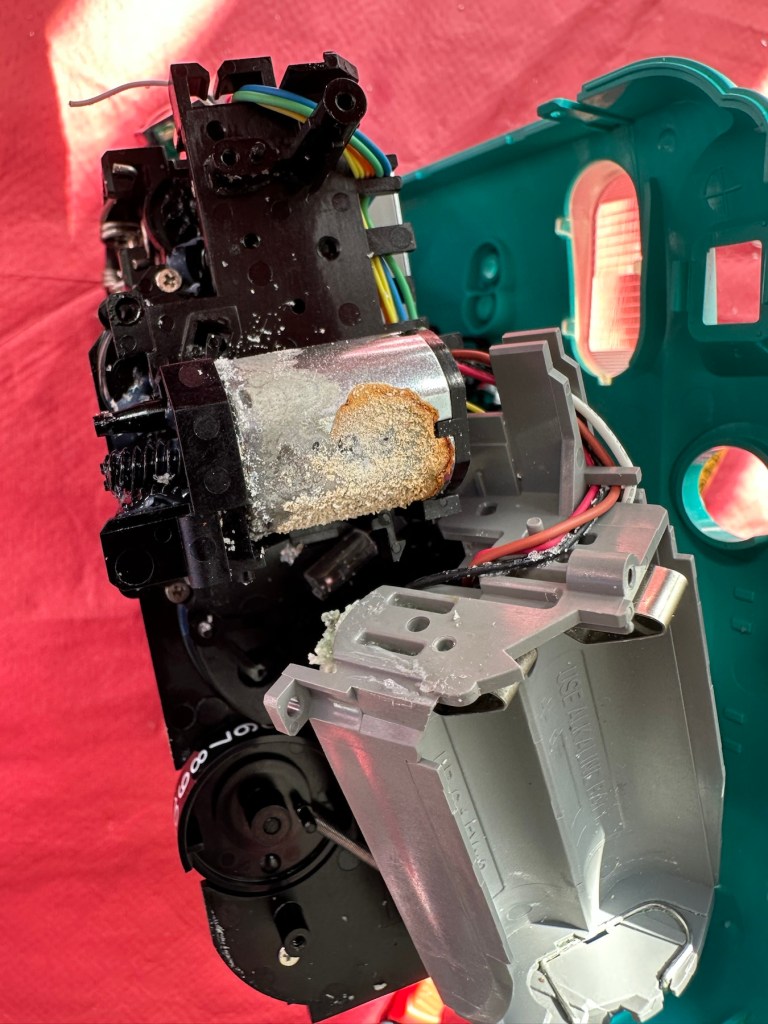
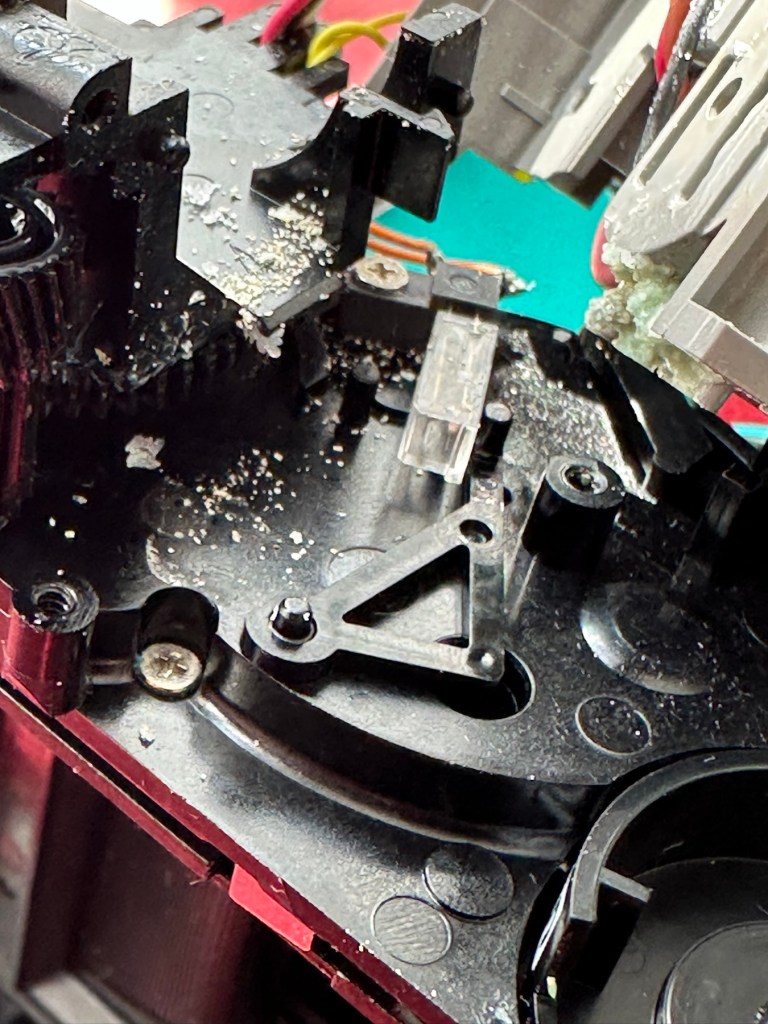
With everything cleaned and left to dry, I put some power across the winder power contacts and nothing happens. No noise, not any sign of clicking or of any movement at all. Just as previously feared i think the corrosion has gone further. Let’s get it opened.

Leatherette removed to access internally
Corrosion has made it inside

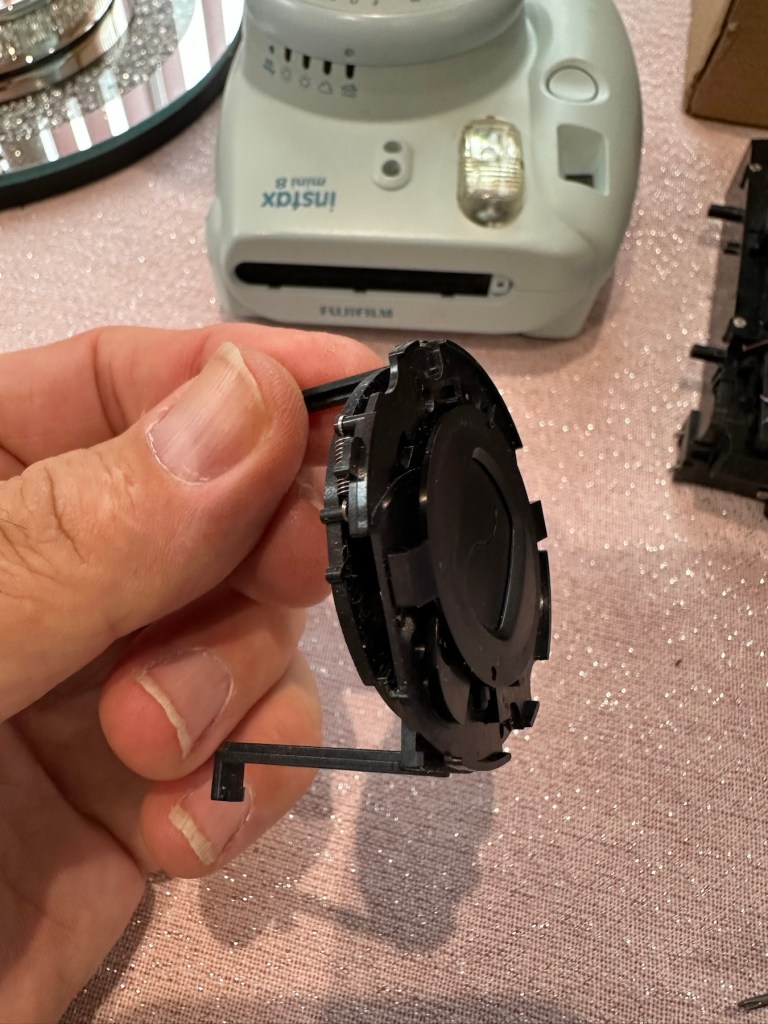
And as expected the corrosion has made its way inside, the picture above shows a wire at the contact point rotted due to corrosion, in fact the second wire fell off just after removal, the contamination has eaten the cables and is rotting the connections. The good news is that it seems that the issue hasn’t gone beyond these contacts.

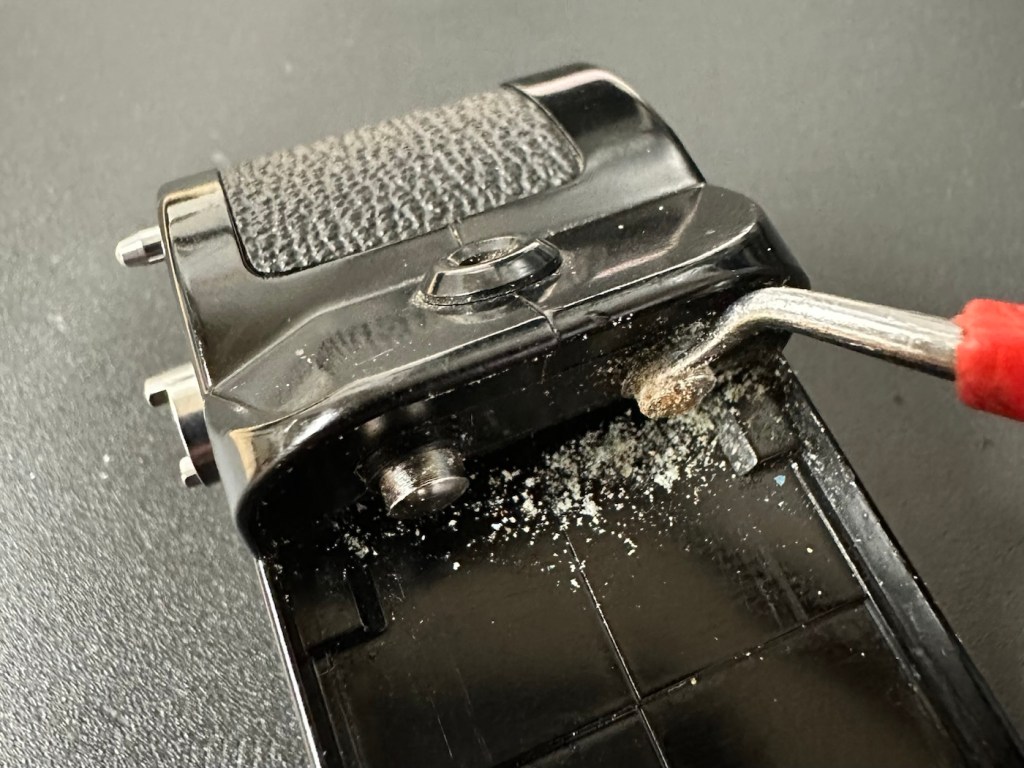
I’ve now cleaned and polished the contacts at the rear in preparation for being re soldered, the issue here is that I may have to extend the cables slightly as they are quite short. This may aid my testing of the unit prior to reassembly, let’s wait and see.

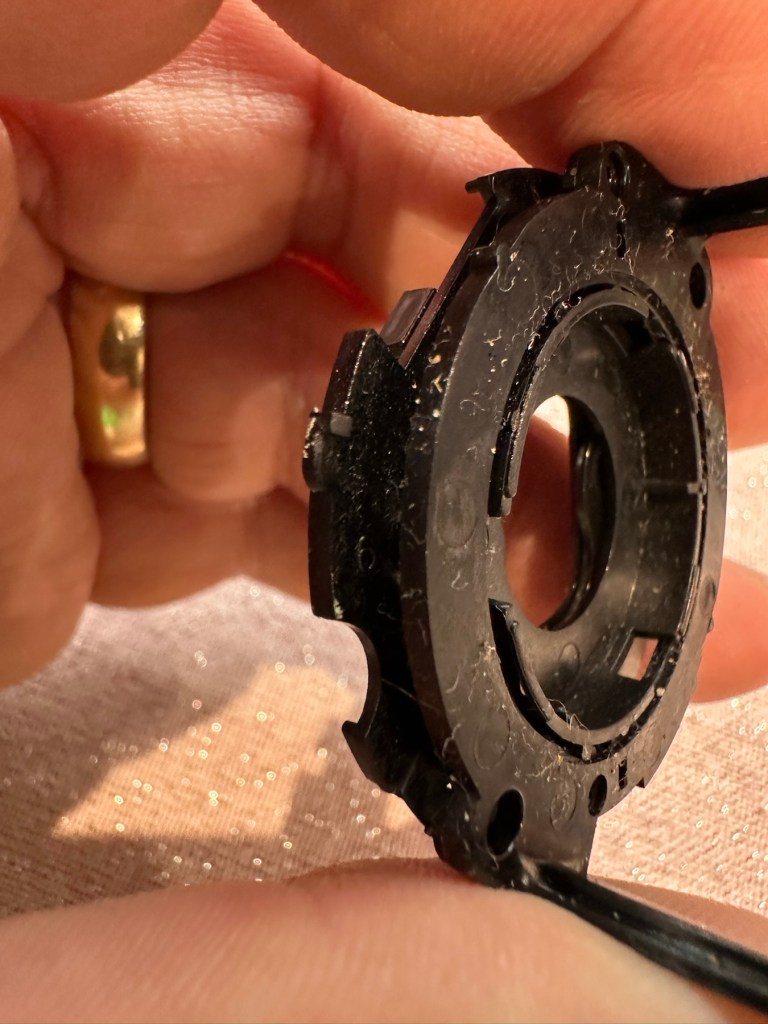
I have now soldered both contacts back into position, without any extra wire, hell, it was really fiddly and I doubt it would be able to be opened again without these wires being extended a bit further. I have also thoroughly cleaned throughout the internal workings removing all signs of contamination. I have reassembled the unit and it now sits in one piece. I have taken a dentist tool to further scrape down the contact point within the battery barrel area.

Further cleaning of the contact in the battery barrel area

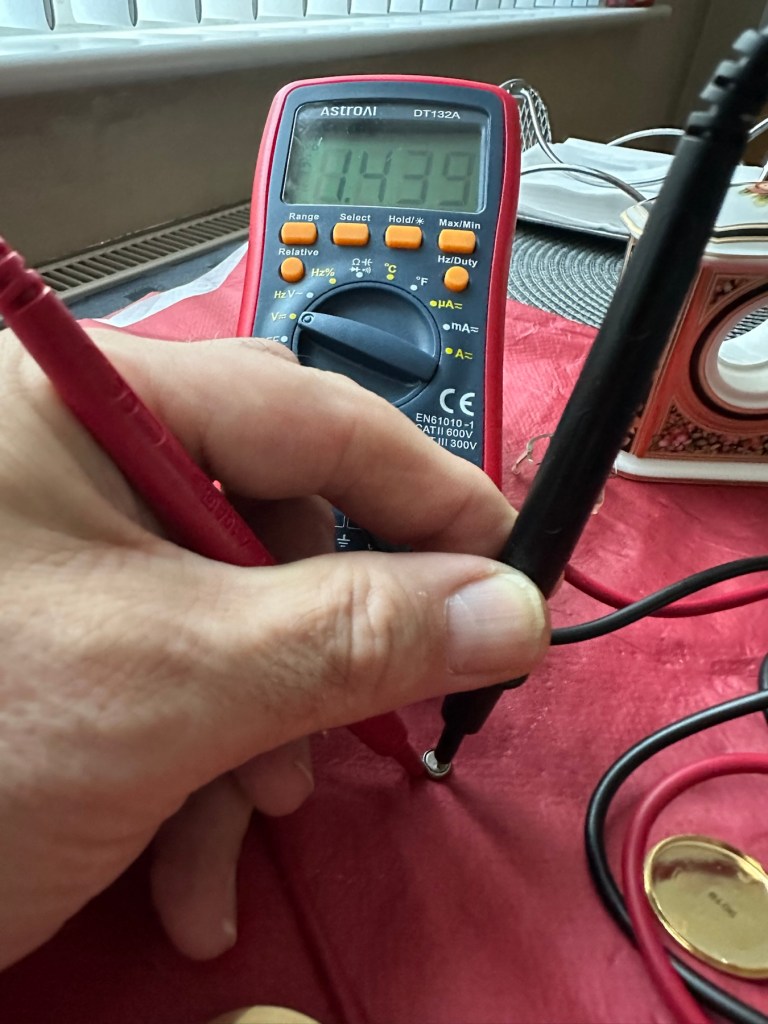
Using a little wire wool and IPA to clean the area I now have two good points of contact. Using the multimeter confirms we have continuity over the contacts that we didn’t have previously.

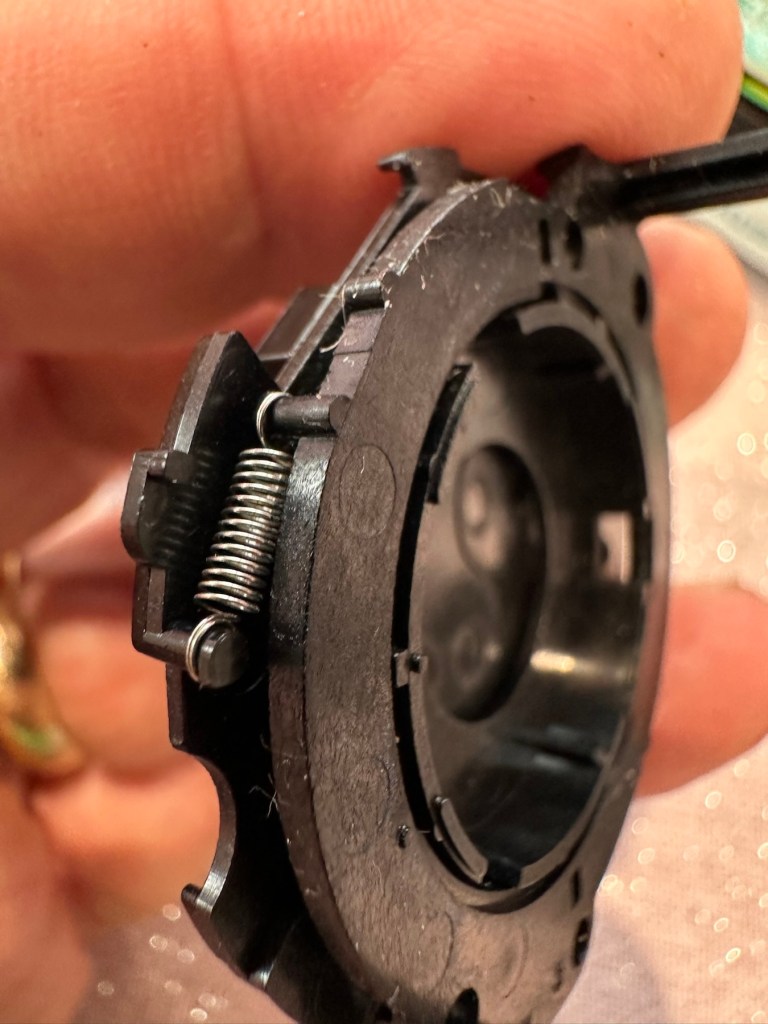
Reading the section above, you will remember that I had to remove the two springs on the battery case as they had totally corroded and broken away. I have some new ones but they are in storage, so for now I will just have to compromise until I can get to the new ones and solder them in place. Here I just obtained an old spring from a waste metal box, split it in two, added a small washer one end for the positive contact and just left the other as it was. Both springs were put in place, just being held there by the four AA batteries. As I stated this is purely for testing purposes and will be corrected once I have confirmed the unit works.

The battery holder was attached and then switched on. Nothing. Then I remembered I have to simulate the signal from the camera and this can be done by putting a metal short across the two raised pins at the power switch end. This worked, and the motor did its quick burst as expected. See the small video below.

The winder, now working. And shorting the pins to simulate the cameras signal

I’m pleased with this, as all the work I have done has been worthwhile. I just need to get the new springs soldered in place, give the whole unit a thorough final clean, ensure the leatherette that was removed is stuck back down and that the on off indicator is stuck back into place. And then we can put it onto the Canon AE1 to see if it works as it should.

Leatherette now glued back in to place
On / Off switch plate glued back in place

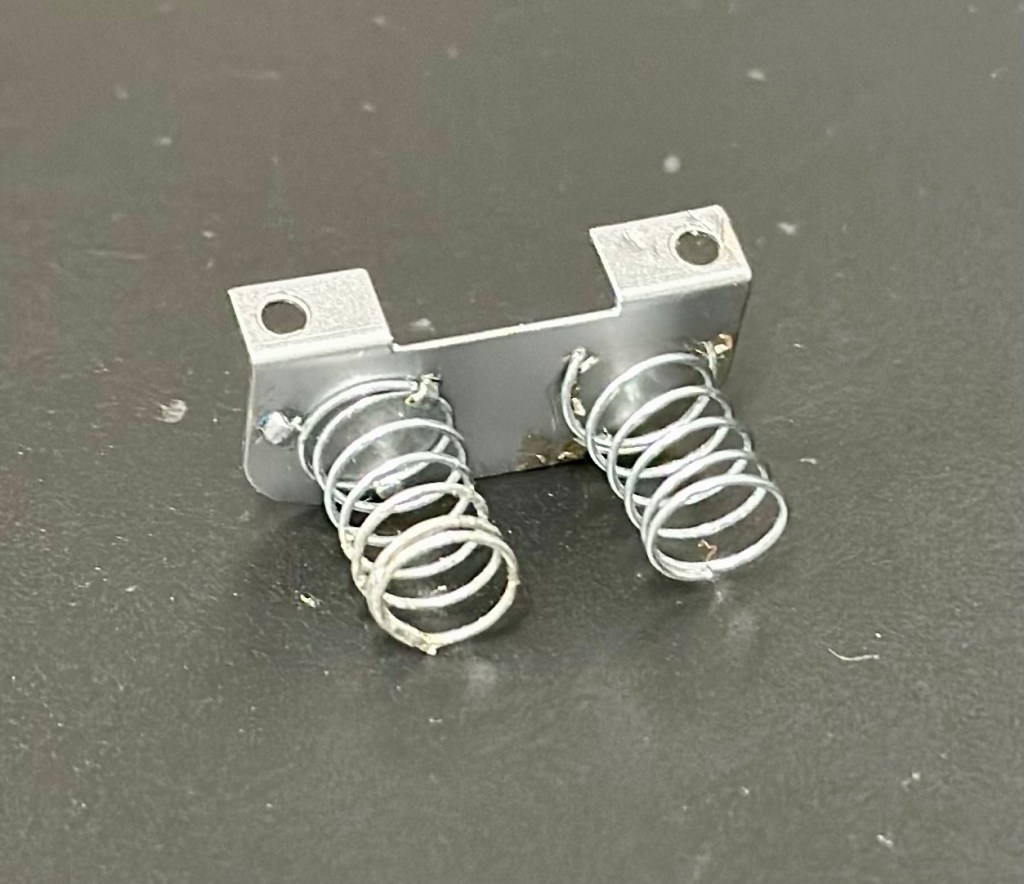
Today I have taken out the battery spring connector and I am about to put the new spring contacts in place. I’ve found even more corrosion behind this plate so this will need to be cleaned before reassembly.

More corrosion found behind the battery spring contact plate

I’ve now fixed the new permanent springs in place, they wouldn’t solder so I’ve had to use a combination of using the old clips that were originally there and weaving the spring though the holes where some clips used to be but had corroded away. Either way it has worked well and both springs are quite solid, and don’t look out of place at all, they probably look better than the originals.

New springs attached to a clean plate

With the battery pack contamination removed I can now reinstall the battery contact back into place.

I know that the pack works, and now the final touches have been added, this winder is now back into a good working order, and fit to go back to work doing what it was originally designed to do.

Result:

This is an item you can readily buy on the auction sites at a very reasonable, some would say even very cheap price.

Is it worth the repair you say? Well yes, it is. The trouble is, it is so easy to throw stuff away these days, that in reality, can be given an extended life and purpose for pretty much no cost apart from your time and patience. On top of that, getting these items apart and reassembling them is a great learning circle, and you can never stop Learning. You are preserving the past, and that’s always a good thing.

A very brief video showing it working

As you can see above in this small video I have taken today, here I have my Canon AT-1 with the winder attached, doing what it is meant to do and sounding so retro with that motorised winding sound. Don’t you just love it? I most certainly do.

Thanks for passing by. It’s always very much appreciated.

Another Fujifilm Instax mini 8

Yes another one. Anyone that reads what I post will realise that these little cameras have really become popular with the youngsters within our family. I recently posted about a family get together: The garden gathering and in this post I stated that a young member of the family liked these cameras so much, that she went out and purchased a damaged one and asked if I could fix it for her. How could I turn down such an offer?

Another Instax mini 8 and that Iris should be closed

And here it is. Needs a little clean and immediately I can see an issue, what I’ve noticed is that the little iris lens protectors that close when the lens is retracted are missing, or not operating and opening properly. Everything else seems to be doing what it should, motor, film transport system etc, however the initial issue reported with this camera was that it’s exposure was sometimes hit and miss, it most definitely all related to the lens issue. A good clean wouldn’t go amiss with some extra attention paid to the light sensor area.

Anyway, enough chat, let’s crack on.

Assessment:

A nice tidy camera, needs a little clean, flash fires, film transport mechanism inside is working and the motor runs. It gives the impression that it is working fine, however….

Here’s a reminder from the young family member who made the purchase, regarding its issues:

I’ve just remembered, I think the advert said something about the photos coming out dark no matter what setting it is on! x

I’d already noticed the little iris mechanism on the front of the lens didn’t open and close when the camera was turned on, so I was going to be looking in this area anyway. But when I looked a little closer and moved the aperture ring on the side of the lens, the relative apertures in the lens were only moving to roughly the half way point, off centre, hence there was no corresponding fully positioned aperture, and in relation to the lighting situation that was presented, they were stuck and blocking the incoming light. In a nutshell there was not a sufficient sized aperture “hole” for any light to get through, resulting in the exposure issue stated above. This needs adjusting. You can see what I mean in the photo below. The lens aperture leaf does not sit central in the lens.

Incorrect aperture settings and positioning in the lens

Apart from the highlighted problems above, i don’t believe there are any other underlying issues. So I’m going to concentrate on the front of the camera solely in the lens turret area.

Let’s get on with the repair.

Repair:

The iris issue is within the lens turret so this will need to be dismantled to access the iris.

It was a bit of a head scratcher this one, as I spent a lot of time just staring at the mechanism trying to figure out how it worked. When the iris lids were manually manipulated to the closed position when the turret was retracted all was fine. When the turret was opened up the iris lens did the same, but then if you again retracted the lens the iris remained open exposing the lens. I was thinking it must be missing a spring somewhere and I was about to be proved right.

I found a replacement iris turret in my spares box for instax cameras

I found a replacement iris mount that fits within the lens turret. I had this in a spare box and used this as a reference to compare to the old non operating one. Here is where it was confirmed that there was a spring missing and this is why the iris was not operating.

I replaced the old mechanism with the new one and this was installed back in the camera, this now works fine. I have however found a suitable spring for the old iris so I do now have another spare ready should another be needed in the future.

Iris mechanism installed and now working

The issue with the aperture positioning has been sorted by ensuring that the aperture ring is correctly positioned in relation to the cog mechanism in the lens turret area. It’s a bit like sorting out the timing belt in a car, it just has to be in the right position to achieve the correct aperture settings.

This sorted, the last thing to do was to give the viewfinder a little clean. You have to be very careful here as the viewfinder is connected to the camera “ready to shoot” indicating light, and there are very fine wires all around this area. Be just a bit too clumsy here and you’d have a difficult soldering project to also add to the original problems. Anyway, no such issues today, the viewfinder was un clipped and prisms and glass cleaned and reassembled. All looking good.

Viewfinder and lots of little wires

I’m now happy that all the issues have been attended to and I’m just going to reassemble the camera ready for a quick clean. Luckily all the screws that came out went back in with none leftover. Result!

Result:

We now have a nice little unit, all aperture settings are working as they should and the lens iris is operating as it was always supposed to do. The viewfinder has also been cleaned and it’s now a nice clear unobstructed view. It just works.

I’m guessing this camera will be coming away with the owner on a family holiday that we are all about to embark on shortly. I’m hoping to run some film through this soon but I am ultra confident it will work as all the issues have now been addressed.

I’ve just got some film and rattled off 4 quick shots, one of them indoors. Exposures are fine so I’m happy this is a perfectly good working camera.

4 quickly produced shots

I’m sure there will be one younger member of the family who will be very happy with her new camera. And may she have many years of capturing good times and fantastic memories. This is what these little cameras are made for after all.

Thanks for passing by, it’s always very much appreciated.

Fujifilm Instax Mini 8

What the listing stated:

Fujifilm Instax Mini 8 Instant Camera Teal Blue Spares & Repairs

Please see photos for condition this will be the item you will be receiving.

The camera will not turn on.

Thank you for looking!

EBay

It’s about time I started to get back to repairing some cameras, I have a mountain of them to get through but they can wait a little longer. These little Fuji units are really popular with the younger generation, and in my view anything that gets youngsters interested in, and involved with photography is a good move. We have some youngsters in our clan, and I have this earmarked for one of them if I can get it working. We had some conversations during our family gathering over Easter, and the subject of photography, and this particular member of our family came out. Seeing this auction today, I acted and purchased as this is a perfect little starter unit for her. My total outlay for this unit was £11:45GBP and considering the current costs are around £30-£40GBP for a working example, this is not too bad an initial outlay.

Here’s some history on these cameras:

Instax is a brand of instant still cameras and instant films marketed by Fujifilm.

The first camera and accompanying film, the Instax Mini 10 and Instax Mini film, were released on November 10, 1998. The “Wide” film and first accompanying camera were released the following year. The Instax Square film and accompanying camera were released in 2017.

The formats of Instax film give an image size of 46 mm × 62 mm (1.8 in × 2.4 in) for the Mini, 99 mm× 62 mm (3.9 in × 2.4 in) for the Wide and 62 mm× 62 mm (2.4 in × 2.4 in) for the Square. The Instax colour film is available in Mini, Wide, and Square formats and the black and white Instax Monochrome is available in Mini and Wide formats.

Wikipedia

For anyone that was around in the 70s, these cameras are an extension of and an advancement of the then Polaroid instant photography system. Nearly every household back then had access to Polaroid cameras. If you look back at any photo album or collection from that time, you will invariably find some Polaroid photos stored within that collection.

Here is a typically over enthusiastic review produced by a very pleasant chap when it came out about 8 years ago. Sums up in a few minutes just what it can do, and just how easy it is to use.

A very enthusiastic review

This unit looks to be in quite a nice condition but as always we will never truly know until it has arrived and can be assessed, never forget, this is EBay that we are purchasing from 😂

Battery compartment…suspicious!

Something looks suspicious in the battery compartment. There seems to be contacts missing, they might be fine I just don’t know. They just don’t look right to me. There may well be some minor signs of corrosion as well. Who knows, I’ll just have to wait until the unit arrives. So let’s just be patient until then.

Come on Mr.Postman!

Assessment:

I’ve downloaded the instructions and they consist of just half of one sheet of A4. To be honest they are about as basic as are needed I guess, but in technical quality they are about as much use as an ashtray on a motorbike! And those contacts I mentioned above, look just as they were from the factory. What a strange design.

On arrival the camera appears to be in a really good cosmetic condition, there is even an old film cartridge still inside that I suspect is well fogged by now. However this will be of use if I can get it working, as it will prove if the film transport works.

The battery connectors are exactly as they were when the unit was assembled, so my earlier suspicions have come to nothing. However there are small indications of battery leakage on the outside that are always concerning, because they can always hide a greater issue occurring inside the camera. When batteries are put in place the unit is totally dead, just as advertised.

So no more to it, I have to open the unit up and see what I can find inside. Before doing that though I have connected a bench power supply to the contacts and there was still no draw on the power at all. It is definitely dead.

Repair:

On opening. Oh my word. What the heck is that? I have never seen contamination around a battery terminal like that before, the battery contacts have been totally consumed.

Under that crystallised mess is what is left of a battery terminal, and that thing that looks like a biscuit on the left is the main motor. Totally crusted up

I could hear some rattling around inside the case and thought something had worked itself loose. No. It was what looked like broken glass, but it wasn’t, it was crystals of contamination, this camera has more stalagmites than Wookey Hole! The motor was badly contaminated and every part of the working mechanism had signs of this contamination, it was everywhere.

First things first, the issue with the power supply is purely at the point of that big mass of battery contamination on the battery terminal, there is no continuity here and this needs removing and attending to.

Using a combination of alcohol to break down the contamination, and a grinding pen, the offending crust was eventually removed. It had eaten through the wire at the battery terminal and was being held in place by the mass of crust that has built up around it. I was able to cut back the wire and re solder the terminal to make it good. There was contamination everywhere and this all had to be removed, if left in place it would cause more problems in the future. It had to be eliminated completely.

Contamination everywhere, what a mess

I removed the motor, and used a contact cleaner to free up its motion, I constantly turned it back and forth for about 15 minutes and I could gradually feel it freeing up. A wire had broken off from the led light on the viewfinder, this was soldered back into place and we were now ready to test. I put the batteries in and flipped the switch. I could hear the flash capacitor charging and all lights came on, I switched the unit off and began preparing to re assemble the unit, not before accidentally touching the flash circuit and taking a quick 300v shock in the hand. It’s a big capacitor as all flash units usually are. I’m an idiot, it was a school boy error. And I had a capacitor discharge unit sitting right beside me. Fool!

Ok. I’ve stopped cursing myself and the reassembly continues, and I manage to complete this with no further issues.

It seems to be working.

I’ve loaded in that old cartridge it came with and can confirm that it was all fogged film. However it has proved that the film transport system and flash are working as you can see in the video above. I’m now going to have to source some fresh film for a true test. Before that I’m going to open up the unit again and give it a good blast with compressed air and a final check to make sure I’ve got all of that contamination. It’s just the OCD coming out in me.

That said, the flash has now ceased working even though I can hear the capacitor charging up. I suspect the flash bulb has failed, so I need to get back inside anyway. Oh well, here we go again!

Like the idiot I am, I realise I have not been using sufficiently powerful batteries and the flash capacitor and flash unit are both in fine working order. I’m just going to make a small adjustment on the shutter opening switch though, and also the power contacts connected to the lens internal focus ring.

I’ve removed an unnecessary spring that was on the aperture ring, it was causing the aperture ring to sit in an opposing position to the light indicator on the side. The two of them have to match to ensure the correct exposure. The spring was pulling down on the ring, and moving it to a lower position on the indicator. Thus causing an exposure issue. I’ve removed it, it is not needed and is now working better. I have also cleaned the circuit board as I found another small patch of crystallised contamination. It’s now cleaner than when it departed the factory.

The lens aperture ring, and indicator

And here we have a picture where I’ve captured the flash unit working.

Flash captured working

Now all back fully assembled I’m confident that the camera unit is in as good a condition as it could be. Fully serviced, clean and operational just as it should be. The next real test will be when I get some film inside of it to carry out some realtime tests. I’m hoping I’ll have the film within the next day or two.

Result:

I dont know why but I really love this little camera. I’ve enjoyed the challenge, the issues thrown up by it, and have gained immense satisfaction in getting it back into a working order. I don’t know if it’s the size or just the pure simplicity of having a picture to hand that is fully developed in about 15mins. The excitement of watching a picture form in front of your very eyes and even the fun factor is incredible. It’s what is needed in photography today, a step back to the 70s world of Polaroid, it’s true that back then they really knew they were on to something big, but I bet they didn’t think that it would now be having such a resurgence with the younger generation 50 years later. Instant memories preserved right in front of your eyes. The Japanese photographic industry, are so up there with modern photographic trends and demands. If only some of the now defunct big players such as Kodak who I used to work for, had gleaned such future insight, things may have been very different.

This unit as was stated earlier, is promised to a younger member of the family and that is where it will be going. I think I’m probably going to buy another damaged one to fix for myself, because I just love these little packages of fun and instant memories.

My film arrives within the next 24hrs and I’m really looking forward to getting some pictures taken.

Now all polished and cleaned and looking splendid.

The film is here and I’ve put in new batteries and tested the unit prior to putting the film in. Anyway, film installed let’s take the first picture that will remove the cover off the film cartridge within.

Now to find some subjects without wasting too much film. Picture one was of another Instax camera i am working on, bit close to be honest but there is at least an image, the camera is working. Second one is in the corner of the kitchen this comes out well. Third one is of the feral cat “Tabs” who owns our garden. She wasn’t too happy that I’d disturbed her sleep but that said it was a good photo.

First three trial photos

Overall I’m exceptionally pleased with the results. Closer examinations shows some repeating white spots up the right side of the photos, no big deal but this probably points to some contamination on the film roller. I can’t clean this now without fogging the remaining film, so I’m happy to leave this until this cartridge has been used. I’m happy that this is the only minor issue after all the other problems this camera had.

Working perfectly and looking great

Been a great little project that I have thoroughly enjoyed working on. These little units are great fun and the little lady that is going to get this camera is going to have a great time with it.

Another one of mass manufacturings victims, revived, and repaired and now facing a much longer and rosier future. Another one successfully kept from landfill. A winner in every sense of the word.

Many thanks for passing by, as always it is very much appreciated.

Wedgwood Clio ceramic clock

What the listing stated:

Wedgwood Clio style Ceramic Clock Casing – Clock not working. Attractive casing showing fruit and berries. About 20 years old. Unfortunately, the clock is not working and has battery corrosion making it uneconomic to repair.

One of the photos shows the casing with the clock inserted and I will include this clock for information purposes. The casing is 90mm high and 90mm wide with a depth of 50mm.

EBay

This had just been listed and had a really low buy now price so I took it. With postage and all costs it’s cost a total of £8:32GBP, and I think that’s a good price for late issue mass produced Wedgwood piece. I’ve always fancied having a go at fixing a timepiece so I’m happy to trawl around at the low price end to give it a go. This will my second piece I have attempted, the first one being even cheaper and very tacky that i passed on to my older sister, and she just loves it : Rock & Roll clock

The Wedgwood Clio style was introduced in 1992 and ceased production in 2005. The fact that the seller dates this clock as around twenty years old would tie in nicely with this piece being part of the last production run of this range.

You can buy replacement Clio design clock inserts from Wedgwood direct at about £27GBP per item, but that’s not the purpose of this site, so I will attempt to make the repair. If all else fails and it is actually beyond repair, then I will source something similar to replace it with. This is a 36mm fitting clock insert.

Anyway, let’s await its arrival so we can fully assess things.

Assessment:

A lovely piece of my favourite pottery in just as good condition as described in the listing.

If you remove the timepiece and crack the back open there is definitely signs of battery corrosion around the battery connectors. Measuring the battery voltage it is registering 1.4v, I may well replace this as I don’t know if this is the one that caused the issue or whether it is depleting under load, and I wouldn’t expect that load to be too excessive. But you never know so I will source a fresh battery.

Battery registering 1.4 volts

Repair:

The internals are contaminated with green/blue corrosion from an old battery, using my magnifier and a small grinding pen I am able to remove all the visible corrosion.

After I’d used the grinding pen, I cleaned the timepiece with some compressed air and then cleaned the workings with some Isopropyl Alcohol to remove any residual contamination.

With the unit now reassembled, i can confirm the unit is ticking along quite nicely.

It’s just gone 8pm and keeping good time
20’minutes later still going well. You’ll just have to take my word for it.

Result:

It amazes me that someone sells a unit as lovely as this stating that it’s “Beyond economical repair”. What nonsense, this has cost me the grand total of “Zero” to get fixed. At the very most it’s taken 15 minutes of my time. I love easy repairs such as this, the fact that I purchased such a charming little timepiece at pretty much no cost at all makes it all the more satisfying. An item such as this needs to be looked at as it’s too nice to just be stuffed in the back of a cupboard until it’s thrown out with the junk.

Still quietly ticking away after being repaired

Again, some things are just so easy to repair if you just commit some time and patience to it. This clock now has many years of good use ahead of it. On display, right where it belongs.

Another item saved from waste.

A positive outcome in my personal point of view.

Thanks for passing by. It’s always very much appreciated.

How Do We Deal With Microplastics In The Ocean?

An interesting read on what is a problem now that is only going to escalate if we don’t change our ways.

Like the lead paint and asbestos of decades past, microplastics are the new awful contaminant that we really ought to do something about. They’re …

How Do We Deal With Microplastics In The Ocean?