Fujifilm Instax 100 instant film camera

What the listing stated:

Fujifilm Instax 100 Instant Film Camera – Faulty Untested See Lens Shutter

Otherwise clean, 

battery compartment is clean, 

unable to test so selling for spares or repair considering the lens shutter 

EBay

I’m a tad annoyed at myself here as I had arranged a good price with the seller but because I was too eager I pushed the wrong button and purchased at the original advertised price. The seller must think I am a right plum, and I’d be inclined to agree with him. That said I’ve secured this for a good all in price, and it will be a nice addition to my collection. It’s a 26 year old camera, and i’ve been looking for one of these particular cameras that use the wider format of Instax film for quite a while, but even the damaged ones command hefty prices. I’ve paid an all in price of £28:55GBP here when I should have paid £23:55GBP. Never mind, lesson learned and don’t be so hasty in the future. They can command a good price as can be seen in the photo below:

Some recent sale prices

Here’s some info about this camera:

The Fujifilm Instax 100 was released on May 1st, 1999. It has been replaced by the newer Instax 200, which is very similar except the flash is on one side rather than directly above the lens.

Technical Specifications

  • Type: Instant camera
  • Film: Fujifilm Instant Color Film instax
  • Picture Size: 62x99mm (based on the golden ratio, closer to the naked eye)
  • Lens: Move in/out type Fujinon Lens 2 components, 2 elements, 95mm
  • Aperture: f/14
  • Shutter: Programmed electronic shutter 1/64 ~ 1/200
  • Viewfinder: Real image viewfinder 0.45x
  • Focusing: Motor-driven 2-range switching (0.9 to 3m/3m to infinity)
  • Power supply: 4 LR6/AA-size 1.5V alkaline batteries for around 10 film packs.
  • Dimensions: 171.5 x 91.5 x 119.5 mm
  • Weight: 650 gr (without batteries, strap and film pack).

Camera-wiki.org

Now this one is being sold with what looks like only one fault that the seller is concerned with and that being a shutter problem. From experience and as can be seen in this recent post of mine: Another Fujifilm Instax mini 8 I know that this is not a “Lens” issue it is in fact an issue with the iris that protects the lens, and is probably as a result of a small spring being disturbed in that area. It’s quite a simple fix and if it is the only fault then that would be quite some result. However, this is EBay that we are talking about and there could be a number of further faults we haven’t been informed of. Now I will just have to be patient until it arrives, there is no other choice.

Assessment:

It’s a big one. Compared to the other Instax mini cameras this one is very big. It’s probably 1.5 times bigger than your standard SLR. It’s big. And weighty!

It’s clean…ish. And there seems to be a strip of plastic, a gate as such missing from the top of the camera near the exit slot. This wasn’t mentioned and I’m quite annoyed about that. When batteries are put inside it makes all the noises, but the action isn’t smooth in the lens extension range. This probably ties in with the advertised issue of the lens iris operation. I’m thinking I paid well over the odds for this particular camera, I’ve been conned here, lesson learned.

There could well be multiple problems here, and if that missing piece on the top is anything to do with light proofing, then we could have an issue. Anyway we will cross that bridge when we come to it. Initially I’m going to stick with the original fault, so let’s attack that and worry about any other issues if and when they crop up.

Repair:

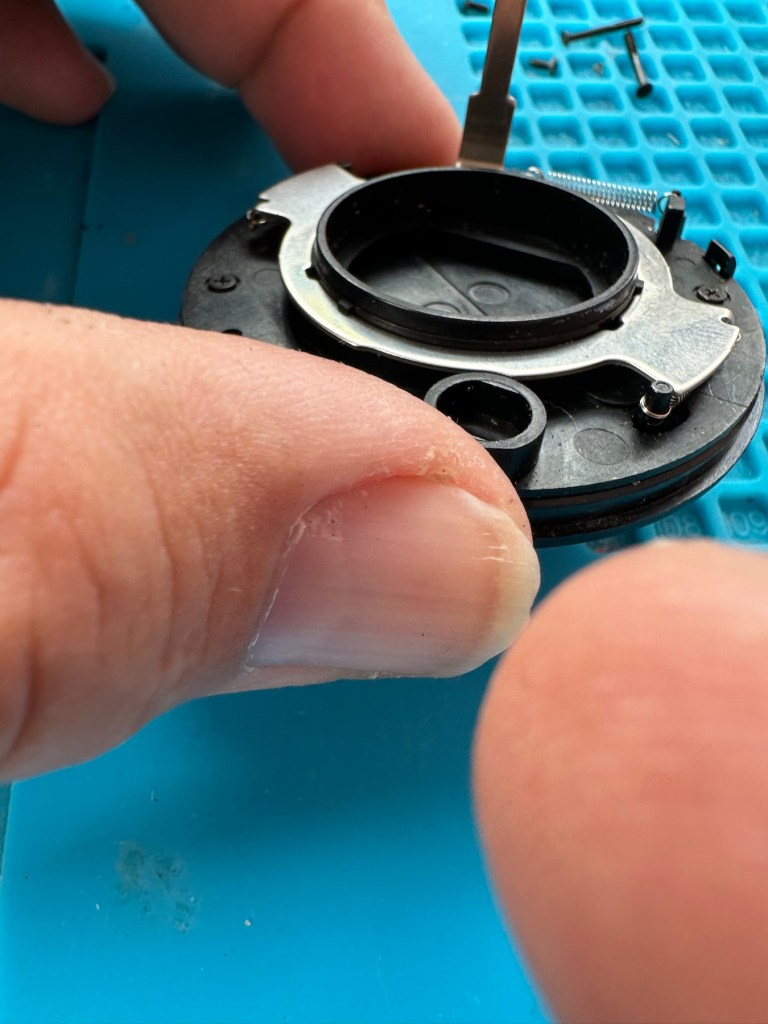
The more I get into this camera the more I find wrong with it. The main issue of the faulty lens iris is a fiddly one. You prise off the last section of the lens turret and the iris mechanism comes away fairly easy.

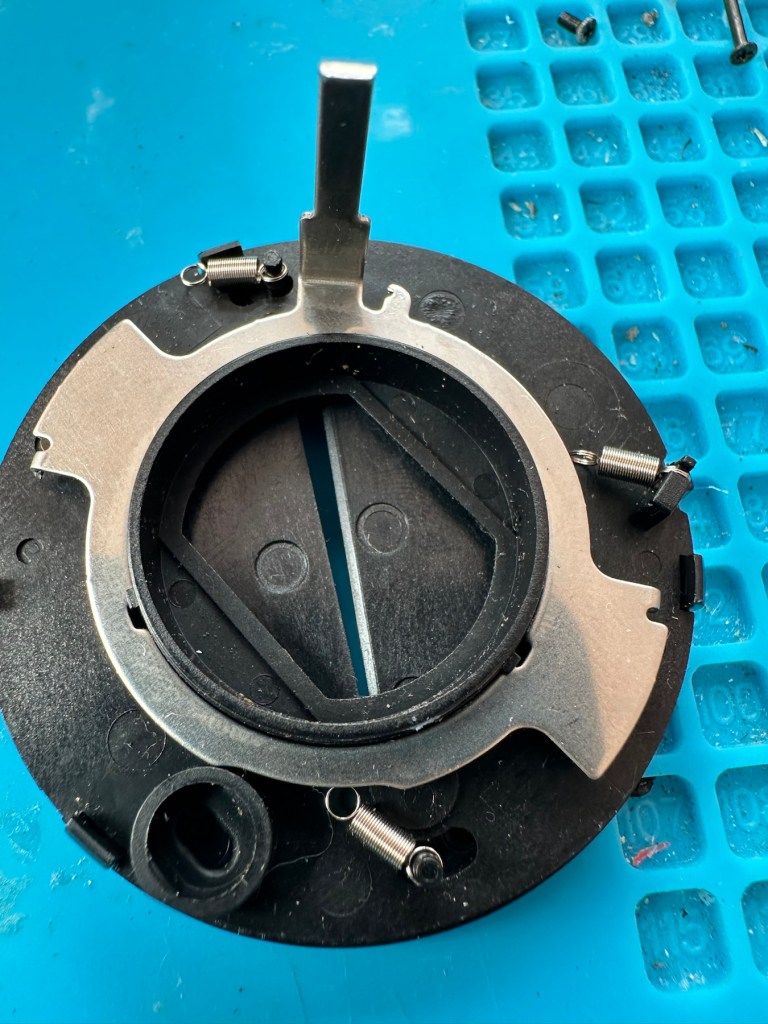
But then three tiny springs just fall out and this is why the iris didn’t work. Trying to get them in place is a puzzle itself, as no sooner do you have one connected then another drops off. It’s a fine balancing act to get them all back into place. When they are all reconnected it’s a very delicate operation to get them back into place. And even then you have to go to the inside of the camera to ensure that the lever inside that operates the iris, is aligned to the iris mechanism that is being installed back in the lens turret. It’s a fiddly time consuming job.

Iris now working

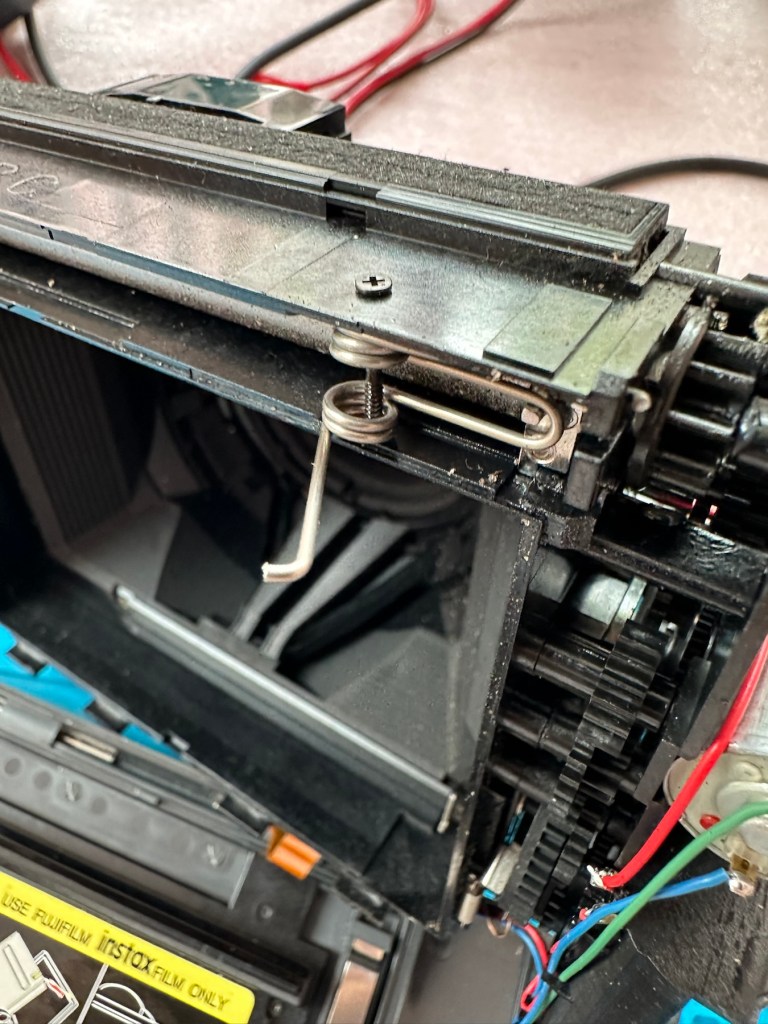
At this point the rear fascia and associated ribbon cable need to be removed to facilitate this repair. That’s when a piece of broken plastic falls out, it just so happens that one of the posts putting tension on the print rollers has broken. Great. Another problem. I’ve quickly fixed this by using some wire to act as a retention point. Bodge? Yes, but there really is nothing else that can be done here as the plastic case is thin and brittle. I have used some silicone grease to lubricate the cogs and the whole movement is now a lot smoother. It Will work. of that I am confident.

Result:

Well it works but it remains one of my most disappointing fixes due to the dishonesty of the seller. I know, if you buy off auctions it’s Caveat Emptor as they say, I preach it enough but this time I was caught off guard. Lesson learned. But I remain disappointed. Multiple faults, sold as just the one when in fact it also had bits missing that were not declared, very misleading in my opinion. Maybe in future I need to look deeply into these purchases before I give any feedback, i need to change my operation as I was truly shafted here.

It does everything that it should, the motor and transport system work, the iris now works, shutter is good, and flash operates. I’m confident that the camera is working fine but I haven’t tried any film through it yet as it uses a bigger format film and is quite expensive, and I’m not forking out for any just yet. Maybe when I get another wider format model to look at I will pay out. Just not yet though. When I do get some film through it I will amend this post accordingly.

I’m off to calm down a bit now, thanks for passing by, I really do appreciate it. Have a great day.

Modified Sega game gear 2110-50

You may wish to refer to this post: Sega game gear 2110-50 where I purchased a non working Sega Game gear and brought it back to life.

The (I thought it was repaired) Game gear

I’m now ready to do some modifications on this unit, and I will save the replaced items for use on later projects.

Pretty much every Game Gear that was ever produced (and that is approximately 10.6 million units) has suffered with the dreaded (Capacitor plague) that I have discussed in an older post. The first job that is recommended to be carried out when purchasing an old Game Gear is to replace the old capacitors, it’s quite an easy task and nine times out of ten will remedy any issues that you have and allow you to continue gaming for years to come.

However there are other issues.

The screen is an old tube powered system that is exceptionally power hungry, you can replace this with much superior LCD versions, I’m withholding from doing this at the moment as I want to get as much use out of the old screen, and to be honest my unit doesn’t require replacement just yet, there’s still life in the old girl. I’m sure that this will be a future project though.

Occasionally after doing the capacitor replacement on the power board, other components such as a small IC and three transistors that control voltages across the system, start to misbehave causing the unit to switch off after just a few seconds. This is currently occurring with mine and I am intending to replace these components to see if this sorts out my issue. I have also ordered a replacement power board from China that is a fraction of the cost of a European one, it may work, it may not but if the change out of components dosen’t work at least I’ll have an alternative option.

There are a few checks we can do prior to replacement of these components on the power board that will confirm the various voltages required by the system. It’s best that these tests are done prior to diving in head first to replace them. You could be just wasting time. You may need a new power board or maybe even consider converting to a rechargeable battery system. It’s all doable.

Expected voltages – photo courtesy Retrosix

Here are the results from my test of voltages on the power board, I’ve injected 9v via a bench power supply to the battery contacts on the board:

  • At the 34v pin I had 0v
  • At the 9v pin I had 8.9v
  • At the 1.28v pin I had 1.28v
  • The three ground pins read as ground
  • At the two 5v pins I had 0v

So as a result I obviously have an issue with the 5v rail and the 34v rail, I believe the 5v rail is the one that affects the boot sequence and the 34v is not an issue at the start up, however, it’s there for a reason and this simple test proves there is an issue. I will therefore only change the IC and three transistors as the capacitors were changed when I did a full recap.

For my modifications I am getting a new clean amp duo audio board with dual speakers instead of the single mono one that is standard. This is an upgrade on the original, extremely efficient and with better sound processing.

I am also replacing the shell with a new Blue case and glass to replace the scuffed old screen, this shell also has dual speaker outlets to compliment the audio board replacement. The shell is already prepped to accept a rechargeable battery system should I decide to install it at a later date.

I shall be getting these upgrades from Retrosix who specialise in supplies and modifications for gaming consoles.

All the items have now arrived and the first thing I’m going to do is sort out the replacement IC and transistors on the power board. The rest is fairly straightforward. However they have sent me the wrong shell, a single speaker one instead of a dual speaker one, so I’ve now got to await a replacement, annoying!

Scratch that, they are saying that they never did have any duo speaker ones even though they were advertising them on their site ( as per picture above..) and after a protracted discussion with the supplier / owner i’ve come to the conclusion that he might think he is a wizard at modding and designing circuitry but is totally and utterly inept at customer service, he wouldn’t know good service if it bit him in the ass. Hey ho on we go, it is what it is.

If you choose to use them in the future then just be aware. They have an uncanny knack of trying to pin their inadequacies and mistakes on you, the customer. Caveat Emptor – as they say.

So now the sound will be original mono, but hopefully improved. I have a spare speaker and mount as a result and I can use the new clean amp duo board in a mono configuration. Should I get a duo speaker shell sometime in the future I can always do a swap out.

Today I’ve taken the empty new shell and installed the new audio card and speaker, as well as the new buttons and silicon pads. I’ve then installed the main board minus the power board that still needs the new components.

I’ve also installed the new front lens on the unit and I must say it looks nice.

New front lens on unit

Let’s get to the difficult bit, replacing the components on the power board. I’m not joking when saying that some of these items are not much bigger than a grain of rice. I suspect a lot of bad language will be used here, as this is a new level of soldering for me. I’ve never replaced anything so small before. If I balls it up I’ll just have to await my cheap Chinese power board.

Ok, the power board from Ali Express got here really quick, to be honest even before I could set some time aside to change the components on the old board, so therefore I’ve decided to try this new board as a straight swap.

I will keep the the components and the old board to use at a later date.

First though I have used the bench power supply to test it is ok, and it’s a big tick on all voltages as per the test I did on the old board. All voltages are stable and consistent, so I have secured the board in place and put the required batteries inside. Works perfectly.

Back together, awaiting the big switch on
Working perfectly

I now have a perfectly good looking updated Game gear that I am exceptionally pleased with. The sound system is a good upgrade, it has a really loud volume (adjustable) and is crisp. The powerboard from China at a total cost of £10.80 is an absolute bargain, and works perfectly with good stable voltages. The case is good, fits well and the lens is clean easy to install and scratch free, the whole thing looks brand new.

Two old rebuilds, rejuvenated

I now have two perfectly good looking and working examples of 90’s retro rivalry in perfect working condition. The plan is to display these in the house, on a custom made display. I’ve really enjoyed working on this little project and I’m made up with the outcome.

The only things left to be done would be to change the power supplies to rechargeable and to change the screens to new IPS/LCD screens, but I don’t think I’m going to do that on these two, I’m keeping them original or as close as possible to original, I want to keep these as they are, to cherish in this condition for as long as I can.

I love them. And they are fantastic.