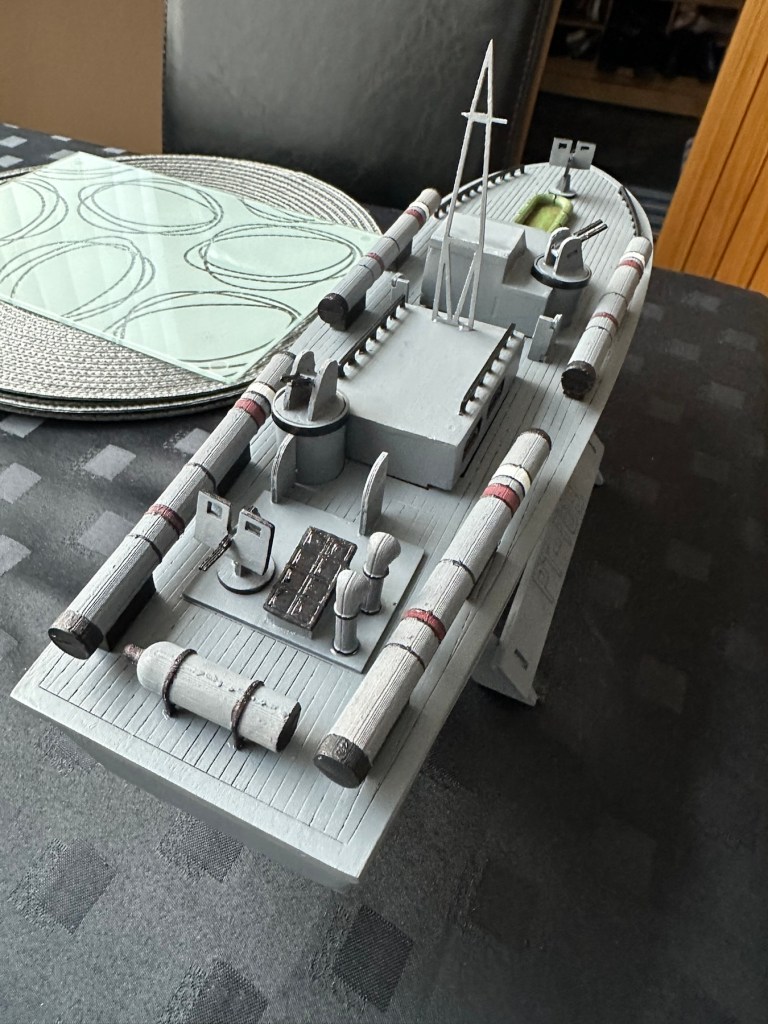
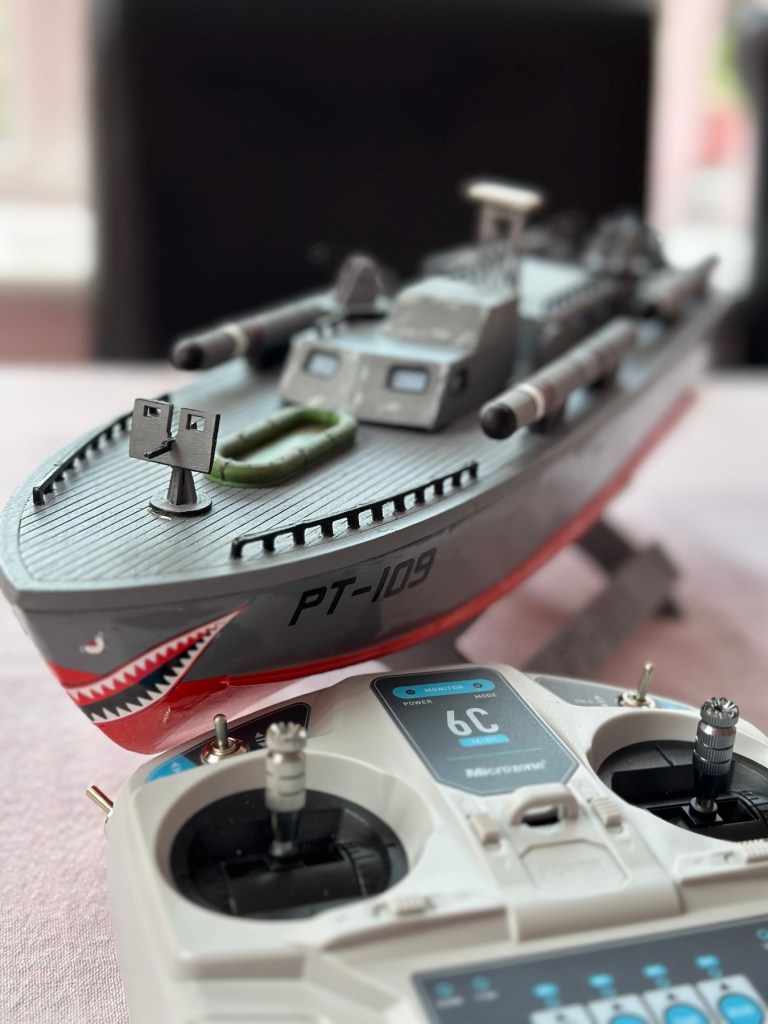
Today 16th June 2025 and this boat that I was gifted for my last Birthday back in Nov 2024, finally underwent proper trials on water, and thankfully after all the issues experienced during the building process it came through them with flying colours. There are a few little tweaks to do as a result of the maiden voyage, but this will only go towards making it a far better and less stressful task on future excursions. Boy was i nervy about today, what with all my family watching.
A nervous owner placing his boat on the lake…
And off we go…slowly
I only have the one battery for the boat so time was limited, and I probably managed about 15 minutes with it nutting about, before it stopped and had to be rescued by my Brother in laws boat that just happens to be a tug, a seaborne version of the RAC.
Luckily the seaborne version of the RAC were on hand
Anyway prior to that minor mishap the boat performed quite well, the motor is hellishly powerful and I thought it would go either of two ways. Either it would launch itself out of the water like a missile or it would go nose first into a deep dive towards the bottom of the lake. Luckily it did neither, however I did learn that turning at speed is liable to capsize the boat, so care needed to be taken when performing turns under power.
And she works…..
As usual I have learned a lot. It needs some minor tweaks such as a better centralisation of the radio gear in the hull, it needs some Baffles to be put in around the front deck where the hull and the superstructure join, to prevent water ingress at speed. The front does sit low in the water but at speed the contours on the hull do create lift, and this does work very well, so I am particularly happy with this.
A great day out, at the start of the holiday, and the fact I didn’t have to go wading to rescue a failed boat is also an added bonus. Really looking forward to showing the videos and pictures to the elderly friend who purchased this fantastic gift for me. They will be as pleased as punch, as they know about all the hard work and care that has gone into getting this project finished.
Thanks for following the journey with this project. As always it is very much appreciated.
How it looked in the last blog post prior to finishing
This post covers the finishing, that is the priming, painting and installation of the radio gear to complete the build of this wooden model boat.
I have to give a couple of coats of high build primer to the hull and deck sections, and for this task I will be using Guild lane high build primer.
This will seal the already sand sealed wood and give it a good foundation for the final paint application. I will give a good initial coat, lightly sand and fill any imperfections and then give a final second coat prior to choosing the colour scheme I’d like for this boat.
Today I have given the first two coats of primer to the hull and deck, and I’ve primed all of the cabins and guns and torpedos in preparation of individually painting them. I need to do a light sand on the hull and I believe a third coat will then suffice.
All deck weapons primed and painted
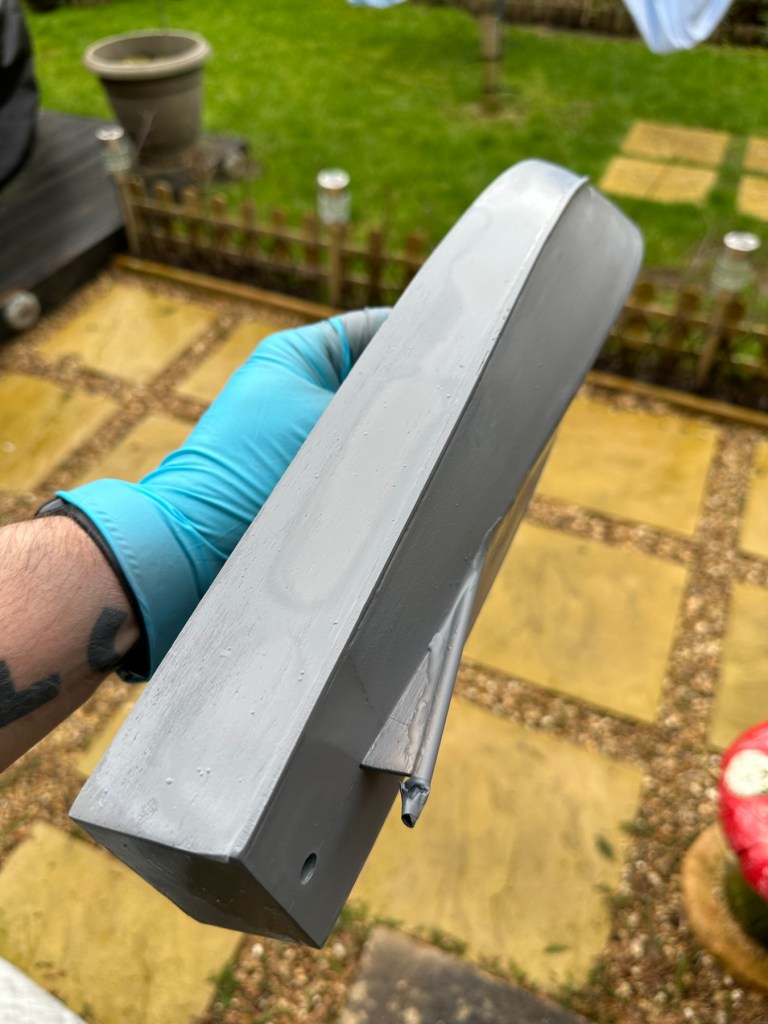
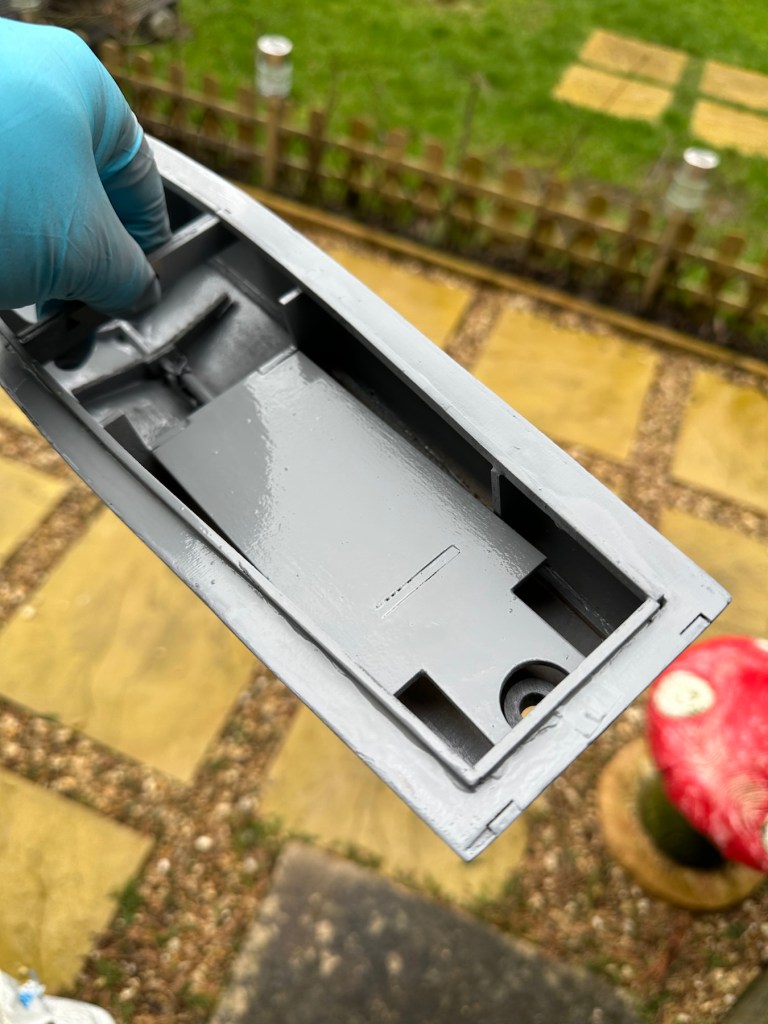
HullInner battery plateInside hull
I’ve given a light sanding to a couple of spots on the hull, I’ve filled a couple of tiny holes, sanded again then re sprayed the hull. I’m happy with how it looks at present. I’m not following a traditional paint scheme, so there will be no comparison to its original appearance. I’ve hand painted some of the deck fittings, put in the cabin windows and started to fix these items into place.
Hull painted deck fittings to be put in place. Deck dinghy painted and weathered Super structure addedDinghy placed Weaponry attached
I’m just awaiting some red paint to finish the hull, then I can get some decals in place. Then I can seal it all to finish the exterior of the model and then I can concentrate on setting the motor and the internal electrical elements up. Next I have to mask the area of the hull that I will paint red, I’ll do this now before the paint arrives as it just has to be right first time. I don’t want to be touching up too much if I can help it.
Masking of the upper deck in preparation for a red belly
I’ve made a pair of support struts out of balsa that sit behind the aerial, I’ve changed this area completely as it was too delicate and would have been a nightmare to transport. I’ve built a modern style array for a radar, I know it’s not going with tradition but again it makes for easier transport and reduces the need for repairs on the go.
First coat with mask in place
I’ve done the first three coats of red paint for the waterline, I’m going to leave this 24hrs now before I peel back the masking to reveal what mess I have underneath. Fingers crossed on this 🤞
Masking tape all removed
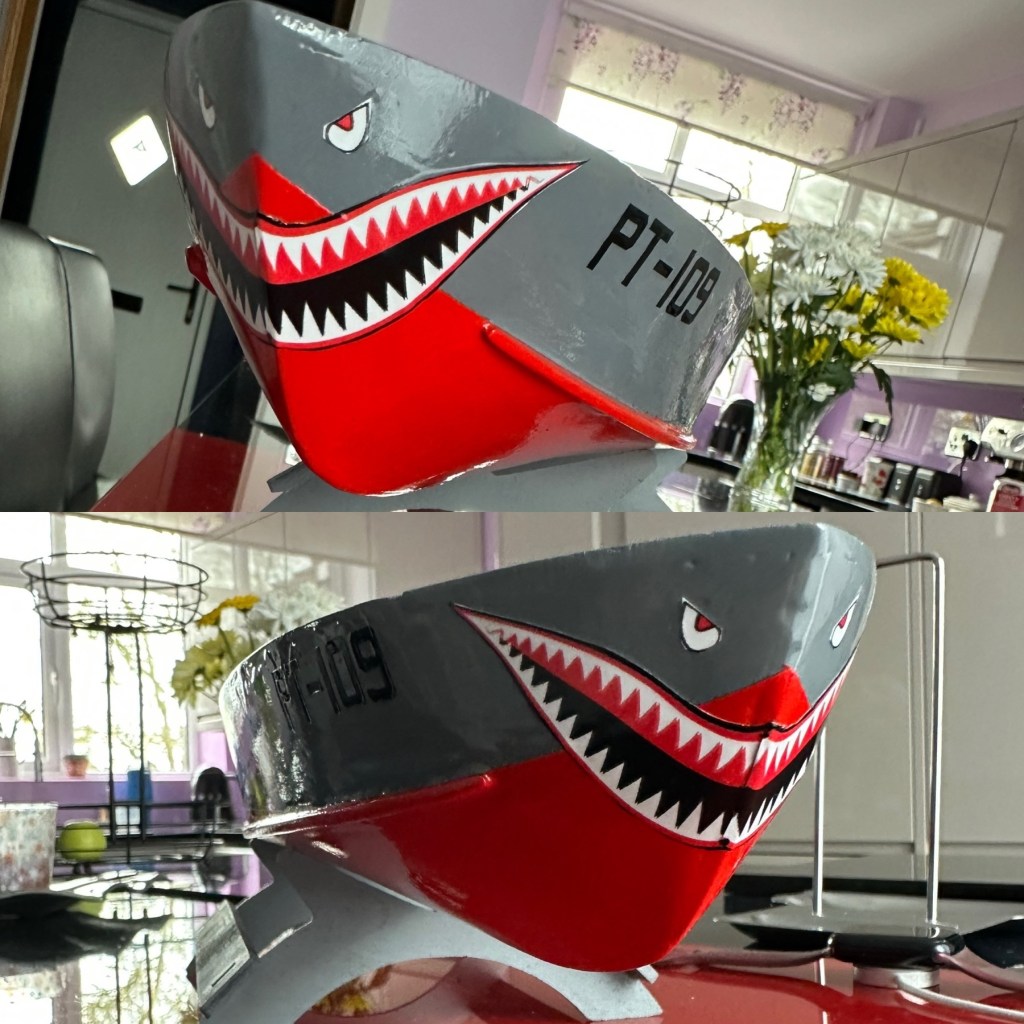
Fingers now uncrossed I’m really pleased with the outcome. The masking tape has been all removed and we now have a nice crisp line around where the red joins the grey. There’s some like marking up by the front end that believe it or not are finger nail marks when I was applying the mask. I’m not worried about this though as I have some sharks teeth decals coming that should cover this area. One of the little additions I wanted to make, to put my own mark on the build. Once all the decals are placed I will then give a final coat of a yacht varnish to seal all this work. I’m going to test a small area first as the last thing I want is for all this hard work to run into a gooey mess.
I have done the tests and commenced with coat one of the varnish. It looks gorgeous. Im probably going to do a further two light coats and that will be the hull complete. I haven’t put the decals on yet, I will probably do that prior to putting on the finishing coat.
All decals placedVarnished
All decals applied and final varnish completed. I can now look at getting the rudder and electronics installed. I’m happy with how the whole hull area looks.
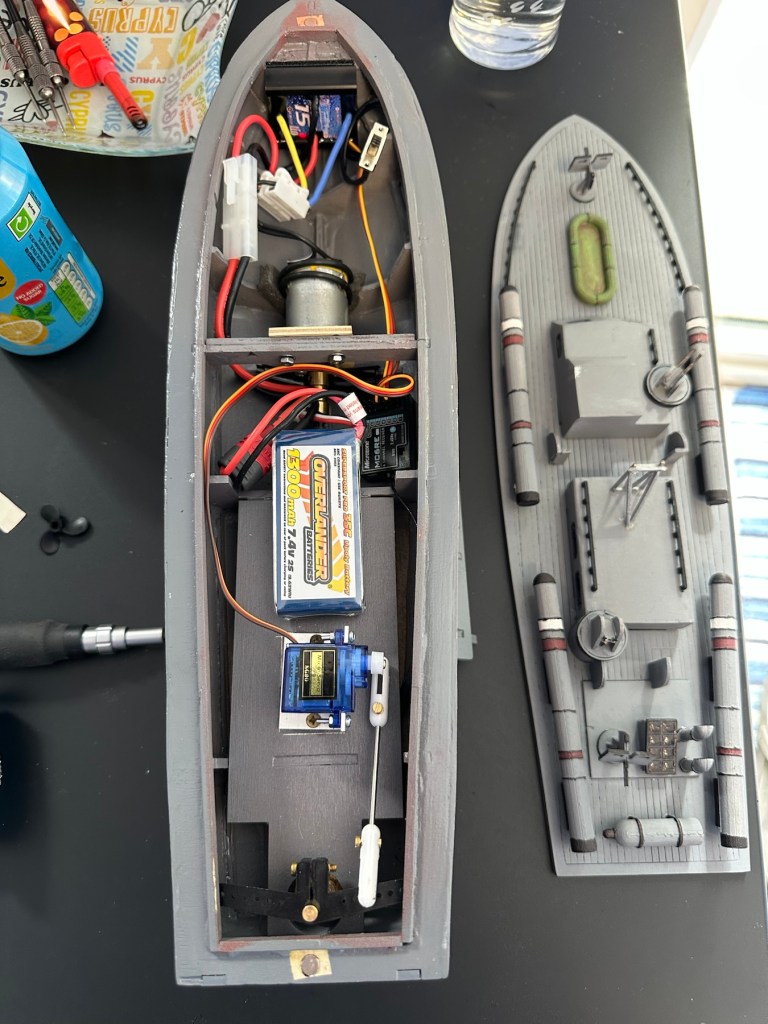
Motor, prop shaft and rudder now in placeLooking good on her stand with prop and rudder in place
All that is needed now is to place the battery, receiver and ESC in place. I have quite a strict time on this build and I must have it ready for “Lake” trials when we go to Norfolk in June.
I will also be borrowing my brother in laws pond for 30 mins or so to do a balance and water tightness test.
Let’s get the electrics installed.
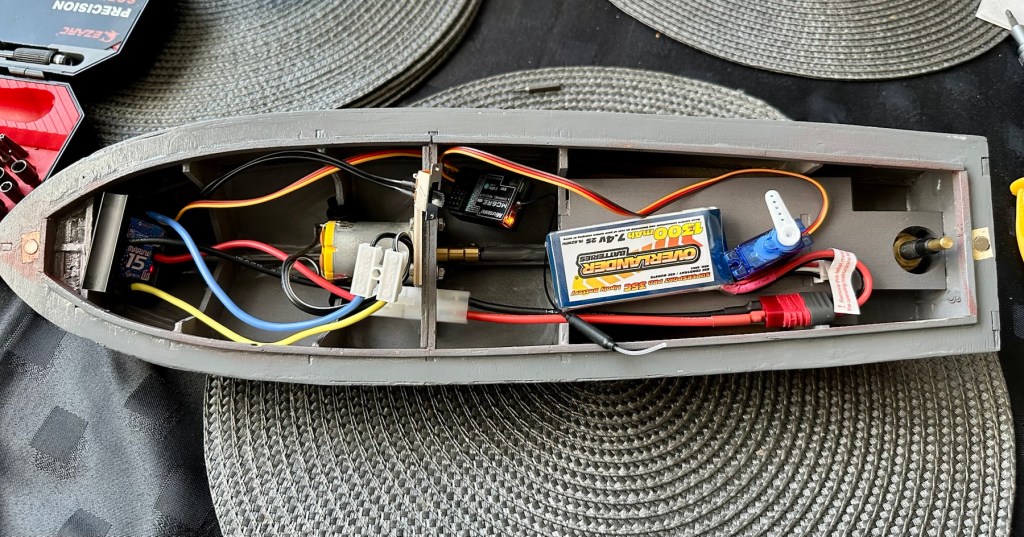
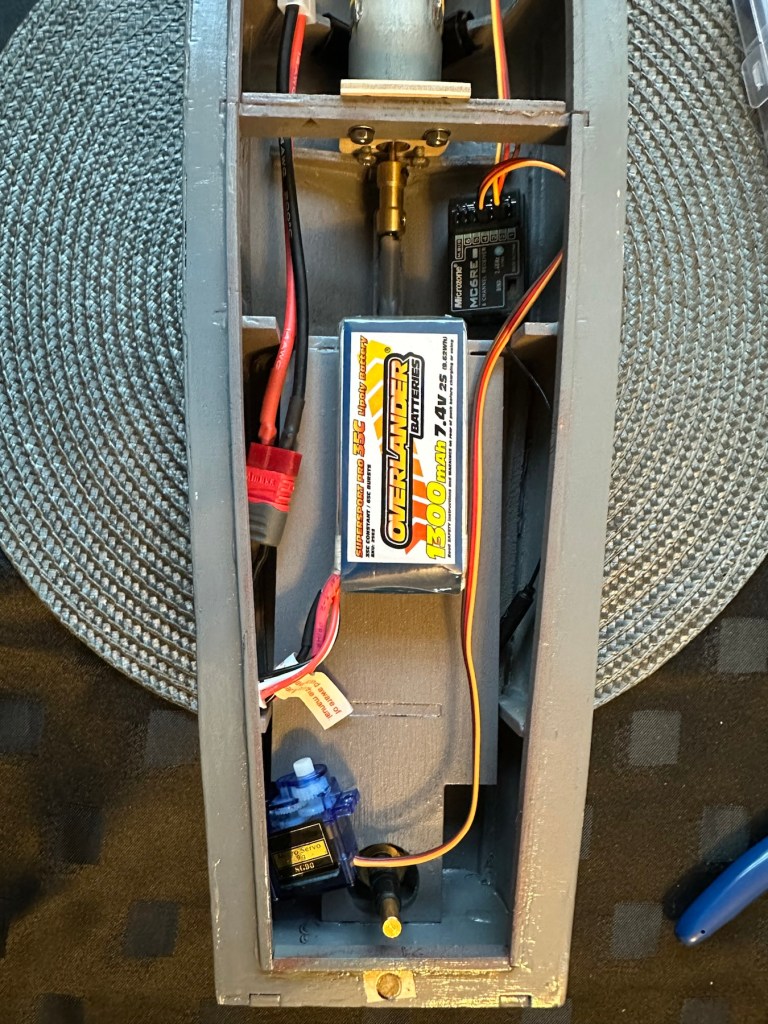
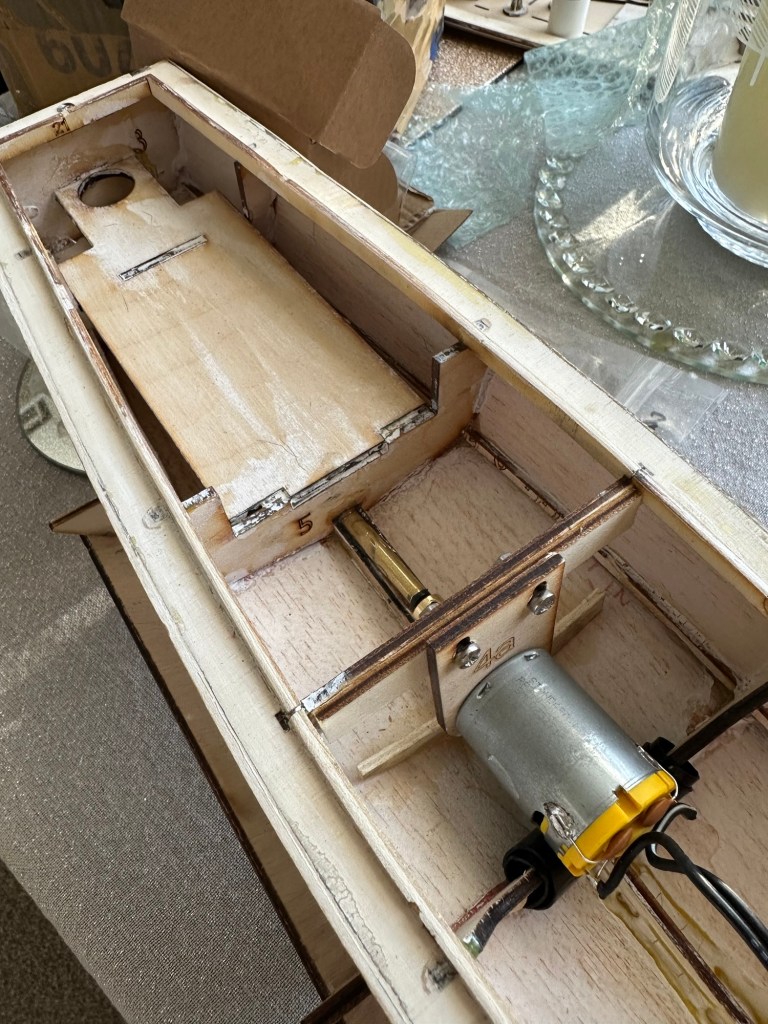
Having never really done this before, I’m quite amazed by the amount of gear I have to fit into such a small area.
All this has to go in there….i need a bigger boat
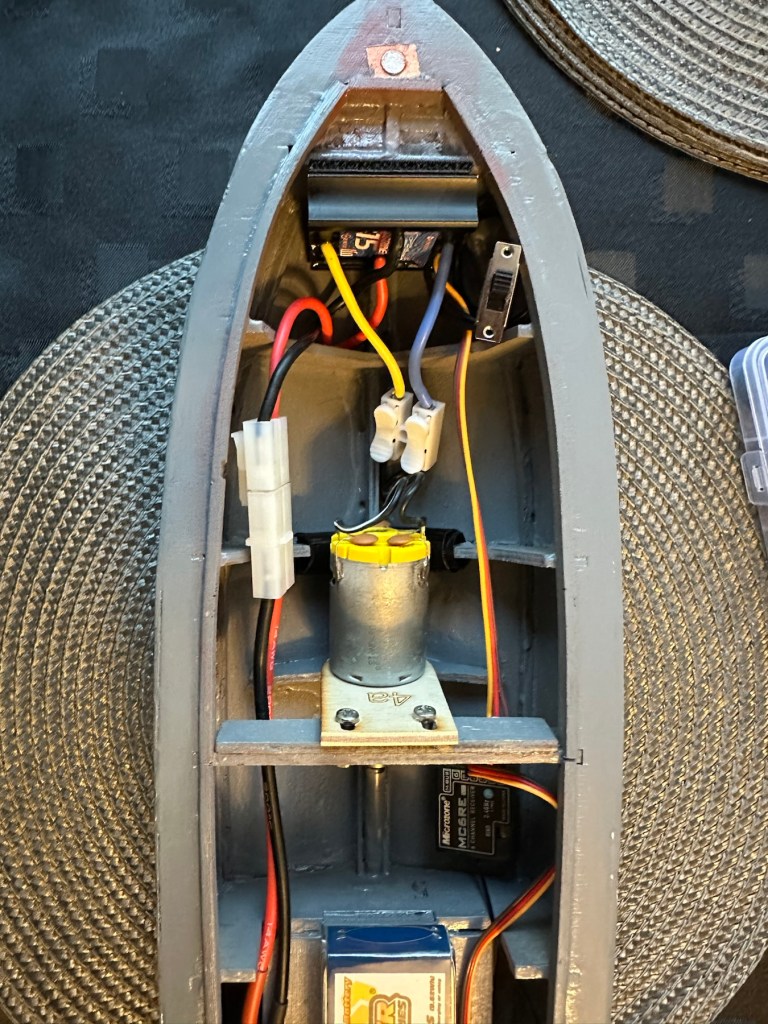
It’s in – just needs sorting
I’ve managed to put these items in-situ, in a rough position inside the hull. I need to shorten some cables, I need to somehow position the rudder servo, but I’m sure that will not be an issue. I’ve already tested the centre of balance and I’m happy with that. Later today I shall start to really tidy the layout by working from the front to the rear of the hull.
Front RearThank the Lord for Velcro tape. All complete apart from the rudder connection. I’m still working on that.
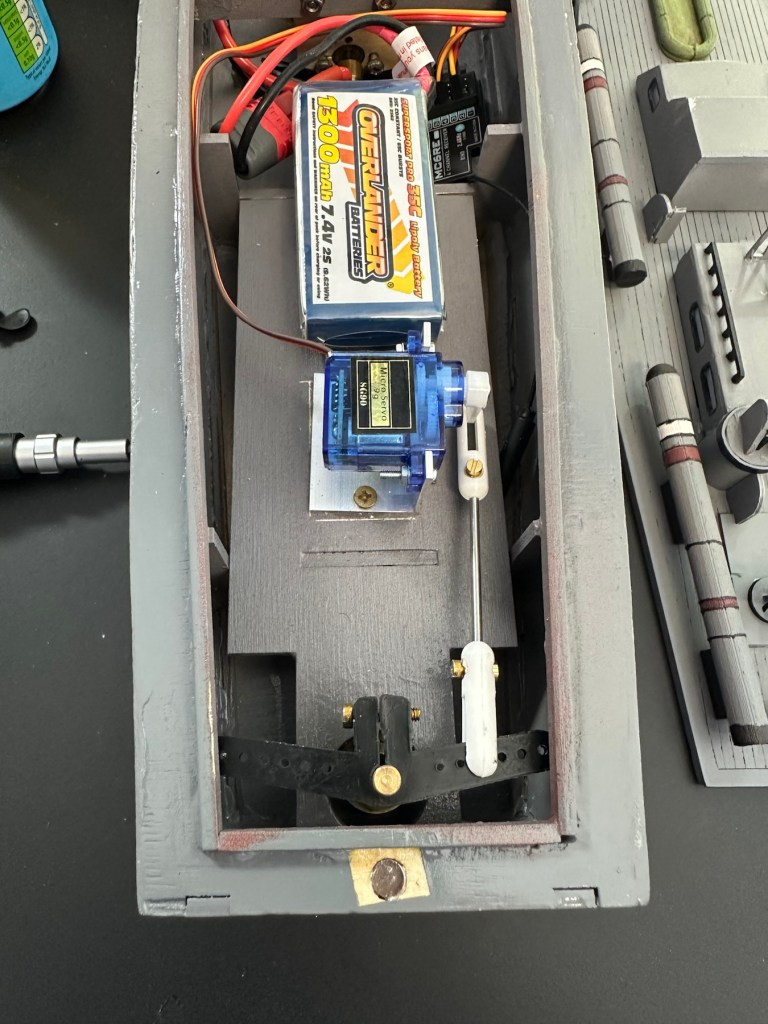
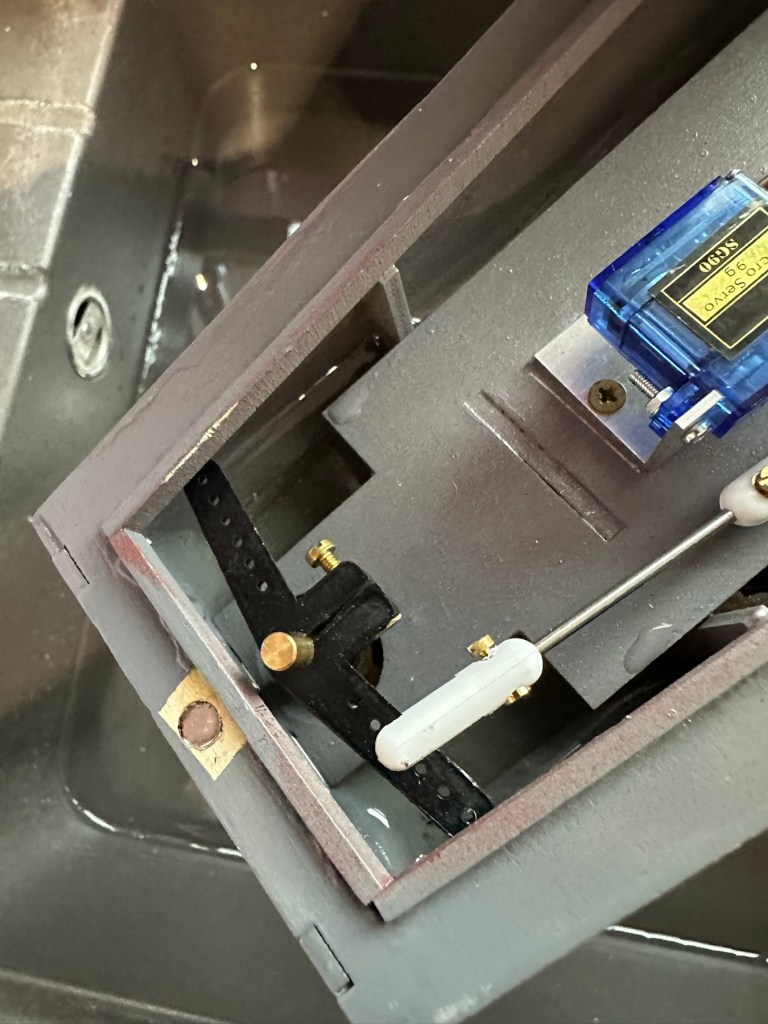
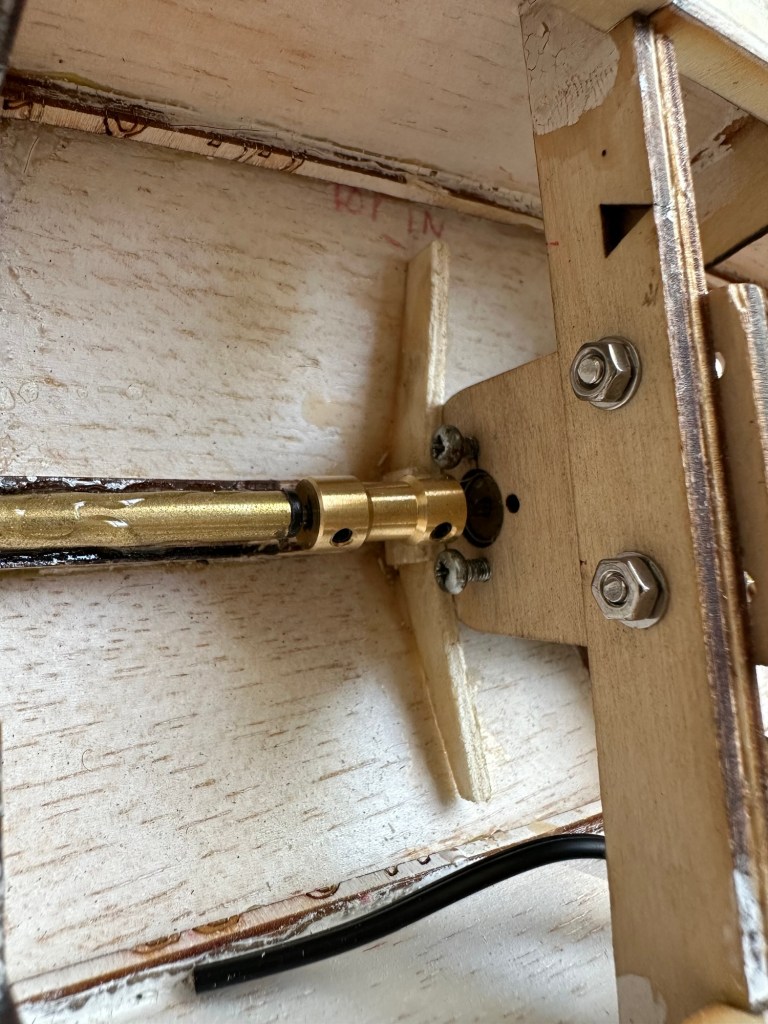
I’ve had to purchase a small bracket for the rudder servo along with a couple of connecting rods. Hopefully we can now complete the electrical connections within the hull and get the rudder operational, then I can get it water tested to check for leaks and balance.
Rudder linkage in place, just needs shortening
Rudder linkage now adjusted and in place
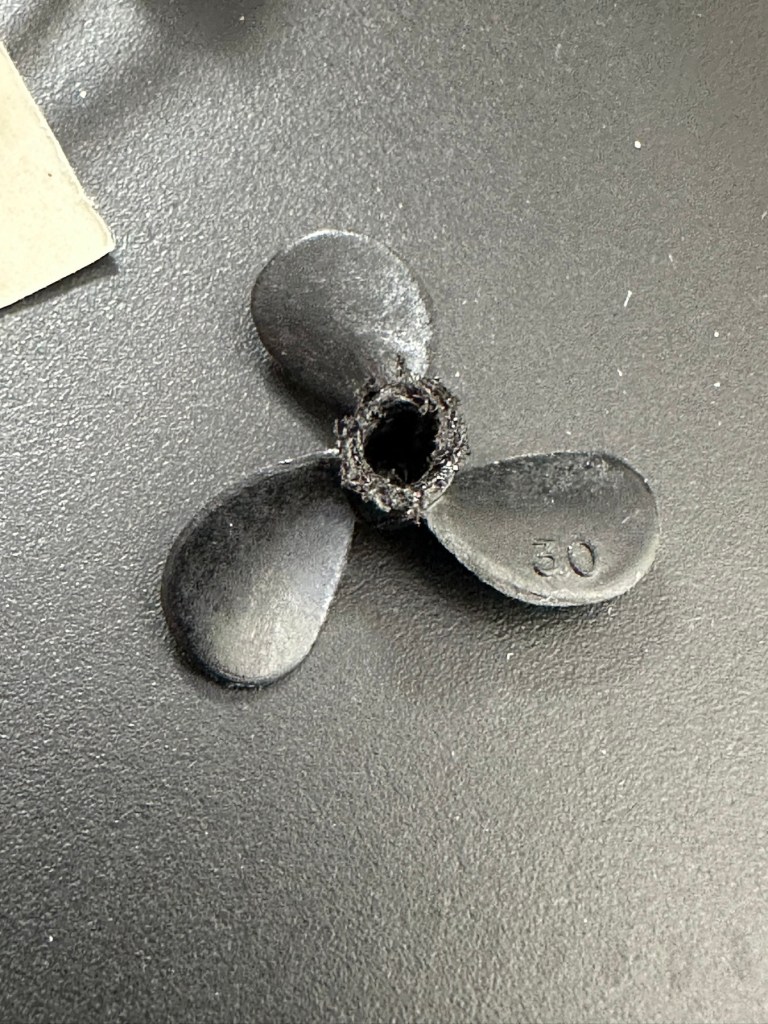
I’ve just had quite an annoying and inconvenient moment. The rudder linkage is all now in place and working fine, however the issue lies with the propeller shaft. I’ve rather foolishly connected it all up but left the propellor flush with the shaft end so when I put on full power to test, there was a burning smell as the propeller wizzed past my ear across the room and the shaft seized up. There was such a build up of friction between the propellor and shaft that the propeller melted and bent the 2mm prop shaft out of place. A stupid mistake, caused by my rushing to get this completed.
A melted propeller with the screw mechanism missing
A small video that shows the rudder mechanism working
I’ve now had to order a new prop shaft and propeller, hopefully these will arrive in the next few days and I can then get the build finished.
New prop shaft in place, and all electrics and functions are now operational with the motor purring away nicely. I’ve adjusted the distance from the prop to the shaft to reduce Friction and this appears to be working fine.
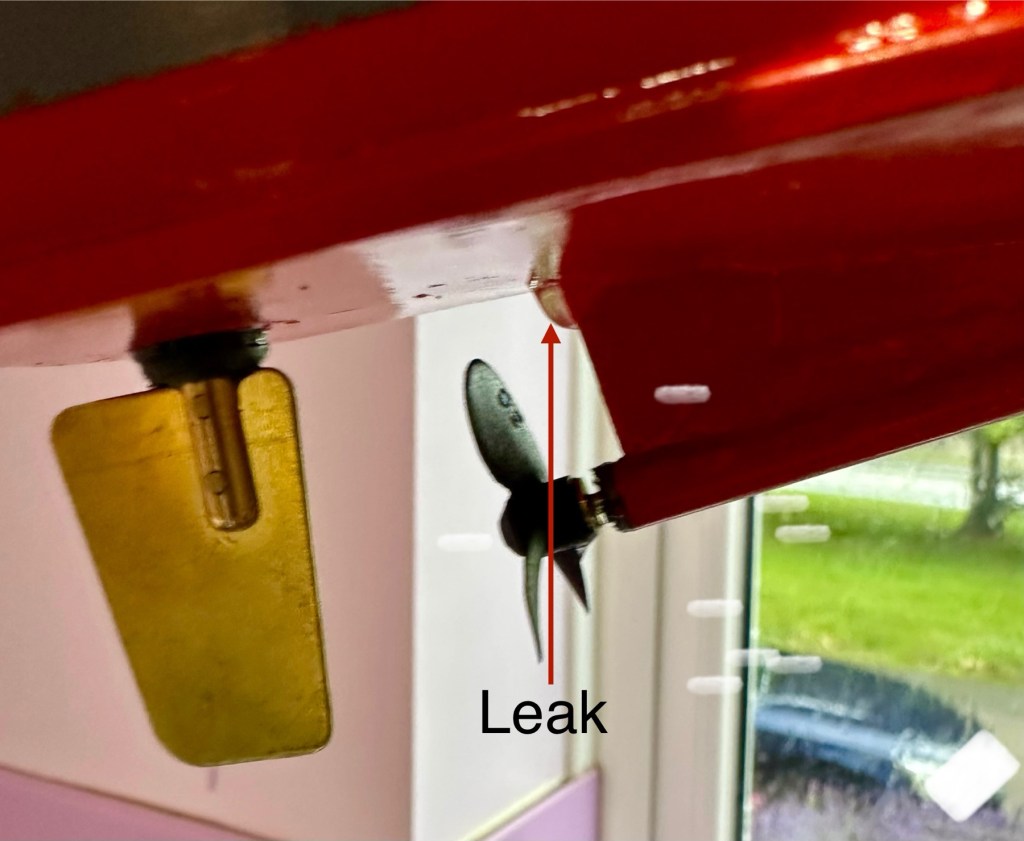
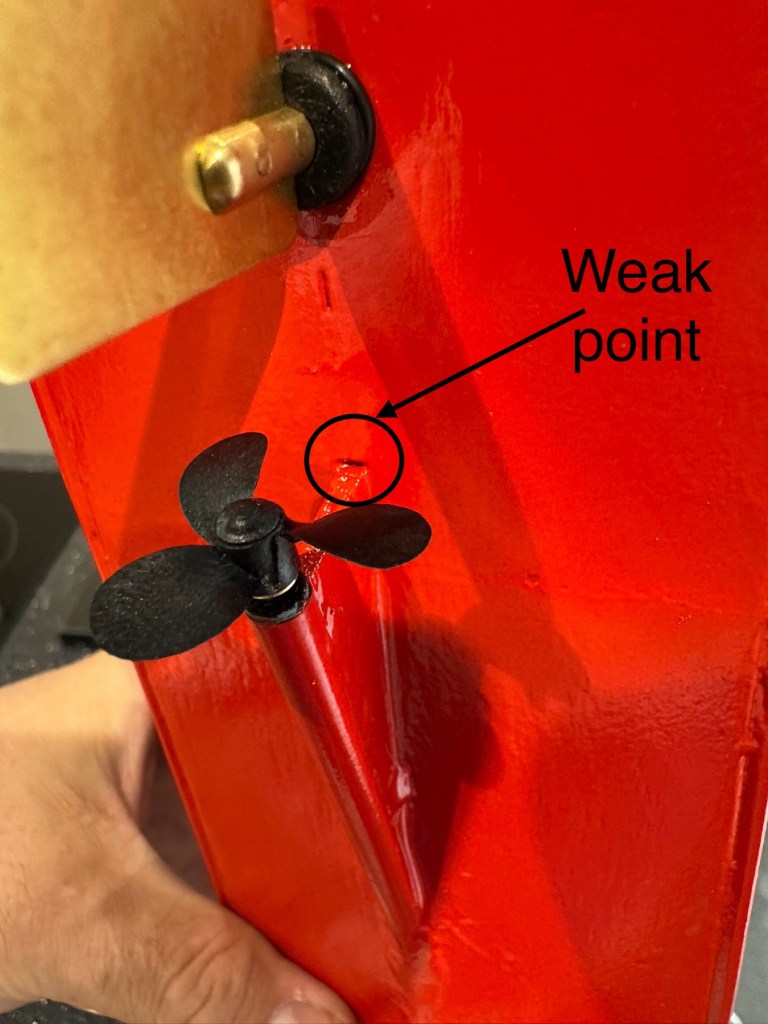
All functions working nicelyLeak can be seenWeak point found
Now to sit her in some water for leak test.
Floating nicely After 30 minutes we have water ingress
The leak test was going so well, all functions worked well and she was sitting nicely in the water.
Water test
The positive here, is that there is no leak in the front end there was no water present here. All the water was in the rear, however it was not entering via the rudder mechanism or the drive shaft.
I removed the hull from the water, tilted it in such a way for the water to gather at the rear, and dried the underside of the hull. After a few seconds you could see a drip starting to gather at the top of the mount that holds the drive shaft in place. I knew it must have been a slow leak as this took almost 30 minutes to build up, I’ve caught it just before it impeded on any of the electronics.
I’ve now emptied the hull of remaining water, it’s now drying off naturally and I have a plan in place to repair the issue once the hull has fully dried. I’m probably going to use some epoxy resin to seal around the whole drive shaft fin, and then I’ll paint and seal this part again. We will then repeat the trial.
Back in the water the following morning at 07:50 after being sealed with epoxy resin on the hull, let’s leave her alone bobbing around for 30 minutes to see what occurs. It’s not good news….again.
Timelapse over 15 minutes
As I’m impatient, I set up my camera in time lapse mode to see if I could pinpoint where the water was accessing. My suspicions were that the water was coming up the drive shaft however I’m quite pleased that the timelapse shows this is not the case. the water appears to be accessing again from the very base of the hull. This area was sanded to quite a thin tolerance so i suspect, that even with all the sealing, two coats of paint and a coat of varnish there must be tiny holes along the hull. The previous sealing I did cured the issue at the rear, it now appears that I will have to carry on with the resin coating or something similar, along the length of the hull. To make things entirely water tight I’m going to remove what I can internally and also seal inside the hull as well.
One good soaking of polyurethane varnish later…
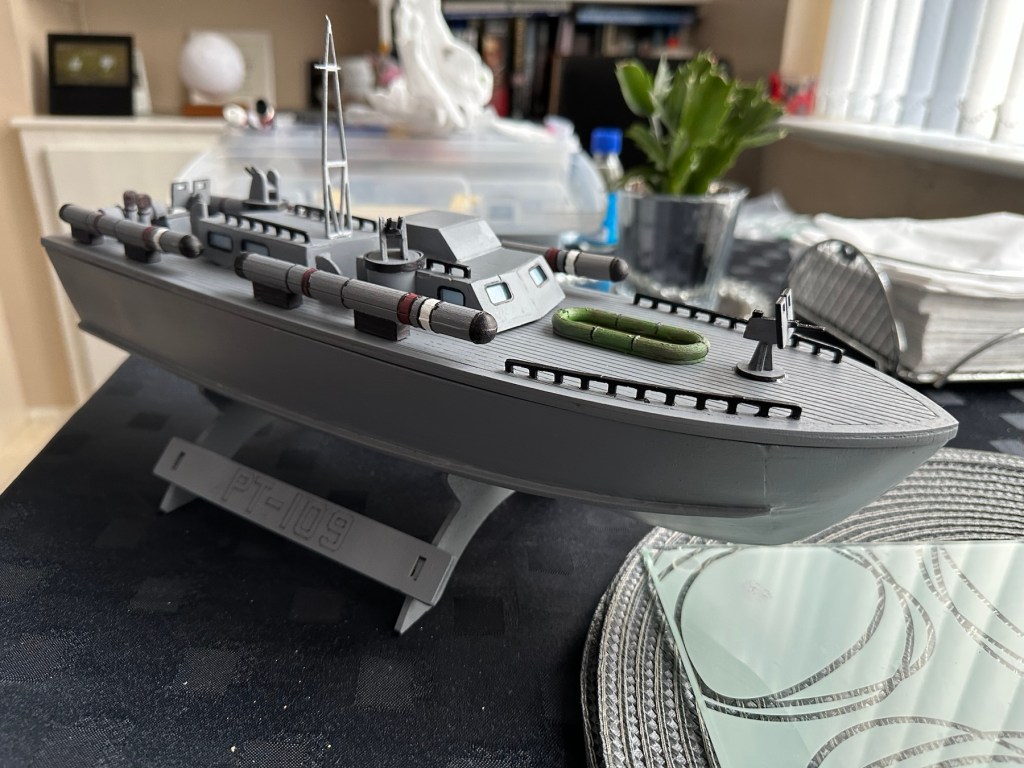
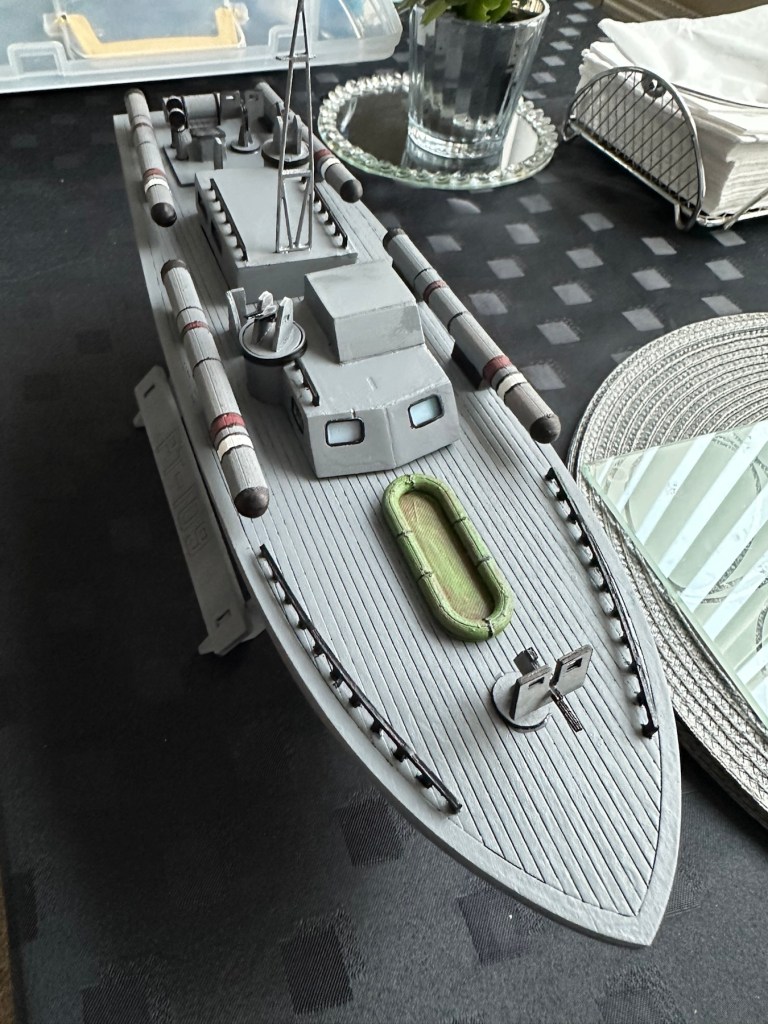
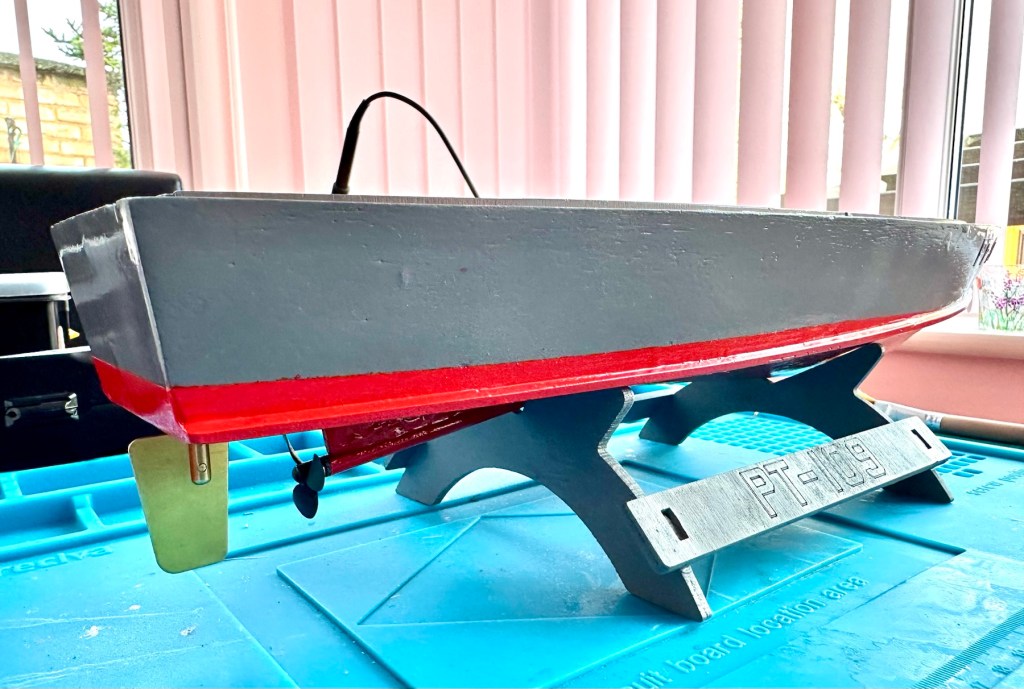
Three days after all this varnish has dried, I have done another float test and this one was with all equipment on board for an hour…and it was successful. We seem to be dry. I’m now putting the whole boat back together now ready for its maiden voyage at Gorleston boating lake in a weeks time.
Ready to go…
I will do a separate post regarding the maiden voyage and its outcome whether positive or negative shortly after.
Thanks for passing by, as always it’s very much appreciated.
This picture was painted on an iPad. I did this one back in 2012, I’d just received notification that my pension pot with Kodak had almost halved due to them declaring bankruptcy and moving production back to the USA. Sod everyone else who worked for them worldwide.
We lost out big time and that’s why I had a rant in this obscure painting I did at the time.
This years birthday, I’d hinted that I wanted to build an RC model boat from scratch, and that’s what I got. A good friend of my wife and I came up trumps and brought me this nice little wooden boat starter kit. I’m fairly experienced at building balsa gliders and planes from plans and have done quite a few. I’ve never ventured into boats though so this is a first for me. It all stems from going on holiday to Norfolk, where we normally stay in a place called Gorleston where there is a nice boating pond that two of my brother in laws sail prebuilt trawlers that they have brought, i’ve always said that I’d join them on one of our trips, jokingly saying I’d get a submarine or battleship to blow them out of the water. However i wouldn’t do that, and this is the first stage of venturing into the world of model boats. I’ve now just got to build it.
Boating pond at Gorleston
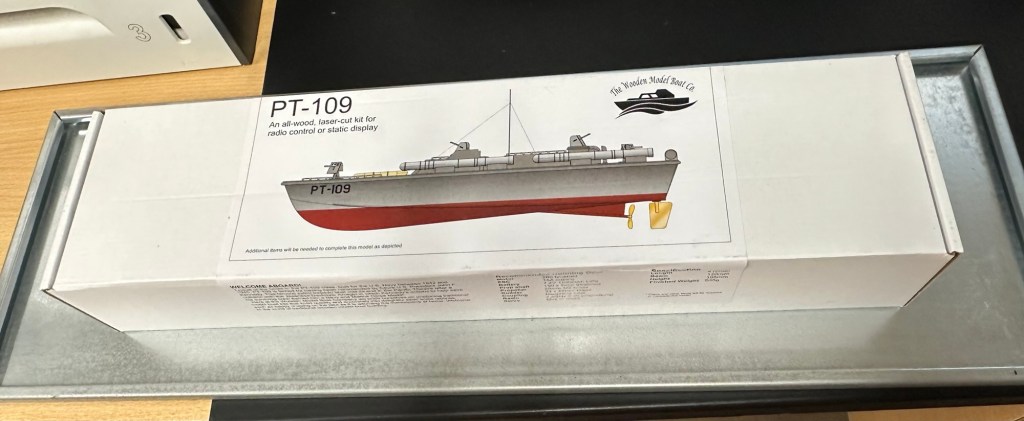
The boat that i have chosen is made by the wooden model boat company distributed in the Uk by JPerkins models. It is a PT109 torpedo boat modelled on the one that John F Kennedy sailed in, in the Pacific theatre after a collision with the Japanese Destroyer Amagiri in which Kennedy’s actions to help save his surviving crew earned him a Navy and Marine Corps Medal. I’m going to put my own touch on the paint scheme though and not go with the traditional all green or grey. I’m going to mix it up a little by highlighting and brightening up the look of the boat a bit.
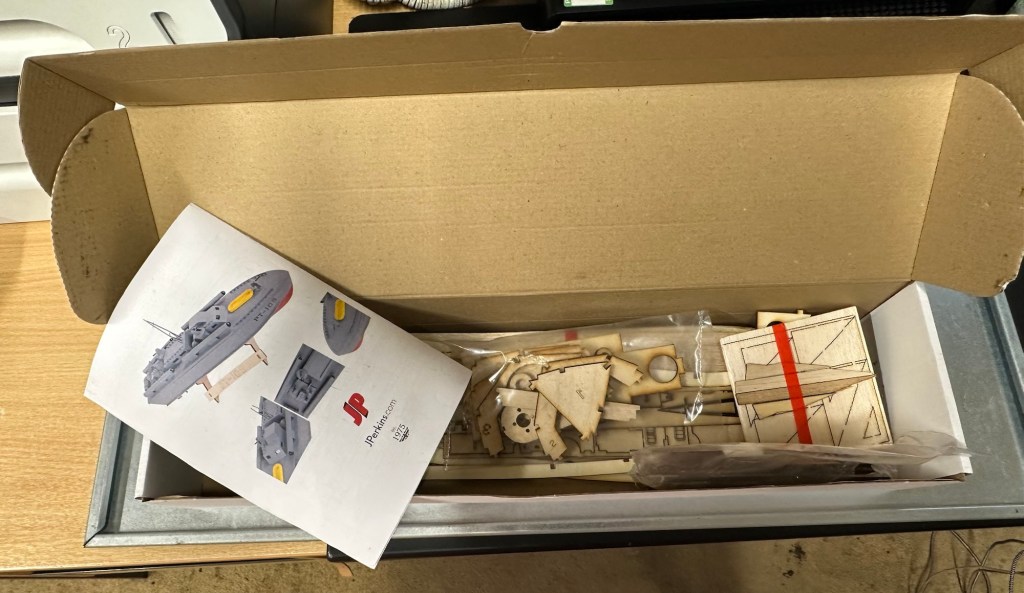
The boxed kit
Bitsand pieces Instructions Inside the box
These kits have laser etched parts, its my first experience with them and my only gripe so far is that some of the parts are so small and delicate that this process cremates the object because of its small size. I have had to make some of my own parts for this kit as in some cases it’s just like trying to press out burnt wood from the etched parts. Not good in my honest opinion, and as this is a starter set it’s more than likely liable to put a beginner off of the hobby to be honest. Not everyone is able to easily replicate the missing/damaged parts.
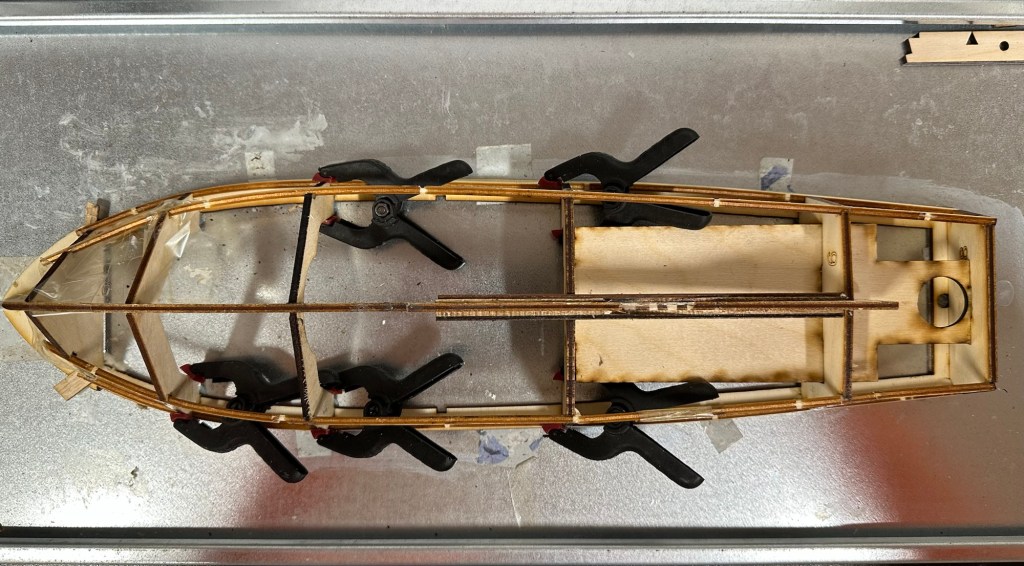
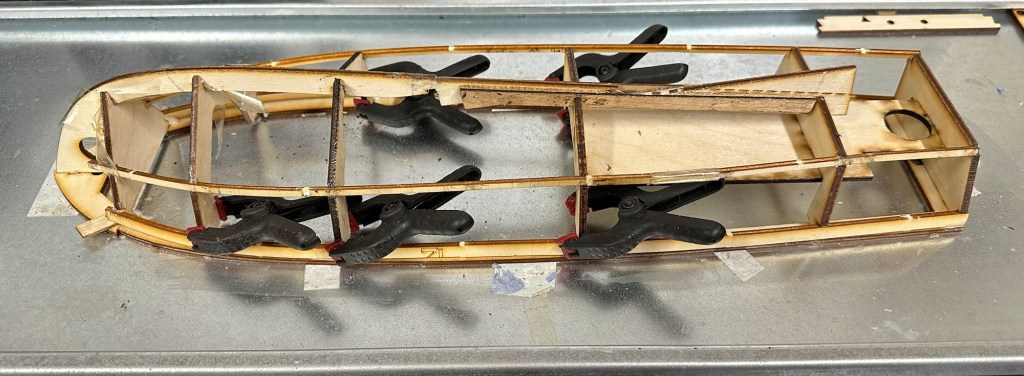
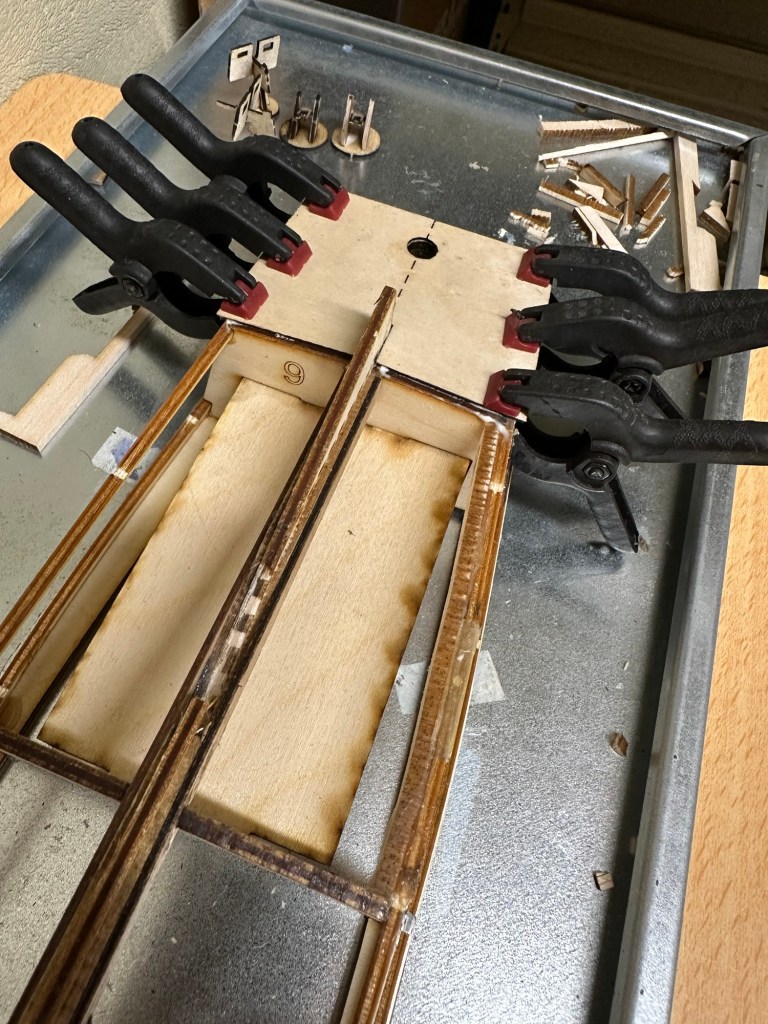
Firstly you have to secure the deck frame to a flat surface using some double sided tape. This is so you can start building the hull frame and prevent warping. I use a small steel shelf for my base that can easily be moved around and stored between sessions.
Secured to flat baseHull frameClamping strengtheners CuringMy shelf working space
There is a lot of time between sessions where you just have to leave parts to dry, you can quite easily try to do so much and potentially ruin all the good work you have done. Patience really does have to be a big part of what you do in build these models, the old adage of measure twice, cut once needs to be used so mistakes are kept to a minimum. You can make tiny adjustments when in the finishing process but for the time being you need to adhere to instructions as much as possible. Check and double check and always dry fit prior to gluing in place.
HullFormers to shape the bowRudder base in place
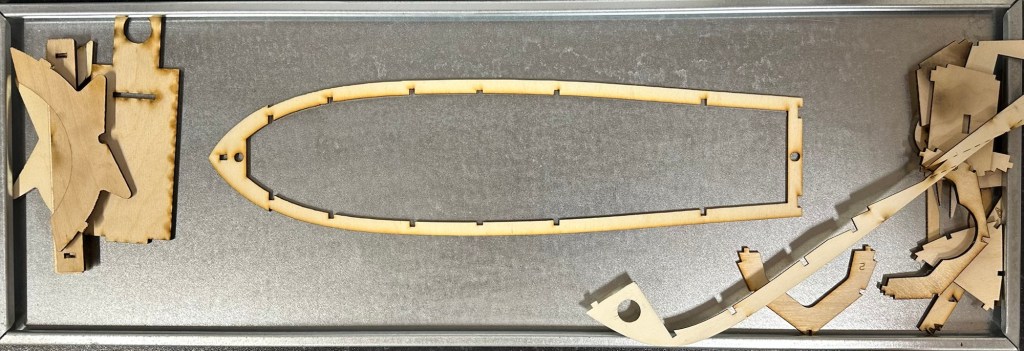
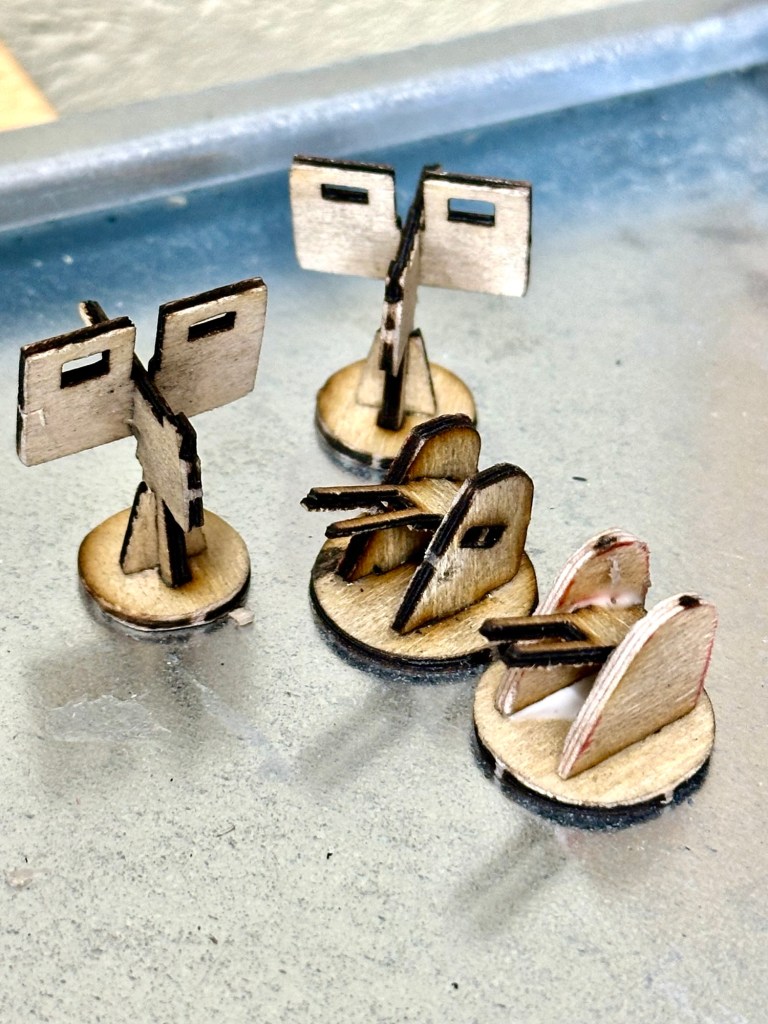
If you look at the picture below you will see how the laser etching burns really small parts. This doesn’t look good however they will look a lot better after they are sealed and painted, if I left all the parts like this the whole project would look as if it had been in a fire. I’ve had to build some of these parts from scratch as the kit itself had insufficient parts pre cut.
Burnt small parts…to be finished
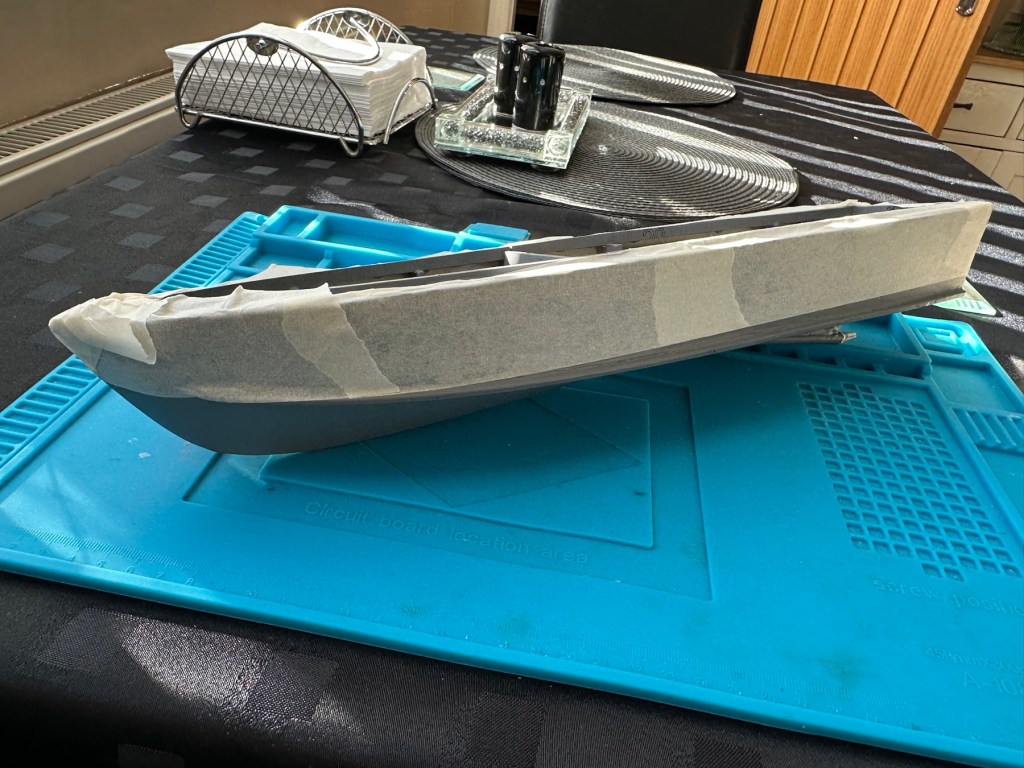
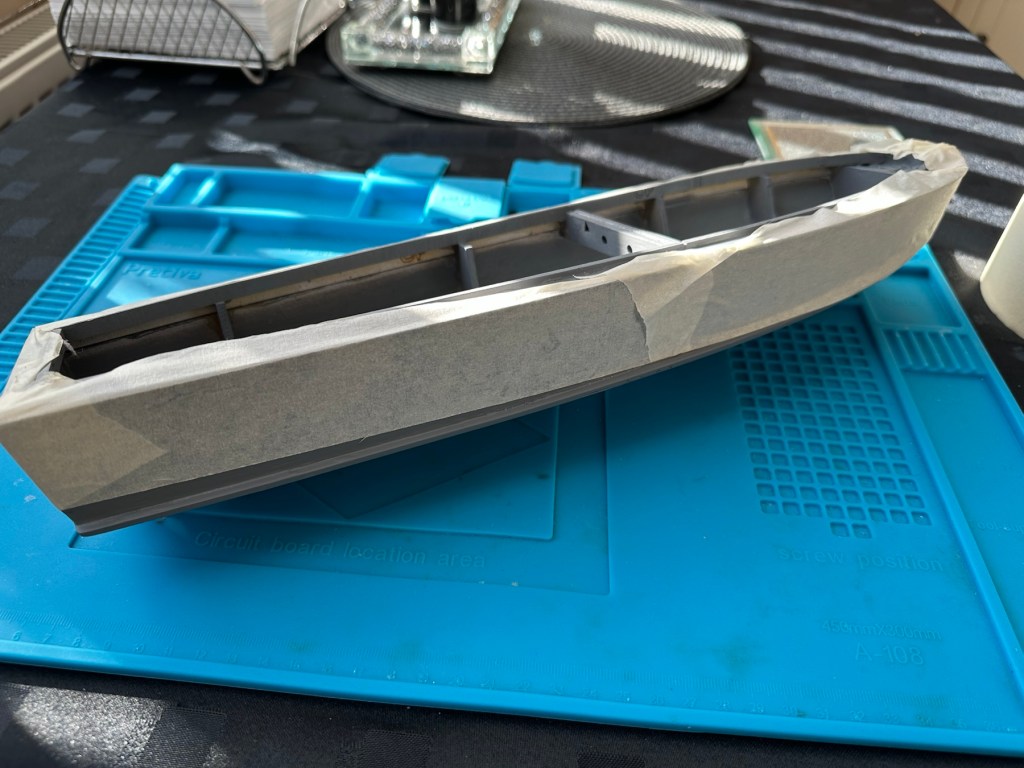
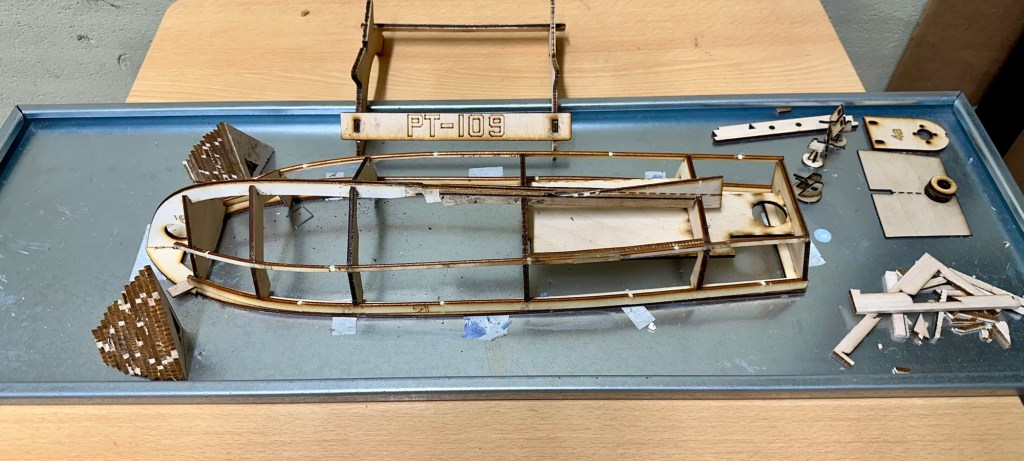
The hull framework is now complete, next stage is to get the outer skins on, the bow formers in place and then hand sand, fill and sand again until the whole hull is ready to be sealed. Again there are issues here with the kit as one of the hull skins is two times thicker than it should be, hence the amount of bending required to shape the hull is not achievable. I have brought this up with the supplier and within a few days I have had a new set of replacement hull skins sent free of charge. Their customer service has been superb and it is good to see that some companies do still try their utmost to keep their customers happy. I will now progress with completing the hull.
These four boards form the outer skins. At 1.5mm they are very flexible. However you can see the second one from the left is twice as thick and not pliable enough. These were replaced by the supplier within a few days of notifying them of the issue.
Below is a small video of the completed framework. It has probably taken about 8 hours in total to get to this stage (plus many more hours to allow glues to cure)
The hull framework complete
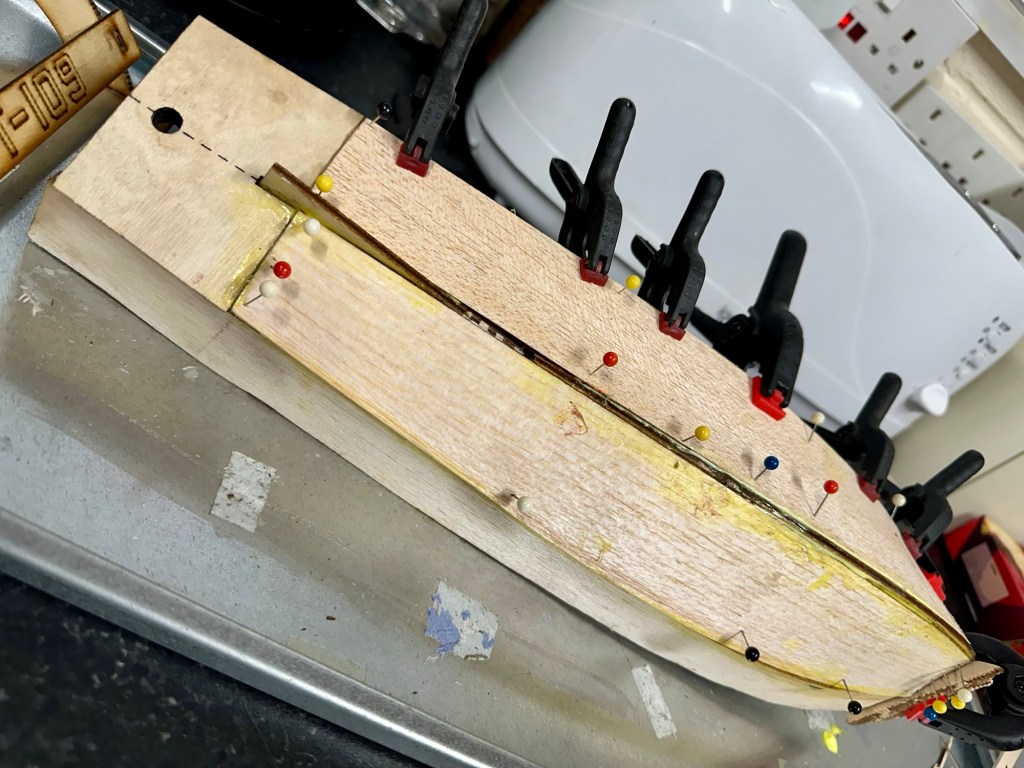
So tonight over a period of about 8 hrs I’ve managed to get the 4 balsa skins that form the hull into place. I’ve had to do a bit of re shaping and minor alterations, and the final bend of the skin would have bust it under the strain if I didn’t decide to wet it first. Wetting balsa allows the inside edge of the sheet to bend in, making these big bends in the hull shape possible. That as well as plenty of pins and clamps with epoxy resin ensures the skin stays where it is put. I left about an hour between each skin placement before moving on to the next one.
First skin Second skin Third and fourth skins in place, when dry I can commence light sanding and filling.
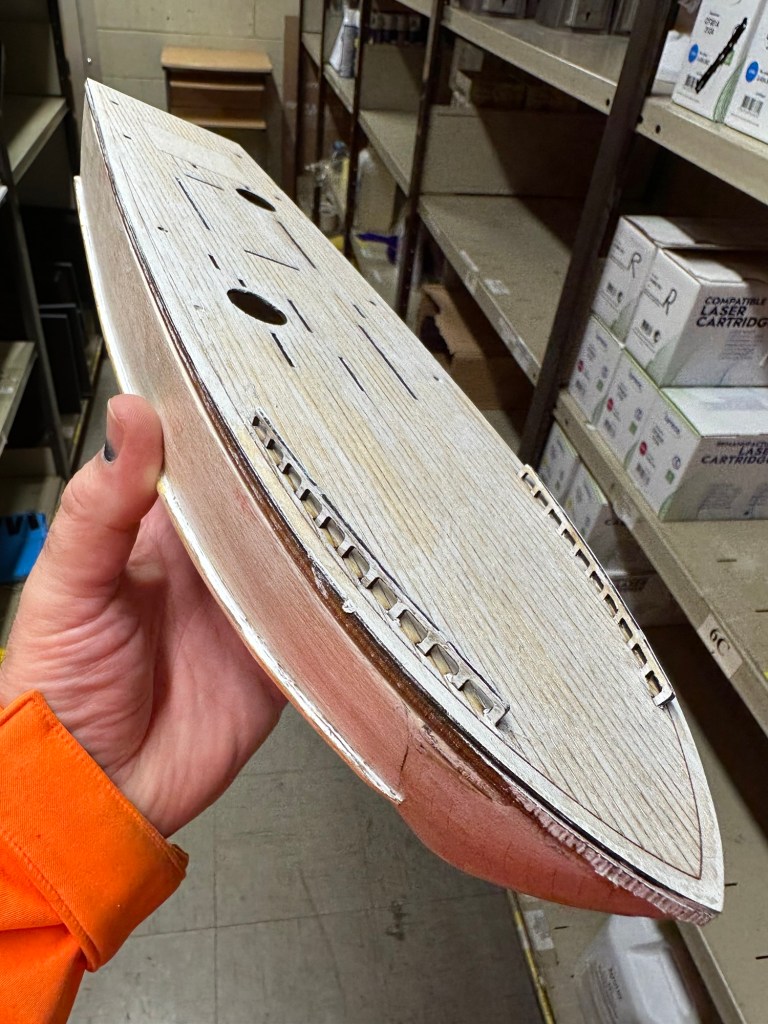
Here is the hull, assembled ready for sanding filling and all the other fun stuff required to make it look good and waterproof.
The hull ready for sanding, waterproofing and painting.
Tonight I have given the first heavy sanding with a course paper. This has really brought the hull up lovely. The former’s that were put in place have now been sanded to form a good bow profile. See photos below.
Before shaping After shaping
I now have to do a small bit of filling with balsa filler and then I will sand with a finer paper.
Looking more like a boat
Once the final sanding has been done I can then look at sealing the exposed wood and then begin the waterproofing and painting. The installation of the radio gear will go in place towards the end of the build. In the meantime I just have to build the superstructure on to the top deck. This will require some small bits to be painted before being put into place.
I’ve built the superstructure and that has been set aside to cure. There will be a lot of sanding and painting needed. I have attached the deck now and all those items will attach to it, and i must say it’s looking quite good.
Deck in placeHull structure now completeJust needs superstructure cabins adding once it has been sealed and painted.
I’ve now detached the deck and gone around with some balsa filler and hopefully tomorrow once it’s dry I can give it a sand with some fine paper and then I can look at putting on a coat or three of sanding sealer.
Sanding sealerTo be sandedAll superstructure sand sealed
I’ve tonight managed to get coats one and two of the sanding sealer applied with sanding after each coat with a fine sandpaper. The torpedo tubes have been assembled along with other items and we are now very close to getting the painting started. However first I will give a final sand to the structure to see if it is ready for the primer. If not it will mean applying some balsa filler and applying coat 3. There really is no rush. I need to now get the prop tube in place and permanently positioned prior to any painting. I am considering a number of different paint combinations at this stage, but they are changing on a daily basis. I wonder what colours I will go with?
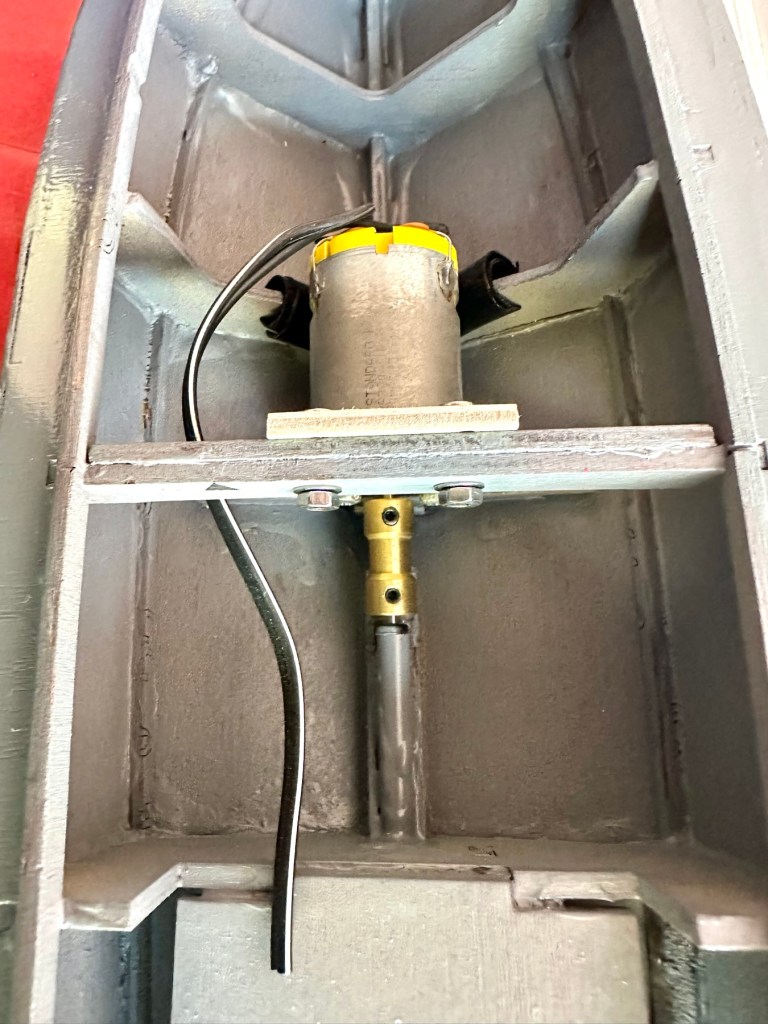
Rudder checks doneEngine in placeDrive connector in place
I’ve done the all the sanding and I’m now happy to commence the undercoat of the hull. I’ve fitted and removed the rudder and engine to test they fit ok, the boat is now bare and ready to paint. I’m going to individually paint the guns and superstructure before fixing to the deck. I might paint the deck with a dark varnish, I haven’t quite decided yet.
Part 2 of this post will cover the painting of the boat. Coming sometime in Feb 2025.
I admire anyone who has artistic talent. However at a push I’d easily rate Bob Ross as my favourite.
Why?
If you were an easily influenced teenager through the eighties, you couldn’t help but see this easygoing extremely pleasant individual on your television screens in the afternoons trying to convince everyone that they had a masterpiece within them.
Bob Ross Golden glow – my first “Masterpiece”
He wasn’t wrong, I’ve had a few lessons using his technique and I’ve produced a personal masterpiece in every session.
The guy had the ability to pull achievements out of people that they didn’t know they had inside them. He taught that art was for everyone not just the gifted few, and I loved that.
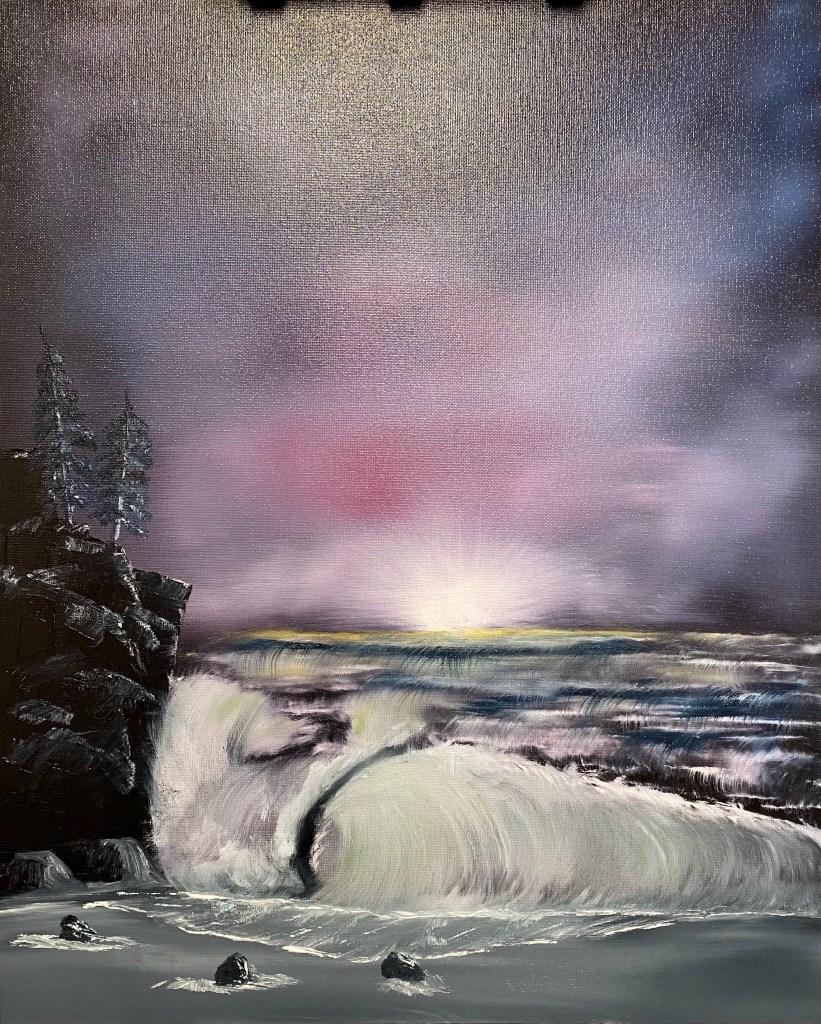
Bob Ross Crimson tide my second attempt
Beyond that my favourite artist is probably Constable, as I loved his detailed countryside landscapes.
But Bobs the man for me. And a local artist called Raymond Riley who taught me Bobs techniques, superb humans in my eyes, and wonderful teachers.
Haha I’m gonna cheat here. It starts today, we’re a little late here at Foxy towers with the spring clean thing. Whilst having our second cup of tea in bed this morning I raised the question of whether we need a new radiator in one of our rooms and it has flourished into a whole “let’s tart the house up,” so I have now inherited a challenge to redecorate top to bottom with the challenge of having the bottom bit done by Christmas, when the family are all coming for dinner.
And there I was in yesterday’s post saying I need to rest more!
I’m going to enjoy that though as I love a challenge.
My real priority everyday is to ensure I’m at my best and that my world is content, happy and feeling loved and protected. In other words my world is my wife. She is my number one priority everyday, always and forever. No questions.
Have a lovely Sunday all, I’m off shopping with the wife, I suspect it will involve paint and wall paper….and maybe a radiator…..or two!
It’s just after 5 in the morning and the only notable thing that has occurred so far today is that I have woken up.
And to be honest for everyone that’s no mean feat. The fact we have awoken from our slumber is something to be grateful for. You have another day on this planet, another go at trying to have a good day, another day to mend relationships and to forgive those little misdemeanours and mistakes.
Another chance to be a better person.
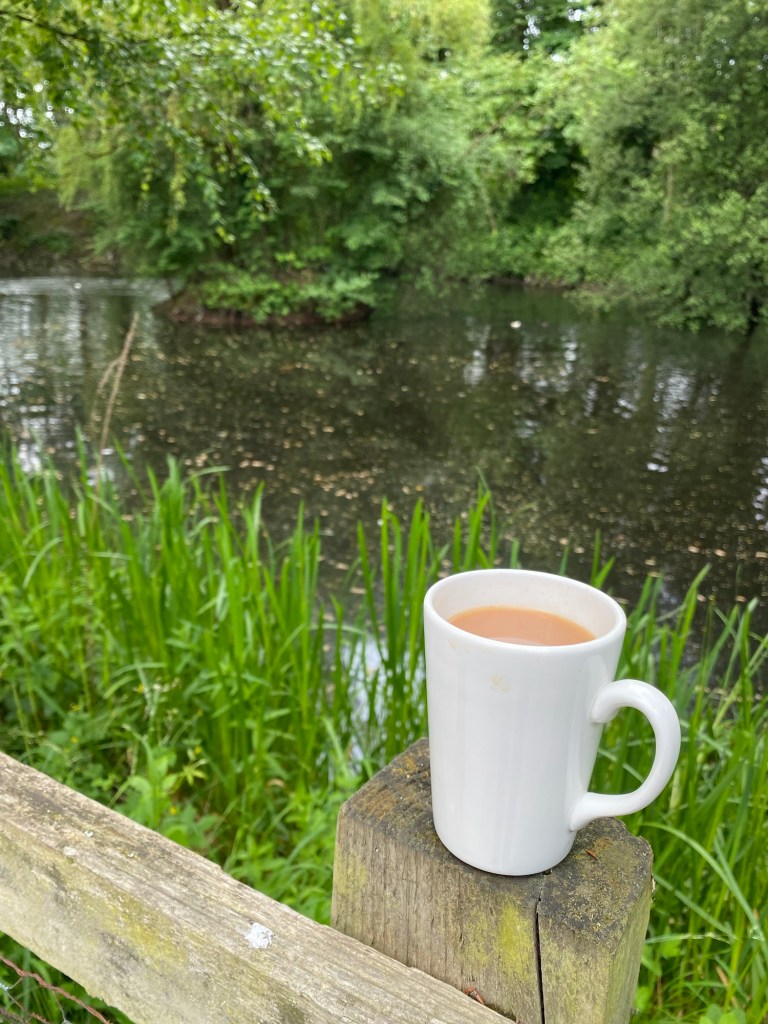
I’ve had my first cup of tea of the day and my next big decision is whether to make another.
Tea – typically British
Start the day with a blank canvas, and go paint a masterpiece.
Hopefully you’ll get another go at it tomorrow. You just never know.
Working tonight, and between jobs I’ve managed to do a few of those little tedious jobs that still need to be done on this camera.
I’ve cleaned pretty much all the parts again, used some isopropyl to really get the old ingrained dirt away and have retouched with either a gloss or Matt paint depending on what part of the camera needed touching up.
Halina A1 Reflex black paint touch up Halina A1 Reflex film box
I’ve also replaced some light seal and still have a bit to do on the roll film door. I’ve also reassembled the mirror assembly after each little part of it has been thoroughly cleaned.
Halina A1 Reflex new light sealHalina A1 areflex mirror reassembly
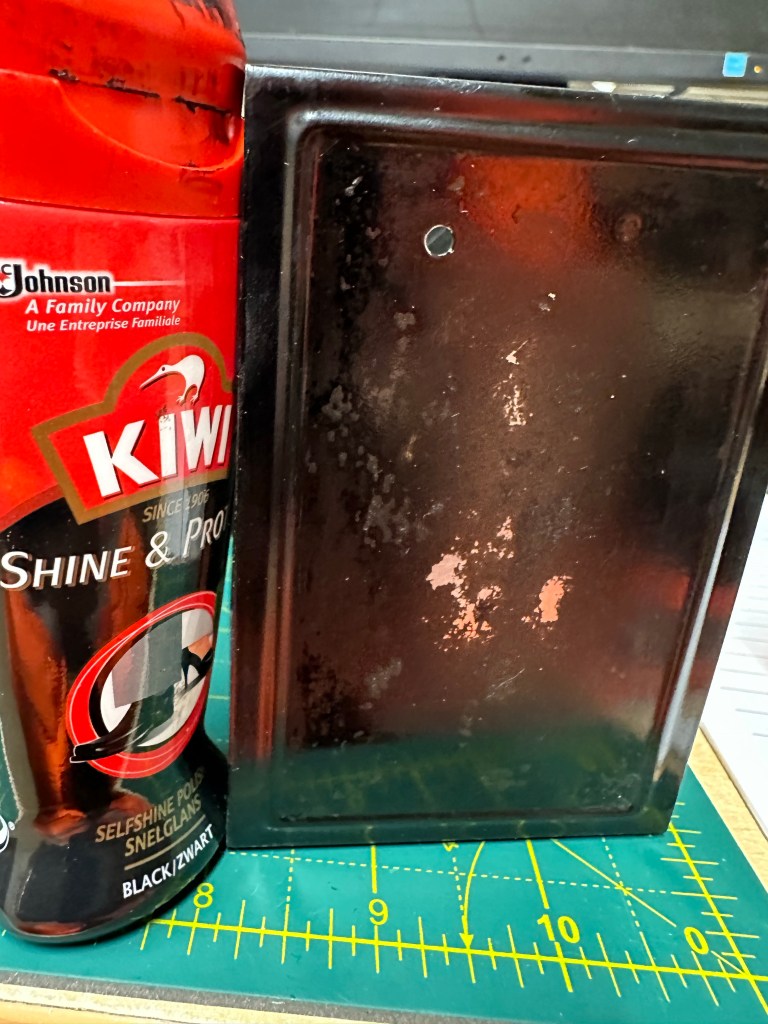
The smell of age that has always been an issue with this camera continues, however I have had a bit of a breakthrough today with the camera itself, it’s a strange one but it seems to work. Once the painting has been done I’ve used a cloth soaked in black shoe Polish to coat all metal areas of the body. Once this dries I buff up with a dry cloth and hey presto not only does the retouched paintwork come up lovely it now has a polished smell that has taken the dank smell away from the bodywork. Hopefully fingers crossed this can be used to combat the years of damp smell that has accumulated on this piece.
Shoe shine….All the silver bits cleaned
Finally I have taken every shiny piece including screws and cleaned these as well, I must say the cleaning works and these parts have all come up lovely.
The case still needs attention, I’m fighting years of damp and staleness with that and hopefully will have an acceptable solution for it soon.
I still have to get into the lens and sort the fungus issue out, there is a hinge on the roll door that needs fixing and I then need to use the templates I created last week to cut out the new leatherette for the camera. Still a small amount to do, but I hope to be able to reassemble very soon.
What tattoo do you want and where would you put it?
We were in Iceland about 5 weeks ago. A fantastic holiday full of spontaneity, I just wish I could lead that life 24hrs a day. Anyway I’m drifting now, the point of this post is that spontaneous action resulted in me getting a Tattoo there and then in Reykjavik at a local tattoo studio.
Helm of Awe and Icelandic runes
It’s a Nordic protection in battle symbol called a “Helm of awe” used to strike fear into people in the early years of the islands forming, I’ve used it as a protection in life of sorts. The Icelandic runes are the letters D & E that relate to the wife and my names.
So that’s what I’ve had done, I’m now looking at having another couple done relating to my home county. I think tattoos are great and that there are some stunning ones out there if done properly.
Mind you, you don’t half see some right rotten ones. Must admit they’re not for everyone but at the end of the day what you do to your own skin is your decision and yours only.
In many ways and forms, no doubt about it, the Covid lockdown had people looking for other things to do for numerous reasons, for me it was to preserve my sanity.
I always enjoyed painting, however I was unsure of just what I wanted to use for subject matter, that’s when I looked for local painting groups in my area and stumbled across a lovely chap called Ray who offers tuition in the Bob Ross way of painting.
Ray states on his site that you can turn up at one of his classes and go home with a masterpiece and to be fair he’s not wrong, I have seen many attempts from his classes and all are of a very good standard.
I enrolled on Tays “Golden glow” course in Jan 22 and the result is below, I’m happy with this to be fair. Not fantastic but hey it was my first attempt.
Bob Ross Golden glowBob Ross Golden glowBob Ross Golden glowBob Ross Golden glow
The pictures are in stages from start to completion. When I took this home the wife didn’t believe I’d painted it and even contacted Ray via Facebook to check with him… what a cheek 😂
I booked a second course “ Crimson tide” with Ray and the results are below, I wasn’t so pleased with this one but I know where I made the mistakes. That’s the point of learning you learn from your mistakes.
Bob Ross Crimson tideBob Ross Crimson tideBob Ross Crimson tideBob Ross Crimson tideBob Ross Crimson tideBob Ross Crimson tide
A session with Ray is about 6hrs and the peace and tranquility is fantastic, it’s quiet the tuition is second to none and doing your own thing is actively encouraged when adding your own touches to your painting. For me I have found the distraction I wanted and now book in a session with Ray when the world is starting to get on my nerves. I’m overdue a session and must get another one in soon….


You must be logged in to post a comment.