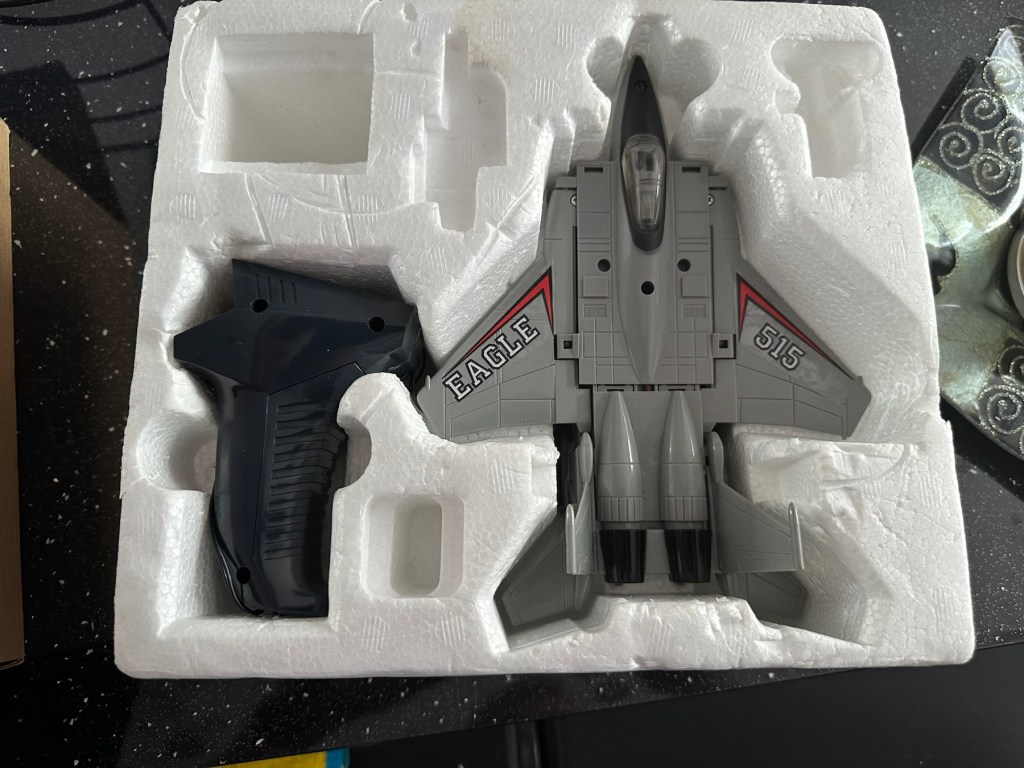
I arrived home from work last evening to find my nephew at home. He’d been looking around his mum and dad’s attic to find his old star wars toy collection he had from the 80s-90s. Whilst in the loft he found this old toy from 1985 by a company called Yonezawa being sold under the Grandstand branding, and it isn’t working. Here is where it passes over to uncle Dave.
Uncle Dave, it’s not working
There’s no real value to these toys as they were produced in massive quantities off the back of all the transformer type toys that were available at the time. There are some accessories missing from this one that are obtainable via the auction sites, he may well ask me to source these, but at the moment he just wants me to get it working to pass onto his boys. The video below shows just what it does….and that’s not a lot. But the one I have here is totally dead and needs reviving just like Frankenstein.
Deltatron what it should do
So here we go…
Assessment:
My overriding surprise is that this has been in a loft space for close to 30 yrs and does not have that expected damp mustiness that usually comes with such an item. I must say, my brother in laws loft space is an exception, it’s obviously free from excessive moisture, mind you it’s only about 40 yrs old so building standards had probably advanced somewhat from when ours was built about 90 yrs ago.
It’s in a good condition and all its parts are there minus a few little additions that originally came with the toy. But as I have stated earlier these parts can be obtained on line if required.
Right, let’s have a look at what is or isn’t happening here…
Repair:
When batteries are installed and the remote control is operated, all that happens is that a light comes on in the toy. The motion that is required is non existent.
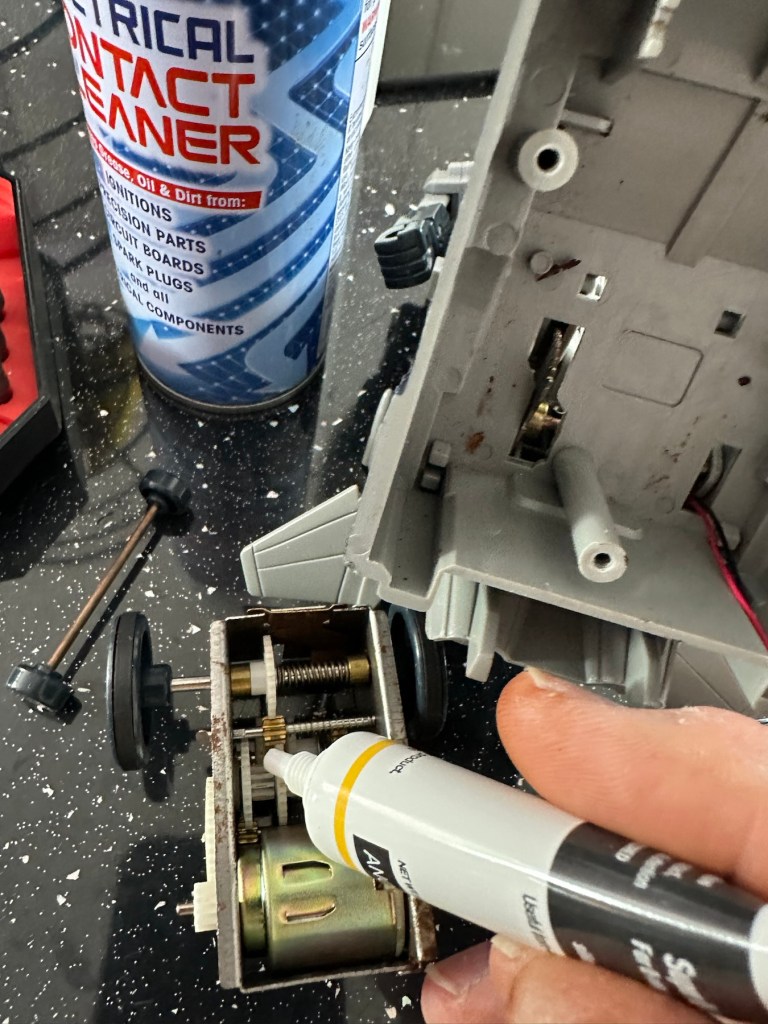
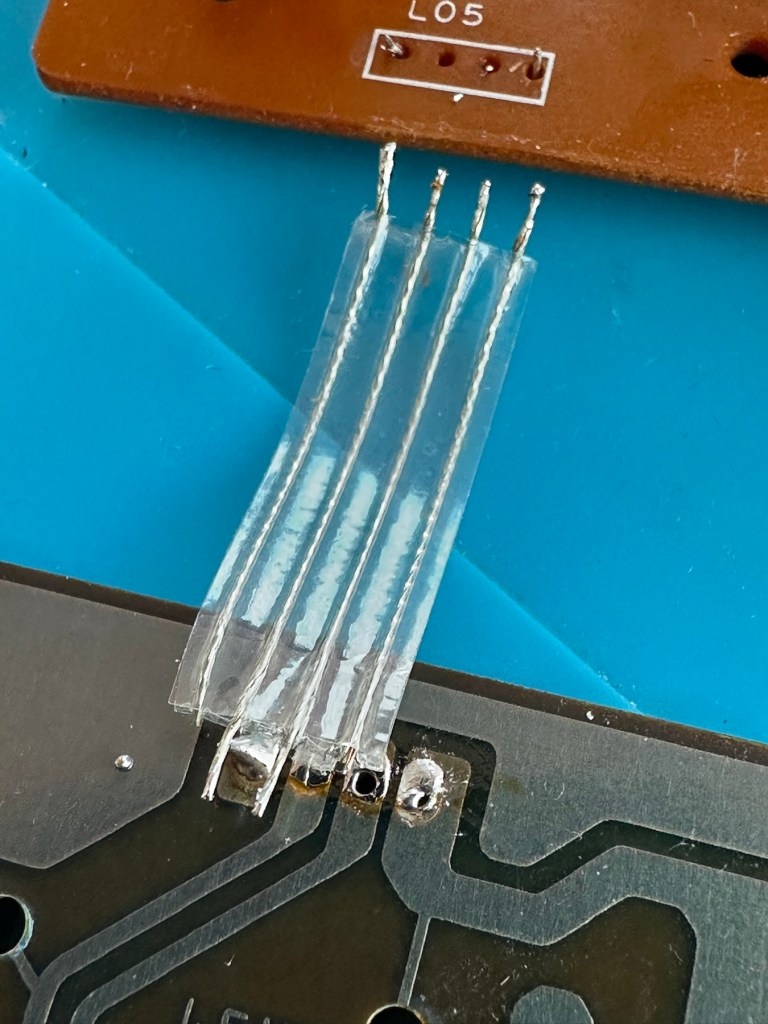
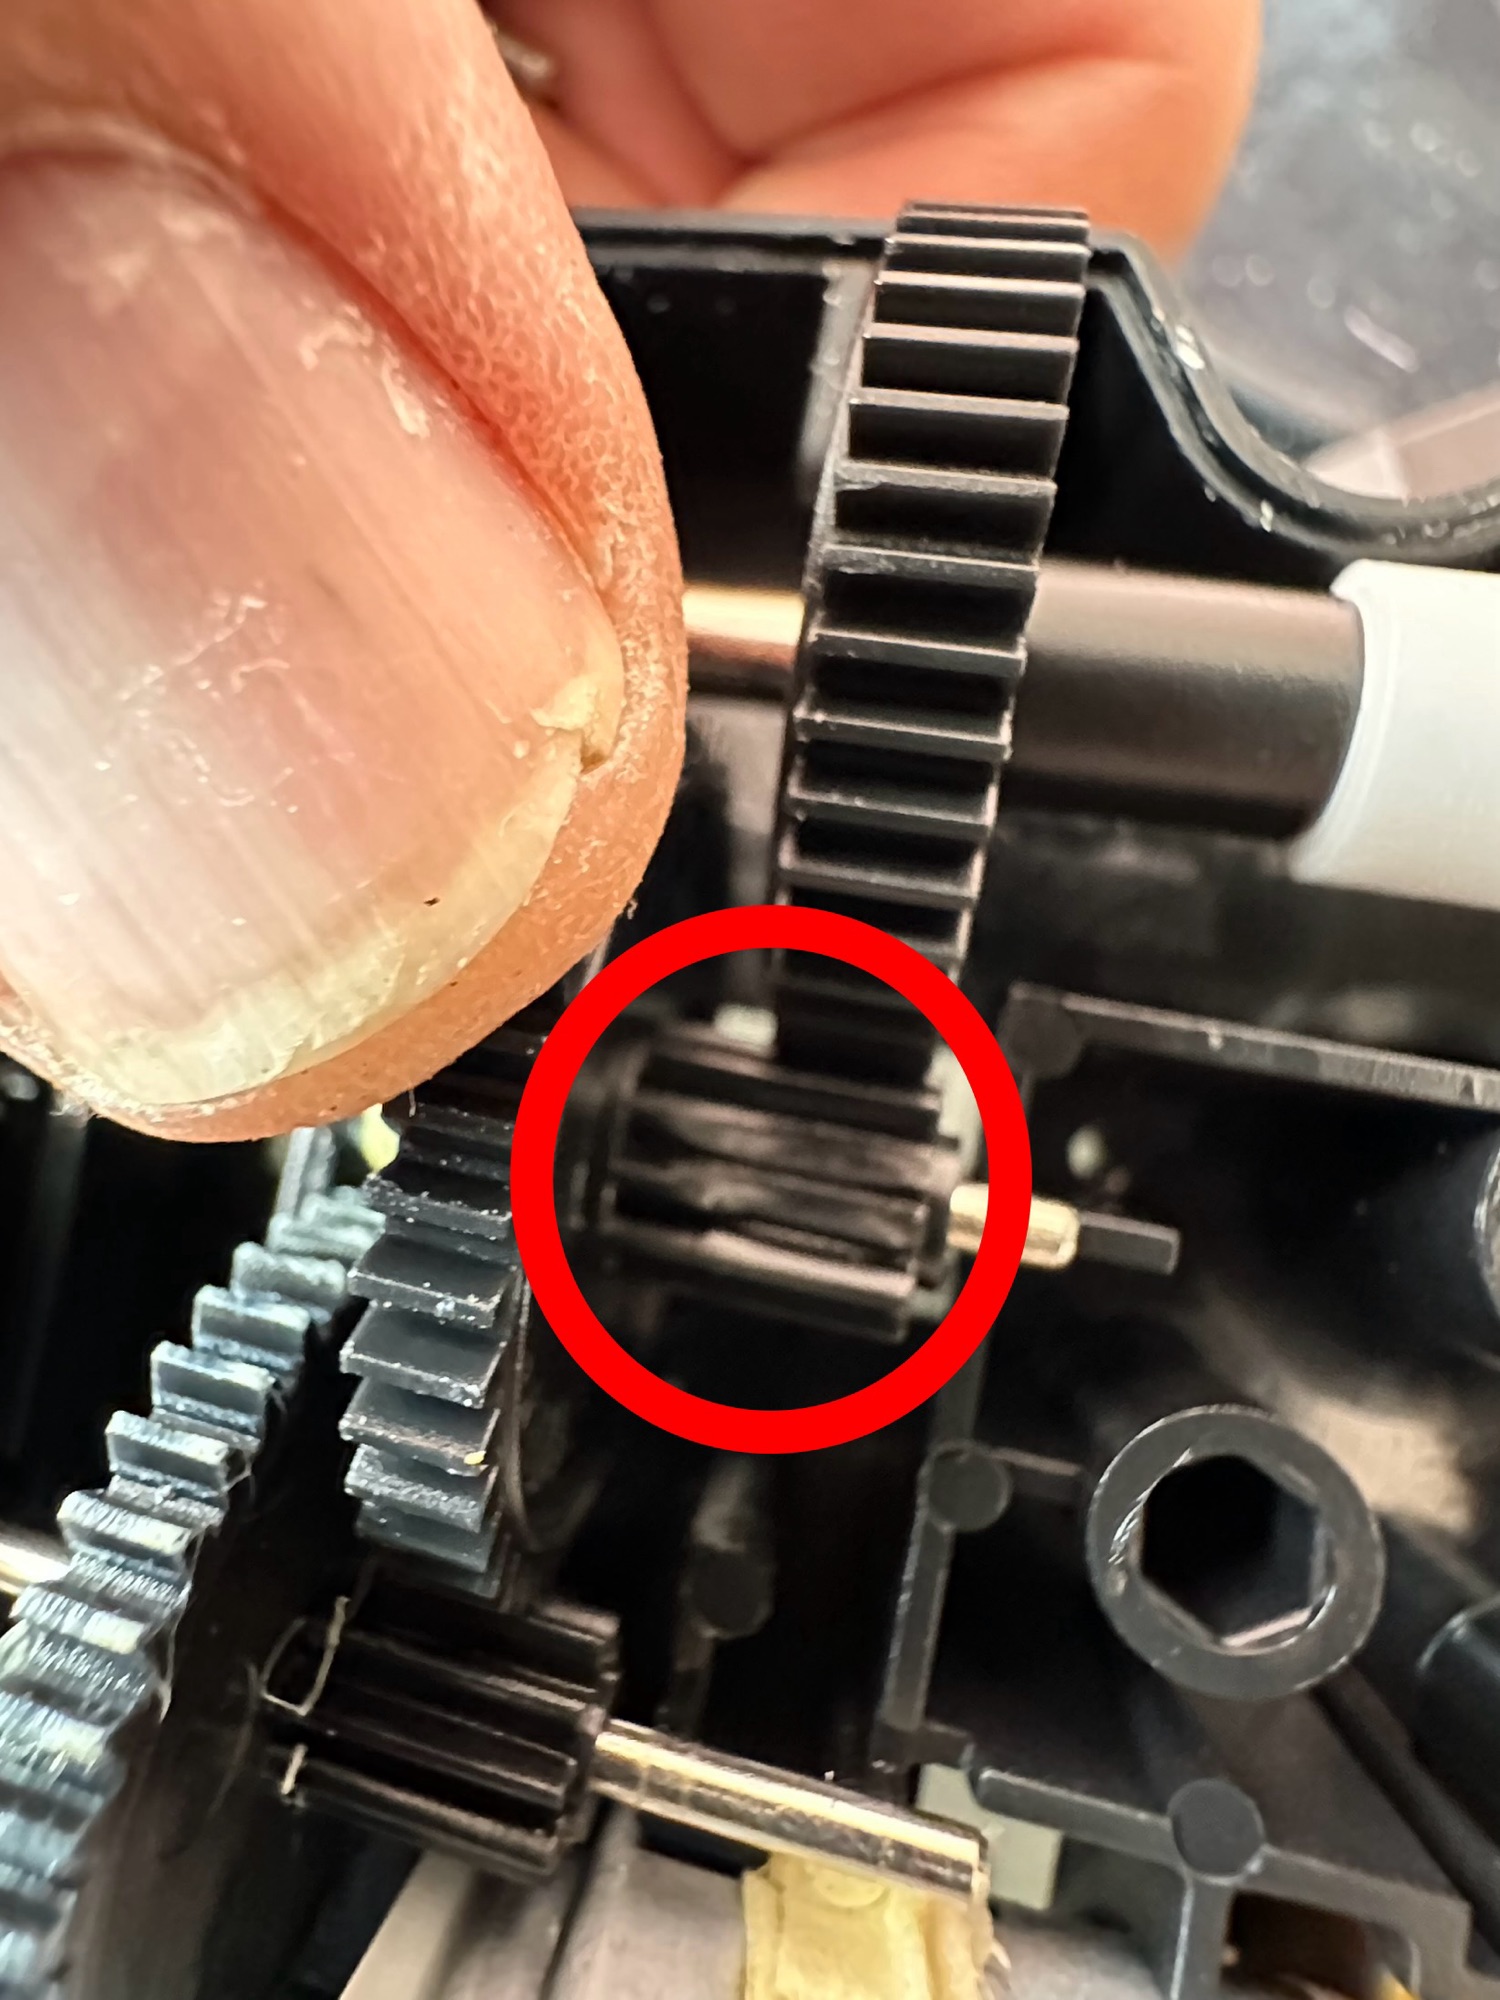
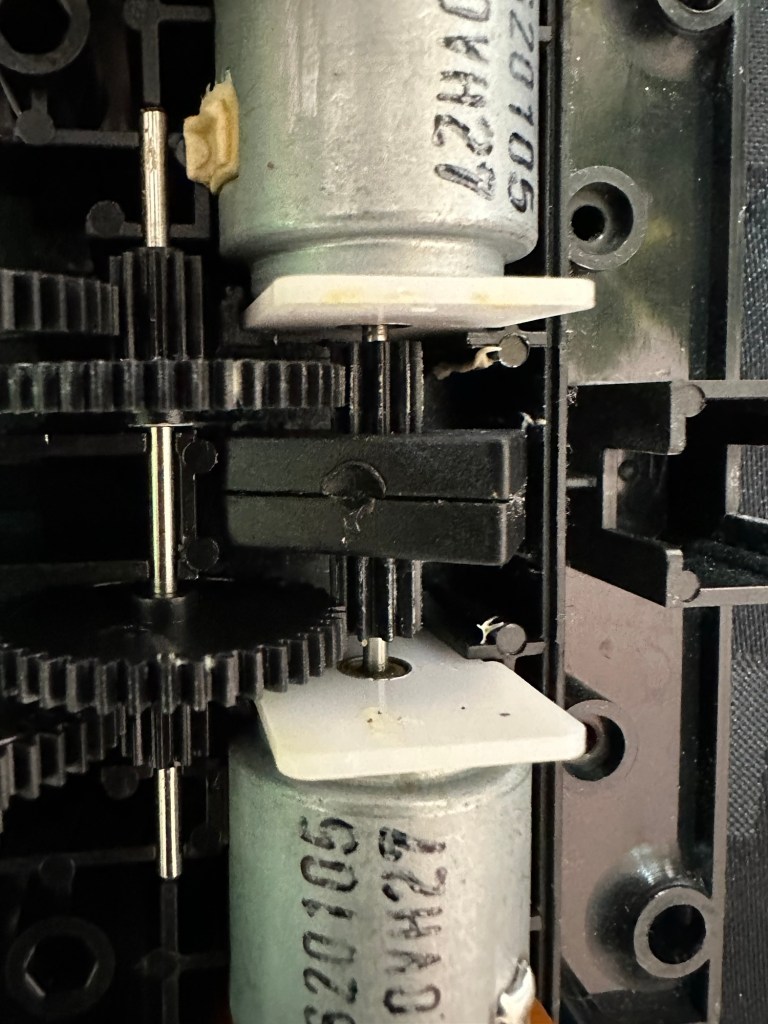
The motor unitMotor removed, there is a cog mechanism to move the unitThe motor unit removed
When examined closer you can see there is a lot of surface rust on the side of the motor where the contacts go into the unit.
Really rustyQuick clean later
The contacts were so rusty inside the motor unit that you’d get an intermittent running of the motor if you moved them. I’ve checked continuity and solder joints and they were fine. I’ve injected some contact cleaning spray into the motor and sat there manipulating the motor in both directions for about 5 minutes, this was sufficient to get the motor running freely once power was reapplied. The contacts were dirty and restricting the flow of power to the motor. I decided to use some IPA around the area to give it all a good clean and once again sprayed more contact cleaner through the motor.
Contact cleaner and silicone grease
Once I’d run the motor for a few minutes in both directions I then applied some silicone grease to the cogs and moving parts to allow a smoother operation. It’s worked. A nice simple fix.
Result:
It’s working and here’s a small video to prove it.
It’s now working
I’ve already handed it back and it’s a joy to see the smiles on my nephew and his dad’s face when they watched it working. Such a simple thing, bringing back treasured memories and laughs. Another old toy saved for another generation and best of all another item not going to a landfill.
Thanks for passing by, as always it is very much appreciated.
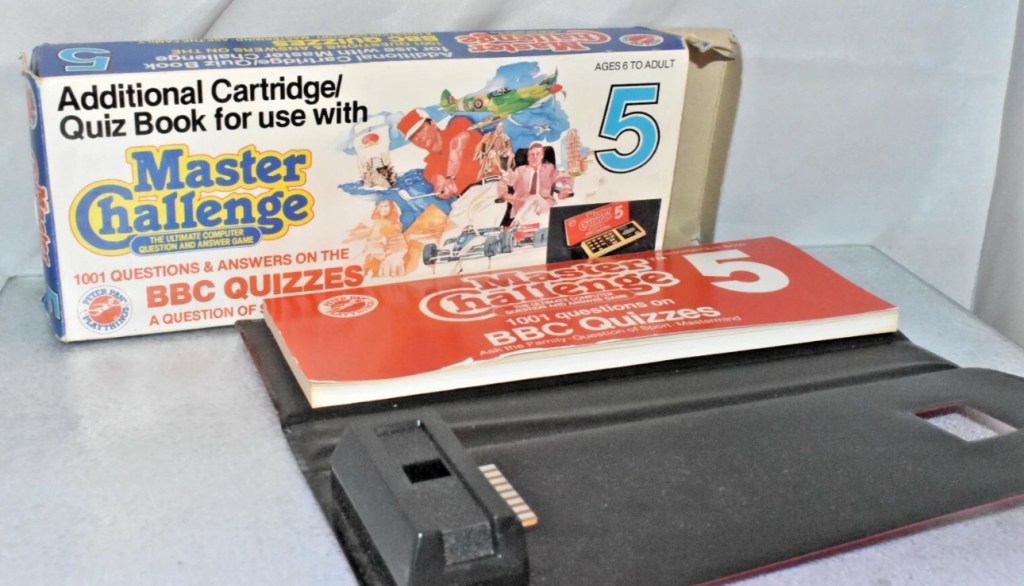
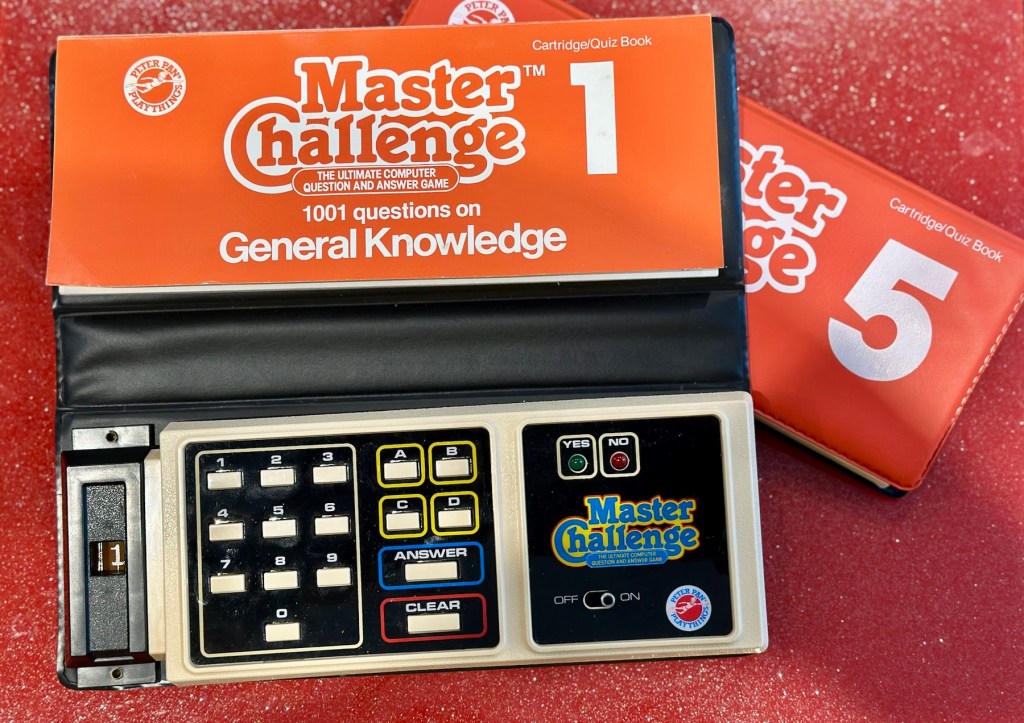
Embark on a journey down memory lane with the vintage Master Challenge Computer Electronic Quiz Game by Peter Pan. This handheld electronic game offers a test of knowledge and skill, making it a splendid addition to any game’s collection. Ideal for enthusiasts of retro gaming, it provides hours of entertainment as you tackle a variety of questions and challenges.
As a sought-after piece amongst collectors, this game is a testament to the era of classic toys and games. Whether you’re looking to complete your set of electronic games or seeking a unique gift for a vintage game aficionado, the Master Challenge game promises to be a talking point at any gathering.
This item is sold as spares and repairs as not working. Please send offers or ask any questions.
EBay
The seller here has obviously used the wonderful AI assistant to write this post as it is so false. The unit is incomplete, it is probably not sought after, as it was not that well received back in the day, and in its current state is probably only fit to be disposed of, also an important part of it is missing. However I’m not for disposing of items such as this and will endeavour to get it back into a working state, it’s just going to take a little time and patience.
I’m missing a fair bit, and it doesn’t work
What my unit looks like
What the unit should look like
Some history:
Peter Pan Playthings Ltd was a British toy company founded in 1963. It bought Salter Science and other assets from the receivers of Thomas Salter Ltd. In 1972 the company reported a £80,000 profit. The following year it was acquired by Berwick Timpo.
The company was sold on to Bluebird Toys in 1987, which continued to use the Peter Pan Playthings brand for several years.
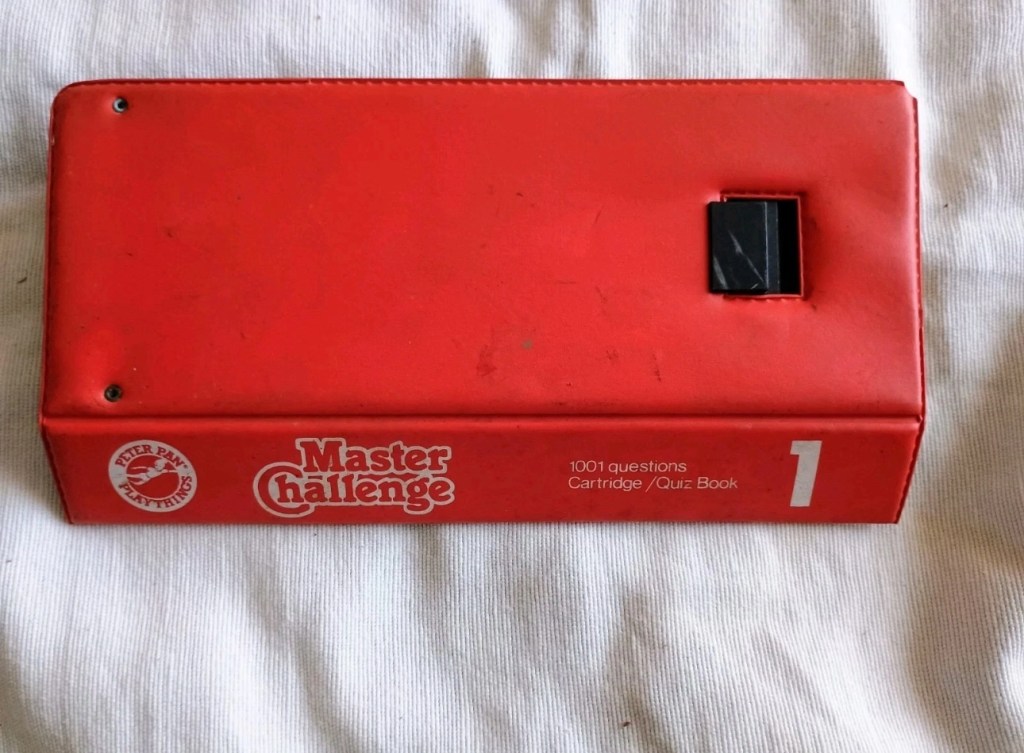
Produced around 1980, the Master Challenge system was licensed from Coleco (Coleco’s Quiz Wiz system), this was released in the U.K. by Peter Pan Playthings. There were 30 different cartridges for Coleco’s version. The unit comes with a question book and the system is used to answer those questions. It is currently unknown how many cartridges were made for the UK version.
T’internet
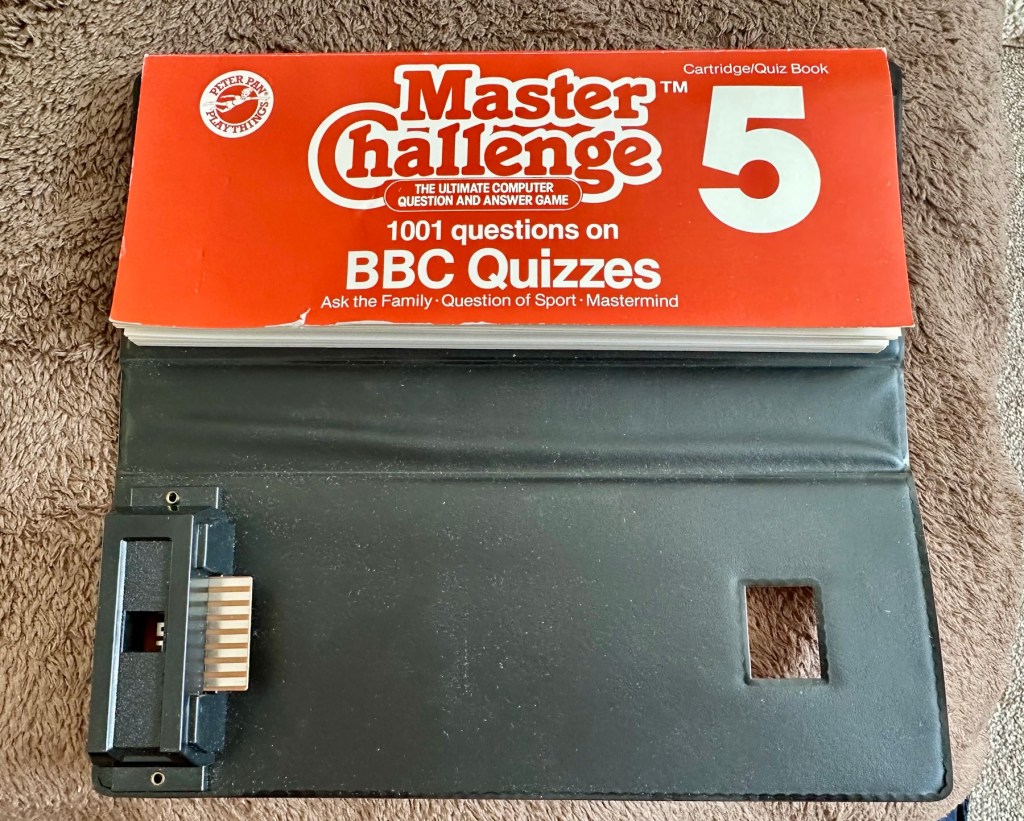
So for some unknown reason I have purchased this 45yr old piece of retro nonsense because I just can’t keep my bidding finger still. That’ll teach me a lesson. I’ve paid the grand total including postage of £5:69GBP, and I think it is missing the most important part, the book of questions that go with the cartridge, usually attached to the binder that encompasses the unit. It’s also broken, so it needs fixing anyway, and I believe extra cartridges can be purchased, so if I can get it working, and I can obtain further cartridges then no problem. If I can’t, then there is a problem. The battery cover is also missing. I’m a fool, honestly I am.
Whereas the Coleco Wiz system had 30 different cartridges available I believe the Uk version only had the 6 as listed below:
1 – General knowledge
2 – World of sport
3 – Music
4 – The bible
5 – BBC quizzes
6 – BBCs Top of the form
And back in the 1980 these additional cartridges and quiz books could be purchased for £6:99 GBP and 50 pence postage! Quite pricey for the time.
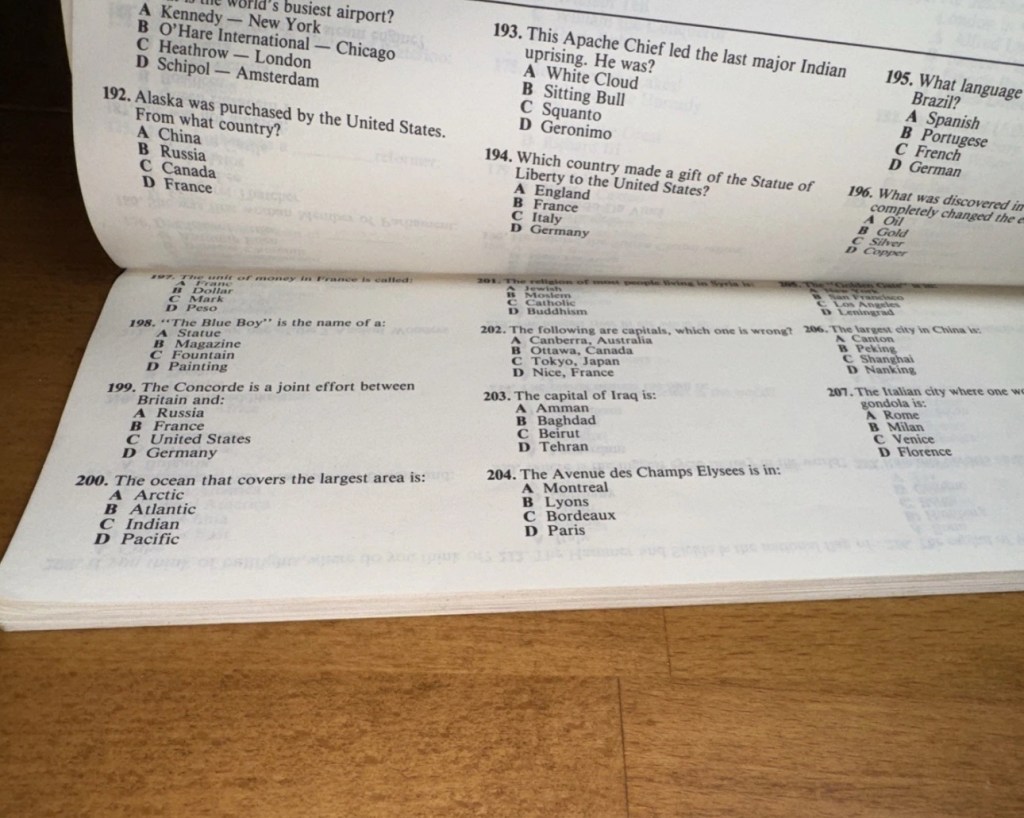
On this particular cartridge or what remains of it are the pre programmed answers to 1001 questions that I’m not in possession of. How novel. I have managed to find a photo on line that has some questions showing on it, these would have been in the original book that would normally be attached to the binder of this unit, so this should be sufficient to at least test the game in its current form.
Some questions to test the unit.
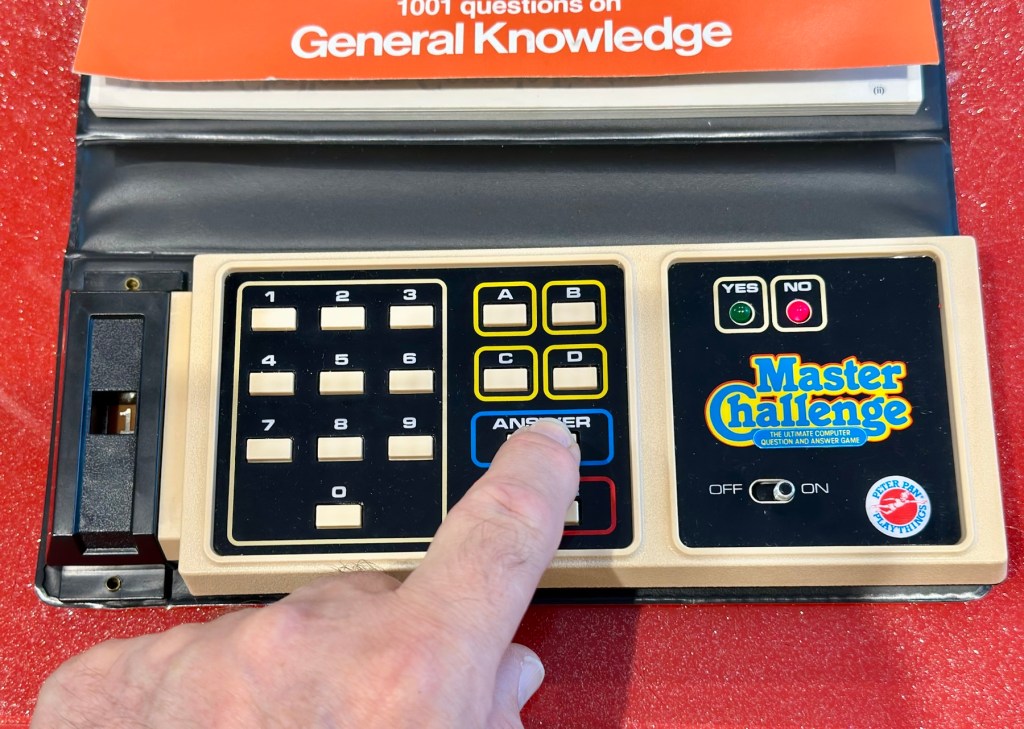
The game works in such a way that you choose a question from the book, you then use the unit to give your answers. If the answer is wrong you hear a corresponding low pitched sound and get a red light. If you are right you hear a high pitch sound and see a green light.
Score sheets in the back of the booklet
So basic in its operation, many thought it was totally pointless back in the day. However this was computerised technology in its earliest and most basic form and was at the dawn of a new era of personal entertainment. It deserves to be preserved.
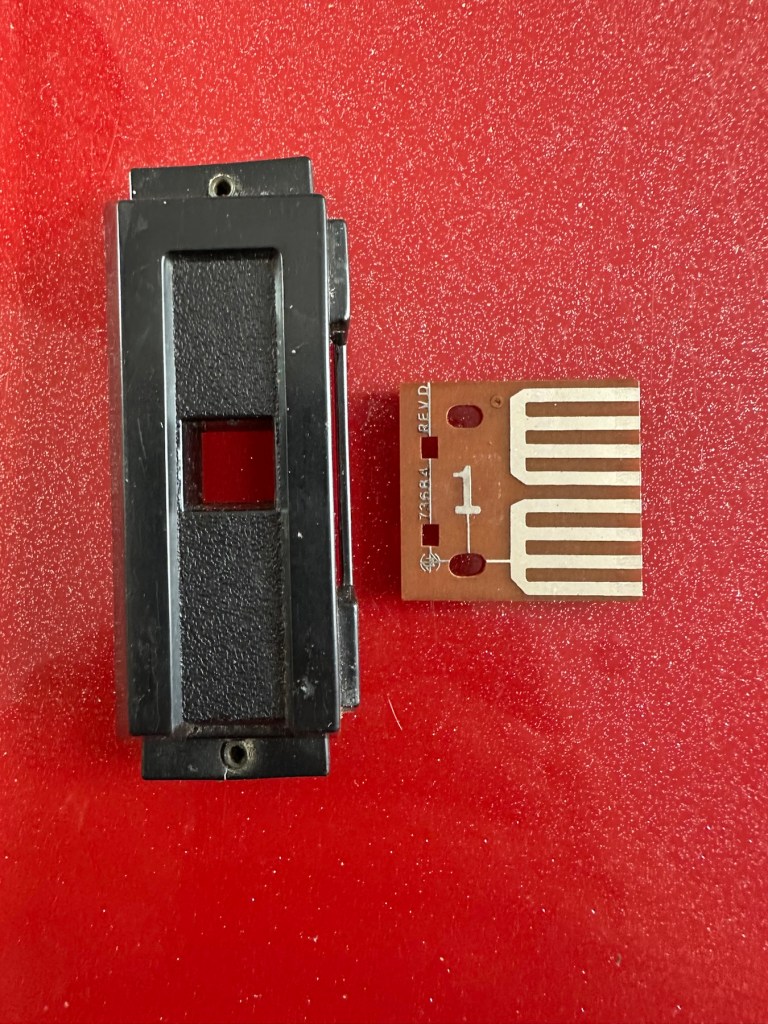
To cover my apparent foolishness I have found another cartridge that I’m going to purchase to make this unit complete.
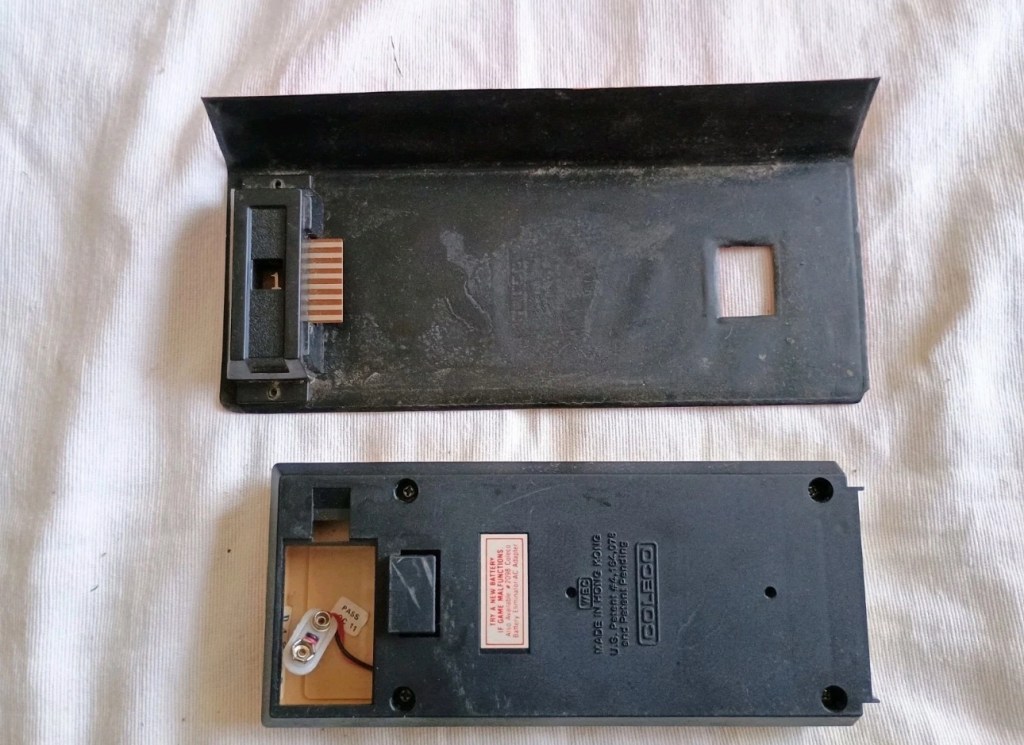
These plug in units come in a binder format with the brains of the game situated in an enclosed plastic block on the base of the binder, i suspect it is something along the lines of an integrated circuit. I can’t open this one as it is sealed, however when the old one arrives i will open it up as that one doesn’t have a quiz book with it. It will be good to see just what is inside. This little unit contains all the answers to the 1001 questions that are provided in the attached quiz book that slots into the top of the binder. The number inside the block indicates the quiz book reference.
Challenge quiz book and questions
The “Brains” and the quiz book reference number
The faulty computer unit I am awaiting, then slots into the binder and block by the pins you see in the photo above. The computer then simply has to decide whether your answer choices are right or wrong. And that’s the crux of the game in a nutshell.
Whilst awaiting this broken units arrival, I’ve purchased the additional set of plug in questions seen in the pictures above. This is an additional 1001 questions set, based on all the old BBC quizzes. It’s complete with answer book and the complete surrounding binder. It has arrived ahead of the faulty unit and is in an exceptionally good condition considering its age. None of the mustiness you’d expect from an item that is 45 years old. It must have been stored with great consideration. It’s cost me more than the broken unit, this cost a total of £8:15GBP, so that makes a running total of £13:84. I do have another game cartridge on order that I picked up for another £7:83GBP but I’m quite happy with this. It will be a nice addition to the games box that comes out when the family or guests come around, and everyone loves an old retro style game. It will certainly be a talking point, that’s for sure.
My additional plug in cartridge
Assessment:
I’ve not even received the unit yet and I’m getting a bit ahead of myself wondering just what could be wrong with it. Its operation is so basic, think it could only be one of five things possibly be at fault.
Pins that read the cartridge are dirty/damaged
Contamination in the battery area
Loose wires
Faulty switch
Cold solder joints
I guess we will just have to await its arrival when we can make an accurate assessment.
The unit has arrived and it’s a tatty looking piece. Dirty, and only the remains of the binder that used to accompany it.
What has arrived
I’ve put in some batteries and there is very dead. There is the occasional buzz when the switch is slowly moved but nothing else. It could be a faulty switch, it could be the contacts. I’m going to have to open it up and get down to board level.
Inside – all posts welded
The problem here is that inside there are no screws attached to the inside support posts. The whole unit has been welded, all plastic posts have had heat applied to moulding the post tops. I’m going to have to break these off and try to re-weld them when we’ve got it all working again….if we can.
In the meantime I’m going to open up the the plug in module that’s attached to what is left of the old binder, i might as well sacrifice that piece as it’s of no use to me and it’s in the name of research.
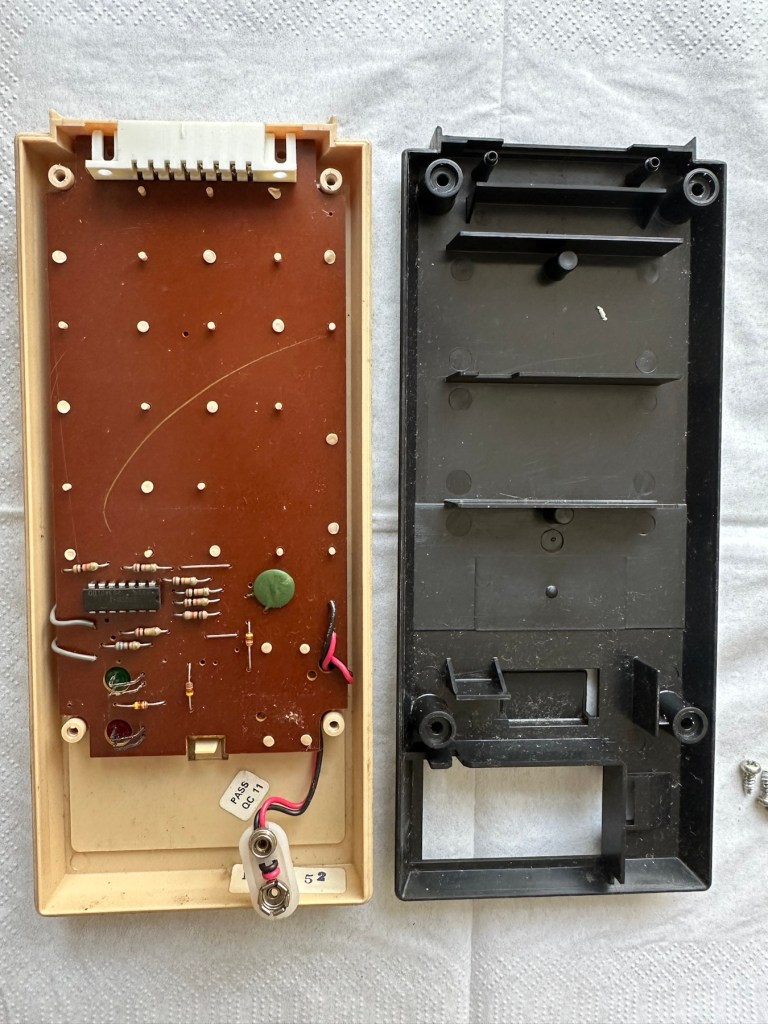
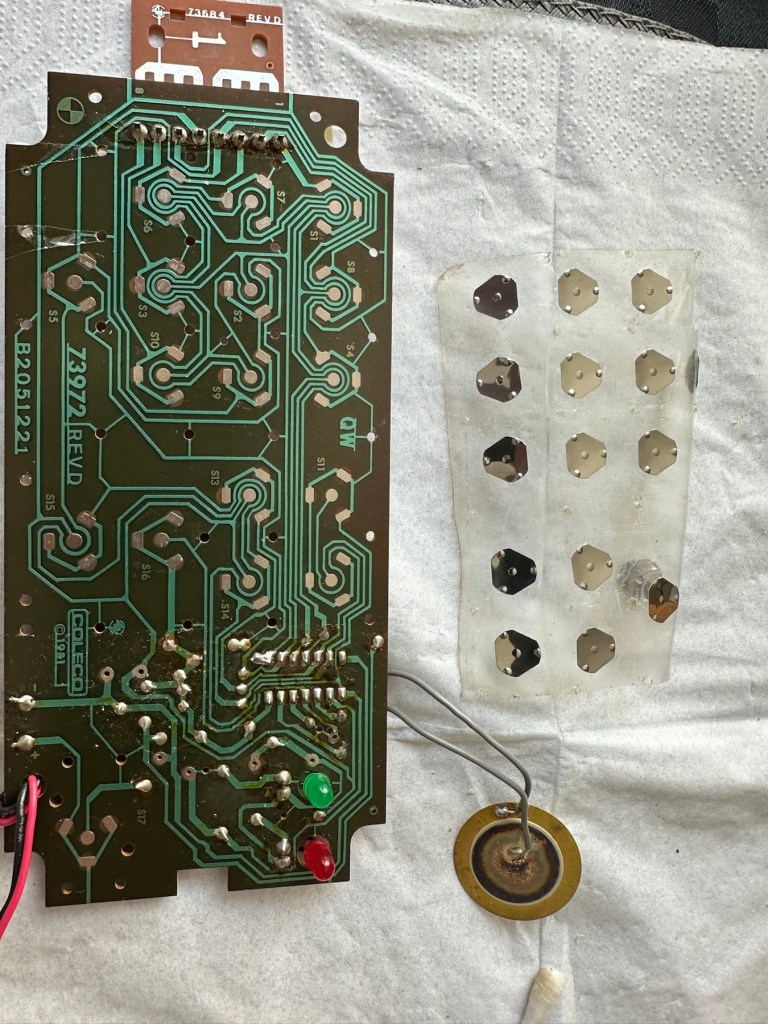
How the unopened board looksBoard removed front viewBoard removed rear view
Now I thought they’d be some kind of integrated circuit in here but there is not. It appears to be just a board with two sets of comb like traces that would appear to just short together in the unit. Makes you wonder if the questions in the book follow some simple kind of algorithm that the unit just adheres to. Maybe every so many questions, they all have the same answer, there must be some simple and basic way that the unit knows the preprogrammed answers. Maybe I’ll find out more when I look inside the actual “Computer” unit.
Repair:
Inside the unit there is not a great deal of components apart from a single IC a capacitor and a number of diodes and resistors.
I’ve used a very fine emery board I borrowed off of my wife (don’t tell her) to try to get in and clean these contacts, as I believe this is what is causing the issue.
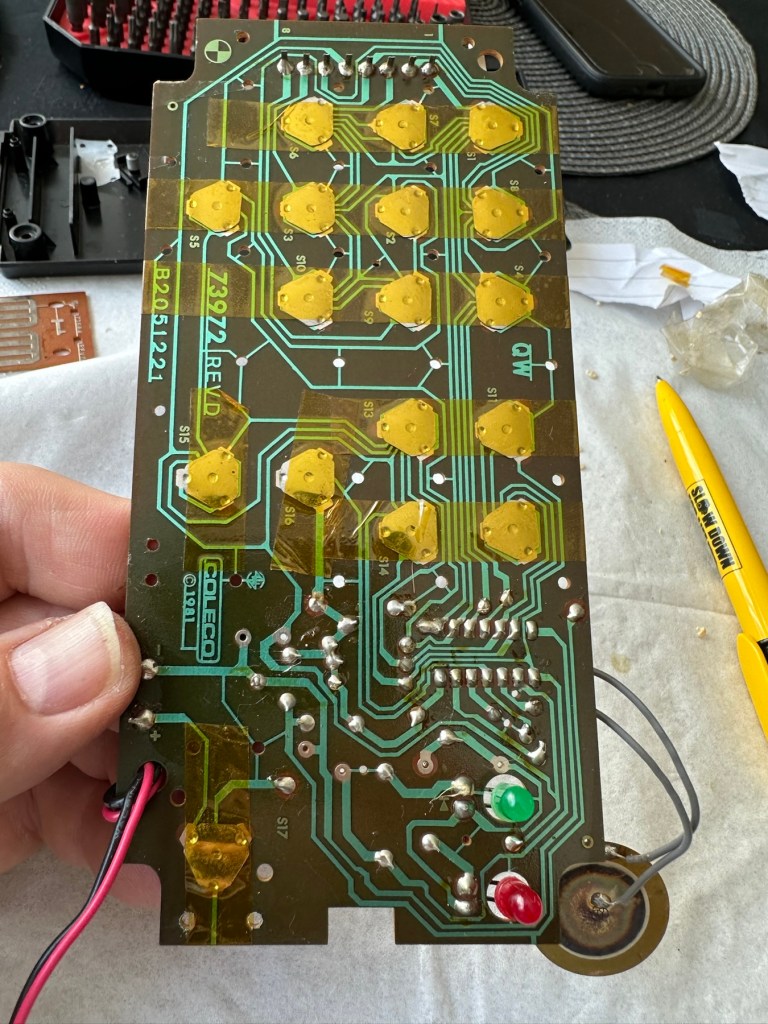
All buttons under a sheet of tape
All buttons are under a sheet of tape. I have removed this tape, cleaned all the contacts with IPA and repositioned them and re taped them using Kapton tape. They are a lot cleaner and are clicking nicely.
Button removalAll buttons removedAll cleaned and sealed down with Kapton tape
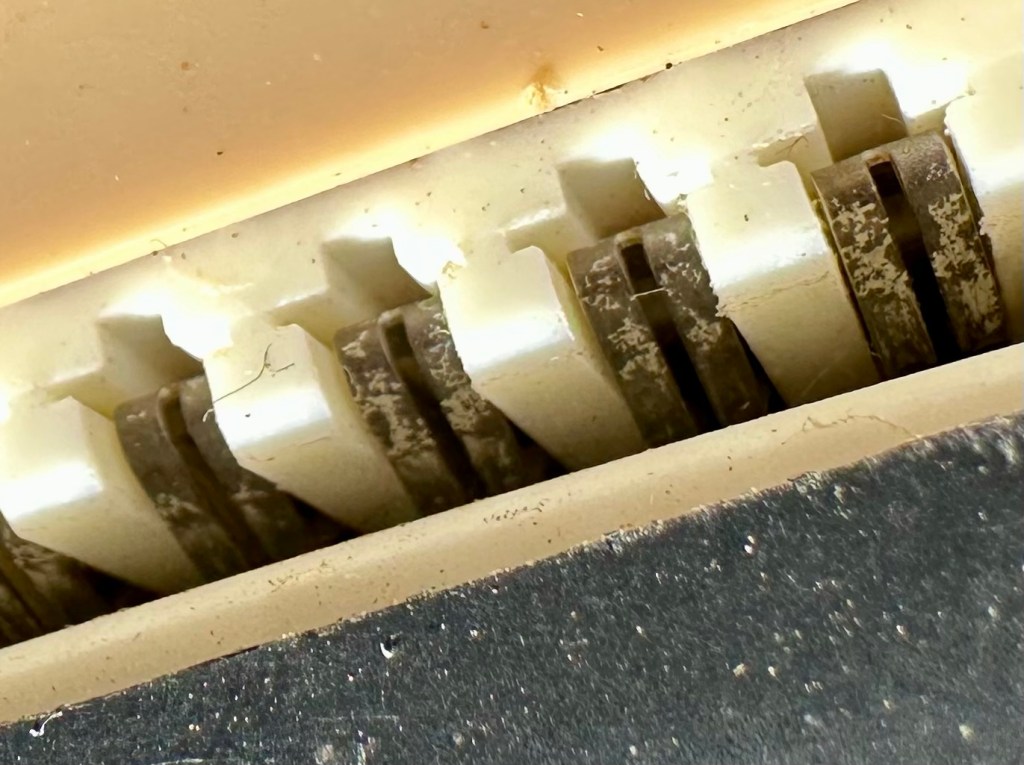
The contacts where the game cartridge is inserted are quite contaminated so these also have to be cleaned.
Contacts are contaminated
I’ve used an emery board to clean the contacts up on the unit, and when the cartridge is inserted we have a result. The first ten questions I have input have had correct answers only and no duplicates, so it really does really look as if the contacts were contaminated causing some kind of issue with the two parts of the game communicating.
Result:
It’s had a good clean both inside and out and a few of the old items inside replaced and given a new lease of life. The unit is now fully working and can be seen doing so in the little video below.
A little test example
I’ve since purchased a new binder for question set 1, so I now have that along with question set number 5. I’ll keep an eye on the auction sites to see if any of the other sets become available, and who knows I may try to get a full set. Now that would be quite rare I’d imagine.
A nice clean and working unit
I love digging around in these 80s units and just wonder at how basic the technology was back then, it’s just amazingly simple and so well put together. Anyway, this one is now working and good to go for a few more years yet. Saved from landfill we have another successful repair under the belt.
Thanks as usual for popping by. It’s most appreciated.
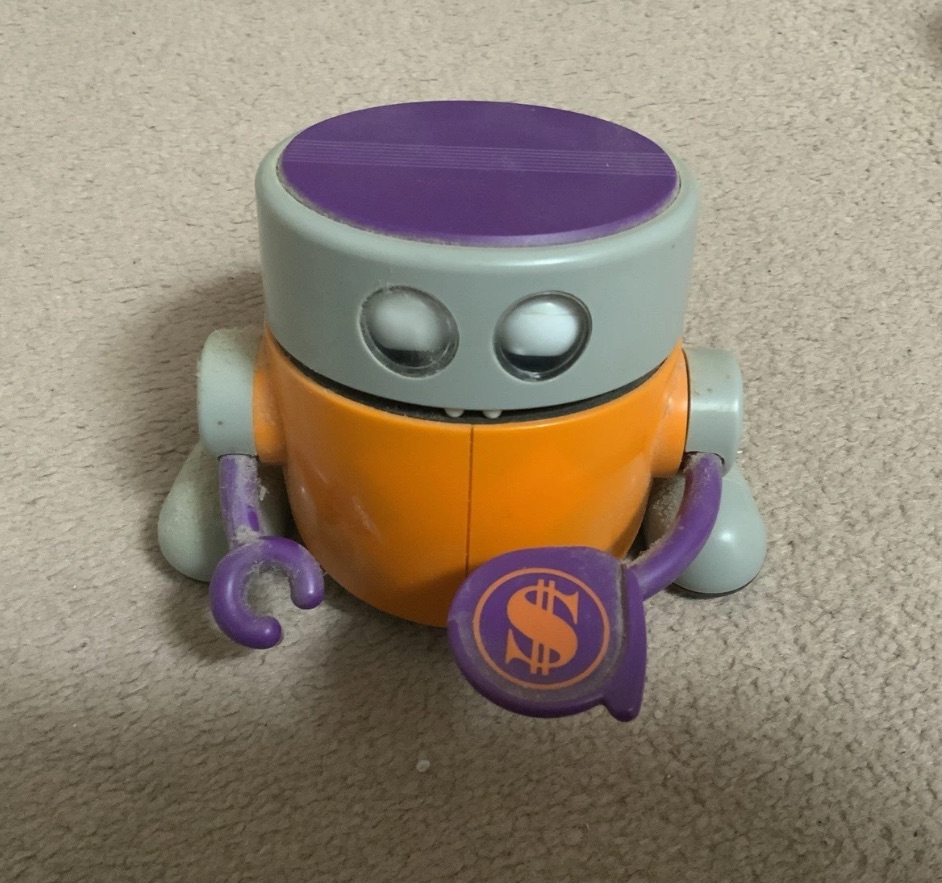
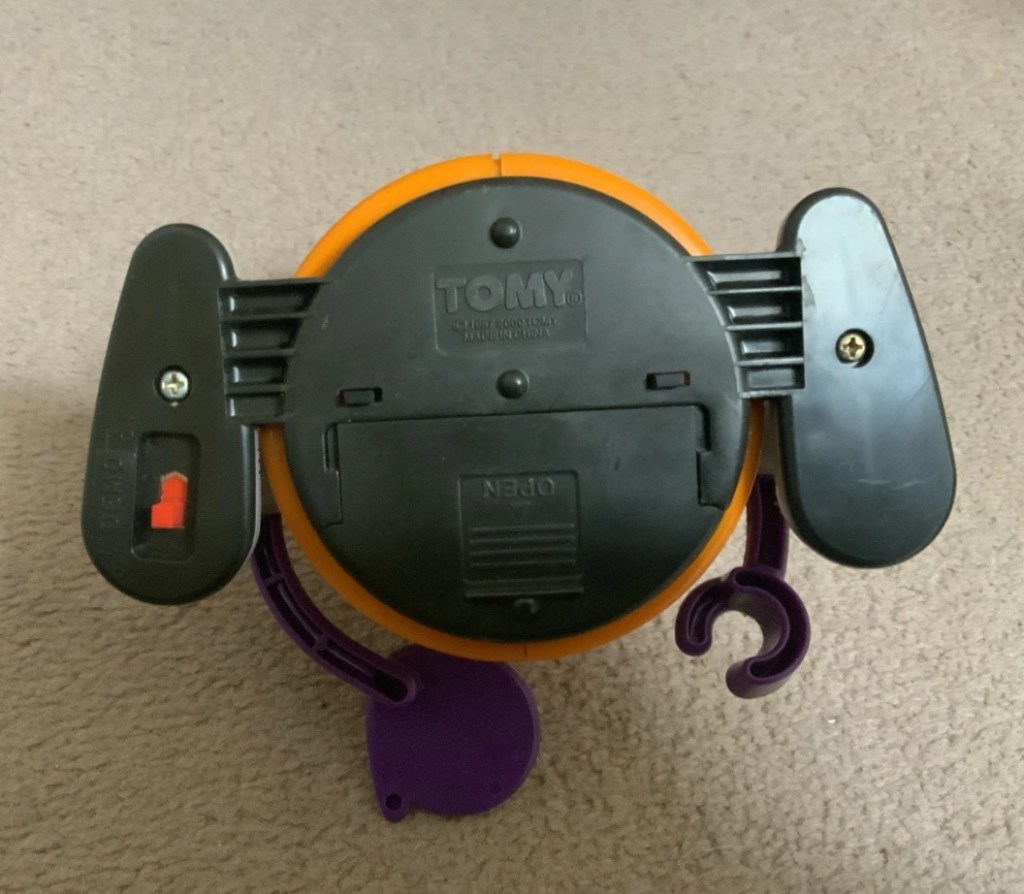
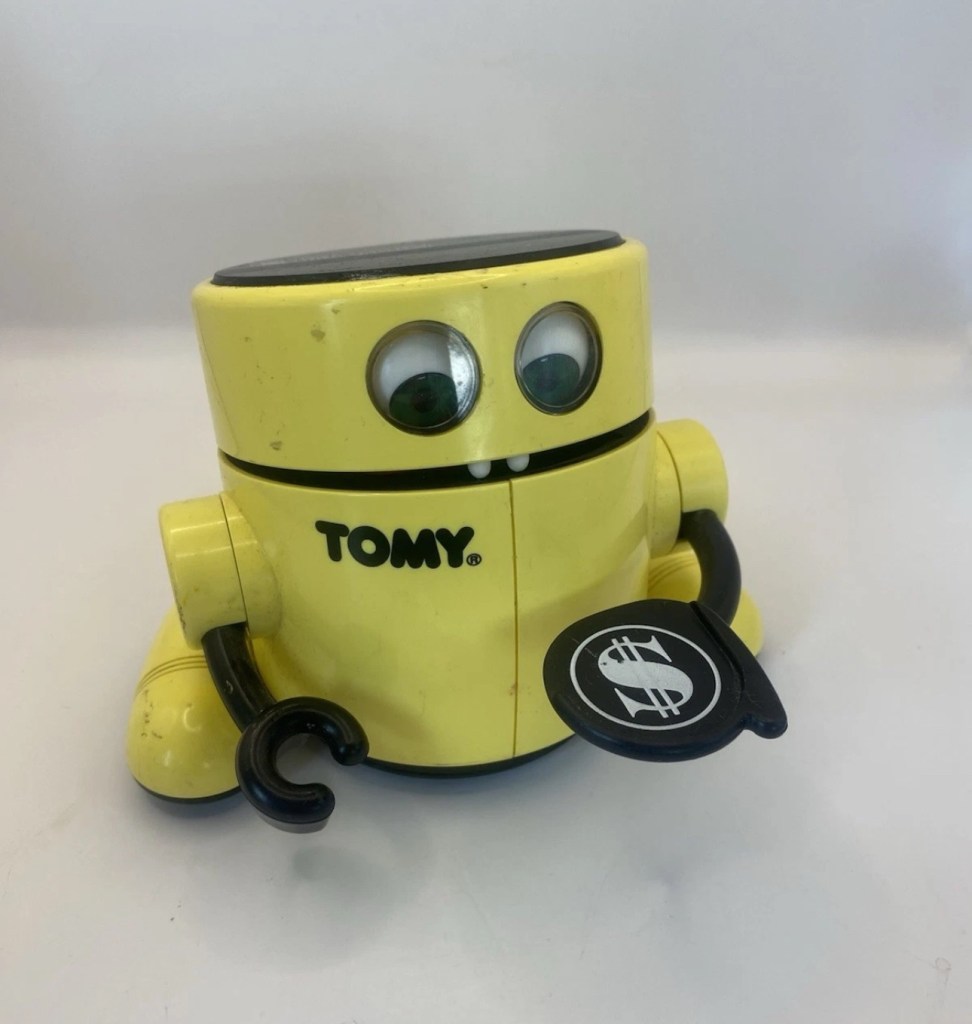
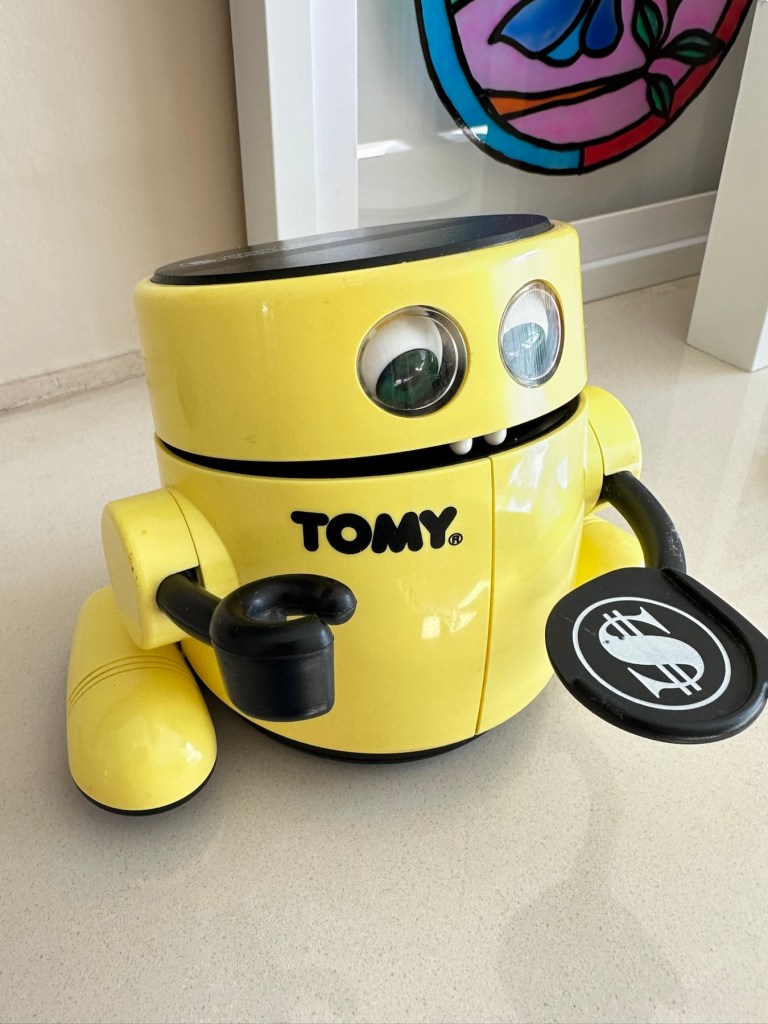
One yellow with pound coin on hand and one orange with a dollar on his hand.
I don’t think either are working and the yellow one is missing the battery cover so selling as spares or repairs.
EBay
Two more heading home
Dirty boys – Missing battery cover
Those of you who follow this site will realise I purchased one of these a while back and did the repair here: Tomy – Mr.Money bank
I paid a total of £10:20GBP for the one in that repair post, and he is currently earning his keep at work collecting money for our local hospice charity – LOROS.
These two I have managed to get for a total of £19:26, so in theory these two are in the similarly price range as the other two. These were produced in 1987 to encourage children to save, with the element on a little bit of fun. These money boxes, when in a good, working condition do command a fair price. Just look at the screen grab of the latest prices being charged on the sale sites.
Latest prices
Both apparently, are not working and they do look quite disgustingly dirty, I’ve no idea what the actual faults are but I’d bet they centre around the switch area as that is a common issue. Add to that one of the battery covers is missing, and the price will rise by about another £5:86GBP as I get a new cover 3D printed, that will mean a total outlay of £25:14GBP or to be specific £12:57GBP per unit.
I more than likely will keep one of them and move the other one on. Let’s wait and see what arrives for us to begin the assessment.
Assessment:
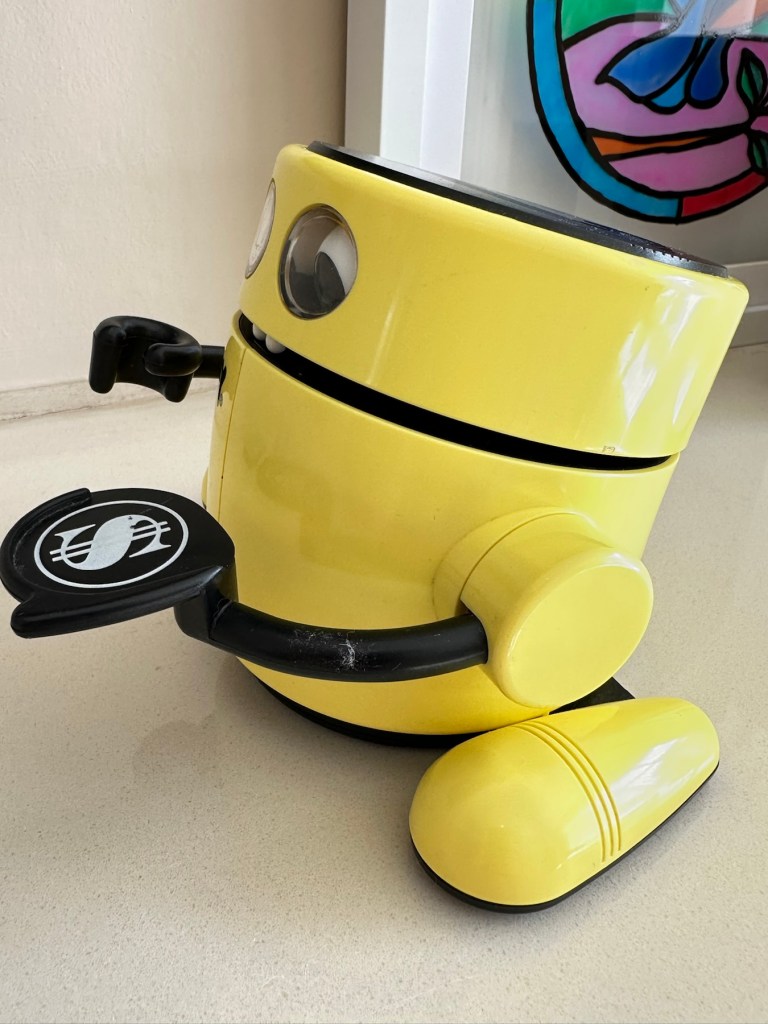
Well, have a look at these two scruffy urchins that turned up today. Both in an absolutely filthy state, need a really good clean. It really surprises me that anyone can send such a filthy item through the post. Does it really take too long to just dust an item down with some furniture polish? Thankfully the wife wasn’t here when they arrived or else she wouldn’t have let them through the door 😂
That said they are as described. Everything is in place apart from the battery cover that I have already ordered as a new 3D print.
Two scruffy urchins
First thing to do is to clean them. They are filthyOne missing battery cover, a 3D replacement has been ordered
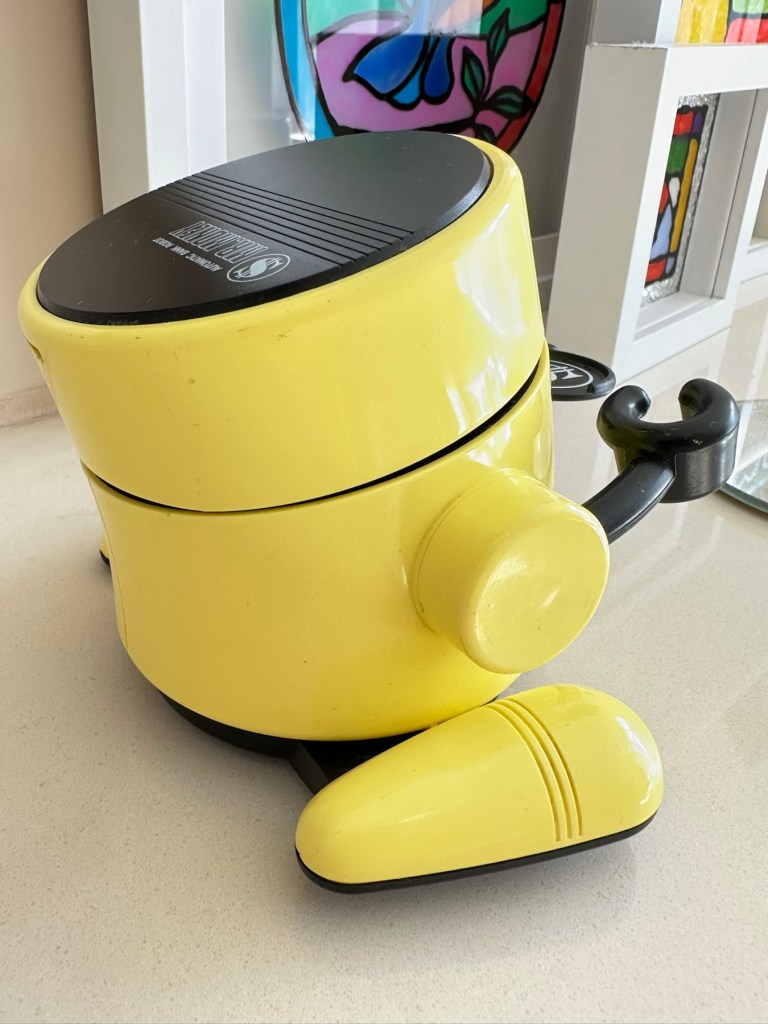
Setting a good example. My perfectly clean, and working example at the front
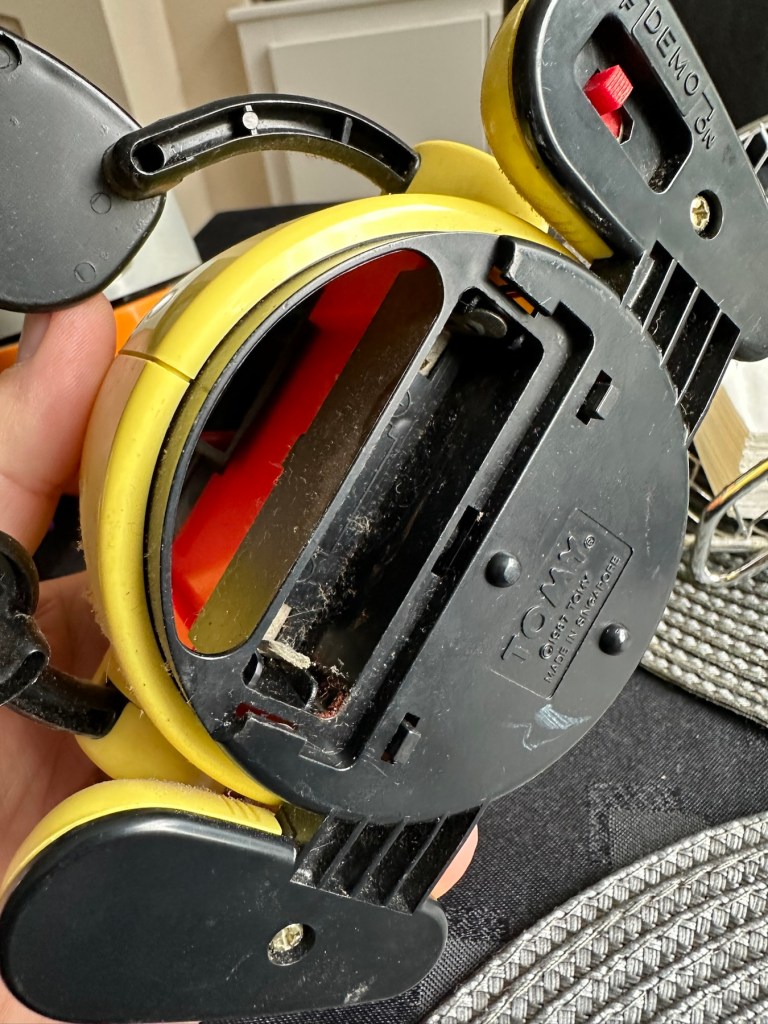
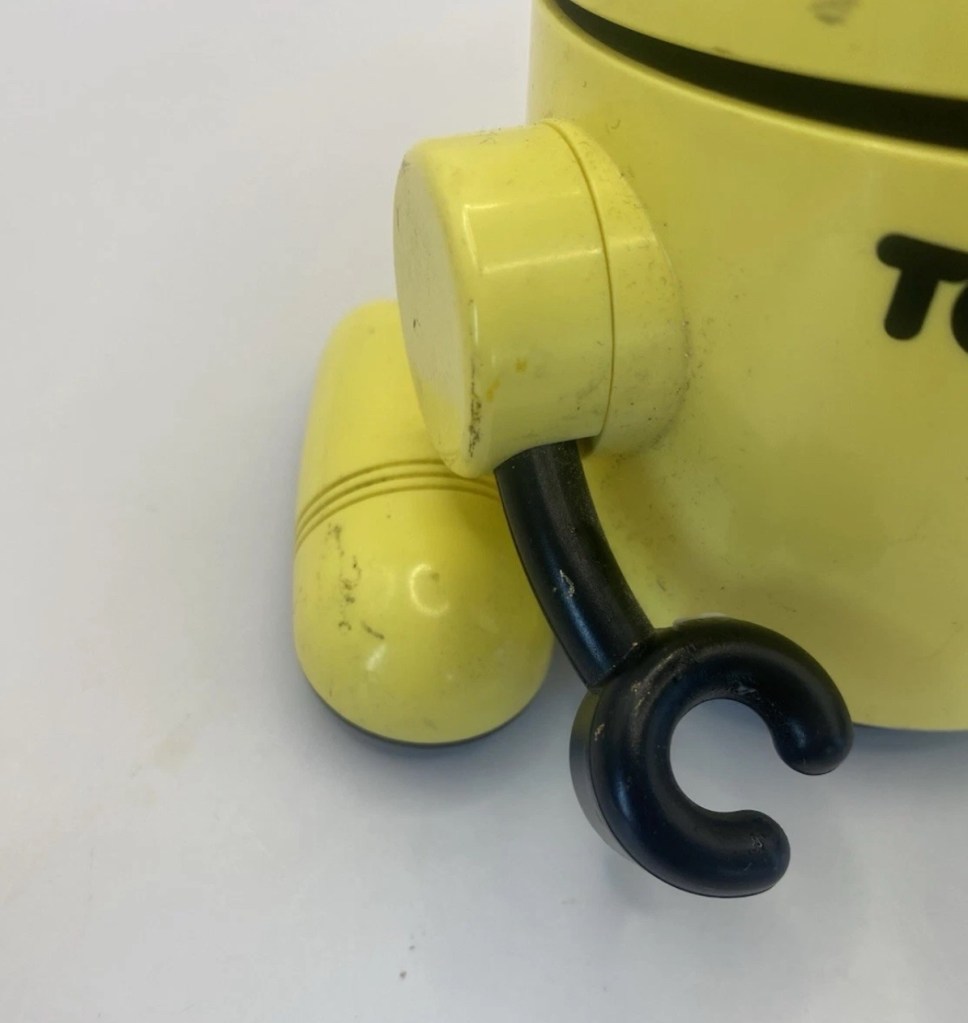
Apart from the above all seems fine. I have put a battery in each and turned them on, nothing happens. On the yellow example there is a little contamination on the battery contacts and when I move the battery I do get some motion but it sounds as if there is a sticking or broken gear inside. The orange example is totally dead but the contacts are clean. This could be the classic switch issue. So the order of the day is to get these both cleaned before dismantling just to keep any mess to a minimum, open them up, clean inside and check the gearings and then lubricate with some silicone grease. I’m hoping these will not be too labour intensive as I have been inside one of these before, and I’m more than aware of the issues of small parts falling out.
Repair:
First a clean with some polish.
A quick clean and they come up lovely
Cleaning done, they’ve come up lovely, I’ll give them a final clean at the end after we’ve attended to the internal issues. So let’s get on.
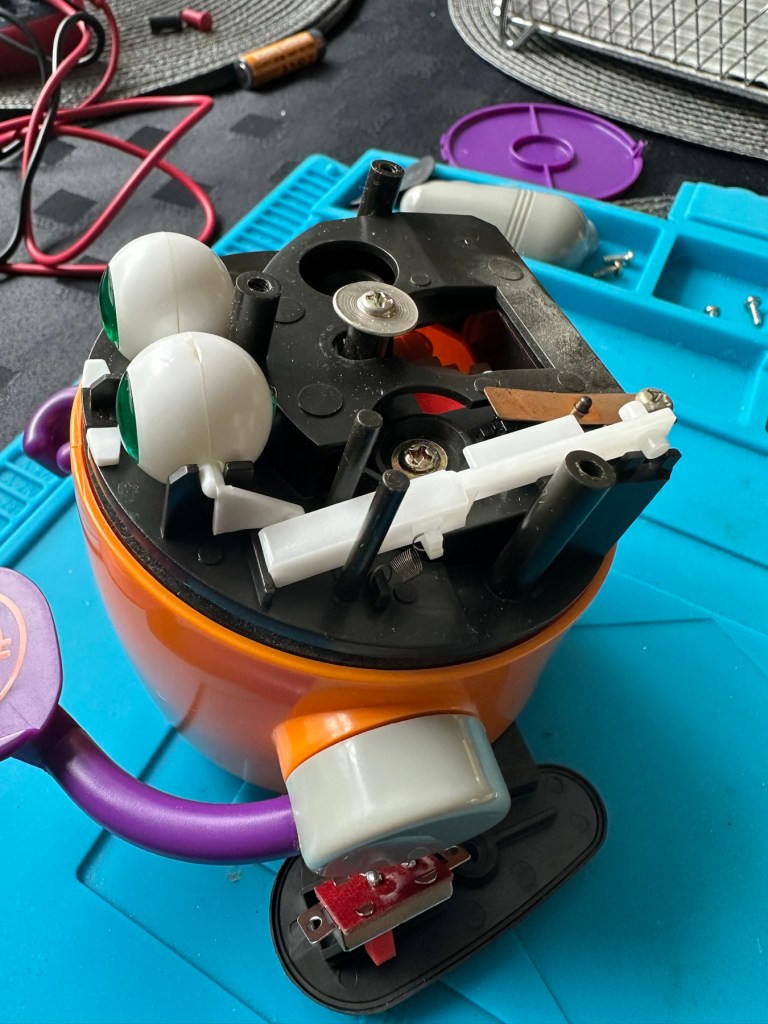
I’ve chosen the orange chap first, however my suspicions about the faulty switch are wrong. The switch tests fine and I then go a bit deeper into its soul 😂
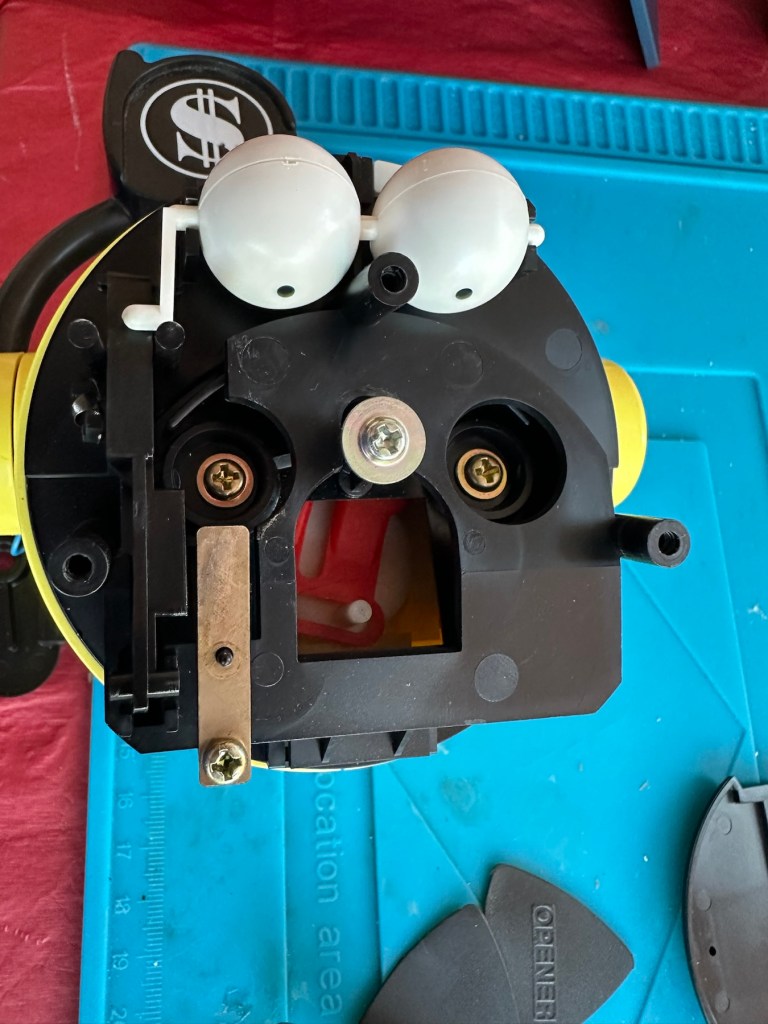
Off with his head and down into the cogs and sprockets
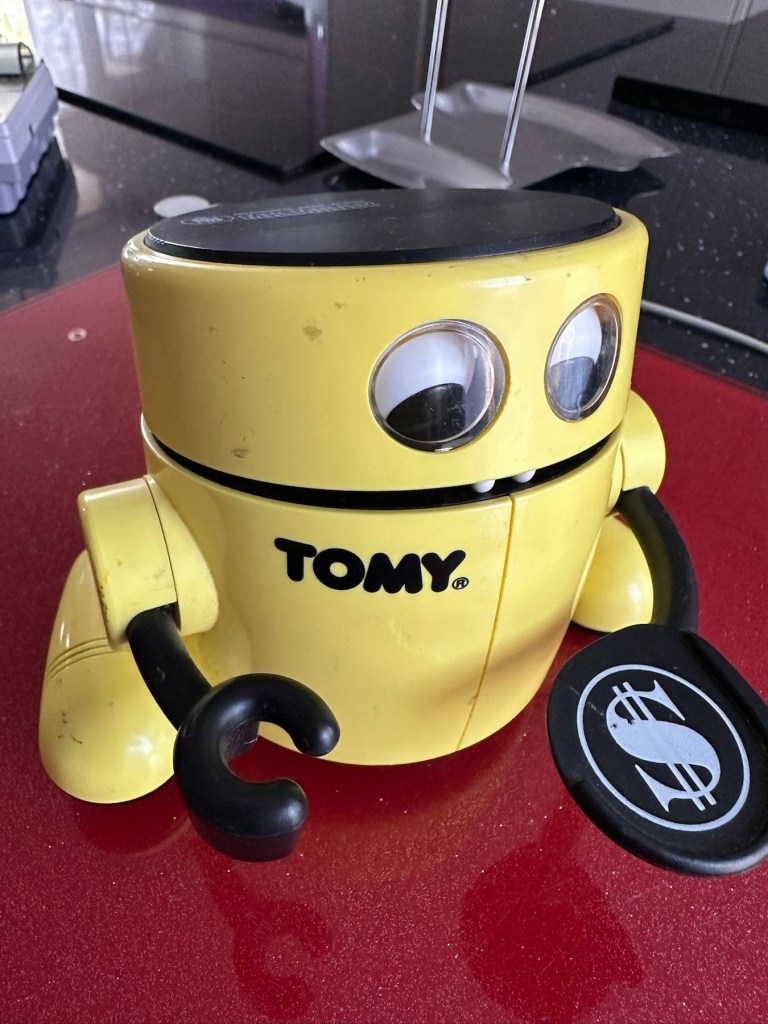
I get down to the motor and the cogs and sprockets and realise the motion has ceased. A little silicon grease over all the moving parts and a little bit of teasing and the unit springs into life. I let it run for a few minutes and then reassemble, cleaning everything along the way. This unit is now working.
The second unit, the yellow one, was working sort of. So as I have done above, this one was also stripped down, cleaned along the way and also had all cogs and sprockets greased accordingly. It also is now working fine.
I have already purchased a 3D printed battery cover to replace the missing one, and this is now installed, so we now have two complete units. For what I’ve paid for 3D printed pieces over the last year, it would probably be worth investing in my very own 3D printer.
The new replacement, 3D printed battery cover
Result:
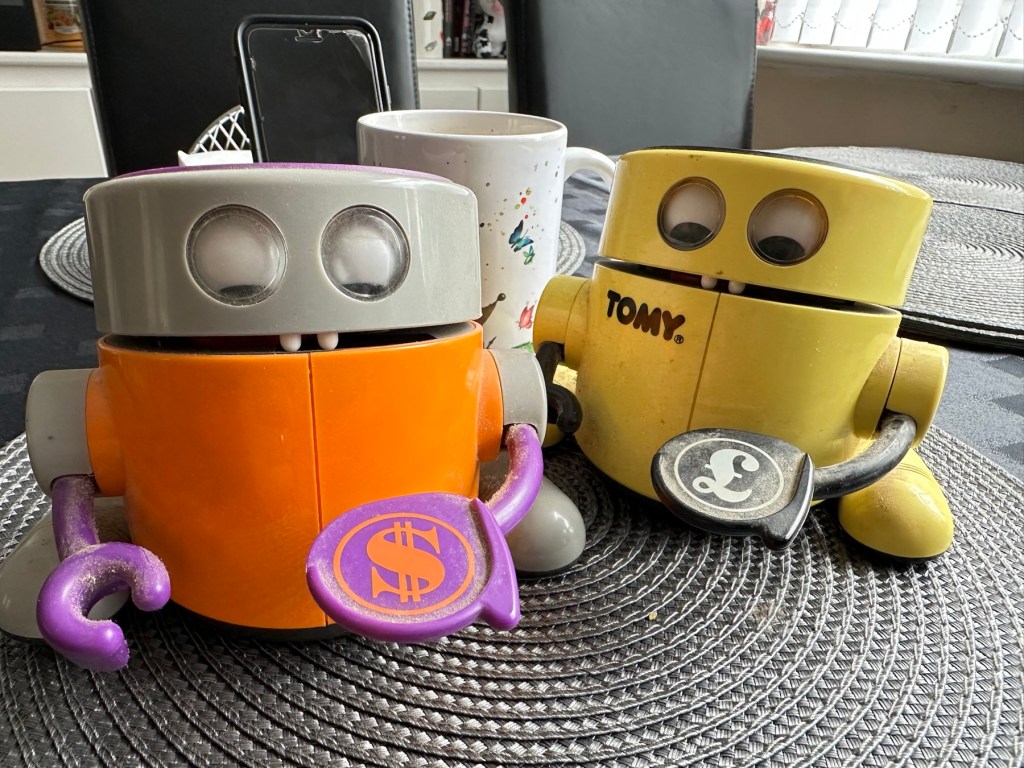
Well I now have three absolutely perfect working examples of this fun piece of 1980s technology. One is in use earning money for the local hospice.
The Orange one is going to be used by a work colleague to raise money for the British Heart Foundation.
Earning his keep
He is selling candles and I’m going to brand this one with a BHF logo to add some fun to his fundraising.
The three amigos
I have put together this little video regarding feeding time for these three . Enjoy!
Feeding time
The third unit will probably be sold on unless I can find someone else who can put it to good use.
Thanks for visiting, as you know it is always very much, appreciated.
Now I don’t half buy some junk to fix, but this one struck a chord with me. Looking into its history I believe it’s a toy made to encourage children to save money from around 1987. So he’s currently around 38 yrs old.
Dirty, as per usual and a bit beaten up. Sounds just like me 😂Crazy prices
As you can see in the photo above, you could originally buy a set of these, incorporating Dollar, Pound or Euro stickers for the serving hand, the one i have made an offer on is the dollar one.
What appeals to me about this item is that I’ve been looking for a way at work to raise some money for the local LOROS hospice, and this might be a fun way to do it if I can get it working. I plan to brand it with the local hospice details and just thought it would be a fun way to use it. This is a fun object where you put a coin on its hand, its mouth opens, the eyes go up and the coin goes in the mouth. There is a munching motion and then the tongue licks its lips. Or at least it should do. This one I have ordered is having none of that and this is the challenge ahead. These units are notorious for having issues with the power switch, a simple fix if that is the case, but this is me…nothings ever that simple.
And as usual it’s dirty, has marks on it and needs a good clean.
As with everything retro (New antiques 🤦♂️) items are attracting some crazy prices, though I do think the general public are not as stupid as the sellers seem to believe they are, as all the above listings have yet to attract any bids. Now the one I have bid on is broken, and yes it has its battery cover. My current bid is £6.70GBP and I must now wait to see if it is a winning bid. With postage (Rip off as usual) the price will be £10.20GBP in total, so compared to the prices in the listings above it is an absolute bargain.
Good news – I have won the auction at this price. Nice.
Assessment:
Well, he’s arrived and just like Frankenstein he’s very dead. He needs an electrical kick start and that’s what we need to do. He’s obtained a lot of scuffs and marks but I think these will buff out. Cosmetically everything is there, even the battery cover and that pleases me immensely. With batteries in place there is not even the tiniest sign of life even if the on /off switch is operated many times. We need to get inside and take a look. Hopefully it’s not too big an issue.
He’s a little dirty, beaten up and scarred
And I’m just so happy he has a battery cover. Exceptionally rare and unexpected.
Repair:
I’ve headed straight for the switch as this is where there is usually trouble and straight away there was a problem. There was no continuity at the switch when operated, so this was removed, opened, cleaned and the brass contacts ground and cleaned. The switch was then reassembled and tested and was all ok.
No continuity, so dismantled, cleaned thoroughly and reassembled
But this was not the problem. Damn it, I now have to take it apart and there is a lot of mechanical items within.
Gradually dismantling
Once dismantled I’ve had a good rummage around and have checked voltages around the electrical circuits until I found no voltage at the motor. The culprit was a small 3inch length of wire that had been crushed. This was replaced and the continuity was now restored to how it should be but still there was no life. I was confident that the electrical issues were no more so it must be a mechanical issue. There is a part of this unit that involves a tongue 👅 that pokes out. This was our issue. The cog and lever system had somehow been knocked out of sync, and once put back into its correct position the unit has now sprung into life. See the little video of this stage below:
We have life
Happy with this I’m now going to review all the pictures that thankfully I’ve taken, and ensure it’s reassembled and cleaned as I go along. The marks and dirt have buffed out nicely and the unit is now extremely clean and looking as good as the day it was purchased. And it works:
Working perfectly
Result:
Here it is now in all its highly polished and clean glory
Looking Beautiful and handsome in its 38th year.
Thoroughly enjoyed this little project, I love the electro mechanical items from this period, they really get you thinking.
The local charity
This unit is now going to have a LOROS hospice logo placed on it to cover the Tomy one as discussed at the beginning of this post. We can then start to gather all that loose change in my work place to pass onto them. They need every penny we can raise. Every penny helps, especially in the current financial climate.
Thanks for passing by, as always it is very much appreciated.
Can’t get to turn on unfortunately. No battery cover. Any questions please ask
EBay
Dirty unit No battery cover
I know, there is no battery cover, however I have already sourced a seller of one if needed. This item looks quite dirty so a good soak might be the order of the day to get started. I’ll wait for its arrival before I jump to order any other bits for it.
Now as I’ve said in the past these units fall into that crazy price category on the selling platforms as the “New Antiques” of today. For an item that was low cost, somewhere between £25-40GBP when it came on the market, they can certainly command a wide range of crazy prices, here is an example of price ranges from today:
The massive range in prices for these units
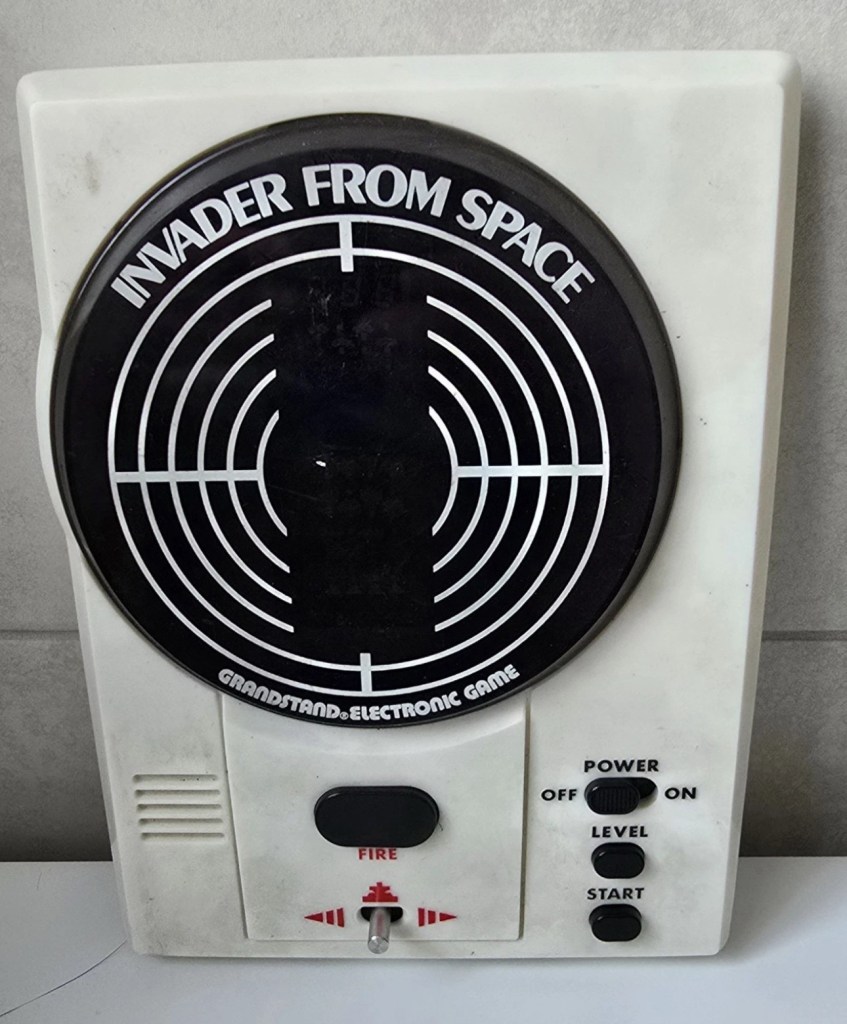
This one I purchased today only came up for sale about 3 hrs ago and I thought it would have been snapped up by now, it hadn’t so I didn’t hang around any longer and purchased it for a total of £16:38GBP including its delivery. I’m not going to get too smug yet, as for all I know I may have just purchased an empty shell. Let’s wait until it arrives.
Here’s a little history of this unit:
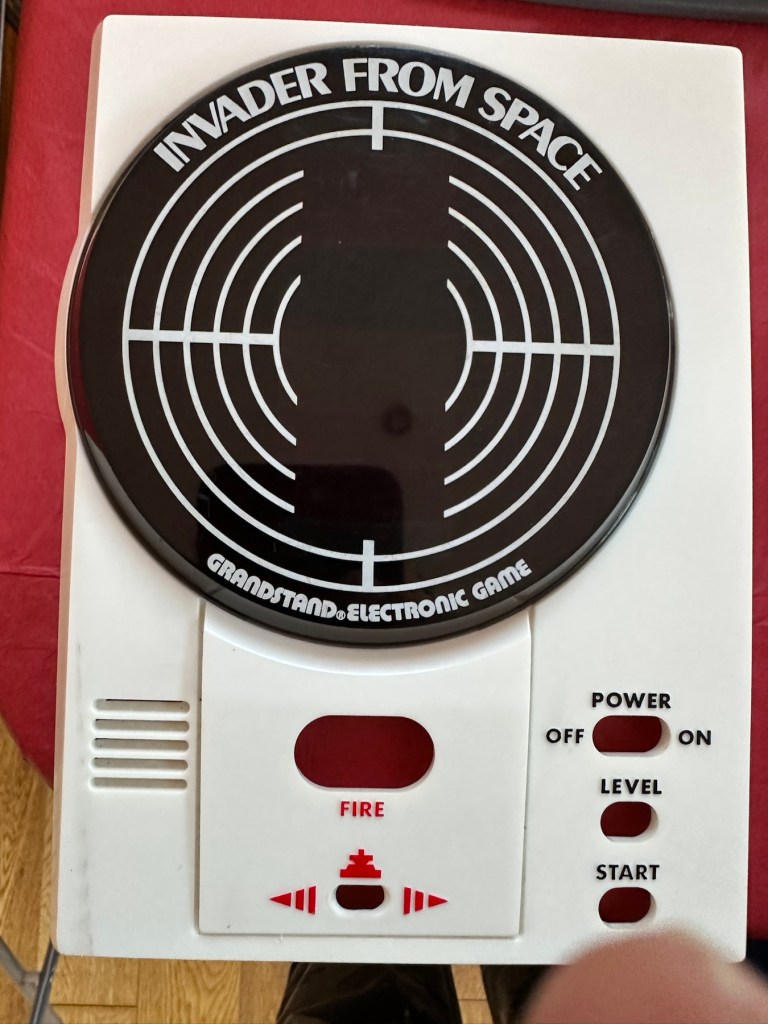
Grandstand “Invader from Space” is a tabletop LED game dating back 45 years to 1980. Four ‘AA’ batteries power the unit or, alternatively, the Grandstand 5.5V@300mA power adapter (or an equivalent power pack) sold separately. The game, licensed to Grandstand, is a copy of Epoch’s “Invader from Space”
The company initially behind the “Grandstand” label was Adam Imports Ltd., (from 1980 Adam Leisure Group Ltd. and by 1983 Adam Leisure Group PLC) founded in 1973 by Chris Rycroft and Les Kenyon of Harrogate, UK. The company initially started as a mail order company and was the single largest supplier of calculators in the UK by 1974. By August 1978, George Bassett had acquired a 75% holding in the capital of Adam Imports for £750,000 cash, plus 60p in the pound of profits before tax in excess of £500,000 for year to December 31, 1978. Adam Imports was re-acquired from George Bassett by Chris Rycroft in 1980. It chiefly imported electronic products from other manufacturers such as VTech, Epoch, Tomy & Entex, selling them in the UK re-branded under the Grandstand name.
Wikipedia and others
So that’s the history
There is a good link to a similar repair on YouTube from a guy I follow named Stez Stix Fix, it’s very much worth a look and he has a great if not sometimes crazy way of diagnosing and repairing items. A cool guy though.
The Grandstand invaders from space game
Anyway back to my own purchase.
Assessment:
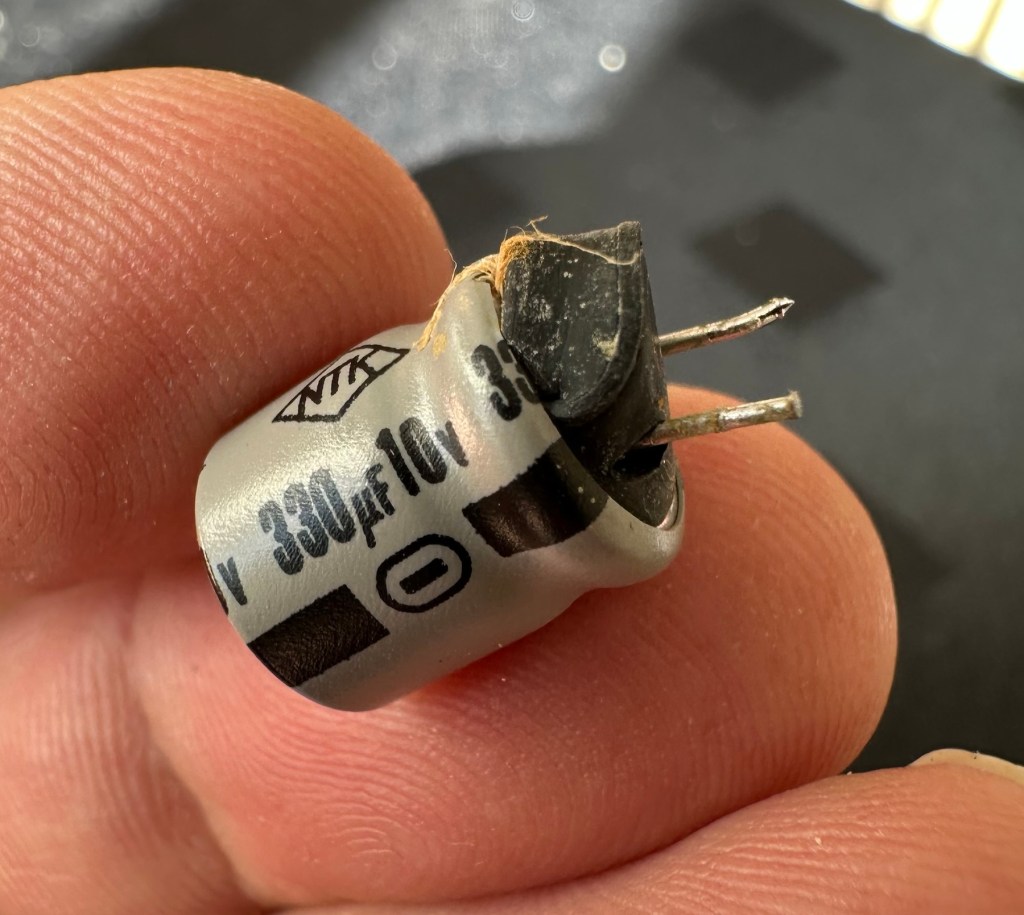
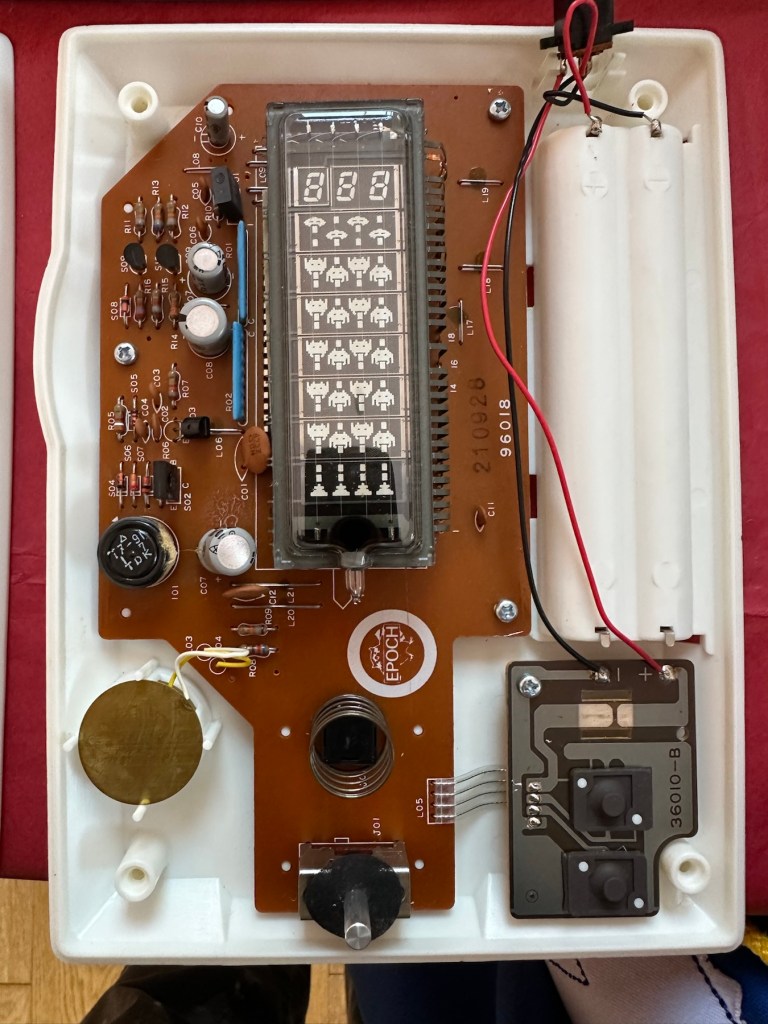
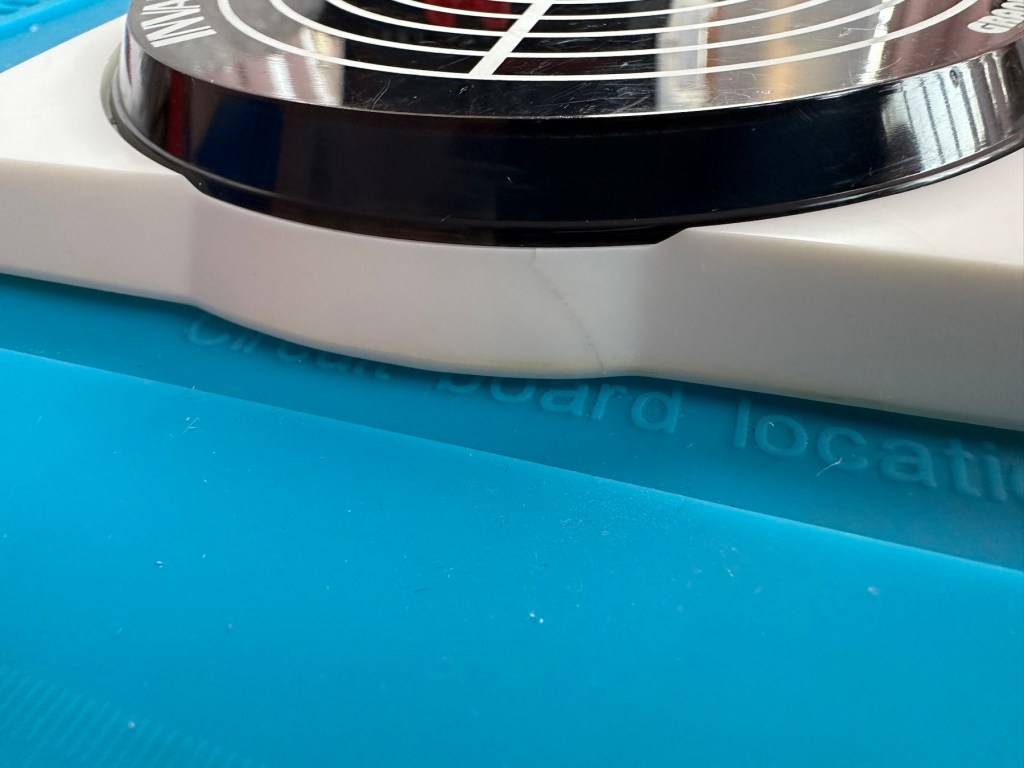
I must admit the unit doesn’t look as dirty as in the original pictures. The battery cover is missing and there is a crack in the side and a deep scar at the bottom, this won’t be too much of an issue if I can weld it all back together. I will still give it a good soak to clean it all up though. I’ve put four batteries in place, and the unit is definitely dead. There are no loose wires, voltages are getting around the board according to the multimeter and nothing is getting hot. There appears to be no short circuits, and then I notice this, capacitor CO7, slight bulge on top and what looks like leakage from the bottom. We have a candidate as to why this unit is not working.
CO7 looking unhealthy to me, you can see the component to the left that looks like it’s covered in a fur ball. The result of the old capacitor “coughing”
I’ll whip this out and see what we have but I suspect this old capacitor has failed and is causing an issue, heres hoping I have a suitable replacement.
Repair:
This little beast is a 330uf 10v electrolytic capacitor. I have none available so have had to purchase a pack of ten. These should be here in the next few days. There are three other old electrolytic capacitors that I will also change whilst I’m in there, as these are all likely to fail at some point soon. These components are now all around 45 years old, it’s a wise move to change them out.
One very dead capacitor removed.
I’ve ordered a 3D printed battery cover to replace the one that is missing. This should be here in a couple of weeks.
Whilst waiting I have cleaned the inside and outside of the casing as best I can. I still have a piece of broken surround to repair, however this is just a simple glue and a little bit of support job.
Case inside and out cleaned
Broken surround repaired
The surround that was broken has been repaired and secured with some nylon soaked in a superglue compound inside the casing. It’s rock solid. Outside the break is hardly noticeable. The break is secure and much stronger now.
New capacitor here
I’ve replaced all the offending capacitors and the unit remains dead. I’ve reflowed most of the board as there were some dry solder joints. I’ve also rewired the bridge from the control panel to the main board as one of the wires here had broken.
Bridge required resoldering
After using the multimeter to check some traces and components it’s now pointing to this component (a power transistor D882) being the cause of this catastrophic breakdown as its readings are all over the place. I suspect this item has overheated, the capacitor has blown and then it’s just died itself. I’m probably wrong, but I know what I mean. Probably just a catastrophic chain of events that all contributed to the units demise.
D882 transistor – power regulator
And as usual I have none available so will have to send for some new ones. The new components have arrived and the new power transistor has taken its place on the board. Now reassembled I place some new batteries in and the unit comes to life. It was the power transistor at fault, I should have really checked here first after seeing that damaged capacitor at the beginning.
All old components removed and replaced in this unit
Not to worry though as it’s had a good overhaul and has been totally recapped as a precaution. I’ve used some conformal coating on a few tracks that had some copper exposed after a good clean, to ensure they don’t deteriorate any further.
It has life
The unit is looking really good and these items were traditionally very loud and this certainly is. It’s working well just as it should do and I’m exceptionally happy with this repair. I’m still awaiting the battery cover that I have had 3D printed and this should be here in the next week to complete the fix.
No scoreHere we go3D printed cover arrived. Minor adjustments needed but in all a good purchase
So with that I will bring this build to a conclusion. It has been a fun project, I’ve learned a number of things about this circuit board and gained valuable knowledge.
But best of all we have rescued another item and saved it from landfill.
First of all I hope you all had a good Christmas Day, our family day went really well with no issues, and today is round two at someone else’s house so at least the washing up won’t be left for me today.
All time favourite automobile? Now I’m not really a petrol head and to me an automobile is purely a way to get from A-B. I’ve owned some right old bangers that I’ve really loved, but to be honest as I’m having to choose favourites, one is a toy and one is real.
The toy:
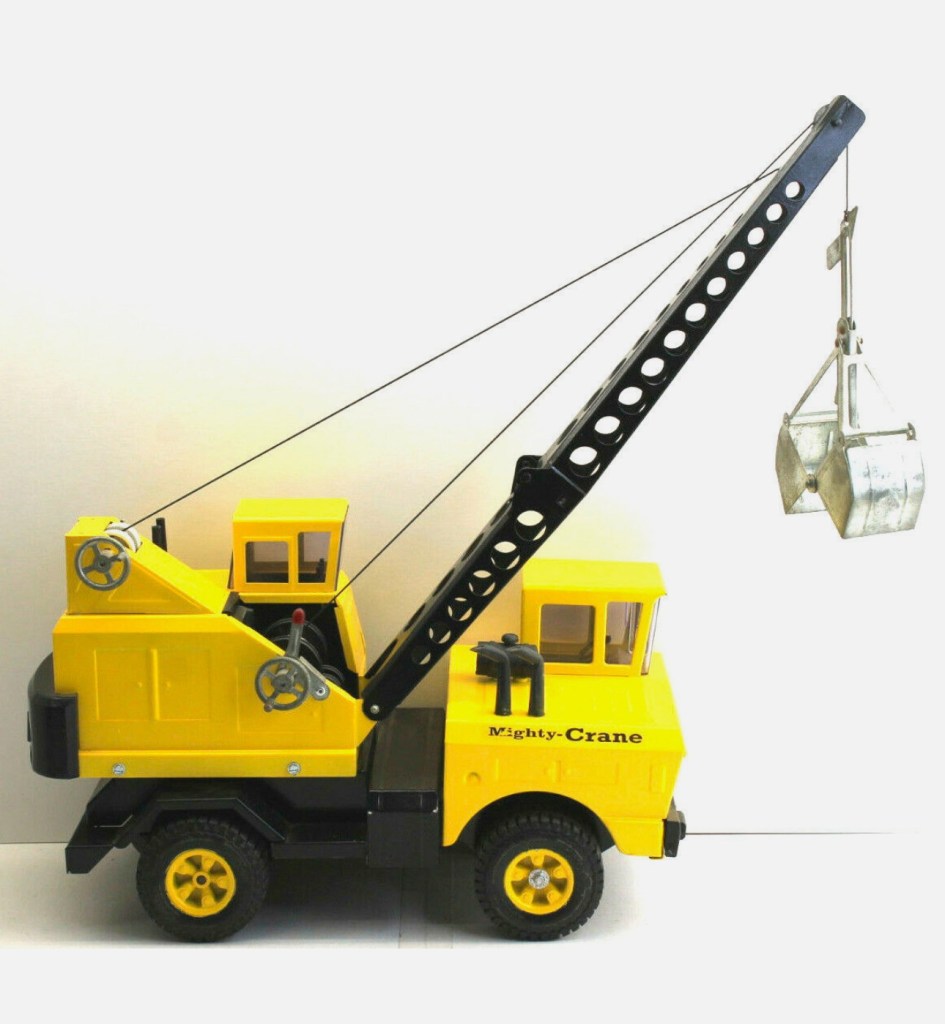
1970s I was brought a Tonka crane that was my absolute pride and joy. I was probably about 8 years old when I was brought this but to this day it’s still there in my memory banks as just something special. Knowing my love for anything retro I will probably one day look at obtaining one, much to the wife’s dislike.
A 70s Tonka Crane
The real thing:
When I was diagnosed with Kidney cancer a few years back I went out and treated myself to Landrover discovery 3. God I loved that car, it was like sitting in your favourite arm chair and a beautiful car to drive. It cost an absolute fortune to maintain but was worth every penny. Just like everything in this country though, we pay too much tax and because big diesel drinking vehicles fell out of fashion the grabbing government decided to tax these out of every day affordability. I loved that car and must admit I shed a tear the day it drove off our drive for the last time. I’d buy another one in a heartbeat, I loved it.
Doris – my old trusty Landy
We currently have a new car that serves a purpose but is as basic as you can get. That said, I’d rather walk anywhere within a reasonable distance than take the car.
We have tried a few batteries but the unit does not power up so beig sold for spares.
EBay
I obtained this for a very reasonable price considering the amounts being charged these days for similar battery operated 1970’s items.
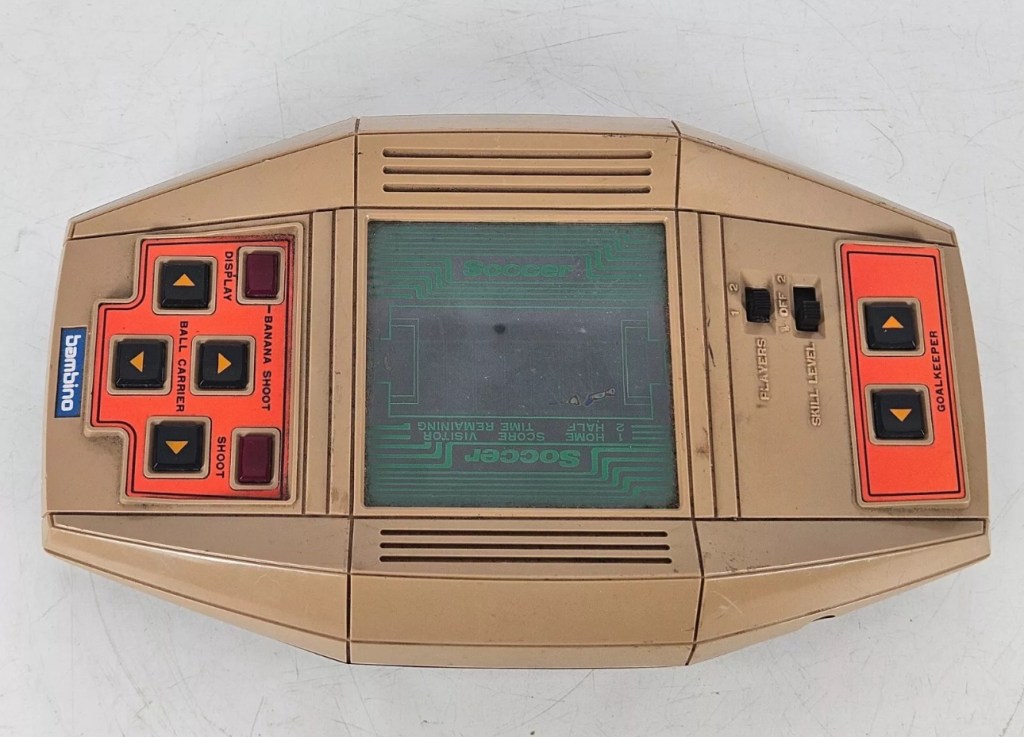
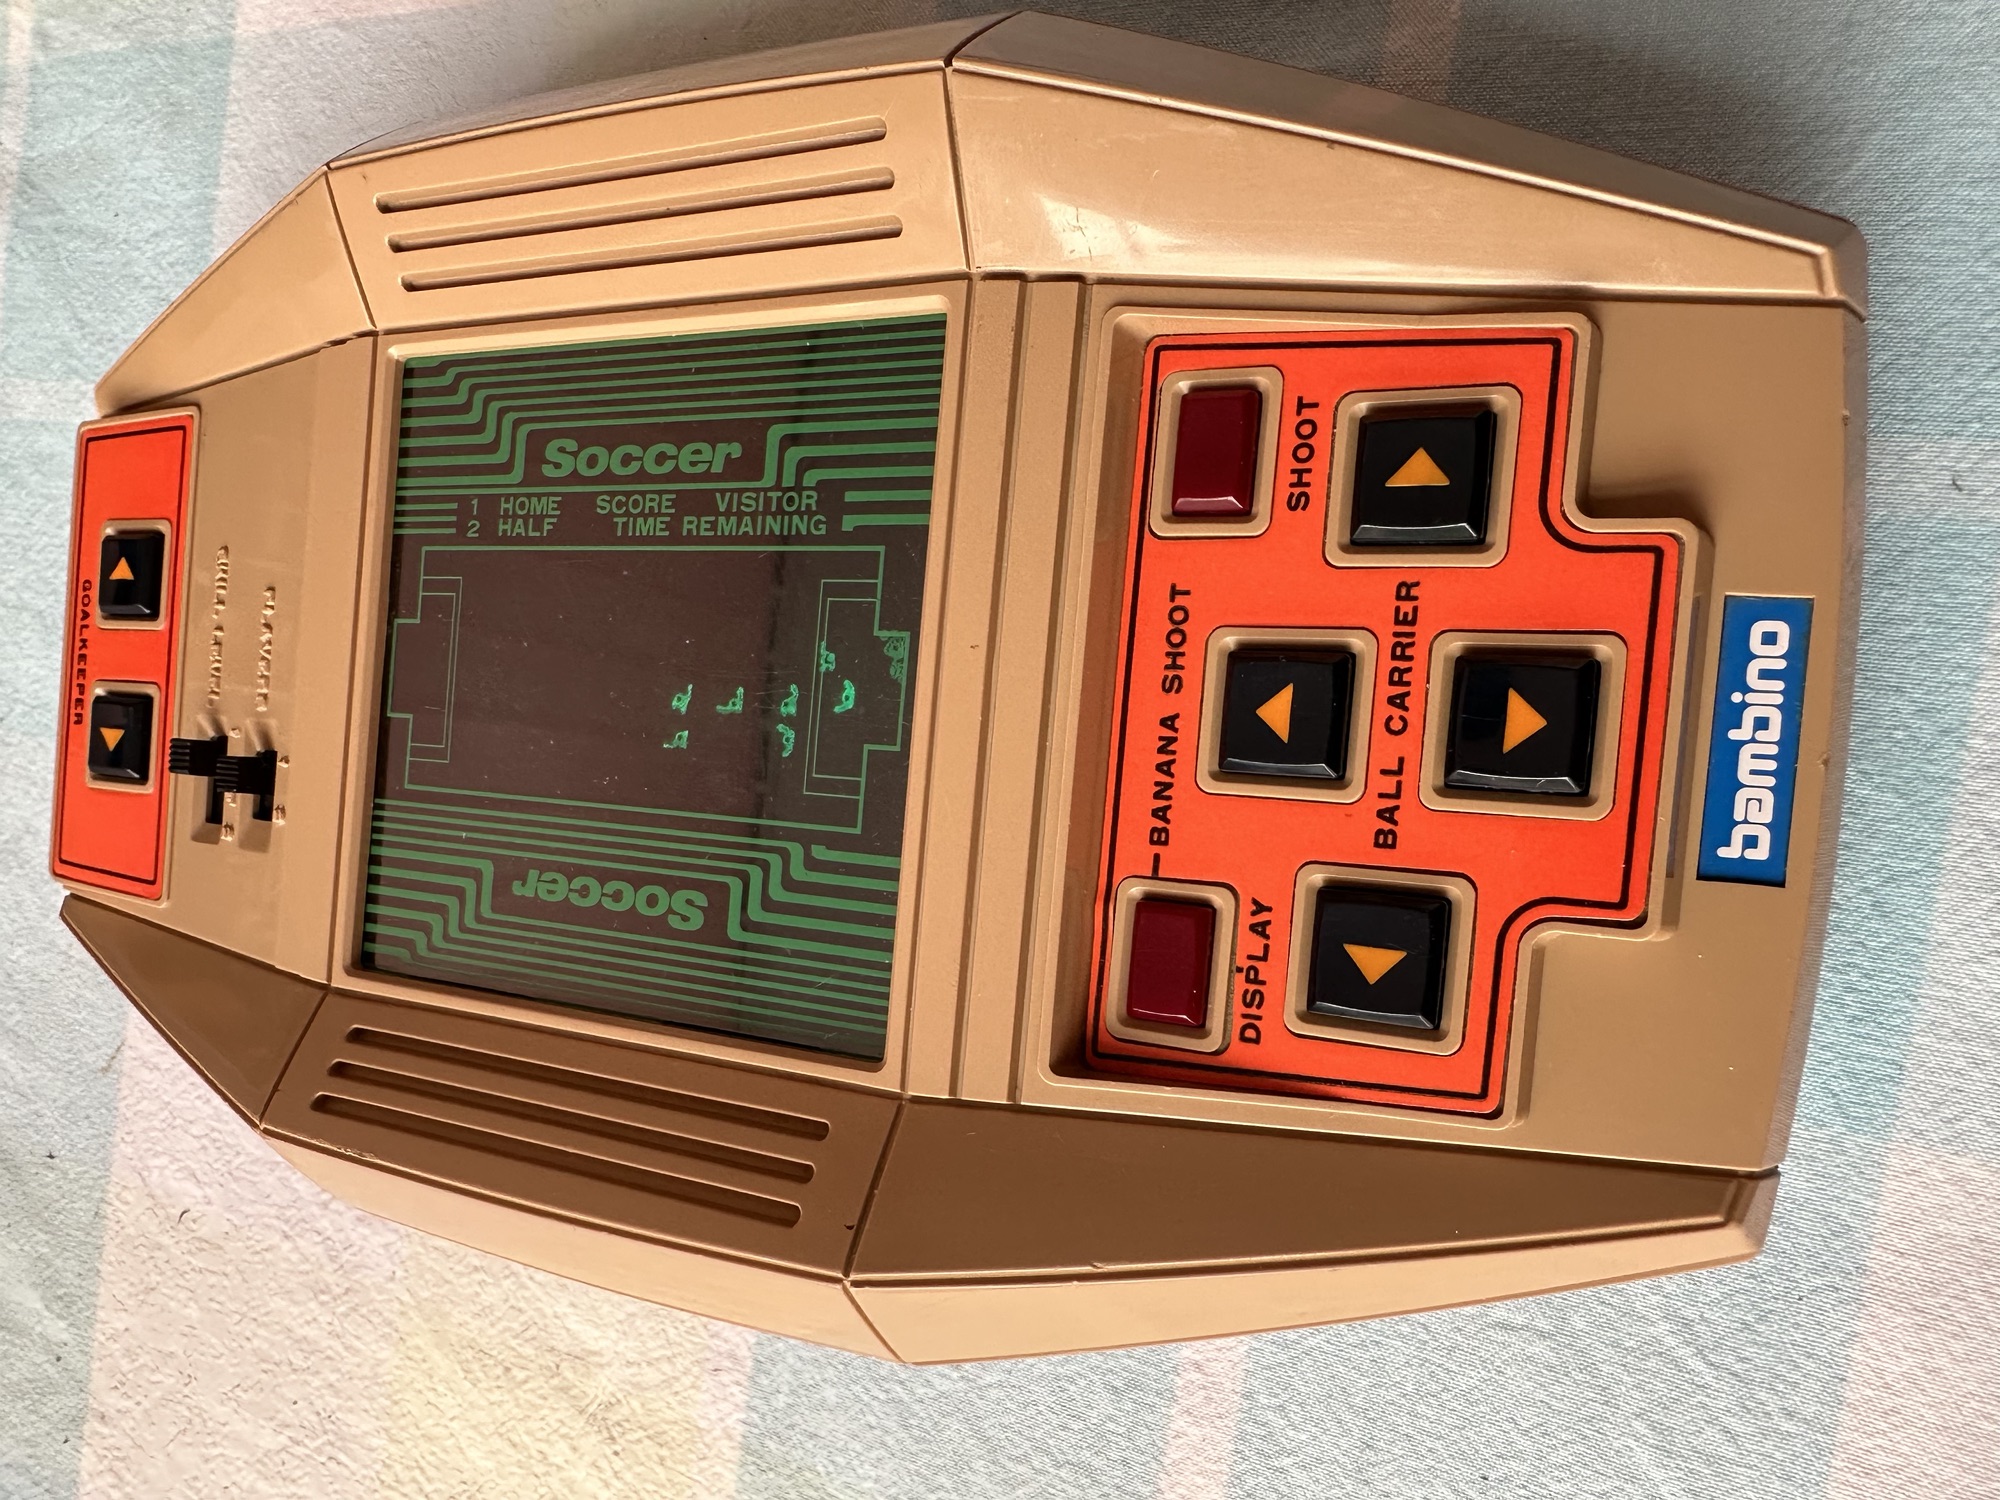
Bambino gameLooks tidyNo Corrosion Bambino Kick the goal soccer game
This unit was assembled in 1979. From initial pictures a few things are pleasing. It looks fairly tidy, the battery cover is supplied, there appears to be no corrosion and the labels appear intact. However actual delivery and when it appears in my own hands may prove otherwise so I’ll await its arrival to give a final judgement.
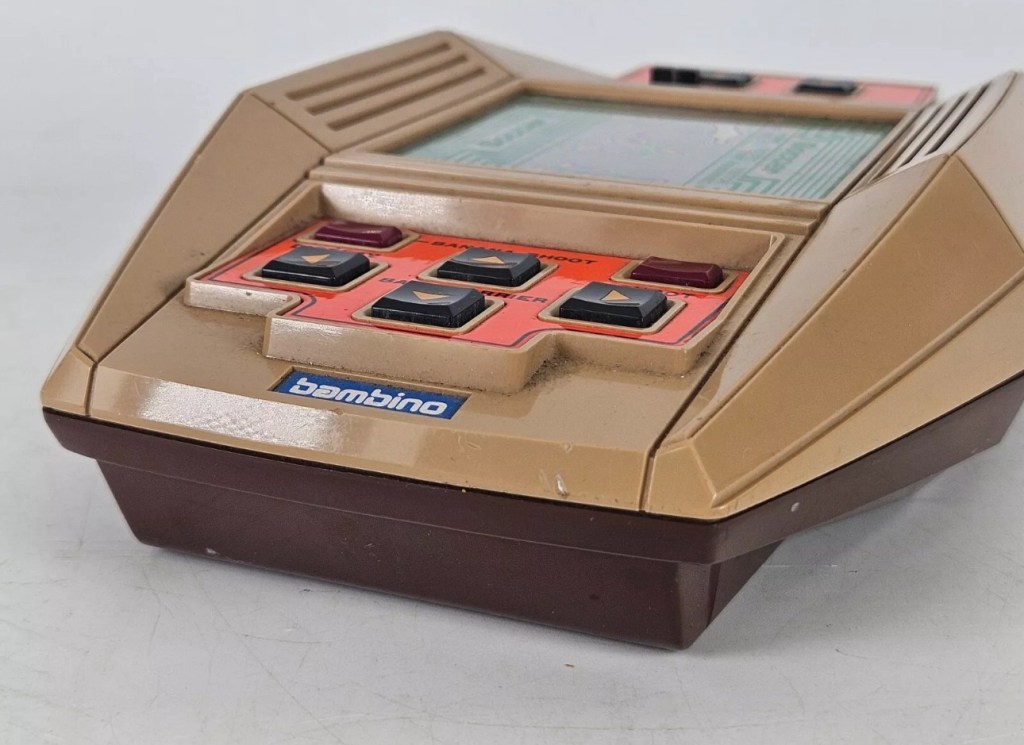
Well the item has arrived and considering it’s 45 years old it appears to have had a good life. A few small knocks and scars, no more than what you would expect….lets get some batteries in and see what occurs.
A few cold solder joints needed re flowing45 years old and clean as a whistleGame pads all to cleanButtons to clean
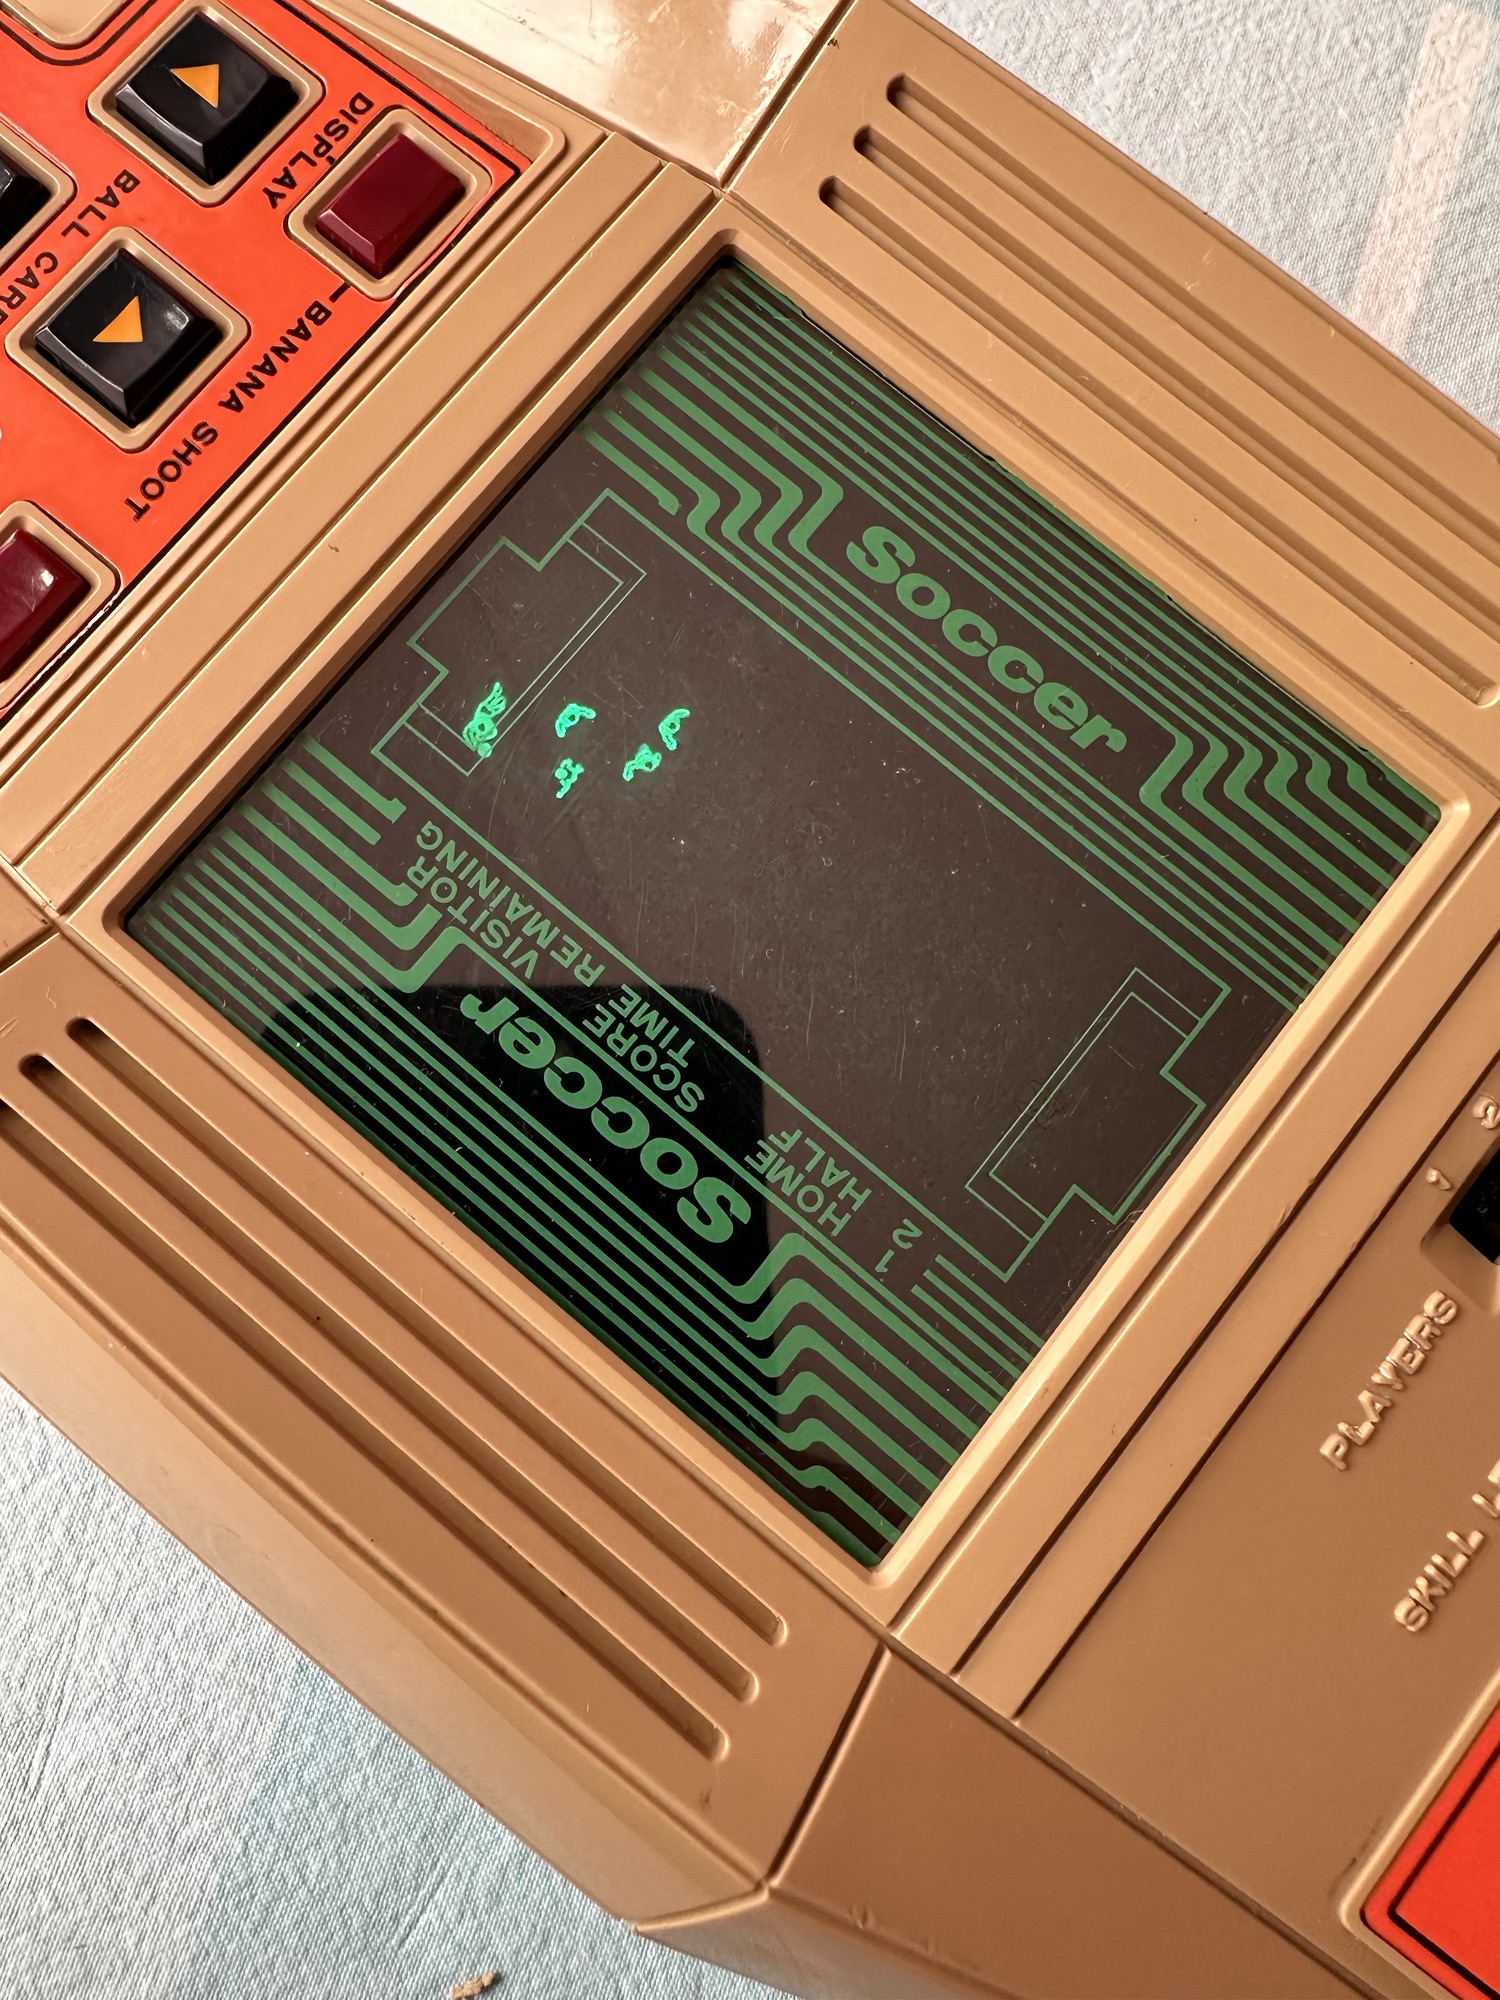
Inside is amazing, no LED screen just a tube that looks like an old Cathode Ray tube that you’d have on a TV. (Actually known as a Vacuum fluorescent display) Thank god this isn’t damaged as it would be game over. Wiggling a few contacts and I can hear the speaker crackling, closer inspection shows some cold solder joints so I quickly reflow these and it all springs into life. Excellent.
Lovely old display- more like a cathode tube
I’ve decided to take it all apart and give the parts a good deep wash in some soapy water.
Bath time Drying off
I’ve cleaned the two switches with a contact cleaner, I’ve cleaned the screen membrane and all buttons and their attached membranes as well.
Looks stunningAssembled and workingNice and clean
The whole shell has also been cleaned in all the nooks and crannies, and it looks superb.
Before and after
Now assembled it is in full working order, everything works as it should and the display is bright. The batteries are a tight fit but that’s not so much of an issue. Once you get into the game it’s quite addictive as single player mode is a right challenge as the computer is a great goal keeper 😂
Just can’t score – computers goal keeper is too good
Again it’s been quite a simple fix but an enjoyable one. It’s always good to see something that is about to be disposed of brought back to life and saved from the landfill. I paid a total price of £12.71GBP for this unit, and items of a far worse condition are currently selling in excess of £40GBP on EBay. However this is going into our games box in the garden pub for use by the family, especially the kids who I hope will appreciate the height of technology we had in the 70s.
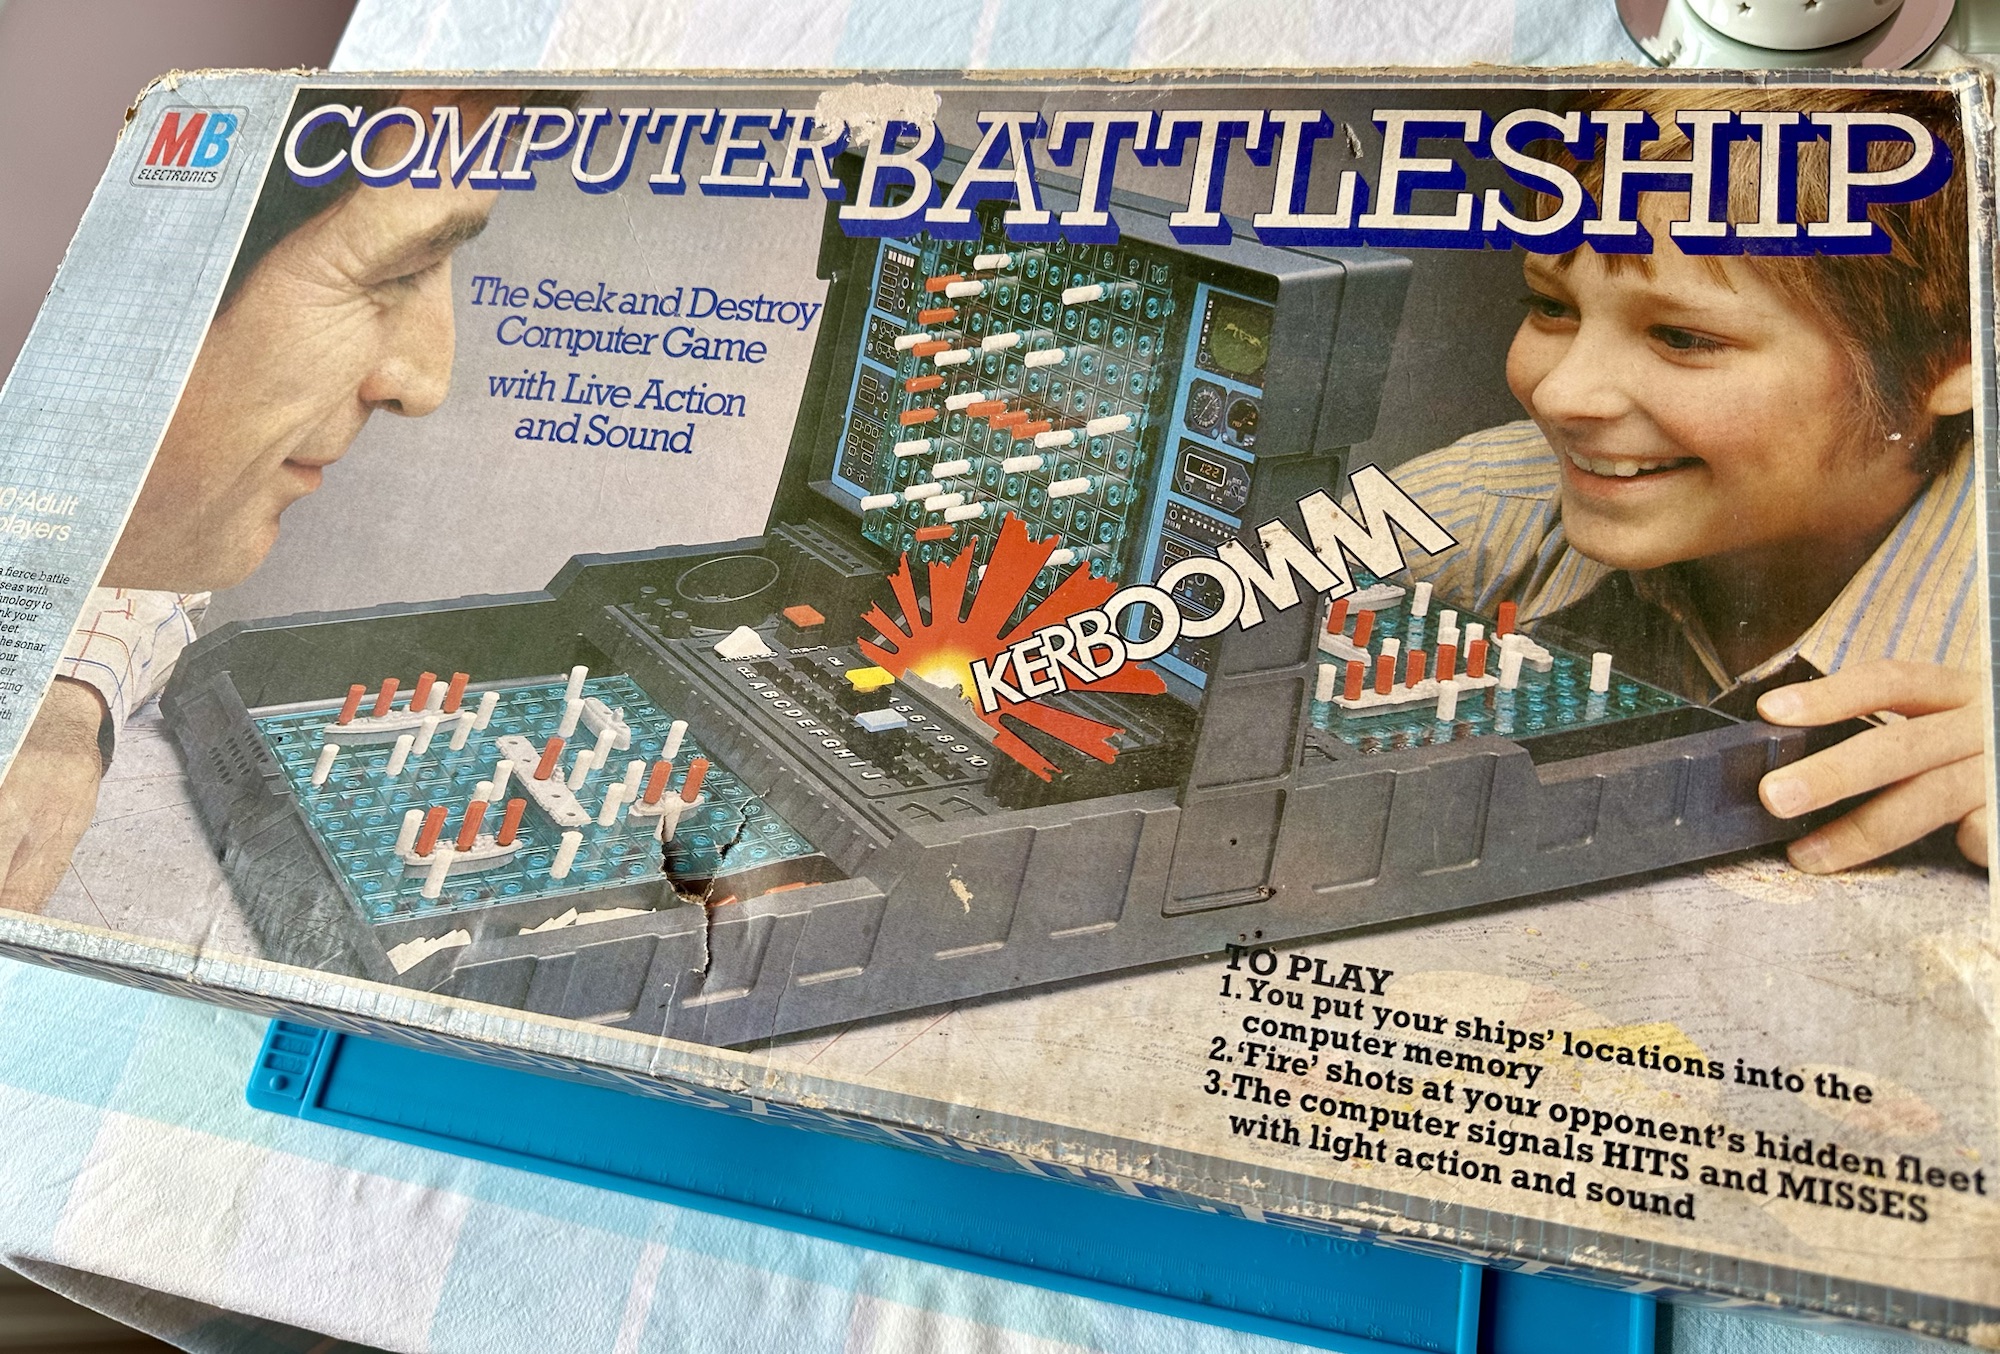
VINTAGE COMPUTER BATTLESHIP MB ELECTRONICS GAME FOR SPARES / REPAIRS APPEARS TO BE COMPLETE BUT THE GAME IS NOT WORKING WHEN TESTED WITH BATTERIES HENCE BEING SOLD FOR SPARES / REPAIRS
Ebay
And here’s some info around it:
In 1977, Milton Bradley released a computerized Electronic Battleship, a pioneering microprocessor-based toy, capable of generating various sounds. Electronic Battleship was designed by Dennis Wyman and Bing McCoy.
Wikipedia
Now this is another toy from my childhood that I had envy over. This game is the one that coined the phrase, “ You sank my Battleship” as seen on many TV ads towards the end of the 70s. This time my nephew was brought one of these games for his birthday back in the late 70s when I was about 12 years old. I’ll be able to give a more accurate date of the unit when I get to see the main board inside. I suspect I’m looking at something around the 1979 timeline. Man this toy was the bees knees, again early computer technology at its finest. Here I am approaching the sixth decade of my life and I’m having another menopausal moment just as I did in this post a few months back: Big Trak CE3962 restoration
Computer Battleship
This is going to go in the games box in our garden pub / Man cave. I’m confident I’m going to get it working. I’m not too bothered if there are any small parts missing as there seems to be plenty of spare parts available online.
Let’s have a look at what has turned up.
Original boxOriginal packaging
Well I’m impressed. This game is in its original box with original packaging and is in pristine condition. It comes with the original instruction manual and all parts listed in the contents section are there. In fact there are more of the red and white pegs than required so to be honest it looks as if I have bagged a bargain here.
I’ve paid a grand total of £19:96 GBP for this game and that includes the postage, by far the best price that was on offer for any similar advertised games that I could see at the moment of purchase. Considering this game is now somewhere between 45-47 years old, a bargain you might say, if I can get it working.
I’m thinking that all the capacitors on this board as a matter of good practice should be removed and replaced. Let’s face it they are almost the same age as me, could fail at anytime (if they haven’t already) and are as cheap as chips so what’s the point of just replacing a singular one when there are only two of them on the board. I think I will do this, test them all and report back.
I know that this unit is a 70s creation but it is interesting to get some facts on capacitors and problems that they have caused over the years, especially during the 90s and early 2000s. See this old post on capacitor plague: Capacitor plague
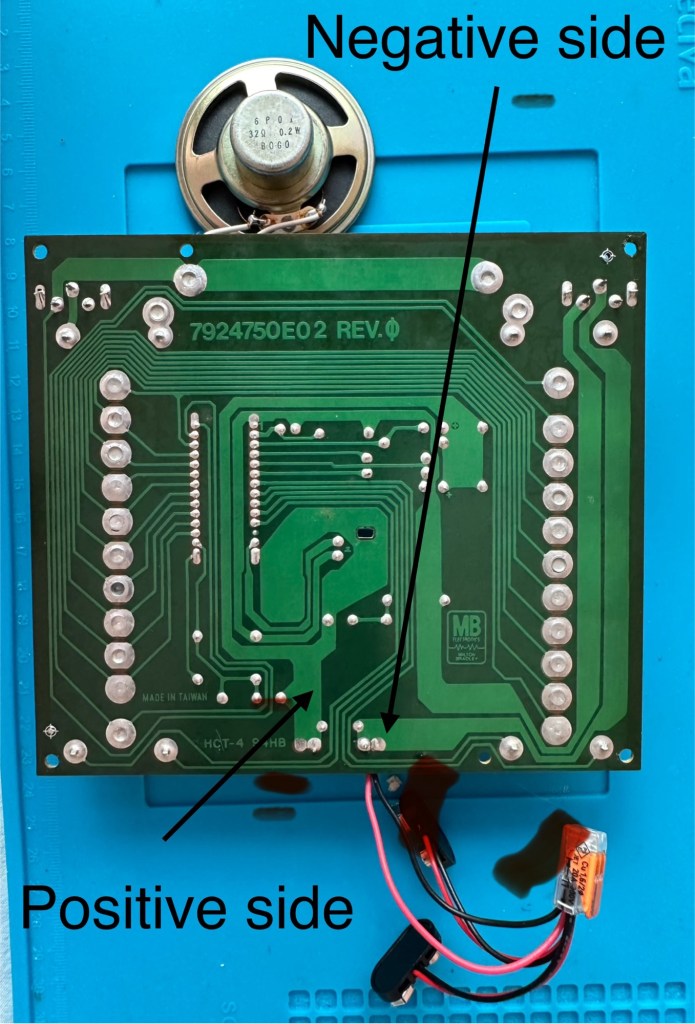
Board removed One side of board
I have removed the board and there seems to have been some pre work done where all the wires are relayed through a connector block. This was a dangerous situation as the work that had been done diverted both negative and positive leads through this dodgy connector to the negative side of the board, causing a short that caused the batteries to heat up to a point where I thought they were going to explode as they were so hot. You may as well of just connected the two batteries together…childish mistake. I was testing for voltages and was suspicious that I was getting no readings, just as well I went straight to the battery when I did. Lesson learned for me.
Bad wiring
I have checked the speaker is working, this is a 32ohm speaker and it was indicating 31ohm so there were no issues there. I have removed the two capacitors and checked them and they are both within tolerance, hence I will leave these in place.
Speaker is fine
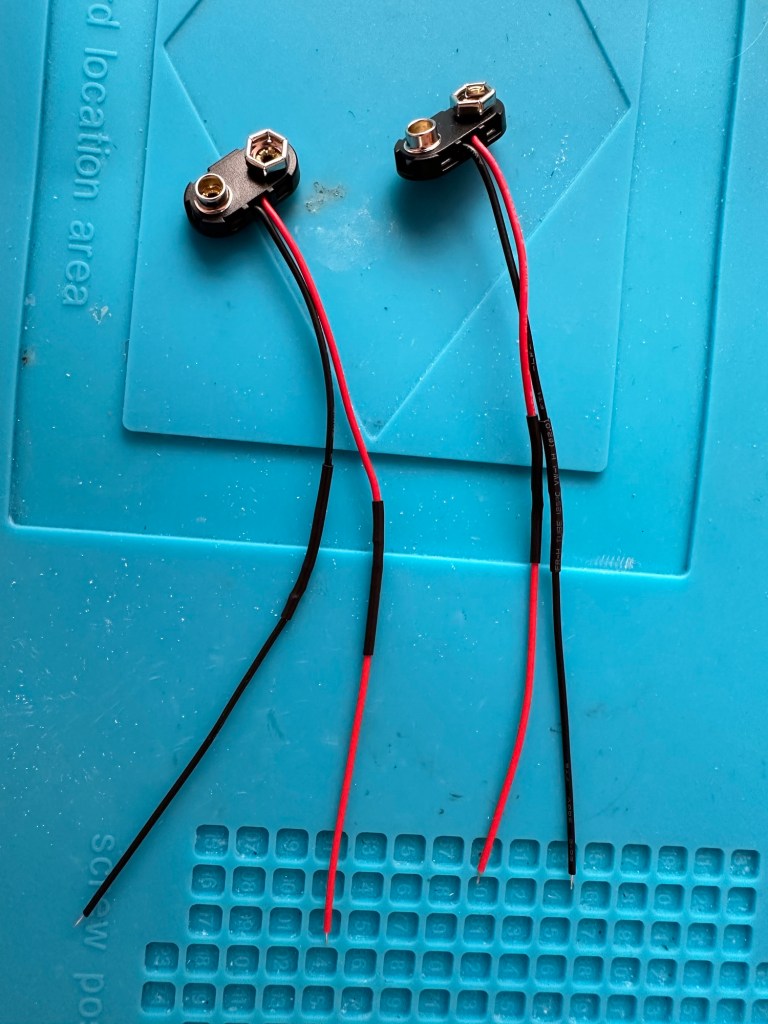
The batteries are separately wired on this board. The two negative wires go to the negative side and the positive wires go to the positive side, straight forward wiring, I don’t know why the previous clown wired it as he did. These four wires now soldered in place with new leads and connections allow me to attach the batteries and check voltages, all is good and reading as it should.
New leads made
I clean all the switches with contact cleaner, I clean the board with IPA and clean all the contacts. A good suction and polish of the frame and all is good.
I can confirm the board indicates that this unit is week 24 of 1979 as per the writing on the main board. That puts this particular unit at 45 years old. Will it work.
Hell yeah it does!
Main switch into the on position and the annoying sonar sound kicks in, my dog leaves the room as it’s annoying him, to me I have just been transported back to my childhood. It’s brilliant.
I collar the wife into a game, I have to teach her how to program it and it works perfectly. Every sound is there, it’s noisy repetitive and computer programming at its absolute most basic level. And it’s mine.
Computer Battleship – It works
It’s going down our garden pub to be used by the youngsters and adults alike. I think the kids will love it due to its primitive technology. They’ll learn from it.
Another piece of my past saved from landfill, and it will be put to good use. Just don’t trust any mods or fixes done by others, don’t inherit a fire risk. Check check check.
Here I purchased the toy I most wanted back in my teenage years. Unfortunately I wasn’t available to get the original MB version produced in 1979 so I had to settle for the latter “improved” version made by Zeon Ltd that was made in 2010.
It’s arrived and to be honest dosen’t look too shabby, needs a bit of a clean up and maybe some new transfers applying but we’ll get to that at another time, for now we need to try and get the machine up and running.
I’ve eventually managed to get the lid off. This unit was built to ensure that it was difficult to get into so repairs couldn’t be carried out. Some of the screws are buried under fascia dressings, and if you aren’t careful you could end up snapping some of the body shell.
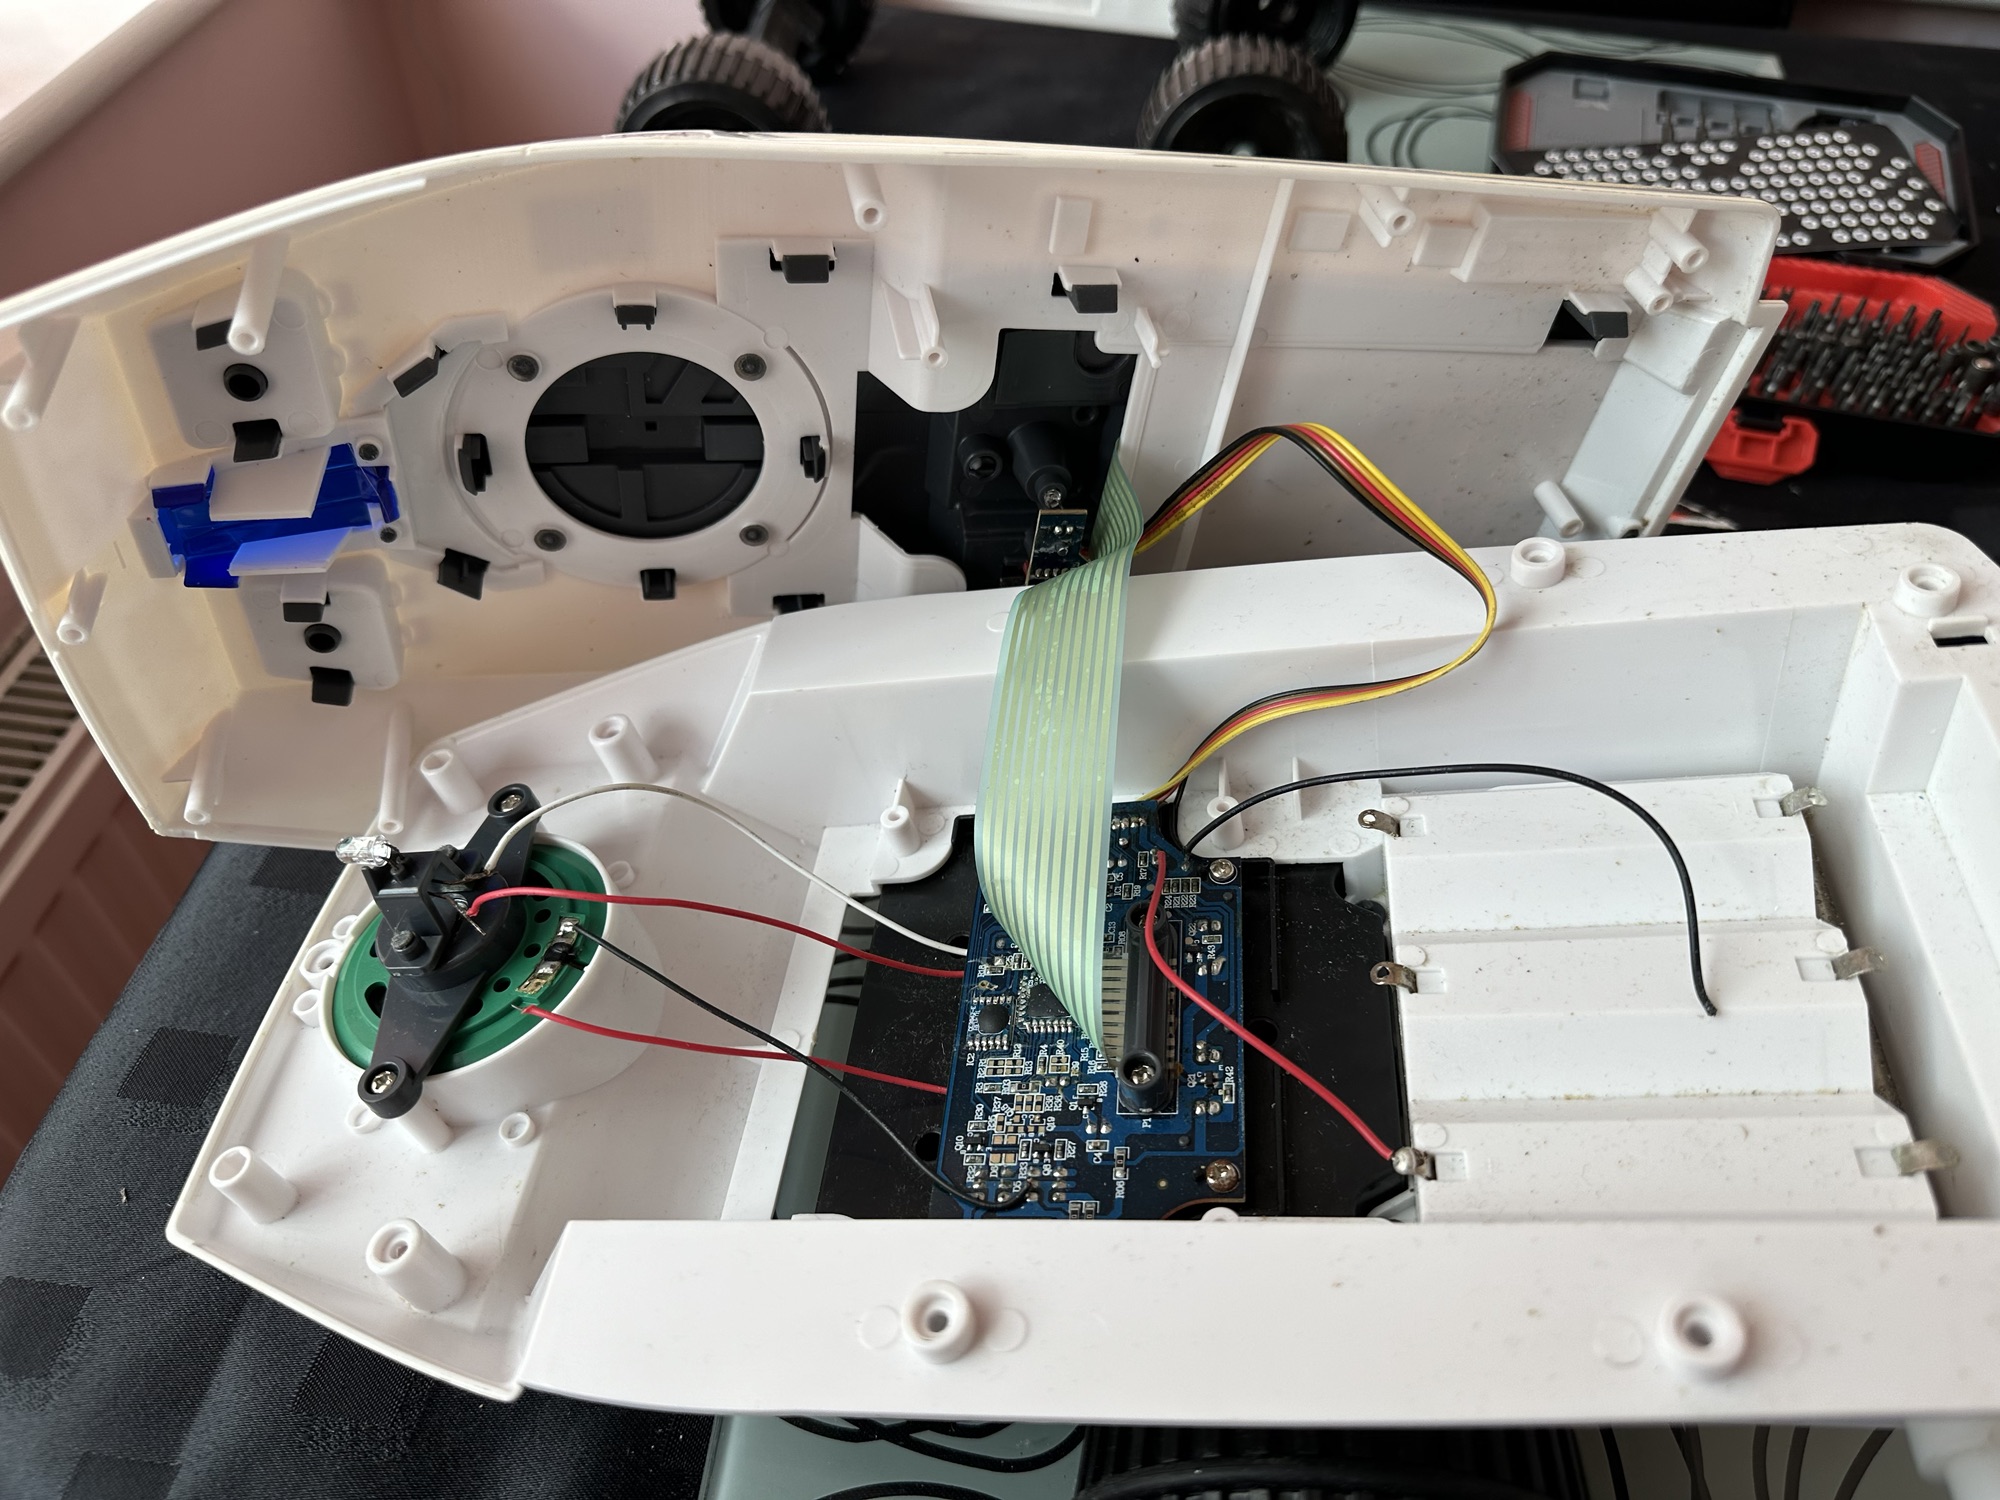
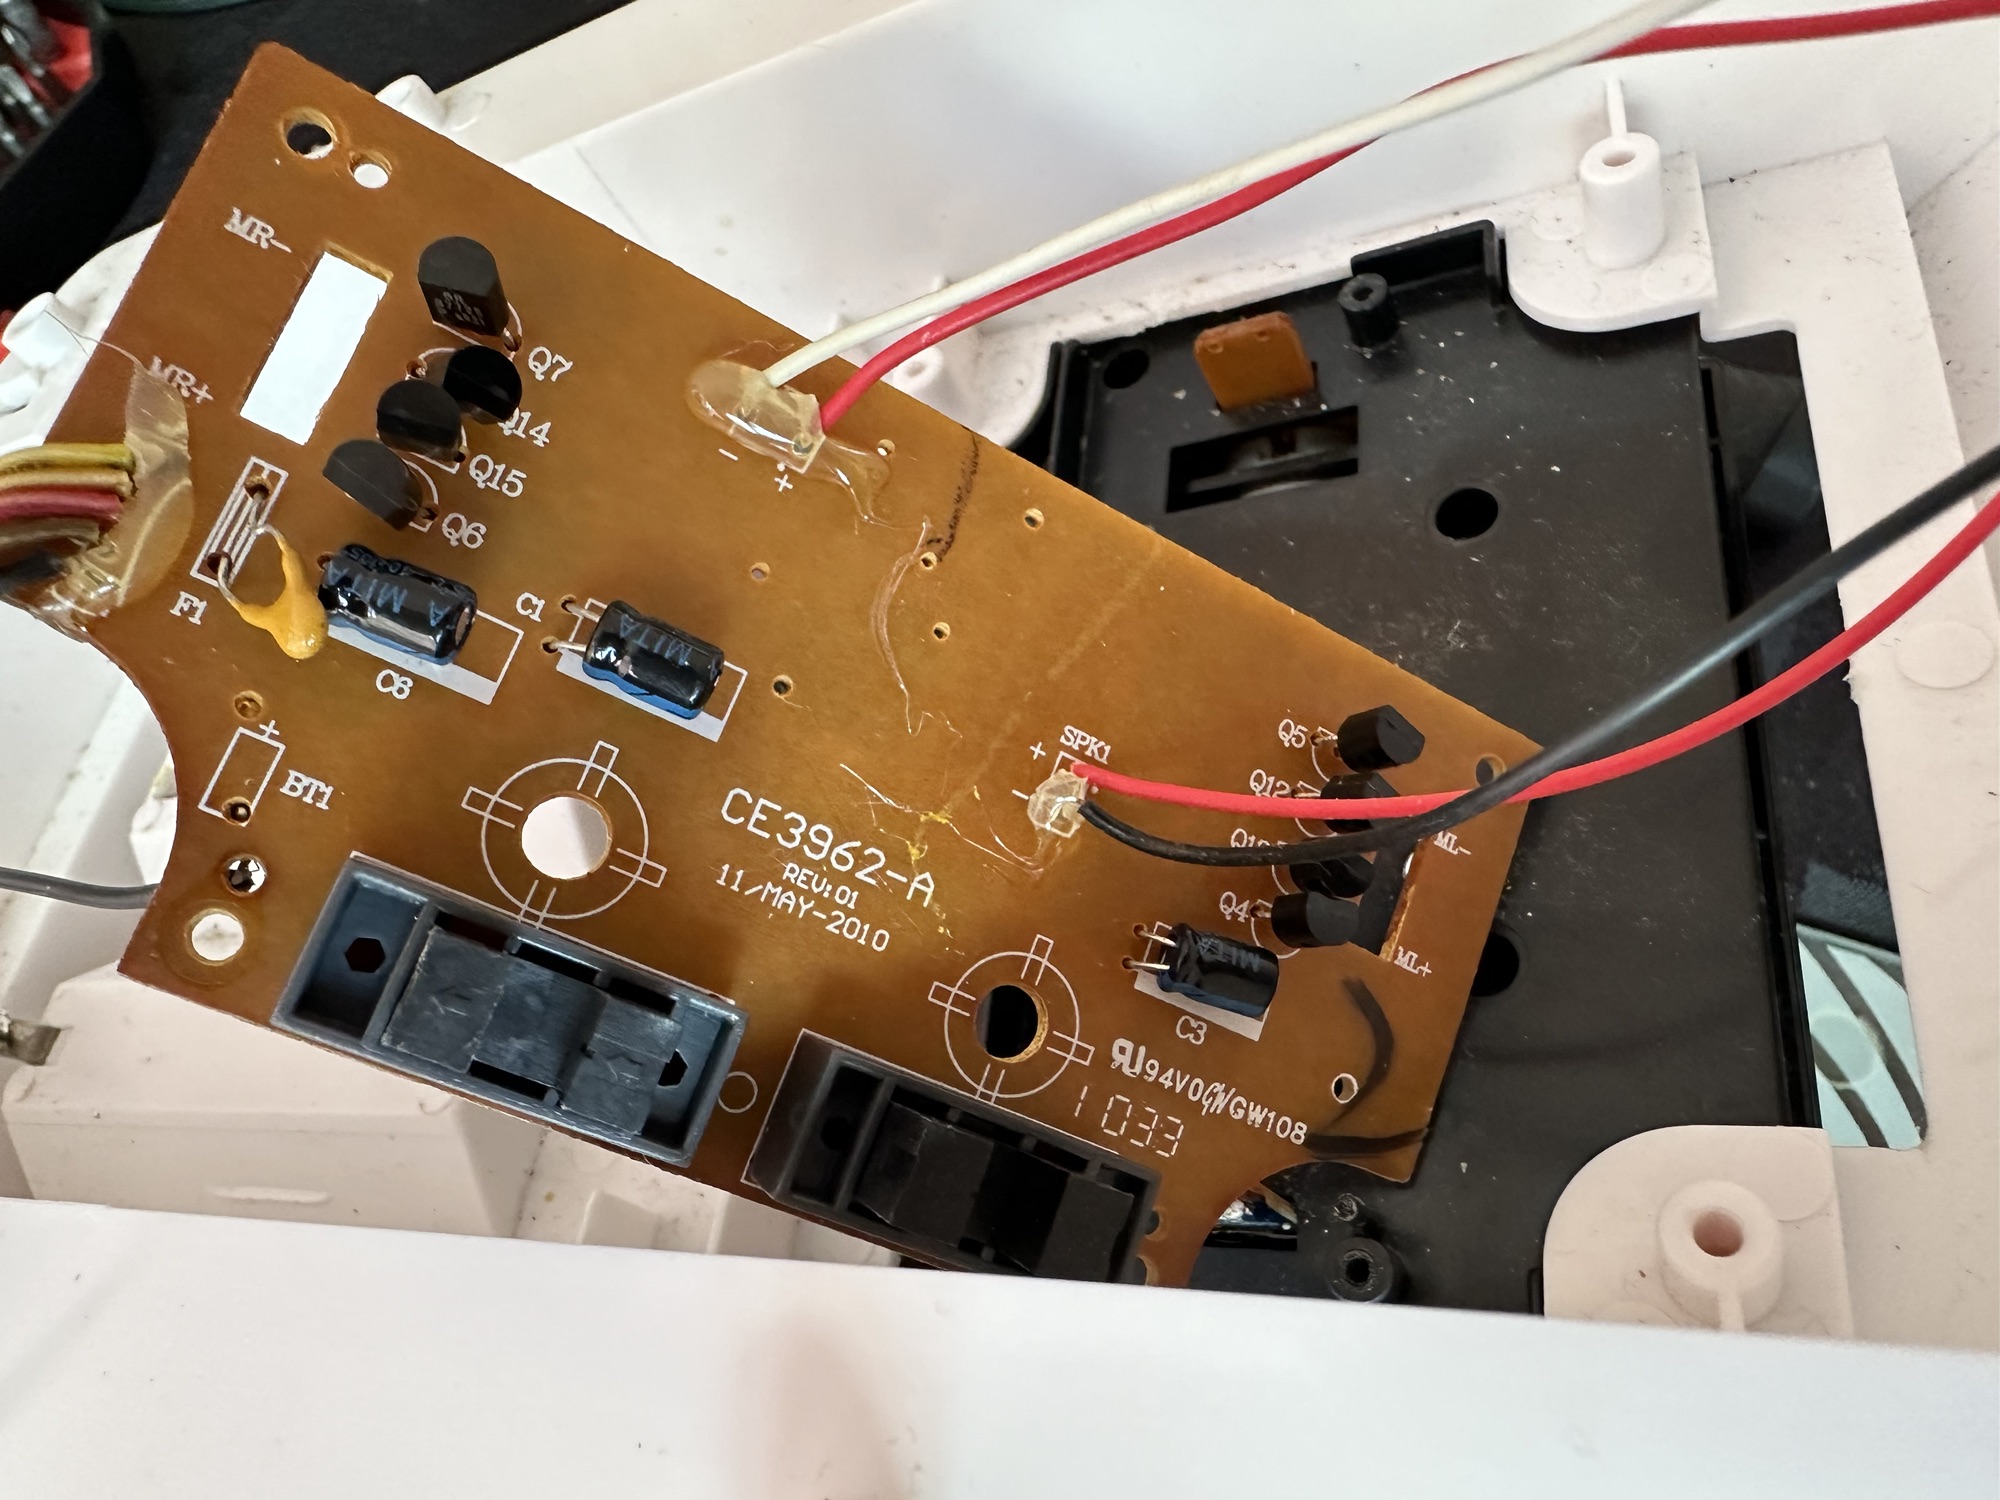
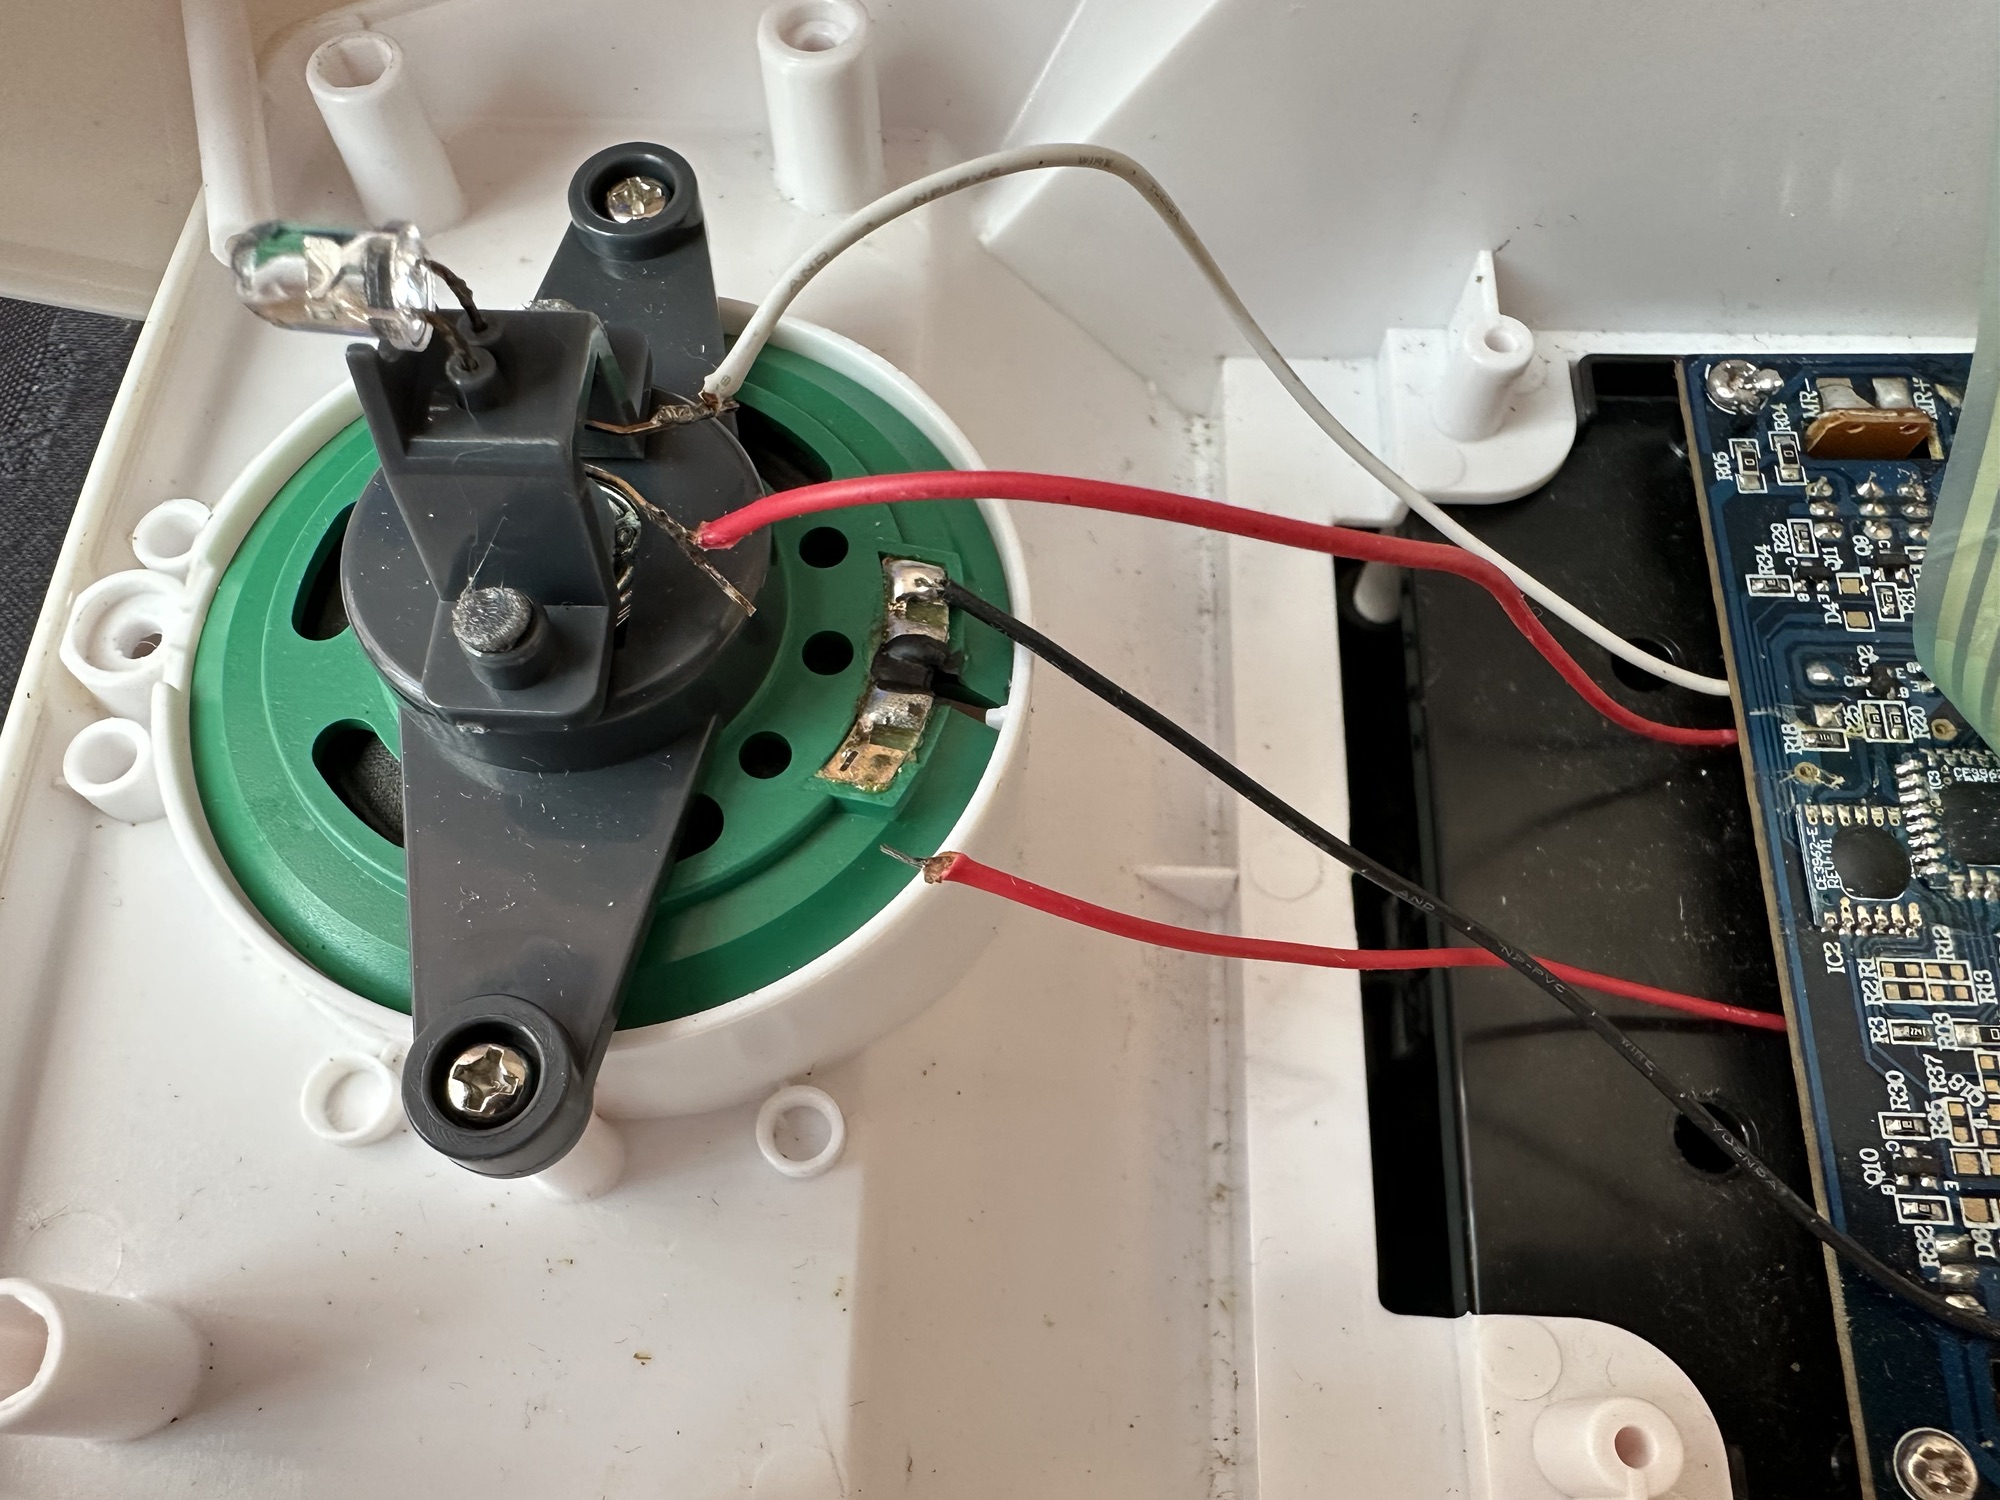
Big trak body shellBig trak circuit boardDetached speaker wireDetached battery wireBig trak wheels removed
With the two halves of the body shell detached it’s obvious there are some detached wires. One was a battery wire, one was a speaker wire. Oh if this was the issue wouldn’t it be great? But it wasn’t. I soldered these wires back into place, put the three D types in place and it was still dead.
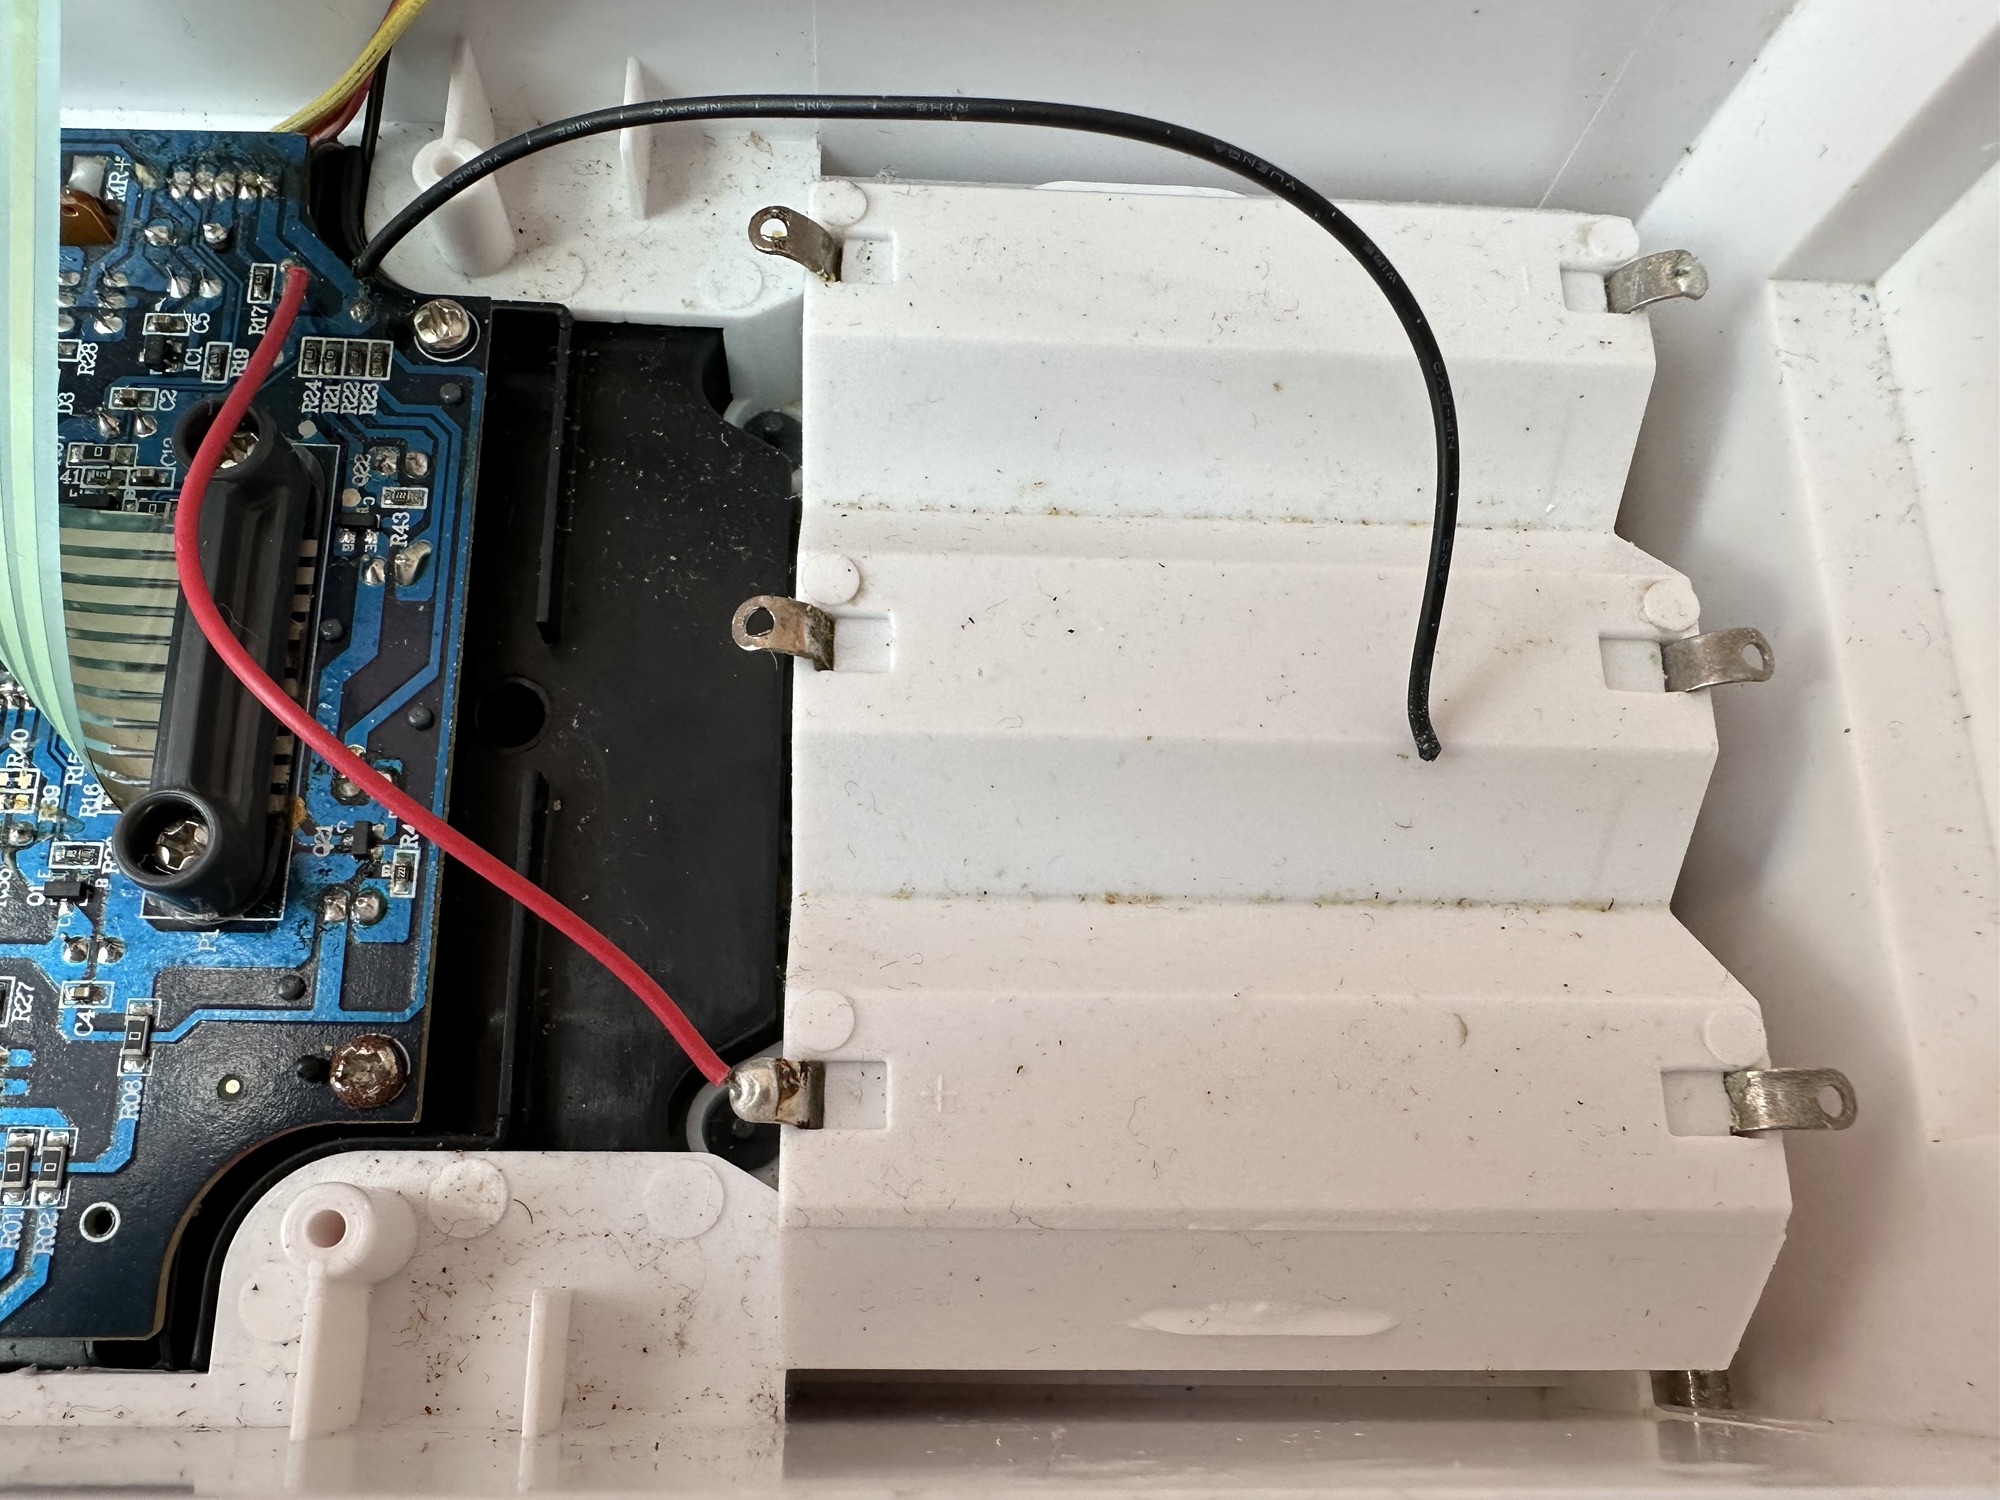
I’ve now desoldered all connections from the circuit board to assist in carrying out checks for continuity and tracing voltage. I can also check the board under the microscope. I may change all the capacitors for SMD ones.
I started checking continuity and tracing voltages and was doing really well until I got to a large section of the main board where everything seemed dead and unresponsive. What the heck was going on here? And then I noticed the wire had detached from the positive probe of my multimeter thus ending any further testing for today. I need to order some new probes. Well, I’ve ordered some nice new probes and croc clip connectors as well, so as soon as they arrive I’ll get back on with the testing. They arrived and were damaged on arrival, so back to the drawing board.
Big trak worn cogsBig trak worn cogs
I took the drive train to pieces and here it became apparent that a number of the cogs are damaged. I believe there is also some issues with the motion detector but I can’t confirm that until I get some power into the motors. I can’t find spare cogs online so I have ordered myself a second damaged unit to use as salvage. To be honest this new unit has all the transfers in place so I will probably use that shell and the guts of my original unit to form one complete Big Trak.
New donor Big Trak – better than my original one
The donor unit has arrived and boy I’m impressed. It’s in far better condition than my original one, so as expected this one will become the working unit and my original one will be come the donor. Any parts left over will be sold on as spares or even used on another damaged one if I can source it.
My new Bigtrak
If you look at the video above you will see the new Big Trak going through the motions. However the one thing it dosen’t do is turn. Could be a wheel sensor issue who knows. Good thing is that the cogs haven’t broken as the drive wheels are both solid and not free wheeling.
There are only two real issues with the donor here. Firstly it will not do the turn command and secondly, one of the drive wheels is damaged. Luckily I have a spare wheel so this was swapped over, some decals were missing but I coaxed these off my old truck with a hot air gun and reapplied them with no issues.
Missing decalsDecals applied
Looking into the drive issue meant opening the gear box. In here we have two magnetic independent gear controls that should have a gap between them, these two were stuck together thus rendering independent motor operations of the turning control useless.
Magnetic sensors joinedMagnetic sensors as they should be
I removed the two motors and repositioned them and the cogs holding the magnetic gear, this gave a gap of about 3mm that now allows the wheels to turn in opposite directions allowing the unit to turn.
Now the Magnetic sensors are adjusted….it turns
Whilst in this gear box I was able to confirm the issue with my old gear box and it really is all down to two damaged drive cogs that I need to obtain. I’m pleased with that as I could now get two good working units for just a small outlay once I can source some cogs. I will have to repair the wheel I removed to replace the one on my new unit however I have an idea how I’m going to remedy this and again it’s a low cost option. But that’s a job for another day.
2:18 of rebuild magic
So if you look at the video above, it’s the full fix that I posted on YouTube. Really pleased with this fix, again I’ve learned quite a bit about these units and I’m going to have immense fun programming it. My wife dosen’t understand my excitement over this toy, but all my old buddies and colleagues understand it as they grew up in the same era. Maybe it’s the male menopause, reliving the past and all that.
But hey, it keeps me occupied and out of mischief so who should worry about that
This one is going on my shelf so when the kids visit I can show them the joys of basic programming we experienced back in the day.
I’ve just brought one of these, it’s a toy and I’m heading for the senior end of adulthood:
Big Trak CE3962
BIG TRAK / bigtrak is a programmable toy electric vehicle created by Milton Bradley in 1979, resembling a futuristic Sci-Fi tank / utility vehicle. The original Big Trak was a six-wheeled (two-wheel drive) tank with a front-mounted blue “photon beam” headlamp, and a keypad on top. The toy could remember up to 16 commands, which it then executed in sequence. There also was an optional cargo trailer accessory, with the UK version being white to match its colour scheme; once hooked to the Bigtrak, this trailer could be programmed to dump its payload.
WikipediA
Here’s what the original listing said:
Item probably does not work. I recall attempting to fix corroded terminals years ago and it’s still not working. I do not have D cell batteries to test now.
EBay
I was just browsing around as I do and this popped up on my timeline, the wife is going to disown me for bringing such junk into the house, however for a split second 14 year old me was in the house and a flood of memories, not all good came back to me. These toys came out in 1979 when I was aged 14. My friend over the way from me was brought one of these for Christmas and I experienced one of my first ever episodes of Jealousy. Back in 1979 I believe they retailed for approximately £39 Gbp, and my parents weren’t about to part with hard earned cash to invest in developing technology like computing – “It’ll never last, it’s just a fad” (Famous last words).
I made every excuse possible to go around his house to play and even offered to look after it for him when he went on holiday, he never let me though and I believe at that moment my friend realised what the term obsessive meant, as he was experiencing it big time with me.
Now I own one, however this is the later version from 2010, it only cost me £9.99 Gbp and its probably a wreck, but I’m really going to treat this like a proper full sized car restoration and I want this to work, crikey I’ve even found out I can buy the original decals from Australia, so it’s patently obvious the obsession is still there.
I can’t say I have genuinely looked so forward to a parcel arriving as much as this one. I sincerely hope I have no regrets…. And I have all fingers crossed.
This is going to be a labour of love and I can’t wait.


You must be logged in to post a comment.