Psion organiser II CM

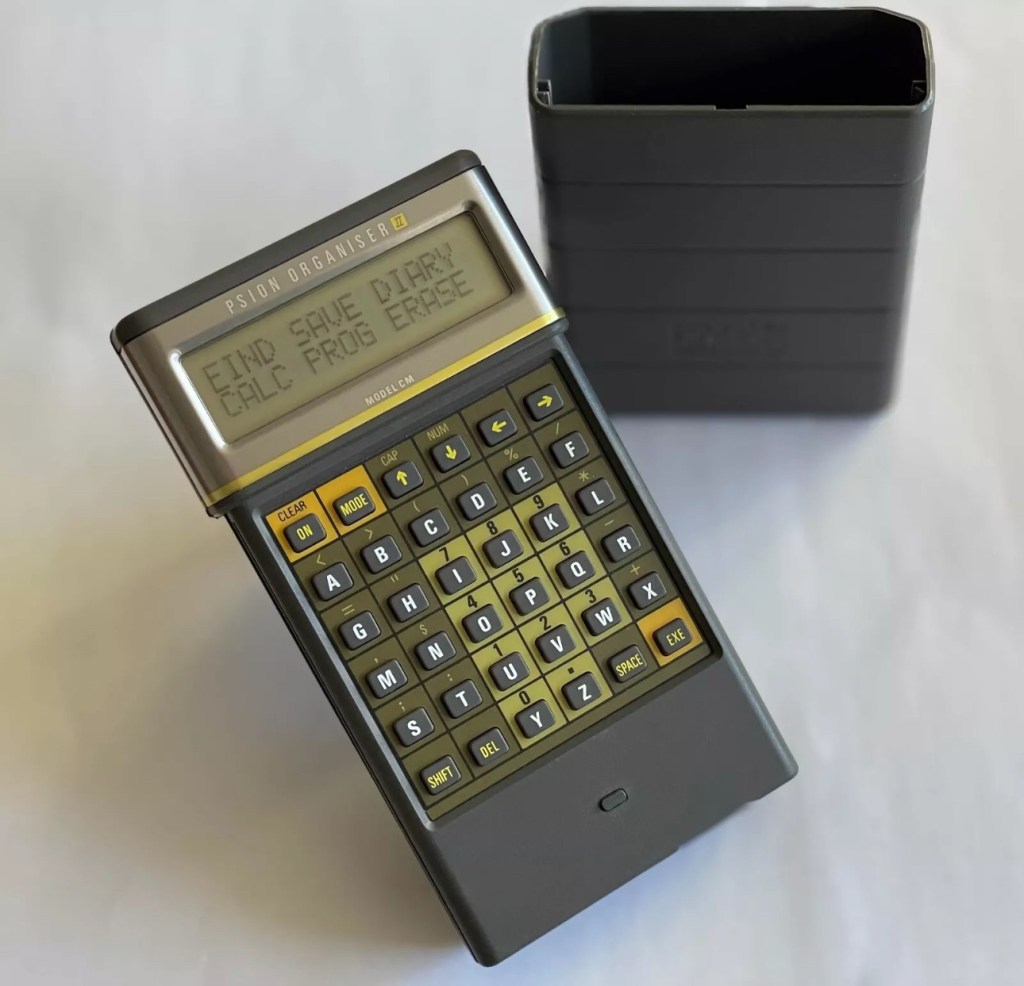
I have a Psion organiser II Cm from around 1986, a lovely blast from the past piece of technology that for a period of time, put the UK ahead of the world in electronic storage and retrieval technology. For an item that is thirty nine years old it was way ahead of its nearest rivals in both looks and capabilities. Let’s be honest the biggest selling data retrieval system prior to this coming along would have been the good old fashioned Filofax. It really was a game changer.

My personal organiser is in good condition. I’ve had it for about a year now. It has no known faults so I’ve not done this post to show a repair, I have created this post to highlight, just like us all, that the older we get the more care we have to take of ourselves, the same goes for this machine. There is a whole online community still committed to this equipment and the amount of knowledge available to anyone looking at getting one of these items is absolutely immense. Just look here: Psion Organiser II forum

My organiser is a CM version. It has a memory of 8 KB. Data packs can be added, mine has a 16 and a 32k pack so I have a whopping 48k of available additional memory. Extra storage is available between 16-128k again dependant on the limits of your unit.

This version, the CM was a victim of the Y2K bug that you will be more than aware of, if you are of a certain age and possessed a computer on the run up to the year 2000. Panic reigned supreme around this time, the world was about to end. It was a crazy time. For some it was just that, plain crazy and nothing noteworthy occurred, for others they will say it was a whole different story. However it wasn’t all that bad as we are all still here today. That said some units were rendered useless as their date ranges didn’t exceed beyond the year 1999, and that is where this particular model of the Psion organiser slots in to place.

It has that very issue as does the XP version, later editions such as the LZ did not have the issue.

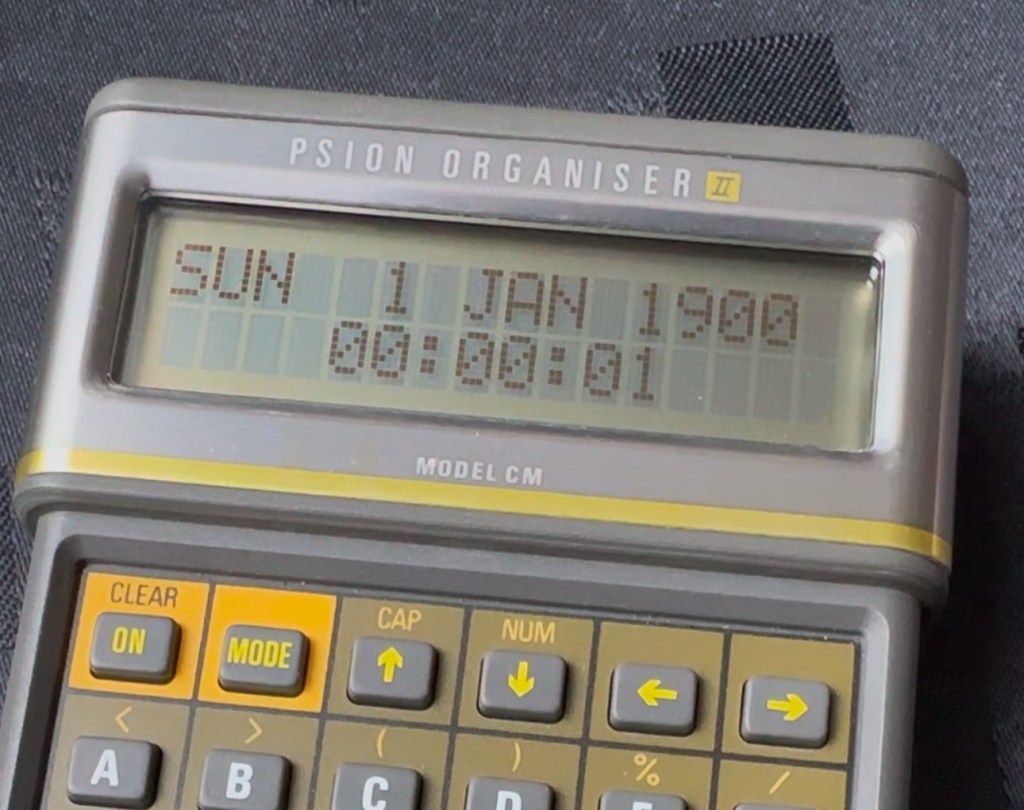
I’ve created a very small video here that replicates exactly what occurred when midnight on the 31st December 1999 finally arrived.

My Psion, replicating the Y2K bug

In a nutshell it resorted back to the year 1900. Some computers freaked out, others that had been attended to had fixes deployed that added extra years to the internal data streams. And we can also do that with this unit today.

All we have to do is visit the site of Jaap Scherphuis who has provided the download to enable users to now extend the date range by another 84 years to 2083. My time on this planet will be done by then so I’m not that worried about what happens beyond this time period. I have quoted exactly what this little fix achieves, below.

When it is installed the main menu item TIME is redirected to the memory resident routine. This routine is identical to the normal one in ROM, except that it adds 84 to the year, making the range of the available years 1984 to 2083 instead of 1900 to 1999. This new range is chosen because these years have the same weekdays.

Jaap Scherphuis

To achieve this fix there are three ways that it can be achieved, either as a direct entry set of commands via a serial cable link to the top of the unit via a computer, direct entry via the unit programming mode, or by using a programmed data pack. I do not have the link, and I possess “Sausage fingers“ so I don’t trust myself to type the detail in correctly, so I will be using the latter option, i am cheating with one of these.

A vendor used to sell these on eBay. They are data packs that contain the very Y2K patch I need, as well as a few other little nuggets of interest all on a preloaded pack. There is an aside to this particular fix. As it is stored in the local memory, should the battery die, or be taken out to be replaced you will lose this fix and it will need to be reinstalled. With Psion, any hard data you wish to keep, has to be saved to one of the data packs, if you don’t you will simply lose your data, no auto save ability here.

So if the battery does die or get removed, with this pack it can be quickly restored to normal use in a couple of minutes with no need to involve other computers or peripherals.

Before fix installed Y2K issue remains
No Y2K issue now

I have now installed the new TIMEINST routine that adds the extra years into the the units memory and it is now usable for the next 78 years (For someone, not me though, as I won’t be around!)

So this is my Psion up and running. I don’t claim to know much about the technical side but I’m learning. If I can assist anyone in any way, whether that is by directing you to someone who knows, or by taking you through what I have done here, then please make contact. I will assist you however I can.

Thanks for passing by.

Stylophone portable organ – you were warned

Earlier in January I posted that I’d brought this retro pocket organ from EBay. Stylophone pocket organ It has now arrived and wow, it is in near perfect condition, the seller did not lie when stating it hadn’t been used since 2008. It is almost mint.

Mint condition

Anyway not being a person to disappoint anyone, I did promise that I’d video myself learning to play the unit. I wanted to prove that anyone can play these “Toys” that were hugely popular over the last 40 years. You lucky people. Here’s the video below.

Enjoy.

You were warned

Sinclair ZX81

Write about your first computer.

Now this is a prompt that excites me as it is a nod in the direction of all that i really like, retro.

I started my first full time job in about 1982. The ZX81 came out in 1981, and I used my first months pay to purchase one, it cost around £70Gbp if my memory serves me well.

Sinclair ZX81

My first real surprise when I opened it was that it wouldn’t do a thing unless you actually programmed it, I really hadn’t done my homework and what followed was a crash course in BASIC programming to get it to do something, but I loved it.

Looking back the best thing about this product was that it got you learning stuff, and I have no doubt that items such as this started many people off on the road of computer technology employment, computing was now available at a good price to everyone, and we youngsters really took to this unit en mass as 1.5 million units were sold prior to it being discontinued two years later in 1984.

I moved on fairly quickly to the Vic20, Spectrum, Amstrad CPC464 and then the traditional home computer and as they say the rest is history. They were fantastic times back in the early days, and I cherish them immensely. In fact I’ve never fallen out of love with this technology and I will soon write a more in depth piece about the ZX81 as I am looking at purchasing another one for my retro collection.

Have a wonderful weekend.

Inside Vacuum Fluorescent Displays

I come across a number of these displays whilst working on old retro items. Good post well worth a read.

VFDs — vacuum fluorescent displays — have a distinctive look, and is generally fascinated with retro displays. So, it makes sense that he’d build a …

Inside Vacuum Fluorescent Displays

Samsung SQ3000 electronic typewriter – assessment & repair

This is the follow up to a recently obtained electronic typewriter that was purchased in January 2025, the initial post can be found here: Samsung SQ3000 electronic typewriter.

Samsung SQ3000 electronic typewriter

The following post will deal with the assessment on its arrival and what I am going to try to do, to get it back working again, as close as possible to its original state.

I’ve downloaded an instruction I manual, I’ve had to download one for a Smith Corona Wordsmith 200, it is in theory the exact same unit, just under a different manufacturers branding.

Assessment

It’s arrived and apart from a little age yellowing it looks ok. There is a PAT testing sticker that says it was last electrically tested back in 1998 and is due a retest in 1999. This corresponds with my date estimate of mid 90s.

I will retest and renew the safety checks when I’m finished working on it. I have noticed that the paper bail/release rail is broken on the left hand side so I will have to add that to the repairs, this shouldn’t be a major concern.

Before I took the roller out to get to the paper bail I did start the machine up. Everything went as expected and when I tried to type I was getting some weird reactions to the keys I was pushing. All kinds of characters were appearing.

Before

I checked the daisy wheel and there was a click. It wasn’t sitting right. I reset the machine using the two reset buttons and the machine then went through its reset programme, pretty much the same effect as turning it off and on again. (Not much changes in the way of tech there then)

After

Well that’s worked fine, I have tried every combination on the keyboard including the erase function and this is now fully working. It really was quite simple. My next job is to try and fix this paper bail.

Paper bail removed for fixing

There is quite a bit of dust and dirt inside that needs removing. And whilst I’m at it I will lightly re grease the areas that need it. Let’s be honest it’s not been done in the last 30yrs so now is as good a time as any. Inside will get a light hoovering and a bit of a tart up, I’m not going to go mad. I will clean the outside and all knobs and buttons and try to get rid of some of the yellowing, but to be honest as long as it’s clean I’m not too worried about age marks.

The keyboard has lost a few of its letters. I will remove what is left of some of them and use some keyboard decals to replace the missing ones. This will be one of the last jobs I do.

Well that’s the assessment done and apart from a few small issues and requiring some basic maintenance I don’t think we have an immense amount of work to carry out. We know it now works. Let’s hope I don’t cause any further carnage whilst working on it.

Let’s get to work.

Repair

Right it’s straight onto the paper bail to try and fix the snapped end. Firstly I’m just going to use some superglue to get it in place. When this is dry I’m going to create two “Doublers”, place one either side of the damaged part and glue these in place to create a stronger repair and to add some stability to this area.

I’ve got some black semi rigid plastic. I’ve created a small template from a tracing that I did of the good right hand side of the bail.

I now have two doublers cut from the plastic that I will use as explained above.

Two doublers

It doesn’t matter that they are not perfectly shaped, however they both fit perfectly well into the profile of the bail arm, and this portion of the arm is hidden in the typewriter housing anyway, so the part will not be visible, but it will now be strong.

The Doublers have been put in place using a quick set epoxy resin, I will leave this to dry for a good few hours before I tidy it up, with a light clean, and then I will try to get it back in place.

Bail arm repaired, installed and working.

Now that’s done i’ve gone inside and there were a nice couple of spider webs around the transformer that are now history. I’ve secured the cable in the rear of the unit that never had any tension restraint, so that there will be no issues, should anyone now give a good yank on the cable lead. This is a safety addition I have made that was never on the original unit.

Cable restraint screwed to base to prevent strain on internal wires in and around the transformer bay.

I have also tightened all screws and checked the wiring and this all seems ok. Plug and fuse have been checked and all is looking good. I’ll carry out a PAT test once I’ve finished the clean up.

I’ve cleaned the main roller with alcohol, and removed all the old grease and dirt from the platten adjuster switch and the roller advance knob. I have removed the platten plate as well as the six mini rollers that are here. I’ve cleaned them all and re assembled/installed them.

I have cleaned the daisy wheel as well as in and around the printing head unit.

Inside the unit I have given a good hoover as well as a light clean and again removed more old grease. I have given the exterior plastic a preliminary polish, this has removed some of the yellowing and made it look “cleaner” I am not going to worry too much about the yellowing as it isn’t that bad, and I don’t really want to venture into carrying out a “Retrobrite” on this unit. It would take too long and there would be no benefit for this project.

I’ve now added very small amounts of a watch lubricant to those areas that i have previously cleaned and removed the old grease from.

The unit has been reassembled and I’m pleased to say it is still working fine. It’s running smoothly and all aspects of the unit seem to be working just fine. To be honest it seems to be printing clearer to me.

Daisy wheel and print quality is perfect

I don’t know how long the print cartridge has been installed but I suspect it may have been a few years back. It’s almost finished, and I do have a replacement on order. I’m sure a fresh cartridge will make the print stand out even more.

Next I’m going to have a go at replacing some, or even all of the keyboard letters. It all depends how it looks when I start replacing them. I’m going to gently rub off the lettering that is left and clean the keys using a 95% pure Isopropyl alcohol solution (IPA).

All damaged and missing key decals removed in preparation for replacement new decals. Others may have to be removed dependant on how the new ones look when in place.

These are the replacement key decals I will be attempting to use.

Qwerty keyboard decals

I’ve replaced the damaged key decals. The ones I’ve used are a lot brighter than the original ones and really accentuate the yellowing. I’m not troubled by this as it keeps its “Old” look. I would have to scrape and wipe for hours to remove all the other keys and to be honest it would look just like someone had gone abroad to have a bright white set of dodgy veneers installed, it would look quite out of place, and in your face. Just like a Cheshire Cat smile.

New veneers anyone?

It serves a purpose and just allows the unit to be usable again.

The final product:

Fortunately a lot of the equipment and parts I have used, I was already in possession of, so there are no additional costs for this project. Below you can view the total costings for this project as they currently stand:

  • Purchase inc postage £13.14
  • Cable restraint £0.25
  • Keyboard decals £1.25
  • Total cost of project £14.64

Again I have managed to save a fantastic 90s retro item from landfill for very little cost, and that is a fantastic result. It has years of use left in it, as long as the consumables remain available, and of that I am confident that they will be available, for at least the next few years. The unit is clean, I’ve just carried out an electrical PAT test and it is electrically sound.

Believe it or not I’m going to go back in time and will write some traditional typewritten letters to friends and family. I’m looking forward to doing that and it will certainly surprise them, it will be totally unexpected.

When all that is done, i will donate this unit to our local LOROS Hospice shop so they can sell it on and raise much needed funds. They deserve it. Edit: This was done in March 2025 at their shop in Hamilton Leicester. I hope it gets them a good price.

Watch the brief video for the final words on this restoration. All 13 seconds of it.

And that’s it folks..

Thanks for passing by.

Samsung SQ3000 electronic typewriter

What the listing stated:

Offered here is a good vintage Samsung SQ-3000 electronic typewriter. It powers up and operates when the keys are pressed. However, the symbols printed do not match the button pressed ! The daisywheel may be out of line. Otherwise, good cosmetic condition. Any questions, then please ask. 

EBay

I have again succumbed to purchasing something very retro, a typewriter. Yep it has a fault just as most things I buy have, that’s part of the fun of it all, can I fix it and save another item from landfill? Who knows but I’ll give it a try.

This Typewriter, the SQ3000 was also sold as the Elite S-7500, Hanseatic Europa II, Leader MD, Olympia Textstar MD, Opperman S-7100, Privilege Electronic 2600, Royal RT 7700, Silver Reed EX-133 MD, Smith Corona Wordsmith 200 and Welco EX 260 DS. It was manufactured sometime between 1990 -1995 and was a mass produced low cost typewriter of the time. Personally I think it was around 1995 as this was when regulations insisted that electronic items such as this required wired in power supplies, and this unit is a hard wired unit.

Samsung loosely translated/stands for “Three Stars”Apparently the three represents “Something big, numerous and powerful” and the “Stars” represent “Everlasting and eternal” so there you have it, that is today’s history lesson.

I loved using typewriters prior to the word processor/Pc rendering them useless. There is just something special about them, I can’t quite put my finger on it.

This item looks to be in fantastic cosmetic condition, and I have also checked that the consumables are available, they are so I might have struck lucky. From what I can see in the pictures a number of letters have worn off the keys, hopefully I can source replacements, or decals or I may even repaint them myself.

I have had to download the instruction manual for the Smith Corona Wordsmith 200 as it is the exact same unit under a different name, Samsung just don’t seem to have anything listed or historically available for download.

I think I’ve bagged a bargain (if I can get it working) I’ve paid a grand total including the postage of £13:14 GBP and that was after knocking the seller down a few pounds from the original price. He bit my hand off to be honest, so we’ll just have to wait and see what arrives. If all else fails I can certainly use it for spare parts in the future.

Anyway, this now gets added to the long list of other items I have, that need to be repaired. Please check back to view the “Assess and repair” post that will follow, explaining what arrived, its condition and what I will be doing to get it back in working order.

Thanks for passing by.

A New Life For a Conference Badge, Weighing Bees

You never know, one day you just might have to do a weight check on a bumble bee

😂

We love electronic conference badges here at Hackaday, but it’s undeniable that many of them end up gathering dust after the event. Most of them are …

A New Life For a Conference Badge, Weighing Bees

Stylophone pocket organ

What the listing stated:

A BRILLIANT RE-pro of an iconic Stylophone Pocket Organ from 1968.

Bought for me as a birthday present back in 2008. I packed it away and placed it in my loft.

I’ve just found it again and have added 3 Duracell Plus AA batteries to test it for the first time. (Included in sale)

All works extremely well.

The unit is as new, the box has very minor wear.

EBay

We will just have to wait for delivery to see just how true this listing is… however I have spoken with the seller today, he’s a lovely chap and my mind is at ease that this is a genuine good purchase.

Anyone that pays the slightest bit of interest to my blog will know I love retro electronic equipment, especially if at sometime in my life it has meant something to me. Well, the Stylophone was a very basic synthesiser/toy that popped its head above the parapet originally in the late 60s, but was super popular in the mid 70s and that was when I first got my hands on one. It was a cousins unit, not mine as my parents wouldn’t pay out for toys like that as they were just a fad. (How wrong were they?). So envy struck once again as I was never able to have one…..now fast forward 50 years and I’ve now purchased a good example of one.

The Stylophone is a miniature analog electronic keyboard musical instrument played with a stylus. Invented in 1967 by Brian Jarvis, it entered production in 1968, manufactured by Dubreq.

Some three million Stylophones were sold, mostly as children’s toys, but they were occasionally used by professional musicians such as John Lennon, Kraftwerk and David Bowie.

Wikipedia

Back in the day a chap called Rolf Harris was constantly on the TV advertising or playing these units, however the less time talking about this fellah the better, he was a right wrong ‘un.

This particular unit is not an original, I’m still after one of those. This unit was a reissue in 2008 so it’s about 17 years old now. But I’m happy with that. And it works, and for me that’s unusual as I normally only buy broken ones to repair, maybe the original one I’m after will fit the bill, if I can find one that is not completely overpriced. The original unit ran off a single PP9 9v battery, these newer units have improved circuitry and operate off 3x AA type batteries using half the original power. I’ve said before retro electronics are rapidly become the antiques of tomorrow, and people are out of their heads with the prices they are demanding even for something that is completely wrecked. They all need a reality check for the prices they are demanding. The total I have paid for this one is £20:00 GBP and that includes the postage and batteries, so in all I think I’ve got a bargain if it matches the actual listing.

I’m actual going to record a video of learning how to play this unit, just to see how easy or hard it is, and this creation will also be the subject of a later post, Here: You were warned

In the meantime prepare your ears for an assault to the auditory system as someone with no ability to hold a tune tries to play a toy/instrument from the 1970’s, you are truly blessed 😂

You lucky people 😂

Duga radar

What’s that then? I hear you ask. Well since I became a radio amateur (M0ESB) back in Feb 2003 anything regarding radio has fascinated me.

The Duga or – Russian woodpecker issue of the early 80s has always been an item of interest to me. It was allegedly constructed as a Russian over the horizon early warning system and was replaced in the late 80s when satellite systems took over the early warning mantle.

However it obtained notoriety by creating havoc on the airwaves worldwide for quite a considerable period of time.

This video by a fellow Amateur radio enthusiast M3HHY explains quite eloquently, in 11 minutes what the issue was. Some great photos of this absolutely massive antenna array can be seen in this video.

And whilst we are still here this is what Wikipedia has to say:

The duga system was extremely powerful, reaching over 10 MW, and emitted in the shortwave radiobands. It was given the nickname Russian Woodpecker by shortwave listeners for its emissions randomly appearing and sounding like sharp, repetitive tapping noises at a frequency of 10 Hz. The random frequency hops often disrupted legitimate broadcasts, amateur radio operations, oceanic, commercial, aviation communications, and utility transmissions, resulting in thousands of complaints from many countries worldwide. 

Courtesy: Wikipedia

I hope you find this as fascinating and informative as I have. Radio remains to this day special to me. I’d sooner be listening to it in any form rather than watching a tv. In my eyes or should I say ears, it was the most significant invention ever made, if only Marconi knew back in the 1890s just how important this communication method would become he would have been blown away. It has helped to shape so much, our modern day world, and how we communicate with each other on a daily basis.

Do You Know Vail Code?

Alfred Vail (public domain) We talk about Morse code, named after its inventor, Samuel Morse. However, maybe we should call it Vail code after Alfred…

Do You Know Vail Code?