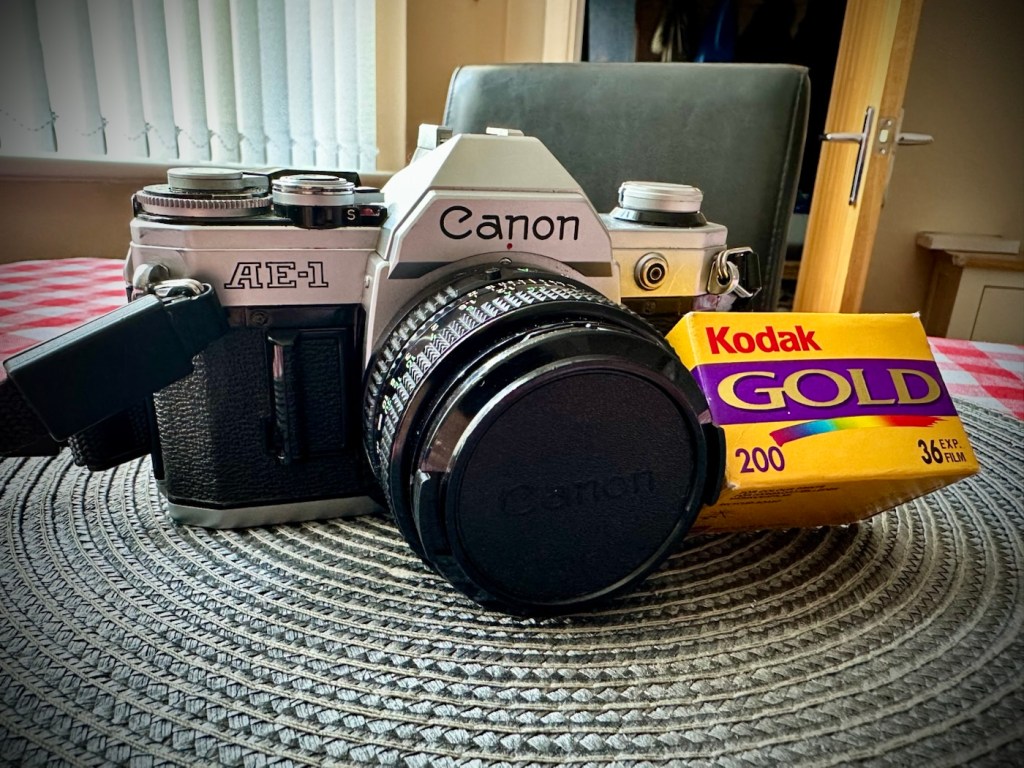
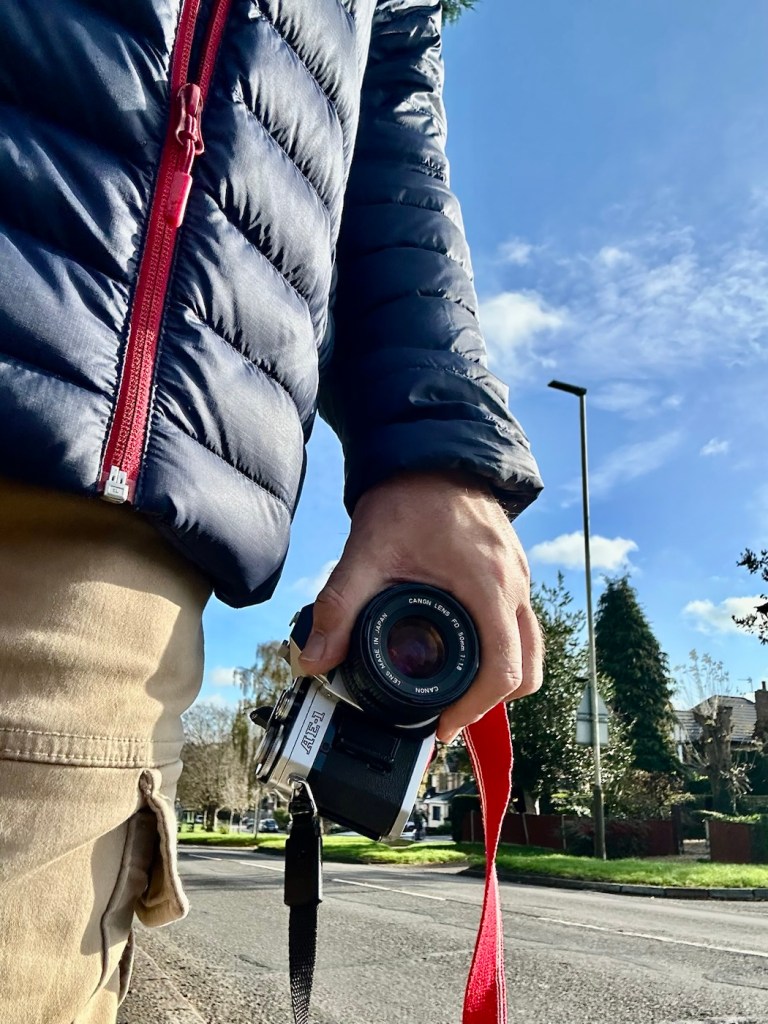
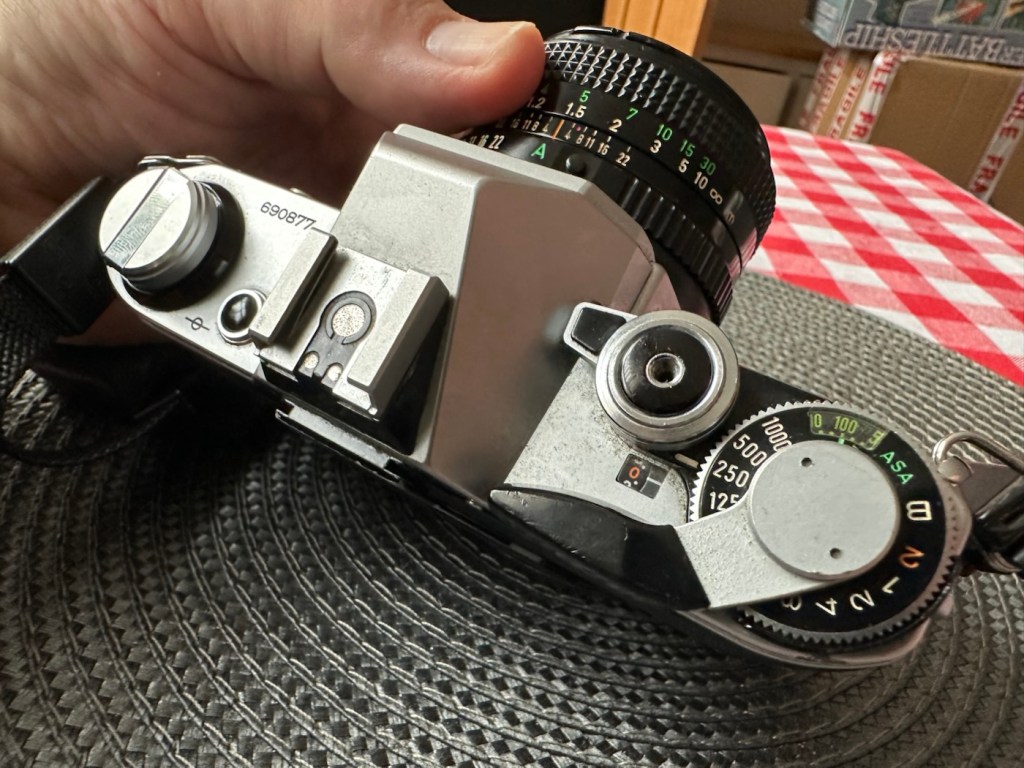
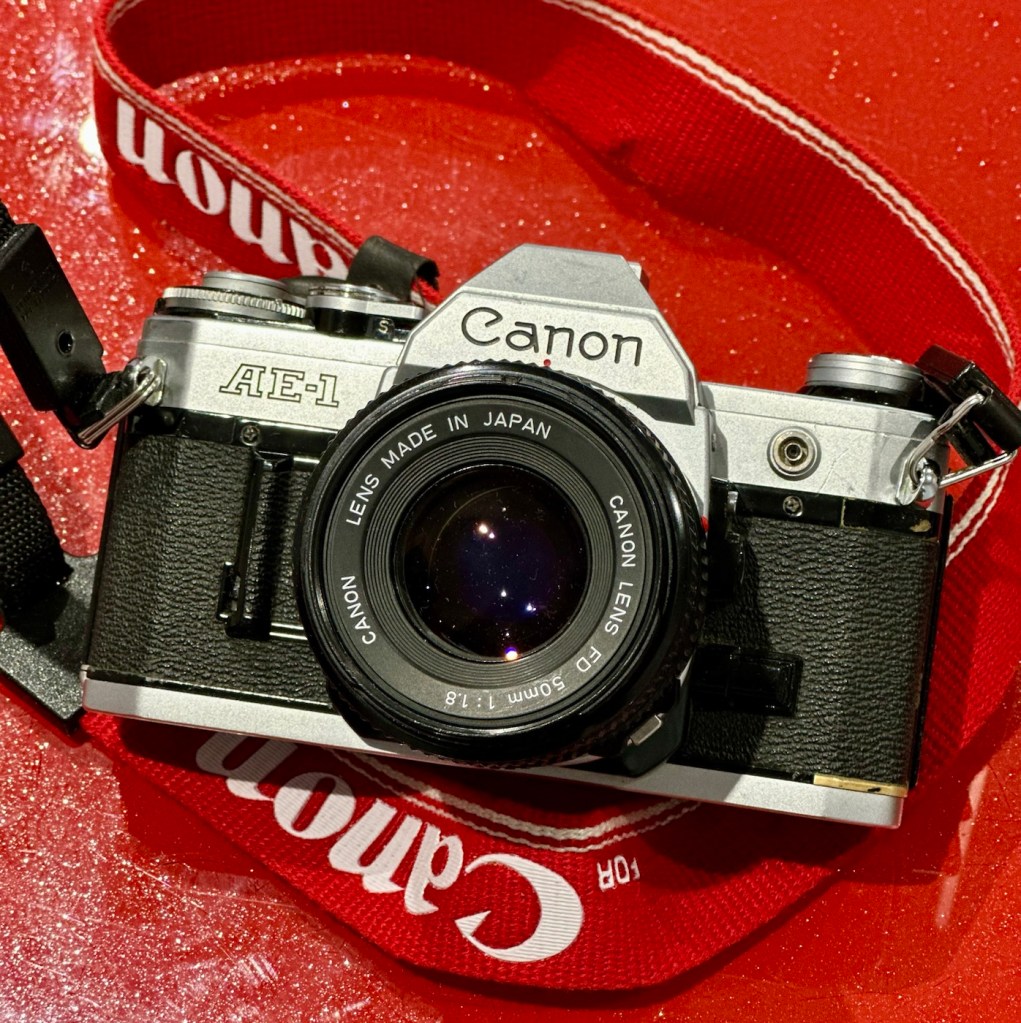
The wife told me this morning that she was going out shopping with her sister. Nothing sinister in that, in fact it means two things really. One, I’m going to be a bit lighter in pocket and two, I’m going to have to occupy myself for a while. I have work later this afternoon, so with a couple of hours spare what better time to get out for a walk and to take a 48 year old camera with you that needs testing. This one to be precise: Canon AE1 35mm SLR
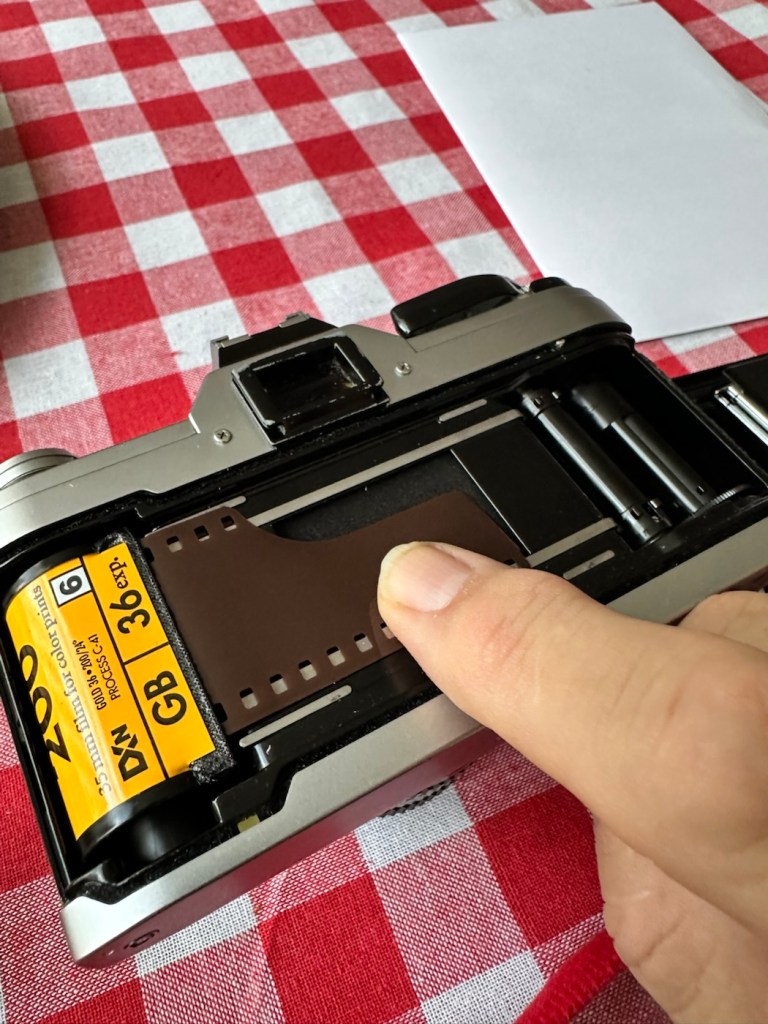
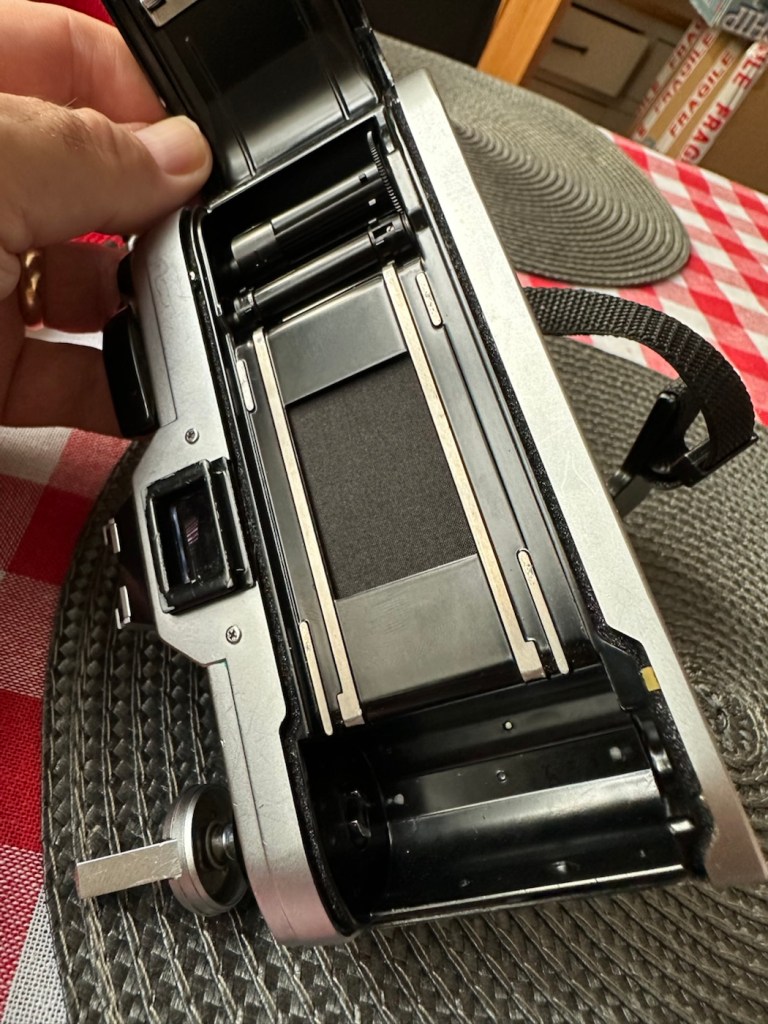
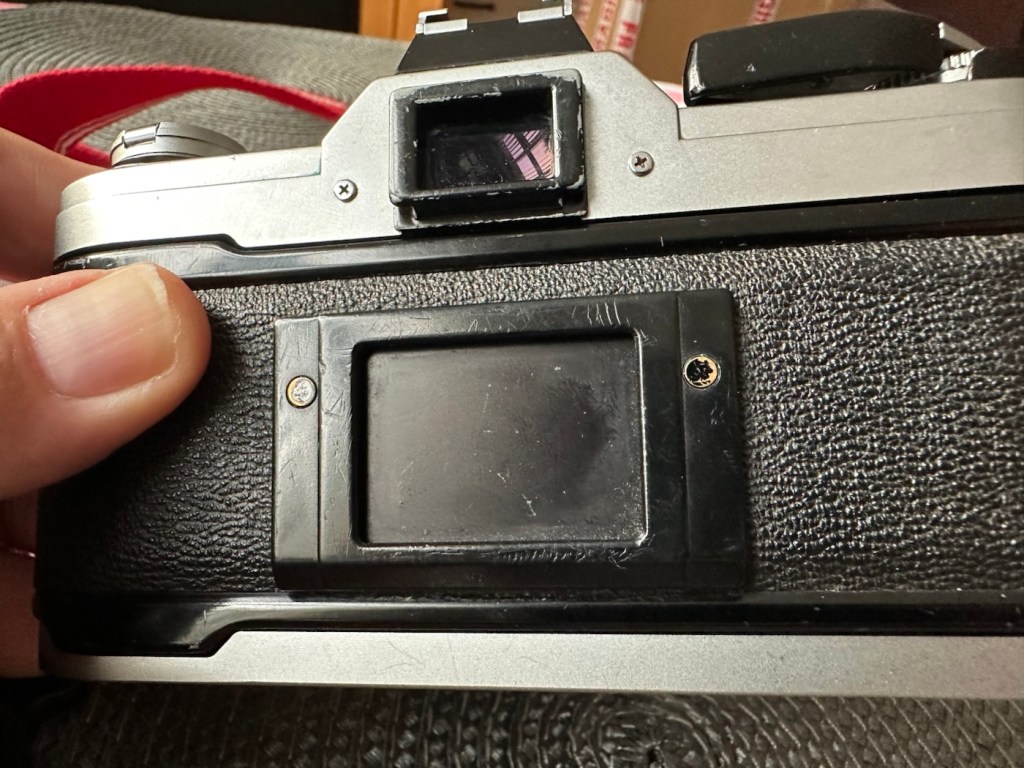
I dashed down to take a film out of the fridge, left it sitting for an hour and loaded the camera up, stage one achieved and everything as expected.
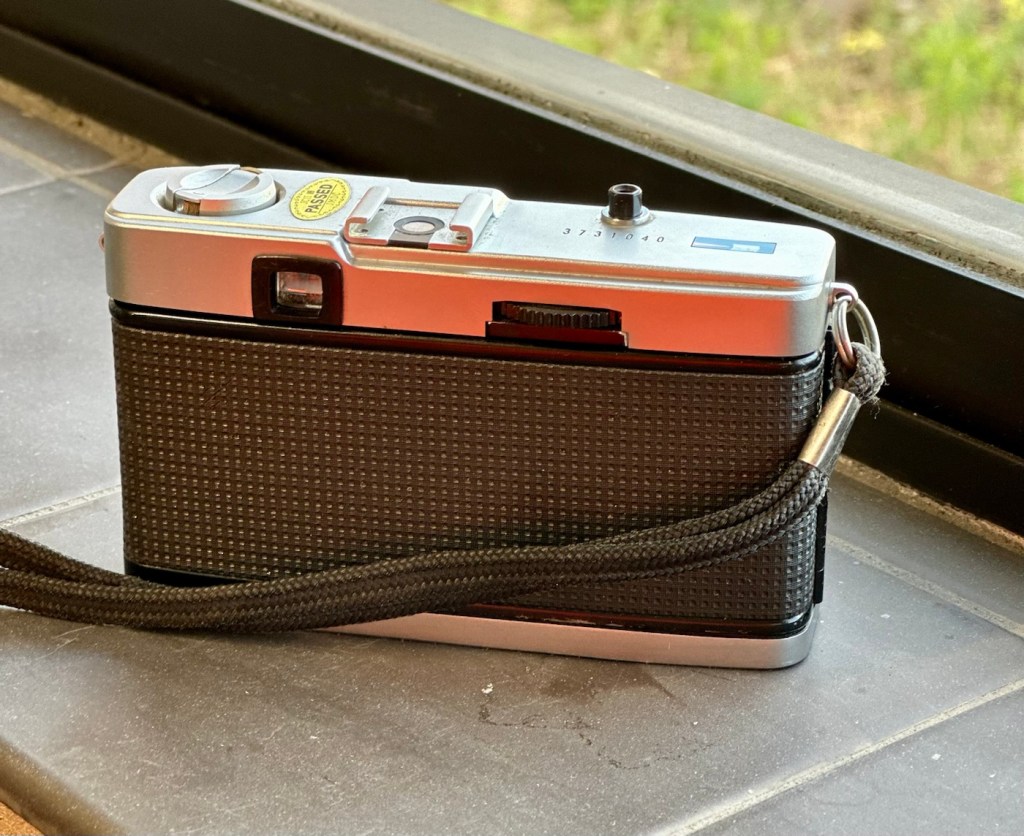
Today’s walking companion
Film successfully loaded
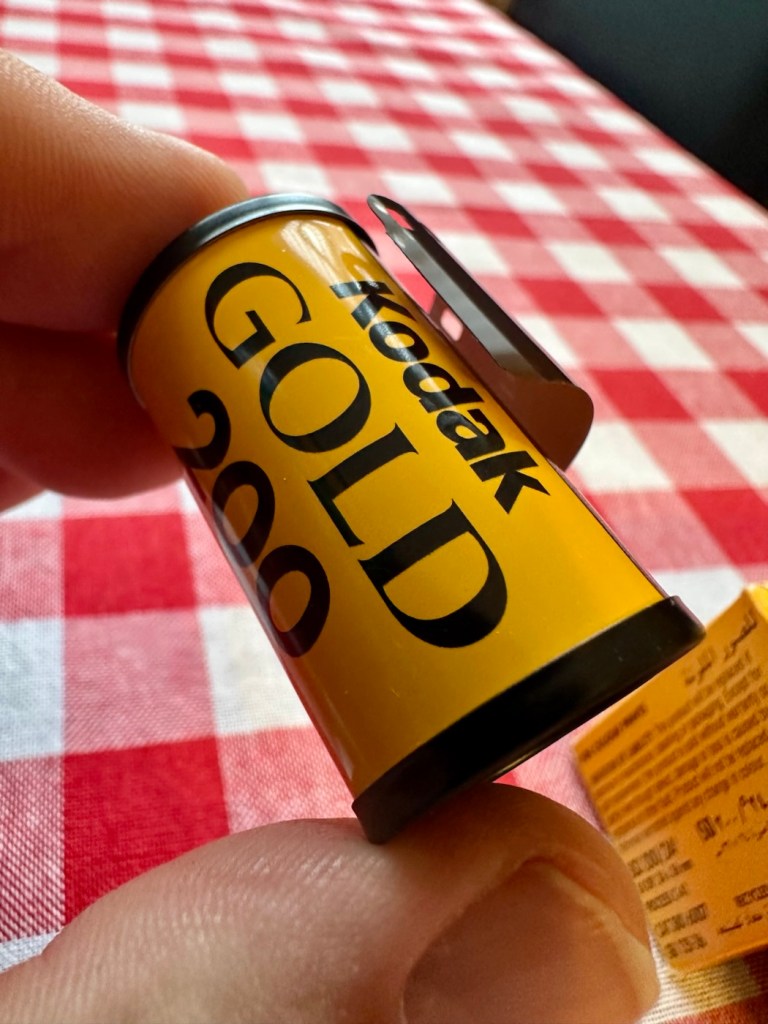
Now the film I have been given is one of 8 rolls I have been gifted that are all out of date. This one is a mere 20 years out of date expiring in 2005. This roll of film is older than 21.8% of the Uk population according to the office of national statistics 2024. It’s that old.
Today’s film is a Kodak Gold 200ASA film. There is a general rule of thumb out there that for every ten years the film is out of date you should over expose the film by one stop. So on this film, as it is a further 10 years past that, and if I follow that recommendation then I have to over expose this film by 2 stops. This means in theory that this 200ASA film should be exposed at 50ASA that equates to two stops of overexposure.
I’m not going to do that, I’m going to experiment here. I don’t know how this film has been stored over the years, I don’t even know that it will work at all, it could be fogged or just so deteriorated that it just doesn’t work.
It’s a 36 exposure film so here’s the plan. Exposures 1-12 at std setting of 200ASA. Exposures 13-24 at 100ASA setting and finally the last 12 exposures at 50ASA. Here I cover all bases and should hopefully get a reference roll for the other seven that I have in cold storage at present.
Needless to say I’m not going to be too fussy with what I photograph, scenery, shades, over and under exposure and bright colours, everything that can be used as a reference to check saturation, contrast, grain and film deterioration.
Let’s go.
Off we go
So as stated, I’ve exposed and over exposed equally throughout the roll, so this should cover all bases.
12 exposures of each
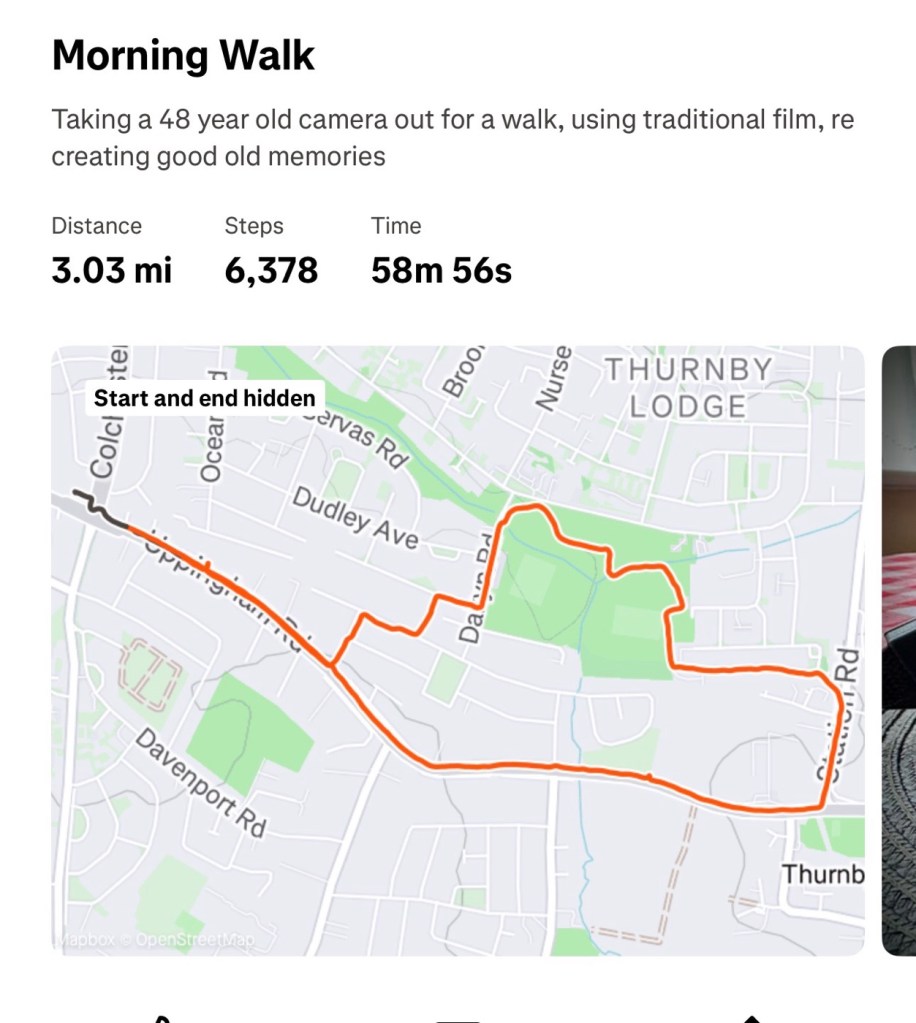
Right from the start I have thoroughly enjoyed this little exercise, I spoke to two elder gents who were quite excited at what I was doing and shared their own experiences with traditional film with me, it was lovely, i was even offered an old camera but i politely declined as the wife wouldn’t have been happy with that. I walked 3 miles, I went through some of the less salubrious areas, but these areas had some of the best subject matter.
3 joyous miles of walking
When you are using an old camera, you seem to scan the area more intensely, you see stuff you haven’t seen or noticed before, it’s amazing what you pass and ignore. I think you are less selective with phones and digital media, with film, you are limited so have to be picky.
I bloody loved it. I’d forgot just how good it is to get out there and use good old fashioned equipment.
And that camera behaved just beautifully, everything worked as it should, it is as good as it has ever been, I’m so pleased with how it has behaved so far. See the results here: 20yr old Kodak Gold
I guess the proof is in the pudding as they say. Time to get it processed and to check the results. Needless to say I will feed that back on this blog as soon as it becomes available.
Don’t give up on the past, there is a lot of good tunes played on an old fiddle.
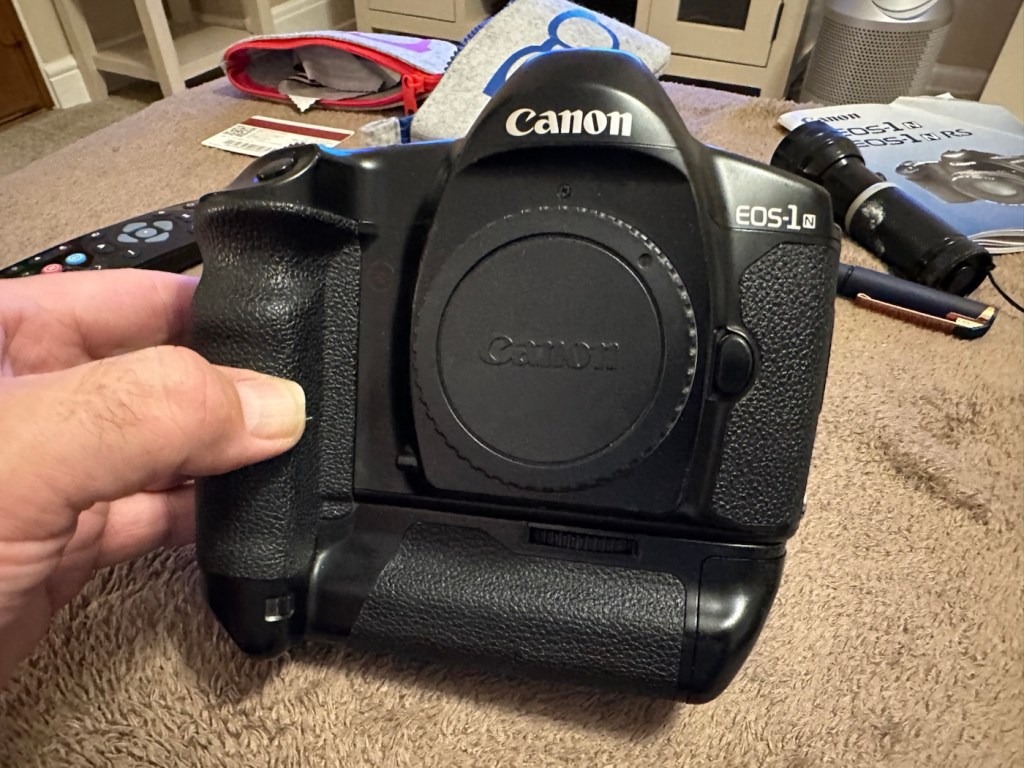
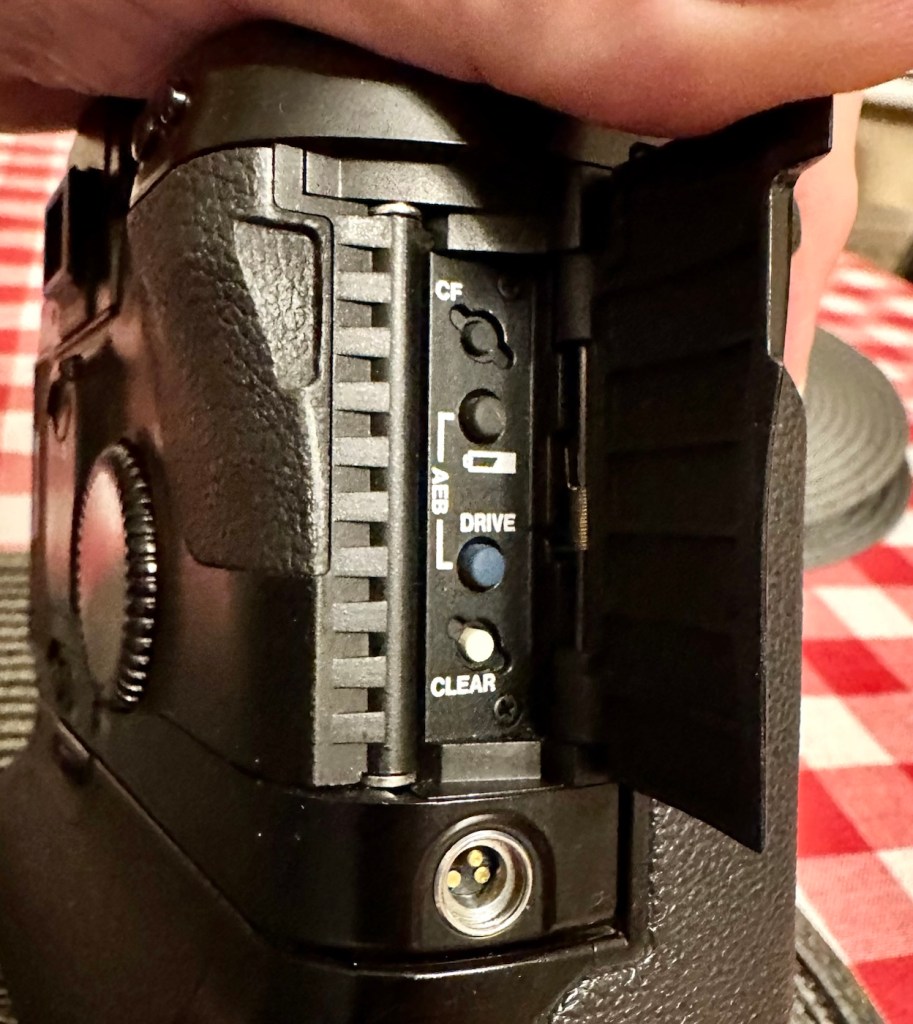
The EOS1 N with the well documented BC fault. Can I repair it?
The EOS1 N was a professional 35mm camera from 1994, it is currently 31 years old. This model is basically the EOS1 N with the E1 drive booster/winder earning it the HS suffix.
Canon EOS1 N HS
These are beautiful analogue cameras and over the years I’ve had a fair few of these pass through my hands, I have not however owned one with the E1 booster/winder before. I’ve recently had a number of cameras passed on to me by a good friend and that post can be found here: Cameras…i need more!
This is one of those cameras that he passed onto me and it carries the well known BC fault. We’ll come on to that later, in the meantime here is a little history lesson, of the evolution of this camera.
The EOS-1N is a 35mm single lens reflex (SLR) camera body produced by Canon. It was announced by Canon in 1994, and was the professional model in the range, superseding the original Canon EOS-1.The camera was itself superseded by the EOS-1V in 2000.
The original EOS-1 had been launched in 1989, two years after the company had introduced their new EOS autofocus system. It was the company’s first professional-level EOS camera and was aimed at the same photographers who had used Canon’s highly regarded, manual focus professional FD mount SLRs, such as the Canon New F-1 and the Canon T90.On a physical level the EOS-1 resembled the T90, which had been designed for Canon by Luigi Colani. The EOS-1N was a revision of the EOS-1, with five autofocus points spread across the frame rather than a single centrally mounted autofocus point, plus more effective weather sealing, a wider exposure range, and numerous other improvements. In common with the EOS-1, the 1N used Canon’s A-TTL automatic flash system, and does not support the more modern E-TTL.
Assessment:
Right, let’s get on to the problem. The BC fault is a blanket fault, covering a multitude of issues, predominantly electrical, even addressed in the accompanying instruction manual as a potential battery issue. However the issue that it is more associated with the fault is the failing shutter mirror magnets. See the video below.
BC error repair
The video above gives a very good insight to the issues, and what to look for and how to get the shutter operational again. It’s not a permanent fix, sometimes the magnets haven’t been used for such a long time that they just seize up. They can be de magnetised, they can just be dirty, either way it’s worth having a look at, to try and restore what is in all aspects a very good camera. It seems to be an issue that an open or close signal is sent, however the magnets for some reason do not react, dirt can be a contributing factor. Below I have put together a very short video of my own camera, the early part shows me trying to get it working and showing the BC indication, the second part shows the mirror “sort of” working after I have tapped in the area just above the top screw on the left side of the lens mount under which the magnets are situated.
My own EOS1 N showing the BC fault
It still doesn’t work properly though and is extremely intermittent, but it’s a start, it proves the fault. I have also used a strong magnet to fool the internal magnets, this works for a couple of firings but that’s it. This also adds credibility to confirm the magnet issue.
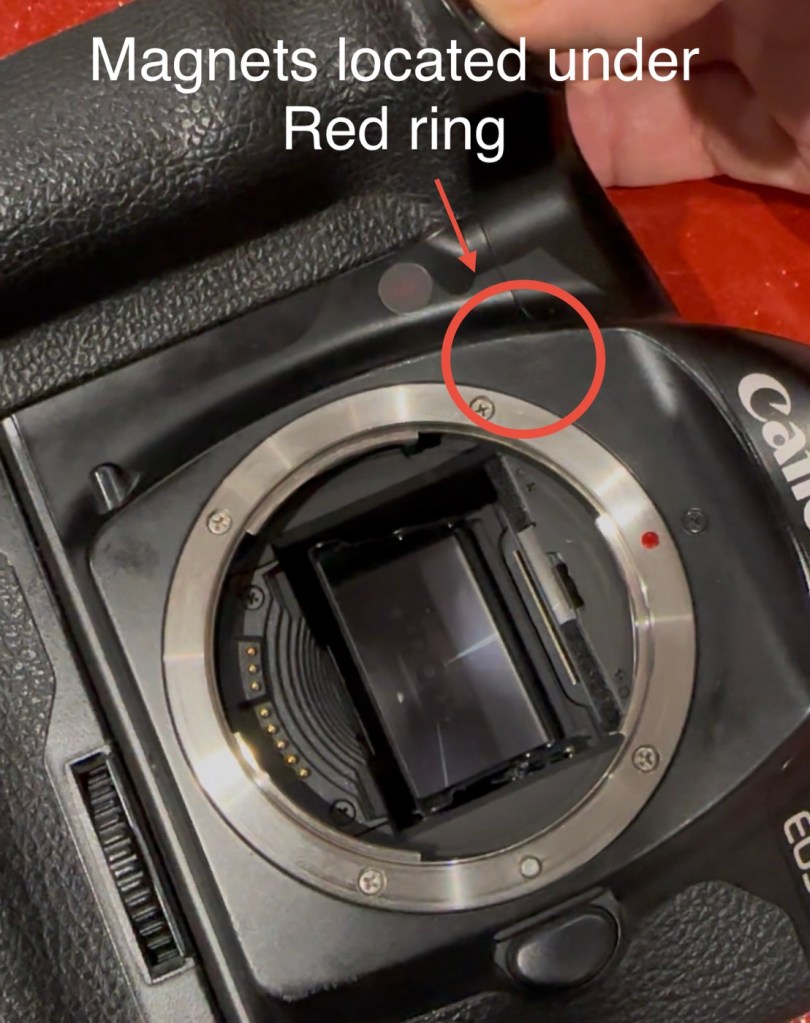
I haven’t yet taken the fascia off to access the magnets, I’ve just tapped in their general area, or probed with a strong magnet, this was enough to allow the shutter to intermittently fire, and it is now quite apparent that this is the issue I have with this unit.
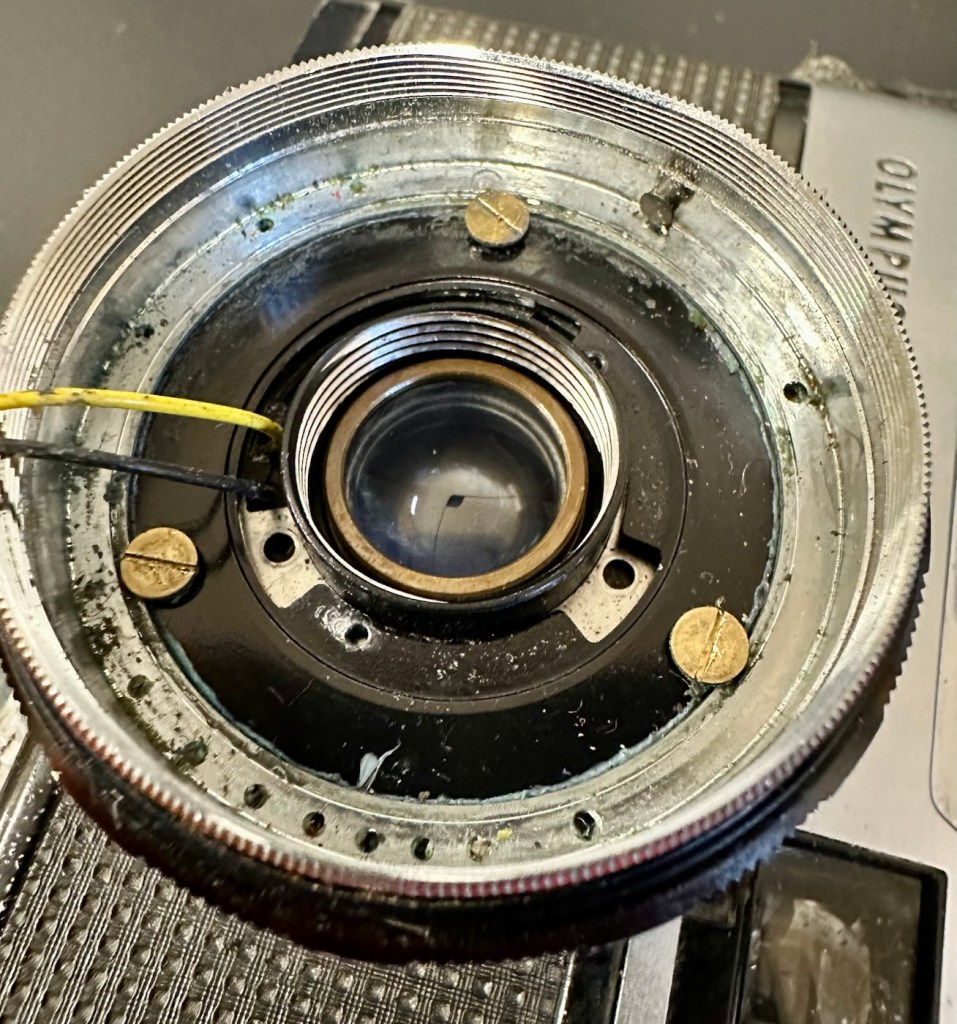
You can see exactly where the magnets are located under the fascia
I’ve done some further checks to confirm the fault. If you turn the camera on and open the small door to the right on the rear of the camera, there are a number of buttons inside that allow you to check battery levels and to do resets, and so forth.
The battery check button
By pushing both the clear button and the battery check button together, you can get a fault code to appear on the screen on the top of the camera.
Battery full and Fault code 6
Here as you can see, I have fault code number 6. If you look at the chart below supplied by Canon you will see it refers to a mirror fault, more specifically the mirror is up, but didn’t switch back to on from off, as I mentioned in the above paragraph.
Fault codes
As you can also see above, fault codes 6,7 & 9 refer to the mirror operation issue.
I’ve done all I can really on the outside of the unit, and I think I have conclusively proved the area of the fault. Before we look at replacement of the part, I am going to give it a good clean to see if that will clear the issue. I’ll worry about spare parts later if required. Let’s get the fascia off and have a closer look.
Repair:
I’ve been a right stubborn sod with this one. I really didn’t want to dismantle this camera at all. Something inside was telling me it was unnecessary so I decided to persist with what I had been doing earlier. If only I could get the magnets to fire for a few exposures at a time, it would be just like a coughing car engine clearing out its system and kicking in to life, once it bites you can accelerate it a little more until it starts ticking over. Old motors and cameras are a strange but similar comparison, the longer they are left unused the more inclined they become to not partake in doing what they were made to do, whether powering a car or taking photos. Stop using them and they do just that. Stop.
Well, that’s what I think anyway, My world is as simple as that. And I think it might just work.
So I have persisted….
And purchased a much stronger magnet a “Rare earth” one to be precise. These are the sort of magnets they use for magnet fishing, however this one is small and despite having credentials behind it saying it has 19kg of pulling power I’d suggest that is a lie. Probably a maximum of 3kg if you’re lucky, but either way more than sufficient for me wanting to kick start a tiny electro magnet in a camera.
The most surprising issue around this magnet is the absolute ridiculous size of the packaging that it came in.
This tiny magnet, came in this massive box. Good old Amazon
So I persisted with the magnet, around the lens ring. I reset again and again. Nothing. I used my knuckle to tap the area near the magnet, a single cough, good. More resets, single coughs, more taps two coughs….this is good. I set the camera to high speed wind, kept the exposure button depressed and continued tapping, five or six coughs then stop. It’s an improvement. The magnet is starting to pick up. More tapping then I’m getting about 20 coughs with an obvious delay on one or two activations… we are now getting somewhere.
I put the rare earth magnets near the camera magnet and then switch off and reset. I turn back on again and then get a good 15 seconds or so of rapid fire, the internal magnets are clearing. I remove the rare earth magnet, reset again and the old girl fires into life for about 30 seconds continuously with only the occasional “misfire” the internal magnets are sparking back into life.
You get the idea.
Once you get these magnets operational, the best thing you can do is continually fire them, until they fire smoothly. This camera has not fired up for years, and these components inside are made to be used, and just like someone trying to keep fit, similar to a muscle, if you don’t use it you’ll lose it, it’s the same with these cameras, they need to be used on a fairly regular basis.
I did a 3 minute firing and I’m pleased to say she is now chugging away beautifully with no coughs and splutters. I’m sure glad I persisted with my hunch. I was right. And believe it or not. The battery levels are still good.
I’ve put together a little video here showing it working before and after.
My EOS 1N shutter magnet issue
Well what more can I say. It appears to be working.
Result:
To say I’m chuffed with this repair is an understatement. Sometimes you don’t have to dive in and start dismantling to get results. Do your research and make your own plan of attack with the information you have at your disposal. You will find equal amounts of good and bad advice out there, you’ll soon become aware of the differences, just follow your feelings and do what you think is right, if it’s wrong, well you’ve learned a lesson.
She’s ready to go – what a beauty
I am so looking forward to getting a day out with this camera and really letting her loose. I just love the sound of these clunking old machines, I don’t understand why anyone dislikes them. I loved visiting air shows when you had the big old really noisy aircraft that shook your soul from head to toe, they then sanitised that with super quiet aircraft…so boring. They’ve done that to cameras as well that nowadays make no noise. I love these old cameras, every click, clunk and whir brings back superb memories to me. I just love old cameras. I like to think I’m helping a few last just a little bit longer.
Many thanks for passing by, it’s always very much appreciated.
What shall I do with all these expired rolls of 35mm film? I know, let’s take some pictures
I’ve recently inherited 8 rolls of life expired 35mm film. In other hands I guess these would just be discarded, and thrown away, however this is me writing, you know, that fool who collects old knackered cameras. That’s me that is.
Well I’m going to use them.
What could possibly go wrong.
8 rolls of film 20 years old
A number of things to be precise, let me enlighten you. As these rolls of films all expired back in 2005 this means they expired 20 years ago, that’s a third of my life span, phew! Film loses its sensitivity over time and we will have to compensate for that when we get to use the film. Colours and dyes fade, and the finished product (if there is one) is likely to look washed out. Add to that the issue of not knowing how the film has been stored over the last 20 years, and this could be the difference between there being an image and just being blank film. If the film has been kept cool, and in a darker environment, there is more of a chance of getting a result than one that has been stored in light and heat. You get the picture….or not.
These rolls are colour negative film all using the C41 chemical development process. And for this type of film and process, the line drawn in the sand says that it’s wise to overexpose the film by 1 stop, for every 10 years (Decade) of expiry. Since the rolls i have are now twenty years out of date, following these guidelines I would be advised to overexpose these films by 2 stops.
Black and white film is more forgiving and might not require adjusting at all, whilst transparency film is totally unforgiving, and personally i wouldn’t touch it with a barge pole.
The higher the ASA setting on the film, means that it requires less light, a lower settings means that more light is required. Therefore, as an example, if these films were originally rated at 400 asa i would now be advised to expose them at 100 asa therefore allowing more light in to expose the deteriorating film accordingly. But remember, when you process the films they must be processed at standard normal development times, if you push or pull the development times you will not achieve the result you require. Develop as normal.
The unknown factor here really is how the film was stored. Chances are that if it was stored in perfect conditions, then we could probably get away with using its original asa setting. But we just don’t know and will just have to suck it and see as they say. We won’t really know how things are going to turnout until we’ve developed the film.
Old film is good for experimental purposes, you don’t really want to trust old film to a photo shoot as you could be wasting time and money. Unless you really want that old washed out retro 70s look.
The film stock I have is listed below:
I have 4 rolls of Kodak Gold 200ASA colour film.
Gold 200 ASA
I also have 4 rolls of Kodak Gold Ultra 400ASA film.
Gold Ultra 400 ASA
All expiry dates are circa 2005, so they are exactly 20 years out of date. I’ve put them all in to cold storage for now but it could well be 20 years too late. Typical for me, always late to the party!
As an aside to these films, I’ve also found a Canon EOS 30 body that I have also been given to get working again, it just so happens to have a partially exposed film inside it. Now this roll I will have to expose as per normal as it has a dx code reader inside, and I can’t override it from what I can tell initially. It will be interesting to see what it returns.
So. When I get around to exposing these films, the 400ASA will be exposed at 100ASA and the 200ASA ones will be exposed at 50ASA. To be honest, I will probably expose half a roll of each at the original setting and then half at the modified setting. It will be good to see the difference, the deterioration and the grain quality. I have a number of old 35mm cameras still to test, so these rolls will be a welcome opportunity to test and experiment, and you don’t often get the opportunity to do this, so I’m going to make the most of it and have some fun.
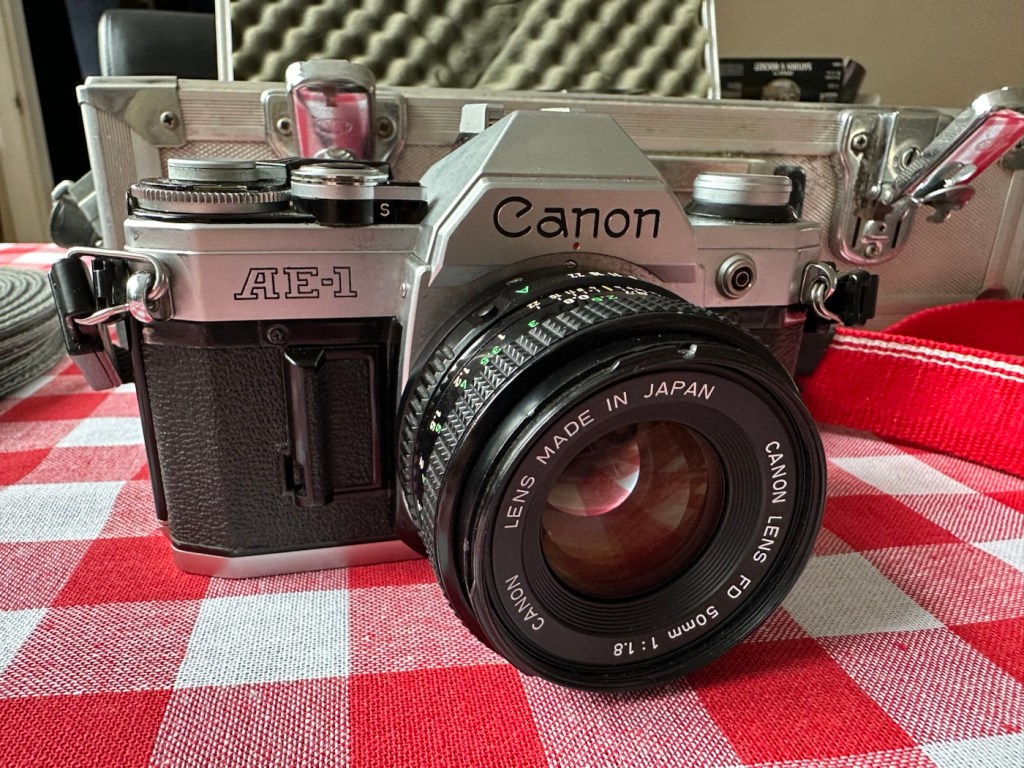
A sympathetic restoration of a 70s classic camera.
This is a Canon AE1 that was produced around May 1977. I know this because of the date code within the spool area where the film sits. Seeing these units were produced between 1976 – 1984 this particular unit is quite an early one. It is currently 48 years old and looking very good.
Canon AE-1
This camera is part of a batch of cameras recently received from a good friend of mine Jon, who has been in the photography business for more years than he cares to remember… it’s a big number and that’s all I’m saying. I did discuss his very kind donation here: Cameras…i need more!
How did you date this camera?
Surprisingly quite easy. There is a number on most Canon cameras externally, and contrary to belief this is not the ID number, the id number we require is inside the camera, printed in the film spool bay in a very dark ink. You have to position it in the light to view it properly.
ID number in film barrelThe ID number
The number can consist of 4 or more digits. In my case the number is R519. If you go to this site by a guy called Bob Atkinson he has a chart here that explains how to source the date of your Canon Camera or lens: Bob Atkins Photography- Date codes
So using Bobs code the letter “R” refers to the year of manufacture and in this case represents 1977 or 2003 (the dates were recycled when they reached the end of the alphabet) seeing this camera’s production run was between 1976 – 1984, “R” in this case represents 1977. The next two digits represent the month of manufacture, and occasionally in months 1-9 the preceding zero was omitted. In my case considering the number 51 does not represent a Month, the zero was omitted in my case therefore making the month of manufacture “05” hence month 5 – May. So this unit was more than likely produced in May 1977. Occasionally there would be a final letter such as an “F” that would represent the factory it was made in. “F “ would have been the factory in Fukushima. See, that’s how I dated this unit. Check Bob’s site out and date your Canon equipment.
Anyway, here’s a little history about this superb little camera:
The Canon AE-1 is a 35 mm single-lens reflex (SLR) film camera for use with interchangeable lenses, manufactured by Canon Camera K. K. (today Canon Incorporated) in Japan from April 1976 to 1984. It uses an electromagnetically controlled, horizontal cloth focal plane shutter, with a speed range of 2 to 1/1000 second plus Bulb and flashX-sync of 1/60 second. The camera body is 87 mm tall, 141 mm wide, and 48 mm deep; it weighs 590 g. Most are silver, with black grip and chrome trim, but some are black with chrome trim.
Its name refers to the fact that it is an electronic camera using aperture control for automatic exposure. The AE-1 is the first SLR containing a digital integrated circuit, which allowed Canon to integrate more functionality while making the camera smaller.Both the digitally-controlled automatic exposure and the small size helped to make the camera a success: backed by a major advertising campaign, the AE-1 sold over 5.7 million units, which made it an unprecedented success in the SLR market.
Wikipedia
So there is a lot of them about, but it’s rarer now to find one in a good condition. I think I have one that is in a good condition, has very slight signs of ageing (Patina) and shouldn’t take too much effort to get it working again.
Let’s have a closer look at my inherited camera.
Assessment:
It’s been in storage within a foam lined metal box for a few years and this appears to have assisted in maintaining its overall good quality. There are a few slight signs of wear that are present as you would expect with a camera that has been well used but cared for, but there are no major dinks or signs of bits being broken. It has been loved.
Curtain clean and smoothSilver worn, nice patinaJust a bit dusty Just needs a good clean
Looking at the shell all the buttons are doing what they should, it’s a bit dusty and grubby and looking through the viewfinder you can see a lot of dust in the view, but I believe this is just dust on the mirror, or at least I hope so.
The camera has attached to it a Canon power winder “A” and this does not work, it has serious corrosion that I suspect that has gone behind the contacts and will need dismantling, cleaning and rebuilding. I will cover this activity in a separate post, whilst this one covers the camera and is a separate activity.
The winder looks goodInside tells a different storyOld batteriesSerious corrosion
Anyway back to the camera. The wind lever seems to be locked, it can’t be cocked. The shutter doesn’t fire but there does seem to be movement in the exposure meter in the viewfinder but it seems erratic, not quite as it should be. I have a feeling and in fact I’m quite confident it is an electrical issue, as with the Canon A1, a bad power source would render the entire camera useless.
Repair:
With my suspicions about the electrical element on this camera the first thing I did was to do a battery check in the camera. This camera has one cell in it, mounted on the front face just to the right hand side of the lens in a small chamber. It is a 6v lithium battery. I suspect this one has been in place many years.
Battery check button
To check the battery power you look through the viewfinder at the light meter to the right of your field of view and depress the little black button on the top left of the viewfinder on top of the camera.
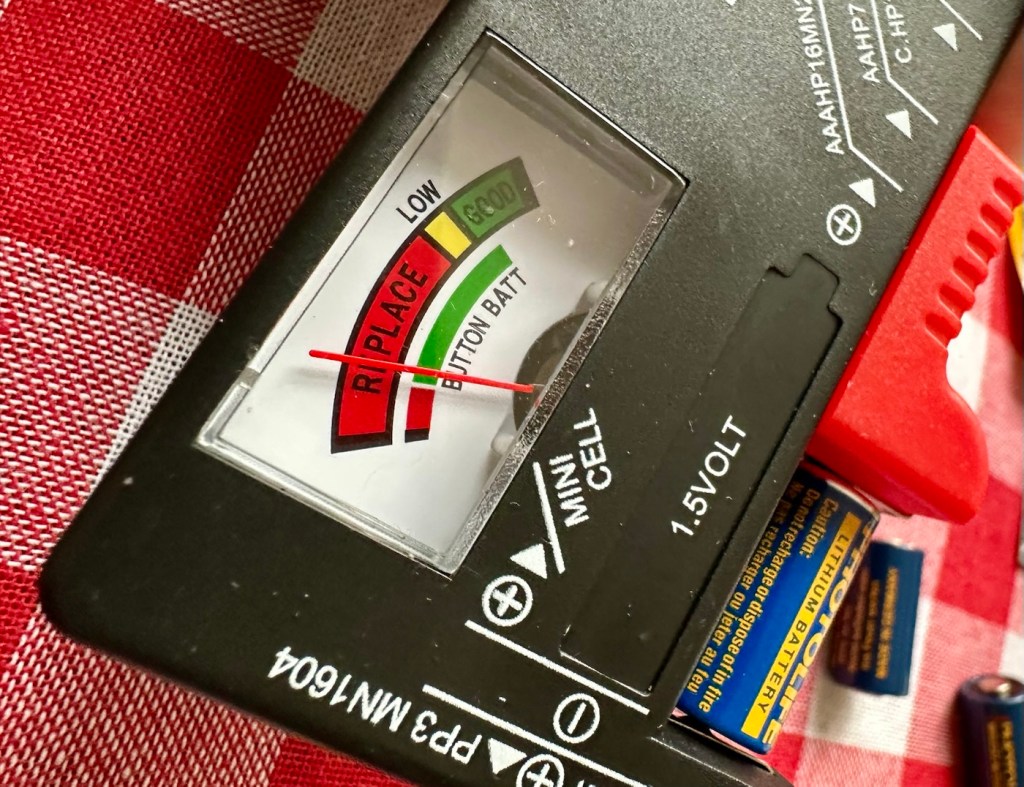
This. Battery is dead
As you can see above, when you push the little battery check button the needle on the exposure meter moves. It may settle, it may move about, but the battery should be indicating below the 5.6 level to prove it has life, this battery is indicating dead. Let’s confirm that on an external battery checker for confirmation.
Yep. It’s dead
And I think that confirms things for us that this old battery is dead. Fortunately I have plenty of replacements available so I just put a new one in to see what happens.
New battery
The new battery is in place and now you can see the indication has dipped well below 5.6 indicating a healthy battery supply. I push the shutter button and it fires perfectly. Power has been restored.
The lens on this camera is pretty much the stock issue FD 50mm. I have removed it and exposed it to high lighting levels to see if there are any imperfections and I’m pleased to say there are none. No Mould or fungus build up, I must admit my friend who passed this on to me has stored it perfectly. Apart from a little dust build up, I was able to use a lens cloth on both the lens and mirror and the issue was sorted in minutes, not that it was ever an issue really.
View through backAnd front
I’ve used a dummy film and the carriage works fine, the lens apertures all react smoothly, and the shutter speed’s respond as they should. There is no shutter scream or lag, and everything seems just right. After spending a good few hours going through the instruction manual and checking all its functions I am happy it is doing just what it should. It is very rare to find such a good condition of camera that requires very little maintenance. It’s a credit to the previous owner.
This is a sympathetic restoration. I’m leaving it looking as it is. I’m not fixing something that isn’t broken, and I will attend to it with lubrication and maintenance as and when it is needed. I will very soon run a roll of film through and see just what comes back as a result. I have a number of films here that are now 20 years out of date so there could be some interesting results.
Result:
A beautiful camera
Stunningly beautiful
The camera has cleaned up beautifully after a good deep clean and polish. I have a superb little example of a well loved and well used retro superstar of the late 70s. In perfect working order and ready once again to be used for what it was designed for. Taking great photographs.
As stated I’m going to run a film through and I will post the results on here whenever I get the time to do so. See the test results here: 20yr old Kodak Gold
My plan is to have this displayed in a case in my workroom alongside my Canon A1 when I have completed its repair. I took up photography in the period of time that these cameras were produced, and they hold great memories and sentimentality for me. They come from a time when cameras had style and innovation, before they all started to look the same, quality and style, it’s what’s missing today.
For someone like me that loves old cameras, I think these are superb and will always hold a place in my heart.
Thank you for passing by, it’s always very much appreciated.
I say more cameras, my wife begs to differ.. my friends agree with me.
Well, my wife would probably disagree with the above comment.
However, i have some very good friends who are quite happy to ignore my wife and her protestations. Some would say they are very brave…others would even say they are foolish. Time will tell.
A couple of beauties – you wouldn’t understand
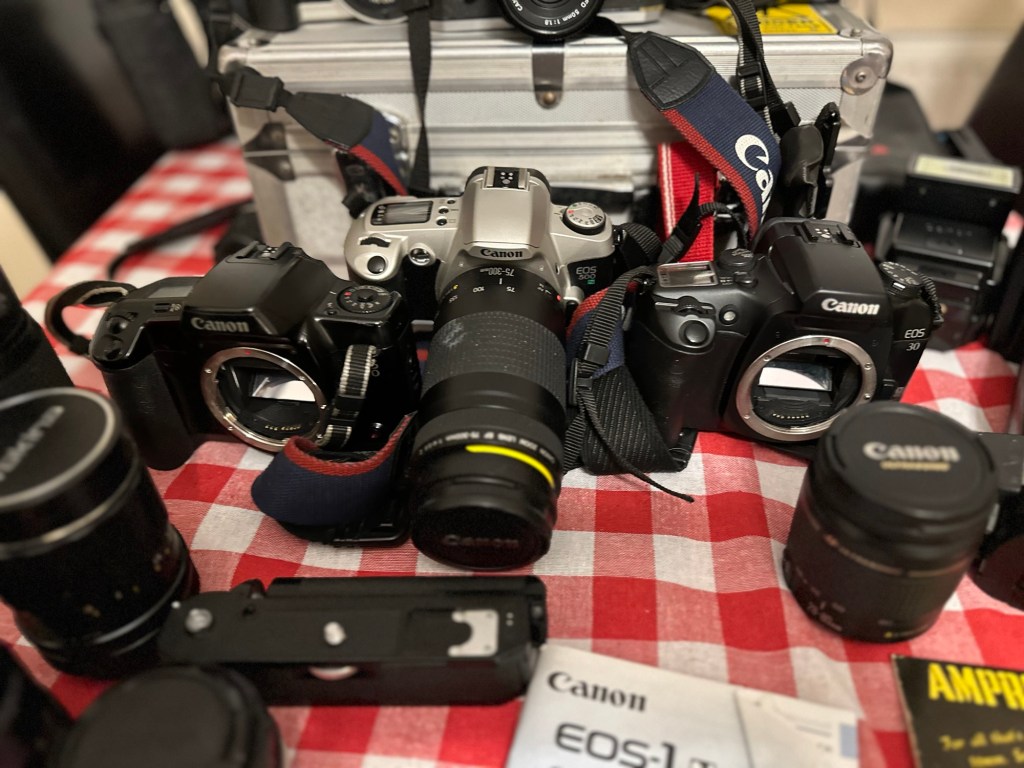
Jon, is a friend and former work colleague that i have known for many years. We both worked at the same Kodak plant in Harrow, me on the graphics art film production track and Jon was in the training and development area. We rarely met there as the plant was so huge that our paths crossed quite infrequently. However Jon has also been the mainstay and life blood of a local football team since the early 70s, and it’s true to say he is a local legend and pillar of the community. This is how i really met Jon, and we have always discussed issues of photography, he is very much involved with promoting the armed forces and has been fortunate in the subject matter he has been asked to photograph. Needless to say, he has a lot of redundant equipment, and when he became aware of my blog site and the repairs i attempt to do, he very kindly donated a number of items for me to write posts about, and to be quite honest it will keep me busy for quite a long time.
A few items to keep me busy
The majority of the items probably just need a little service and a test session, a couple have some battery corrosion issues, but in general cosmetically, they are in good condition. We have a number of old lenses, but as you’d expect from someone who looks after their equipment, there isn’t a sign of haze or fungus in them. They just need a clean up, and very little else.
Here’s a list of what i have received, and observed after a very quick look at the items.
8 cameras:
1 Canon AE1 film camera and user manual, mirror was stuck, now freed up and firing ok but requiring a check over.
1 Canon EOS 30 film camera, a bad case of sticky body.
1 Canon EOS 10 film camera, issues unknown
2 Canon EOS 500N film cameras, issues unknown
1 Canon EOS 3000 film camera, issues unknown
Canon EOS 1N film cameras with E1 power drive, beautiful camera, issues unknown.
Canon EOS 7D digital camera with BG-E7 battery grip, stunning camera, issues unknown.
7 lenses: all Canon fit
2 x Canon FD 50mm 1:1.8
Tokina 300mm 1:5.6
Tokina 135mm 1:2.8
Tokina 35mm 1:2.8
Canon 75-300mm 1:4-5.6
Canon 28-80mm 1:3.5-5.6
There is a separate lens that i have been asked to look at and repair for him as it’s his third go to lens, that is a Canon EF 28-200 1:3.5-5.6 USM lens. It doesn’t focus in auto, i notice it has lens wobble and a lens washer appears to be exposed in the zoom section of the lens. It needs investigation.
Other items:
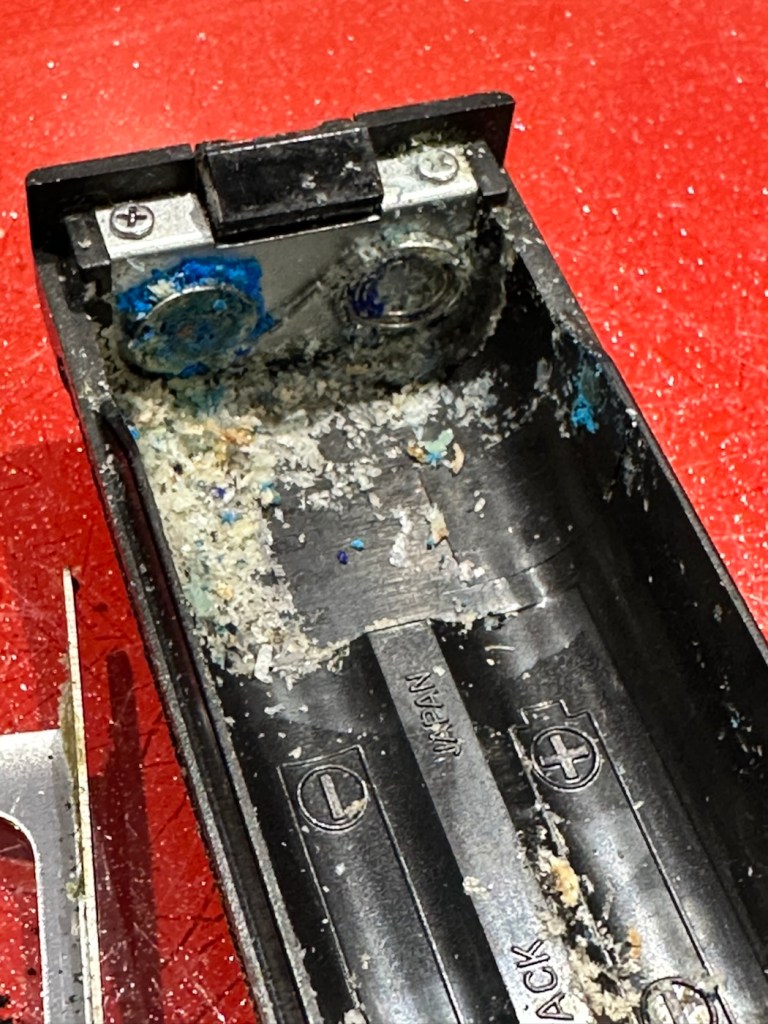
Canon Power winder-A. Part of the AE1 camera, you can smell its issue as you hold it, battery corrosion. Batteries inside have seriously corroded, however i believe the issue is salvageable.
Canon speedlite 199A flash gun, untested.
Metz 45 CT-1 flash, again there is corrosion in the battery pack, you can smell it. Again this should be salvageable.
Sangamo Euro master light meter and invercone. In excellent condition, could be that the selenium light cell is dead. Needs investigating.
8 rolls of film, expiry date 2005, may still work..who knows.
3 x 6v lithium batteries, all tested and working.
Add to that the two camera bags and a hard case that they all came in and I’m sure that you will agree that it was a pretty nice package to receive.
I’m extremely confident i can get these all into a good working condition, any cameras that i will not be keeping will either be sold on to benefit charities supported by Jon or donated to local charities for their benefit. Either way nothing will be heading to waste, that is a promise i have made to Jon and thats just how it will be, i do not break promises.
Thanks for passing by, and i will be posting articles on all these products in the coming months. As I already have 13 projects already in draft awaiting a time when i can back to repairing them, you can plainly see I’m going to be very busy for quite a while and should be able to supply quite a regular feed to this blog.
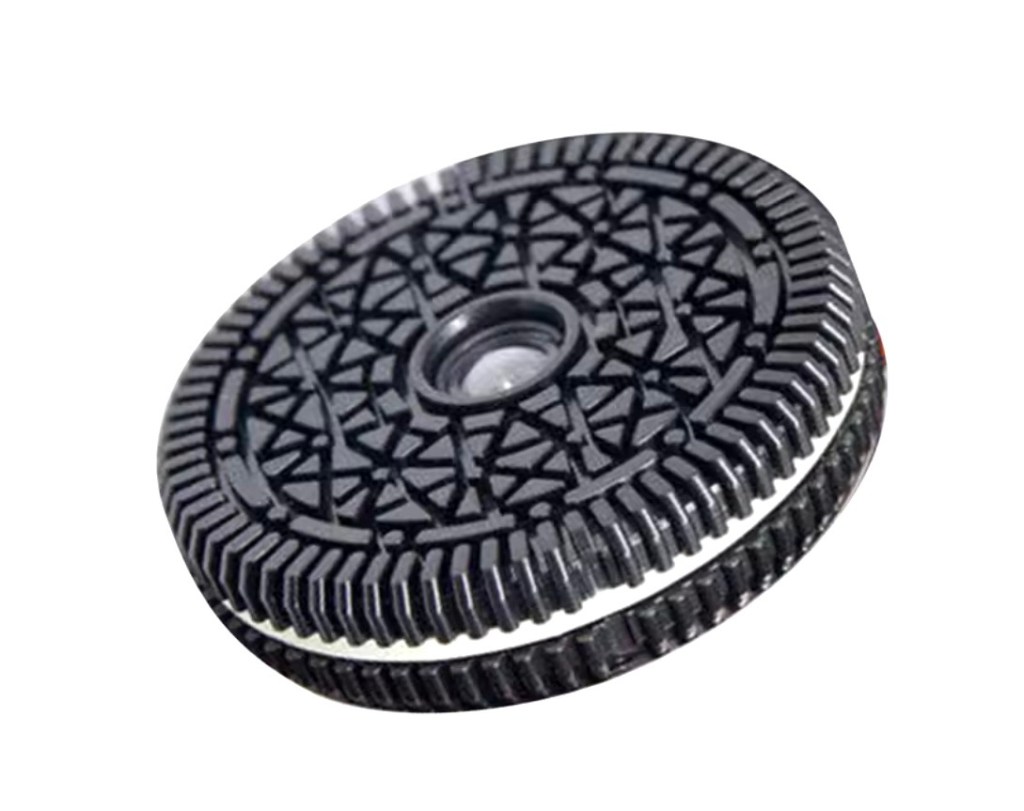
It’s a colloquial term for a flat thin lens assembly that started to emerge from the 60s through to the 80’s, commonly seen in compact SLR cameras of the time. This then developed into a body cap lens, an extreme type of pancake lens that is designed to both protect the camera internals as a body cap normally would, yet still allow the user to take photos. These lenses are manual focus only and generally have no more than a couple of optical lens elements, no image correcting elements, a very-slow fixed aperture, an extremely thin focusing ring (if any at all), and a retractable lens element cover. Due to this compromise in design, body-cap lenses generally suffer from numerous image quality issues such as heavy vignetting and poor image sharpness.
Recently there has been a resurgence in this type of lens culminating in the one that seems extremely popular at this time, a cookie lens.
Cookie lens
It’s not hard to see why it is named so, it looks like a big Oreo cookie, it even looks as if it has the cream between the two biscuit pieces. These current ones are sold as being recycled from old disposable cameras. Original pancake lenses can cost many hundreds of pounds, however these ones are classed as disposable, and are priced at around £30 to £40GBP, being sold by a company called Retropia. But hold it! Don’t waste your money on that one, as they can be purchased for at least half that price from Ali Express of Temu, just make sure you shop around. By looking at the reviews £30 can still be a bit of a hefty outlay for what is basically a cheapo lens out of a disposable camera set in a cookie shaped piece of plastic.
One guys in depth review of the “Cookie” lens
These lenses have risen in popularity, as the new mirror less cameras have become more accessible. This lens allows these cameras to be used as a straight forward point and shoot camera, no focussing or metering. achieving that retro disposable camera look, but in much more modern equipment. It’s a fun item and for an outlay of around £13GBP, which is what I paid for mine, it’s not too big an outlay to do some experimenting with, and if it turns out to be a load of old bilge, then it’s no real loss. Reviews are mixed, but in general it seems people are having fun, and that’s what photography should be.
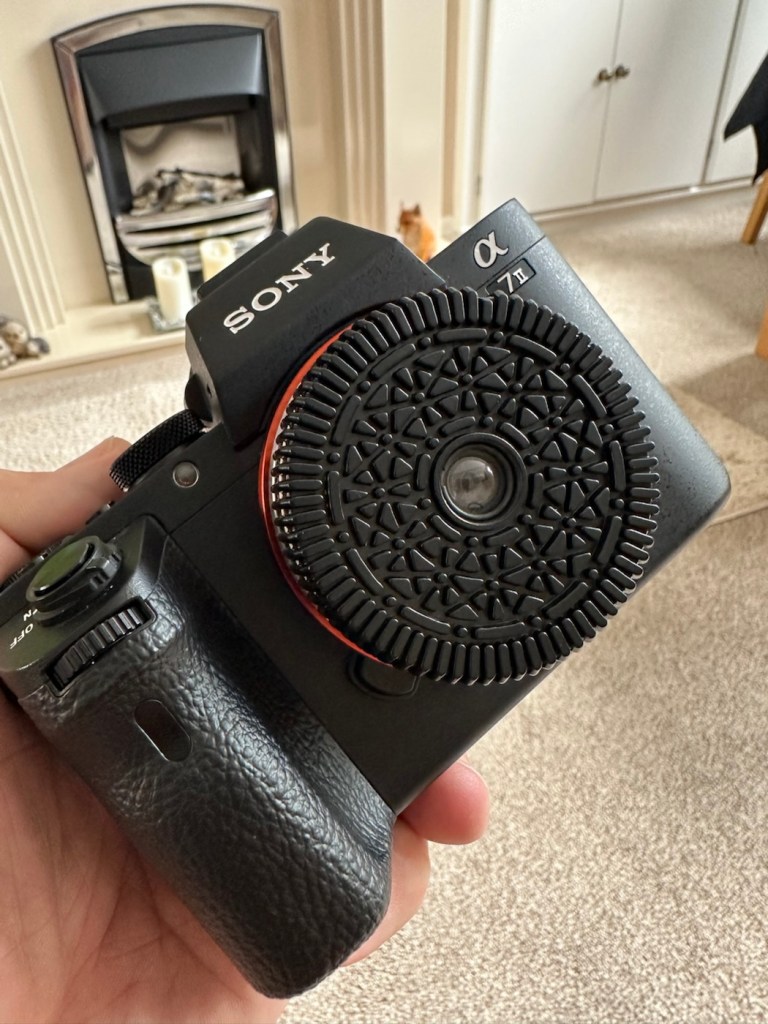
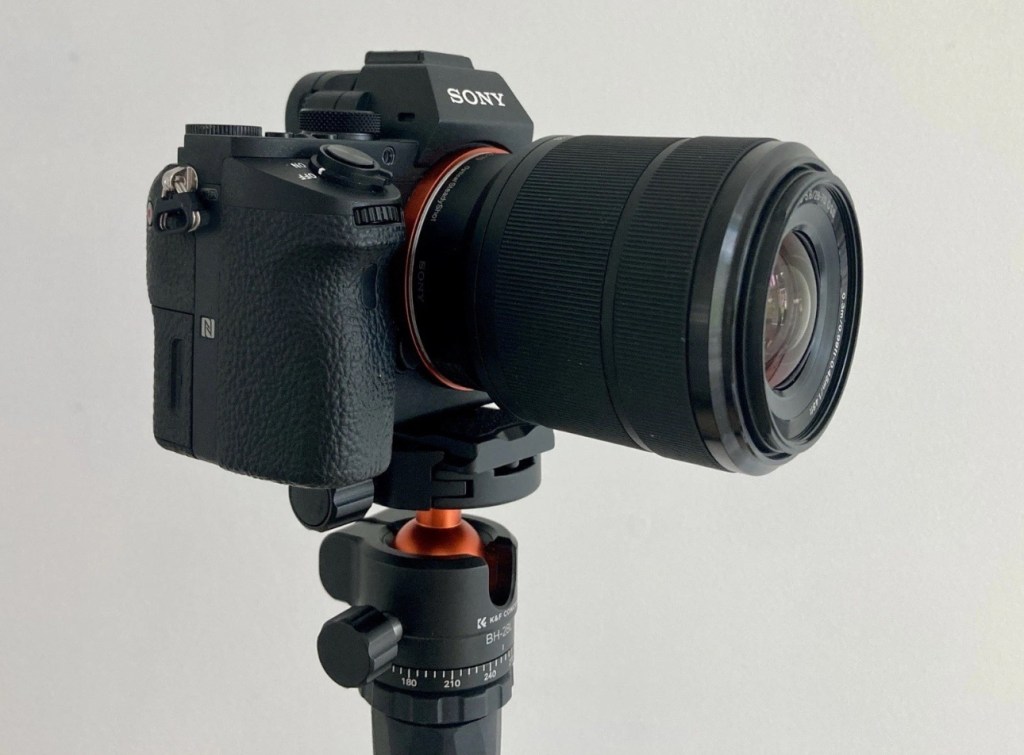
I’m waiting for mine to arrive, and when it does I shall post some photos below to see how I’ve got on with it. Oh, and I now have a suitable camera to use with this lens and that can be found here Sony A7II Mirrorless camera.
The lens has arrivedLens installed
It’s such a simple thing. It turns a complex camera into a quite basic point and shoot disposable, lomography type of camera. Perfect for street photography and just everyday randomness, yep kind of like you’d now find on your mobile phone. However this is more fun and you actually have a camera into your hand, Perfect.
The lens is 32mm, and the CCD in the camera is full 35mm so there is a kind of small vignette around the edges of each shot, but that just adds to the basic rawness of the lens. it’s a bit of fun.
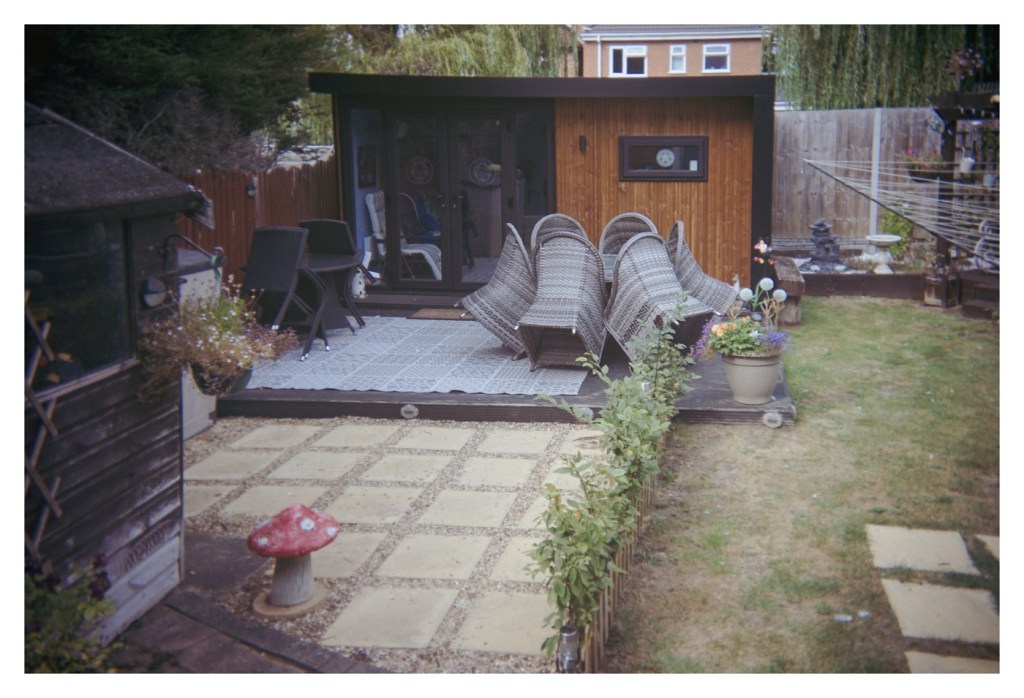
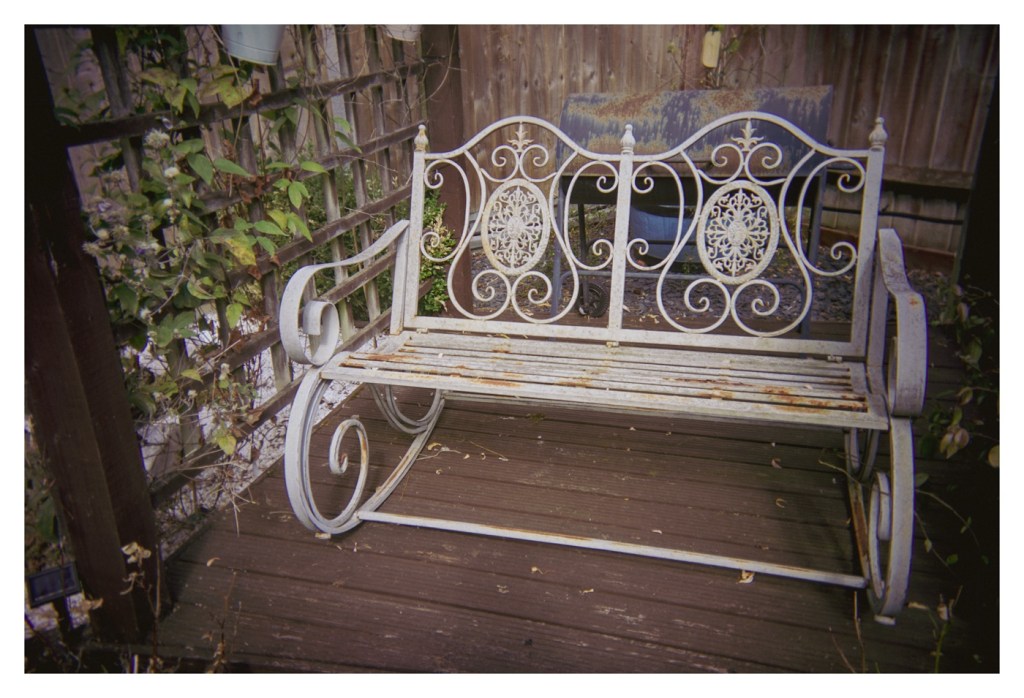
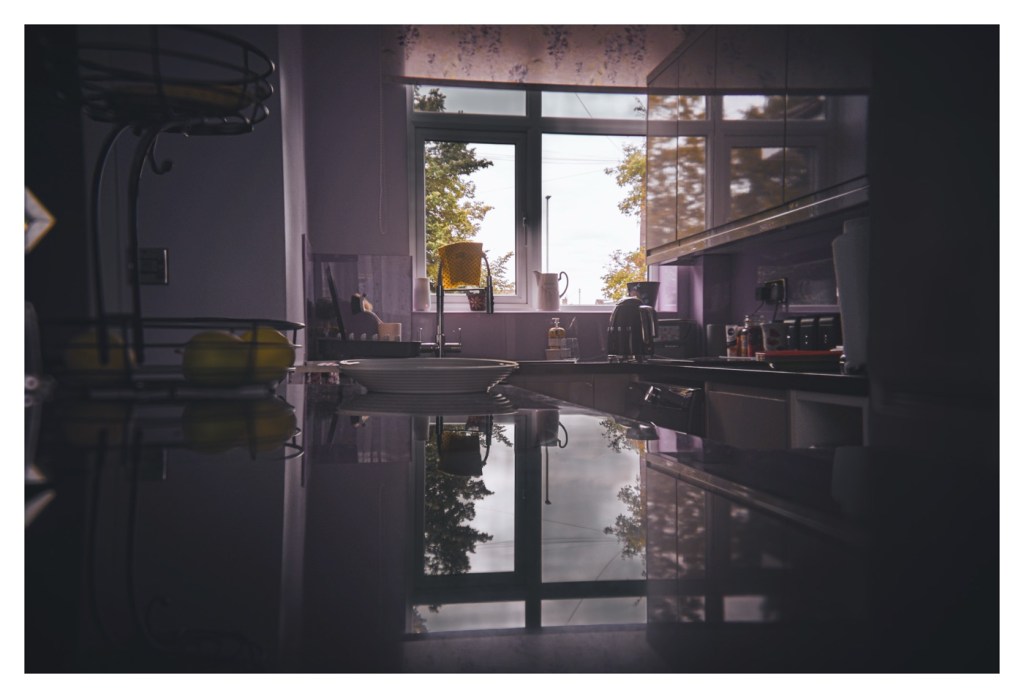
Angles in the living room
Garden pub
Rusty chair
Across the kitchen early morning
Above are a small selection of some of the scenes around home, taken quite randomly and all I have done in the post process is added some vintage presets. The light has been so poor lately that to be honest this already added to the vintage effect. If we see any sun I suspect the results would be very similar to the hazy 70s effect that the disposables always managed to achieve. Don’t expect too much from these lenses, they are just fun to experiment with, and that’s just what photography should be. Fun.
Wow. I’m a lucky cuss as Captain Sensible once sung.
The camera
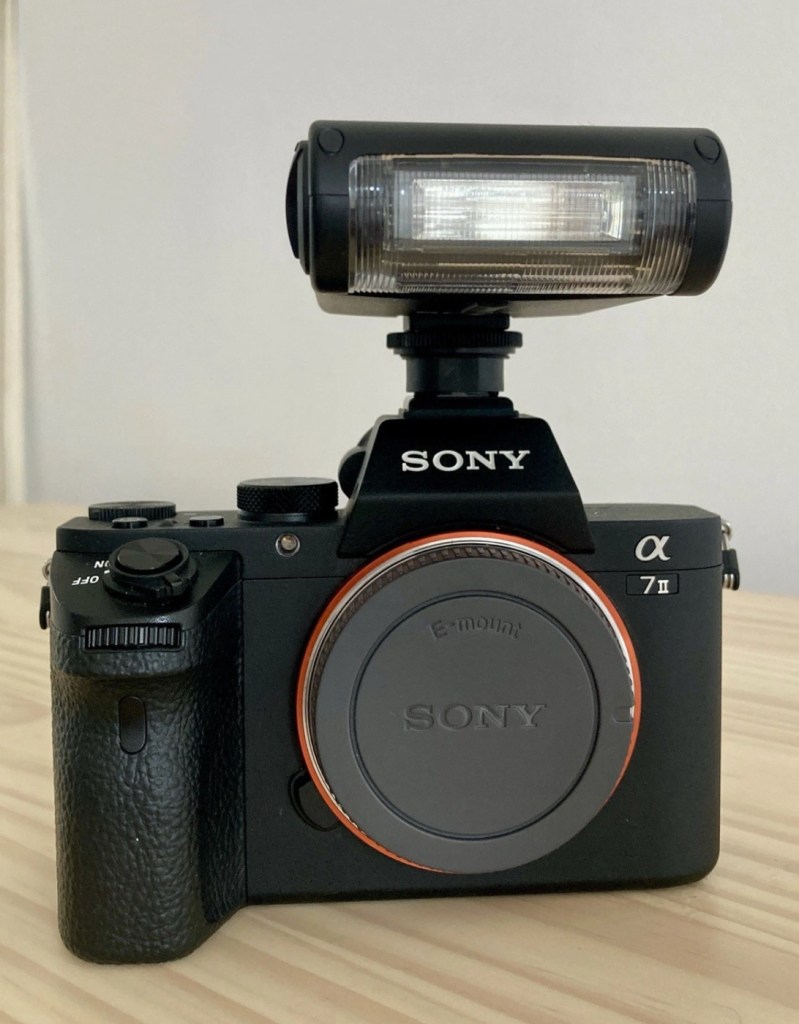
Never really transitioning to digital photography properly, my dear lady wife took it upon herself to arrange an early birthday present for me after discussing technicalities with a photographer friend of ours. As I’m still stuck very much in the past with all my cameras (and anything else to be honest) they have decided to fully bring me over to the dark side and she has purchased me a full, mirrorless camera kit, yes the whole lot as a package apparently from someone similar to me, stuck in the past and not being able to master it. She’s brought me it as in her own words, “it was a bloody bargain, and I’d have been foolish to turn it down” so she thought of me and that was it. It’s a special birthday this year and she wanted to buy something special and this is it. She wanted me to have it now, as there is just too much of it to hide.
The full kit
It’s going to be a cracking setup allowing me to fully explore the large void I have regarding digital photography properly.
Here is what is included, an extract from the email between her and the seller:
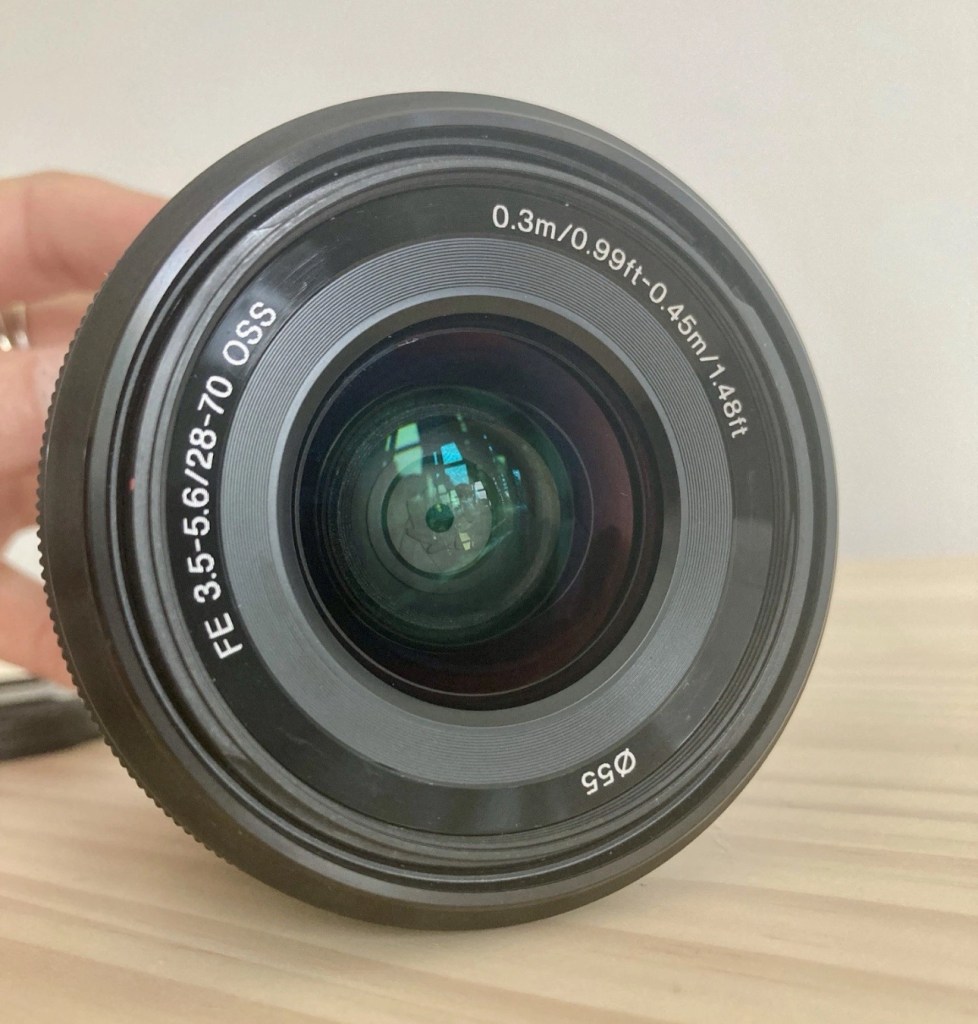
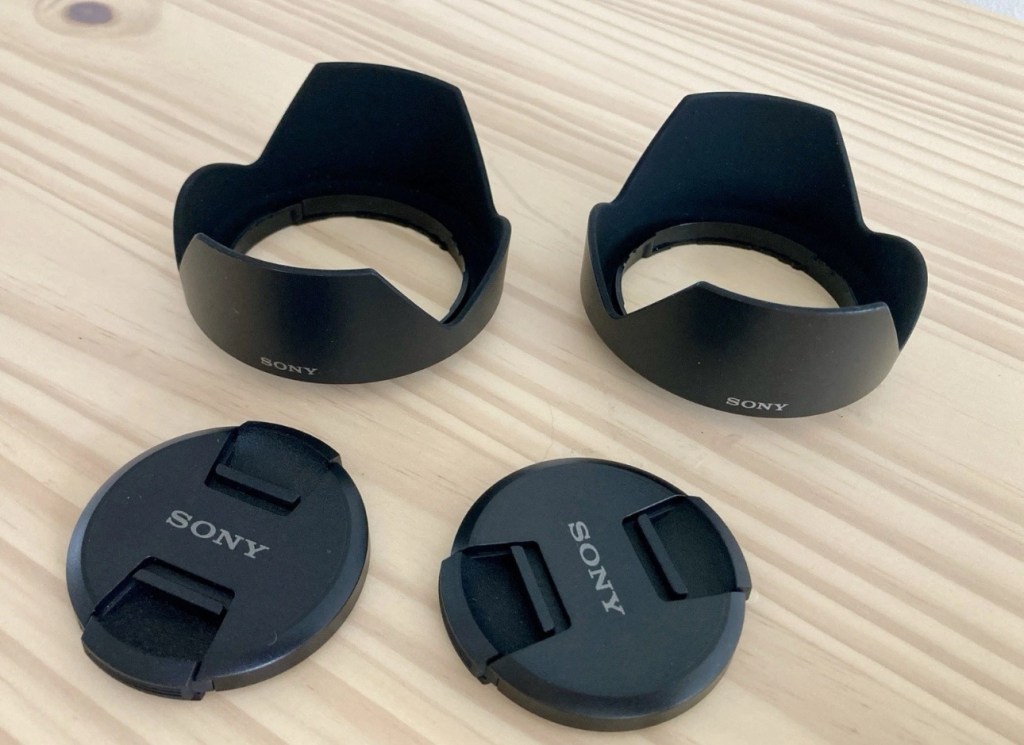
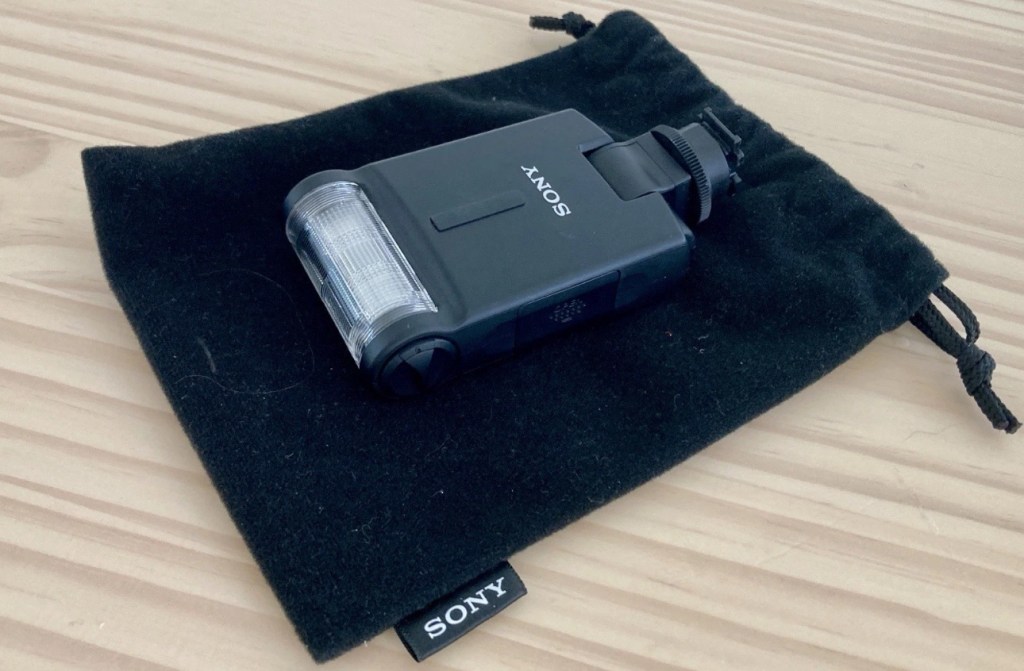
A complete photography essentials bundle built around the superb Sony A7 II. Ideal for anyone seeking a high-quality full-frame mirrorless setup, whether upgrading or starting fresh, with everything needed to shoot immediately. All items were purchased new in 2023, barely used, and are in mint condition throughout. No scratches, scuffs, or marks. Everything has been stored with great care and is fully functioning. Included in the Bundle: – Sony A7 II Full-Frame Mirrorless Camera Body: Renowned for its incredible image quality, excellent dynamic range, and in-body stabilisation, the A7 II is perfect for serious photographers seeking a reliable, high-performance full-frame camera. ✅ Mint condition. – Sony OSS FE 28-70mm f/3.5-5.6 Zoom Lens: A versatile all-rounder lens, ideal for landscapes, portraits, and everyday photography. Equipped with Sony’s Optical SteadyShot stabilisation for sharper handheld shots. Includes Original lens cap and lens hood plus Spare lens cap and spare lens hood. ✅ Mint condition. – Samyang AF 35mm f/1.8 FE Prime Lens: A fast, sharp, and lightweight prime lens, perfect for portraits, street photography, and creative work in lower light thanks to its wide f/1.8 aperture. Includes: • Lens cap • Lens hood • Lens shell (protective sleeve) ✅ Mint condition. – Sony F20M Detachable Flash Gun: Compact and effective external flash gun to elevate your low-light photography. Includes Sony velvet drawstring storage pouch and Two AAA batteries. Note: The only minor point is the missing hot shoe cover on the Sony F20M flash gun — this does not affect performance. The flash can be stored safely either attached to the camera or in the provided Sony velvet pouch. ✅ near mint condition. – Cleaning Essentials: • Giottos Rocket Dust Blower — perfect for safely removing dust from lenses and camera sensors. • A handful of lens wipes for easy on-the-go cleaning. – Aodelan Wireless Remote Shutter Release Kit: Ideal for tripod work, long exposures, or remote shooting without touching the camera. Reliable wireless connection. Ideal for starry sky photography and taking solo selfies on a mountaintop! – K&F Concept 64-Inch Aluminium Ball Head Adjustable Tripod: Durable tripod with adjustable height and ball head for precise positioning. Suitable for travel and studio work. Angle and height of legs are adjustable independently of each other which is ideal when resting it on rocky or uneven terrain. It can also be used “upside down” to shoot handsfree at ground level. ✅ mint condition, never used. – Vanguard Camera Kit Case: Sturdy, protective camera bag with organised compartments for carrying and storing your equipment securely. Compartments are adjustable with velcro edges. ✅ excellent condition – Sony Alpha Soft Carry Case: Original Sony-branded protective soft case for carrying and storing the A7 II R camera. This has a velcro lens hammock fitted inside so the camera with lens attached can be carried safely. ✅ near mint condition SD card NOT included. Additional Information: I paid £**** in total for these items. Happy to provide further details or additional photographs on request. Also more than happy to share images I have taken with this kit. Serious buyers only, please.
I apologise in advance if I start to show more photos on these pages, but fear not. It is and will always be a site dedicated to traditional photography, its equipment and repair, and that will never change.
I believe my wife is fed up with me carrying around old equipment and wishes for me to just “Get with it”
There is a definite method in her madness, bless her. Such a wonderful and thoughtful gift. As if I could love her anymore ❤️
I purchased this camera for just £8:00GBP, damaged a few weeks back. It’s a 9mp camera from back in 2005. It was the simplest of repairs and that post can be found here: Fujifilm Finepix S9500. It’s a lovely little camera, and today we took my 11 year old nephew to Liverpool for the day, to celebrate his birthday and to do a stadium tour of his favourite team. And i took the Finepix S9500 to see if it worked, and I’m pleased with the results. I got some looks of sympathy when I pulled this one out of the rucksack, but who cares, I fixed this, and it works. Yes your big flash fandango cameras are lovely, but to be honest I’m just interested in enjoying my time out with family and getting some snaps. Here’s a selection from today. Nothing special, as I said just snaps.
This lot is being sold for PARTS / REPAIRS, it is currently NOT in a working condition
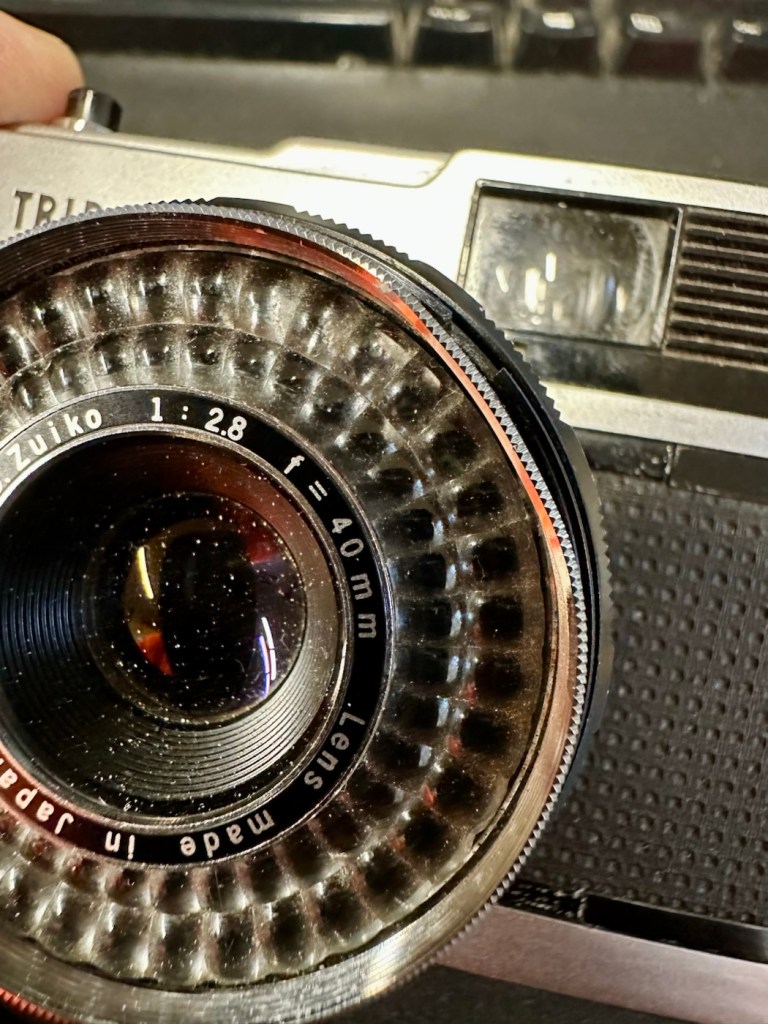
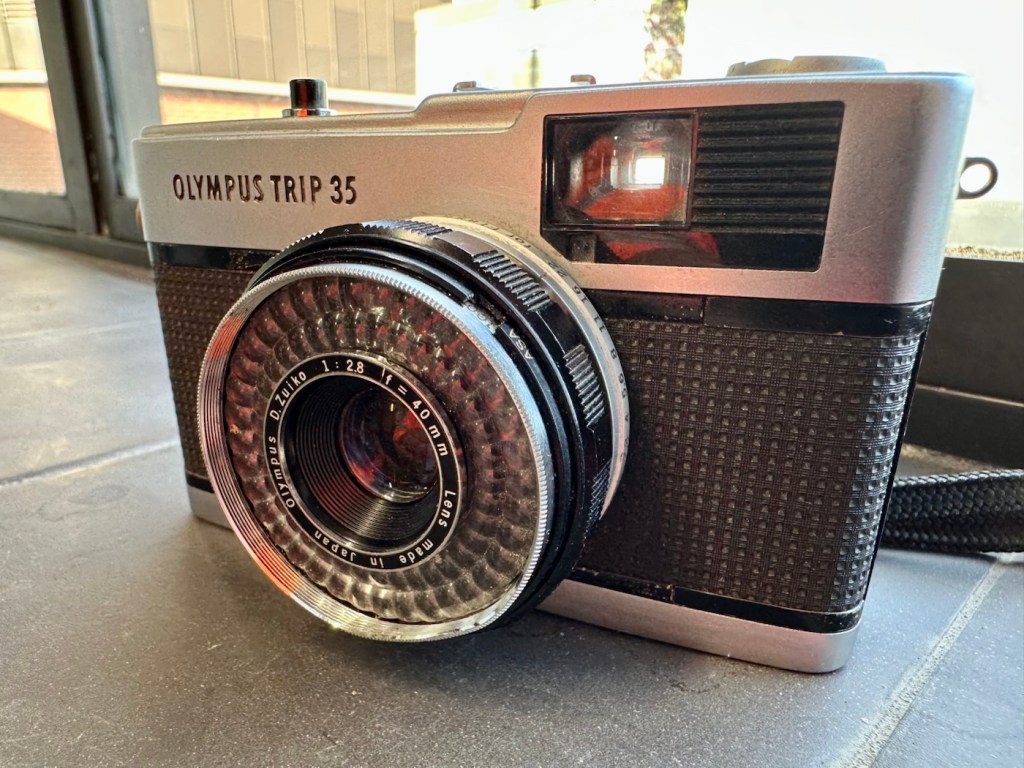
Olympus Trip 35 w/ D. Zuiko 40mm F/2.8 Lens & Original Lens Cap
EBay
Olympus trip 35
I brought this item along with a Canon A1 as a job lot. The full detail of what was in the auction and how it progressed can be found here: Not the lottery, but for me – just as good
The page regarding the repair of the A1 can be found here: (Still in draft – coming soon)
Meanwhile here is a little history about the Olympus trip:
The Olympus Trip 35 is a 35mmcompact camera, manufactured by Olympus. It was introduced in 1967 and discontinued, after a lengthy production run, in 1984. The Trip name is a reference to its intended market—people who wanted a compact, functional camera for holidays. During the 1970s, it was the subject of an advertising campaign that featured popular British photographer David Bailey. Over ten million units were sold.
The Trip 35 was a point and shoot model with a 40 mm ƒ/2.8 lens, solar-powered selenium light meter, and just two shutter speeds. In ‘A’ mode, the camera operates as a Program automatic, choosing either 1/40 s or 1/200 s. The camera could also sync with flash, and has a range of aperture settings, from ƒ/2.8 to ƒ/22. In flash sync mode, the shutter is set at 1/40 s. Apart from a simple four-position zone focus system, and an ISO setting from 25 to 400,[2]the camera has no other photographic controls. The camera has a Prontor-Compur sync connector and a hot shoe. Its lens was a coated Zuiko 40 mm ƒ/2.8, with four elements in three groups.
The camera has an ISO range of 25–400, as films faster than 400 were uncommon at the time and delivered reduced image quality. 25 speed allowed the use of Kodachrome, while 400 speed allowed use of Kodak Tri-X and similar fast materials under low light. Earlier models, from the first few years of production, have a maximum ISO speed of 200.
The use of a selenium photocell to select the shutter speeds and aperture let novices use the camera as a “point & shoot”. No batteries are needed to power the camera.
The lack of more than two shutter speeds was not a problem. At 1/200 s and ƒ/22 with 400-speed film, the camera could deliver correct exposure in full sunlight, while at 1/40 s and ƒ/2.8, correct exposure could be obtained under bright fluorescent light, without a flash.
Wikipedia
And who could ever forget the series of star studded television adverts, featuring the photographer David Bailey, put together to promote this camera.
David Bailey
I never really got to use one, I admired one from a distance instead. My brother in law, Jim had one around about the mid to late 70s and he took some fantastic snaps with it. I wasn’t into photography at that time as I was still more interested in LEGO and Tonka trucks. However he did let me try it a couple of times, it really was that easy to use.
I’m not really sure what the problem is with this one, as the listing was not really clear on its issues. I just really wish sellers would just take a few seconds to describe the problems, it really could be an instant decision for the buyer – is it repairable or not? I’ll just have to wait until it’s arrived, and then i can do an assessment of its condition.
Assessment:
Well, it’s arrived and cosmetically it looks fine. However, zoom in a tad and the issues become apparent. It’s been dropped at some time, the lens has a little bit of wobble and you can see the outer ring of the lens has an obvious dent in it.
Drop damage
It does wind so that’s a bonus. The exposure button works and it clicks as it should, and the old selenium exposure meter appears to be responding, the red flag appears in low light and thus the exposure button will not depress. This is good.
Exposure indicator in viewfinder
When you half press the exposure button you would expect to see the relevant shutter leaf aperture close down, to the corresponding f- stop reading, this occasionally happens. If you move the lens barrel slightly it does have an effect, but it looks as if there is also some contamination on one of the shutter leafs, all of this is probably as a result of that tumble that has occurred sometime in the past.
Obvious lens wobble
I will definitely have to remove the whole lens housing from the camera to see if I can do anything regarding that wobble. This is going to be quite some task, and I’m not confident I will succeed, but who knows.
Let’s attempt to get inside.
Repair:
To get into the lens there are three tiny screws on the inner turret bezel that have to be removed that sit around the edge of it. This then pulls out and the lens optics can then be unscrewed.
Here are then two more screws that allow you to remove the selenium light sensor. Below this are three brass screws that hold the body to the lens. One of these screws were loose, hence the wobbly lens, this must have occurred when it was dropped.
Removing the sensorThe three brass body screws
I’ve pretty much had a cleanup here, applied a tiny drop of camera grease to the ring mechanisms, and tightened all these screws, and now the turret is nice and tight. I’ve just given the shutter blades a wipe with a soft brush and that is all it really needs. I’ve reassessed the camera, and tested its operation and it’s all good, working just as expected.
Result:
The dent in the ring remains as it’s causing no issues and is a subtle reminder of its past. The lens issue and its movement has been repaired and this in turn has cured the issue with the sticky aperture blades.
I haven’t touched the inner workings in the top of the camera such as the light metering, as it’s working fine and what’s the point in fixing what’s not damaged?
All repaired and looking good
I’ve still to run a film through it, and this will be done shortly as I have quite a backlog of film cameras to be tested. As soon as I have photos available I will link through this posting.
Really pleased with how this has gone, a nice easy fix but I can’t believe just how small those screws are around the lens bezel. I need my eyes testing that’s for sure.
Thanks for passing by, as always it’s very much appreciated.
Not one to give up on a project I have looked at a suitable donor camera and believe I have found one as detailed below. Only difference is that I had to buy two cameras as they came as a bundle. Not a problem as I can always do a separate post on the other one, the two have cost me a total of £15:00GBP bartered down from the original price of £30:00GBP. A bargain! So let’s just call it £7:50GBP per camera.
What the listing stated:
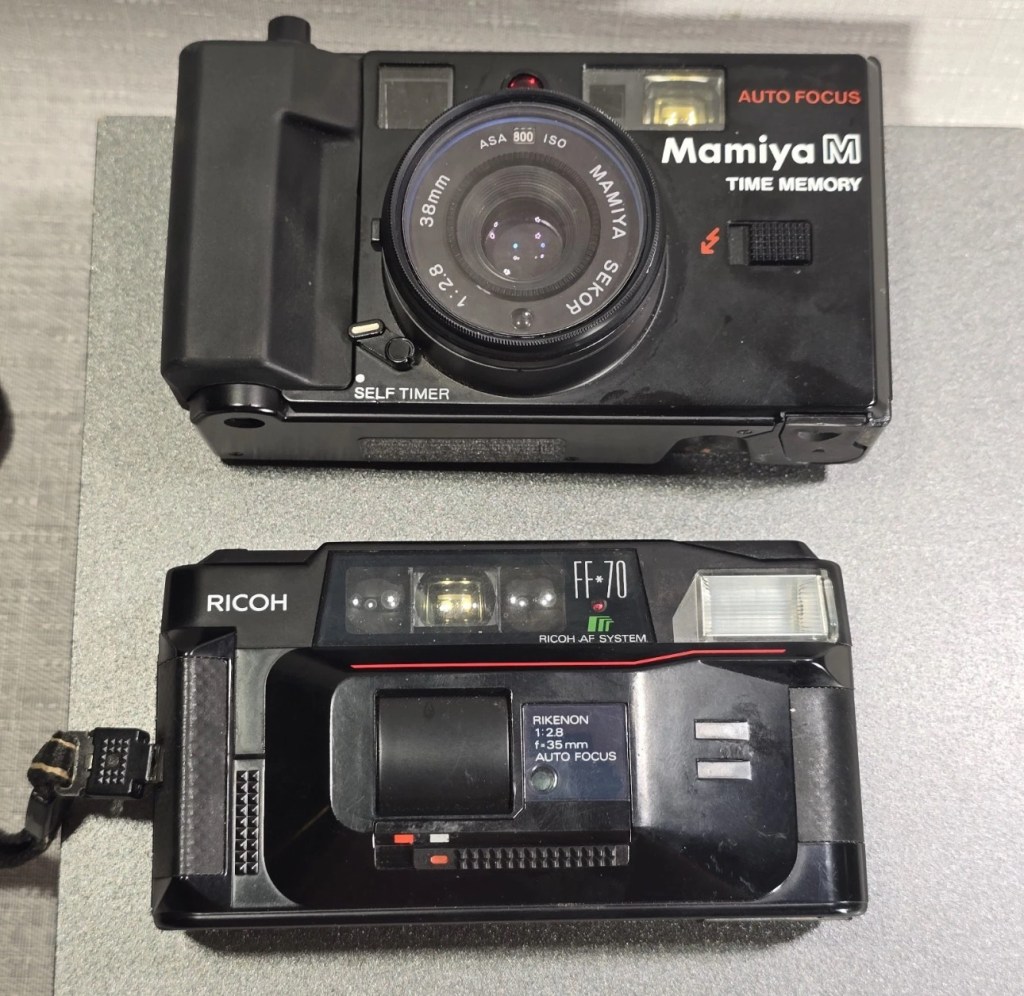
mamiya shutter button is stuck. red light on the right comes on. some external corrosion pictured
ricoh no power at all
EBay
The two cameras
Assessment:
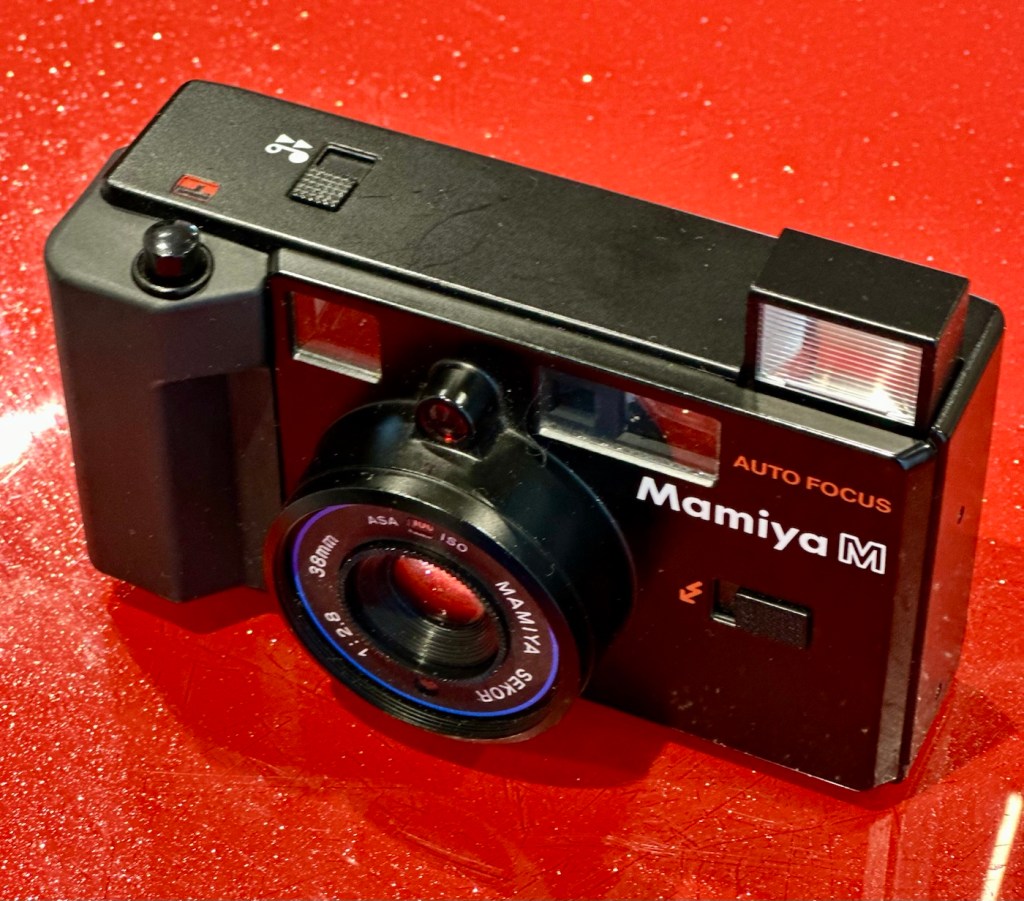
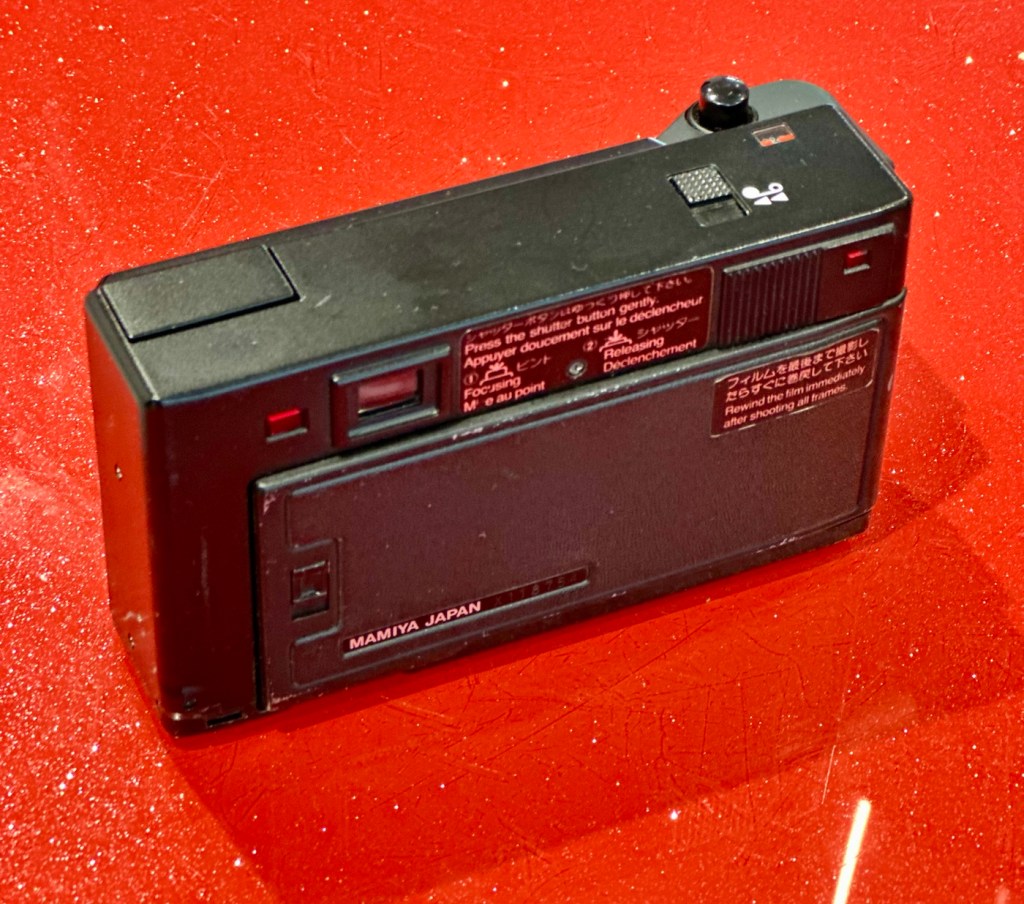
The Mamiya is in quite a poor state, and is the Time Memory version that differs very slightly from the version I originally worked on, it’s essentially the same camera as the Mamiya M, but with an added quartz dating mechanism for imprinting time and date information on the film. This model was the last 35mm camera Mamiya produced before focusing solely on medium format. However the back seems to be a bit rusty whereas mine is in excellent condition, so I will be using a mix of the two units to make the one good one.
Repair:
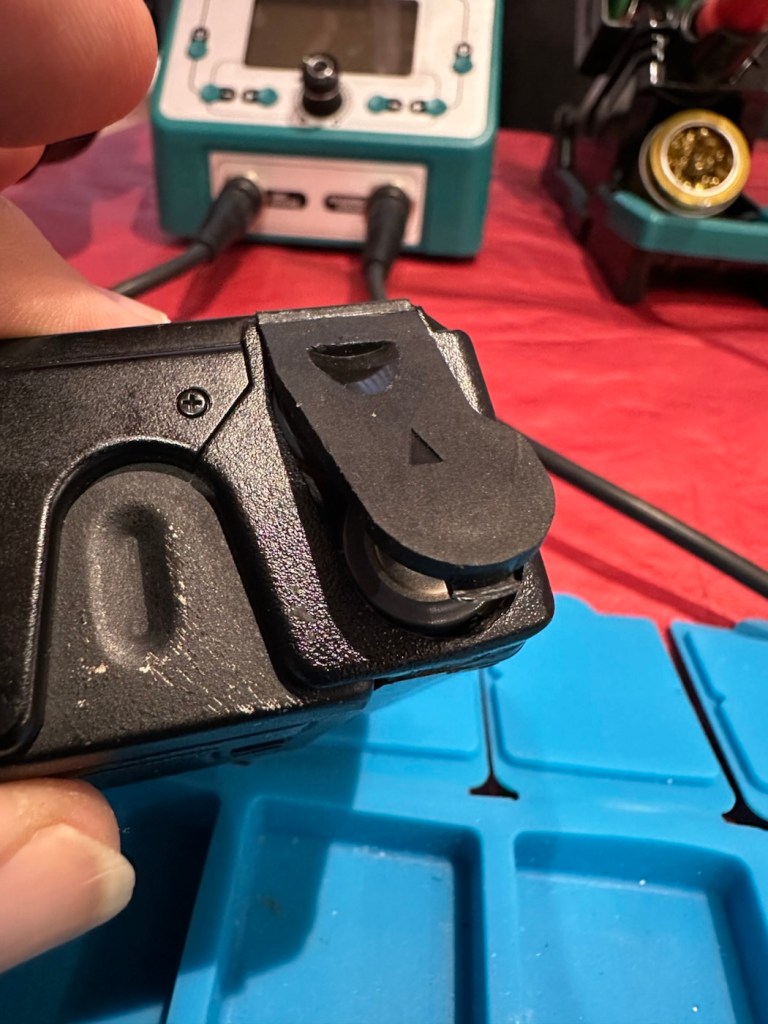
The Mamiya looks good cosmetically until you open the rear and see the rust around the door, not a problem as I won’t be using this part of the camera. The red light does not come on at all and the shutter button is stuck, that’s for sure. The whole camera is dead.
Let’s get into it.
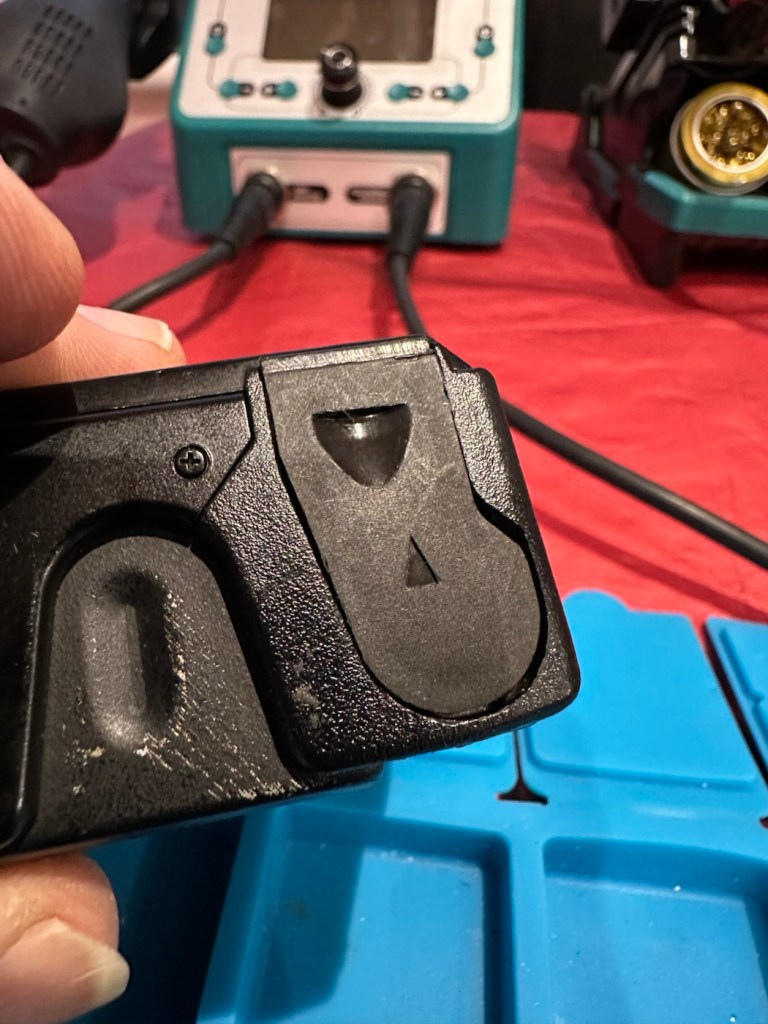
Once opened all looks ok so I decide to have a search around with the multimeter checking the basic operation. Am I getting 3 volts at the top of the battery barrel? No I’m not. It appears that one of the traces on the positive side of the power input board has lost continuity. For some reason the traces has been damaged, this could be either from corrosion or rubbing on something. The area affected is in the photo with the red ring around it.
The board top rightArea of no continuity
I’ve fixed this immediately using some solder to bridge the gap, I have checked continuity and all seems ok. I put some batteries in and the motor squeals like a banshee and then stops. You can hear the screaming motor below in the short video from its first screaming session through to its proper 80s sounding drone.
The screaming motor through to its repair
I don’t think this motor has run for years and it does not run consistently. I have sprayed it with some contact cleaner and let it soak. I have left it overnight and checked the operation in the morning and it seems to have improved.
I’ve used the original fascia, rear door, focussing beam and flash capacitor from the first failed unit, and apart from a few bits of soldering, plenty of contact cleaner and some silicone grease, I’ve revitalised a failing motor and it is now working as it should. I forgot to mention I used some graphite on the shutter leafs to “lubricate” them. All optics cleaned and camera has been tested without film and is working just fine.
View finder indications are good with light meter operational, motor rewind works, flash and exposure is fine, and the motor advances as well.
Result:
I’m really pleased with this little camera and am pleased I didn’t give up on it. It’s taken two broken cameras to make one good one, and I have a good few spare parts left over to be used at a later date.
Re assembly taking place
The unit looks so smart, the only real issue is the battery door that is notoriously flimsy and lots of references to its poor design can be found on line. A temporary way around this is just to put some tape across it to keep it closed.
That flimsy battery door
Beyond that issue, the camera is a really good looking unit that has cleaned up really well.
The completed camera
I can’t wait to run some film through it to see how it performs. I have a few cameras like this to test so I’m looking for some decent priced film to use, as i do need quite a bit.
As soon as I have some photographs availability I will link to this post accordingly.
Many thanks for following the repair, it’s always very much appreciated.


You must be logged in to post a comment.