Sony ICF-480L 3 band radio assessment and repair

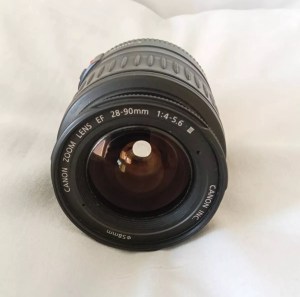
I originally posted regarding the purchase of this item in this blog post Sony ICF-480L 3 band radio

The radio was received earlier today. Cosmetically it is a bit tatty, batteries were placed into it and apart from a quick flash from the power light when it was switched on there was no sign of life. So the original description was false as it stated that it powered up with a very low volume. Oh well, not to worry, it now gives us something else to look at.

Tatty appearance

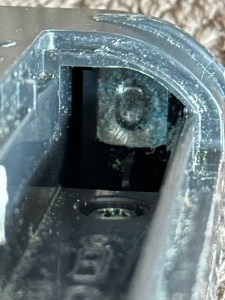
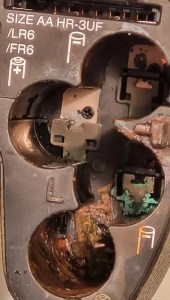
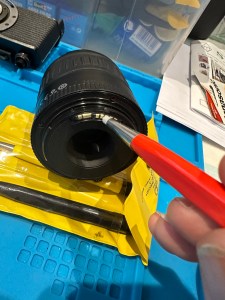
Looking in the battery compartment there looks to be corrosion, this seems to be a common problem with items I’m buying at the moment. The screws have all been tampered with so I suspect others have been inside this radio prior to my purchase, this could be interesting to see what’s already been tampered with or attempted.

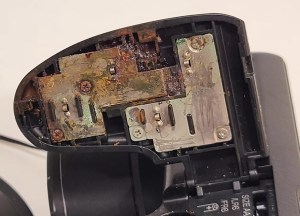
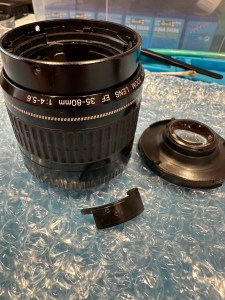
I’ve had the unit open and the first thing that comes to light is the utter filth inside. The speaker is thick with god knows what and the board and switches are also covered in the same filth. Before I do anything I’m going to get this cleaned up.

I’ve used IPA on the board and cover and on the (thankfully small) corrosion on the positive battery pole and this has cleaned up nice. I’ve used contact cleaner on all the switches and dials and these have also come up ok.

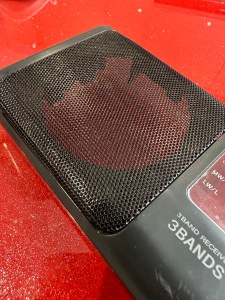
The speaker grill, I have tidied up and used permanent marker to get rid of the marks on this item. This has tidied it up really nicely.

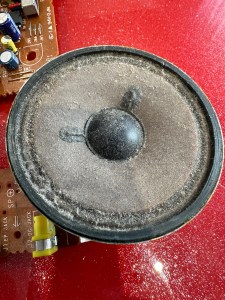
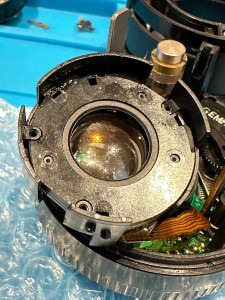
On the speaker I just used a dry cotton bud to wipe it over but I have my suspicions with this speaker, it looks quite worn and earlier reports on the lack and consistency of sound points to this being a potential issue with this unit. There are no clicks and pops when turning the unit on, there is a power and tuning light. Just no sound.

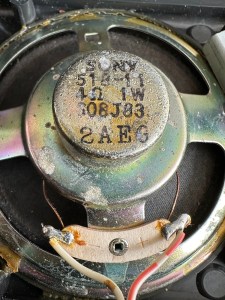
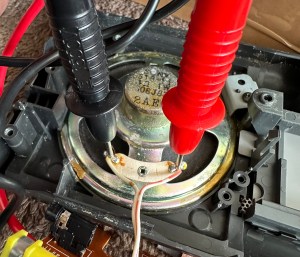
The speaker is a 4 ohm 1w speaker, I’ve used a multimeter to check its operation and it’s showing as dead, not registering at all, it should be looking at indicating something within its 4 ohm range. I’ve double checked it by putting a battery across the terminals and there are no pops or clicks so this confirms things. I now need to source a new speaker.

Trying to source this speaker in the uk is a tad problematic. There are items available but I’m not paying out two to three times the value of the whole unit. I’m going to try some thrift shops to see if there are any suitable donor units available if not I’ll have to purchase a few of them from China, and that will still be cheaper than purchasing here in the UK, crazy isn’t it? But it’s a long wait….

I did manage to get one from the Uk. Paid about £5.18GBP and it should be here in a couple of days. The annoying thing is that the postage is almost the same cost as the actual speaker and that only cost £2.69GBP. Annoying though that is, it has to be done if we want to get this fixed.

I couldn’t get a 1w 4 ohm speaker only a 1w 8 ohm speaker, this will be fine as at this level of use it will not affect output at all.

A small bit of desoldering, removal of the speaker clamp and the speaker comes away after a little persuasion. I take the opportunity to clean the board and all the battery contacts with some cleaner, and all corrosion marks and debris are now a thing of the past.

Corrosion cleaned

I put some contact adhesive on the speaker grill and put the new speaker in place, clamp is attached and I now solder the speaker wires back in place.

All screws back in place, new batteries in the rear and battery hat hatch closed, the unit looks good.

But does it work?

Radio works – have a listen

You betcha! Have a listen to the short video above to hear it as it should be.

I’m very pleased with this little project. Simple repair in the end but in my eyes it’s another item that isn’t going to landfill. And that’s a win for me, as it’s a nice little radio and I’m going to get some good use out of this.

Jobs a good ‘un 👍

Fuji Finepix S1500

Why do I do it?

Serious battery damage

EBay listing

I like a challenge like most people. But this listing note above should have put me off, but no, I have the equipment, I have the time but do I have the patience to see this repair through. The guy wanted more than I was prepared to pay for such a camera, I got him down to less than a quarter of his original asking price paying just £6 gbp for this camera. Hopefully if it all goes bottoms up I’ll at least have some spares that can be used, if the corrosion has got to the circuitry it might be a different story.

Fuji Finepix S1500

On the market in 2009 this camera was amongst the digital assault from the far east that earned the title of being a “Bridge Camera”. Unfortunately this was not one of the better versions but however was well received by the casual snap shot photographer. I had one back in the day and that was my introduction to digital photography. This particular camera will go to a young family member who is getting into photography, if I can get it working.

The plan with this one is to get it open and do a full review on just how deep the “serious battery damage” goes. I’m not too hopeful, but sometimes luck does go your way.

Keep an eye out for updates when it is received and the work I will be doing to restore it to working order.

Thanks for passing by.

Canon EF lens 28-90mm

As the listing stated:

Canon EF 28-90mm Lens Working Then Produces Err99. Reduced to sell at a bargain price will be easy fix

EBay
Canon EF lens 28-90mm

The dreaded err99. It’s a general error code that seems to annoy many Canon owners, and can be a simple fix or a tedious one. I wonder what it will be for me? I’ve seen a good article on Improve Photography’s website that explains some of the steps that can be taken to remedy this error, you can read that article HERE.

I now have the lens in front of me so here is what I can see. Overall the lens is in good order for its age and mounts to the camera ok. All manual focus and zoom works and the lens is clean with no sign of fungus or haze so I’m happy with that. I’m still waiting for the camera battery to arrive so I can’t really comment yet on the error code. I’m not cleaning anything just yet as I want to see for myself if the error shows on one of my cameras, if it does then i’ll start the process of cleaning the contacts which is what I would of attempted first off.

The battery has now arrived and I have now commenced further testing. I have placed it into auto mode and all seems well. I have tried the lens in 4 different camera bodies and have had no sign of the Err99 error code. The only issue I have noticed that may not be contributed to the lens is that when connected to an Eos5 body there is a fair drop in battery power. Again this has been noted in the past as something than can be connected to dirty contacts on the lens, so as a precautionary measure I shall be using some IPA and a fibre glass scratch pen to clean those up.

Using a fibre glass scratch pen

I’m unable to recreate the advertised fault as everything about this lens is working fine as far as I can see. I’m going to wrap this one up as complete now.

I’ve really enjoyed working on these two cheap damaged lenses that I originally purchased just to test my old SLR kit. They are now both working fine and i believe the invested effort shows in the end result.

I am extremely happy.

Thanks for passing by.

Something to be getting on with..

The batch of cameras I purchased the other day, all old SLRs / DSLRs have now arrived… with a bonus.

I was expecting 10 cameras but I’ve trumped that with 12 and a lot of spares as well. The guy I purchased the Nikons from has thrown in two more D70 as spares, with loads more spare parts. He was having a clear out so I guess he’s funneled that stock my way…thanks old chap.

So I have received today

  • One Canon 5 SLR – stuck mirror, missing some small Connection covers and like a lot of these old cameras has a sticky rubber covering that was well known back In the day.
  • One Canon EOS 50E – damaged curtain, faulty lock and again sticky.
  • One Canon EOS 1000F – cosmetically sound no other visible issues.
  • One Canon EOS Elan 2 – cosmetically sound, just sticky.
  • Two Nikon D70S DSLR – missing battery covers and some other small accessory covers, both sticky.
  • Six Nikon D70 DSLR – all missing battery covers, or other accessory covers, one missing a CF card reader and all sticky.
  • And two sizeable bags of D70/D70s spares
And then there were 12

I’ll be starting with a good clean to get rid of that stickiness and then I’ll power each up individually to see what other issues lie in wait. I’m hopeful I can get most of them up and running, I’m confident that the majority of the DSLRs will be repairable.

I’ll feature the repairs once I’m in a position to donate the time to them. I’m a busy boy at the moment what with work and the wife’s growing list of things that need doing around the house.

Canon EF lens 35-80mm

As the listing stated:

Needs opening cleaning and fixing sounds like something loose so selling as a repair project cheap.

EBay
Canon EF lens 35-80mm

No error code so in theory this should be an easier fix, however the fact that something is moving about inside tells me there could be more wrong with it than expected.

I now have the lens in front of me so here is what I can see.

Shake rattle and roll

Well, it certainly does rattle, something quite significant is moving about inside. When Connected to a camera you can’t focus or zoom so something in there is restricting movement. There is also fungus on the lens so this one will need to be carefully dismantled and cleaned throughout.

About 10 small screws later I am into the internal parts of the lens and the cause of all the rattling becomes apparent. A piece of the internal zoom mechanism has broken off stopping the zoom from smoothly operating through its range.

The piece that was broken

The part of the barrel that the item had snapped off was broken due to forceful action with the previous owner. There are two options here, junk the lens or see if it can be saved, I went for the latter. I mixed some epoxy resin and fixed the piece back into place also gluing it to a part of the mechanism that was not liable to hinder future movements. I left this for a couple of hours to cure.

Whilst waiting for the glue to cure I used a mixture of water and hydrogen peroxide to clean all the lens elements. I thoroughly dried them and gave a quick polish and reassembled them into the casing. The glue was dry now so I was careful to reassemble the lens not damaging any ribbon cables or contacts along the way. The lens looks lovely and clear of any fungus now.

I’ve put the lens onto a test camera and it’s fantastic. I couldn’t get focus when I unpacked the lens but now I have the full range of action and a lovely clean working lens for very little outlay and probably just 2 to 3 hrs of maintenance. Well worth it in my opinion. I wanted a good cheap lens to test my old stock and I now have one that I can easily sell on at some point, on top of that I’ve learnt a lot from working on one of these lenses. I’m certainly going to attempt working on more in the future.

Perfectly good working lens

Thanks for passing by. Always appreciated.

Bilora Radix 56

In my search for the unusual have come across this fine specimen that I have purchased for less than the price of a fish and chip dinner.

Remember the battle between manufacturers back in the days of Betamax and VHS? Well this is the film makers battle between Agfa and Kodak, with Kodaks 35mm winning out. The Agfa cassette (known as Karat) was 35mm without the spool and you needed two cassettes to use these cameras. I have one here and hope to be able to use it at sometime.

I like this example as the metal is not too pitted. There is rust but I can work on this, the covers are damaged but this can be replaced. I might go for a totally over the top refurbishment or may keep it as close to original as possible. I’ll make that decision once I can check the optics and shutter.

You can find out more about these cameras at the following link: Camera wiki .org

Thanks for passing by, always appreciated 👍

Halina A1 Reflex rear door repair and new light seal

Just a couple of little jobs tonight.

The loose hinge on the rear door has tonight had a two part epoxy resin glue put on it and is clamped for the next two hours to ensure it is sufficiently secured for usage. Fingers crossed this should work.

Door hinge repair

Also the original light seal on this camera was simply string. It was black originally but seeing I have no black available and in the interest of recycling what I already have I have replaced, in keeping with the original design like for like. Yep it’s red but it’s not going to be seen anyway, is more than up to the job and the new skin will have red on it anyway so it will be complimentary in that aspect of the renewal.

I don’t have anymore to do tonight, if this all works out well and the hinge is sufficiently strong enough then I can start reskinning and reassembly.

Thanks for popping by, always appreciated 👍

Halina A1 Reflex fungus clean

So tonight I have brought my smallest set of screwdrivers and other tools in to work to continue work on the old Halina project I have been immersed in. Tonight between jobs I intend to deal with the fungus issue on the taking lens.

I have previously removed the camera faceplate and the two lenses are connected to this. On the rear of the faceplate is a brass connector that when removed allows you into the back of the taking lens into the shutter curtain and aperture curtain.

This allowed me to dry clean as such both curtains and I used a little graphite dust (tiny tiny proportion) to lubricate both curtains and finally after many years allowing the shutter to work as it should. A good blow with some compressed air dealt with any remaining dust.

With the setting on “B” I was able to access the lens element in front of the curtain, this was cleaned with a 50/50 mix of peroxide and distilled water to remove the offending fungus. I allowed this to dry and lightly polished the element with a cotton bud when dried. Again compressed air was used to finish.

I repeated the above for the other two elements of the lens (this is a three element lens) and then did the same with the viewing lens.

When reassembling it’s important to ensure the elements are fully dry. The elements were all wiped over before reassembly and given a last blow prior to being resealed and checked with a bright light.

Fungus removed from Halina A1 Reflex

This was the job I was most concerned with but thankfully it went well and I am pleased with the outcome. The fungus issue has now been eradicated and hopefully it will stay away. Just a couple of little jobs to do now prior to reassembly of the camera and we can then put the new leatherette on the body.

Thanks for passing by, always appreciated 👍

Minolta Dynax 5000i

Found this on my doorstep when I arrived home from work today. After making some enquiries it transpires that a family member donated it to me as they haven’t used it in about 20 yrs. Knowing that I mess with cameras at the cheaper end of the spectrum he thought that I may find a use for it. I have gratefully accepted this gift.

After speaking with the donor he doesn’t remember there being any issues with it, he wasn’t aware there is already a film in it so I will process this for him and see what if anything comes of it.

This camera was circa 1989 and was a strange beast in that the programmable modes we take for granted on SLR cameras today, had to be purchased as individual plug in cards for this camera. I guess was kind of like VHS versus Betamax back in the day and as things developed in the market I guess Minolta put this idea back to bed as a non starter.

This camera looks in great condition apart from wear and tear dust/dirt and initial checks of the lens show no evidence of fungal damage, the camera does not have that musty smell associated with age so I can only presume it has been stored correctly.

These cameras also work off a 6v lithium battery the 2CR5. Still available it retails for around £6-8 gbp. Again Minolta could have used a rechargeable but this was probably just at the beginning of that technology becoming widely available.

2CR5 6v Lithium battery

Information regarding this camera can be found here Minolta Dynax 5000i courtesy of Camerawiki.org

So, apparently these cameras are popular in the Lomography world. I’m going to give it a good clean/overhaul get a new battery and run a film through it to test. Not a lot to do so hopefully I’ll fit it in somewhere along the line soon. Keep checking back to see how things progress.

Thanks for passing by, always appreciated 👍

Olympus 35 ECR – complete

I have processed the roll of Kentmere 100 at home today, it’s currently drying in the shower and I’m really pleased with what I’ve seen so far. The carriage of the camera is working well with even spacing, exposures look promising and no sign of fogging proving the new light seals are good.

I’m yet to run the negatives through the scanner, still waiting for them to dry but when they do I will post a gallery here. Gallery – Olympus 35 ECR trial roll

The camera in my eyes is now in good working condition, all that I did with it has proven beneficial and I’m adding this into my personal collection.

Olympus 35ECR now in storage

I’ve now packed it in a bag with all the air extracted and a couple of silica bags to stop any potential moisture. I do this to all the cameras I store for their protection and to save me having to go through the whole process of maintaining them again.

I’ve enjoyed this little project and am now happy to say….

Job done 👍