Give me a radio any day. But I’m a sucker for useless information
How do you manage screen time for yourself?
To be quite honest, in this activity, despite all my good intentions, my management of screen time is sadly, quite poor.
I’ve probably mentioned many times in the past that I do not watch a great deal of television. The occasional football game, the news and maybe a documentary or two is about all I care to watch, in total hourly intake, it’s probably no more than a few hours a week. I have always been more of a radio person, I’d sooner have a radio on as a background accompaniment, I’m an audiophile before being a videophile that’s for true.
But, my downfall is a thirst for knowledge, or useless information, which ever way you look at it. This little box of tricks that masquerades as a telephone, currently in my mits, being frantically typed into with squinted vision is my downfall.
I do a lot of research for a number of reasons, study, hobbies etc, but I’m easily distracted, too easily distracted in many cases. If something funny or humorous pops up, I’m hooked like a big game fish on a long line, and I’m fighting all the way.
The whole social media thing doesn’t really get me excited in any way, apart from WordPress maybe, or an occasional foray into YouTube, I really don’t do the social media thing. Why’s that? You ask, it’s bloody toxic I tell ya, and to be honest I can find enough drama within my own family structure without getting involved in anyone else’s, and to be truthful, blatant nastiness just isn’t my thing. I like to think I operate at a much higher level of respect and kindness than what I witness in those turgid cesspools of nastiness.
We’ve tried all kinds of house hold bans on the phones such as banning them from the bedroom, these work for a while and then they gradually start to creep back in again so we simply just give up.
I guess like it or not it’s here to stay and we have all become totally engrossed with the modern technology readily available in our pockets.
I don’t think, as I suspect is the case with a lot of people, that we manage screen time well at all. It seems to me that screen time is managing us, and we’re all in just a little too deep to be able to come up for air.
If you want control it then you need to take control of it, and be stubborn and harsh and direct, with firm actions to control it. Once you’re hooked though, it’s goodnight Vienna, no amount of stubbornness is going to help you back up.
And on that note, have a wonderful day. (Whilst reading this on your phone, tablet or whatever – see, you’re already fighting a losing battle)
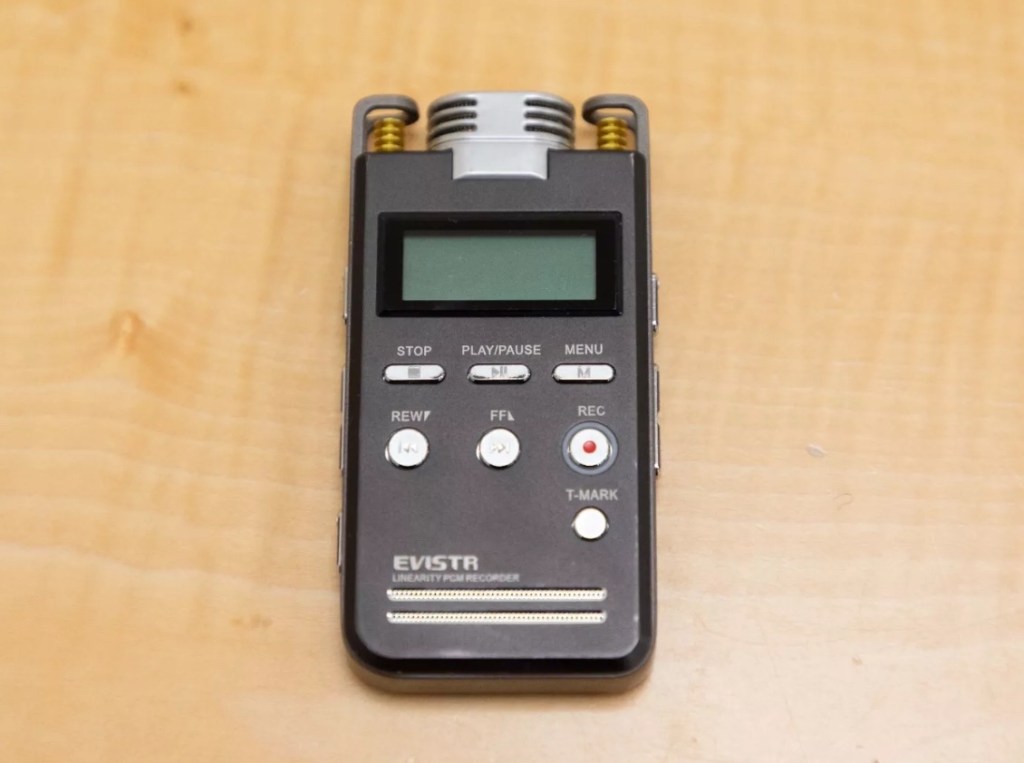
Evistr L53 voice recorder – not working, parts only
EBay
It’s not working
I just wish the listings would be more specific, it’s not working because, (Fill blank spaces) you get my drift eh?
The unit looks good physically and cosmetically, and seems to have been well looked after, we just don’t know exactly what’s wrong with it. I’ll do some digging around and see if there are any generic problems, and I’ll also dig out some instructions just in case. It’s another one of those purchases where the cost of the item £2:24GBP has been out weighed by the postage, £2:45GBP however a total outlay of £4:69GBP isn’t all that bad in reality.
Why would you pay more for a used one?
Current prices are in the £30-40GBP bracket. why you’d pay more for a used item confuses me, but then I’m usually easily confused.
I’ve downloaded some instructions, so we can hit the road running with some basic idea of how it works.
Let’s wait for it to arrive and then we can do an assessment.
Assessment:
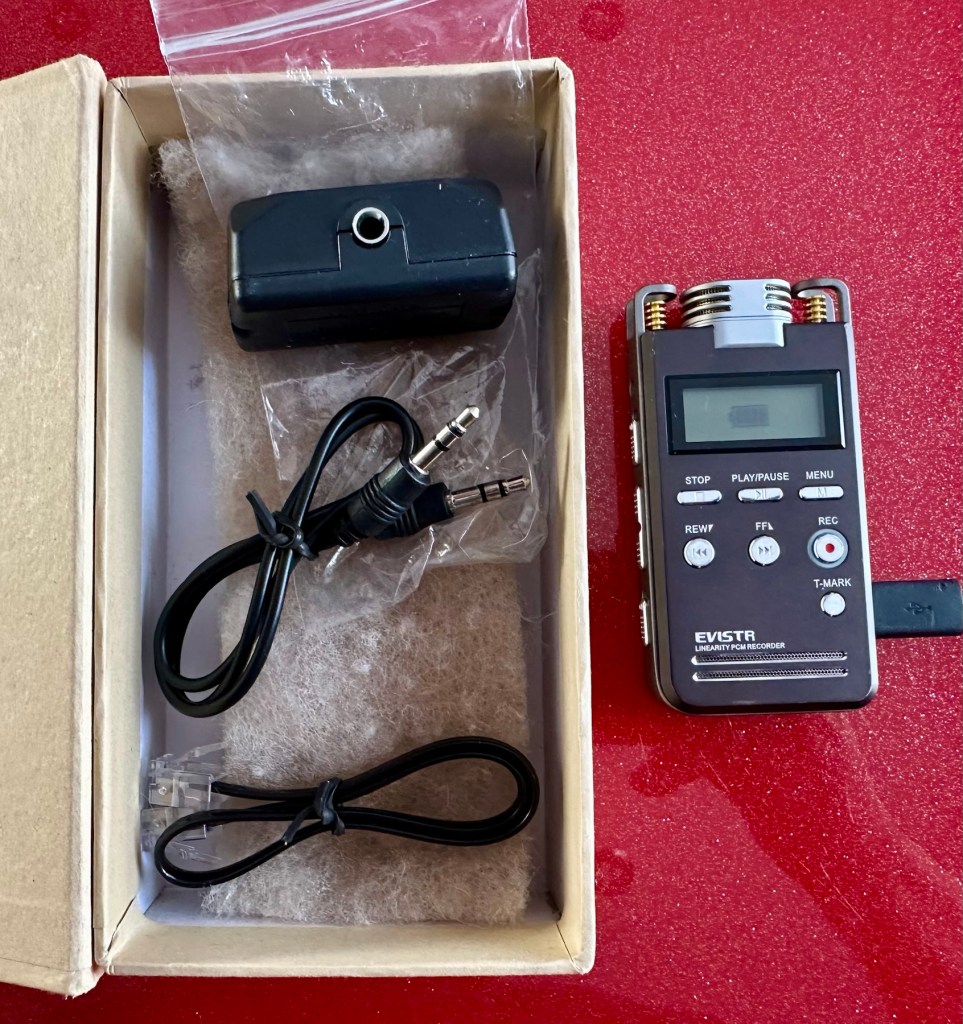
Well, the box you see in the picture above, was just wrapped in some white A4 paper and put in the post. By the time it’s reached me the wrapping was split and the box hanging out. We are off to a flying start. It’s not the original box as that is for a 16GB version and this is an 8GB version, again no problem but probably used by the seller to beef up the offer.
The unit itself is quite smart looking, clean and generally free from any heavy marks with only light scuffs that you would expect after a few years of use.
It came with an audio connector, and some other bits that allow you to connect it to a phone system to record conversations.
The package as it arrivedOn charge
The unit is dead and didn’t come with a micro usb charging cable, however again not a problem as I have plenty of these laying around. I’ve checked the charging port and I’m pleased to say it is in a good state and has no damage. So the first thing to do is to get some charge into the unit as the battery has probably been sitting dormant for quite a while. It was totally dead on arrival.
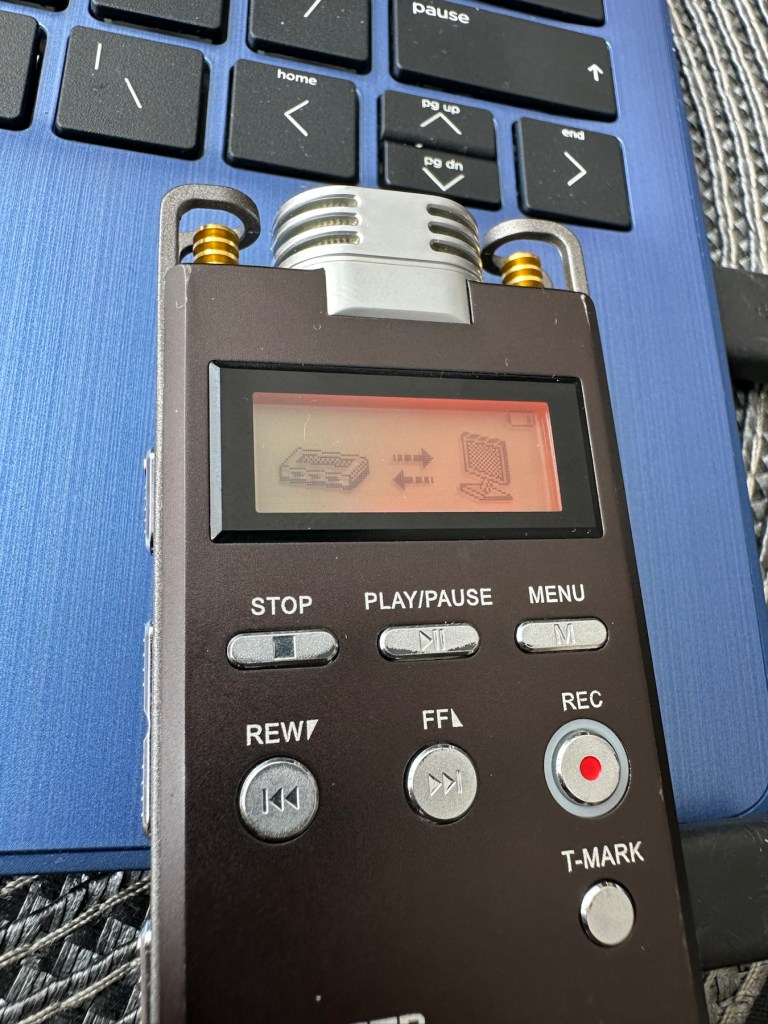
After a while I have turned it on to see if the charge is being taken and was greeted by this message, not one that I was expecting or one that I really wanted to see to be honest.
Disk Error
Disk Error. My immediate thought is that this is no longer recoverable, however, looking at known faults on their own site I might be able to recover the disk by using a Windows computer to access the disk. I’ll look at that option in the repair section of this post.
Security seal intact
One thing I’m happy with is that the security tag on the back that covers the screw that allows access within, is still intact. I’m confident no one has yet accessed this unit internally. One less thing to worry about.
So realistically it’s a nice neat package in a very good cosmetic condition. It’s only problem that I can see at this very moment is the “Disk Error” issue.
Repair:
So let’s get this unit plugged in and see what we can do. It is really the only issue we have with this unit.
On my computer we have issues though. It’s a windows 11 machine and when plugged in, all the right sounds are made however nothing is recognised. Apparently the drivers for this unit are not supported on this windows system. It can’t see the drive. Damn that’s a problem.
My system Does all the right stuff but unrecognised
Ok. I’ve had my thinking head on and just had a brainstorm. My brother in law over the road is notorious for not updating stuff. I called him and asked if he’d brought his new computer yet that he keeps threatening to buy and he says, “No, I haven’t Dave“. “Excellent” i tell him, get it warmed up as I’m coming over to use it.
I arrive at his house and he is curious as to what I want to do, I’m always going on at him to update and make his old computer safer, I keep telling him to upgrade it, and here I am asking to use it!
It’s a Windows 10 machine, slow is an understatement but he only uses it for casual browsing to be honest. I plug the cable in and then the recorder, I get a battery charging symbol and that is it. Hmmm.
Another brainstorm, I realise I’m using a charger only USB to micro usb cable instead of a data capable one. Another quick run back to my property and I take back a selection of cables. One of them worked, the drive was recognised and I was able to format the drive but I did it as Fat32. It worked to wipe the drive but I could not get the drive to boot up again without still showing a Disk Error message.
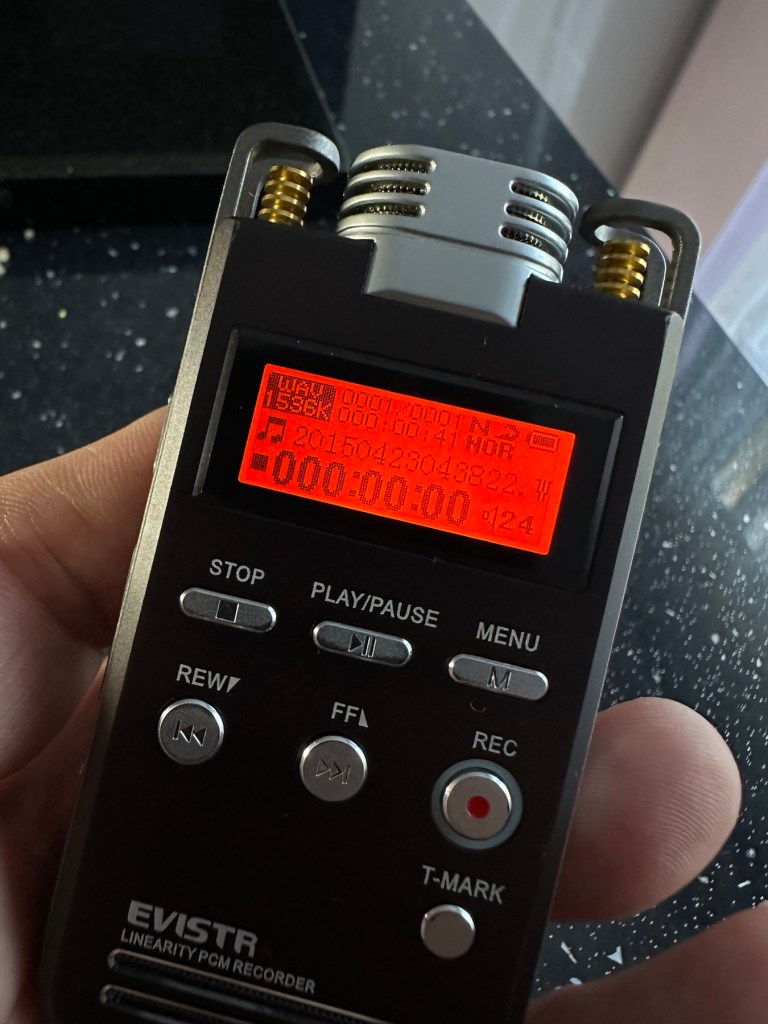
Disappointed I came home, I wasn’t giving up though. I dug out some other data cables from one of my old radio boxes and put it to my computer again, the drive didn’t show on the windows 11 system but it did something to allow me to be able to access the settings via the menu on the unit. I was able to go into settings and format the unit just as it should be via the units firmware.
No Voice recordsHere we go, persistence pays off
After the format it indicated there were no voice records available, this was something I hadn’t seen before, we were finally getting somewhere.
It works, just have a look at the video below
All working
There are a lot of settings to play with in the unit. However the recording quality is superb if I say so myself, it’s so clear and balanced. The unit is now fully restored and working just perfectly. Add to that the fact that is cosmetically beautiful we now have a perfectly usable unit.
Result:
Working as well as the day it was purchased, this is probably the best £4:69GBP I have ever spent. A lovely unit, looks good, fits in the pocket nicely and has years of use ahead of it.
A cracking little device
I’ve really enjoyed this little project, it’s been a right challenge and I was determined not to give up on it. I was glad that I persisted and got it working again.
I wonder how many of these units, or those very similar to it have just been thrown to waste, when they were in fact very repairable. Well this one has been saved, and will be usable for many more years to come yet. (And I now know how to fix it, if it ever does break again😂)
Thanks for passing by. Always very much appreciated.
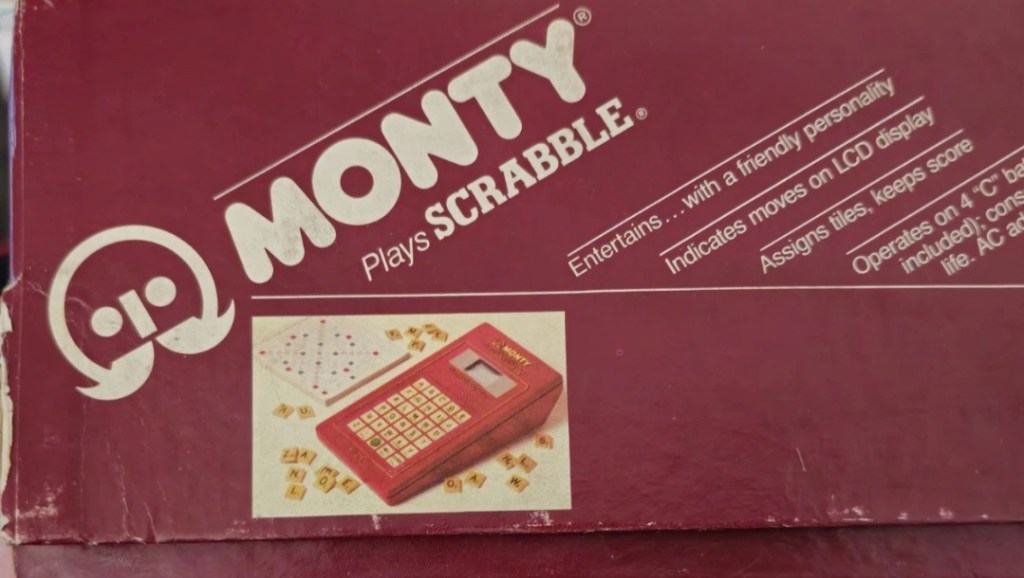
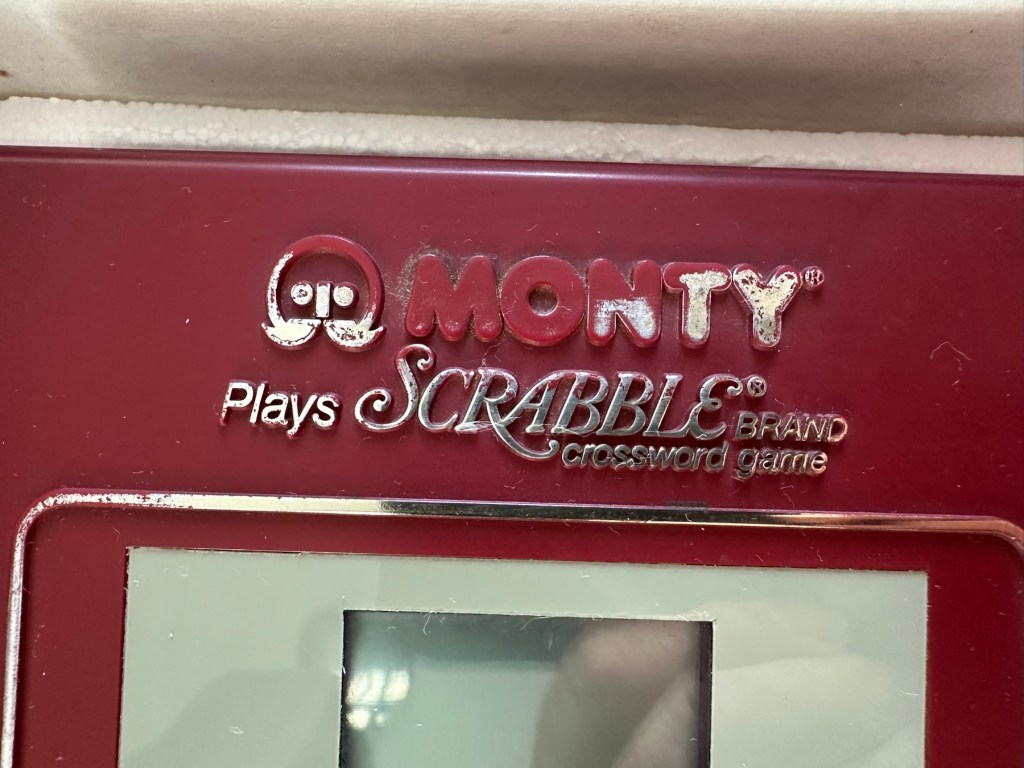
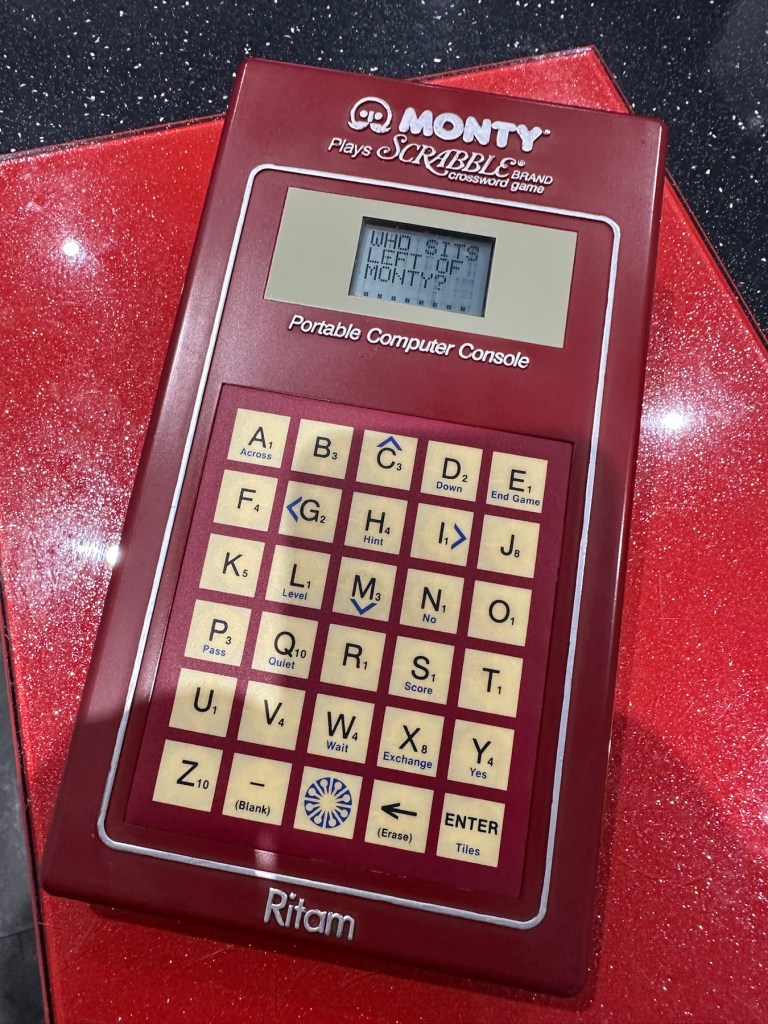
The product is a vintage Scrabble game titled “Monty Plays Scrabble,” released in 1984. It is a rare find and comes in its original boxed packaging. The game is a portable computer console version of the classic Scrabble game, making it unique and collectible. Please note that the functionality of the game is untested.
EBay
Why did i buy? I don’t know, maybe because its from 1984 and fits my modus operandi. To be truthful i looked at it, saw the wear and tear on it and thought to myself that i can make it look better. It also states it’s a rare find….its not. In good old EBay style its “Untested” which probably means they have put some batteries in, it doesn’t work, so let us use the get out clause of selling it as untested. I could however be very wrong, and just be using unnecessary sarcastic commentary, i suspect it’s very much the latter.
And it has a battery cover. Splendid
Here’s a little history:
Manufactured by Ritam Corp, under licence from J.W Spear and sons PLC 1984
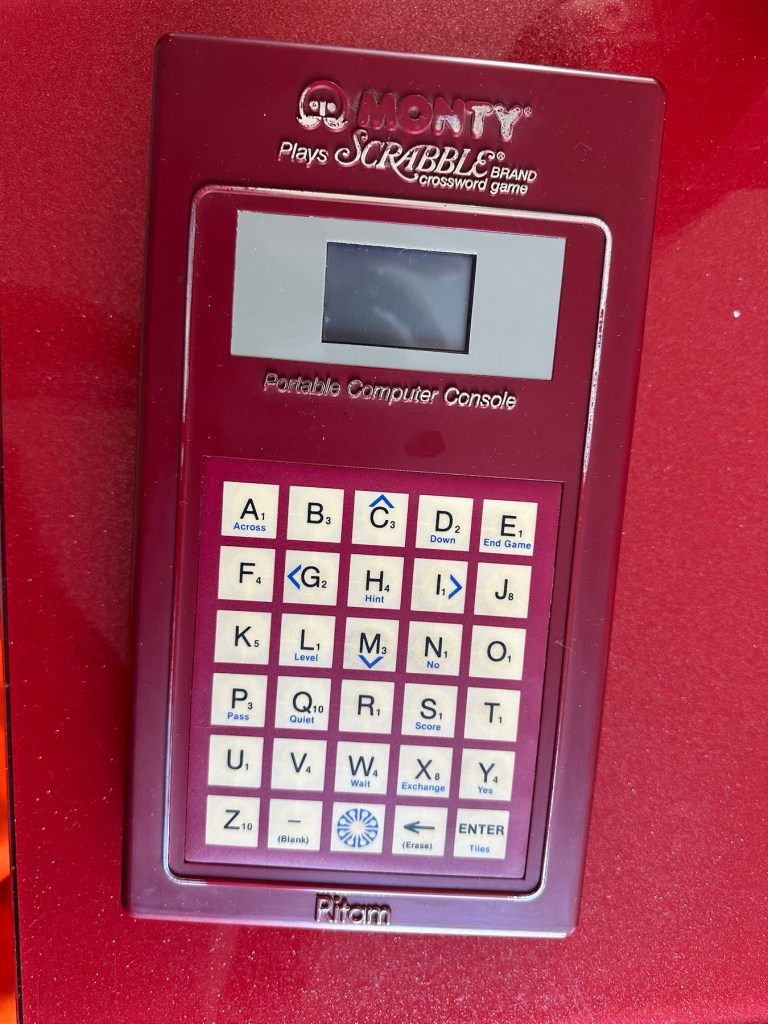
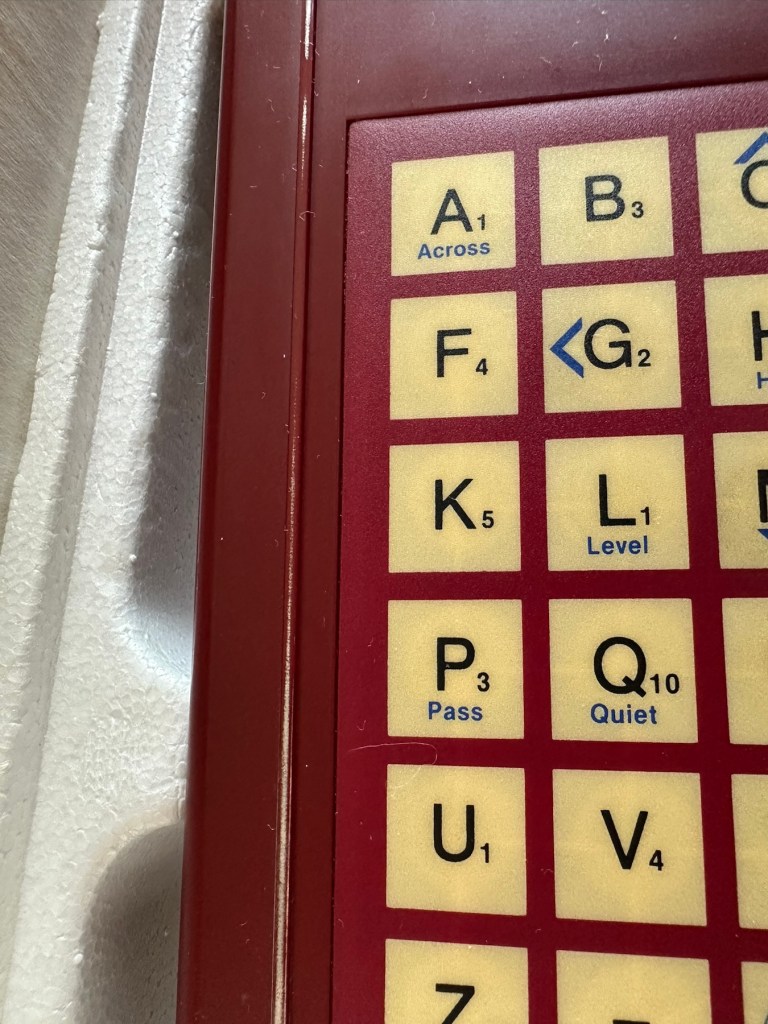
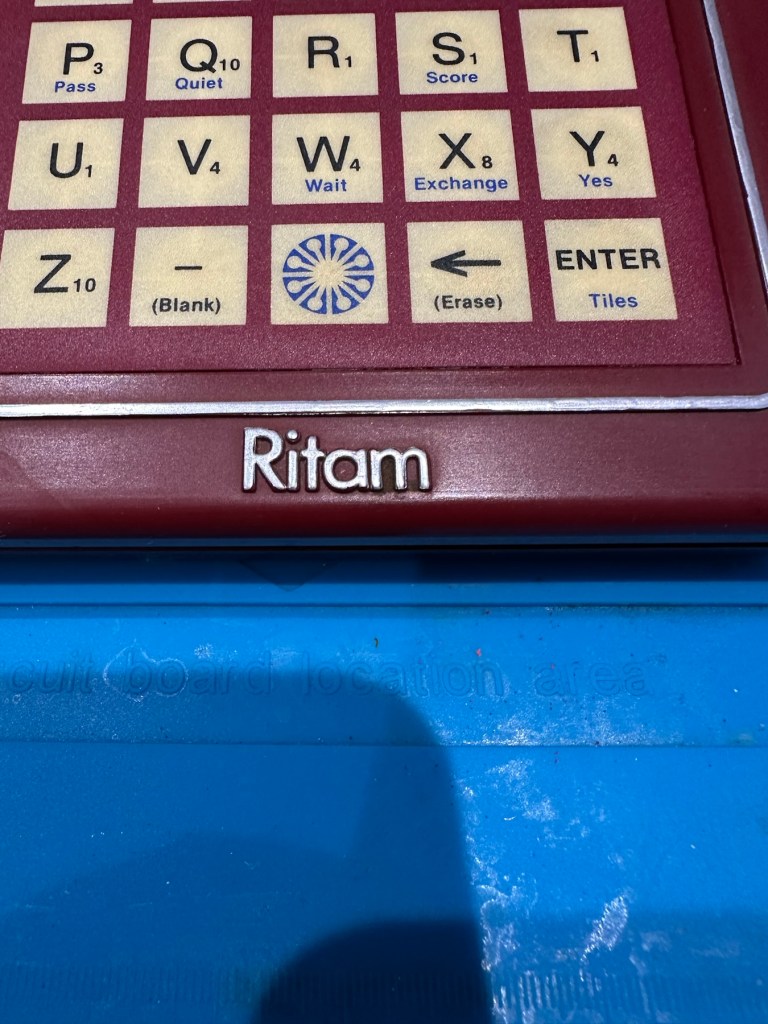
A portable electronic device that plays a competent game of Scrabble. Up to three players may challenge the device. Each player enters one’s own name and subsequently the turn order in which they will play. The players can decide to draw their own tiles or let the device do the randomizing. If the device assigns the tiles, the players may ask the device to suggest a play by using the “Hint” option.
Players keep track of the gameboard using the paper pad provided or use their own gameboard. The device has a LCD readout that is only eight characters by four characters and cannot display the entire board. Players use the arrow keys of the membrane keyboard to scroll around.
All standard Scrabble rules apply. The device will challenge any word played that is not in its 12,000 word vocabulary. The human player is final arbiter however.
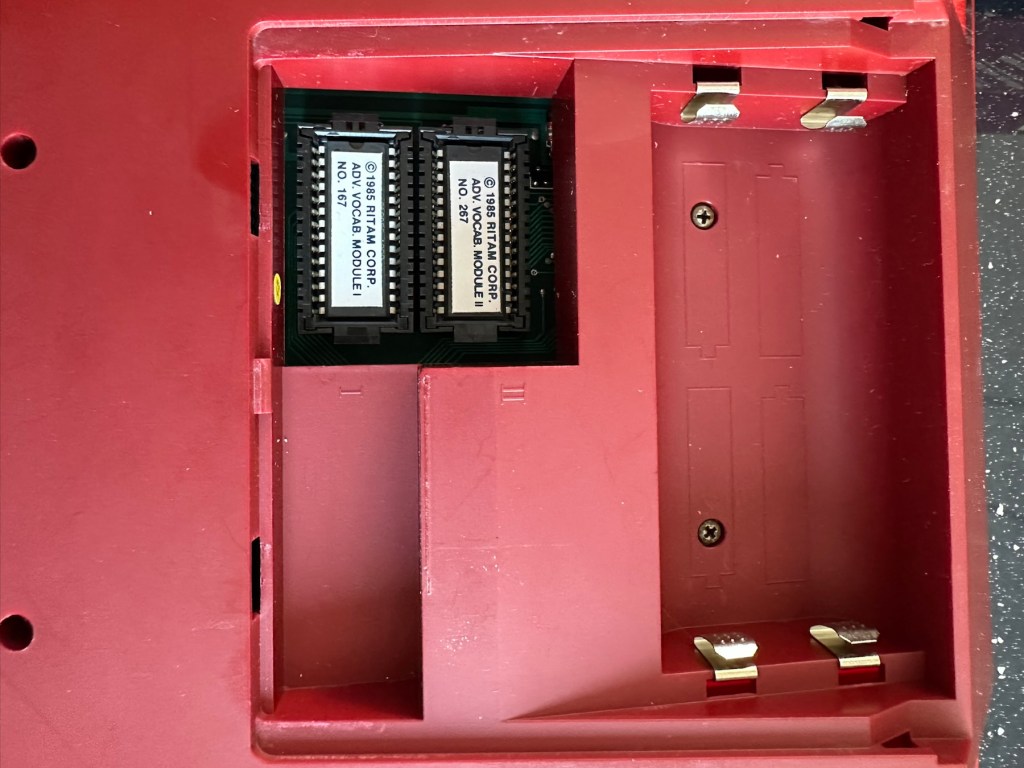
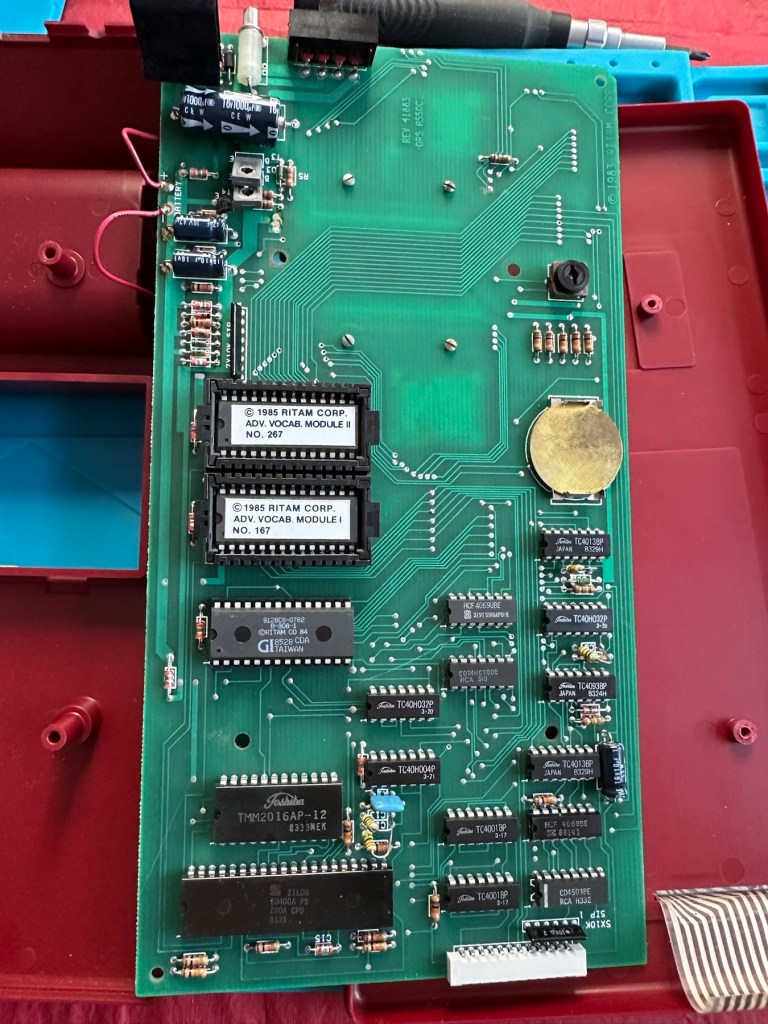
The device is powered by four “C” batteries or an AC adapter. Two Advanced Vocabulary Modules were available. Each module added 16,000 words to the machine’s vocabulary to bring the total to 44,000.
Boardgamesgeek.com
And I’m fortunate to have those two advanced vocabulary modules already installed, so this unit has the full vocabulary range of 44000 words. Lucky me. Apparently the unit is able to do 2 million calculations a second, but can take up to 3 minutes to make a move! With a vocabulary built in of 12,000 words that must mean it does a lot of questioning of itself prior to making a decision. I love a computer system that constantly doubts itself, it’s such a human trait.
Anyway, what’s arrived and how does it look. And is it working?
Assessment:
The parcel has arrived and been unpacked.
Fully boxed All original packaging The unit in its boxFront of unitRear of unit
On taking the unit from the box there is no damage cosmetically, the keyboard is a bit dirty and the silver lettering and edging has worn a little.
Silver lettering and edging worn away
Great news is that the battery contacts are in a perfectly clean condition with no sign of corrosion
Super clean and the two extra vocabulary modulesBatteries added
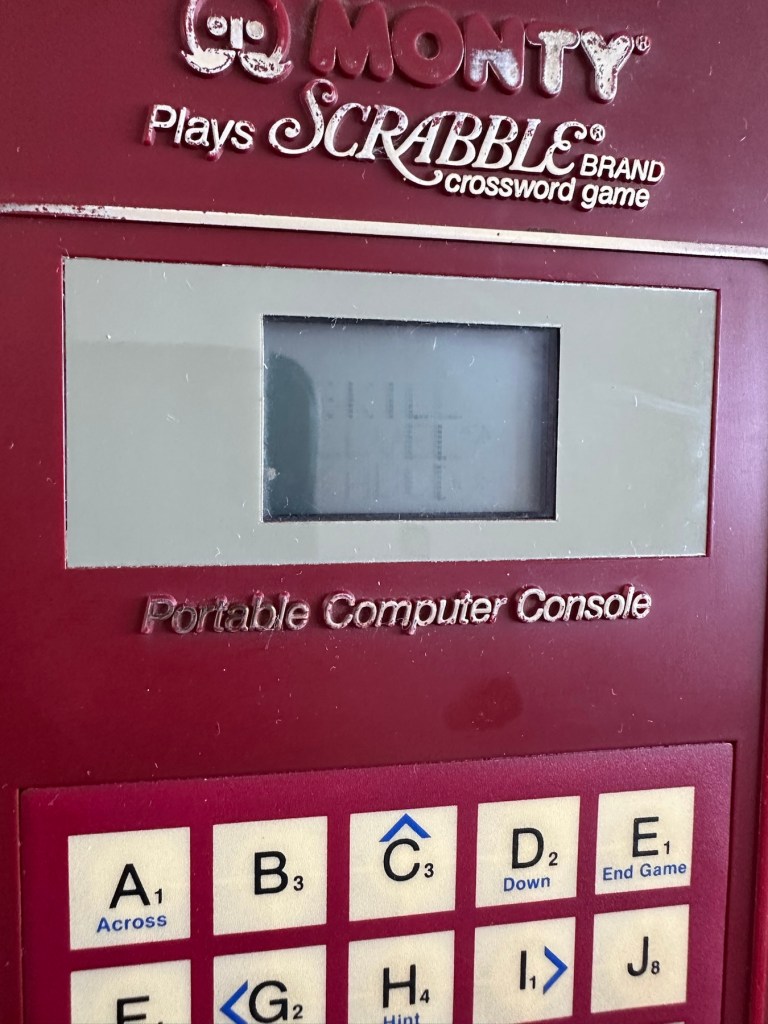
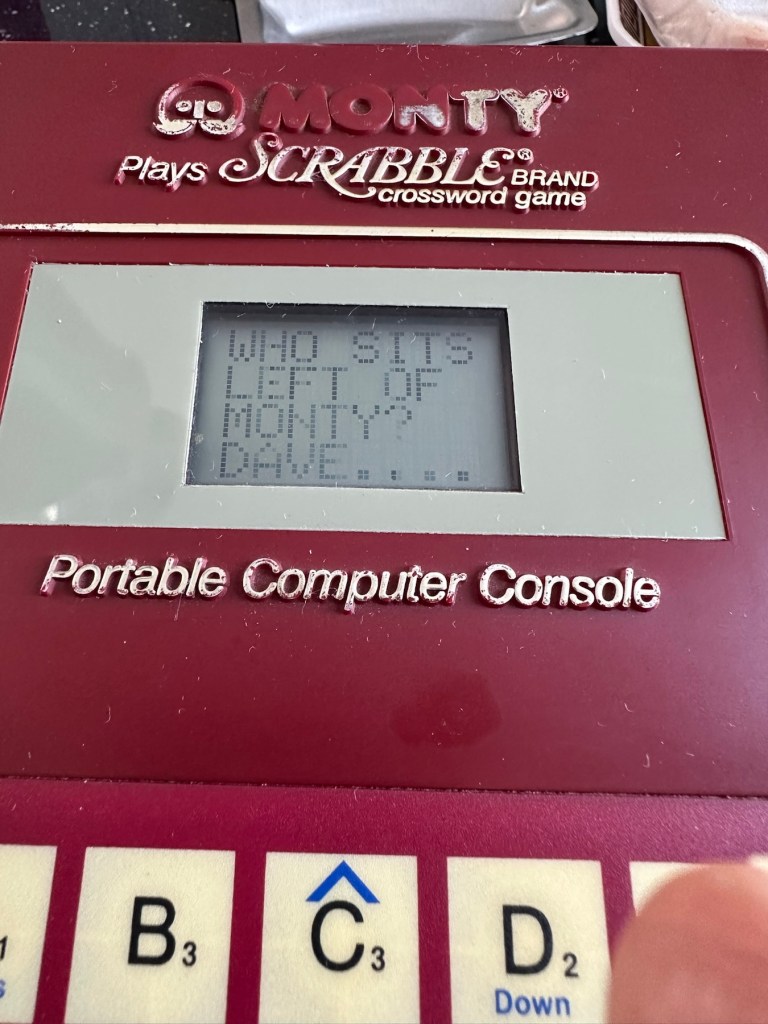
With no corrosion visible, I put some batteries in. I switch the unit on and it makes sound, great. Looking from directly above it looks as if there is some writing on the screen but this doesn’t become visible until you move to about 60 degrees away, a bit closer to the base of the unit.
When viewed from aboveWhen views at about 60 degrees away
So the pleasing thing is that it works. In general it is in a very good condition, coming with instructions and playing sheets. As always with items such as this from this time period, there is the expected smell of age induced mustiness, and there isn’t a great deal I can do about this. But I do seem to have a working unit that just requires a little maintenance and cleaning.
Repair:
I’ve had a quick clean of the front keypad and it was quite dirty.
Bit dirty just after a very brief clean of the keyboard
I’m not sure but I might open up the unit and give it a proper wash, I’ve got to have a look at the screen inside as I suspect the screen quality might be improved by replacing some old electrolytic capacitors that I suspect may be around that area. I could however be wrong. Let’s get it opened up then.
The board looks really clean on both sides, all capacitors (and there were only three of note) look good.
FrontRear
I have taken all three capacitors in the immediate screen area off, I’ve measured them out of circuit and they are all within the 10% tolerance of their indicated ratings so in my eyes there is no issues here. They are working fine.
All capacitors tested and within tolerance
On the rear of the board behind the display is a small variable capacitor. I turned this slightly to the left whilst under power and the screen quality has improved sufficiently be able to view the display from a more natural position. It can’t be adjusted any more though so it is now at its limits, probably a result of its age and limits of performance being reached for that particular component.
The variable capacitor Improved display performance
To be honest I’m satisfied everything inside the unit is fine, and the slight improvement to the display is more than adequate, I’m now going to close the unit back up and will concentrate on the exterior.
I’ve given the exterior a good polish, and then in my art box I have a silver permanent marker that will be great for touching up the worn out lettering and surrounds, so I will use this just to make the unit look a little more aesthetically pleasing.
Silver penAll lettering retouchedManufacturers name now visibleFinished unit
And boy has that made it look better
BeforeAfter
Looking good as new, and with that result we can say the repair is complete.
Result:
We now have a good looking fully restored and fully working unit. It looks as good as the day it was sold and still does what it was made to do. The screen is at its limits but should last a good while yet. A smart looking 41 year old unit that has been saved from the scrap heap and will be around for a good time yet.
All clean, look at the restored lettering
Here we have a small video of its basic operation
Easy to operate even without instructions
All in all another satisfying repair, and yet another item saved from landfill. If it’s damaged, 9 times out of ten it can be repaired and reused. We don’t need to be so wasteful.
Thanks for following the repair, it’s always very much appreciated.
Can’t get to turn on unfortunately. No battery cover. Any questions please ask
EBay
Dirty unit No battery cover
I know, there is no battery cover, however I have already sourced a seller of one if needed. This item looks quite dirty so a good soak might be the order of the day to get started. I’ll wait for its arrival before I jump to order any other bits for it.
Now as I’ve said in the past these units fall into that crazy price category on the selling platforms as the “New Antiques” of today. For an item that was low cost, somewhere between £25-40GBP when it came on the market, they can certainly command a wide range of crazy prices, here is an example of price ranges from today:
The massive range in prices for these units
This one I purchased today only came up for sale about 3 hrs ago and I thought it would have been snapped up by now, it hadn’t so I didn’t hang around any longer and purchased it for a total of £16:38GBP including its delivery. I’m not going to get too smug yet, as for all I know I may have just purchased an empty shell. Let’s wait until it arrives.
Here’s a little history of this unit:
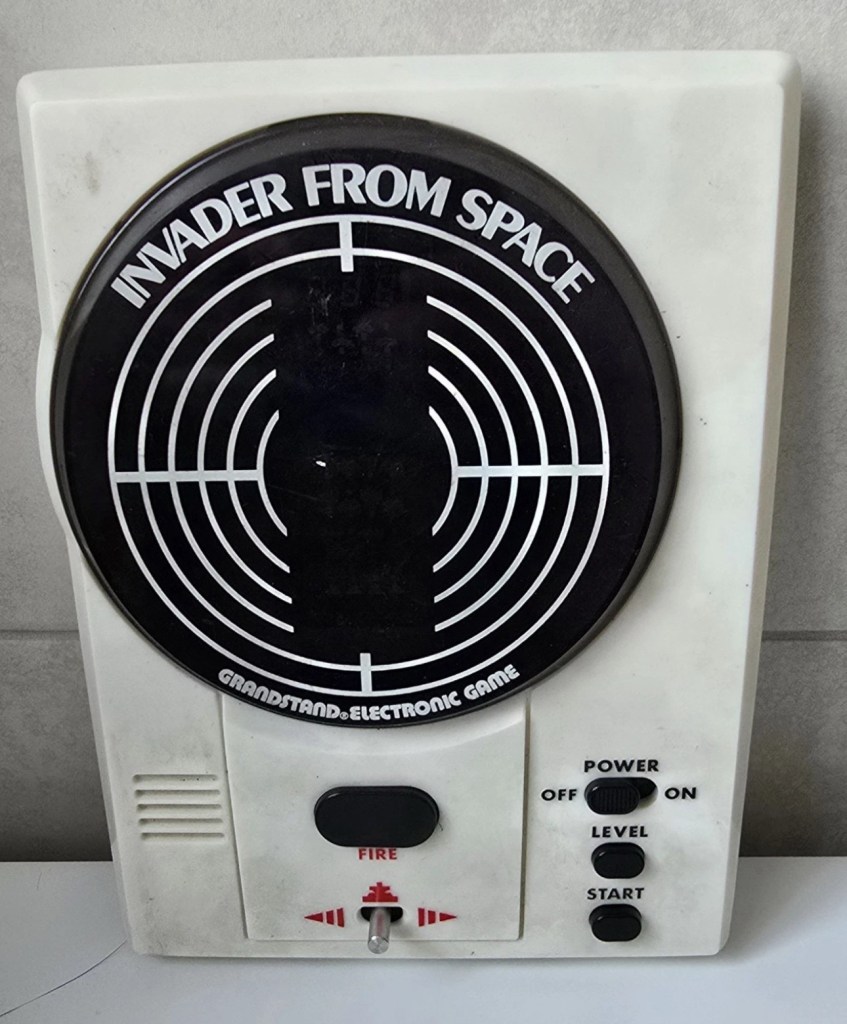
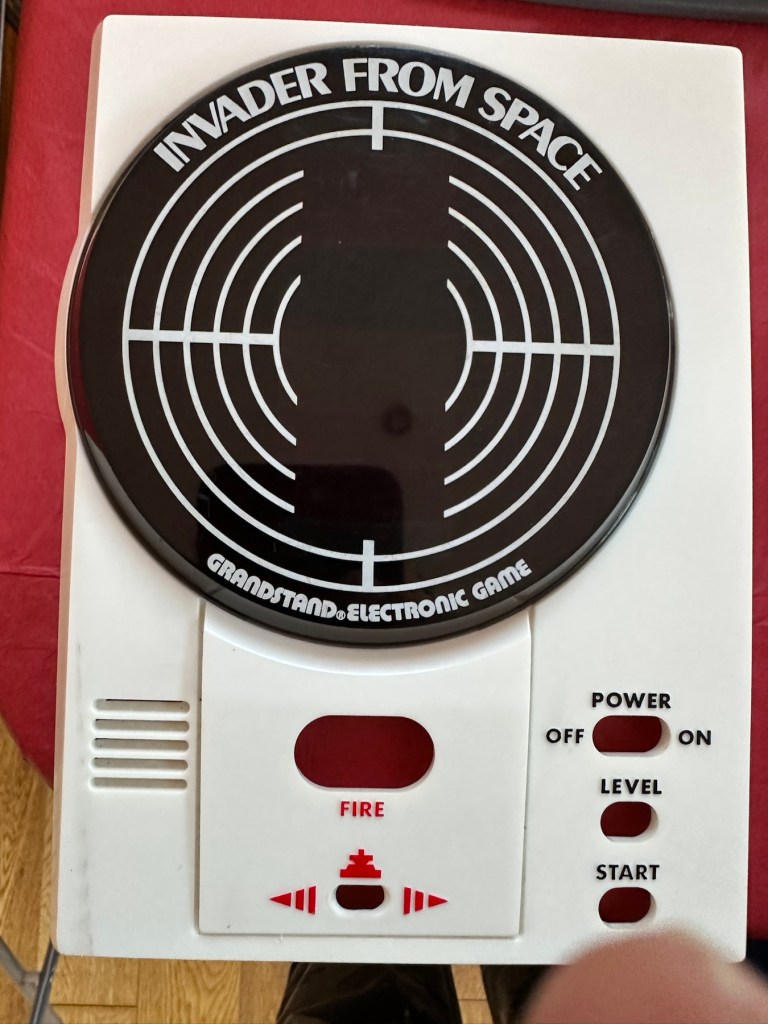
Grandstand “Invader from Space” is a tabletop LED game dating back 45 years to 1980. Four ‘AA’ batteries power the unit or, alternatively, the Grandstand 5.5V@300mA power adapter (or an equivalent power pack) sold separately. The game, licensed to Grandstand, is a copy of Epoch’s “Invader from Space”
The company initially behind the “Grandstand” label was Adam Imports Ltd., (from 1980 Adam Leisure Group Ltd. and by 1983 Adam Leisure Group PLC) founded in 1973 by Chris Rycroft and Les Kenyon of Harrogate, UK. The company initially started as a mail order company and was the single largest supplier of calculators in the UK by 1974. By August 1978, George Bassett had acquired a 75% holding in the capital of Adam Imports for £750,000 cash, plus 60p in the pound of profits before tax in excess of £500,000 for year to December 31, 1978. Adam Imports was re-acquired from George Bassett by Chris Rycroft in 1980. It chiefly imported electronic products from other manufacturers such as VTech, Epoch, Tomy & Entex, selling them in the UK re-branded under the Grandstand name.
Wikipedia and others
So that’s the history
There is a good link to a similar repair on YouTube from a guy I follow named Stez Stix Fix, it’s very much worth a look and he has a great if not sometimes crazy way of diagnosing and repairing items. A cool guy though.
The Grandstand invaders from space game
Anyway back to my own purchase.
Assessment:
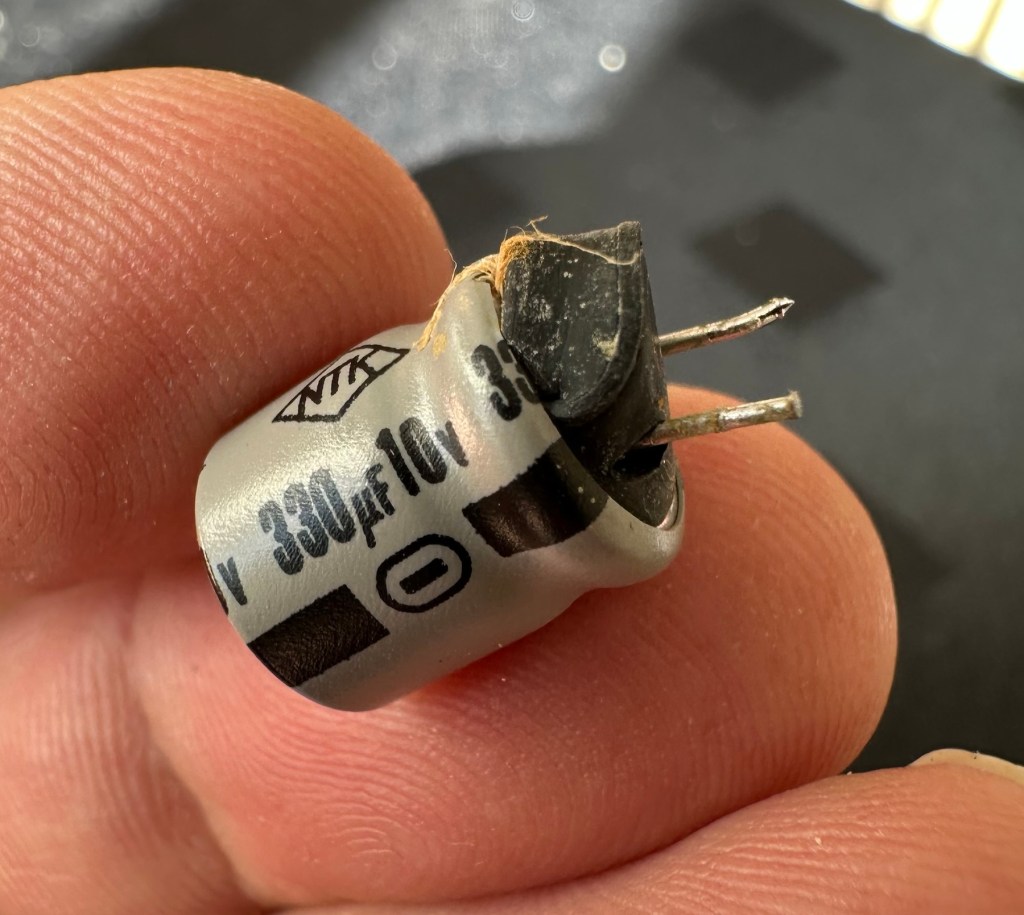
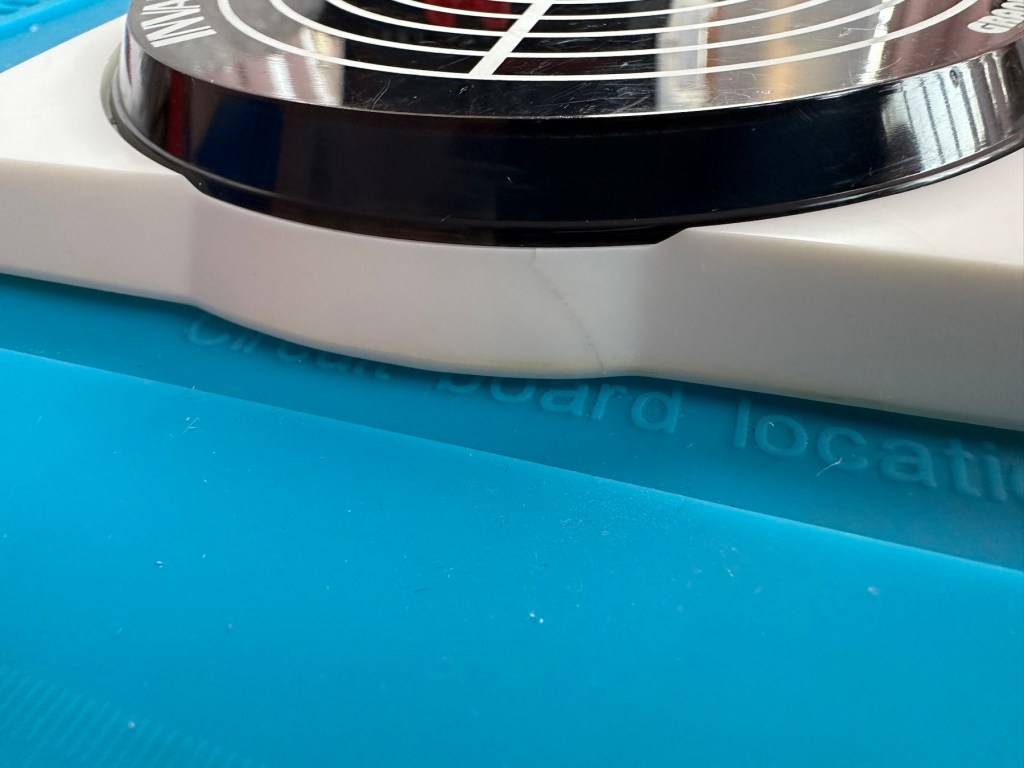
I must admit the unit doesn’t look as dirty as in the original pictures. The battery cover is missing and there is a crack in the side and a deep scar at the bottom, this won’t be too much of an issue if I can weld it all back together. I will still give it a good soak to clean it all up though. I’ve put four batteries in place, and the unit is definitely dead. There are no loose wires, voltages are getting around the board according to the multimeter and nothing is getting hot. There appears to be no short circuits, and then I notice this, capacitor CO7, slight bulge on top and what looks like leakage from the bottom. We have a candidate as to why this unit is not working.
CO7 looking unhealthy to me, you can see the component to the left that looks like it’s covered in a fur ball. The result of the old capacitor “coughing”
I’ll whip this out and see what we have but I suspect this old capacitor has failed and is causing an issue, heres hoping I have a suitable replacement.
Repair:
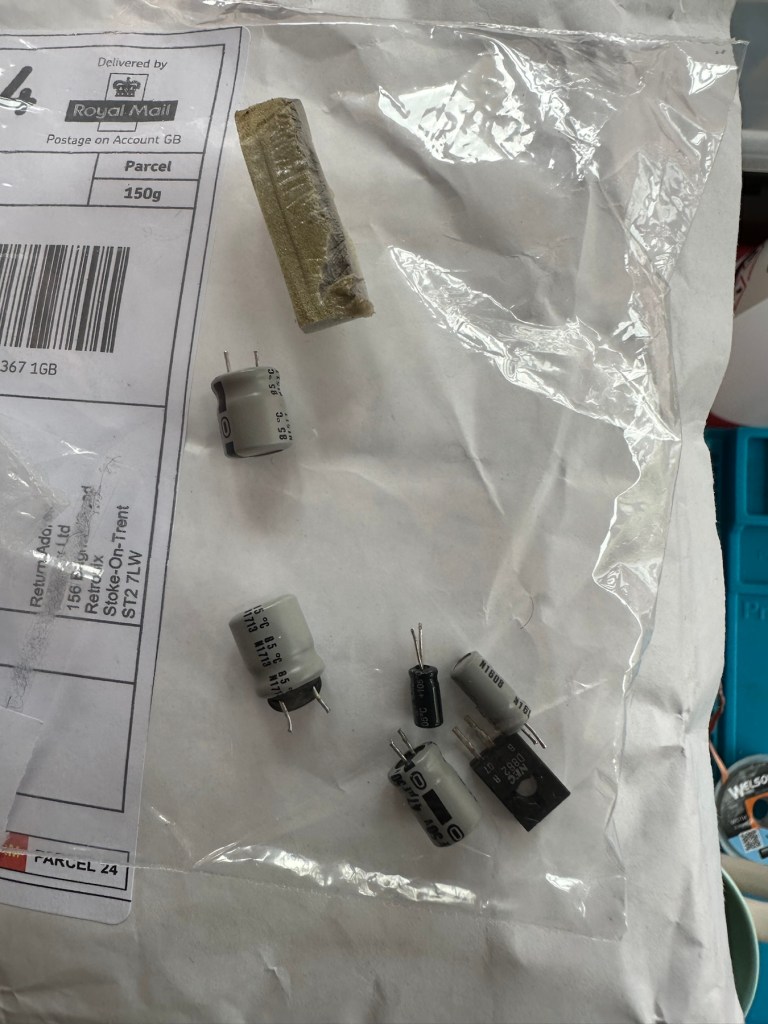
This little beast is a 330uf 10v electrolytic capacitor. I have none available so have had to purchase a pack of ten. These should be here in the next few days. There are three other old electrolytic capacitors that I will also change whilst I’m in there, as these are all likely to fail at some point soon. These components are now all around 45 years old, it’s a wise move to change them out.
One very dead capacitor removed.
I’ve ordered a 3D printed battery cover to replace the one that is missing. This should be here in a couple of weeks.
Whilst waiting I have cleaned the inside and outside of the casing as best I can. I still have a piece of broken surround to repair, however this is just a simple glue and a little bit of support job.
Case inside and out cleaned
Broken surround repaired
The surround that was broken has been repaired and secured with some nylon soaked in a superglue compound inside the casing. It’s rock solid. Outside the break is hardly noticeable. The break is secure and much stronger now.
New capacitor here
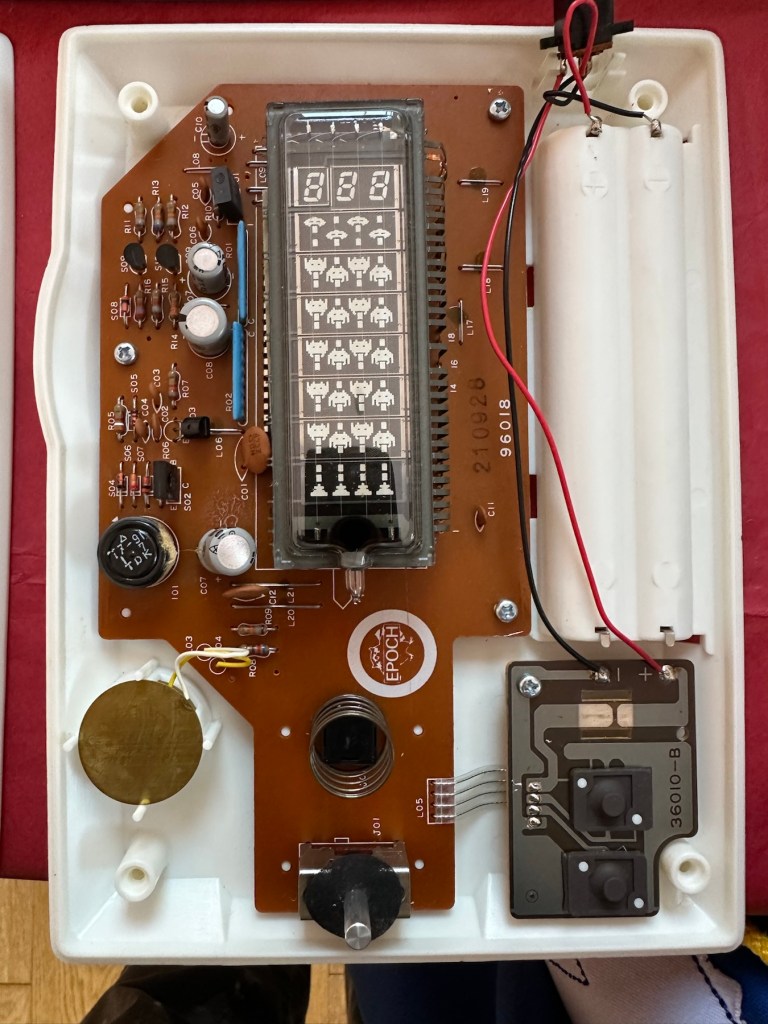
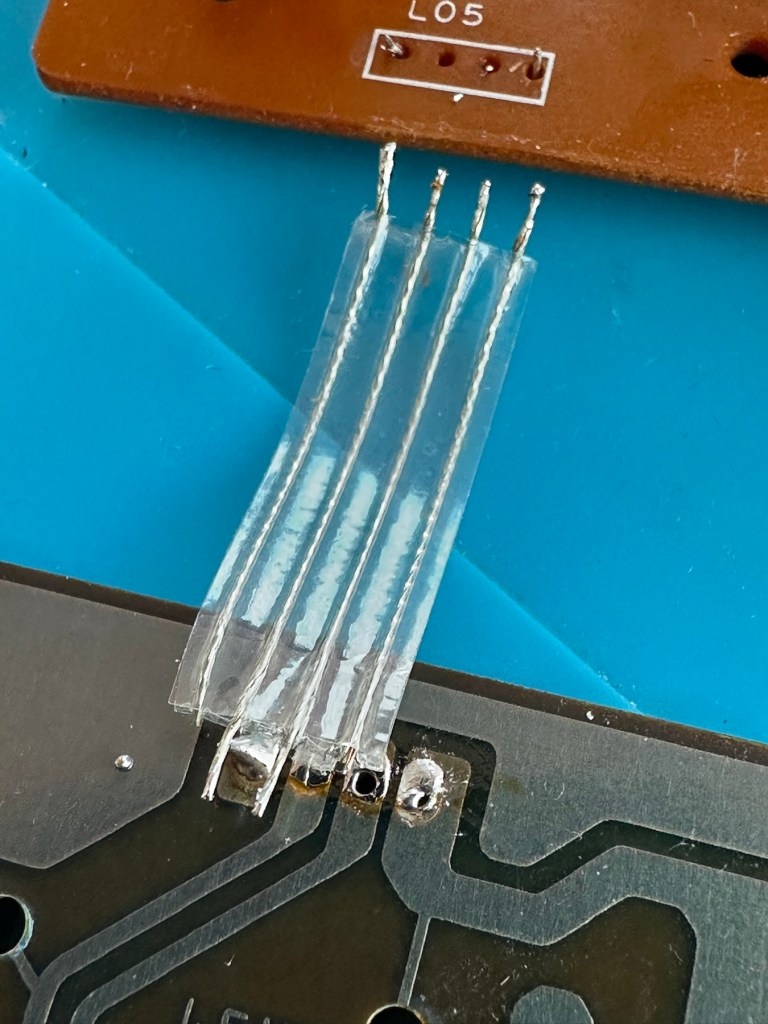
I’ve replaced all the offending capacitors and the unit remains dead. I’ve reflowed most of the board as there were some dry solder joints. I’ve also rewired the bridge from the control panel to the main board as one of the wires here had broken.
Bridge required resoldering
After using the multimeter to check some traces and components it’s now pointing to this component (a power transistor D882) being the cause of this catastrophic breakdown as its readings are all over the place. I suspect this item has overheated, the capacitor has blown and then it’s just died itself. I’m probably wrong, but I know what I mean. Probably just a catastrophic chain of events that all contributed to the units demise.
D882 transistor – power regulator
And as usual I have none available so will have to send for some new ones. The new components have arrived and the new power transistor has taken its place on the board. Now reassembled I place some new batteries in and the unit comes to life. It was the power transistor at fault, I should have really checked here first after seeing that damaged capacitor at the beginning.
All old components removed and replaced in this unit
Not to worry though as it’s had a good overhaul and has been totally recapped as a precaution. I’ve used some conformal coating on a few tracks that had some copper exposed after a good clean, to ensure they don’t deteriorate any further.
It has life
The unit is looking really good and these items were traditionally very loud and this certainly is. It’s working well just as it should do and I’m exceptionally happy with this repair. I’m still awaiting the battery cover that I have had 3D printed and this should be here in the next week to complete the fix.
No scoreHere we go3D printed cover arrived. Minor adjustments needed but in all a good purchase
So with that I will bring this build to a conclusion. It has been a fun project, I’ve learned a number of things about this circuit board and gained valuable knowledge.
But best of all we have rescued another item and saved it from landfill.
I did my Morse test back in 2003 just after I passed my City and Guilds 765 RAE exam in Amateur radio. It wasn’t a compulsory requirement as it was in the States at that time, but I chose to go with it. I wasn’t the fastest in the world but I enjoyed using it to be able to partake in my favourite part of the hobby, low power QRP operations.
As morse uses such a small bandwidth, distant operations using very low power below 5 watts are very achievable. Wspr transmissions operate in even smaller power ranges, however that’s a whole different story.
So what’s the Psion organiser got to do with Morse?
When you set out trying to master Morse you look at loads of techniques and ways to make your journey that much easier. There are Morse trainers, there are even Morse decoders and encoders that basically allow you to “Cheat”, but what’s the point of that as you’re not going to learn anything that way.
The Morse Datapak Psion Organiser II LZ
I used a technique called the visual mode technique that allows you to learn Morse by associating the dots and dashes with the actual shape of the letter and number. It works well when translating to paper, however Morse is a sound mode and it is better to use sound association, that will always work the best. I have this on a book mark to this day, as well as having it as screensaver at work. It worked for me. That’s where the Psion also had a part to play in my education.
Visual mode technique
I have a pre loaded data pack that runs perfectly on this old 1980’s machine. I used a very similar program back in the day, but not this actual one (See pictures above). The program and files are extracted and copied from the Interair Airnav pack and i have uploaded a small video below to show it whilst working.
“Peace”
With this program every digit you press on the keyboard is repeated back to you in Morse code. It’s a fantastic way to keep yourself on the ball. There are a few minor errors but the numbers and letters are pretty much spot on. It’s a great way to learn the shape of a word by sounds, and that’s a big part of Morse code, where you use phonics or the sound and shape of a string of dots and dashes to learn particular words or formations of groups of words. I’m probably making it sound more difficult than it actually is, and I apologise for that as it really doesn’t have to be. Each person finds their favourite way to learn, and this worked just fine for me all the way back in the early 2000’s about 22 years ago.
Have a great day and peace to you all or should that be :
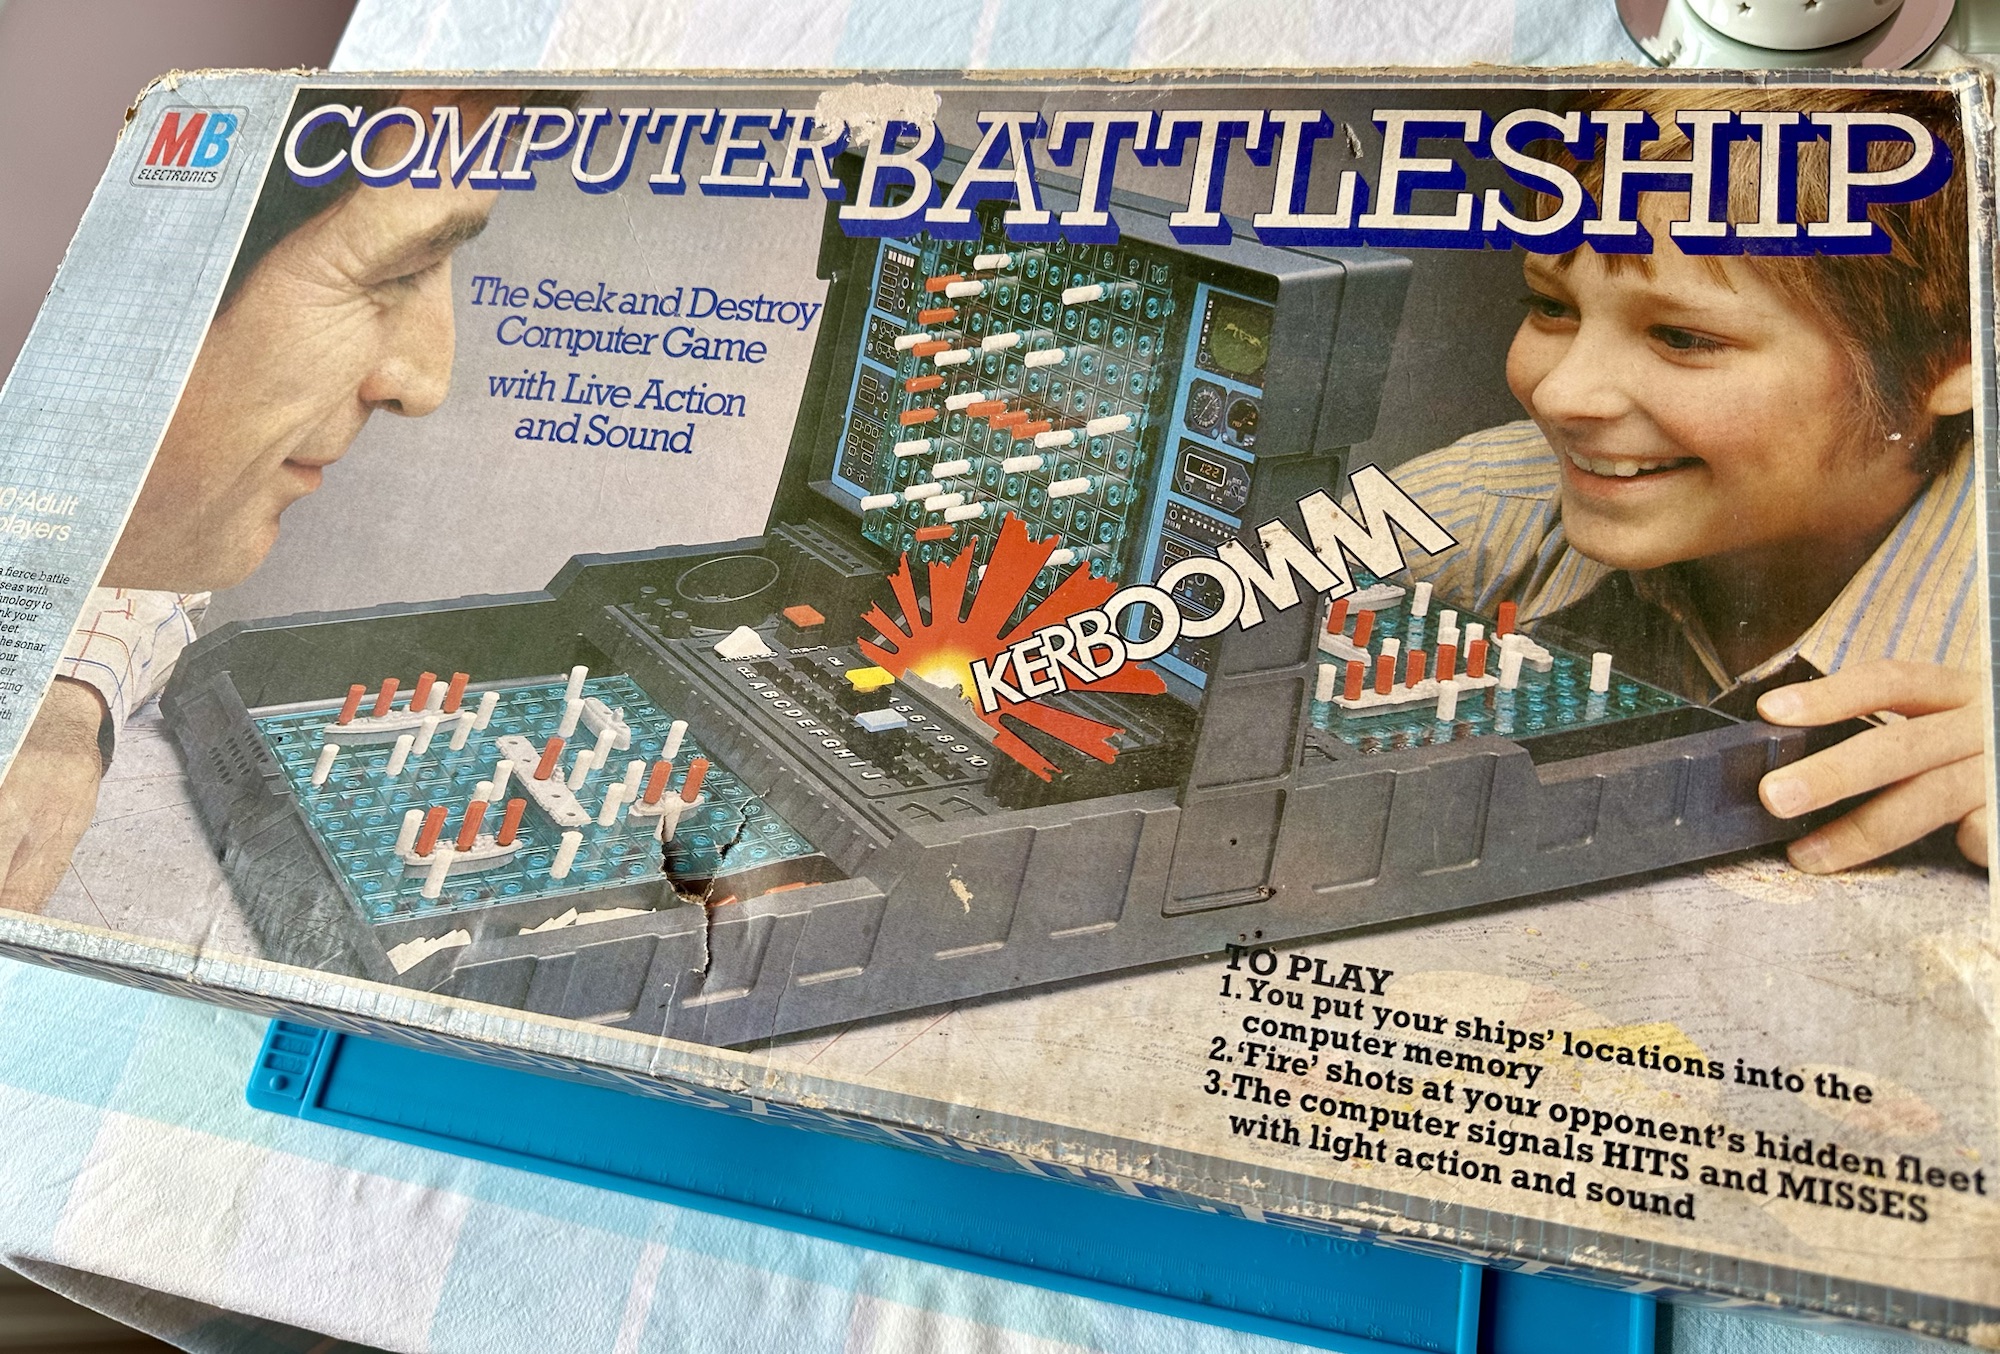
VINTAGE COMPUTER BATTLESHIP MB ELECTRONICS GAME FOR SPARES / REPAIRS APPEARS TO BE COMPLETE BUT THE GAME IS NOT WORKING WHEN TESTED WITH BATTERIES HENCE BEING SOLD FOR SPARES / REPAIRS
Ebay
And here’s some info around it:
In 1977, Milton Bradley released a computerized Electronic Battleship, a pioneering microprocessor-based toy, capable of generating various sounds. Electronic Battleship was designed by Dennis Wyman and Bing McCoy.
Wikipedia
Now this is another toy from my childhood that I had envy over. This game is the one that coined the phrase, “ You sank my Battleship” as seen on many TV ads towards the end of the 70s. This time my nephew was brought one of these games for his birthday back in the late 70s when I was about 12 years old. I’ll be able to give a more accurate date of the unit when I get to see the main board inside. I suspect I’m looking at something around the 1979 timeline. Man this toy was the bees knees, again early computer technology at its finest. Here I am approaching the sixth decade of my life and I’m having another menopausal moment just as I did in this post a few months back: Big Trak CE3962 restoration
Computer Battleship
This is going to go in the games box in our garden pub / Man cave. I’m confident I’m going to get it working. I’m not too bothered if there are any small parts missing as there seems to be plenty of spare parts available online.
Let’s have a look at what has turned up.
Original boxOriginal packaging
Well I’m impressed. This game is in its original box with original packaging and is in pristine condition. It comes with the original instruction manual and all parts listed in the contents section are there. In fact there are more of the red and white pegs than required so to be honest it looks as if I have bagged a bargain here.
I’ve paid a grand total of £19:96 GBP for this game and that includes the postage, by far the best price that was on offer for any similar advertised games that I could see at the moment of purchase. Considering this game is now somewhere between 45-47 years old, a bargain you might say, if I can get it working.
I’m thinking that all the capacitors on this board as a matter of good practice should be removed and replaced. Let’s face it they are almost the same age as me, could fail at anytime (if they haven’t already) and are as cheap as chips so what’s the point of just replacing a singular one when there are only two of them on the board. I think I will do this, test them all and report back.
I know that this unit is a 70s creation but it is interesting to get some facts on capacitors and problems that they have caused over the years, especially during the 90s and early 2000s. See this old post on capacitor plague: Capacitor plague
Board removed One side of board
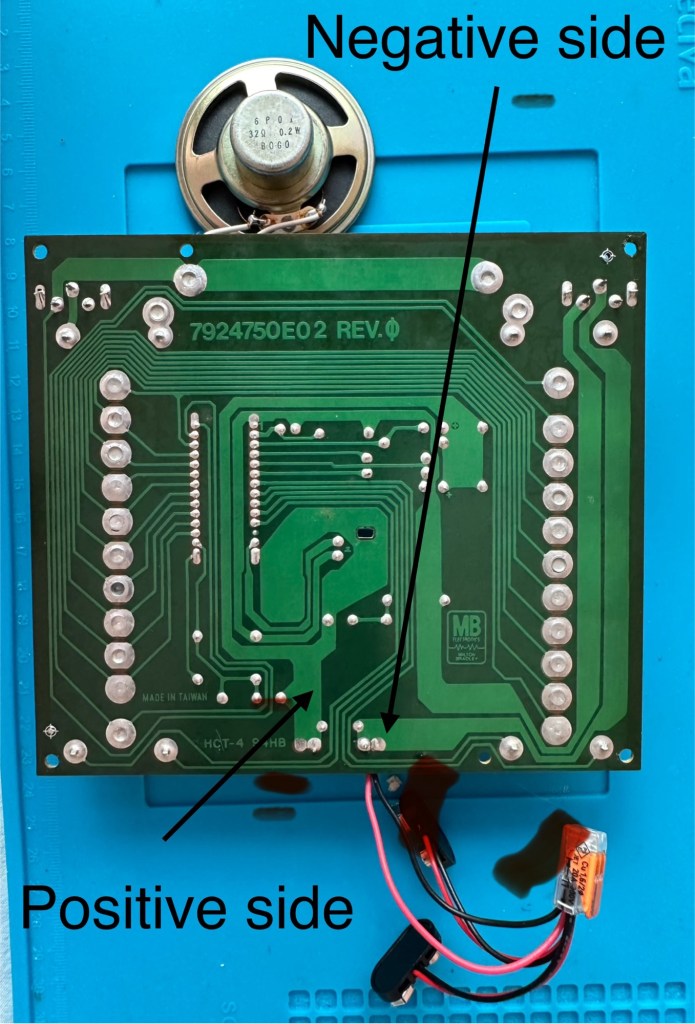
I have removed the board and there seems to have been some pre work done where all the wires are relayed through a connector block. This was a dangerous situation as the work that had been done diverted both negative and positive leads through this dodgy connector to the negative side of the board, causing a short that caused the batteries to heat up to a point where I thought they were going to explode as they were so hot. You may as well of just connected the two batteries together…childish mistake. I was testing for voltages and was suspicious that I was getting no readings, just as well I went straight to the battery when I did. Lesson learned for me.
Bad wiring
I have checked the speaker is working, this is a 32ohm speaker and it was indicating 31ohm so there were no issues there. I have removed the two capacitors and checked them and they are both within tolerance, hence I will leave these in place.
Speaker is fine
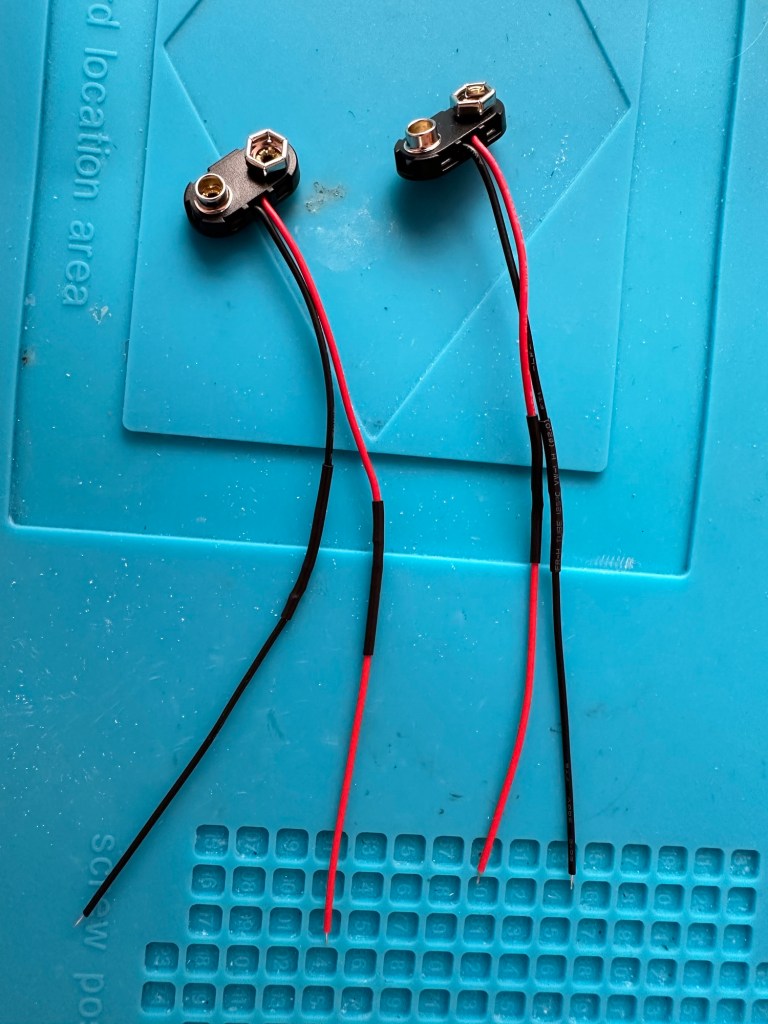
The batteries are separately wired on this board. The two negative wires go to the negative side and the positive wires go to the positive side, straight forward wiring, I don’t know why the previous clown wired it as he did. These four wires now soldered in place with new leads and connections allow me to attach the batteries and check voltages, all is good and reading as it should.
New leads made
I clean all the switches with contact cleaner, I clean the board with IPA and clean all the contacts. A good suction and polish of the frame and all is good.
I can confirm the board indicates that this unit is week 24 of 1979 as per the writing on the main board. That puts this particular unit at 45 years old. Will it work.
Hell yeah it does!
Main switch into the on position and the annoying sonar sound kicks in, my dog leaves the room as it’s annoying him, to me I have just been transported back to my childhood. It’s brilliant.
I collar the wife into a game, I have to teach her how to program it and it works perfectly. Every sound is there, it’s noisy repetitive and computer programming at its absolute most basic level. And it’s mine.
Computer Battleship – It works
It’s going down our garden pub to be used by the youngsters and adults alike. I think the kids will love it due to its primitive technology. They’ll learn from it.
Another piece of my past saved from landfill, and it will be put to good use. Just don’t trust any mods or fixes done by others, don’t inherit a fire risk. Check check check.
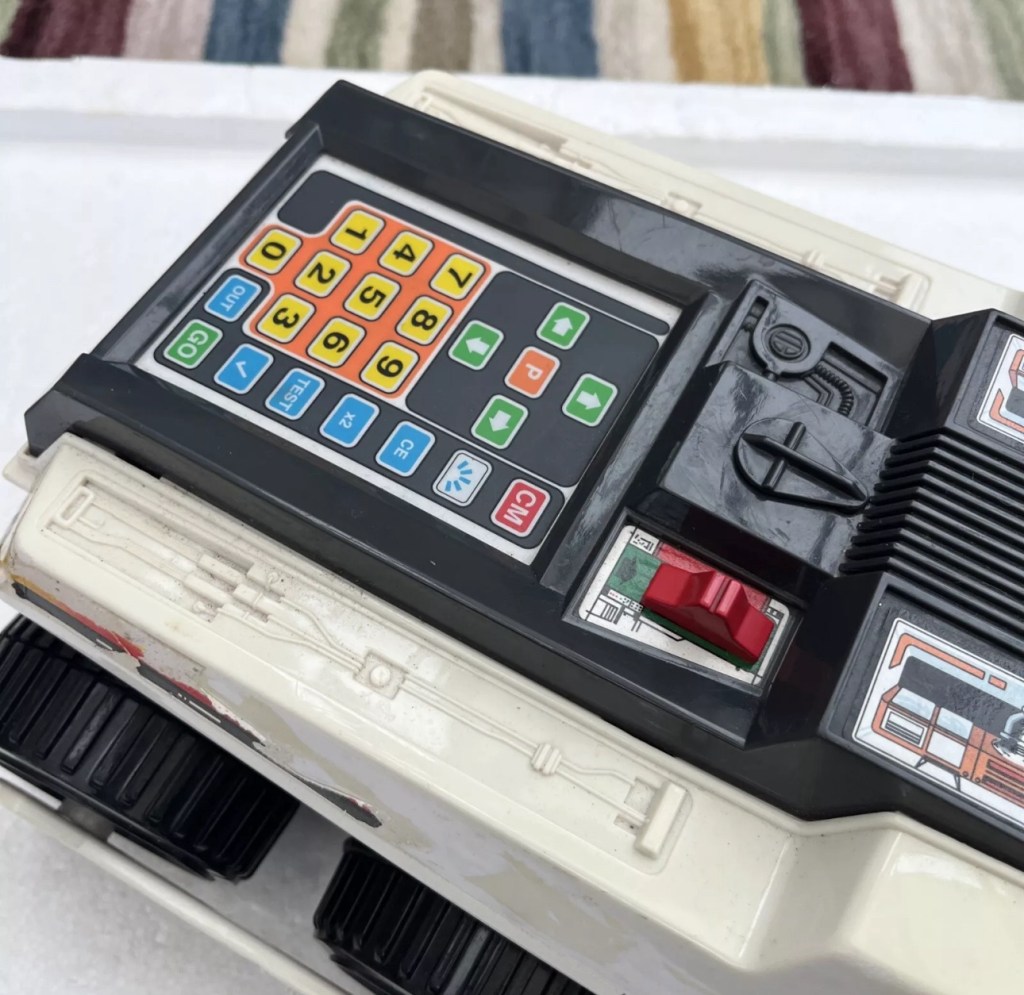
Here I purchased the toy I most wanted back in my teenage years. Unfortunately I wasn’t available to get the original MB version produced in 1979 so I had to settle for the latter “improved” version made by Zeon Ltd that was made in 2010.
It’s arrived and to be honest dosen’t look too shabby, needs a bit of a clean up and maybe some new transfers applying but we’ll get to that at another time, for now we need to try and get the machine up and running.
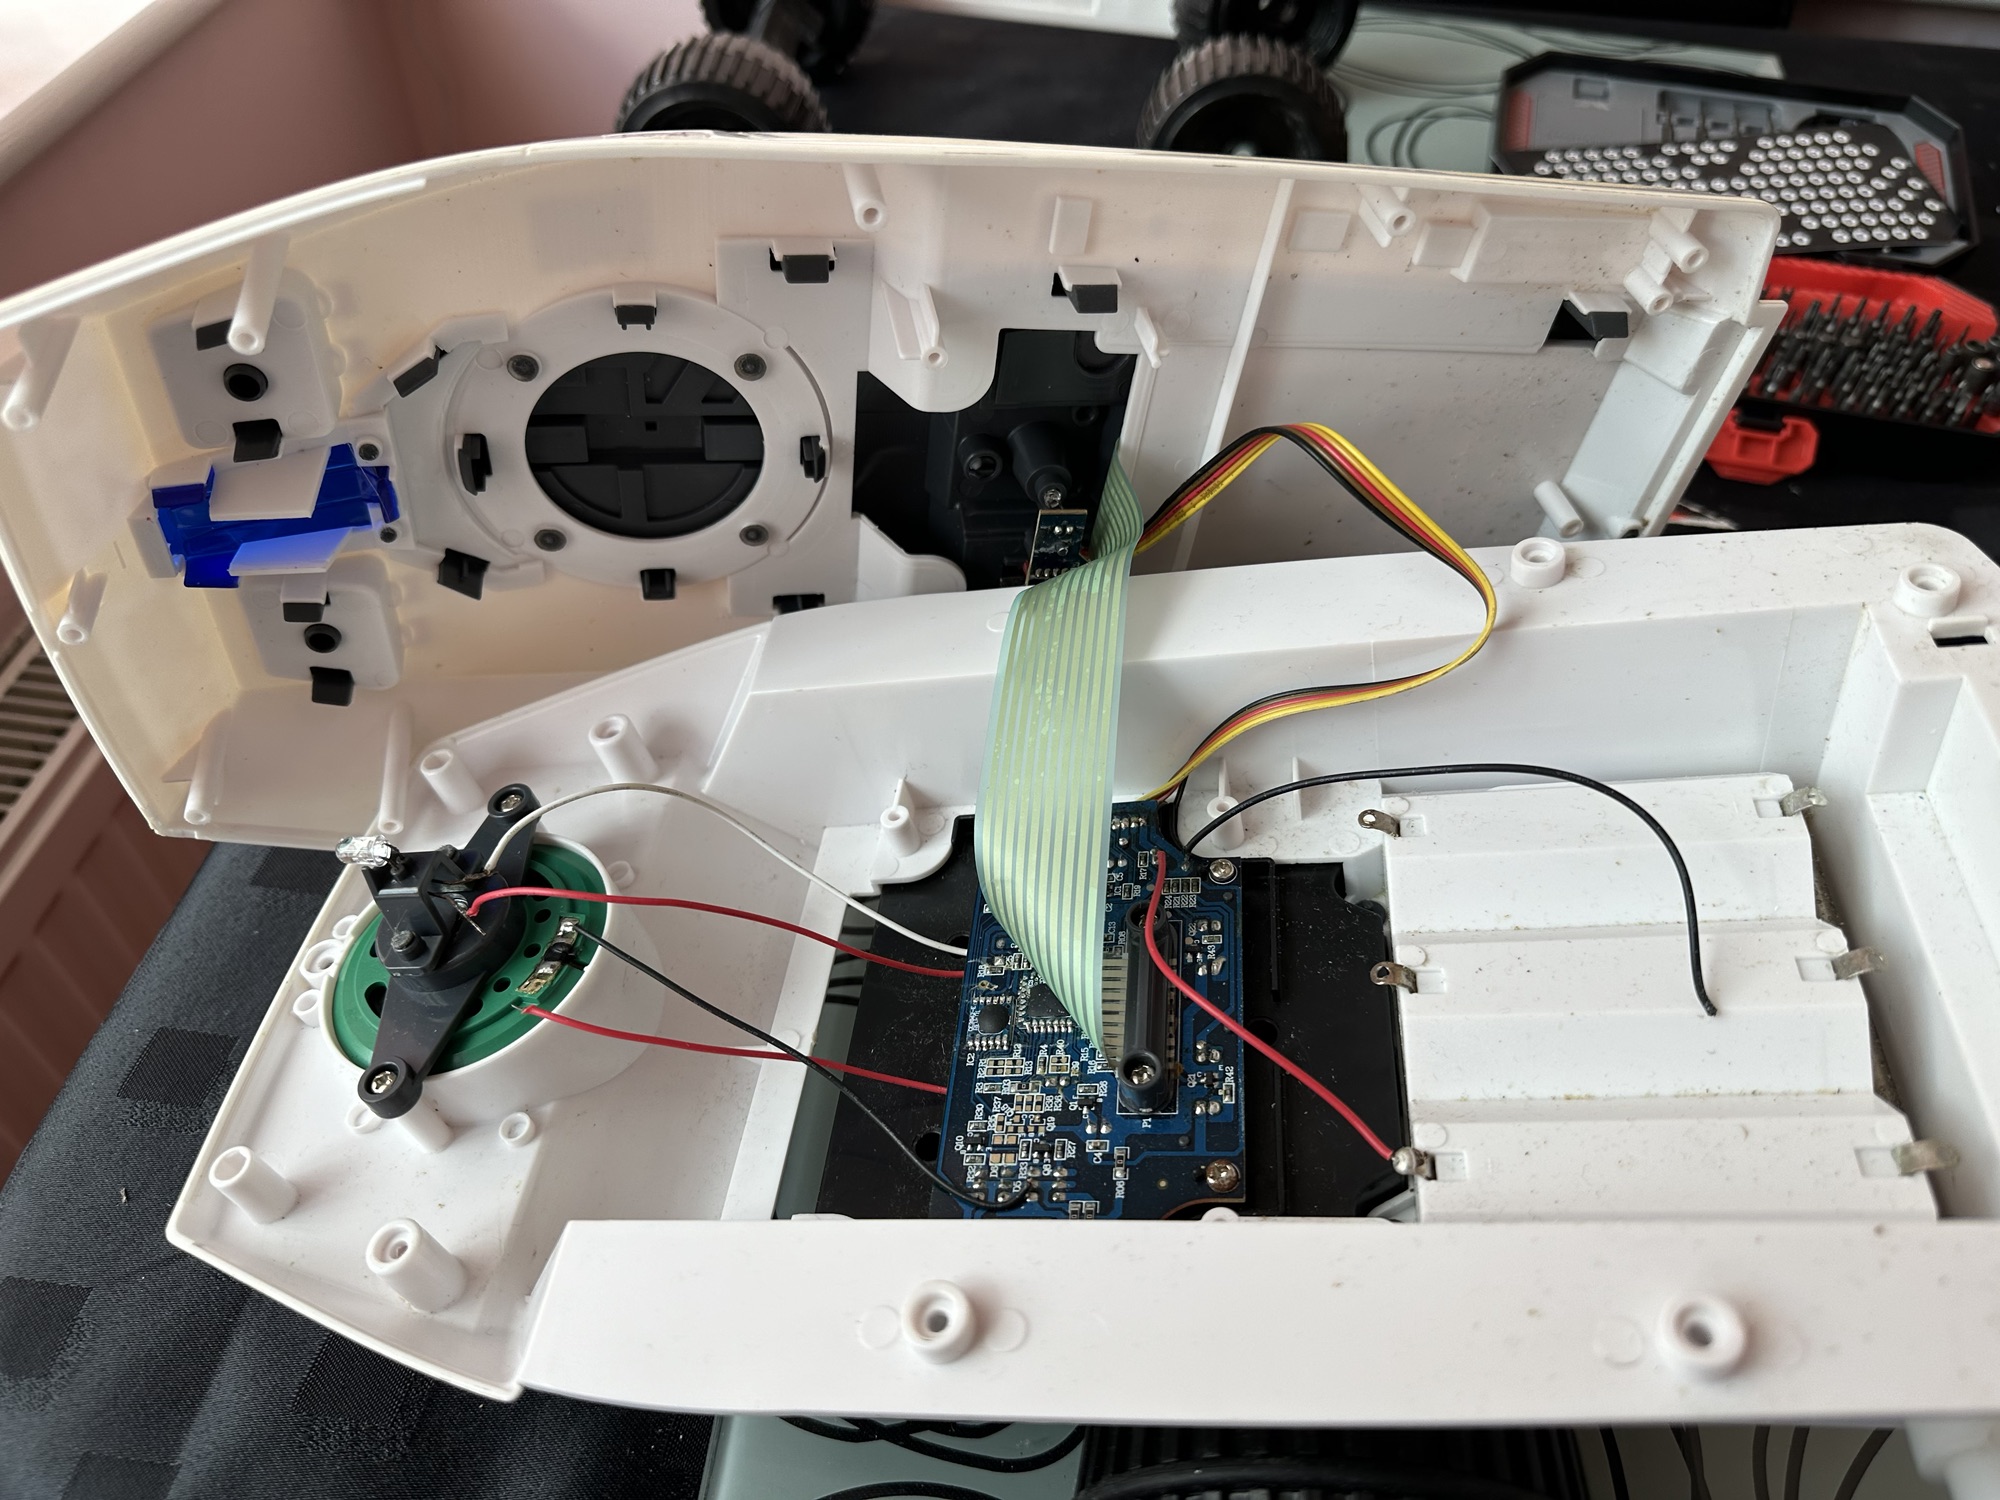
I’ve eventually managed to get the lid off. This unit was built to ensure that it was difficult to get into so repairs couldn’t be carried out. Some of the screws are buried under fascia dressings, and if you aren’t careful you could end up snapping some of the body shell.
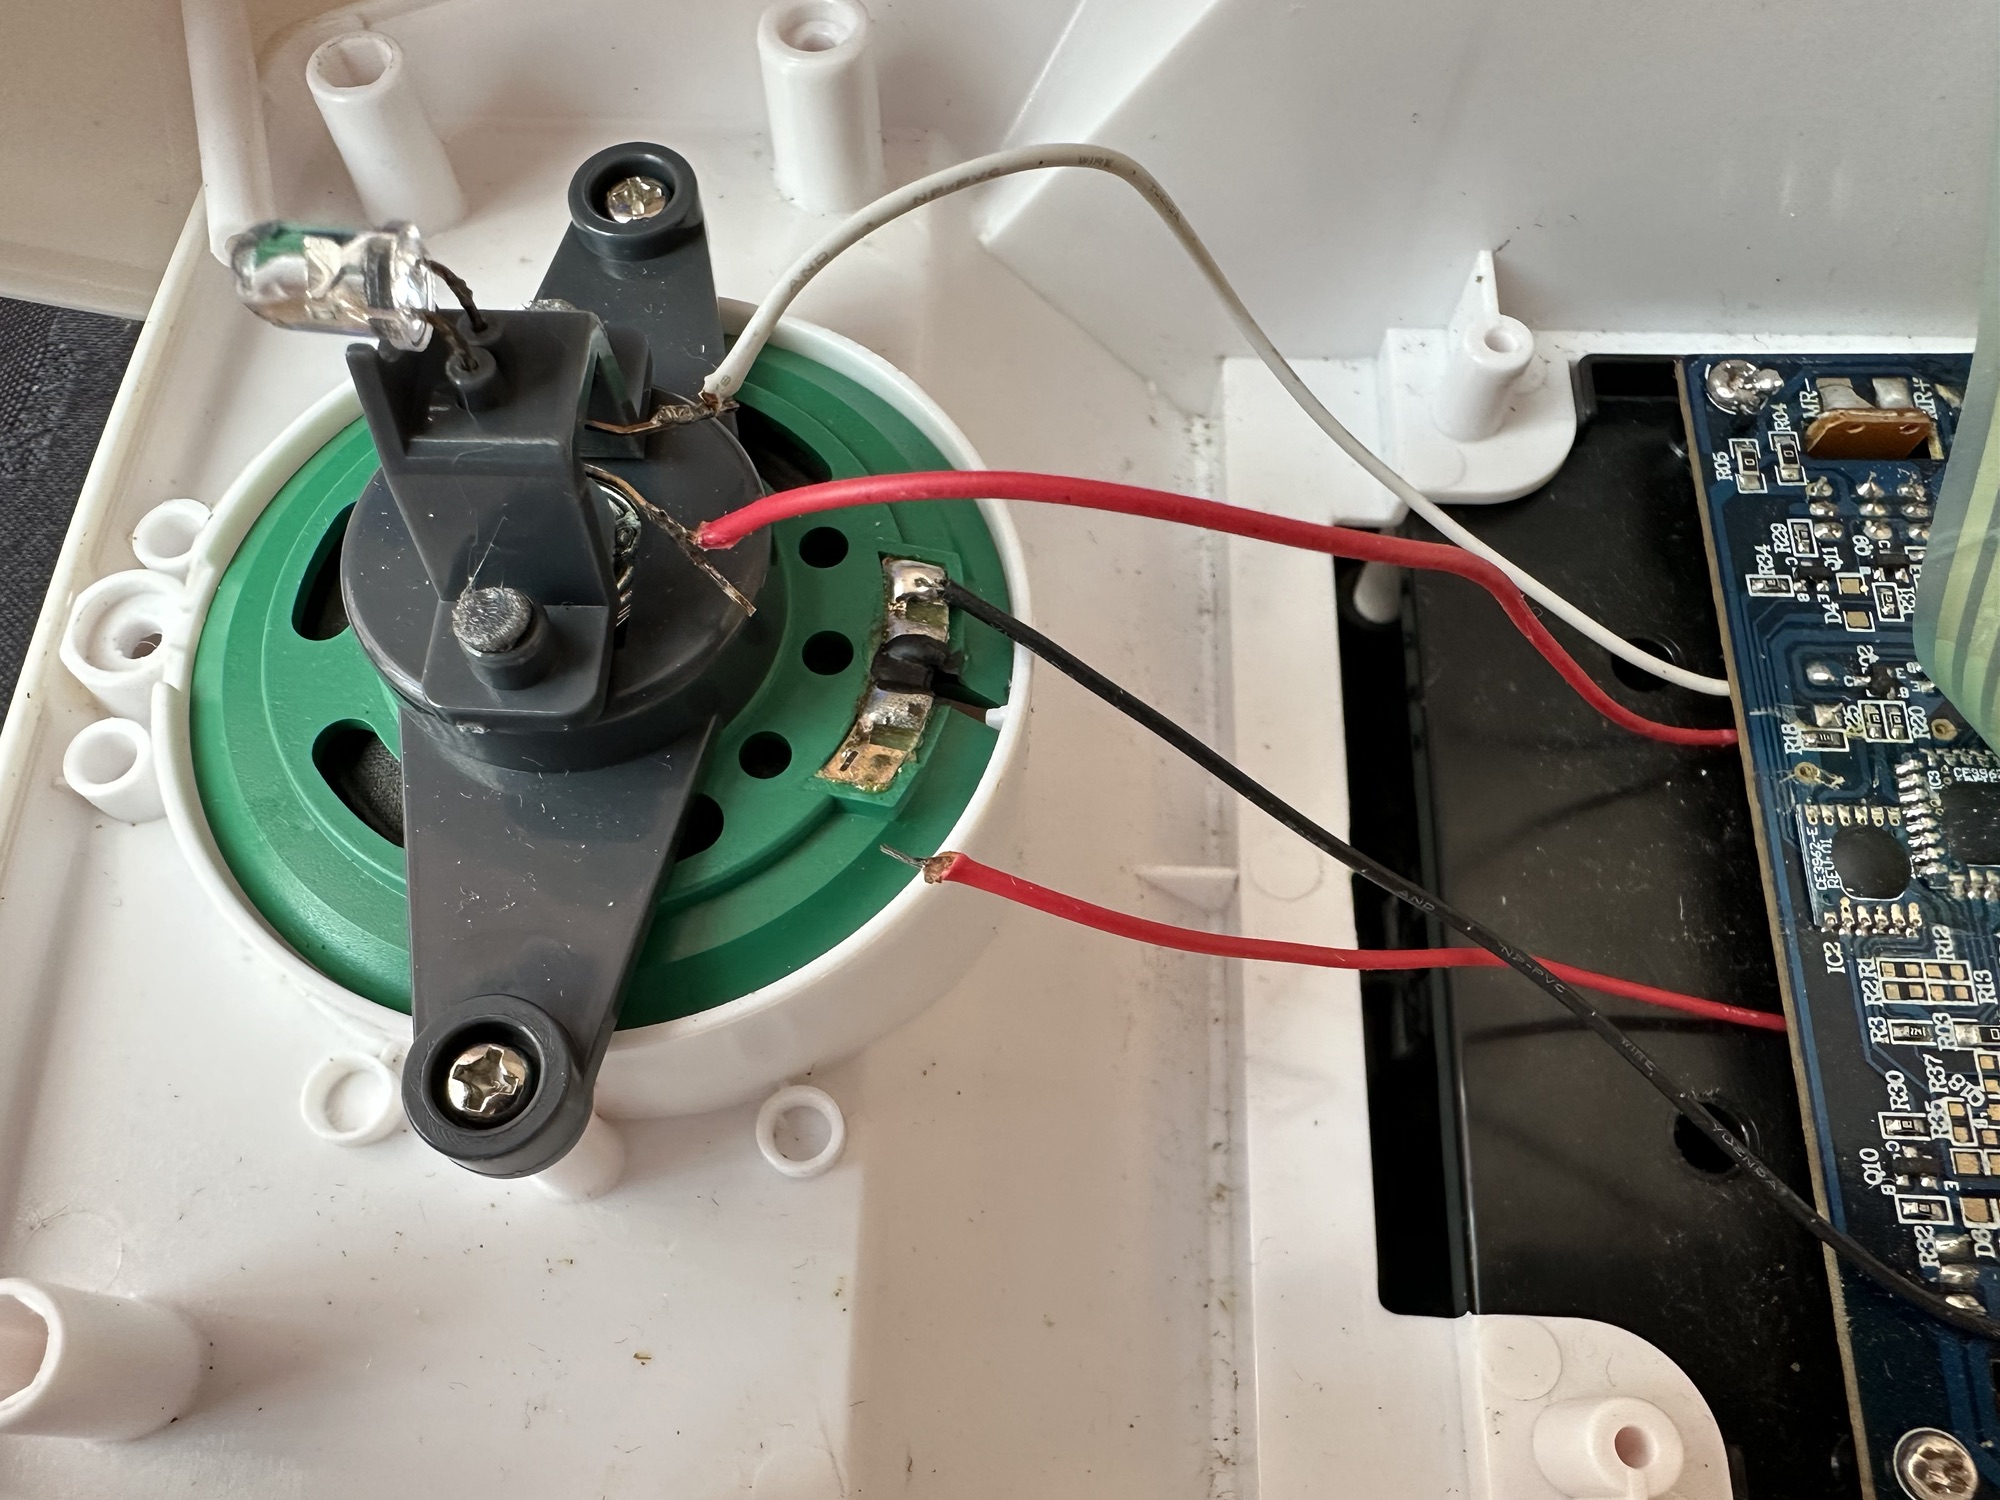
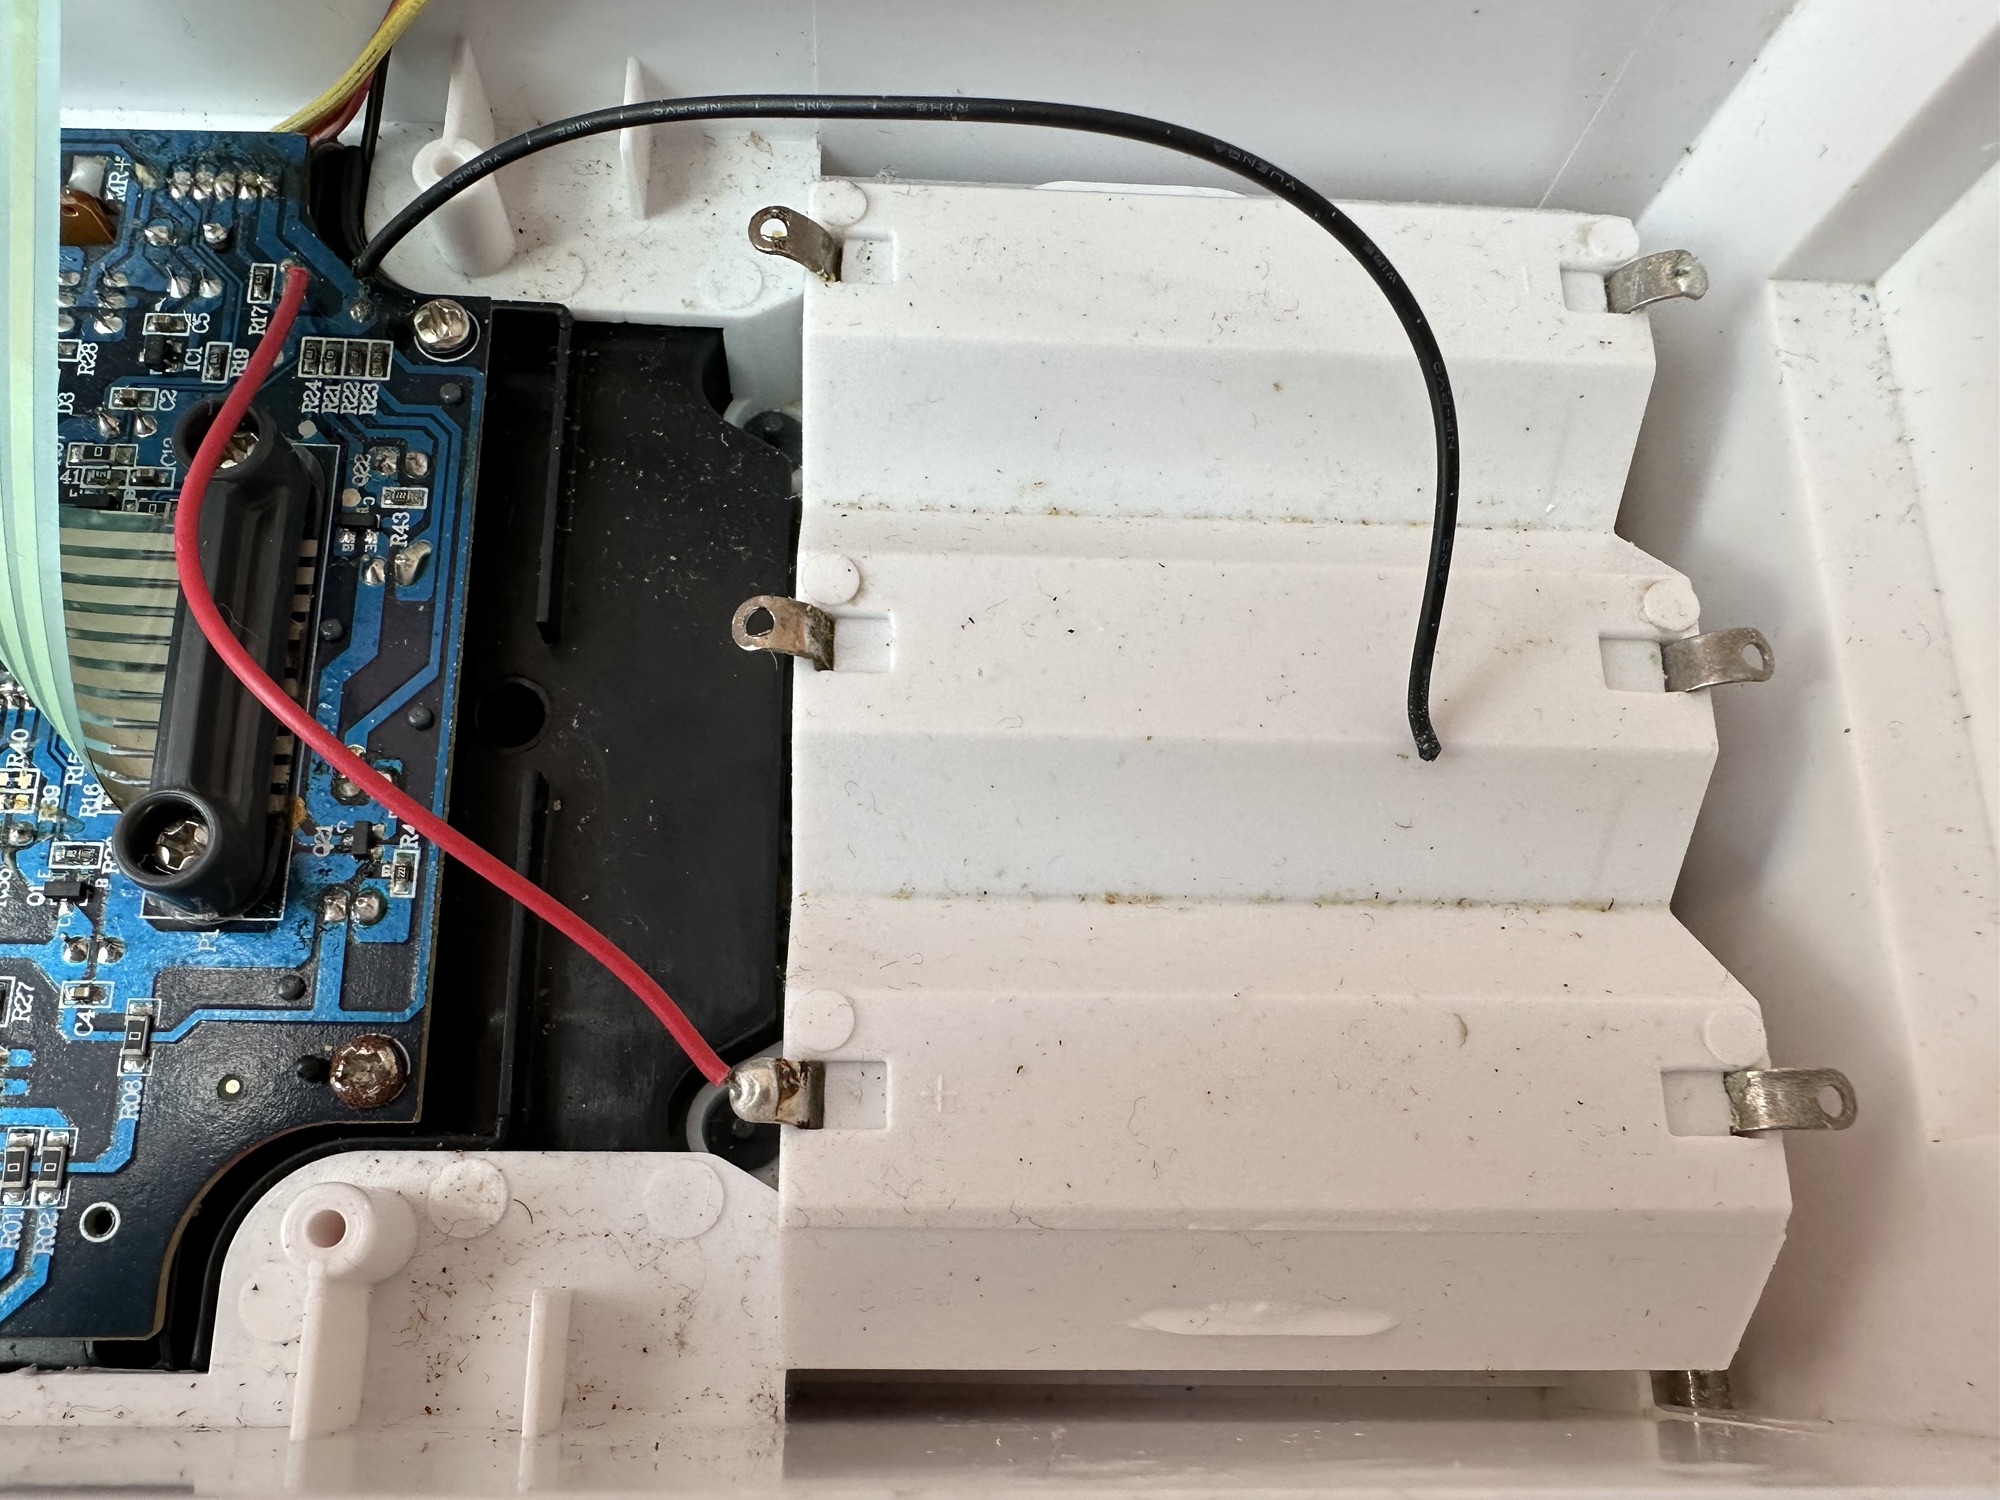
Big trak body shellBig trak circuit boardDetached speaker wireDetached battery wireBig trak wheels removed
With the two halves of the body shell detached it’s obvious there are some detached wires. One was a battery wire, one was a speaker wire. Oh if this was the issue wouldn’t it be great? But it wasn’t. I soldered these wires back into place, put the three D types in place and it was still dead.
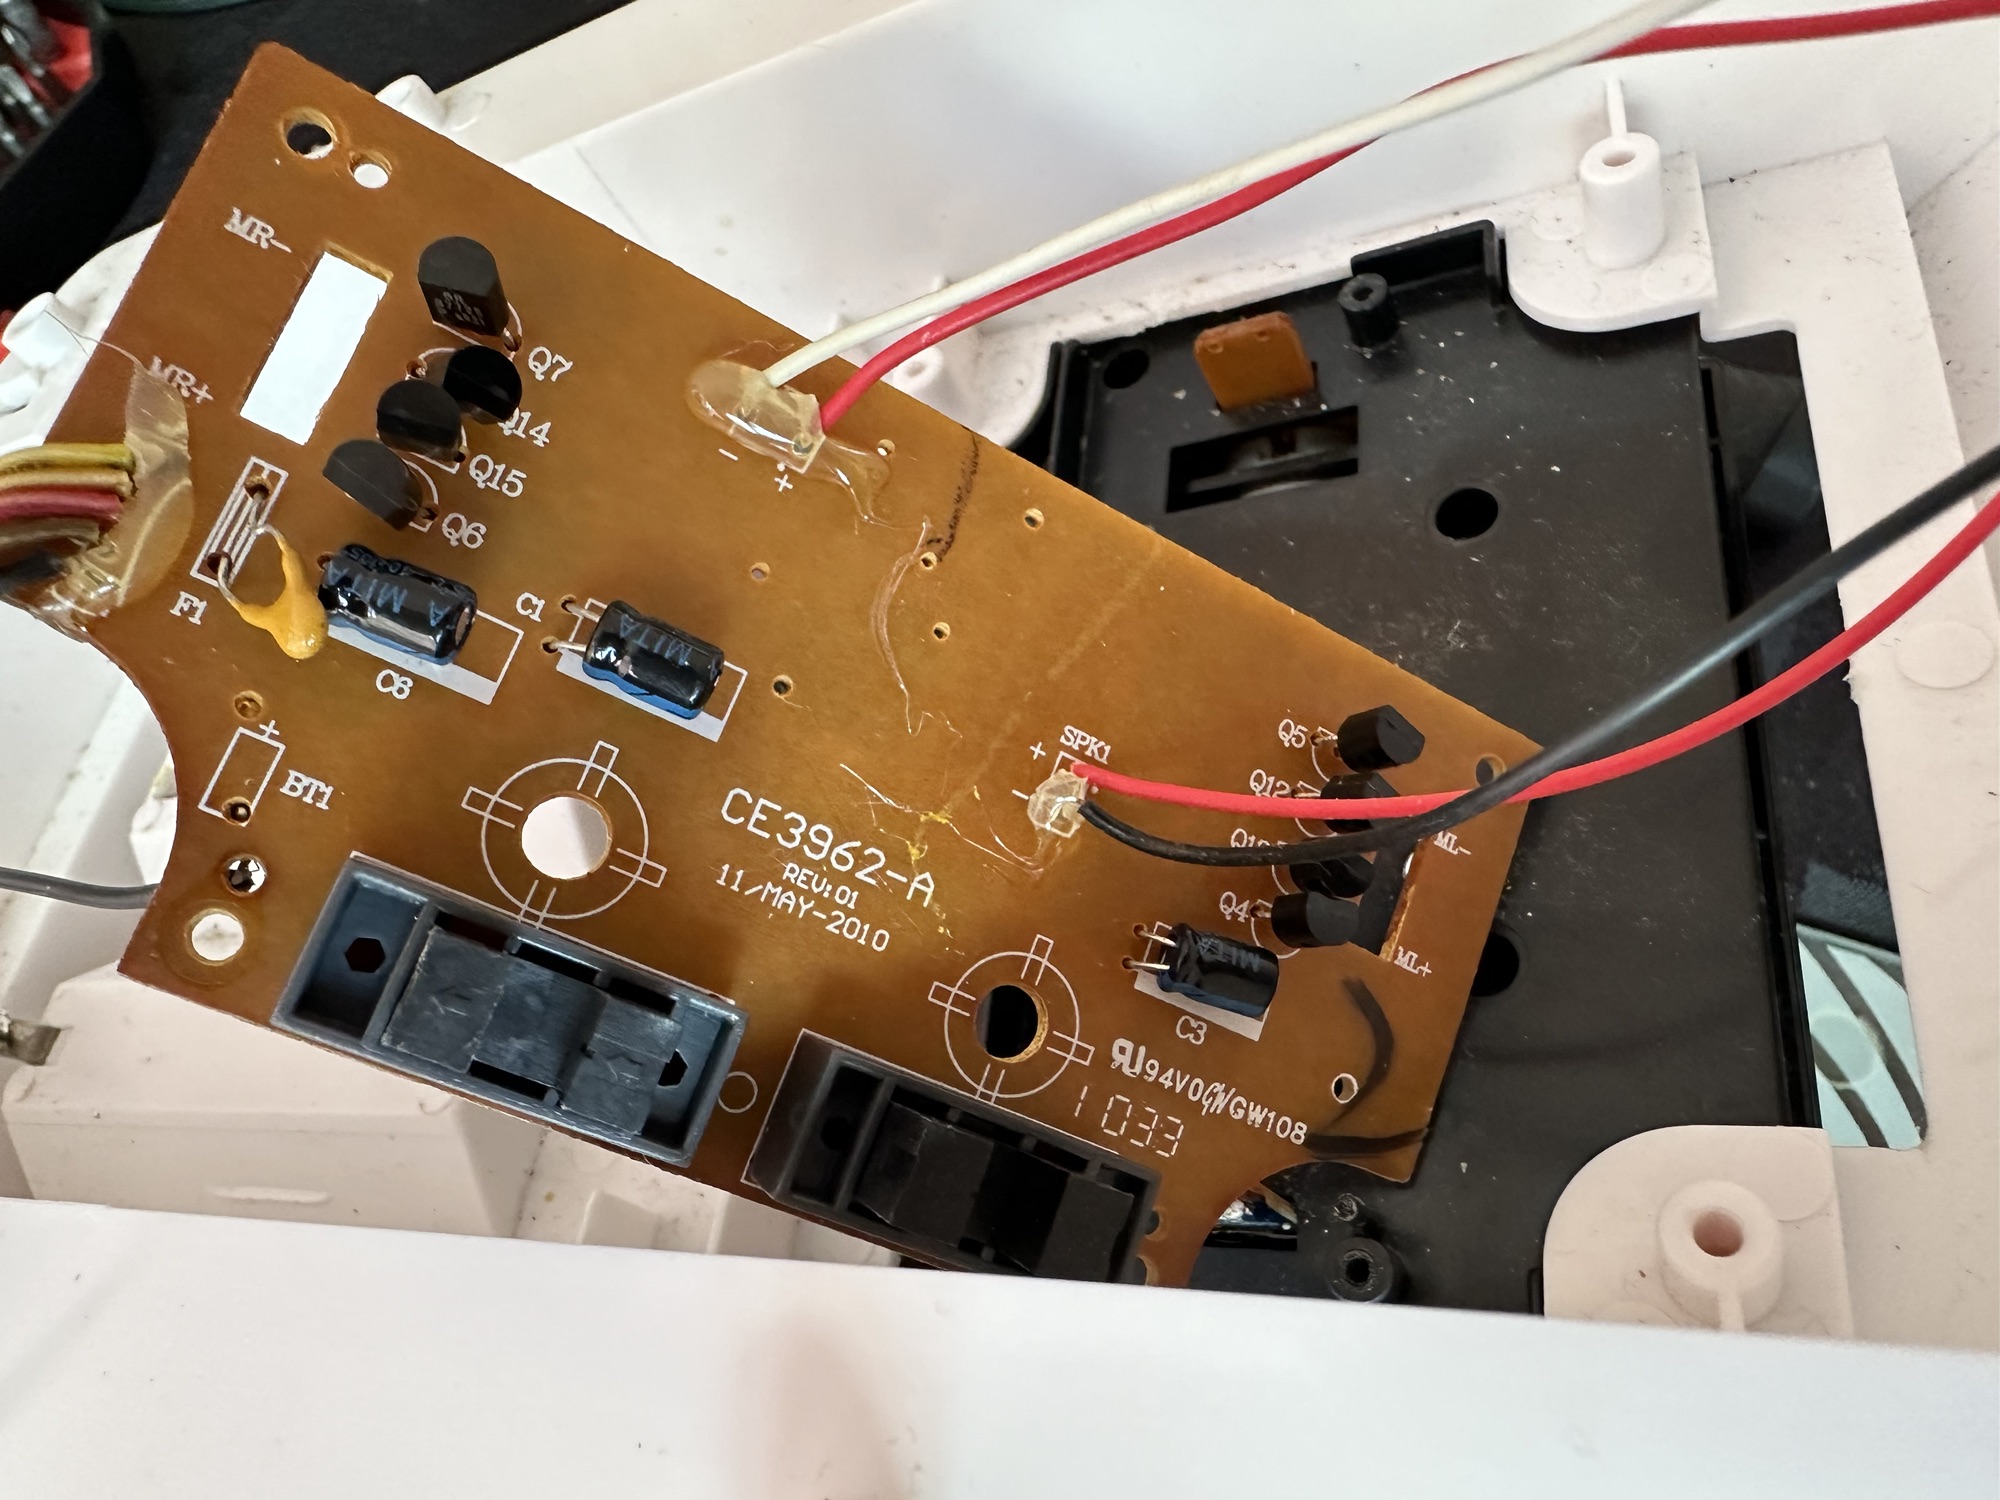
I’ve now desoldered all connections from the circuit board to assist in carrying out checks for continuity and tracing voltage. I can also check the board under the microscope. I may change all the capacitors for SMD ones.
I started checking continuity and tracing voltages and was doing really well until I got to a large section of the main board where everything seemed dead and unresponsive. What the heck was going on here? And then I noticed the wire had detached from the positive probe of my multimeter thus ending any further testing for today. I need to order some new probes. Well, I’ve ordered some nice new probes and croc clip connectors as well, so as soon as they arrive I’ll get back on with the testing. They arrived and were damaged on arrival, so back to the drawing board.
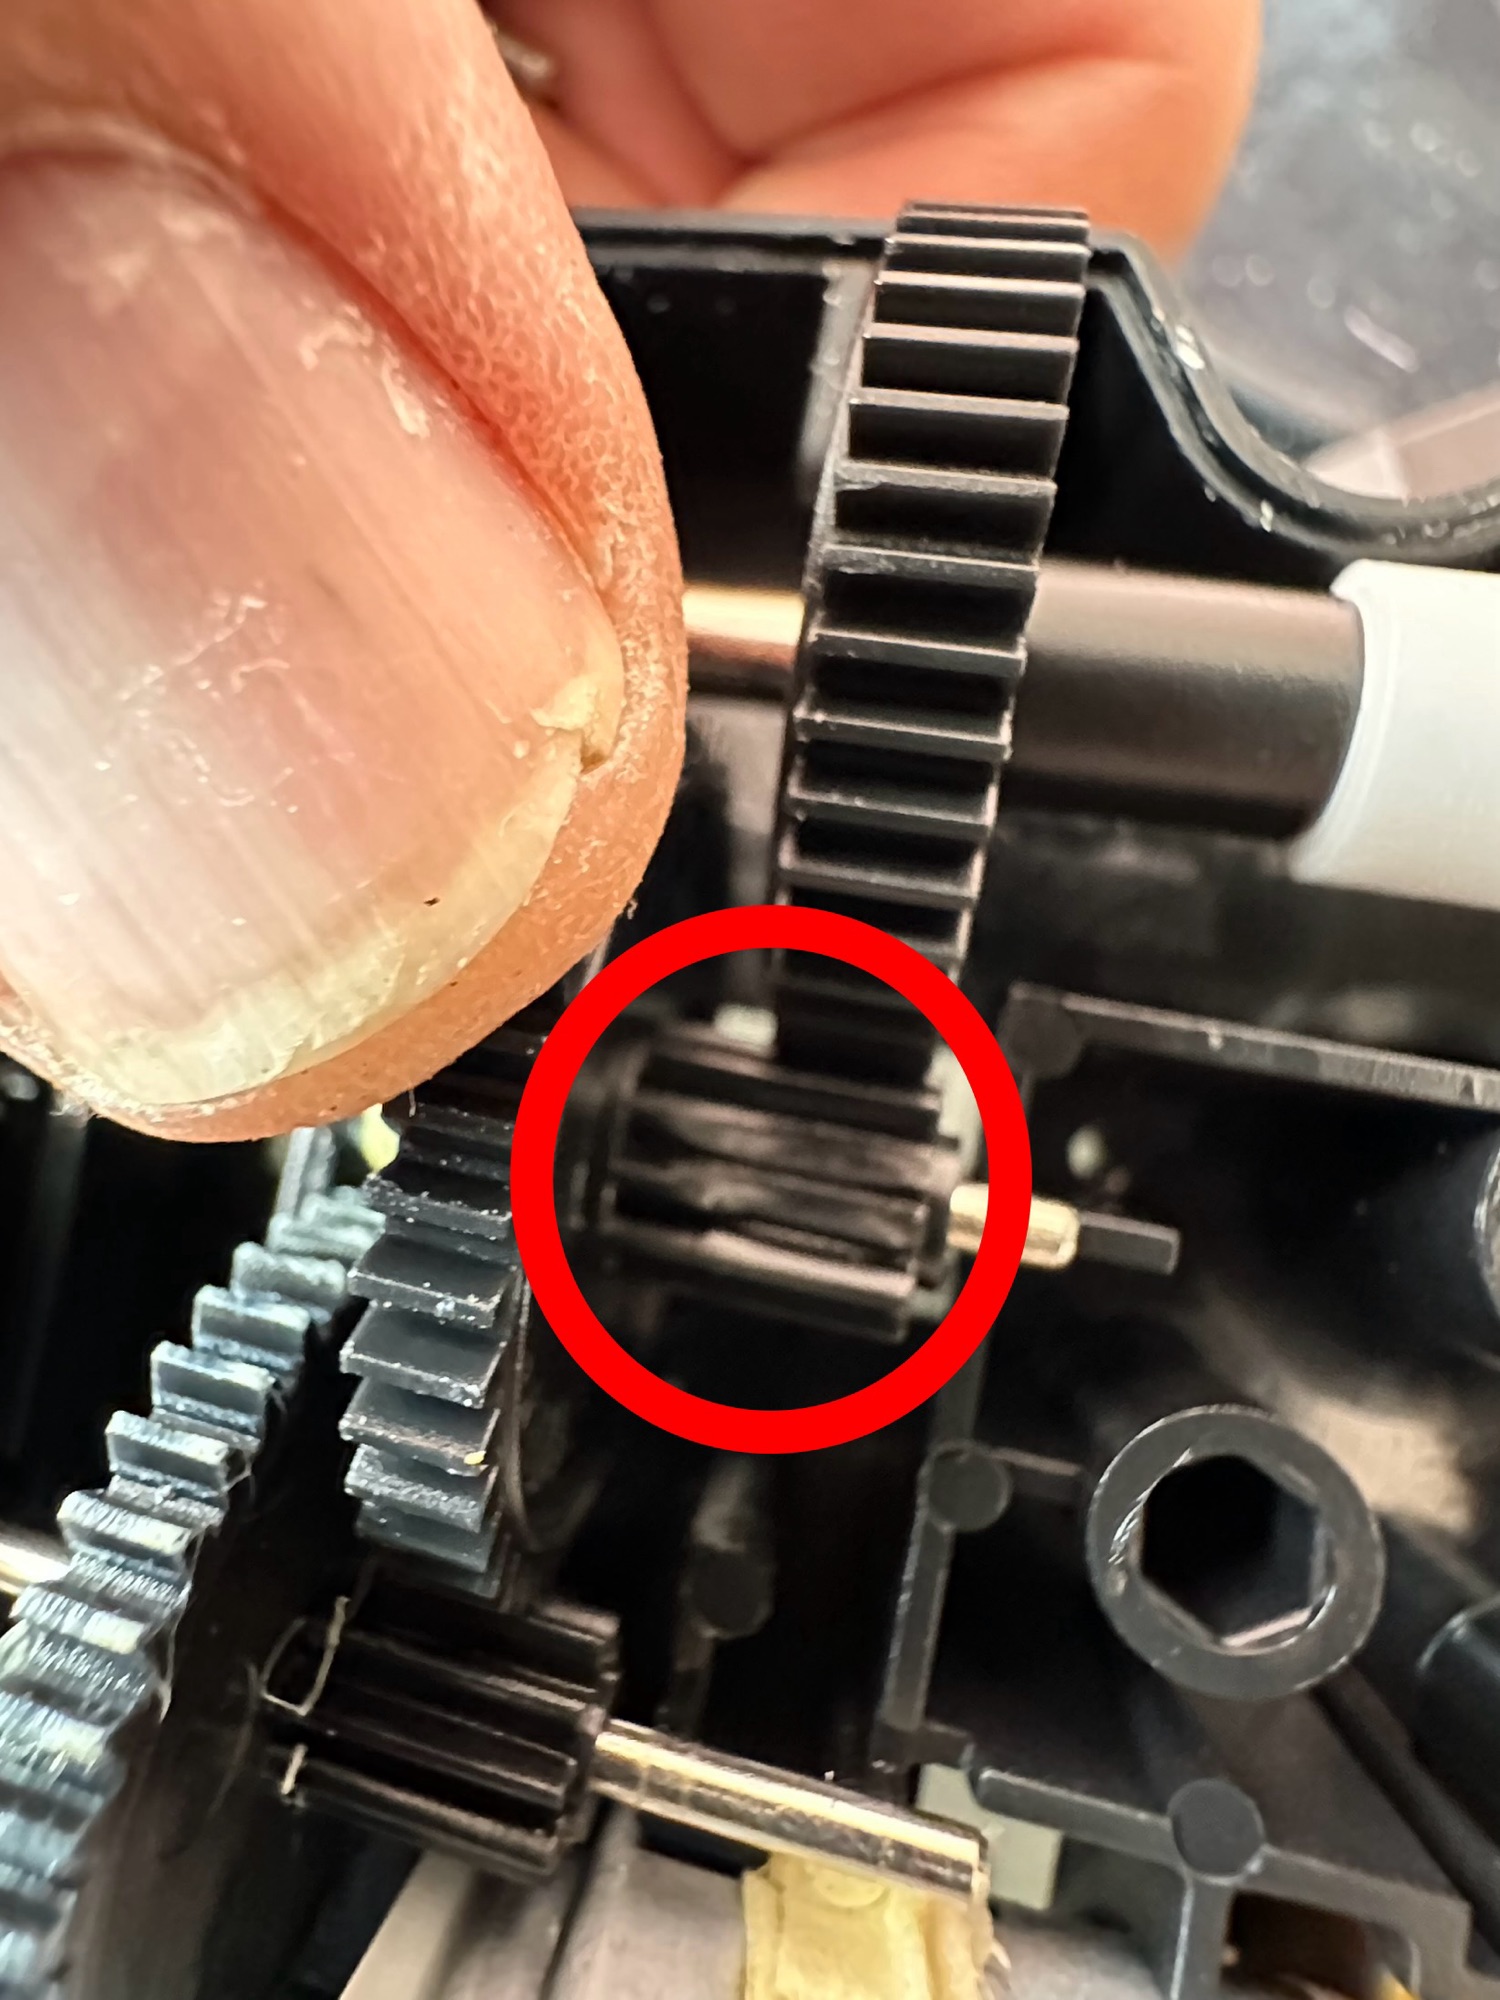
Big trak worn cogsBig trak worn cogs
I took the drive train to pieces and here it became apparent that a number of the cogs are damaged. I believe there is also some issues with the motion detector but I can’t confirm that until I get some power into the motors. I can’t find spare cogs online so I have ordered myself a second damaged unit to use as salvage. To be honest this new unit has all the transfers in place so I will probably use that shell and the guts of my original unit to form one complete Big Trak.
New donor Big Trak – better than my original one
The donor unit has arrived and boy I’m impressed. It’s in far better condition than my original one, so as expected this one will become the working unit and my original one will be come the donor. Any parts left over will be sold on as spares or even used on another damaged one if I can source it.
My new Bigtrak
If you look at the video above you will see the new Big Trak going through the motions. However the one thing it dosen’t do is turn. Could be a wheel sensor issue who knows. Good thing is that the cogs haven’t broken as the drive wheels are both solid and not free wheeling.
There are only two real issues with the donor here. Firstly it will not do the turn command and secondly, one of the drive wheels is damaged. Luckily I have a spare wheel so this was swapped over, some decals were missing but I coaxed these off my old truck with a hot air gun and reapplied them with no issues.
Missing decalsDecals applied
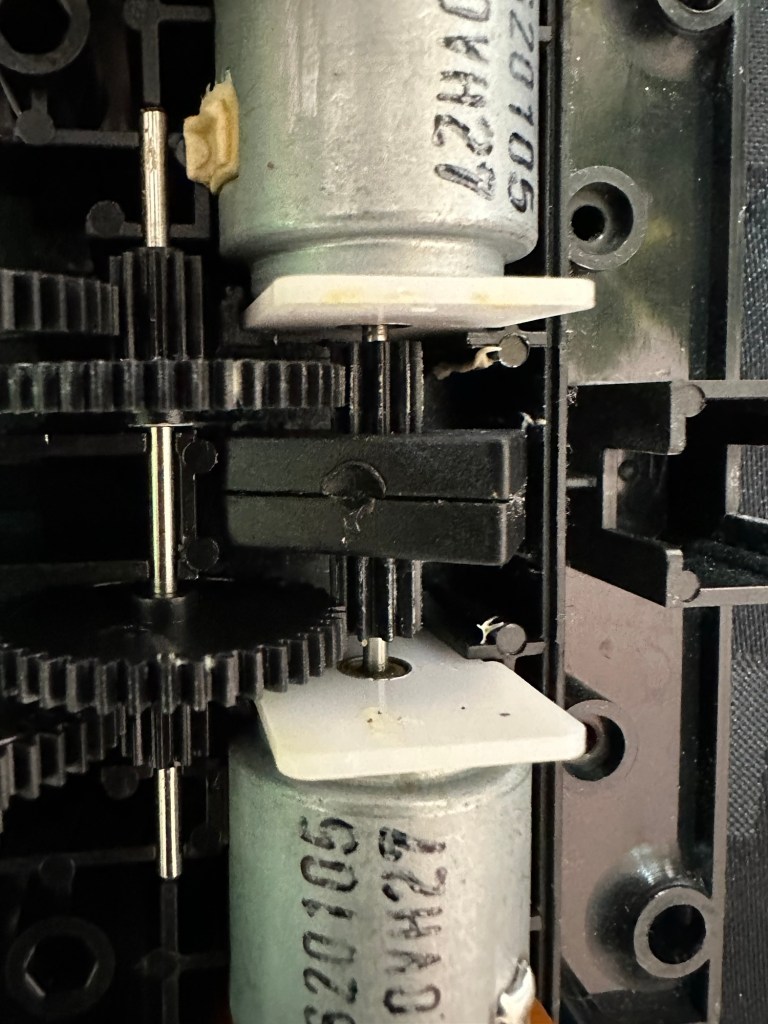
Looking into the drive issue meant opening the gear box. In here we have two magnetic independent gear controls that should have a gap between them, these two were stuck together thus rendering independent motor operations of the turning control useless.
Magnetic sensors joinedMagnetic sensors as they should be
I removed the two motors and repositioned them and the cogs holding the magnetic gear, this gave a gap of about 3mm that now allows the wheels to turn in opposite directions allowing the unit to turn.
Now the Magnetic sensors are adjusted….it turns
Whilst in this gear box I was able to confirm the issue with my old gear box and it really is all down to two damaged drive cogs that I need to obtain. I’m pleased with that as I could now get two good working units for just a small outlay once I can source some cogs. I will have to repair the wheel I removed to replace the one on my new unit however I have an idea how I’m going to remedy this and again it’s a low cost option. But that’s a job for another day.
2:18 of rebuild magic
So if you look at the video above, it’s the full fix that I posted on YouTube. Really pleased with this fix, again I’ve learned quite a bit about these units and I’m going to have immense fun programming it. My wife dosen’t understand my excitement over this toy, but all my old buddies and colleagues understand it as they grew up in the same era. Maybe it’s the male menopause, reliving the past and all that.
But hey, it keeps me occupied and out of mischief so who should worry about that
This one is going on my shelf so when the kids visit I can show them the joys of basic programming we experienced back in the day.
I’ve just brought one of these, it’s a toy and I’m heading for the senior end of adulthood:
Big Trak CE3962
BIG TRAK / bigtrak is a programmable toy electric vehicle created by Milton Bradley in 1979, resembling a futuristic Sci-Fi tank / utility vehicle. The original Big Trak was a six-wheeled (two-wheel drive) tank with a front-mounted blue “photon beam” headlamp, and a keypad on top. The toy could remember up to 16 commands, which it then executed in sequence. There also was an optional cargo trailer accessory, with the UK version being white to match its colour scheme; once hooked to the Bigtrak, this trailer could be programmed to dump its payload.
WikipediA
Here’s what the original listing said:
Item probably does not work. I recall attempting to fix corroded terminals years ago and it’s still not working. I do not have D cell batteries to test now.
EBay
I was just browsing around as I do and this popped up on my timeline, the wife is going to disown me for bringing such junk into the house, however for a split second 14 year old me was in the house and a flood of memories, not all good came back to me. These toys came out in 1979 when I was aged 14. My friend over the way from me was brought one of these for Christmas and I experienced one of my first ever episodes of Jealousy. Back in 1979 I believe they retailed for approximately £39 Gbp, and my parents weren’t about to part with hard earned cash to invest in developing technology like computing – “It’ll never last, it’s just a fad” (Famous last words).
I made every excuse possible to go around his house to play and even offered to look after it for him when he went on holiday, he never let me though and I believe at that moment my friend realised what the term obsessive meant, as he was experiencing it big time with me.
Now I own one, however this is the later version from 2010, it only cost me £9.99 Gbp and its probably a wreck, but I’m really going to treat this like a proper full sized car restoration and I want this to work, crikey I’ve even found out I can buy the original decals from Australia, so it’s patently obvious the obsession is still there.
I can’t say I have genuinely looked so forward to a parcel arriving as much as this one. I sincerely hope I have no regrets…. And I have all fingers crossed.
This is going to be a labour of love and I can’t wait.


You must be logged in to post a comment.