

TinyGS is one of the most exciting grassroots radio‑space projects to emerge in recent years. Built around inexpensive ESP32‑based LoRa boards, it …
TinyGS: The Open Satellite Network Anyone Can Join

It’s easy to get involved with low cost satellite tracking. Here’s a repost of a recent article about TinyGS
TinyGS is one of the most exciting grassroots radio‑space projects to emerge in recent years. Built around inexpensive ESP32‑based LoRa boards, it …
TinyGS: The Open Satellite Network Anyone Can Join
What the listing stated:
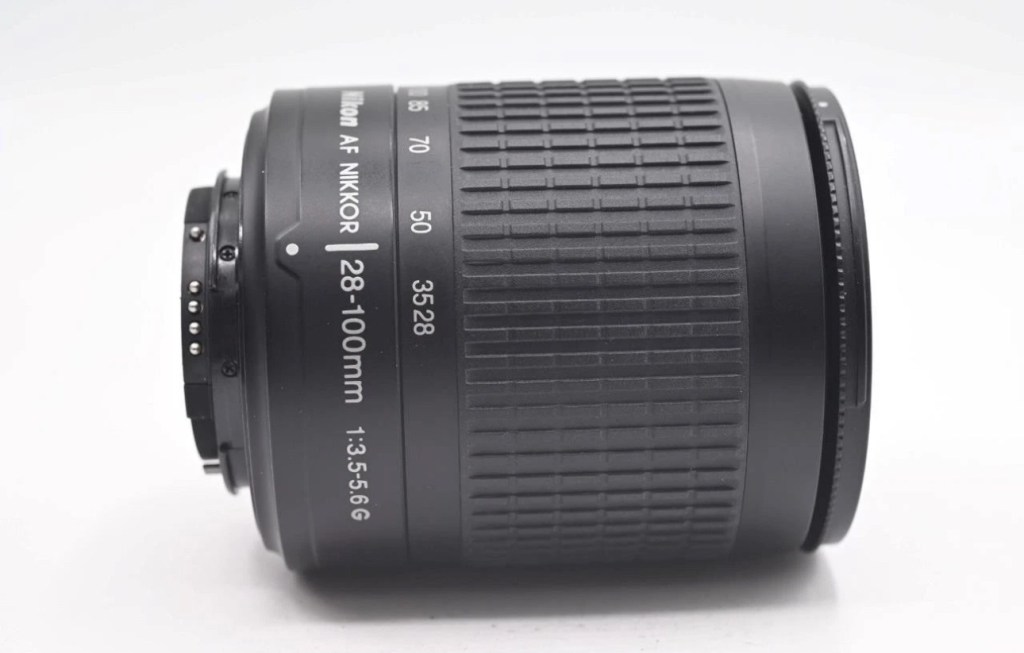
Nikon Nikkor 28-100mm Zoom Auto Focus Lens F3.5-5.6 G
It will autofocus with: Df-D1-D1x-D1H-D2-D2x-D2xs-D3-D3x-D3S-D50-D70-D70s-D80-D90-D7000-D100-D200-D300-D300s-D600-D610-D700-D750-D780-D800-D810-D850-D7000-D7100-D7200-D7500 & Fuji S1, S2, S3,S5
This lens will not autofocus with : D40-D40x-D60-D3000-D3100-D3200-D3300-D3500-D3600-D5000-D5100-D5200-D5300-D5500-D5600 as these cameras do not have integrated autofocus motors in their bodies, but it will still work with manual focus and auto exposure as it has a “chip” mount.
It will also work Nikon 35mm AF film cameras: F80, F90/90x, F75, F70, F65, F60, F55, F50, F80, F90/90x, F101, F100, F401.
Comes with front / rear lens caps
EBay
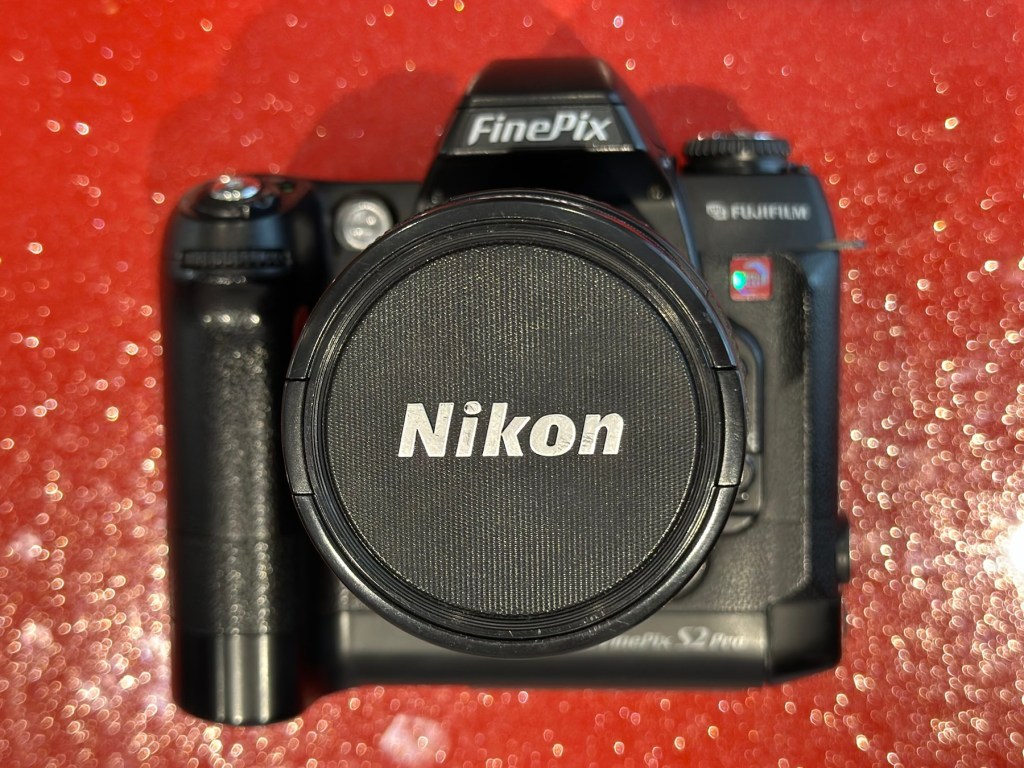
Anyone that has followed my recent repair of the camera: Fujifilm Finepix S2 Pro will be aware that I purchased a lens as a test lens for working on some stock that required a Nikon mount. I went cheap and purchased a lens that was so badly affected with lens fungus that it will require a deep clean and some TLC. Anyway, it allowed me to test electrical contacts and all the menus, and that was about it, it served a purpose there, but taking a picture was like looking into a deep fog, it was hopeless. Anyway that lens is now set aside and will become one of those projects to dig into on a long winter evening…or two, or three.
As I have a number of Nikon based cameras needing assessment on the horizon, some with sensor issues, i have made the decision to pay a little more for some quality, from a company called AP photographic who specialise in quality used equipment, a company that is based close to where i used to live down in the south. This Lens has cost me £58:95GBP including postage, a fair but good price for some peace of mind. This post will not be a repair post as there is nothing wrong with this lens, it will be more of an assessment of the lens when used with the Fuji S2 pro i featured in a previous post.
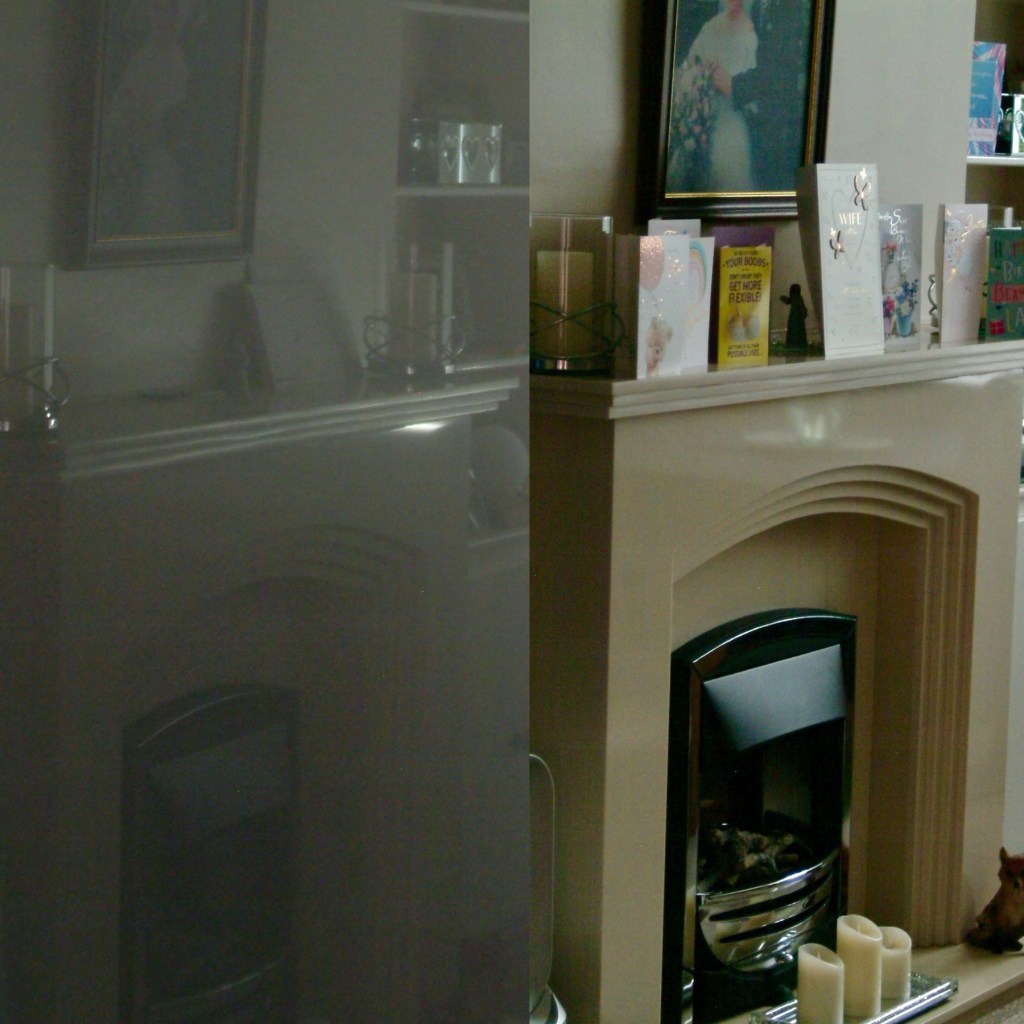
I’ve put this post up to show the difference in the pictures taken on the S2 with both the old lens as well as this lens. I think the results will show quite a noticeable contrast and confirm just how restrictive a lens is when it is infected with a fungus problem.

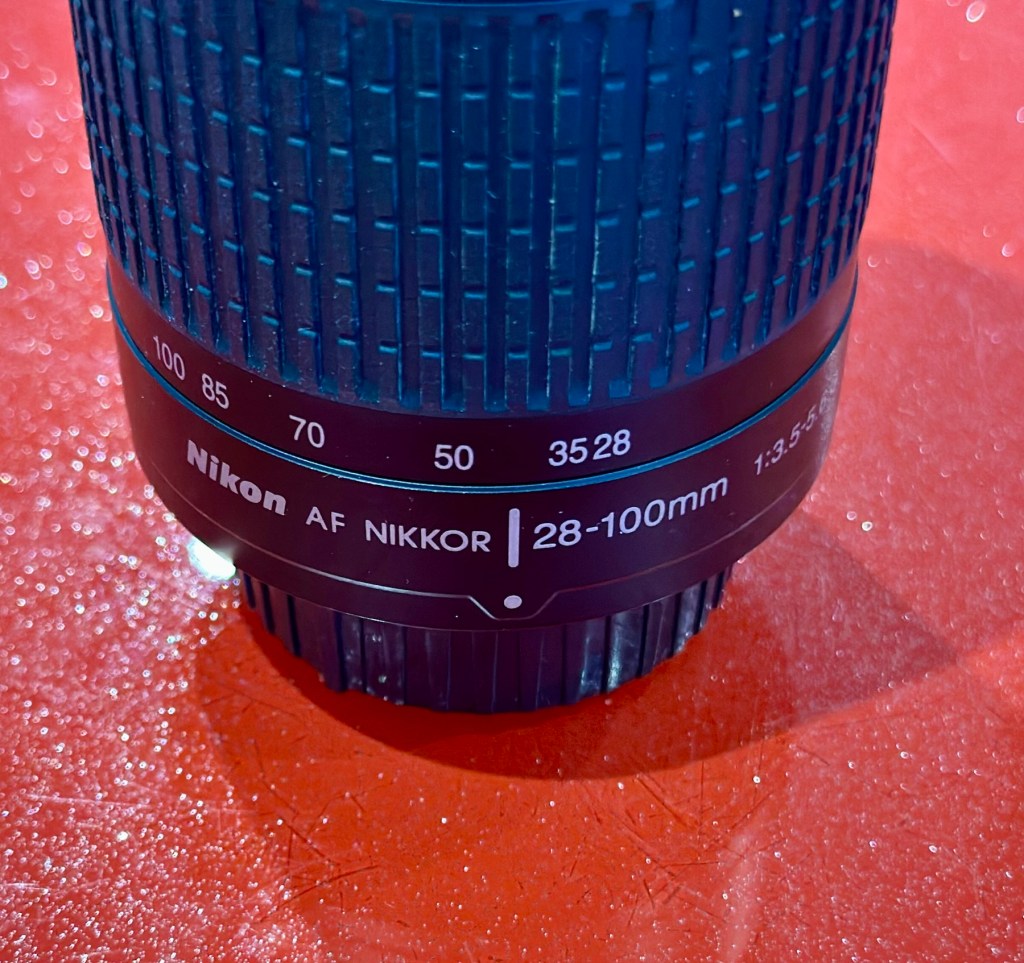
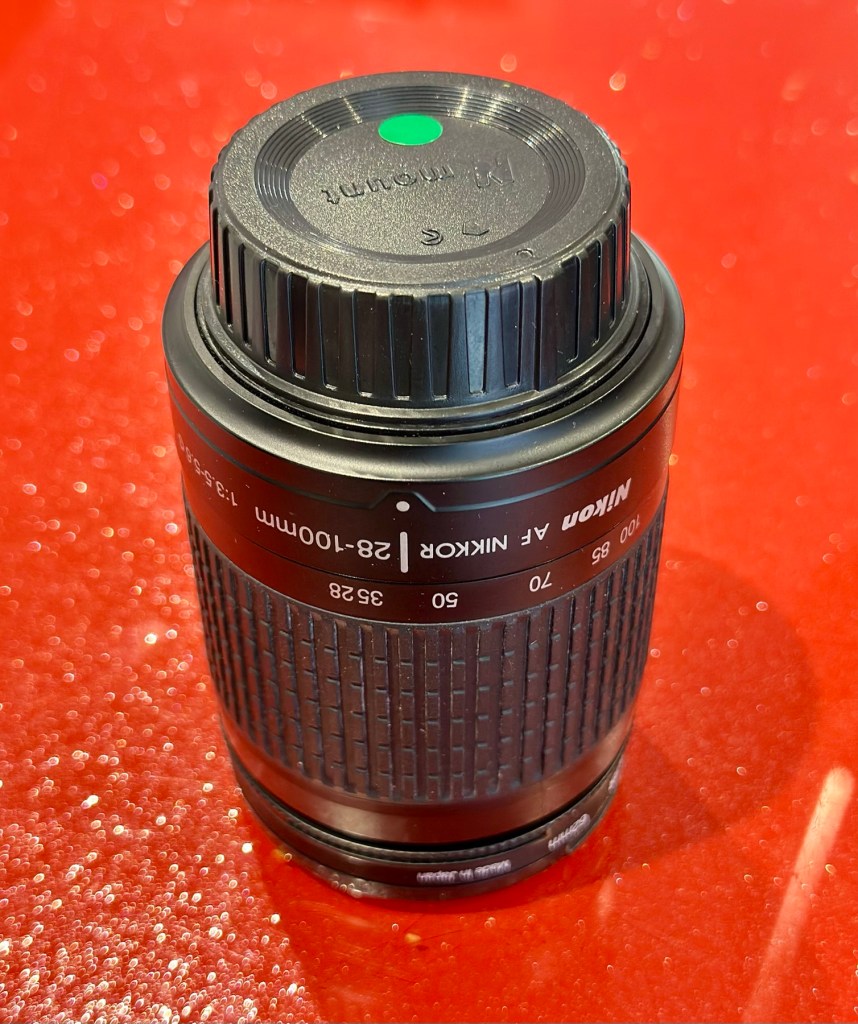
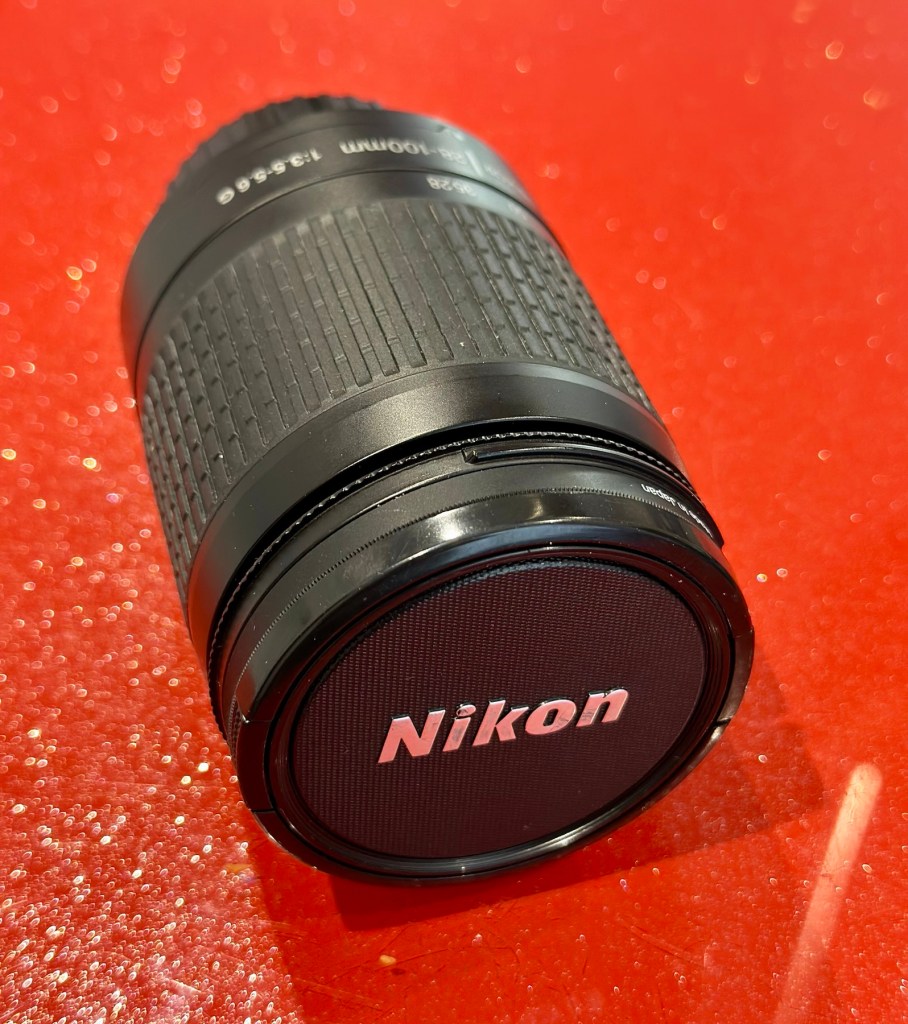
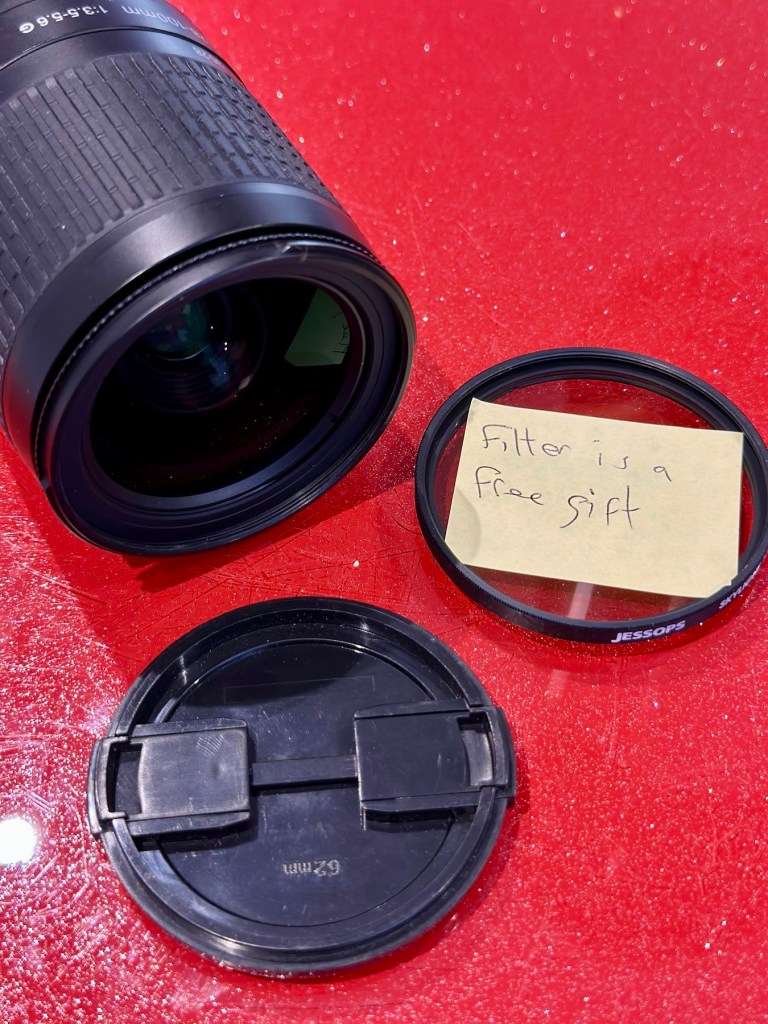
The lens arrived within a couple of days and is in perfect condition. It has a lens cap and bayonet cap so is perfectly protected against dust dirt and damage from foreign objects. And when the lens cover is removed there is another little surprise, a post it note saying “Filter is a free gift” that just happens to be attached to a daylight filter. Nice little touch 👌

Lens is a perfect fit, no aperture ring on it as it is fully automatic, full autofocus. I’m not sure how the flash will work with this lens though when I use the Fuji S2 Pro, as that body works best with a fully closed lens aperture, but I’m sure I’ll be able to work it all out and get it functioning as it should. And I did, i played with the Aperture settings in “A” mode and it works just fine. It’s faultless.

That said on the S2 it not only looks good, it takes good pictures. Compared to the lens I last used this one is crystal clear, not a bit of fungus no aberrations and not a speck of dirt. This is a good lens and will serve me well for the purpose of testing other equipment I have awaiting attention. I think I’ve purchased a good example here.
I can confirm that the Fuji S2 Pro does not have a thing wrong with it and is working perfectly. All modes, all conditions are performed just as they should be. This lens is gorgeous as it is so clear and has been so well looked after. I believe this whole unit will be the one I wander about with when i go out on my walks. I can’t wait to take some serious photos to post.
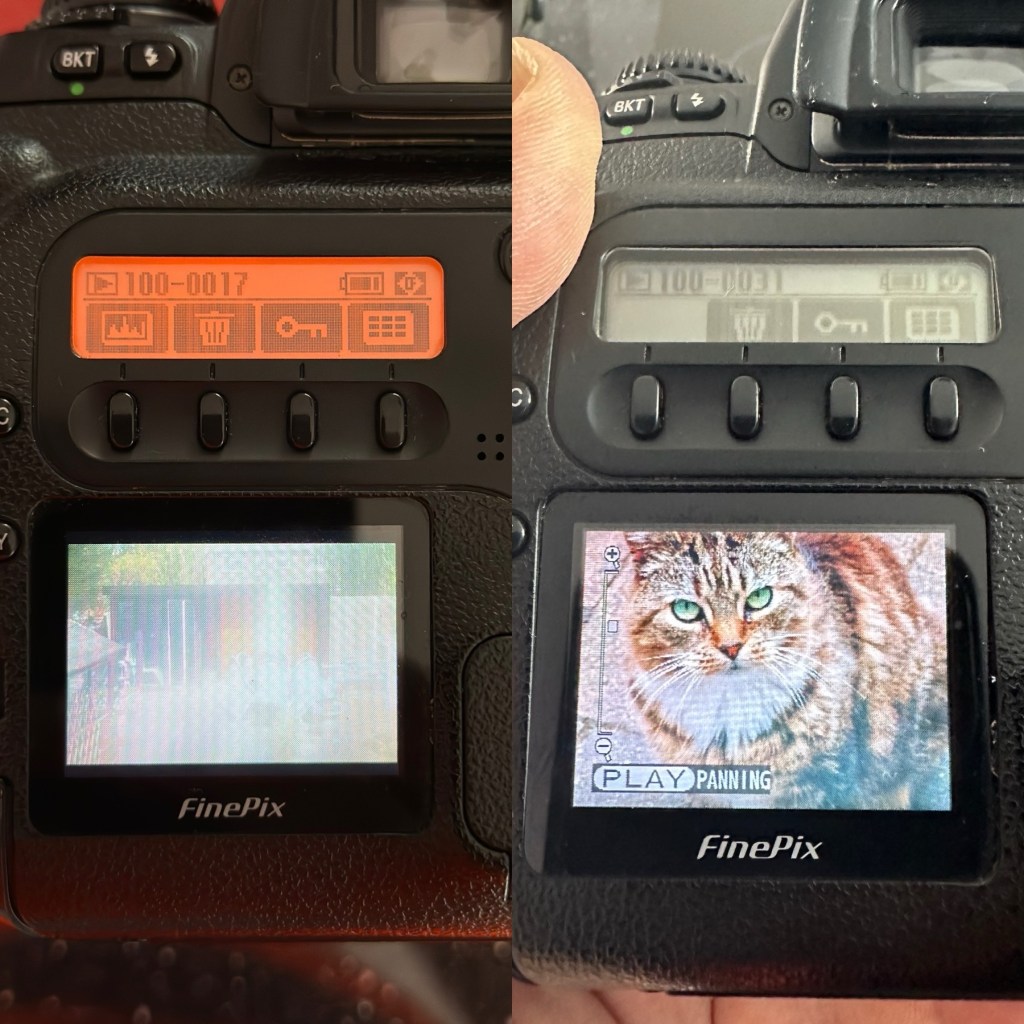
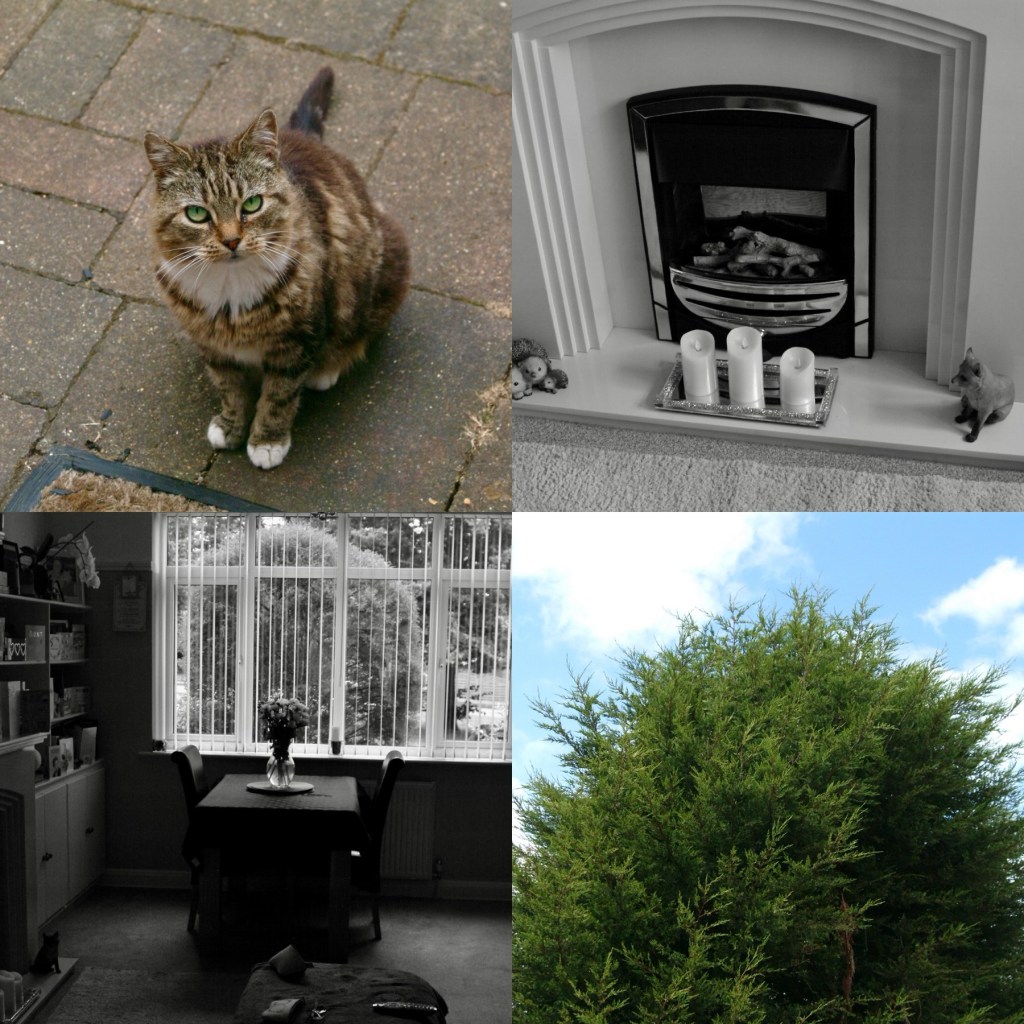
I took some pictures just randomly around the home setting with the old lens to show how foggy things were with the lens fungus. I have tried to take some more photos of the same locations with the new lens as well to just show how they compare and these can be seen in the pictures grouped below.
Before and after pictures, what a difference the fungus has had on the results.


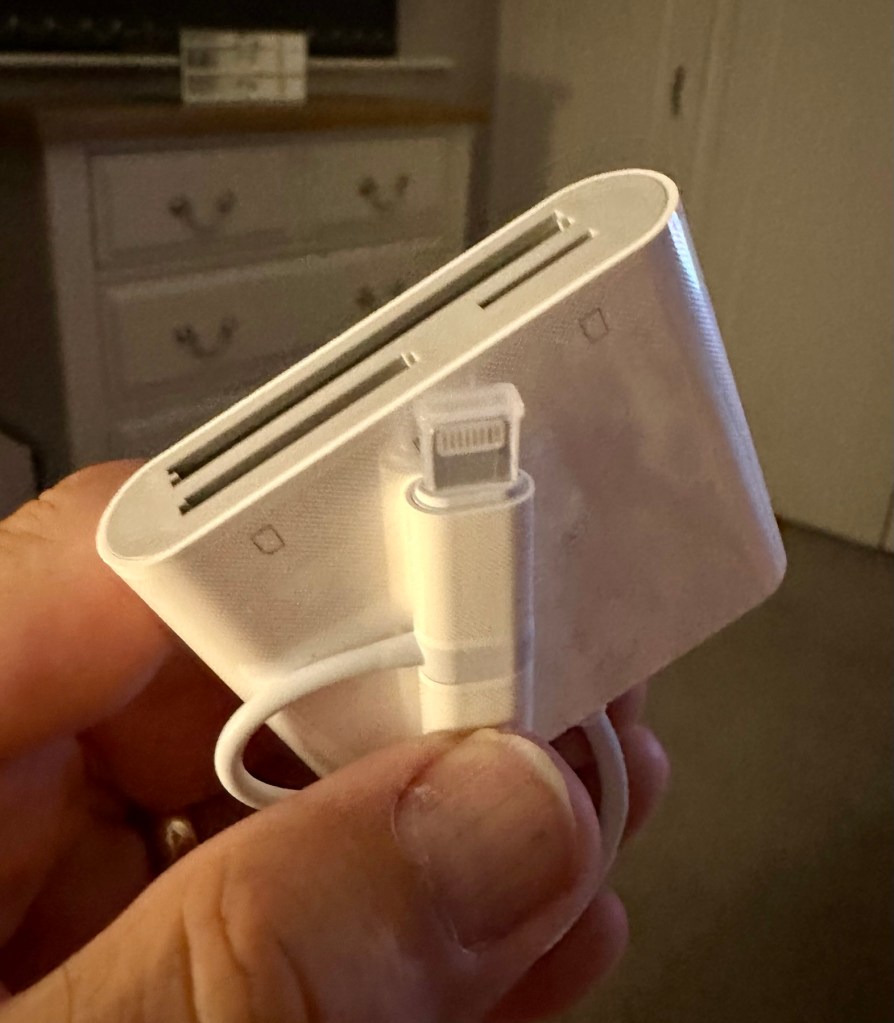
All these pictures are on an old CF card so it is a bit of a palaver to get them on to new technology, but it is doable, it just takes a little time, and this gadget allows me to load numerous card types even the CF cards direct to my iPhone via a lightning connector. It also has a USB-C connector for other phones. It works really well as you can see in all the pictures in this post.
And below are a few random photos taken on the S2, it has a good black and white mode but is quite heavy on contrast. Post editing would probably be recommended, but to be honest I really love its moody appearance.
This camera and this lens have proved fantastic. I know you can get far superior picture sizes and quality on a basic mobile phone, but where the heck is the fun in that? This camera cost me £8:00GBP. Just £8:00. And it is a superb camera that will be going on many trips with me as I just love it and how it looks. I now know it intimately after reading up on it and testing it, and cannot wait to put that knowledge to use.
Cameras are better than mobile phones. Old ones like this are fun, and an absolute privilege to use. It’s not all about the Megapixels, just remember these old cameras were the ones taking high quality professional pictures back in their day. Just because time moves on, and just like an elderly old lady or gentleman, they should not be discarded because they no longer serve a purpose. Respect the older technology, learn from it and you will ultimately become a wiser person yourself. Oldies rule! Never forget it. 👊
Thank you so much for passing by. It’s always very much appreciated.
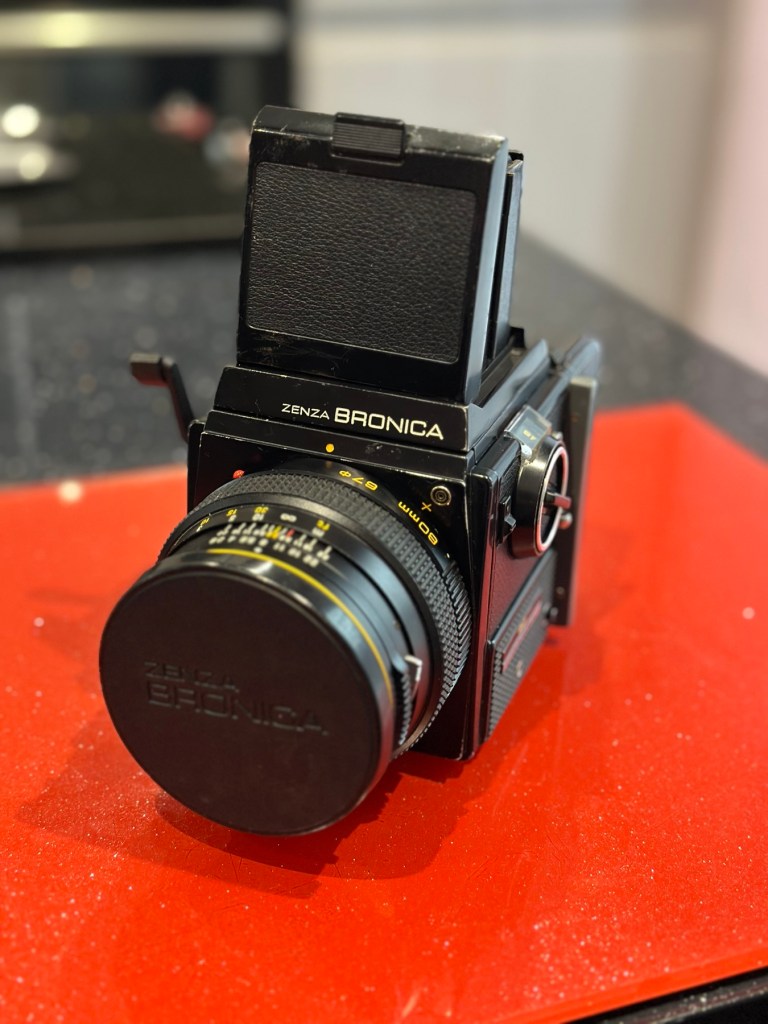
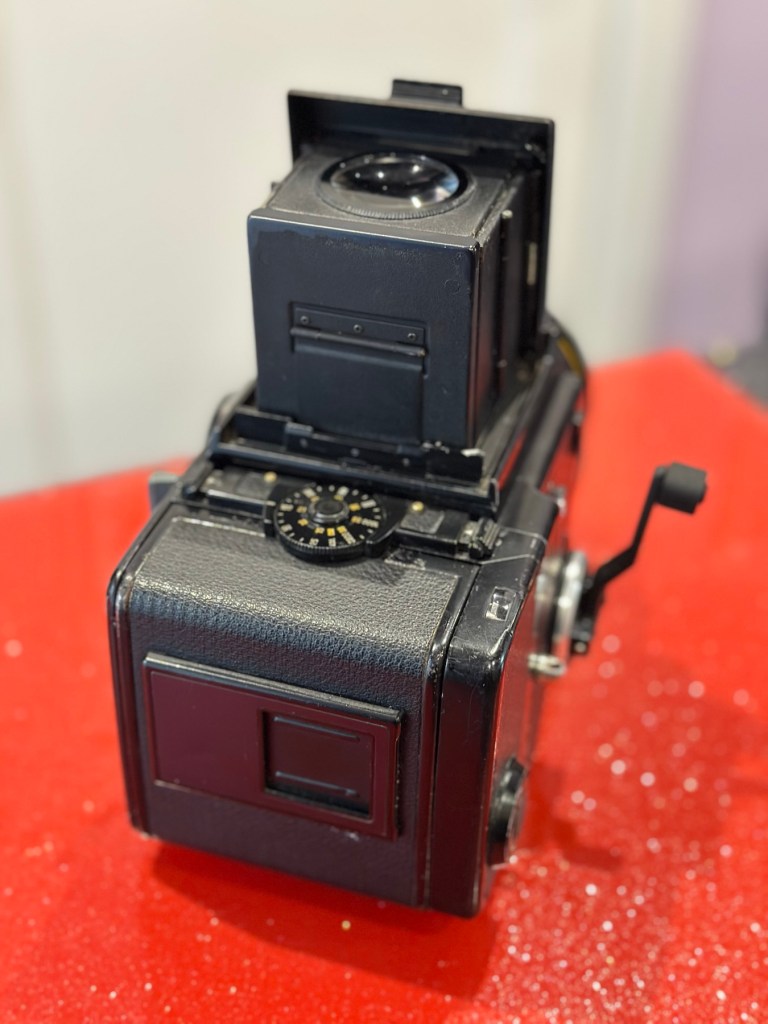
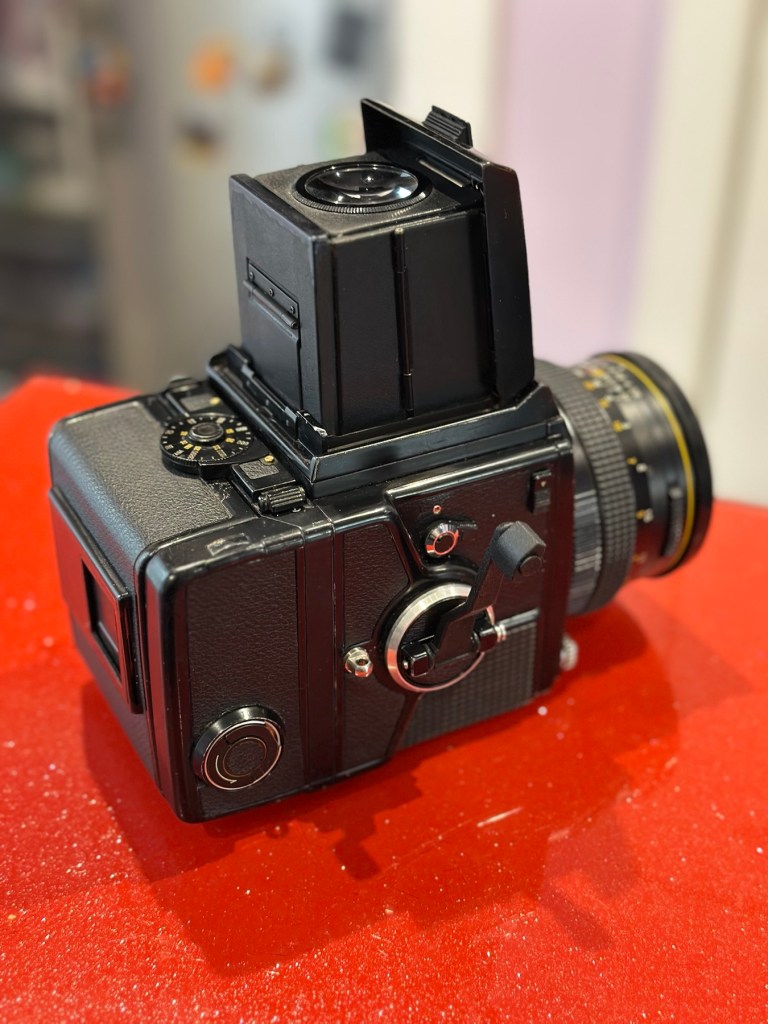
To find out what I am trying to accomplish with this project please refer to my initial post: Bronica SQ-A Medium format camera
To build a usable, basic issue, medium format camera (Bronica SQ-A) from damaged items and spare parts, for as little outlay as possible and shoot one black and white, and one colour roll of film as proof of its successful completion.
Building a camera from damaged parts is no easy task when the name happens to be a high end brand and any parts that are available, are being snapped up by others to service their own stock or to break up for sellable parts. I’m going to keep a running total to try and build this as cheaply as possible, and to keep track of this total I’m going to use my trusty Psion Organiser II LZ from 1989 to keep a tally.
Now we have the bulk of the camera, we just need those annoying little bits to finish off. I’m calling them annoying, because if I was just to pay out for the 5 or 6 little finishing touches I need they would cost more than the total amount I have paid so far for the camera itself. I would be paying a premium for items that will in the end have no effect on the result I require to complete this project, that being two properly exposed rolls of film.
So here we go.
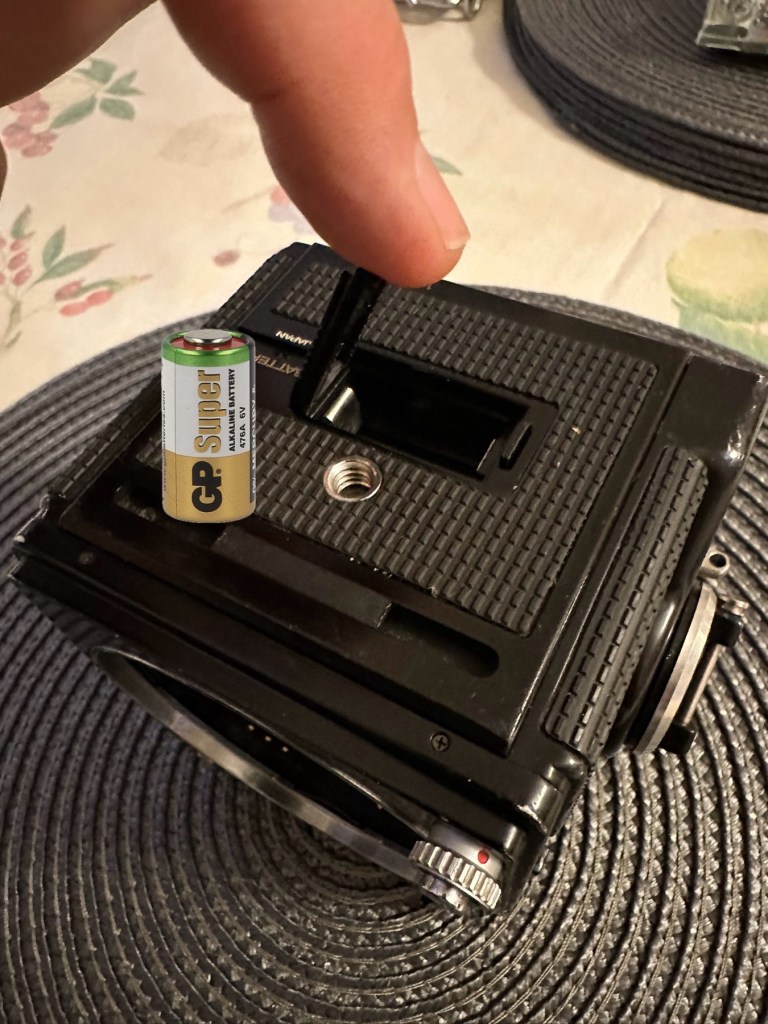
Battery:
Probably the cheapest item you will buy for this camera. The camera requires a single 6v alkaline battery and is quite important. Without it the mechanical shutter still works but at only 1/500 second. To obtain all the other available shutter speeds you need the battery to work the system electronically. This has cost me only £3:50GBP. After testing I can confirm that the battery works fine and all shutter speeds are as expected. Perfect.

Winding handle/Crank:
For some reason sellers always remove the crank prior to selling. That’s because the original Bronica crank is currently being sold at between £70-£80GBP and it really isn’t worth it. Everyone is after a quick buck and some people are willing to pay it. I’m not however, and my handle here is a special strength 3D printed version that I have paid the grand total of £11:20GBP for. It will need a couple of small “O” rings just to pad the handle on the spindle as it’s a tiny bit narrower than the original over priced one. It’s more than capable for the job in hand though, looks absolutely fine and has saved me around £65:00GBP of money.
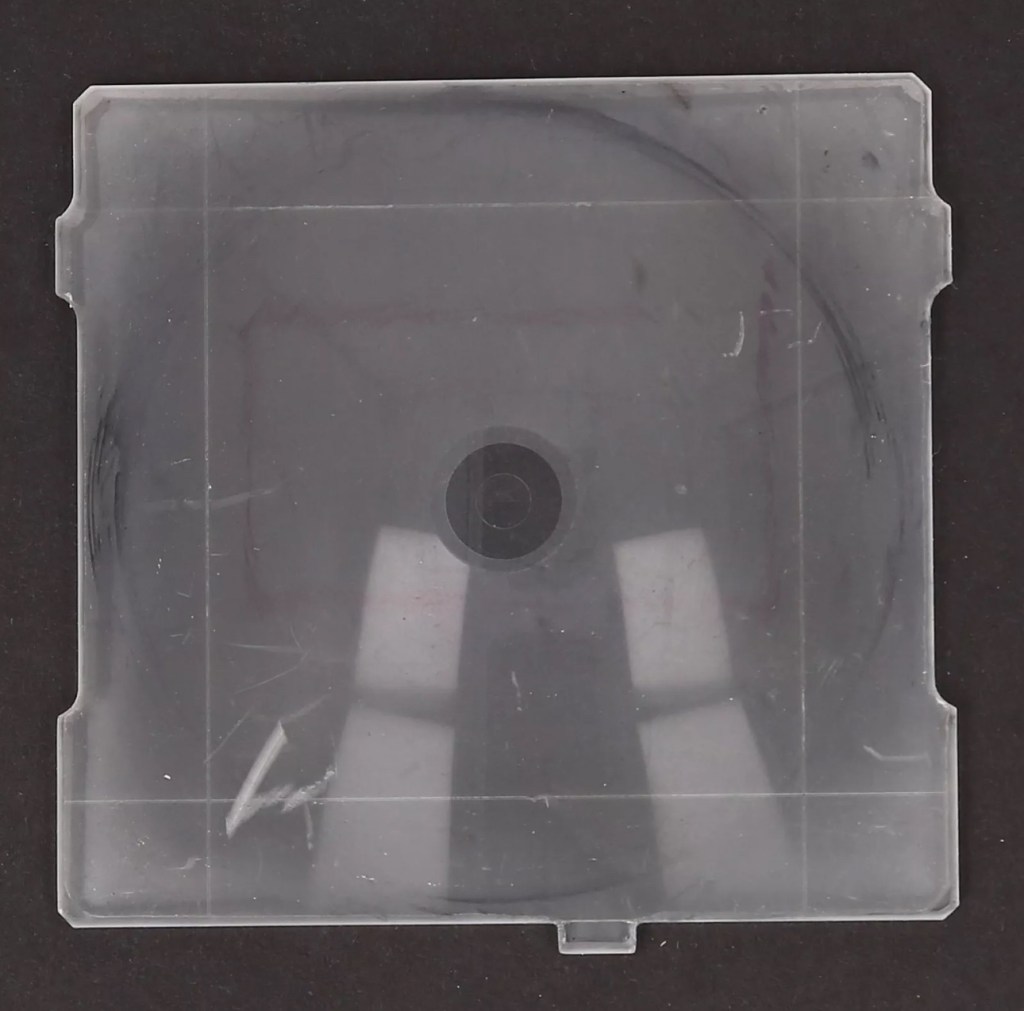
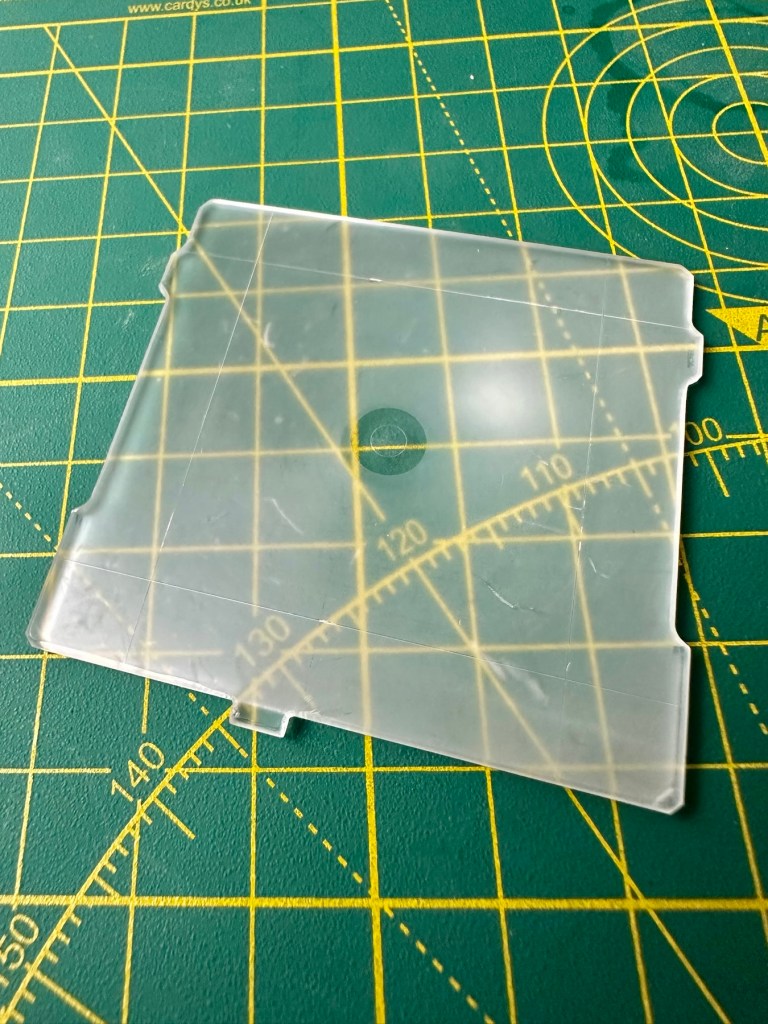
The focussing glass:
This is another item that the sellers withold for individual sale. I wonder why? Yes a standard focussing glass is going to set you back anything up to £150:00GBP and again it’s not worth it. However my one is a “damaged” one in that it has handling and pen marks on it. It looks as if some has sadistically drawn their own frame on the glass, the fool! I’m hoping this will clean up a bit but as long as I can see the focussed image I’m not all that fussed. I only paid £11:75GBP for this so yet again a further saving of around £140:00. See, savings can be made, if you are happy to make the trade for a lower quality item.

Camera aperture covers:
Not really essential at this point, but to be honest you need to protect the fragile equipment you now have so it is really worth investing. I’m not purchasing these just yet, that’s a later purchase, I have a lens cover and hood cover now, so that is all I really need to start the real testing.
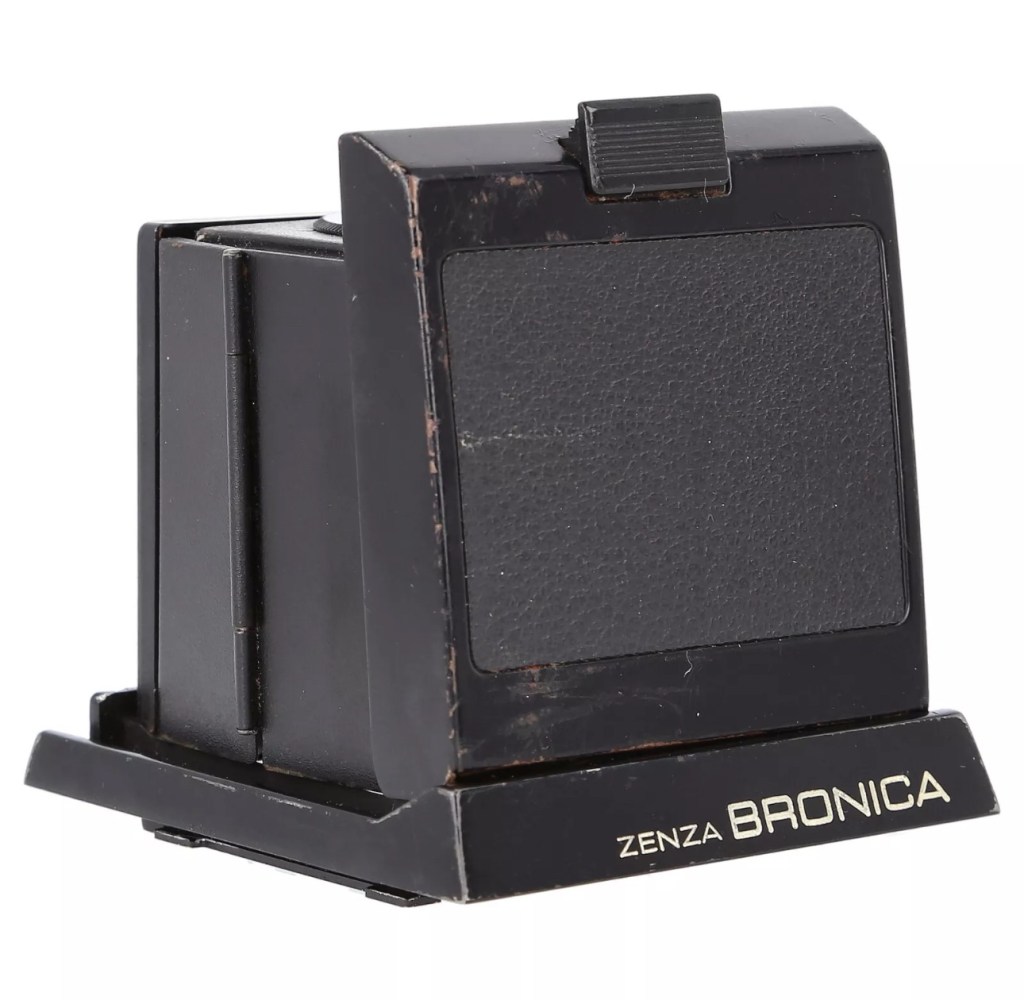
Waist level viewfinder:
Now this is a real bone of contention for me. Individually it is probably the most overpriced single item you could buy. It’s basically just a flip up hood that acts as a cover for the focussing glass, that affords a bit of light protection, as has been common on old twin lens cameras over the last century. But because the sellers again sell these as “additional items” they control the price and at an average of £150:00GBP (Recent eBay sales data) again the consumer is being ripped off. I’m currently monitoring some damaged ones for repair on the sale sites.
And as of the 4th May 2025 I am now the proud owner of one of these items. I’ve paid a total including postage of £39:75GBP and that’s a very fair price. I’ve been searching the sale sites for quite a time before coming across this one. There is one caveat though, it has some slight damage, but that’s what this site is all about and it ties in nicely with the Frankenstein aspect of this post.
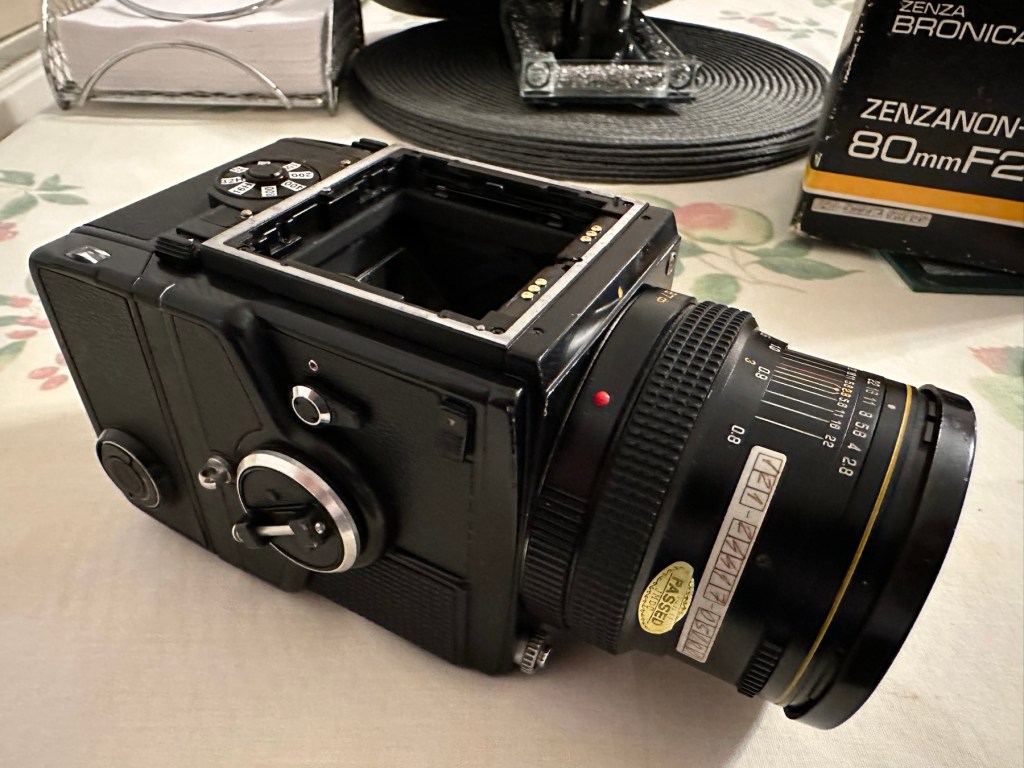
I’m going to be very brief with the assessment, as you will see this project is made from a selection of parts that at time of purchase all had their own faults. Each part that has required repair has been highlighted in the relevant posts associated with this series. Links to those posts can be found in the link supplied in the first paragraph of this post. There are five parts in total. I’m generally pleased that the parts I have obtained have combined to make a very nice “Frankenstein” camera from a brand of camera that is becoming increasingly expensive as an “Antiquity”. Not that it was ever a cheap option for a camera in the first instance. Let’s move on to cover some repairs that have occurred for some of the pieces covered in this particular post.
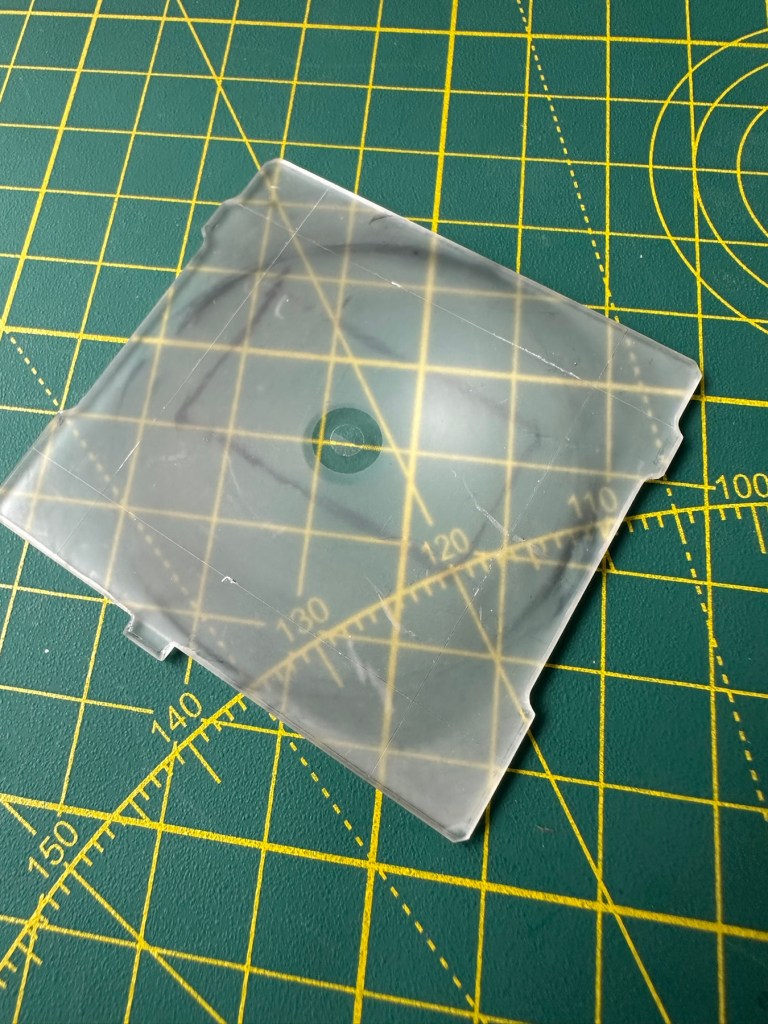
The focussing glass as you will see above was in quite a poor state on its arrival. This one had some scars and it looks as if someone has used pen to draw their own frame in the glass, to be quite fair it was in quite a state, but it was purchased for a really low price and i believe it can be made to look a lot better. Listen to anyone who is,”in the know” and you will always be told to not handle these screens. A load of tosh, I’ve been handling these ground plane glass screens for years and sometimes you just need to get hands on and this is one of those cases. Yes, if it’s in a pristine condition then cotton gloves would be the order of the day, but this example bypassed pristine conditions many years ago.

I started off with a good clean using IPA and cotton buds, I used about six cotton buds in this process using a new one every time the cotton was overrun with dirt.
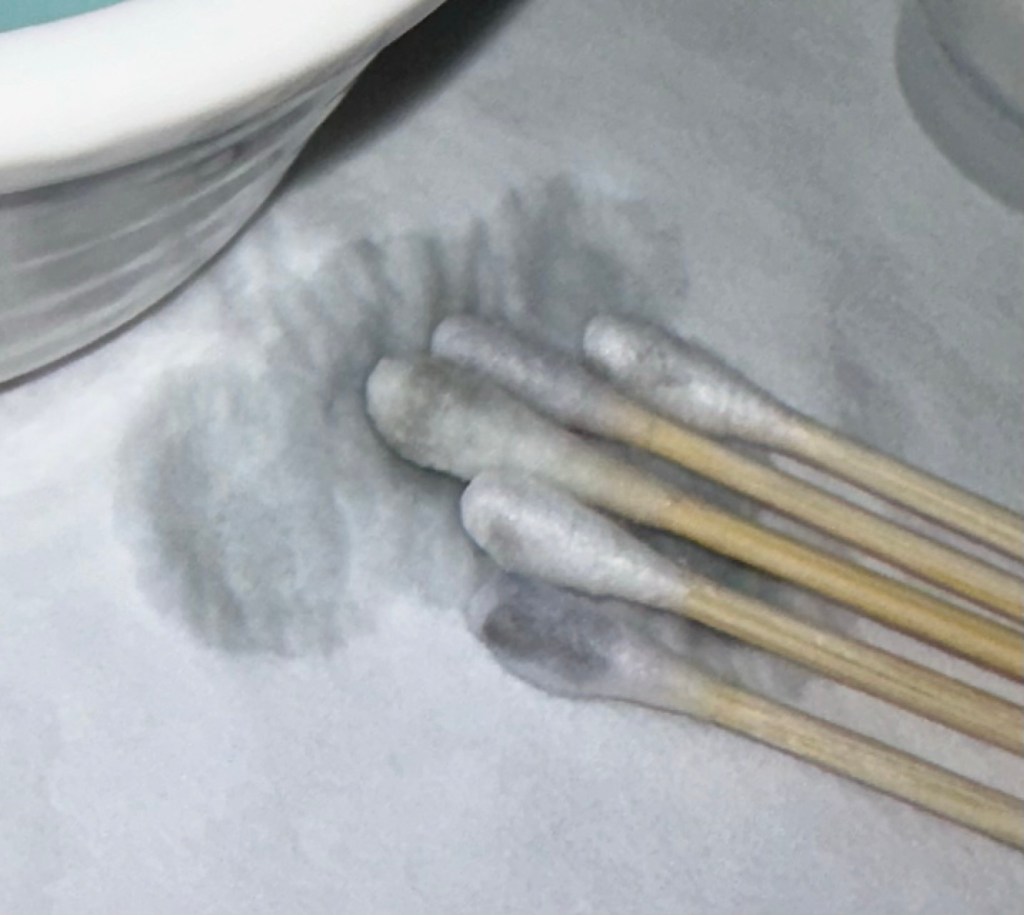
Once the IPA clean had been done I then soaked the glass in a detergent solution and then again used cotton buds to get the solution into the scratched areas of the glass.

I’ve finished the clean with a rinse of hot water to remove all the solutions, and left the glass to dry on some paper roll. A light polish with a lint free cloth finishes the job.
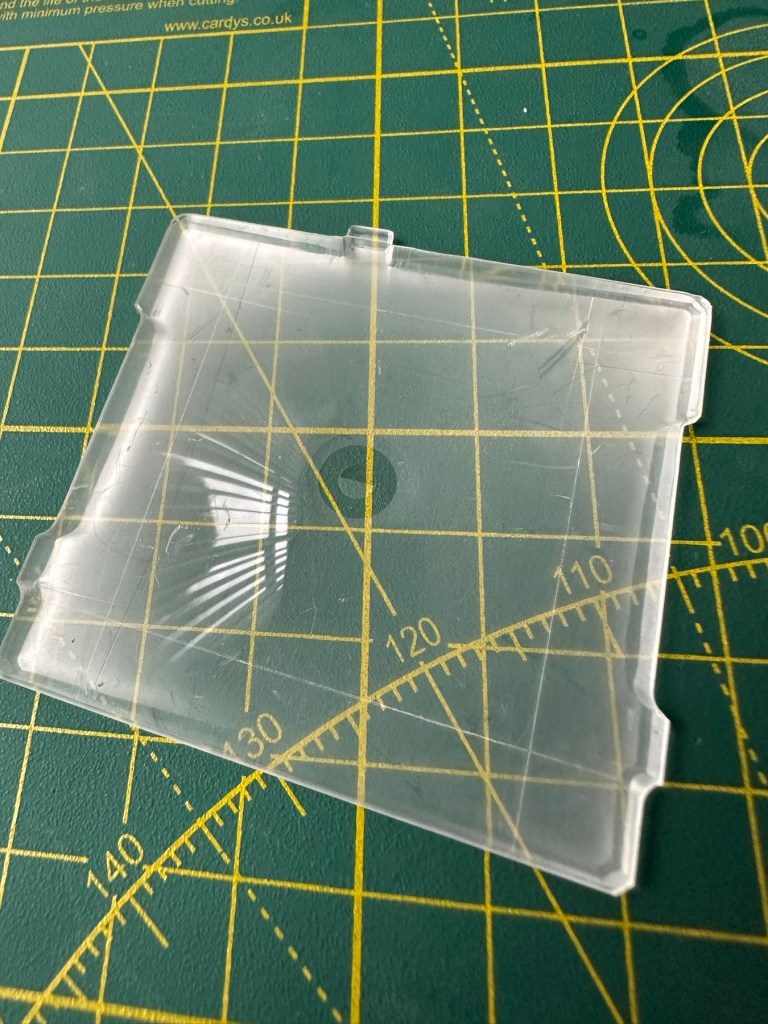
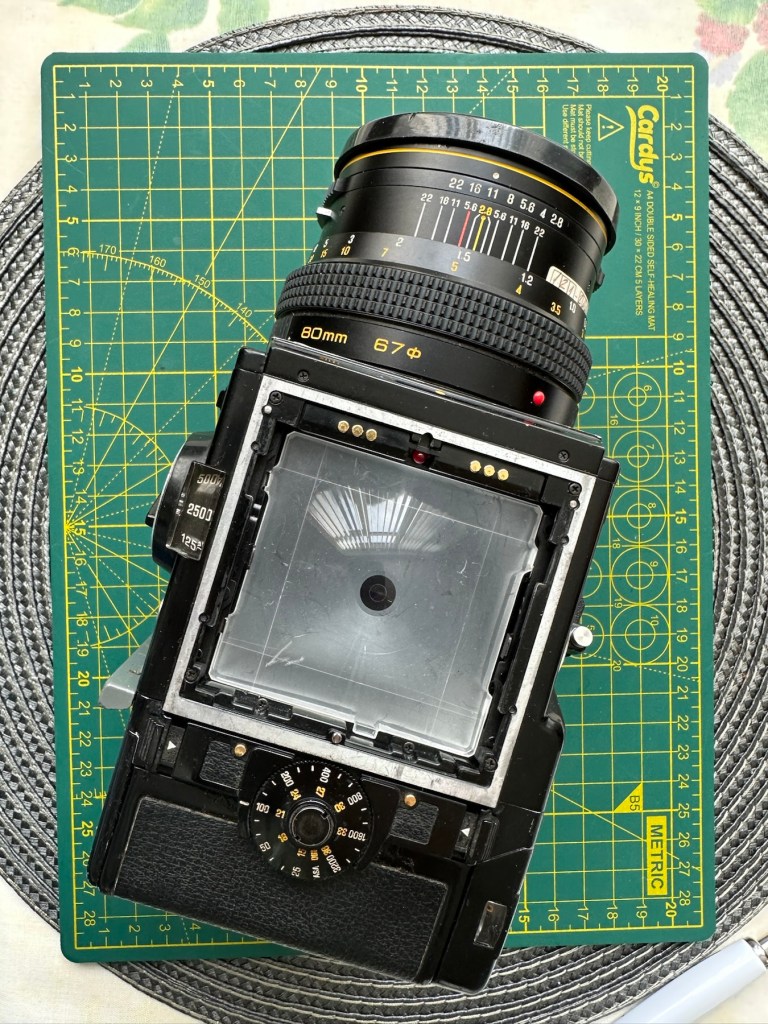
And this is how it all looks in the camera.


I’m extremely happy with the outcome with the glass, it does its job and works really well. With no distractions on the screen apart from a couple of scratches this item has been transformed. Just a little TLC and patience was all that was required.
The Winding handle crank doesn’t really have any issues, it just needs some aesthetic teasing. This crank was 3D printed for the ETRS version of the camera and as such the actual base of the crank shaft is slightly slimmer than that of the SQ model here. It works fine. I’m just being a bit of an OCD freak and want it to look better.
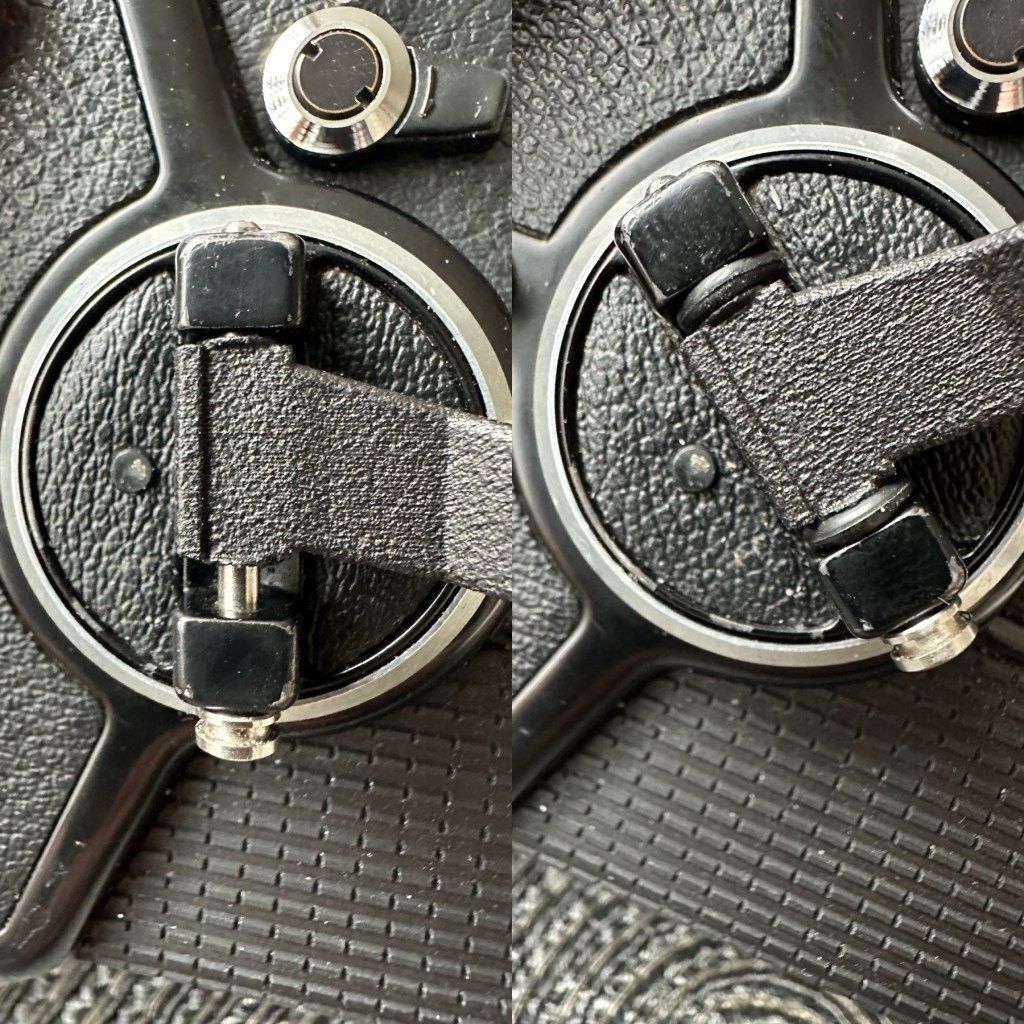
Not a problem though as I only have to pack out about 4mm of space and I have just the thing to use. Two perfectly fitting minuscule “O”rings. Job done, let’s move on.
The Waist level viewfinder has one particular issue in that the folding action is slightly affected by an issue with the spring. Again it is fully usable and does not cause any issues operating wise, it is purely an aesthetic issue that I will get around to sorting once the camera has been tested.


This is one of those parts that has signs of age with small signs of wear and tear, however that adds to it’s character and shows it was once a very much loved item that saw some good usage.
I think, we are now ready to get the entire unit assembled and ready for the testing phase of this build.
So just how much has this little project actually cost? Over to my trusty Psion Organiser 2 LZ for a final update.
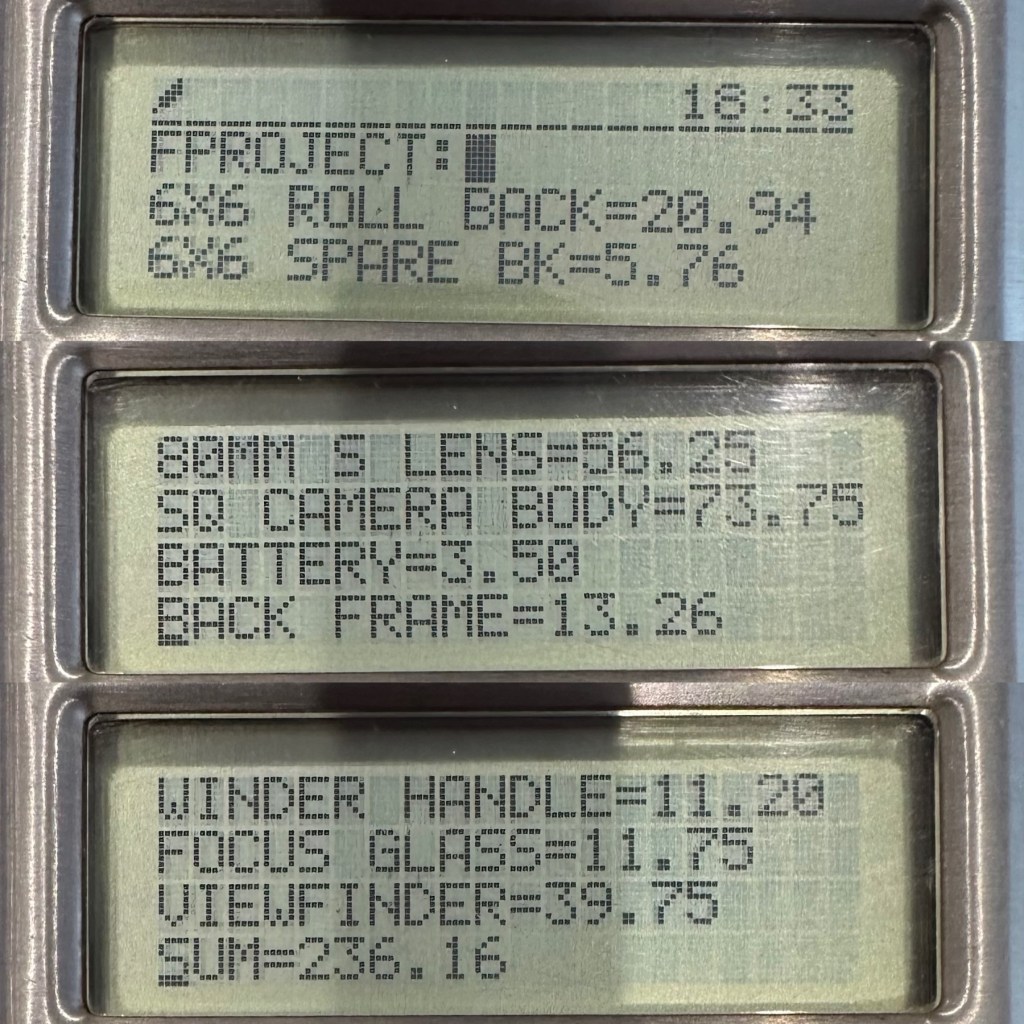
So the total cost of this project is £236.16GBP and I’m very pleased with that considering that sales for fully working similar cameras command prices similar to those seen in the picture below.

So taking this evidence into consideration, the route I have taken of building from damaged stock has saved me between £100-£350GBP. And as it is now a fully operational camera, I could probably command a price that would make a quite nice profit. But I’m not selling. This stays in my collection.
I want to take some pictures with both colour and Black and white film, to prove this camera is capable of this function considering it was constructed with broken or discarded parts.

I will post some sample photos of the tests, and will also produce a couple of galleries to link to within this site. First I will try my luck with the Black and white film, as I have one here currently, though out of date it should suffice as it has been kept refrigerated during my ownership. I also have the chemicals and ability to develop film at home, so this should not be an altogether time consuming process.
This has been a satisfying build making a working piece of camera history entirely with damaged and alternative parts logged throughout all of these posts.
Look out for part 5 of this project that will cover the final testing and the results gained from these tests. Hopefully we will have some good photos and will then be able to wrap this project up.
To find out what I am trying to accomplish with this project please refer to my initial post: Bronica SQ-A Medium format camera
To build a usable, basic issue, medium format camera (Bronica SQ/SQ-A) from damaged items and spare parts, for as little outlay as possible and shoot one black and white, and one colour roll of film as proof of its successful completion.
Building a camera from damaged parts is no easy task when the name happens to be a high end brand and any parts that are available, are being snapped up by others to service their own stock or to break up for sellable parts. I’m going to keep a running total to try and build this as cheaply as possible, and to keep track of this total I’m going to use my trusty Psion Organiser II LZ from 1989 to keep a tally.
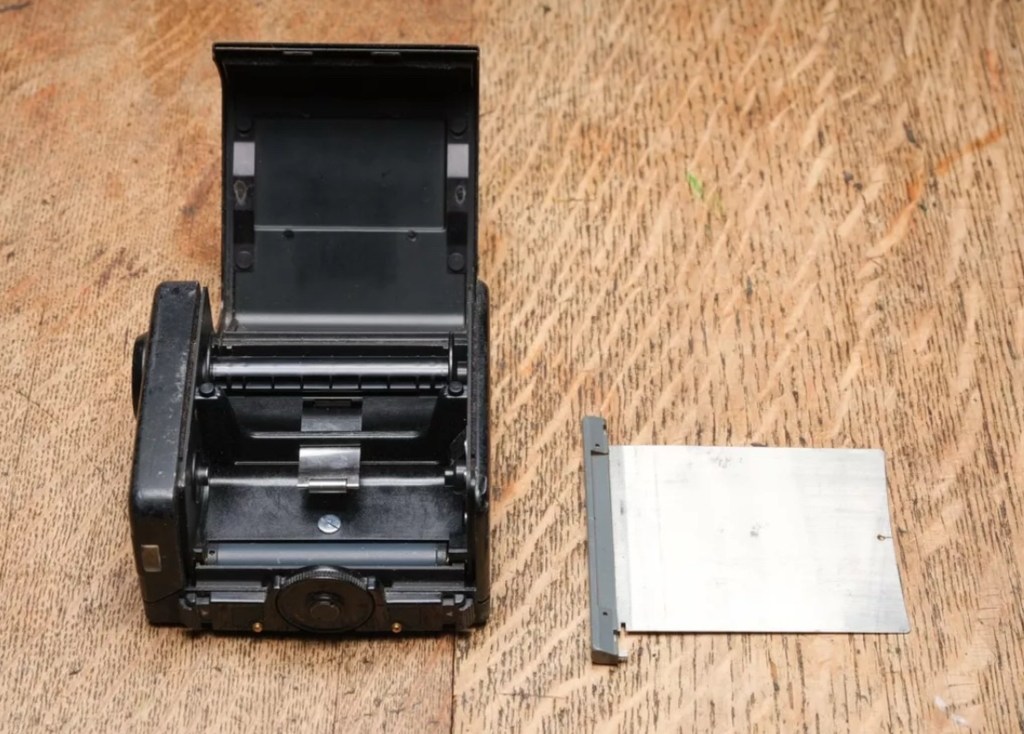
The first purchase has been made and it is for a 6×6 120 roll film back unit with dark slide. I think I’ve paid quite a good price for this item. This is the back piece that fits on the rear of the camera. Here is what the listing stated:
ZENZA BRONICA SQ 6X6 120 ROLL FILM BACK WITH DARK SLIDE Signs of wear, untested.
Uk Buyers Only PleaseEBay


And the total paid including all postage is £20:94GBP. Let’s now start the running total in the Psion II LZ.

All I can really check at the moment is cosmetic condition and this looks a little beat up, however I don’t really care how it looks externally, as long as it’s light tight, that is all that matters and I won’t even be able to check that until later on in the build. Cosmetically I will attend to it, if I feel so inclined at the end of the project, for now it’s ability to be light tight will be my major concern.
The unit has arrived and yes it has seen use, but not in a few years I suspect. The old smell hit me the second the package was opened, it’s kind of a reminiscent pong from the past, however I’ve got to see beyond this.
The light slide seems fine, however the surrounding frame has been bashed and a small bit of frame has gone missing. There is also a screw missing and I suspect the area that is missing the screw may well have been glued down. there are some slight rust spots on the exterior framework, however everything inside appears to be fine apart from some light seals that will probably need replacing. The rollers inside are grubby so a good overall clean is in order.
Annoyingly the ASA markings on the dial atop of the roll holder are missing. I will make something basic up to remedy this issue. Again it’s an exterior issue and I’m not too fussed at the moment.
Yes there is some work required, but there is no rush. And thankfully I don’t see anything that really scares me about it. I won’t really know how it stands mechanically until I find a suitable body to attach it to. I have that to look forward to in a future post.
The ASA dial. Simple solution here, until one becomes available sometime in the distant future, is to use some very small dymo labels I have printed. I will cut these down to size and put them in place where they should be on the dial. Quick and temporary solution a’la Frankenstein. No need to over manufacture things, this will do fine.

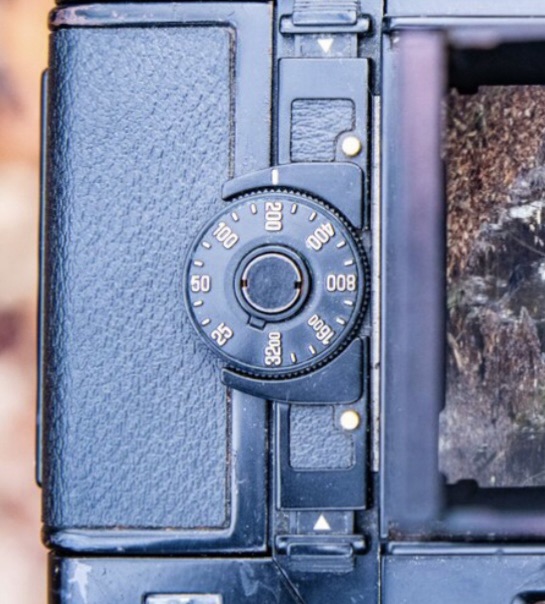

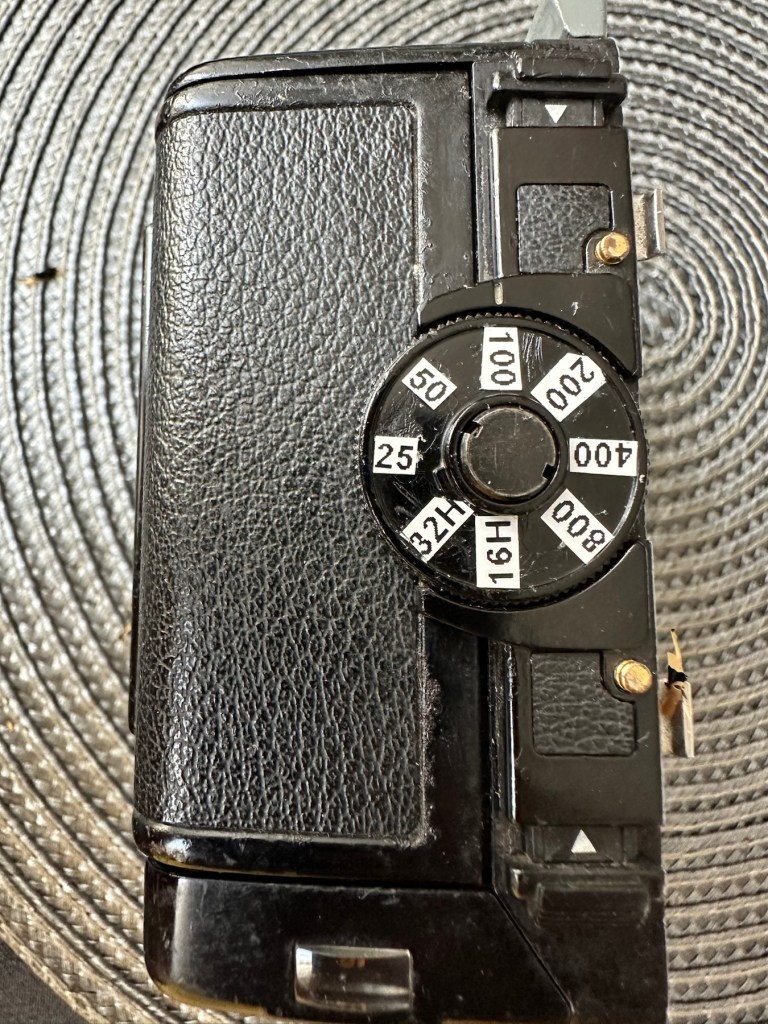
The old asa wheel has been cleaned to remove the original glue, and temporary stickers have now been applied. This completes this fix for the ASA dial, for now.

Edit: I’ve managed to obtain a damaged roll back for a grand total of £5:76GBP, absolute bargain and it also has a working ASA dial. So I’m hoping I’ll be able to use this donor to help in the repair of this item. I’ve used a combination of parts from this and the earlier roll back and I’m happy I have a good working unit. We now have a proper ASA dial off of the spare unit transplanted onto the old unit.
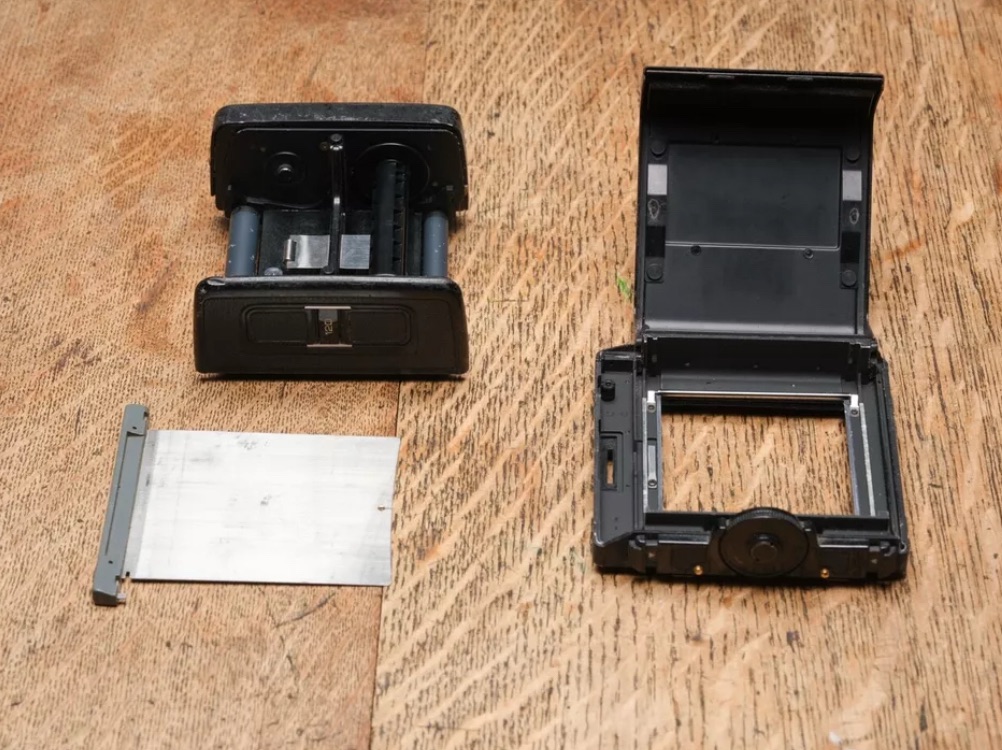
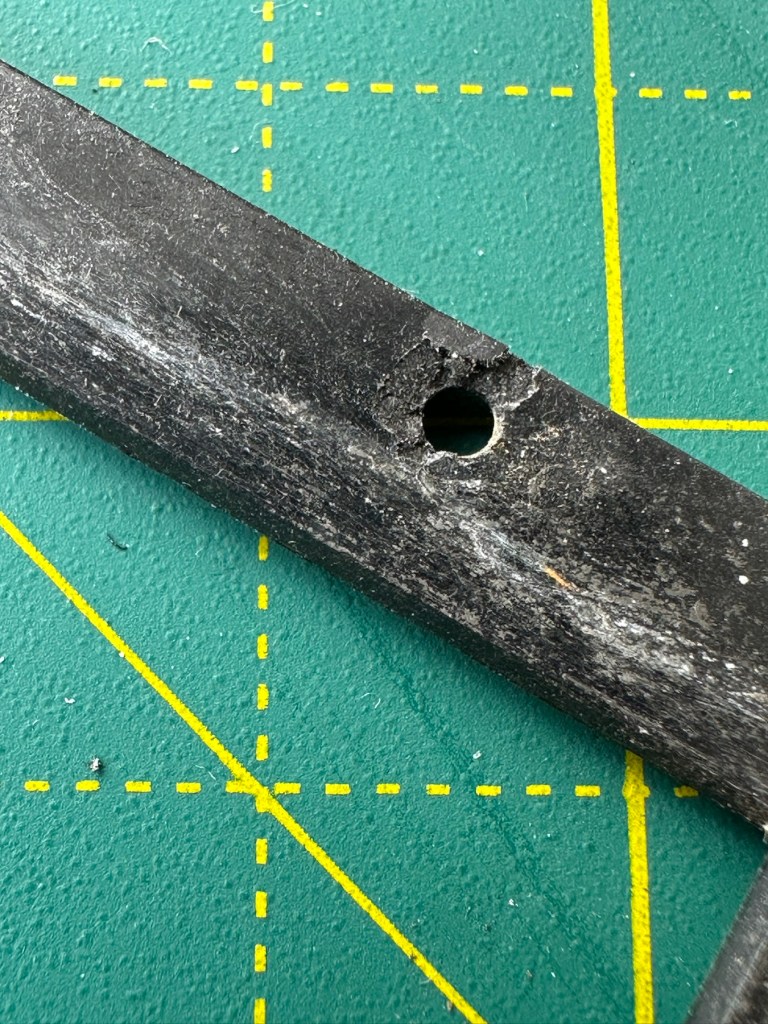
Front frame:
I’m taking this off to give the whole area underneath it a good clean. There are some film guides under this frame that are contaminated and that could cause a scratch on the film, I’m going to clean this whole area under the frame and will then reassemble. The cartridge slide is in a good condition and has just required a polish. Apparently this front frame is prone to breaking and the screw holes splitting, as it gets quite brittle. This has happened to this unit, and I’ve found a guy that 3D print’s replacement front frames and I have ordered one of these to ensure that the whole frame is secure and light tight, as currently one corner can be lifted and this could cause a fogging issue. At a cost include postage of £12:75GBP it’s a small price to pay seeing the only way to get one nowadays is by purchasing a donor unit at cost far exceeding what I have paid here.
There are a couple of screws missing of which I have plenty of spares so these will be simply replaced. I’m happy now that this portion of the camera is in a good condition and will soon be ready to be put to use.
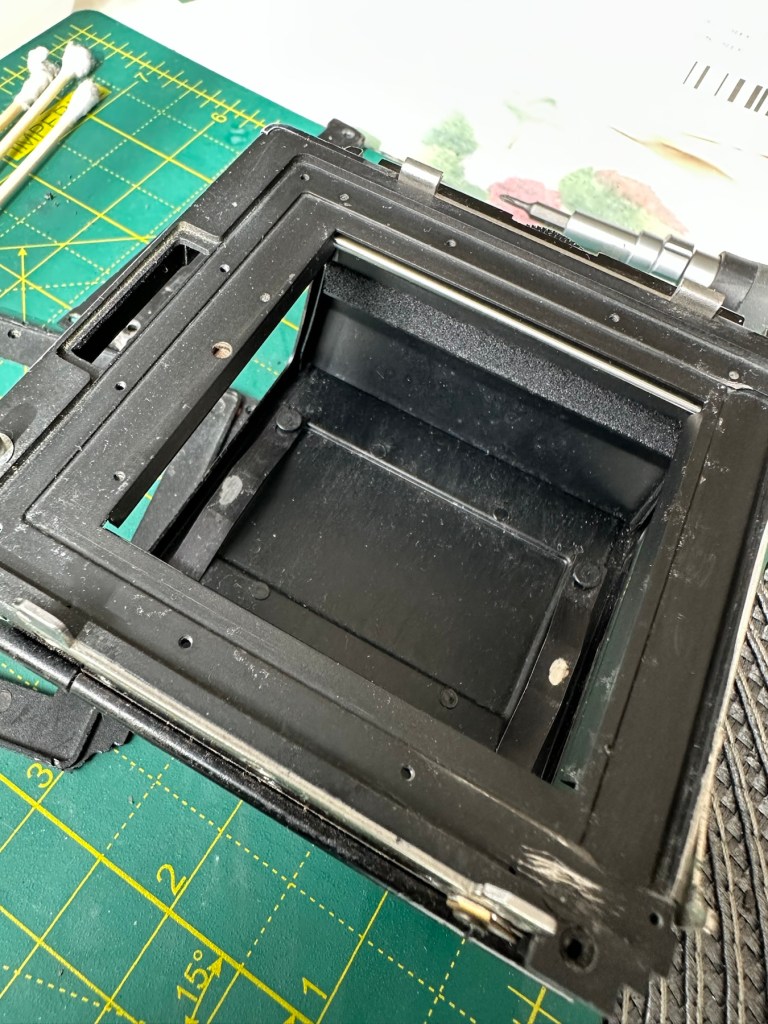
There was a lot of contamination under the plate when it was removed, I was quite amazed just how bad it was. This has since been cleaned prior to the new frame and seals being put back into place. When everything is re assembled there will be another clean, I will also be using compressed air to finally clear any remaining debris from the roll back. Edit: the 3D printed frame has arrived and to be totally truthful it’s not much good. The part where the slide goes in is not usable and I’m not confident this will be as light tight as first thought.
However the spare unit I purchased has a good front frame that just needed a tiny bit of adjustment to work, I’m now confident the roll unit will work as it should.
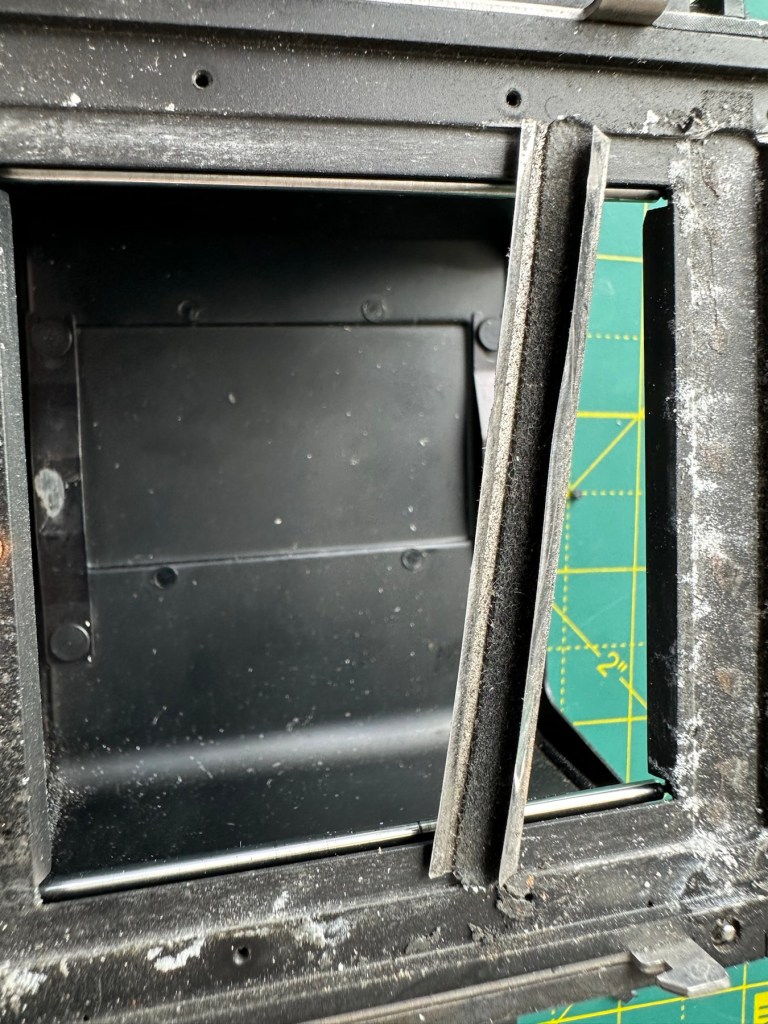
Light seals:
To be honest there are only two immediate areas of concern that I can see. All other light seals seem to be sufficient. I already have plenty of light seals material from where I fix other cameras so this should be simple enough to replace.

There were only two pieces that needed replacing, these were both on the roll film back. All other light seals were fine.
Rust spots:
These are purely external and there are no issues inside the cartridge. However I may just give them a very fine rub down and a quick spray with a black gloss to just make them look better. Then again I may not, and then I’ll attend to the cosmetics once I have completed the project. Edit: I’ve decided to leave this for the moment and will attend to this sometime in the future as it is not affecting anything at this stage.
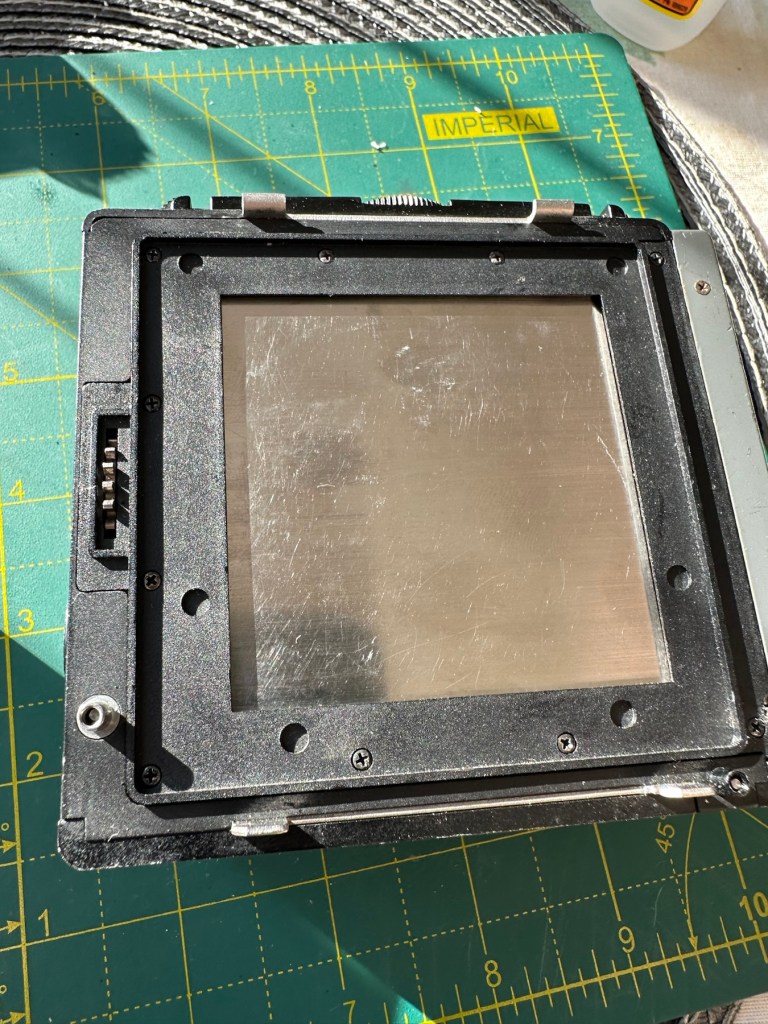
Film cartridge:
Again this has just been cleaned and some contamination has been removed from all rollers and guides within. I have adjusted the back plate pressure pad for the film and also given this a good clean to remove any contaminants. I’m happy the internal cartridge is in a good condition and only requires a light clean. This cartridge is superior to the one I have obtained as a spare so this will be the one i work with. I have replaced all the exterior screws to replace the original ones as they were all a little crusty and contaminated.

The whole roll section has been cleaned with tack cloths and compressed air to ensure all contaminants have been removed.
I’m going to store the whole roll film back, in a sealed plastic bag with some Silica gel packs to try and remedy the mustiness that I mentioned at the beginning of this post, though I must admit after all the cleaning and replacement of parts, the issue has reduced immensely. Some exposure to sunlight on a window seal usually helps immensely. That’s where it’s sitting for the moment. It’ll go in the bag with some silica gel, during the more inclement weather.
This part has been the most demanding part of this project so far. I’ve looked into the possibility of using 3D made parts, but I must admit defeat here. The items are about 80% ok, there are holes missing that should be there and as it’s a two piece fix you are then introducing glues, and potentially increasing the chances of light accessing the one area you want dark. Maybe in time they may perfect it. I was exceptionally lucky to obtain a spares unit for literally one pence. Yes one whole pence. It cost £5:75 to post making a total of £5:76GBP, but in many aspects some of its parts were far superior to what I already had. I am happy that this part of the build is now complete.
All good to go. Please keep an eye on the other blog posts that are coming regarding this project.
To find out what I am trying to accomplish with this project please refer to my initial post: Bronica SQ-A Medium format camera
To build a usable, basic issue, medium format camera (Bronica SQ-A) from damaged items and spare parts, for as little outlay as possible and shoot one black and white, and one colour roll of film as proof of its successful completion.
Building a camera from damaged parts is no easy task when the name happens to be a high end brand and any parts that are available, are being snapped up by others to service their own stock or to break up for sellable parts. I’m going to keep a running total to try and build this as cheaply as possible, and to keep track of this total I’m going to use my trusty Psion Organiser II LZ from 1989 to keep a tally.
This may be a strange situation where Pt:2 and Pt:3 of this project gets published before Pt:1, quite simply Pt:1, the film back. needs a fair bit of work still doing to it.
And the third purchase is for an SQ body. This appears to be well used, but appears to be in a working condition. Here’s what the listing stated:
Zenza Bronica SQ Body Only / Medium Format 6×6 Camera
Condition:
Used but still in good usable condition with usual signs of use – see photos for details please. Fully tested and in perfect working order.
Supplied with: Camera body as pictured.EBay
Now I’m happy with this purchase as well. Not quite the SQ-A I wanted but to be honest the only difference is mirror lock up and metering that I don’t really need so I can live with that, we all managed prior to the metering being done for us, I’m sure we will all survive now . (Oh how we have been pandered over the years)
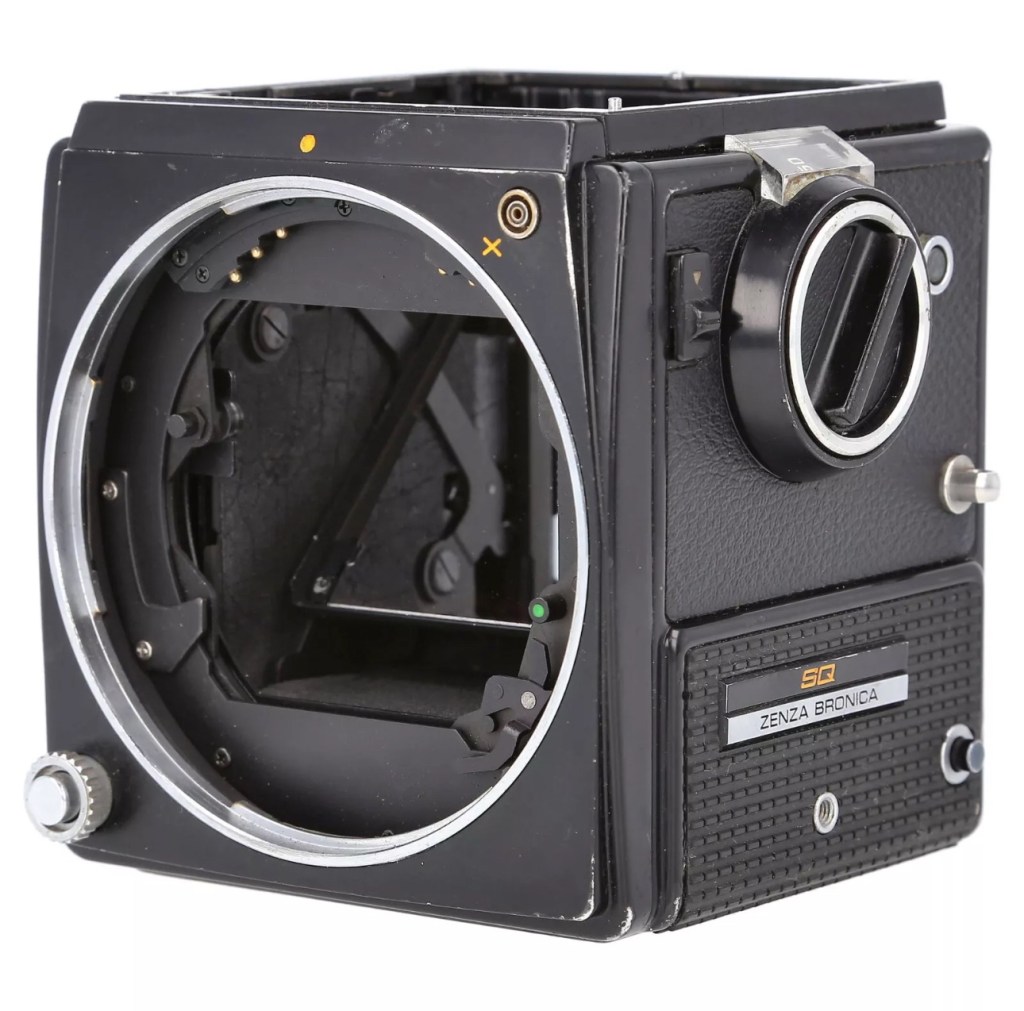


I’ve paid the grand total if £73:75GBP for this body including the postage. There are some bits I will require to complete the body, namely a focus screen and waist level finder that could be a bit pricey, and a winder for the body. Now, the winders are pathetically expensive at around £60 for a bit of plastic. I know a guy who 3D prints a good alternative for a fraction of the price. And that will be the route that I take.
So over to my trusty old Psion II LZ for the running total for these first three items.
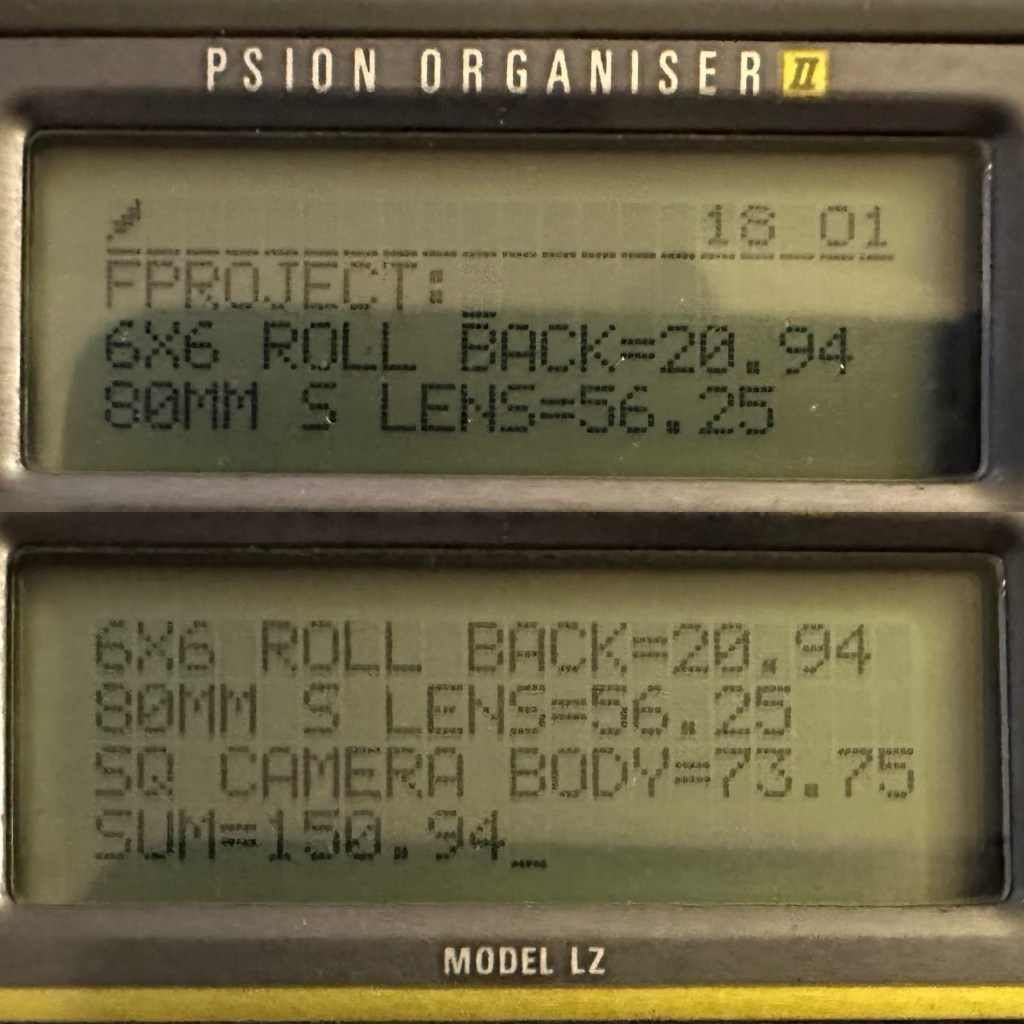
So the total for these three items comes in at a total of £150:94GBP, and in Bronica terms this is extremely reasonable!
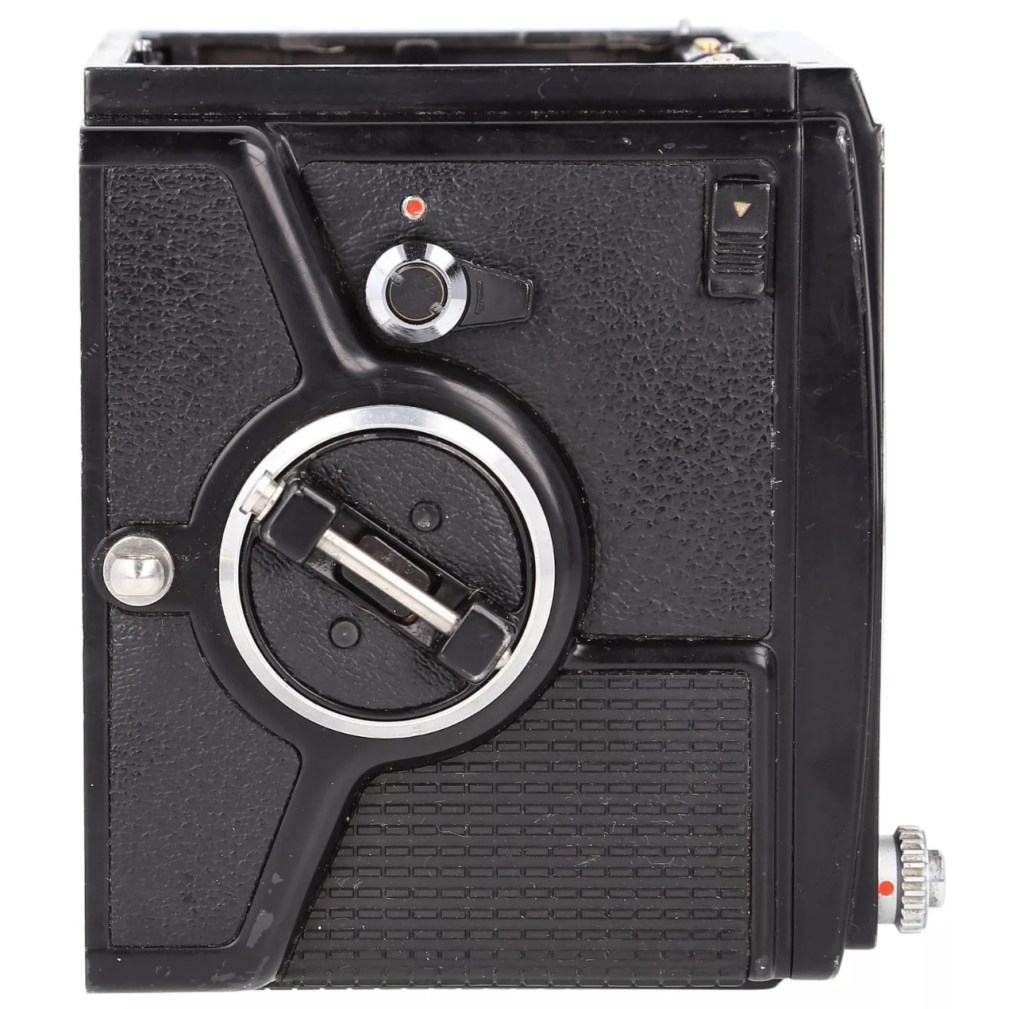
The parcel has arrived and yet again I’m really happy with this purchase. Very well packaged, a very faint age related mustiness that I guess should only be expected on an item that is now 45 years old. It seems to work just fine. I have connected the lens and that seems to be working ok, I just need to verify the shutter speeds are all correct. There is no battery in the base and this needs replacing as this is what controls the shutter speeds. Without the battery the mechanical shutter works, but only at a speed of 1/500 of a second. (Edit: the battery has arrived and after testing i can confirm that all speeds are operating as expected). The film back fits fine but I still have some work to do on that before I can say that this part is working ok. Overall I’m satisfied with what I have for the price I have paid.


Not so much repairs but additions that are required, such as a crank winder arm and a focus screen, a new battery and a selection of covers to protect the central unit in transport. All horrendously over priced and i will deal with these items in Pt:4 of this project.
We are almost there. The lens is fine, the main body is fine and just needs some final testing. The film cartridge is the item that needs the most attention and this will hopefully be finished when I have the new front plate that is being 3D printed. The next instalment will be just a tidy up with all the little bits I need to complete the build. These small pieces in Bronica terms are so bloody expensive, or should I say extortionate, can be obtained at a fraction of the cost elsewhere, you just need to shop around, if you are happy to have a non named spare part as a stand in. I’m happy with that as these parts have absolutely no effect on how the camera performs, and what we want to achieve at the end of this project, that being a well exposed two rolls of negatives that will produce a number of well presented photographs.
All good to go. Please keep an eye on the other blog posts that are coming regarding this project.
There are many blogs I follow on this platform. One I follow religiously is the “Anxiety unplugged project”
For anyone who has moments when they just can’t fathom out what is going on, I’d recommend latching on to this site and just taking in some of the superb advice and guidance available.
Why not? We all have times of stress and anxiety and a few minutes spent reading some good honest advice is no inconvenience to anyone.
Stay safe. Peace to you all.
To find out what I am trying to accomplish with this project please refer to my initial post: Bronica SQ-A Medium format camera
To build a usable, basic issue, medium format camera (Bronica SQ-A) from damaged items and spare parts, for as little outlay as possible and shoot one black and white, and one colour roll of film as proof of its successful completion.
Building a camera from damaged parts is no easy task when the name happens to be a high end brand and any parts that are available, are being snapped up by others to service their own stock or to break up for sellable parts. I’m going to keep a running total to try and build this as cheaply as possible, and to keep track of this total I’m going to use my trusty Psion Organiser II LZ from 1989 to keep a tally.
This may be a strange situation where Pt:2 and Pt:3 of this project gets published before Pt:1, quite simply Pt:1 needs a fair bit of work still doing to it.
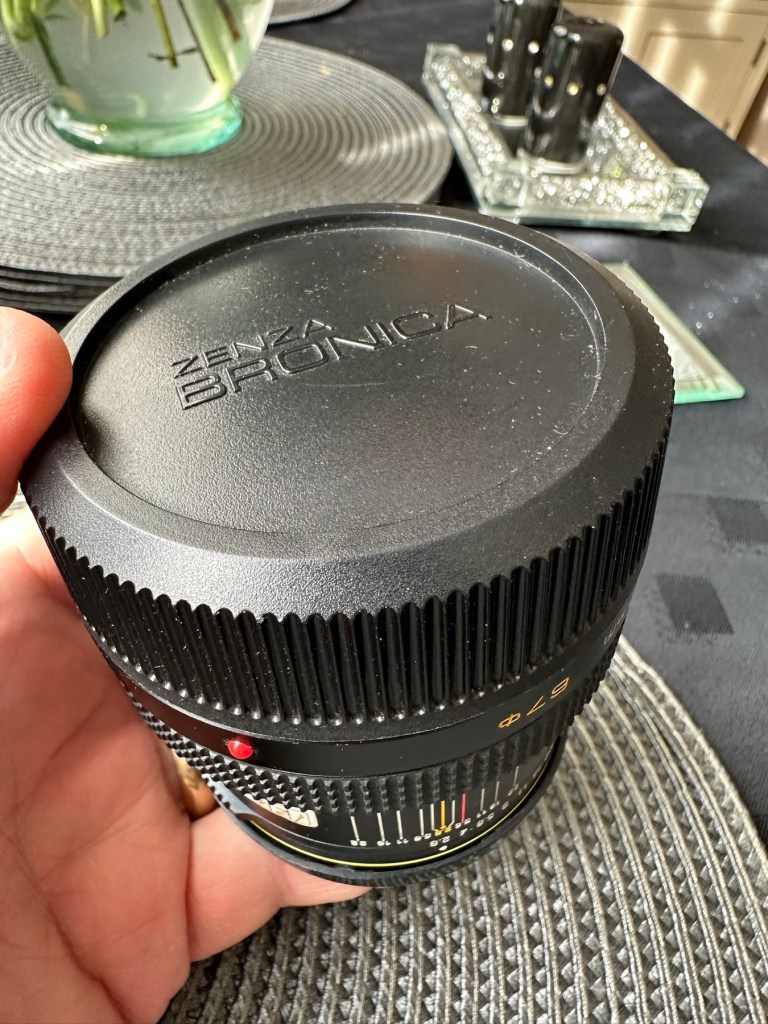
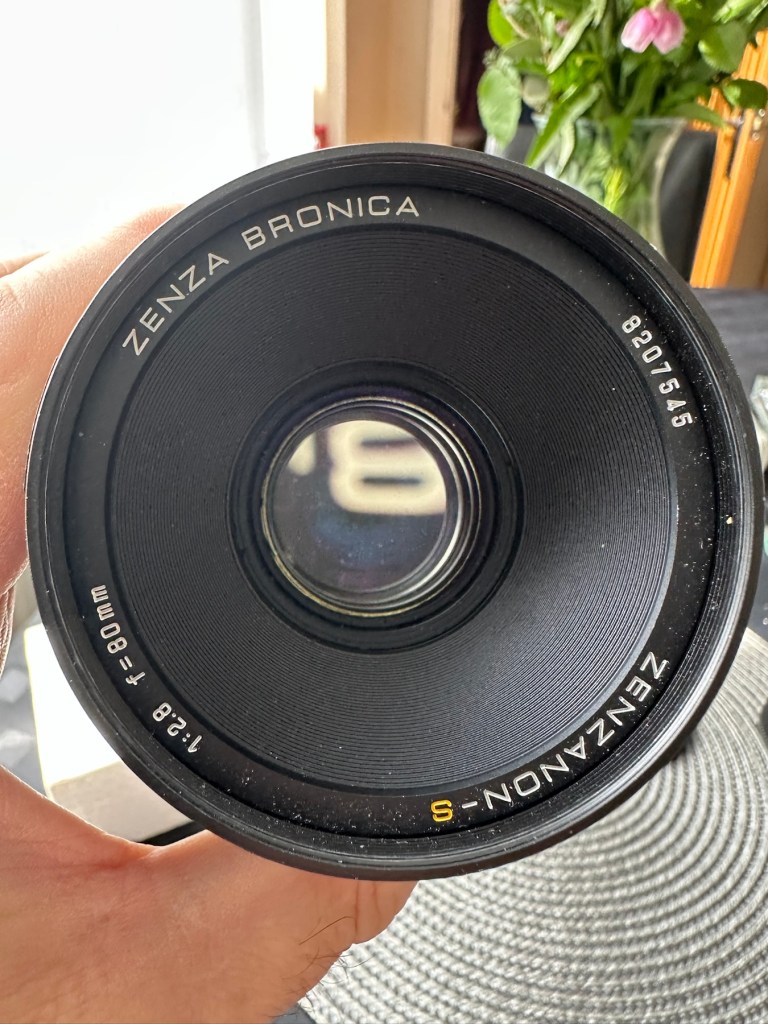
The lens. Probably the most important purchase of this project. Looking for a “cheap” lens is normally not the thing to do when exploring lenses as you do really get what you pay for. You want good clarity? You need a good lens. However this lens came on offer and what sold it to me was that there were no scratches and fungus in the lens, and that was music to my ears. It is a duplicate of a lens the owner already has and was surplus to his requirements. He has also supplied recent proof of photos taken on this lens and i believe he has sold me a little diamond to be honest. Everything about it seems good. There is nothing really to do to it, so no maintenance apart from maybe a light external clean and that will be it until everything else comes together.
Here is what the listing stated:
This is the S version of the 80mm lens and although there’s a slight difference in the lens design on the PS version, I’ve compared the two and couldn’t see any real difference other than a slightly more modern colour rendering. The T mode is also working without issue. This lens has been my main user lens and has never let me down. Glass is clear of fungus, haze and scratches. Aperture and shutter blades are snappy and clear of any oil. Shutter speeds are accurate and the lens produces just delightful images and is massively underrated. I’ve included several shots taken recently with this lens mounted on an SQ-A as per the examples. Focusing is smooth, apertures have a nice smooth click and the lens focuses just fine all the way through the range. I will include the origin box as well as the front and rear lens cap with the lens
EBay


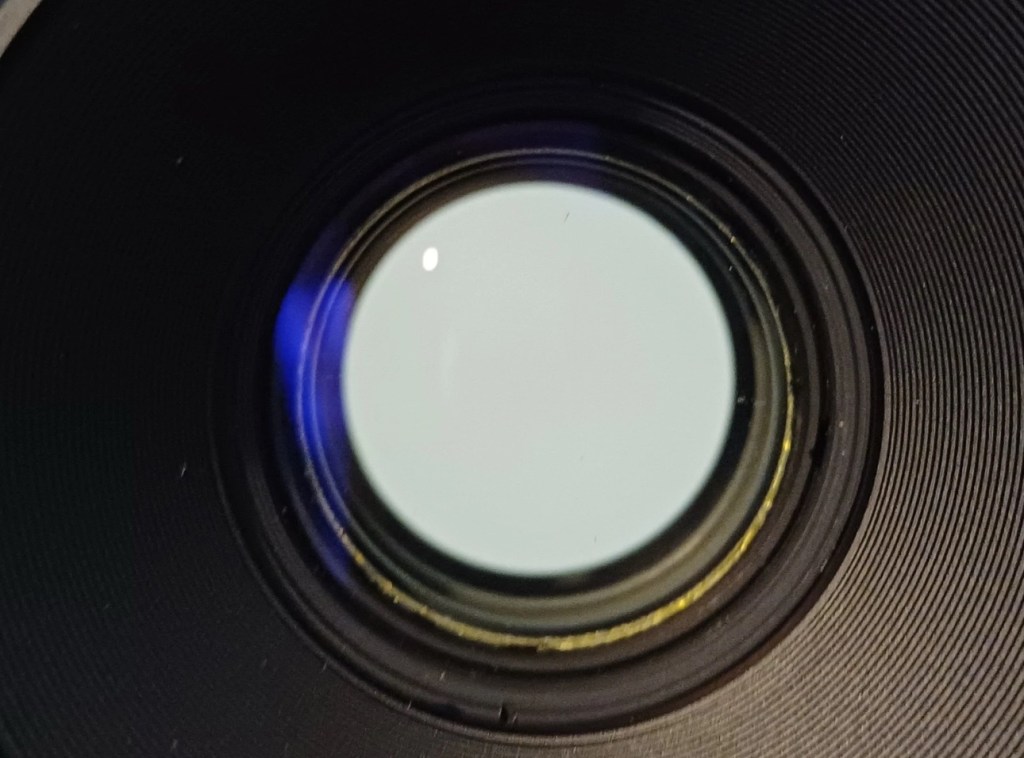
I’ve paid the total cost including postage of £56:25GBP and I think that this is an absolute bargain for what I am getting. It’s an 80mm f2:8 Zenzanon-S lens in its box with two end caps. I’m really pleased with this purchase and there is not a lot else I can say.
So here we have the scores after two purchases, the 120 roll film back and this lens. Over to my old mate the Psion II LZ for the running total.
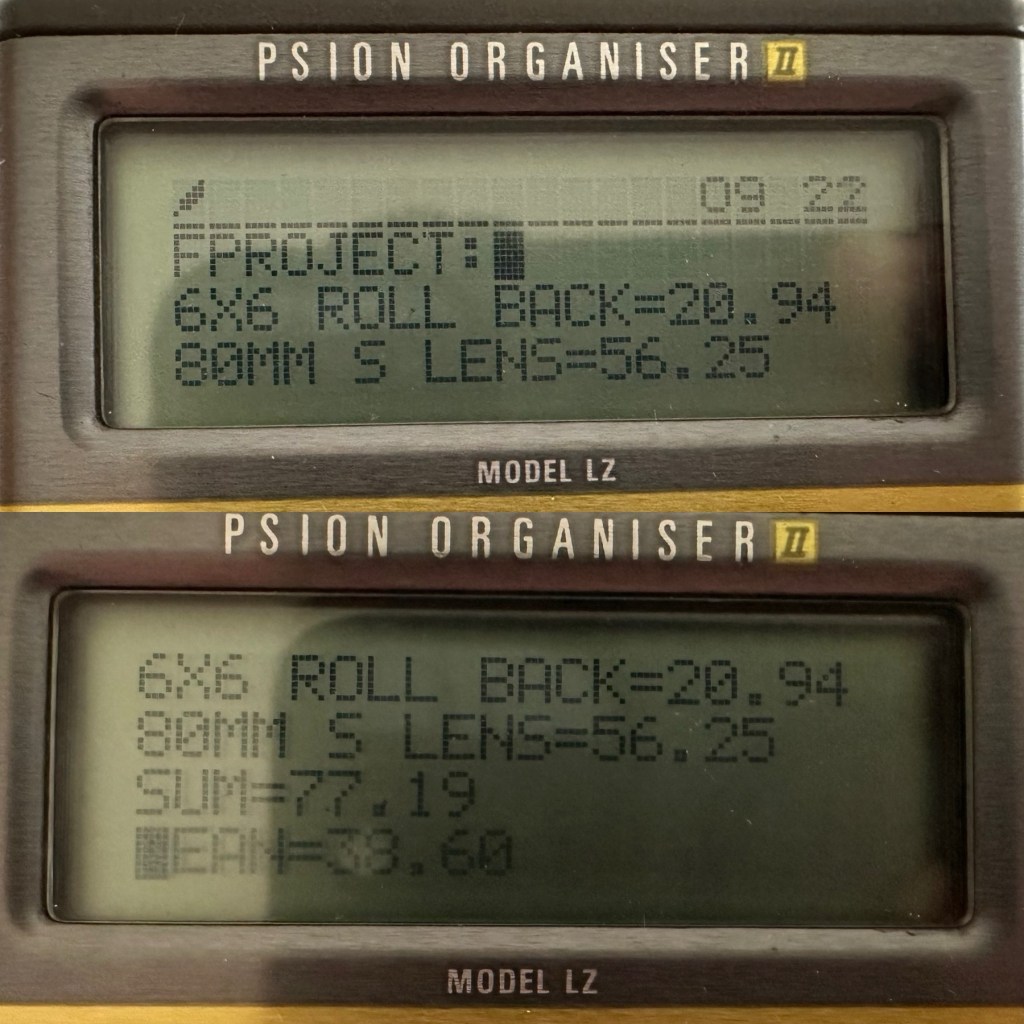
So the total for two items currently sits at a comfy total of £77:19GBP so far, with an average per item price of £38:60GBP. And in Bronica terms that is quite reasonable!
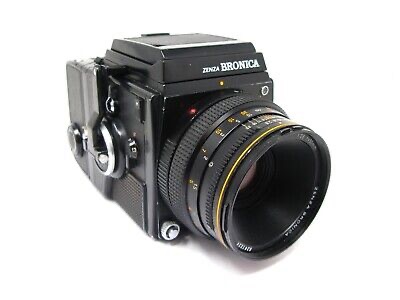
The lens has arrived and to be honest it has surpassed anything I could ask for, for the price I have paid. For this project it is in perfect condition with nothing required regarding any repairs. It’s good to go.


And out of the box the lens is lovely and clear. Just a few bits of dust but that is nothing at all.

None: I know this is boring on a repair front, but for this project it is the perfect result.
All good to go. Please keep an eye on the other blog posts that are coming regarding this project.
This will be post No:1 of a series, where I attempt to buy parts of a damaged camera system to repair, reassemble and get back into working order.
I have chosen this particular camera as it was one that featured prominently in my career when leaving school and starting in the Photographic world. I’m going to buy this camera in bits, as it is modular. I’m going to try and buy parts that are for spares and repair for me to fix, to see if I can get a half decent working example. So expect a bit of a Frankenstein project here.
Just like my post on the Canon A1 that I previously published, this was another loan camera in my early years of photography back in the 80s. When money was sparse, colleagues usually allowed the loan of their equipment under certain conditions, one of those being,”Don’t break it”. I used this camera when I did my first studio session when a friend of a friend was setting up a business selling Teddy bears. She wanted good quality portrait photos of her work and this camera enabled me to do that. This was the first medium format camera I had ever used, and for that reason alone it will always sit as my favourite. Many people favour later models and other equipment, but this is my personal favourite. It has its flaws as some do, however this camera was significant in me learning a profession, as well as it triggering many treasured memories for me personally.
Now I want one of my own. 41 years after I first used one. But I don’t want to pay a premium price for it. In fact i wish to pay as little as possible, and that’s where it’s going to be difficult.
You can read more about the camera here: Bronica SQ-A
As this is modular camera unit, I will need these parts to form the most basic camera, no bells and whistles as they say, just the basic version:
I’m looking at this being a medium term project so these items will be purchased over a currently undefined period of time, I’m hoping to buy items that require attention so I can keep the costs down, something that needs attention and repair would suit, as I can create a post regarding its repair. Individual spare parts do command some high prices so I’ll look at maybe purchasing some beat up stock that I can use as spares. I’ll keep a running total of the spend, I know I could buy a working complete unit for around £6-800GBP second hand, but that’s damned expensive in my eyes, I believe it was only £400Gbp (Minus lens) back in the mid 80s. I want to prove that a good usable unit can be built with just a little attention at a much lower and more realistic price. On the cheap if you like, as good quality photography does not need to be expensive. It might not look pretty, but it will be practical, and it will work. Most working cameras look beaten up. Most of the ones I used whilst working for a photo agency were total wrecks but took great photographs. I want to run a roll of colour and one of Black and white through it to prove i have made a working practical camera. It’s probably going to be a lengthy project, it’s going to be hellishly tough, but one I’m very much looking forward to.
From now on it will be known as….
And more posts will appear as the parts start to arrive and are assessed. Each part will have its own post dedicated to its purpose and repair, and a final post where it will be finally assembled and tested.
Thanks for passing by, please be sure to check back as this exciting project comes together, using the links below:
Part 5
I’m referring you back to this blog entry I wrote on the 10th March The best laid plans and all that…
Here I was complaining about the weather due to a garden project I was undertaking and the time frame my wife has kindly put on it.
It was being severely hampered by the weather and on the odd occasional day I was able to do bits but the time scale was moving ever closer.
Well I finally managed to get the digging complete with a couple of inches more of mud removed and made as level as possible before more rain moved in.
Then I had an 800kg bag of MOT type one sub base layer delivered and this went down in a few hours and I was then able to hire a wacker plate to get it down nice and solid and even all over. I’ve put a wooden edge in as well that will eventually have some bare root Hornbeam hedging put in alongside it to form a softer border.

But it rained again for days 🤷♂️
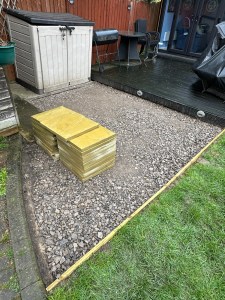
In the meantime myself and the wife went to a local garden centre and got an absolute bargain with the pavers, these were delivered the next day and I was able to place them roughly where I wanted them to be before cementing. Then guess what? Yes you are right it has rained pretty much from the 28th March right up to a few days ago the 11th April.

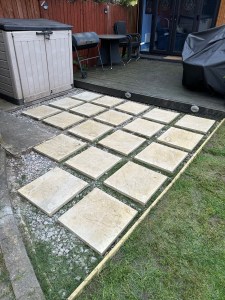
We’ve had some sun the last couple of days and the surface of the garden has dried off a bit. The patio area has dried off quite considerably so on the 14th April I was finally able to get all the pavers cemented into position, I was able to do a first rough cut of the grass and generally have a little tidy up. There was an awkward period when the works supervisor (Alfie, our dog and head of security) intervened and decided to sit on a paver I was cementing, but talks took place and strike action was avoided when a chewy treat was supplied.

I’ve ordered an 800kg bag of pea shingle to finish the job so I’m hopeful the time scale will be met. it was a good day.
This morning the 15th we have had torrential rain, hailstones and a thunderstorm, woo am I pleased I got that cementing done yesterday, you bet I am. I just hope it had time to cure to a state where the down pour hasn’t affected it too much. I’ll check it out later, and I’ll just have to refrain from using the pavers for another 48hrs or so.
Note: I’ve just checked and the cement has set nicely, I’ll leave it another day and it should be all good 👍 we now await the pea shingles arrival.
Fast forward to the 17th after yet more rain has fallen and I now have 800kg bag of pea shingle occupying part of my driveway. I have ordered far too much, however it means I will be able to prioritise a couple of other garden projects that I have recently put on the back burner.
Guess what? More rain but I’m not giving up until these stones are in place.
A couple of hours later I’ve put the shingle in place, first a layer that I’ve then stamped down and then another layer on top to bring it all up to level across all the pavers. I must admit it has come up quite well.

I’ve finished it off with a small circular paver for the wife’s stone toadstool that has been a feature in any garden we have occupied since we first met, as well as some decorative fencing and lighting with 15 newly planted Hornbeam hedgerow plants. I have a vision of having a nice hedgerow line down here within the next couple of years as well as being a natural source of drainage for the this part of the garden, that naturally gets very wet due to neighbouring gardens being concrete wastelands.
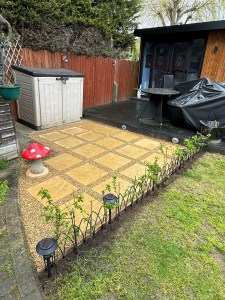
I’m very pleased with the result, it’s on time and the wife is now off my back, and she’s very happy, phew 😥
Thanks for following this little project, stay safe and stay happy.
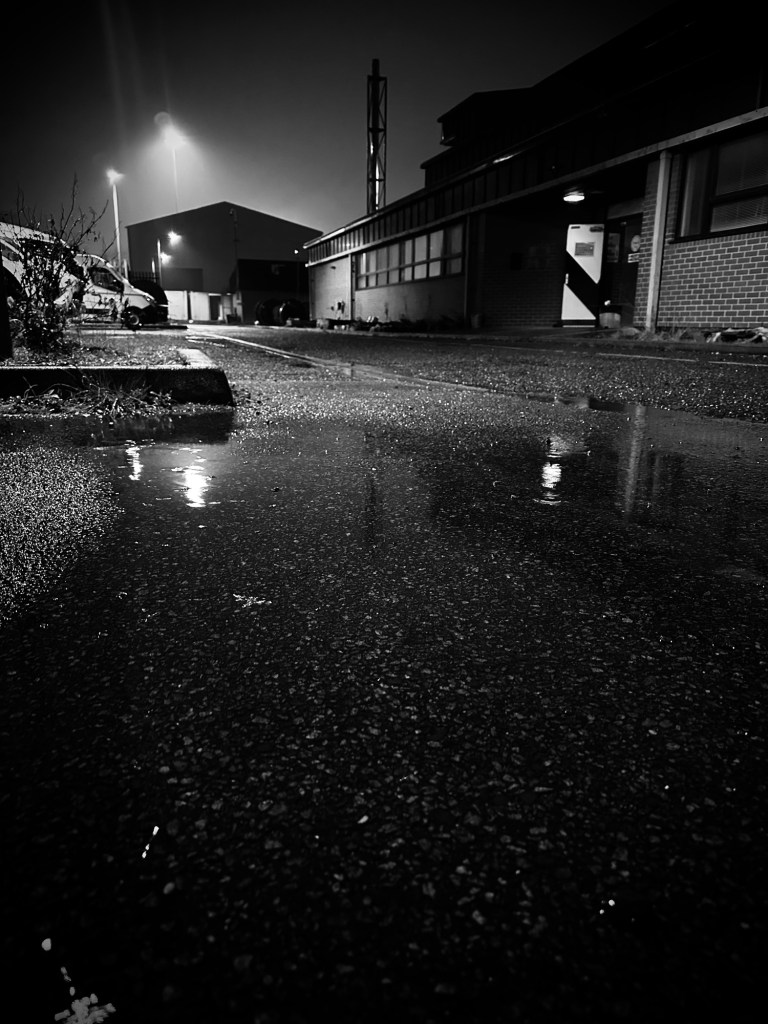
It’s just gone four in the morning, the birds are awakening and I’m stuck in an office in Leicestershire awaiting my next call out of this long night shift.
Despite weather reports being favourable it has been heaving down with rain for the past few hours , and it doesn’t look as if it’s going to let off at any time today.
This is pretty much a post about gardening, another activity I like to get involved in, and at the moment I have a project underway that was pretty much weather dependent.
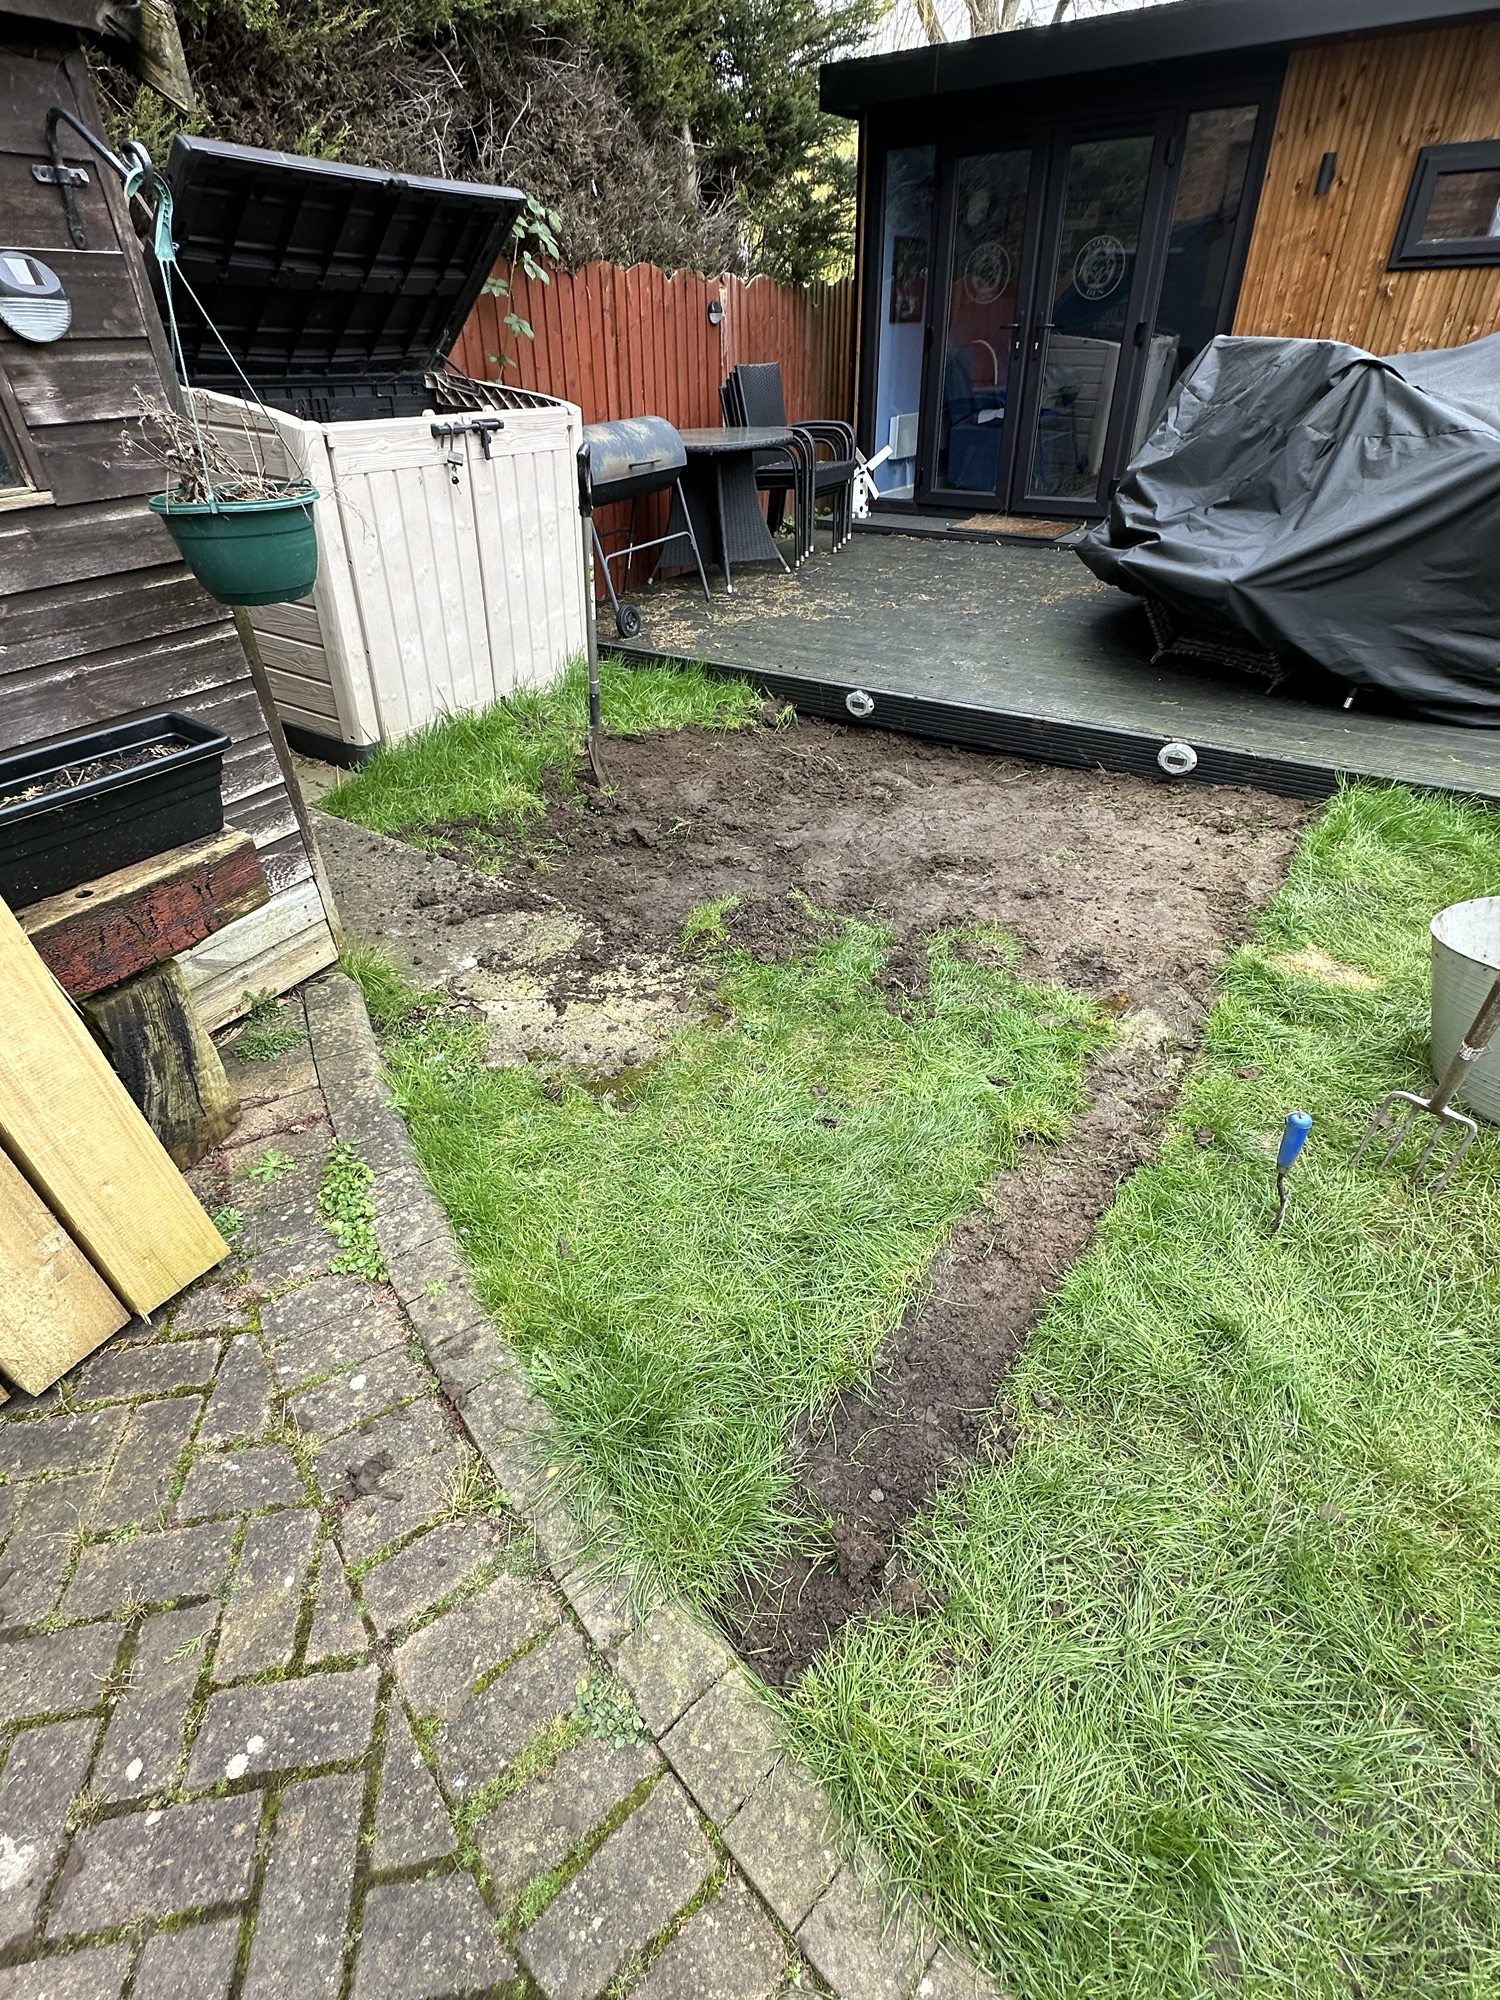
I have begun the digging out of a small part of the garden in preparation for laying a small patio area. Our garden is pretty much clay based under the grass and to be honest as a result of that drainage is not brilliant. We never used to have issues with drainage due to there being 12 trees in situ that the previous owner had planted, he never looked after them and they became diseased. These sucked every bit of moisture from the garden and never gave us any issues with pooling water.

Fast forward a couple of years and those trees had to be removed due to the aforementioned disease, right down to the roots. Now during the normal British rain season ( most of the year ) we have pools developing around the garden. We are replanting a number of smaller trees but it’s going to be some time before they are drinking the quantities of rain water we usually get here in the East Midlands.
I chose this week to do my digging as it was forecast to be the driest week in a while and there was a sufficient chance of me getting all the digging done and getting the sub base in place before any inclement weather arrived.
I sit here this morning cursing so called weather forecasts.
I have been doing work between night shifts spreading it out and was so pleased with progress thus far. I removed all turf yesterday and today started digging out to about 15 c/m and started to level the area out. All excess soil was being spread around the flower beds of the front and rear garden so nothing was going to waste at all.
I stopped work on the garden at about 4 pm yesterday, well happy with progress telling the wife I had about another 2 days of work to do on levelling before we could start to get the sub base in place and compacted prior to paving, hopefully the job would be completed by next Sunday.
That’s not going to happen.
Looking at my security camera in the garden I can see that the patio area has now taken on the look of a pond and later today I half expect to see a couple of ducks taking residence.
The moral of this story is , weather forecasts don’t work. It’s not yet an art despite all the technological advances over the years.
Check progress here: The best laid plans and all that…Pt2
And don’t tell the wife when the job will be finished as she’s now got me tied to that timescale and I know now that is not going to be achieved.
I am a fool
Stay happy people. You are so special.

You must be logged in to post a comment.