What I really love about technology is that there are some damned clever people out there prepared to push the boundaries. This guy on the Skill Make site took on the challenge to build a NASA inspired IONIC plasma thruster as a DIY experiment.
DIY at its finest
These guys are just way out there when it comes to tinkering. There is no way I’d even consider or even know what the hell i’d do in these situations. But I’m so glad there are people out there doing these really random way out there things that impress the hell out of me.
In 1969 Apollo 11 completed the first successful landing of the human species onto another celestial object, our moon. We all know that part of the lander is still on the moon but the section of the “Eagle” that took both Armstrong and Aldrin back up to Michael Collins orbiting above in the Columbia module, could to this day still be orbiting the moon. This video by Scott Manley explains how an amateur space fan has used online tools to predict orbits and the potential position of the discarded “Eagle” 55 years later.
Is the Eagle module still orbiting the moon?
I love articles like this, for someone who was a child of the space race era, it is still a fascinating subject to this day.
Being one of those from the Ham radio community there was always a fascination with putting a Morse code transmitter into a disused Altoids tin (Other tins are available). Here and now though we have a gaming device that can fit in the same tin. Worth visiting Git hub via the link to see the actual boards and the plans for making this a kit version. I’ve signed up, let’s wait and see what happens.
My School was Little Reddings in Bushey Hertfordshire. In year three and for the year following this, one man became the individual who i class as being the most influential person I have ever met in my life. Even stealing that title from my own father. I’ve written of him before but because WordPress is so repetitive with its daily quotes I’ll just post a link here from a previous post from back in 2024 and 2023.
As I wrote earlier today in this post, Strange dream I touched on the fact that I tend to overthink things, in fact I’m a full blown professional at it. And then, this post appears from the team at Anxiety unplugged project, and it has me thinking about it even more. But on a more positive level.
I follow a number of channels on YouTube. It’s the only social media site apart from this one that I do get involved in. I have absolutely no intention of ever making a living on these platforms as to be honest I couldn’t really be arsed to.
Hugh tells you how it is
However a lot of individuals nowadays want to do just that and make their livings on line.
Now Hugh has a very interesting site for someone like me that likes anything from the retro era. He’s been without a smartphone for over a year and his progress without one has been really interesting to follow.
Hugh does earn from his online presence but to be honest it isn’t a living. He goes through the figures in this video that show all the hoops you have to jump through to earn a living from having an online presence.
Had the strangest of dreams last night, what really stood out was it was myself running into a room to attack…myself!
It was just a dream
First thoughts are why the hell am I attacking myself, and why was I even scared of myself? Then I started to overthink, and that is something I am very good at. Do I have dislike for myself? Am I subconsciously attacking myself from within? Why? Am I even so afraid to openly engage my fears that even my own soul is fighting me?
I just don’t know but it bloody well freaked me out to such an extent I’ve stayed awake since. That was 04:12 in the morning, and I don’t think I’m ready for anymore sleep just yet. Bloody hell, I’m afraid of myself and my own feelings at present. If i can’t face myself what chance do I stand with any one else?
Weirdest dream I’ve had in a long time. Funny how you never remember the good dreams, but the bad ones stick around like a bad smell.
Anyway, here’s what those in the know say, enjoy the read:
Dreaming of yourself attacking yourself can signify inner conflict, self-sabotage, or unresolved emotional issues that you are struggling with in your waking life. It might be a sign to reflect on your behaviors and the root causes of these feelings.
Here’s a more detailed breakdown:
Inner Conflict:The dream could represent a struggle between different parts of your personality or conflicting desires and beliefs.
Self-Sabotage:It might indicate that you are unconsciously undermining your own goals and well-being.
Unresolved Issues:The dream could be a manifestation of pent-up emotions, trauma, or unresolved conflicts that need to be addressed.
Need for Self-Reflection:It’s a call to examine your thoughts, feelings, and behaviors to understand the underlying causes of this dream.
Potential for Growth:By acknowledging and addressing these issues, you can move towards greater self-awareness and personal growth.
Google
And how the hell do I deal with that little lot?
Firstly by not worrying and secondly by just getting on with daily life. Hey, It was just a dream.
Have a superb day. And just don’t worry about anything.
To build a usable, basic issue, medium format camera (Bronica SQ/SQ-A) from damaged items and spare parts, for as little outlay as possible and shoot one black and white, and one colour roll of film as proof of its successful completion.
Getting started:
Building a camera from damaged parts is no easy task when the name happens to be a high end brand and any parts that are available, are being snapped up by others to service their own stock or to break up for sellable parts. I’m going to keep a running total to try and build this as cheaply as possible, and to keep track of this total I’m going to use my trusty Psion Organiser II LZ from 1989 to keep a tally.
First purchase:
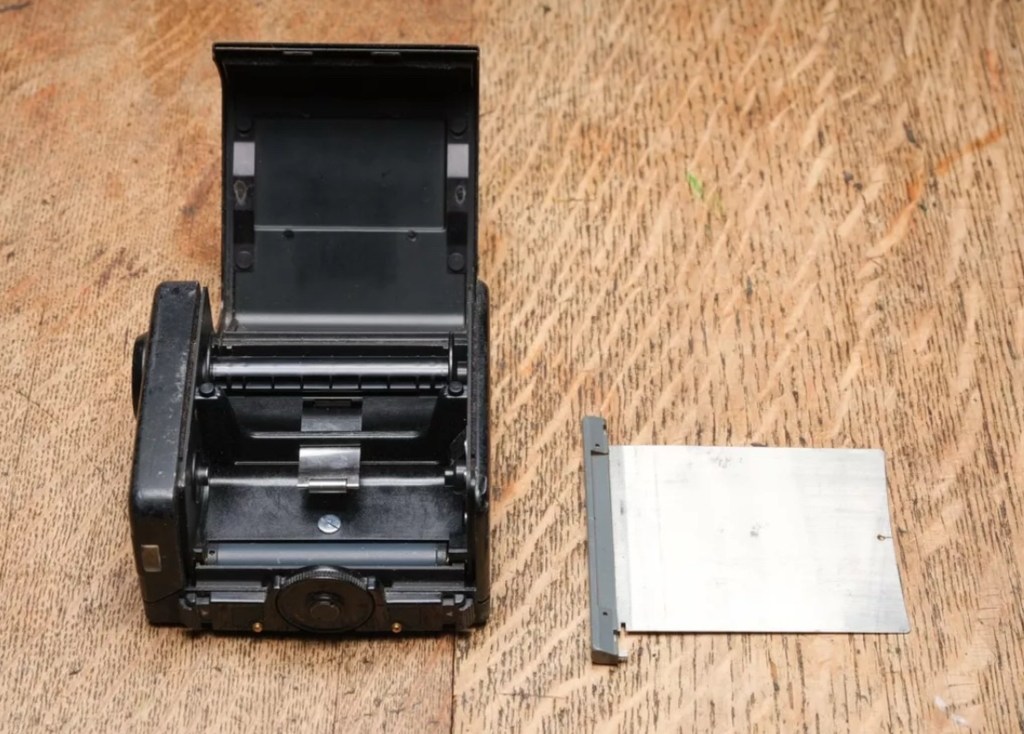
The first purchase has been made and it is for a 6×6 120 roll film back unit with dark slide. I think I’ve paid quite a good price for this item. This is the back piece that fits on the rear of the camera. Here is what the listing stated:
ZENZA BRONICA SQ 6X6 120 ROLL FILM BACK WITH DARK SLIDE Signs of wear, untested. Uk Buyers Only Please
EBay
First purchase, the film back.
And the total paid including all postage is £20:94GBP. Let’s now start the running total in the Psion II LZ.
Running total
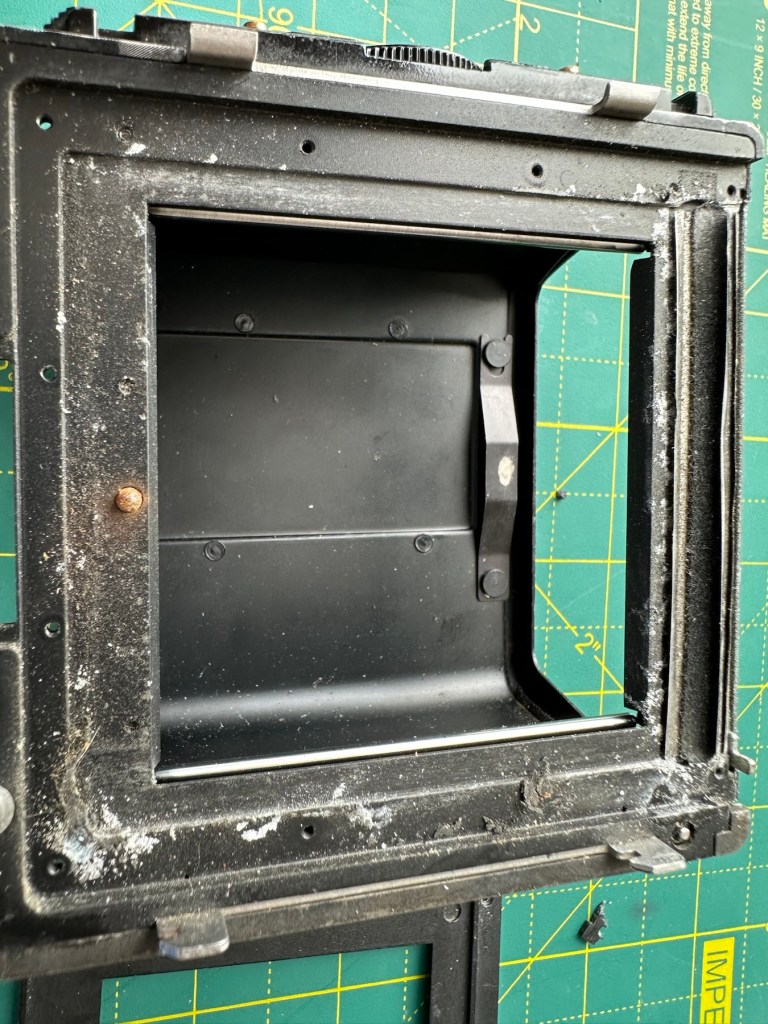
All I can really check at the moment is cosmetic condition and this looks a little beat up, however I don’t really care how it looks externally, as long as it’s light tight, that is all that matters and I won’t even be able to check that until later on in the build. Cosmetically I will attend to it, if I feel so inclined at the end of the project, for now it’s ability to be light tight will be my major concern.
Assessment:
The unit has arrived and yes it has seen use, but not in a few years I suspect. The old smell hit me the second the package was opened, it’s kind of a reminiscent pong from the past, however I’ve got to see beyond this.
The light slide seems fine, however the surrounding frame has been bashed and a small bit of frame has gone missing. There is also a screw missing and I suspect the area that is missing the screw may well have been glued down. there are some slight rust spots on the exterior framework, however everything inside appears to be fine apart from some light seals that will probably need replacing. The rollers inside are grubby so a good overall clean is in order.
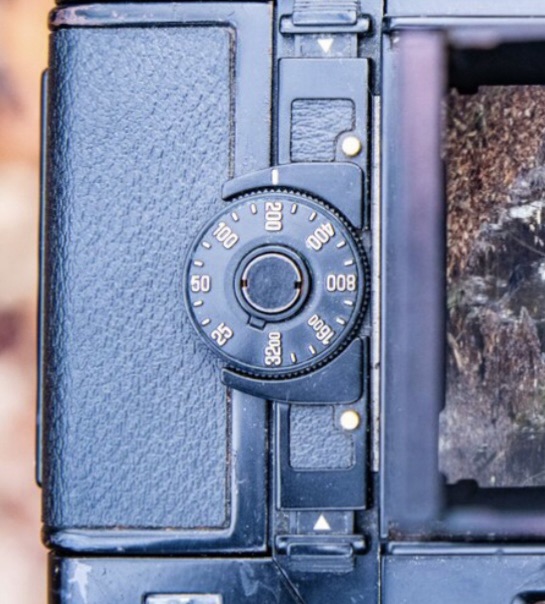
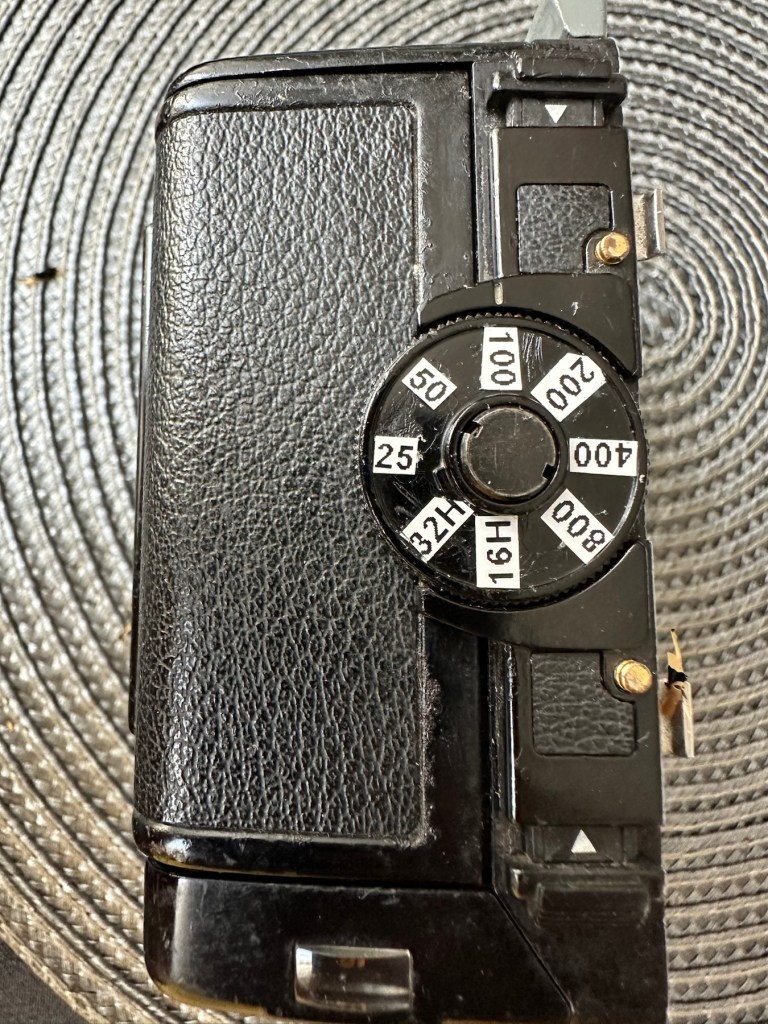
Annoyingly the ASA markings on the dial atop of the roll holder are missing. I will make something basic up to remedy this issue. Again it’s an exterior issue and I’m not too fussed at the moment.
Yes there is some work required, but there is no rush. And thankfully I don’t see anything that really scares me about it. I won’t really know how it stands mechanically until I find a suitable body to attach it to. I have that to look forward to in a future post.
Repairs:
The ASA dial. Simple solution here, until one becomes available sometime in the distant future, is to use some very small dymo labels I have printed. I will cut these down to size and put them in place where they should be on the dial. Quick and temporary solution a’la Frankenstein. No need to over manufacture things, this will do fine.
Size 9 dymo labelsHow it should lookHow mine currently looksAfter I’ve added some ASA numbers- temporarily
The old asa wheel has been cleaned to remove the original glue, and temporary stickers have now been applied. This completes this fix for the ASA dial, for now.
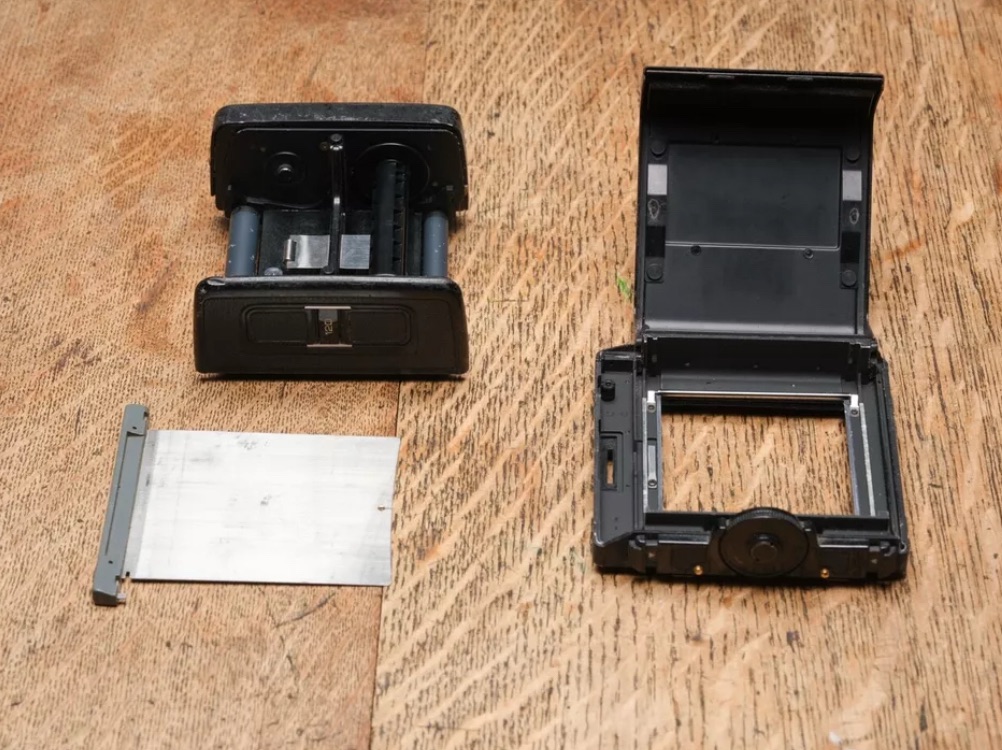
Two items to make one good unit
Edit: I’ve managed to obtain a damaged roll back for a grand total of £5:76GBP, absolute bargain and it also has a working ASA dial. So I’m hoping I’ll be able to use this donor to help in the repair of this item. I’ve used a combination of parts from this and the earlier roll back and I’m happy I have a good working unit. We now have a proper ASA dial off of the spare unit transplanted onto the old unit.
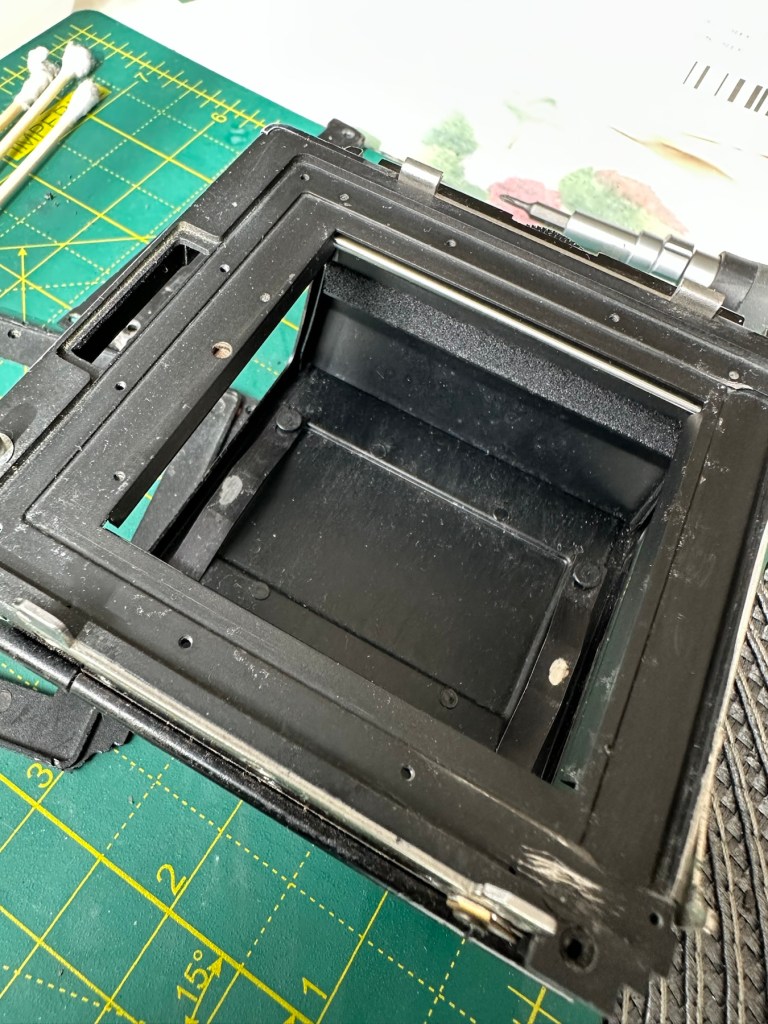
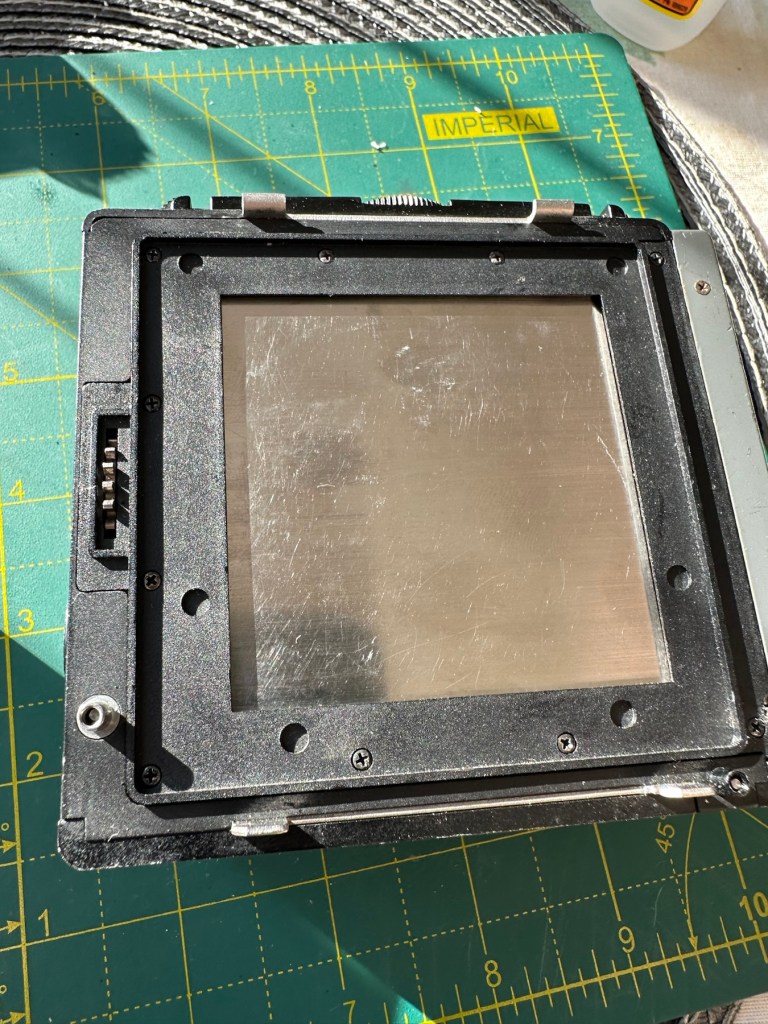
Front frame:
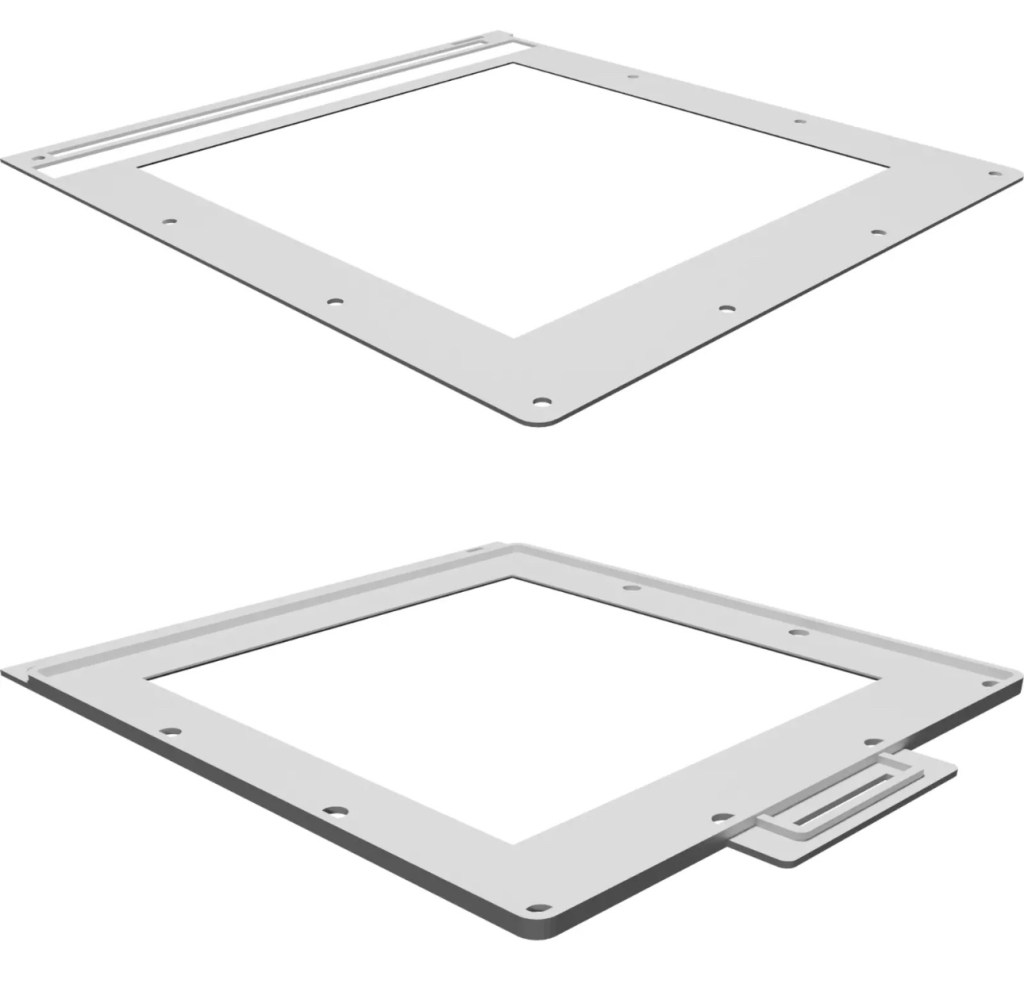
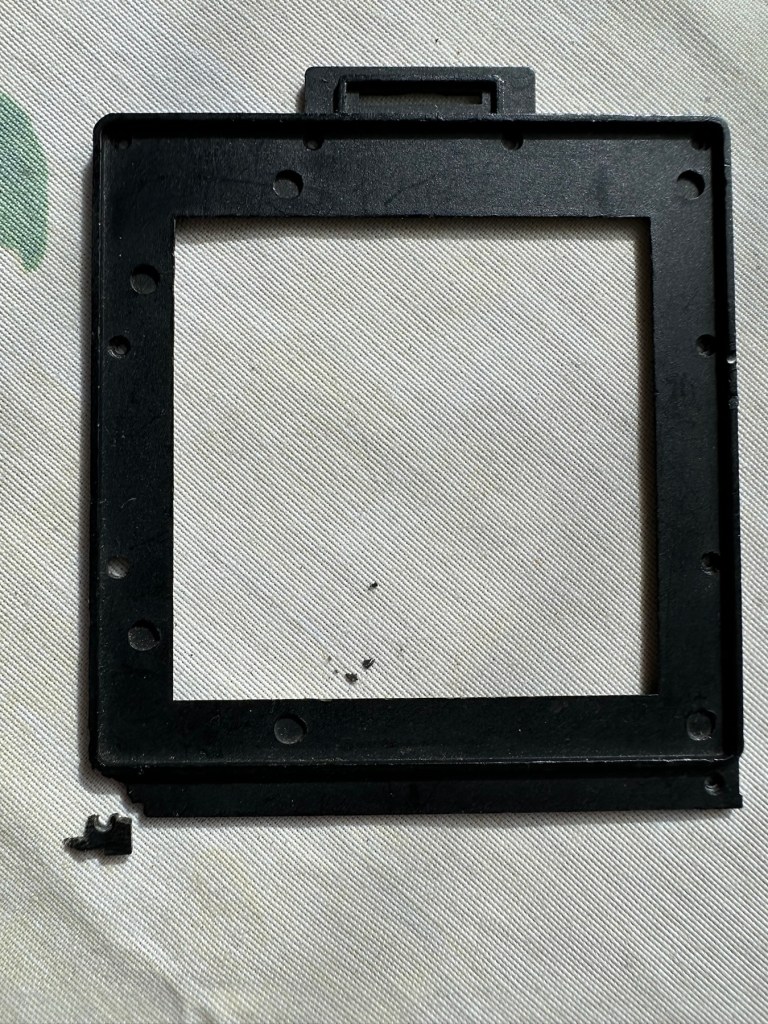
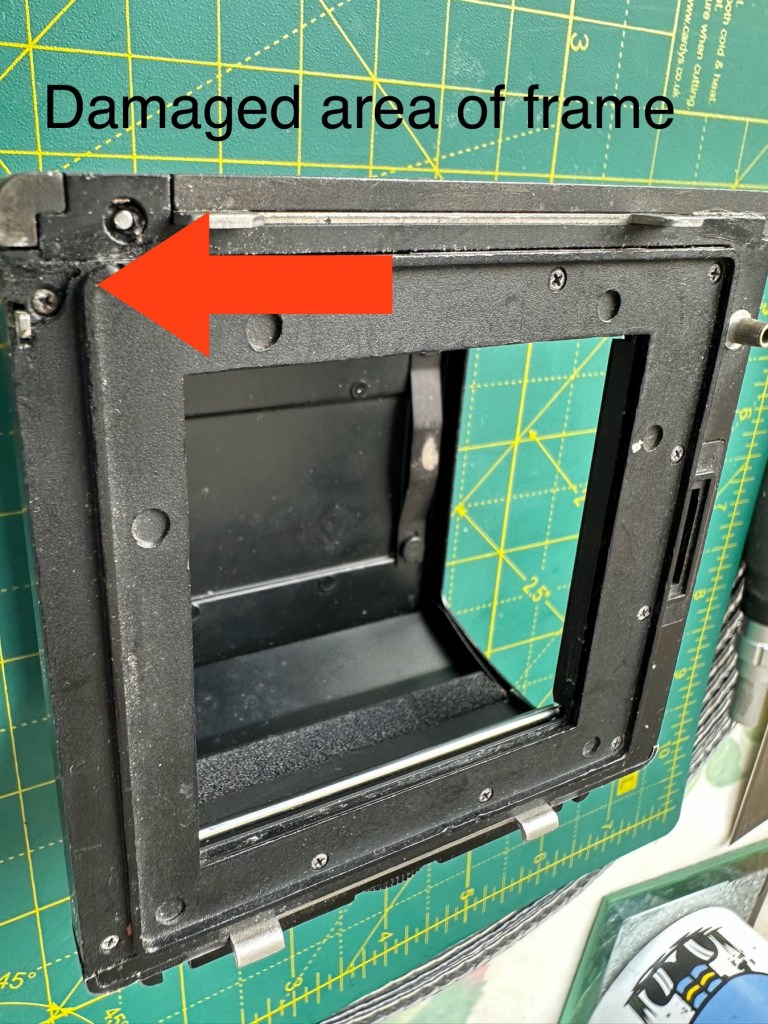
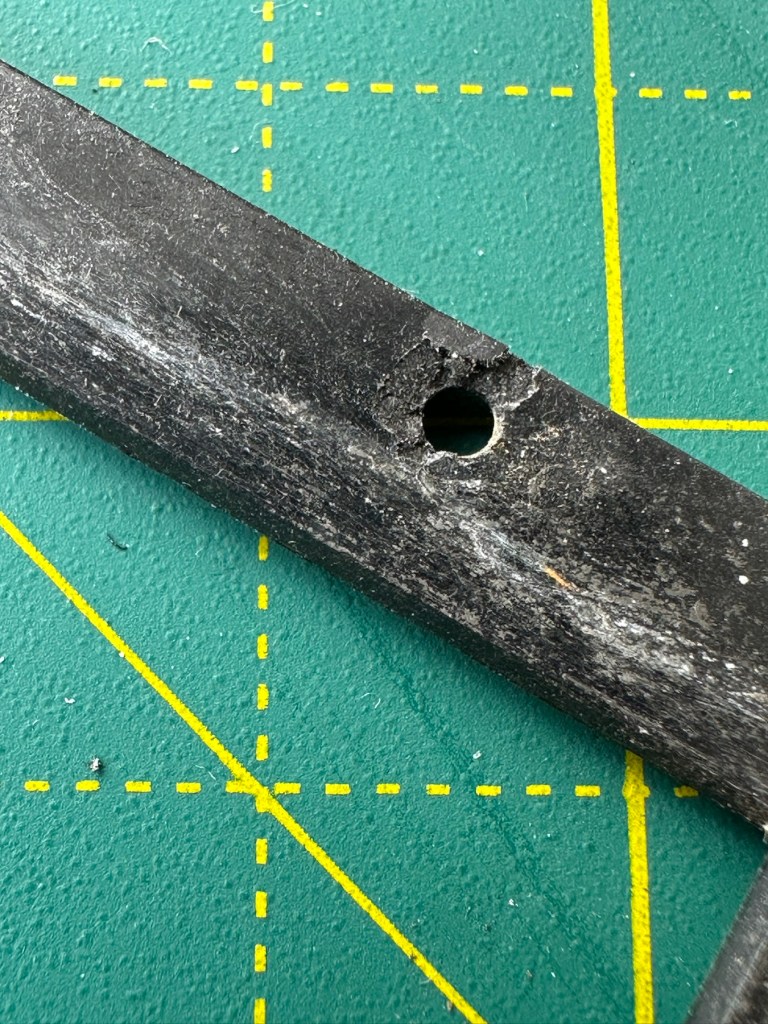
I’m taking this off to give the whole area underneath it a good clean. There are some film guides under this frame that are contaminated and that could cause a scratch on the film, I’m going to clean this whole area under the frame and will then reassemble. The cartridge slide is in a good condition and has just required a polish. Apparently this front frame is prone to breaking and the screw holes splitting, as it gets quite brittle. This has happened to this unit, and I’ve found a guy that 3D print’s replacement front frames and I have ordered one of these to ensure that the whole frame is secure and light tight, as currently one corner can be lifted and this could cause a fogging issue. At a cost include postage of £12:75GBP it’s a small price to pay seeing the only way to get one nowadays is by purchasing a donor unit at cost far exceeding what I have paid here.
The new frame, will be blackThe old frame with broken corner and damaged screw holesDamaged area of frame in situ on the roll back
There are a couple of screws missing of which I have plenty of spares so these will be simply replaced. I’m happy now that this portion of the camera is in a good condition and will soon be ready to be put to use.
Before AfterDirty seals Damaged frameworkRemoval of the frame presented years of debris and filth that needed cleaning as well as a requirement for some replacement parts
There was a lot of contamination under the plate when it was removed, I was quite amazed just how bad it was. This has since been cleaned prior to the new frame and seals being put back into place. When everything is re assembled there will be another clean, I will also be using compressed air to finally clear any remaining debris from the roll back. Edit: the 3D printed frame has arrived and to be totally truthful it’s not much good. The part where the slide goes in is not usable and I’m not confident this will be as light tight as first thought.
Good front frame from the donor spare unit
However the spare unit I purchased has a good front frame that just needed a tiny bit of adjustment to work, I’m now confident the roll unit will work as it should.
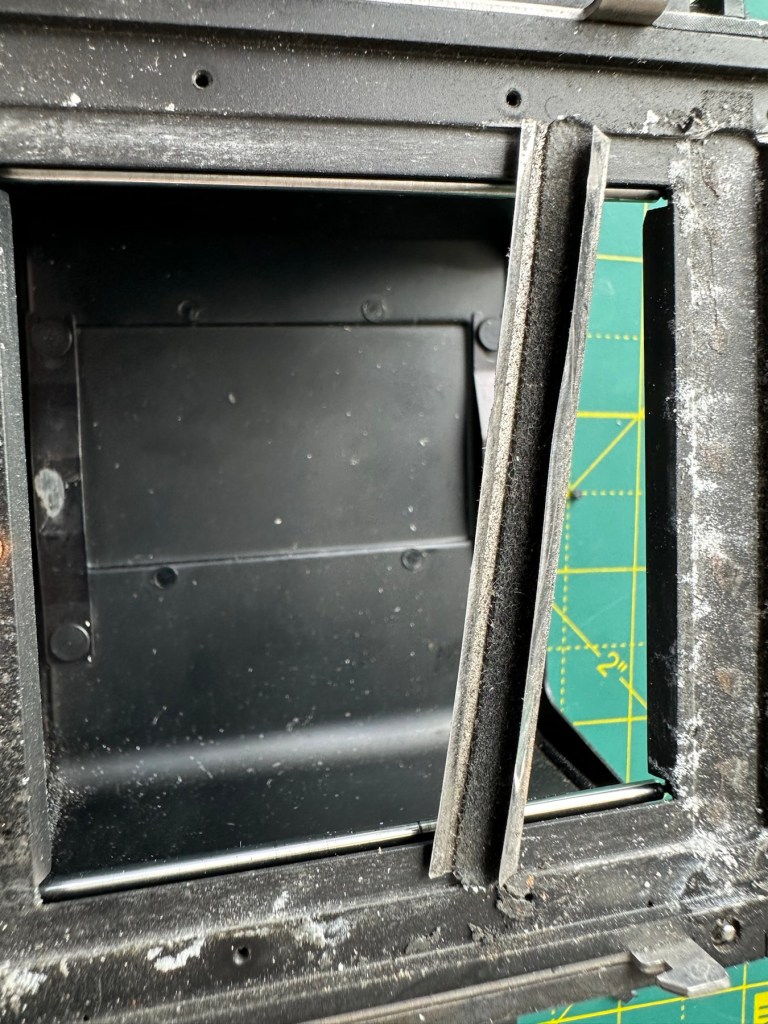
Light seals:
To be honest there are only two immediate areas of concern that I can see. All other light seals seem to be sufficient. I already have plenty of light seals material from where I fix other cameras so this should be simple enough to replace.
New and old light seals replaced
There were only two pieces that needed replacing, these were both on the roll film back. All other light seals were fine.
Rust spots:
These are purely external and there are no issues inside the cartridge. However I may just give them a very fine rub down and a quick spray with a black gloss to just make them look better. Then again I may not, and then I’ll attend to the cosmetics once I have completed the project. Edit: I’ve decided to leave this for the moment and will attend to this sometime in the future as it is not affecting anything at this stage.
Film cartridge:
Again this has just been cleaned and some contamination has been removed from all rollers and guides within. I have adjusted the back plate pressure pad for the film and also given this a good clean to remove any contaminants. I’m happy the internal cartridge is in a good condition and only requires a light clean. This cartridge is superior to the one I have obtained as a spare so this will be the one i work with. I have replaced all the exterior screws to replace the original ones as they were all a little crusty and contaminated.
New screws. I will touch the heads up with black dye
The whole roll section has been cleaned with tack cloths and compressed air to ensure all contaminants have been removed.
I’m going to store the whole roll film back, in a sealed plastic bag with some Silica gel packs to try and remedy the mustiness that I mentioned at the beginning of this post, though I must admit after all the cleaning and replacement of parts, the issue has reduced immensely. Some exposure to sunlight on a window seal usually helps immensely. That’s where it’s sitting for the moment. It’ll go in the bag with some silica gel, during the more inclement weather.
Outcome:
This part has been the most demanding part of this project so far. I’ve looked into the possibility of using 3D made parts, but I must admit defeat here. The items are about 80% ok, there are holes missing that should be there and as it’s a two piece fix you are then introducing glues, and potentially increasing the chances of light accessing the one area you want dark. Maybe in time they may perfect it. I was exceptionally lucky to obtain a spares unit for literally one pence. Yes one whole pence. It cost £5:75 to post making a total of £5:76GBP, but in many aspects some of its parts were far superior to what I already had. I am happy that this part of the build is now complete.
All good to go. Please keep an eye on the other blog posts that are coming regarding this project.


You must be logged in to post a comment.