The workspace is starting to take shape. Normal service to resume soon. Maybe I can catch up with this backlog now.
I’d pretty much closed down my workspace, when we sold our old house back in August last year. Everything I used the most was pretty much moved into storage as we prepared to make the move to our new home. All I was left with was a few screwdrivers, so needless to say, content on this site dwindled, whilst purchasing continued, hence I currently have 29 posts, in draft, awaiting completion as I don’t have a suitable workspace or the equipment available at the moment to complete any of them. I even purchased a 3D printer in November of last year for my birthday, it has been in storage all this time, I have now brought it home and have now made my first 3D print, that post can be found here: My First 3D print attempt
Things are about to change.
We pretty much have every room in the house now up and running. We are settled now and the final boxes have been attended to within the house, and we are finally getting to the point where regular recycling visits to the tip to get rid of the old cardboard boxes are finally coming to an end.
The next stage in my wife’s own words are, “ we can now get Dave’s room sorted.” The words I’d been waiting for.
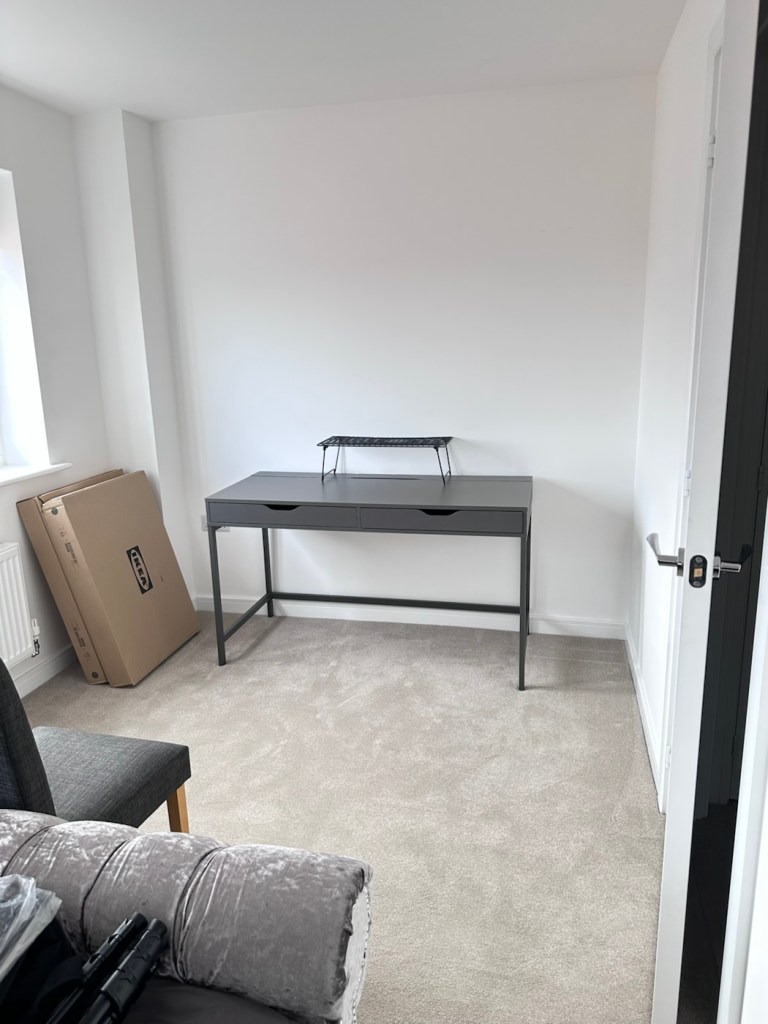
My workspace – a wall in a guest bedroom
I’m calling it my room but in theory it’s not a whole room. It’s part of the third bedroom where I am probably just occupying one wall at the end of a guest bedroom, it’s all I need, I have a Garage to do all the blokey stuff in, this space is purely to work upon all my cameras and other more delicate items of work.
Whilst visiting a certain Scandinavian furniture store i have purchased a basic setup for me to begin working on. The good thing about these furniture systems is that you can start with a basic layout and just expand upon it, and that’s the plan.
I have a desk and drawer system arriving today, and quite a bit of construction to do, once this is in place then I can start getting my gear from storage and get it back into place. It will be nice to have all my equipment in a permanent placement, without having to take it all apart and storing everything back in boxes after I have used it. I’m looking forward to this as to be honest, I’ve really missed it. However I have been pre occupied around the house and there has been an awful lot to keep me busy, there’s been no rest really, I must be very wicked 😂
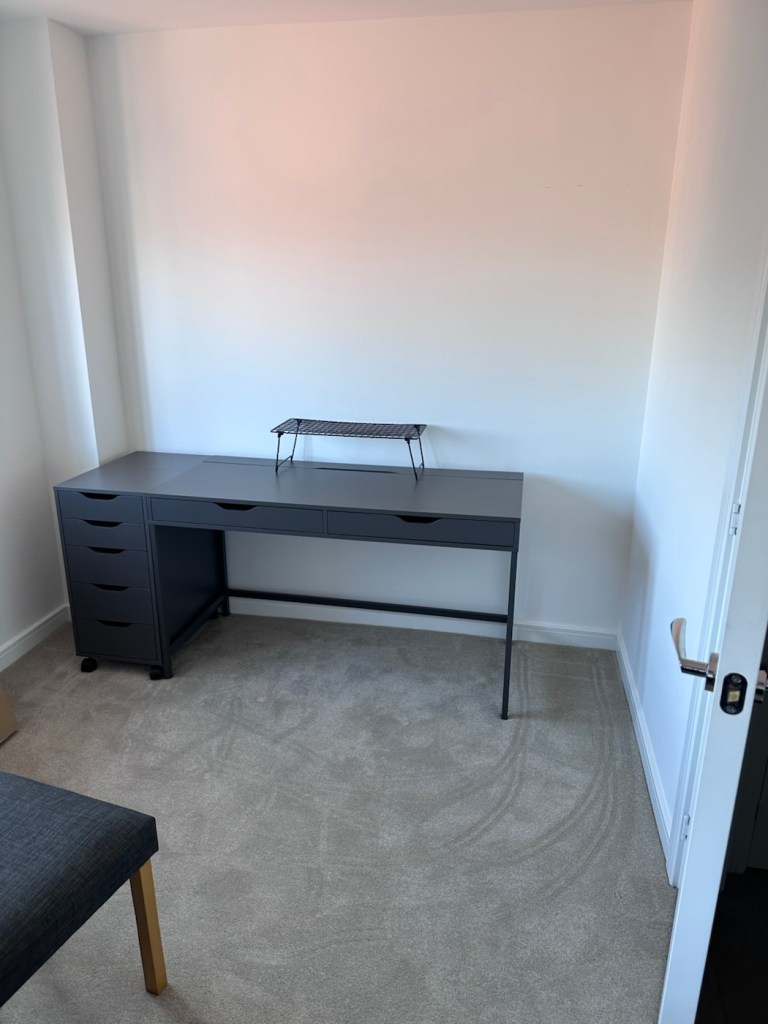
The workspace starting to come together
So as of 10th March, I’m quite pleased to say that my workspace is now ready to use. It’s still a way from being complete as I still have stock to bring from storage along with the last few tools and boxes of components. There are still shelves and storage to put in place, but at long last I can now sit down and finally start to play catch up with my ever expanding backlog.
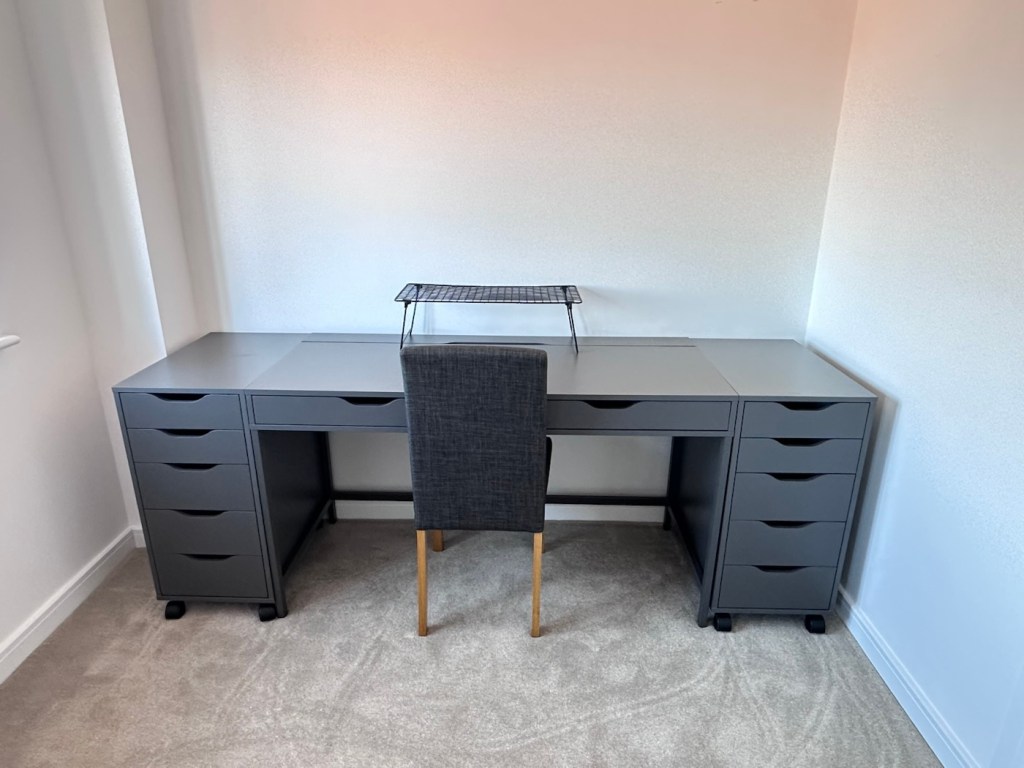
The workspace….liable to be moved about yet again
I must admit I’ve moved things about, and I’m probably liable to move things about again over the coming days and weeks, even months as I can’t quite decide how the setup should look. It’s probably going to be a few sessions of me not being able to find tools, parts and cameras that will help me decide just what, should be where. In the meantime, it’s good that a kind of normality has been restored, and I can now start to resume where I left off all those months ago.
I’ve had a 3D printer for 4 months now. I am now able to use it and today I have produced my first 3D printed item. A Poop bin. Yes you did read that correctly….
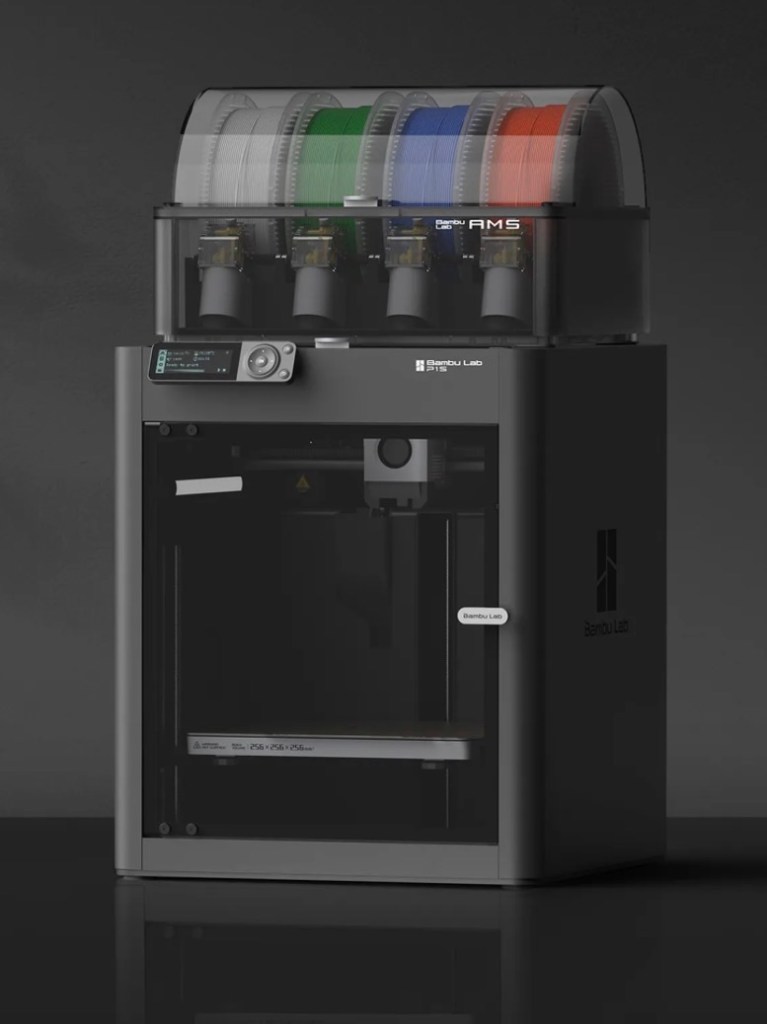
Those of you who watch this site with eager anticipation (I’m joking 🙃) may remember a post that I published in November of 2025, when as a result of all the money I received as gifts for my birthday, I went out and purchased myself a Bambu PS1 Combo 3d printer: I’ve taken a dive….
My Bambu PS1 Combo
I’ve not printed a single thing 3D in my life and to be quite honest I haven’t got a clue on what to do, but as usual I’m willing to learn. I’ve had a number of occasions over the past couple of years where I’ve needed an obsolete part for a project, I’ve had to go as far as Italy to get parts printed whereas with this equipment I could have done so my self, cogs and gearing are a regular item that I come across that I could also use this equipment to produce. See, it will serve a use to me once I have my workspace configured.
That time has arrived….
Now we are safely moved in to our new home, and all the important stuff has been attended to, attention has switched to getting my work area up and running, and I will shortly be uploading a post regarding the inside my work area.
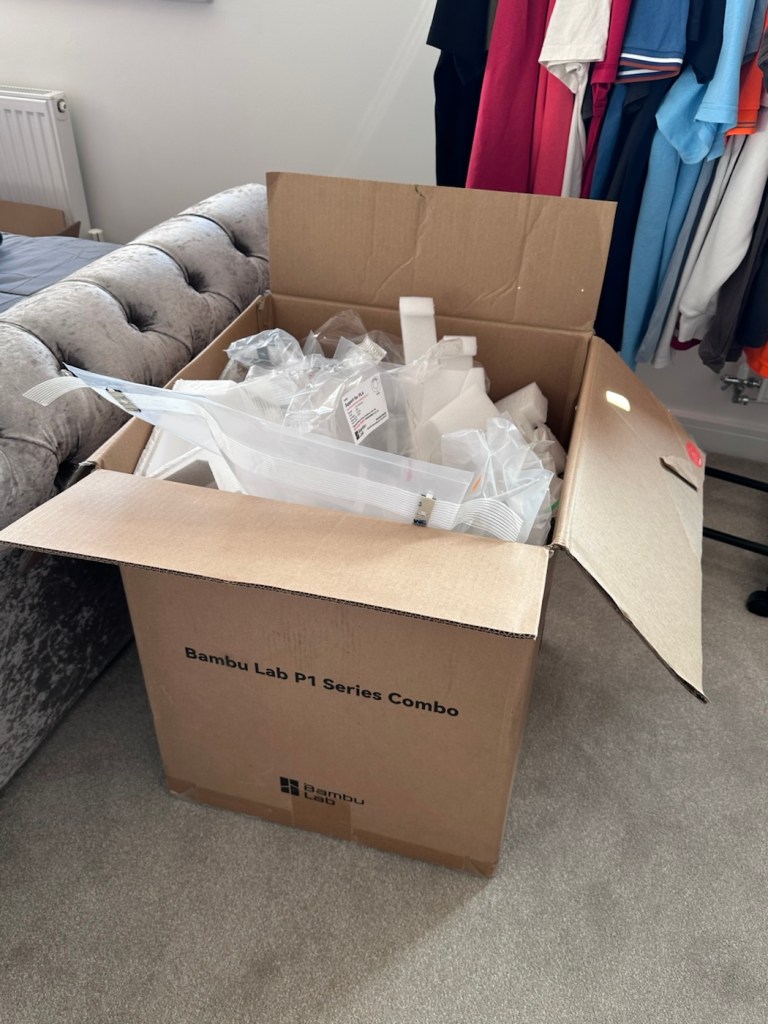
However, this piece of equipment has been in storage since November, almost 4 months now and needed to be put into action as soon as possible. Seeing that the workbench was now in place it only seemed right that the printer was now unpacked.
It’s a big box, and has a lot of packaging
Even to do the unboxing there is a QR code to link you through to the process to follow, it is very informative as these printers are packaged so well, there are screws and supports to remove, put in place to stop sensitive parts being damaged or dislodged during transport.
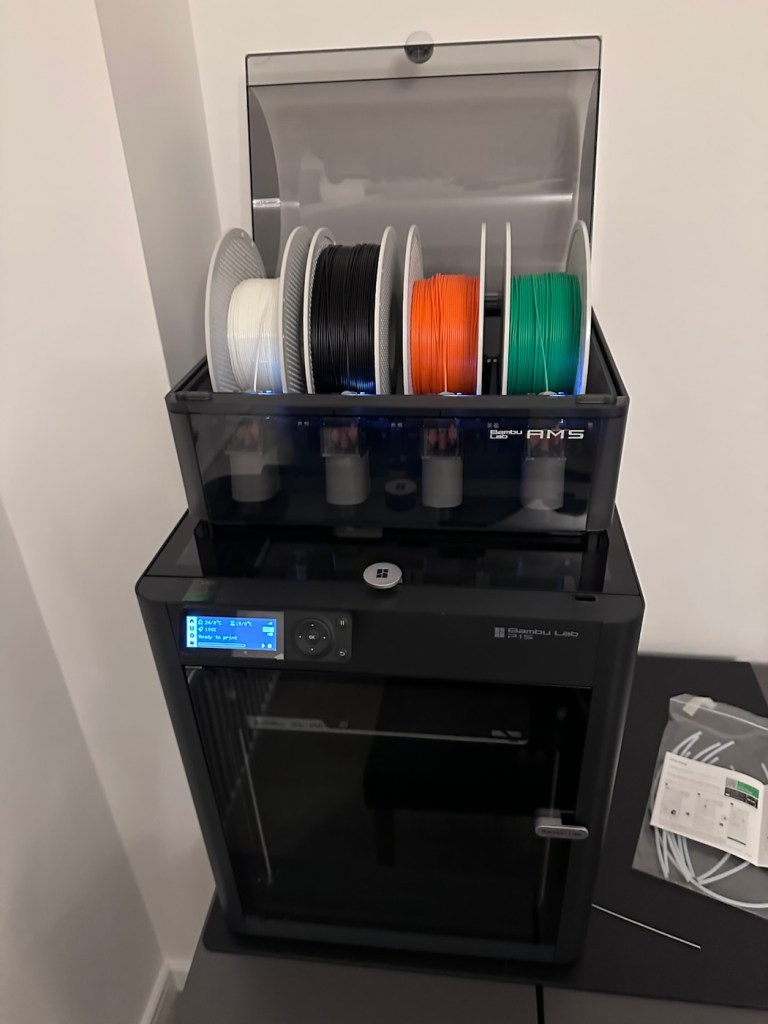
The AMS system installed on the top of the printer
When you follow this system of unpacking, you are also linked to an app called, “Bambu Handy” that really is the control system for your printer. Here you register, set up blue tooth and WiFi options and the app then becomes your monitoring and control for your printer. At the moment I’m sticking with just this app, once you are more experienced there are a number of more complex programs you can then use for design and editing purposes. For now I have found my level. I now install what is called the AMS system on top of the printer, it is an automated feed for using more than one coloured filament, the printer can move from one colour to the next automated, without interrupting the print process.
But that creates a little waste product….
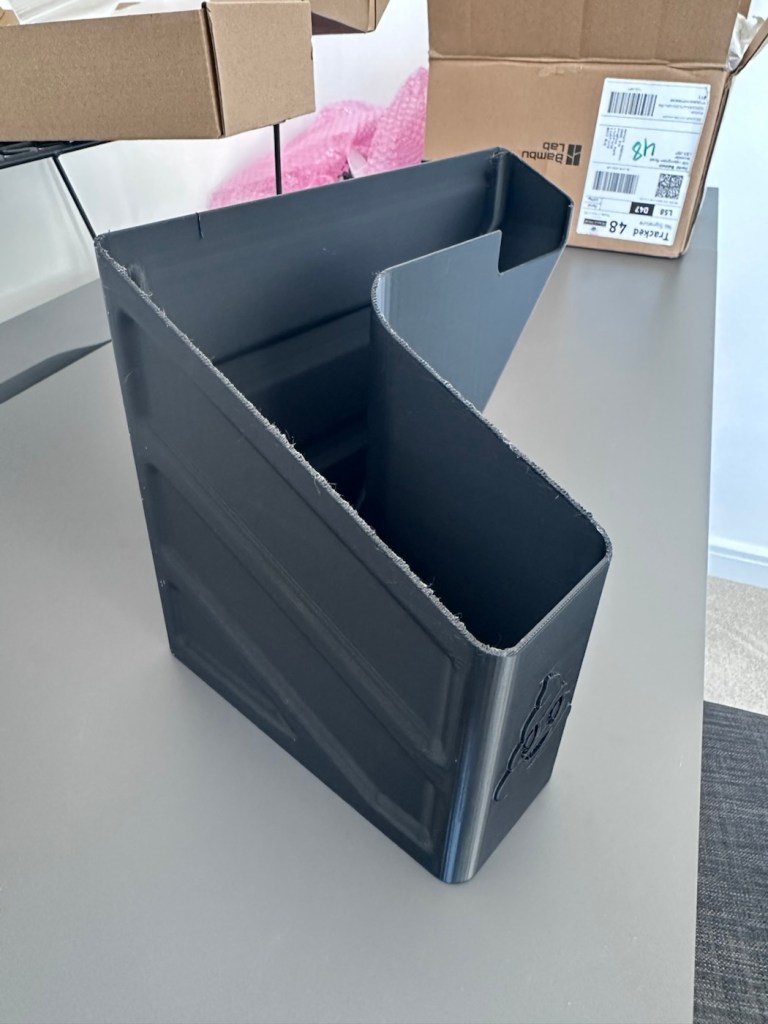
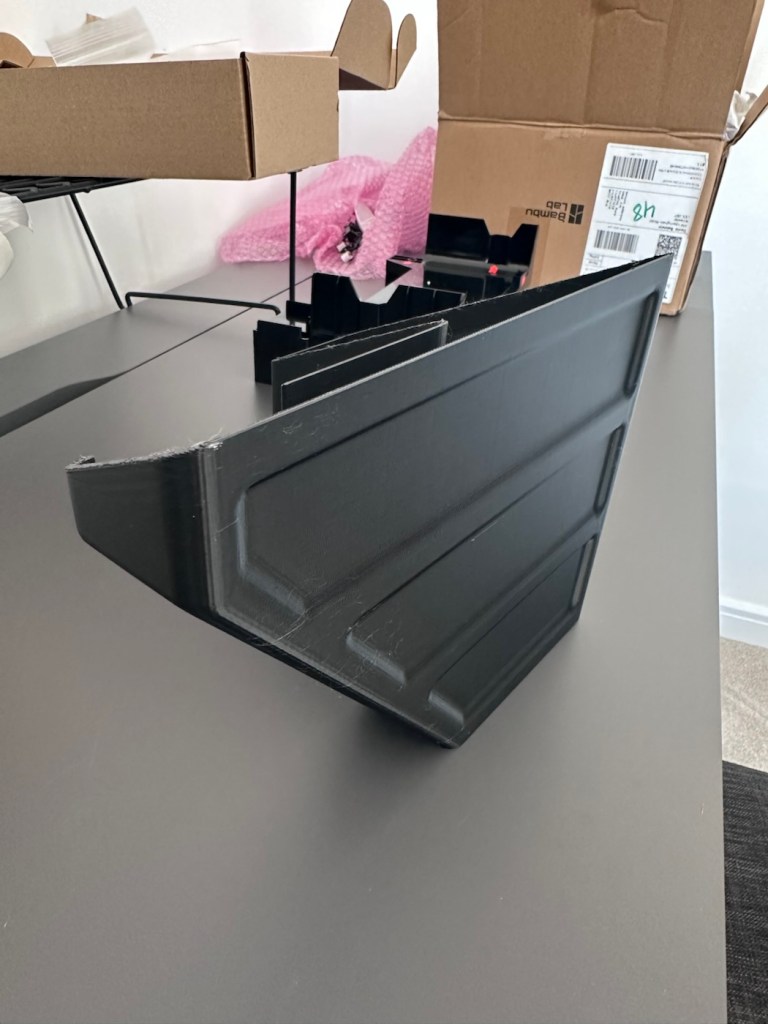
And there is my first print project.
When the printer initially primes, or when it changes colour it will create a little waste as it clears the nozzle of one filament to use another. This waste then exits the rear of the printer onto the floor, or work bench depending on the positioning of your printer. For this reason people then install what is known as a “Poop bin” to collect such waste. Here is a draft picture of the one I will print for this printer.
A draft “Poop bin”
Now, this app fortunately comes with absolutely thousands of pre programmed prints covering all aspects of printing technology from home, toys, educational and everything in between. Fortunately, because “me” as the totally clueless, doesn’t have to learn basic CAD and slicing techniques, because some clever individual has already done that for me. And for that I am very grateful.
There are a number of tools and equipment you can print for these printer units, it’s as if they are self maintaining and developing. All very clever stuff.
But a “Poop bin” is a necessity if you don’t want to suffer the wrath of your other half by spewing out randomly produced plastic waste on to her nice new carpets. That is not conducive to a happy and peaceful existence 😂
So a “Poop bin” is my first ever 3D project….so here goes.
A simple selection on the app, of the item you require, a few settings get amended, the printer does some calibration checks and then the process starts, this particular print takes about 4.5 hrs to complete. Fortunately the system has an inbuilt camera so you can check progress or even get a timelapse at the end. You can basically shut the door, turn off the light and walk away, you can always check in, but sitting there just watching for 4.5 hours can get a tad boring, and is just like watching paint dry, so why not just walk away and do something more useful. I did just that, and went to assist the wife with some chores.
Here is the said timelapse of the print. 4.5 hrs in about 30 seconds. The dark periods are brief and were just me messing with the onboard light settings.
My 3D poop bin printing
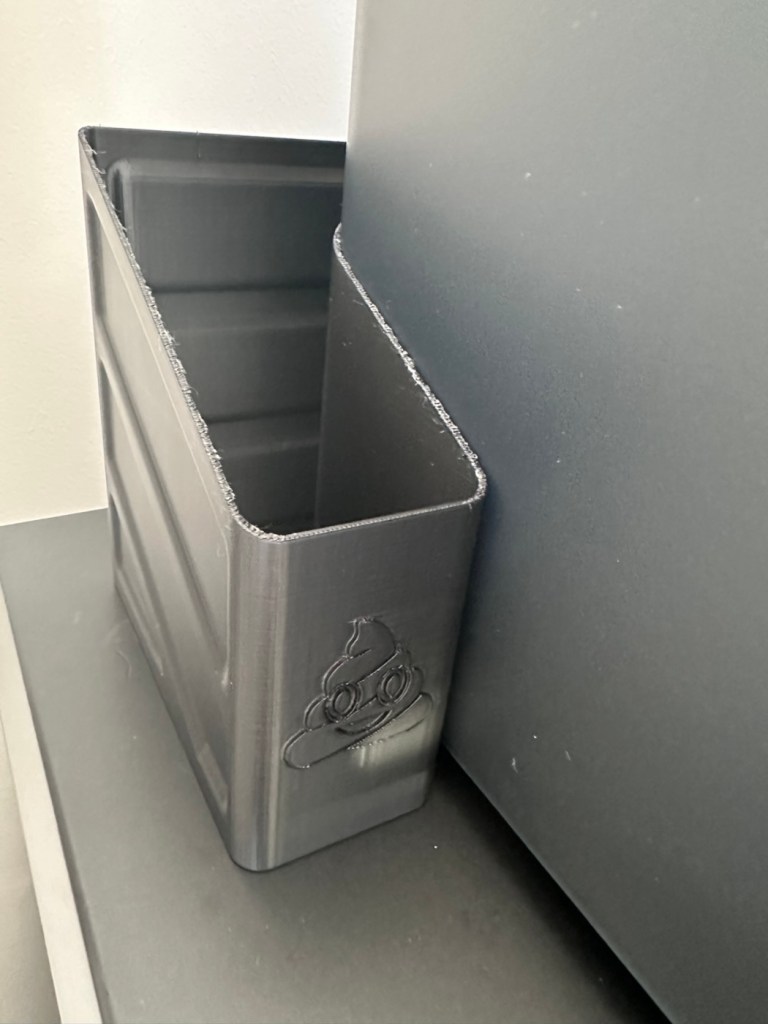
Here’s the actual finished article, and situated at the printer.
Printed item, and in place
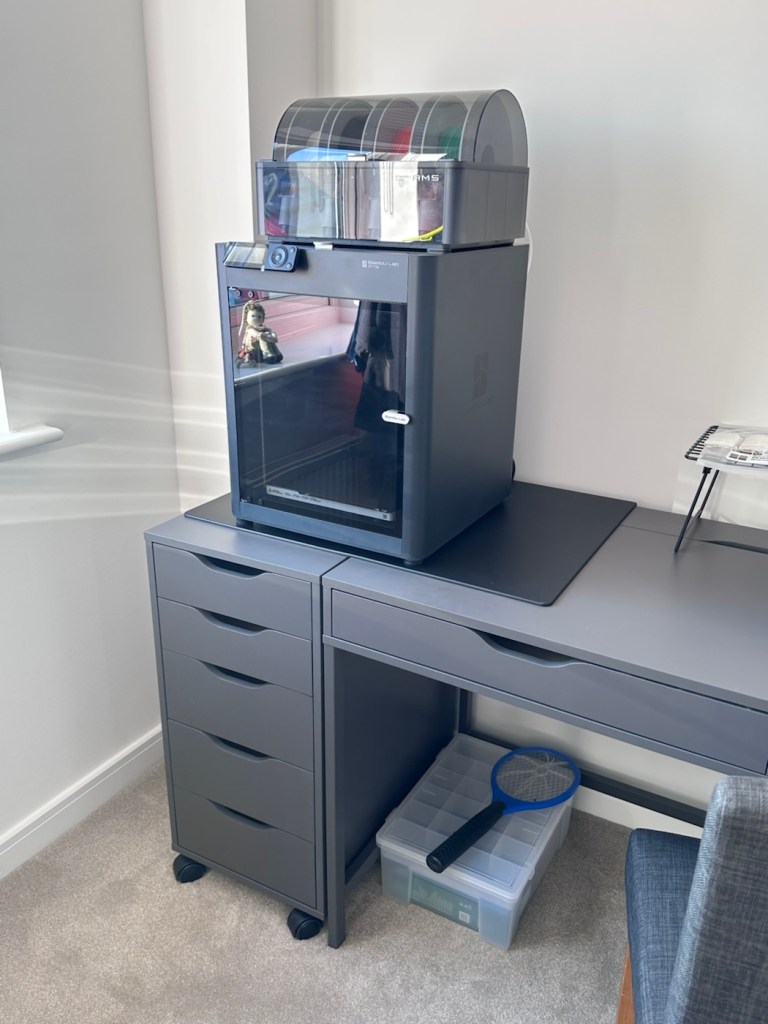
So that’s it really. Still learning but quite happy with what’s been learned so far, the desk and everything needs some fine tuning and there is a lot of gear still to be added but we are now off to a flying start.
Current position with anti vibration feet now installed
One thing I did notice was that there was some vibration and noise, however I did get gifted some anti vibration feet with the package when I purchased the printer, I have now installed these so hopefully the next print will be a little bit more peaceful, not that it was particularly bad anyway.
And that concludes this post. Thanks for reading, it’s always appreciated and I hope this day finds you well and at peace.
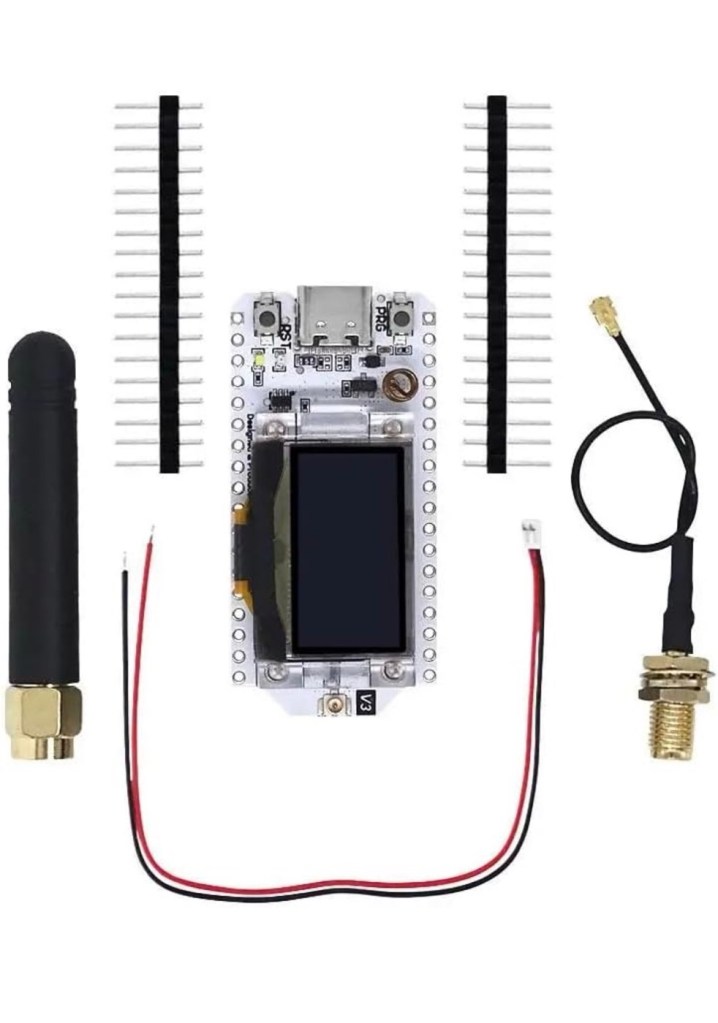
Ever heard of the Meshtastic decentralised off grid communication network? You have now. Dive in and get involved.
What’s that? I hear you say. Well, I’ve been trawling t’internet recently and one of the chaps I follow on YouTube, Gabe, has got me very interested in this particular mode of radio communication. Here’s a video of him explaining Mesh communications in his own charming and extremely enthusiastic way.
Meshtastic – as Gabe sees it
The good thing about Mesh networks are that no licence is required for use, this means the system is truly open to everyone. As a registered radio amateur this system is of interest to me in the spirit of experimentation, and that’s what’s good about this particular mode. Everyone can do it at a very reasonable cost. In the UK it’s been present for a few years now and has an active core of participants. However, usage is very patchy and still developing, and due to the short range and lack of other users to repeat messages, its general take up is going to take a while yet, or in usual fashion it may even be a mode that just dies out due to lack of involvement. It’s not a mass-market tool yet, but a growing niche interest, especially among amateur radio, DIY tech, and preparedness communities. However, that said, in areas with little or no cell phone coverage this could well be a lifesaver. Below is a little bit about Meshtastic.
What is Meshatastic?
Meshtastic is a free, open-source project that lets you create your own decentralized, off-grid communication network using LoRa (Long Range) low power radios. It’s designed to let people send short messages and share data without relying on mobile networks, Wi-Fi, or the Internet.
Open-source & community-driven: Anyone can contribute, modify the software, or build devices with the firmware.
LoRa technology: Uses low-power, long-range radio waves in unlicensed frequency bands (like 868 MHz in the UK/EU).
Mesh networking: Devices form a mesh by rebroadcasting messages. Each device acts as a node that can relay messages to extend coverage.
Meshtastic’s goal is to provide reliable communications when other infrastructure is absent or unreliable and to offer a flexible platform for hobbyists and practical users alike.
How it works
Networking: LoRa radios transmit small data packets over long distances with very low power. Each device forwards messages it receives to nearby devices, forming a mesh network that extends reach beyond single-hop radio range. The network is decentralized — no central tower or internet access is needed.
User interaction: Devices can connect to your smartphone via Bluetooth and use the Meshtastic app to send messages or view locations. Messaging is typically text-based (no voice or high-bandwidth data).
Why use it?
People adopt Meshtastic for many reasons, often tied to availability, resilience, and independence from traditional networks:
Outdoor activities: Hiking, camping, biking: Stay in touch where cell signals are weak or absent. Location sharing: Useful for groups and safety.
Emergency situations: Natural disaster backup, communications can continue even if cellular networks fail. Communities and some groups experiment with using Meshtastic as an alternative communication layer during outages.
Technology and DIY: Education and hobbyists use it to learn about radio, mesh networking, and embedded systems. Integrations with IoT sensors and other projects are possible.
Community and social projects: Enthusiasts set up community networks, share nodes, and even run local meetup groups.
What do you need to get started?
Basically, Amazon, EBay, and the Chinese suppliers such as Ali express have all you need. Needless to say the Chinese options are far less expensive if you are willing to await delivery. Just type “Meshtastic kit” into your browser to view your options.
As I’m in the Uk I can give some prices for the most basic setups within my country. To be honest, all that is needed is a Meshtastic main board of which there are a few to choose from, a power source and a mobile phone to do the setup. Something like this below.
From Amazon in the uk I can get this board, for £18:99GBP and that’s all I need to get started.
Amazon uk
Add to that a small battery and you can probably power this unit for between 24hrs or even a week, dependant obviously on the battery capacity and how you have the system set up. A battery in the uk on Amazon would cost around £6-£10 GBP. You can buy enclosures to make the unit “pretty” or you can even 3D print your own. I think I will print mine when I finally have my printer up and working.
A suitable battery
On the Chinese platforms these items can be purchased at a greatly reduced price, the main board can be purchased for around £3:00GBP, you can even purchase two entire units for less than the one that you get from Amazon. It really pays to shop around.
I’m shortly going to dive into setting up a Meshtastic node, I’m even going to set up an APRS one under my radio licence conditions, but that will be another post.
So hopefully this post may introduce others to an off grid communication mode that may well assist those in remote areas or with extremely limited cell phone coverage. As soon as I’m ready to build and place my node I will write a post regarding its build, programming and eventual usage. It is all very simple technology and worth having a read about on the Meshtastic website : Meshtastic introduction
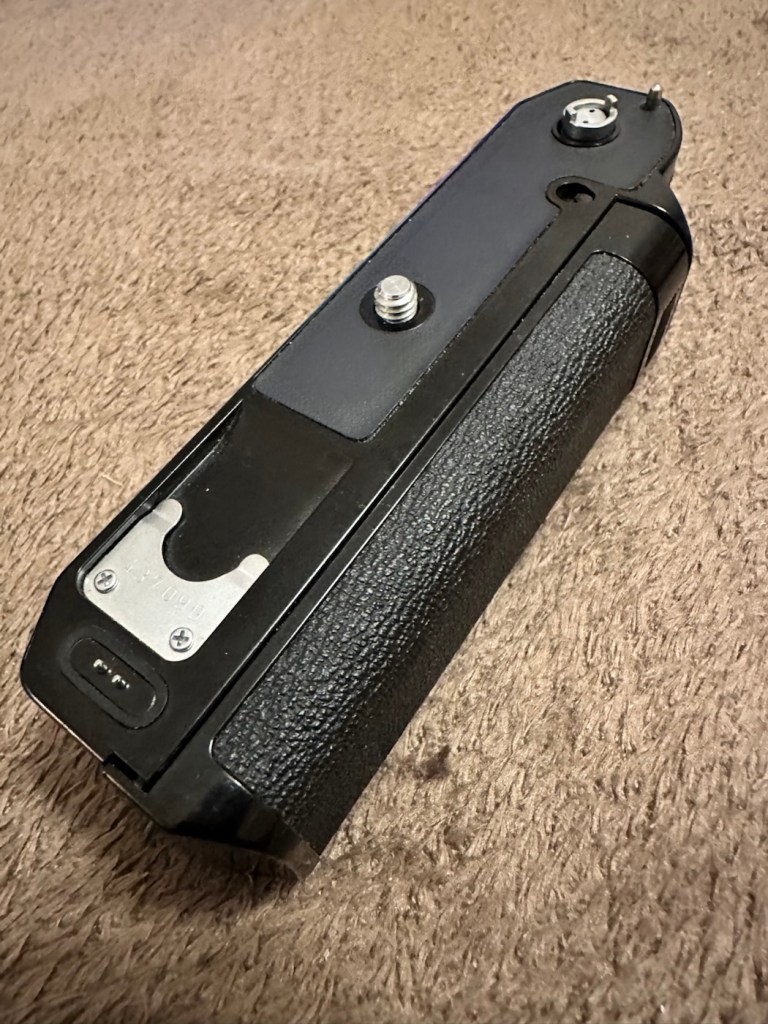
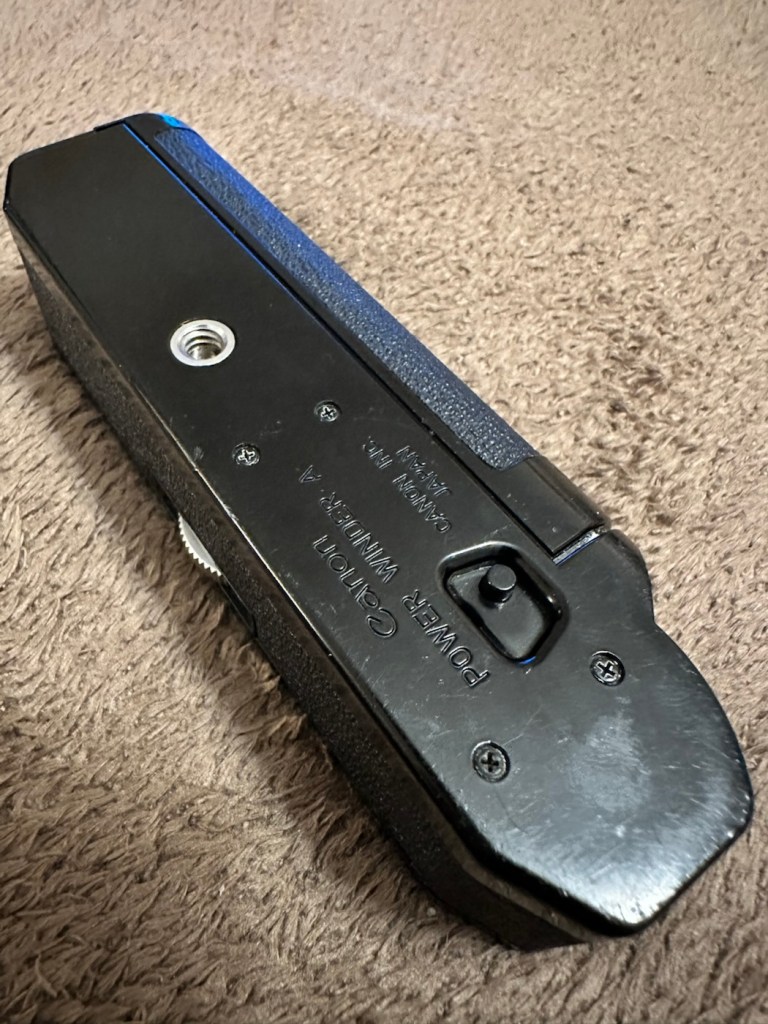
A very corroded Canon power winder “A” from the 70s
This is what it looks like externally, looks fine, but as this post goes on, you will notice a very marked deterioration in quality. It’s a horror story of battery acid contamination.
Looks nice
This unit is part of a bundle that was donated to me by my good friend Jon, see here: Cameras…i need more!
It was part of a Canon AE1 combo, the Camera i have previously posted about here: Canon AE1 35mm SLR, however the batteries within it had been left for such a long time that they had started to dissolve into the unit, leaving quite a restoration project behind. Here’s some history about this unit:
The Canon Power Winder A was originally introduced with the Canon AE-1 camera in 1975 but it also can be used with all the A series models (in fact, it is applicable to use the Winder A with the professional class Canon F-1(n) system SLR camera but without power rewind feature). It is an automatic film winder which greatly increases the automation and mobility of these manual focus cameras. Its exceptional versatility, due to its compact design provided by the principal control circuit built into the electronic circuitry with most of the electronic models such as AE-1, A-1 or AE-1 Program etc, and allows it to be attached to any models mentioned earlier and provides for its use without any special adjustments.
Winding Speed: Approximately 0.5 seconds. Operation: When the shutter button on the AE-1 is pressed, the winder will function. Shutter Speed Coupling Range: 1/50 to 1/1000 second for continuous photography. “B”, or 2 to 1/1000 second for single frame photography. (When the winder is set at “B”, AE photography cannot be performed). Film Counting: Is performed by the frame counter on the AE-1. Automatic Cut off Circuit: When the film roll is completely wound up or if the batteries should run out, the winder will automatically stop and the warning lamp (LED) will light up. Power Source: Use 4 size AA batteries. (In normal temperatures they can take more than twenty rolls of 36-exposure film). Attachment: Take off the winder coupler cover on the bottom of the camera, and mount the power winder using the tripod socket. Size: 141 x 42 x 34mm (5-9/16″ x 1-5/8″ x 1-5/16″) Weight: 3009 (including batteries) (10.9/16 ozs.)
Mir.com
I already have one of these winders on my A1 that I am currently repairing, however that’s away in storage at the moment until I get get my workspace back up and running when we eventually move home.
Im aware that these winders can take a max of two exposures per second if the lighting and conditions are right, meaning you could crack out a 36 exposure roll of film in under 20 seconds! They don’t do auto rewind either, you still have to do it manually, it would be a couple of years yet before that option became available. The red light on the case indicates one of two things, the battery is low, or the end of the roll has been reached, time to rewind!
They are quite reasonably priced if I wanted to buy one, but why would I do that? The purpose of this site is to repair and recycle, so that’s what I will attempt to do. It will be quite a task with this one I think.
Assessment:
As stated above, and from the outside, all looks well.
Outside, cosmetically, no signs of a problem
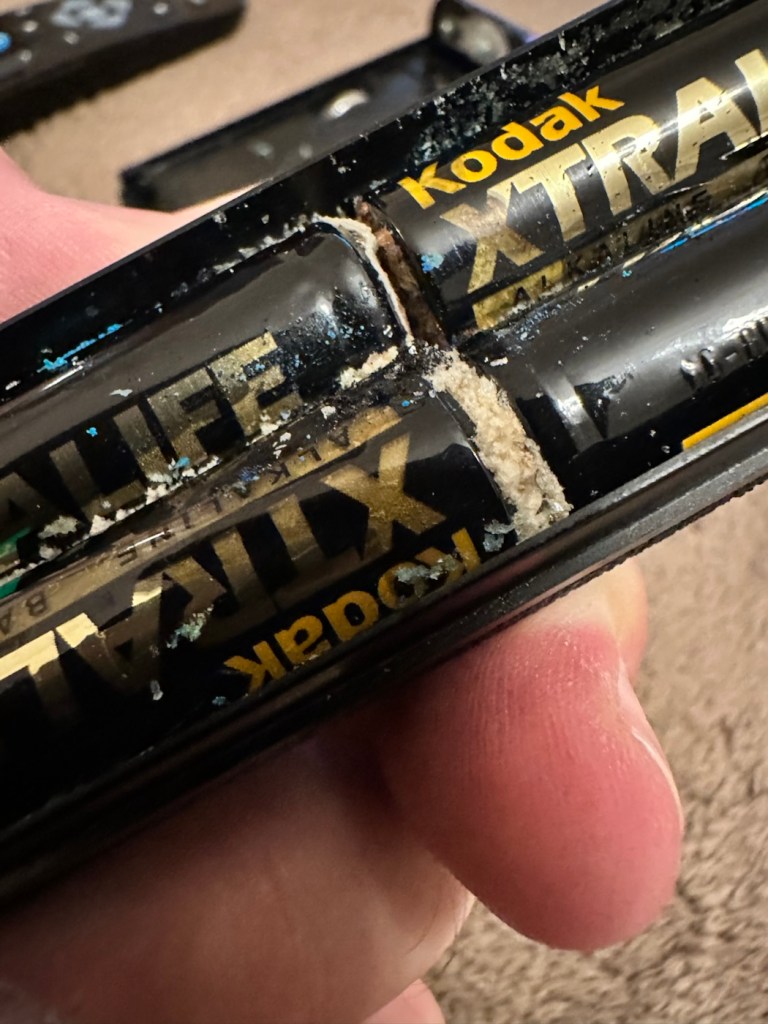
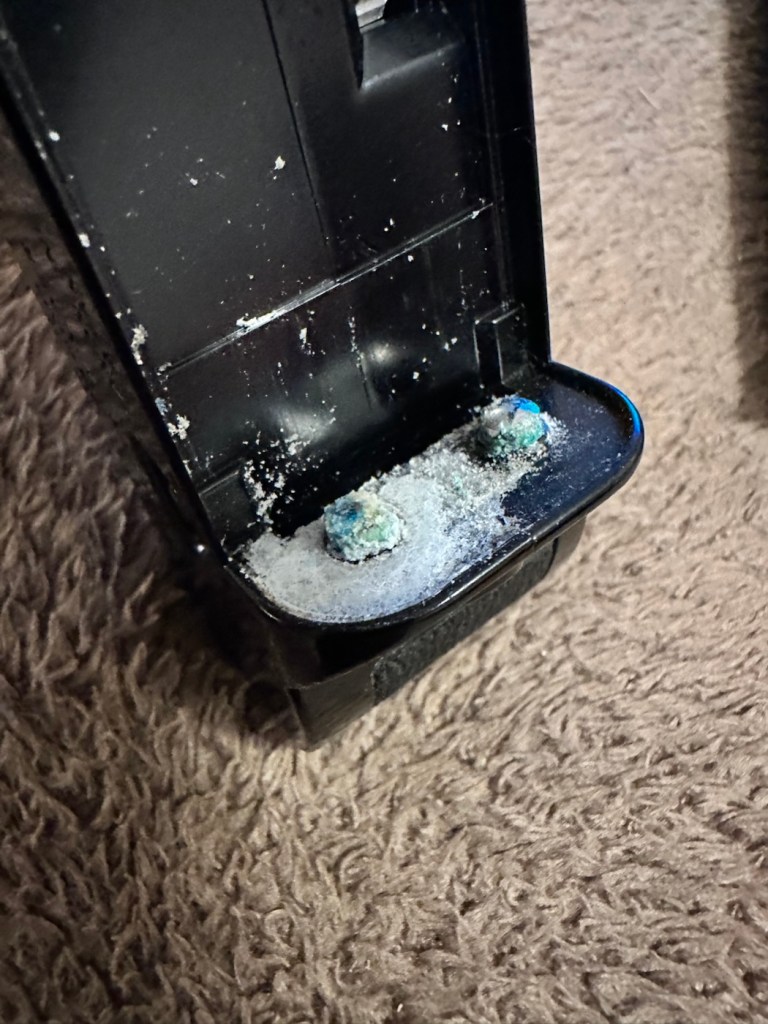
However there are a couple of giveaways that alert you to the immediate issue. Firstly there is an aroma, a kind of metallic musty smell that instantly alerts you to “Corrosion”. Secondly near the switch there are some “blue” granular stains that confirm corrosion.
We start to open up and find signs that all is not wellThe old corroded batteriesThe contacts, and the battery bay
It’s pointless even putting batteries in here yet as they will not work, the damage is too extensive for the batteries to work. To be honest we now need to do a good clean and decontamination before we can even start to look at the extent of the contamination.
Repair:
First we have no choice but to get rid of the corrosion, this will involve brushes, a pencil grinder, and copious amounts of isopropyl alcohol. Let’s get started.
Using a sonic brush and IPA
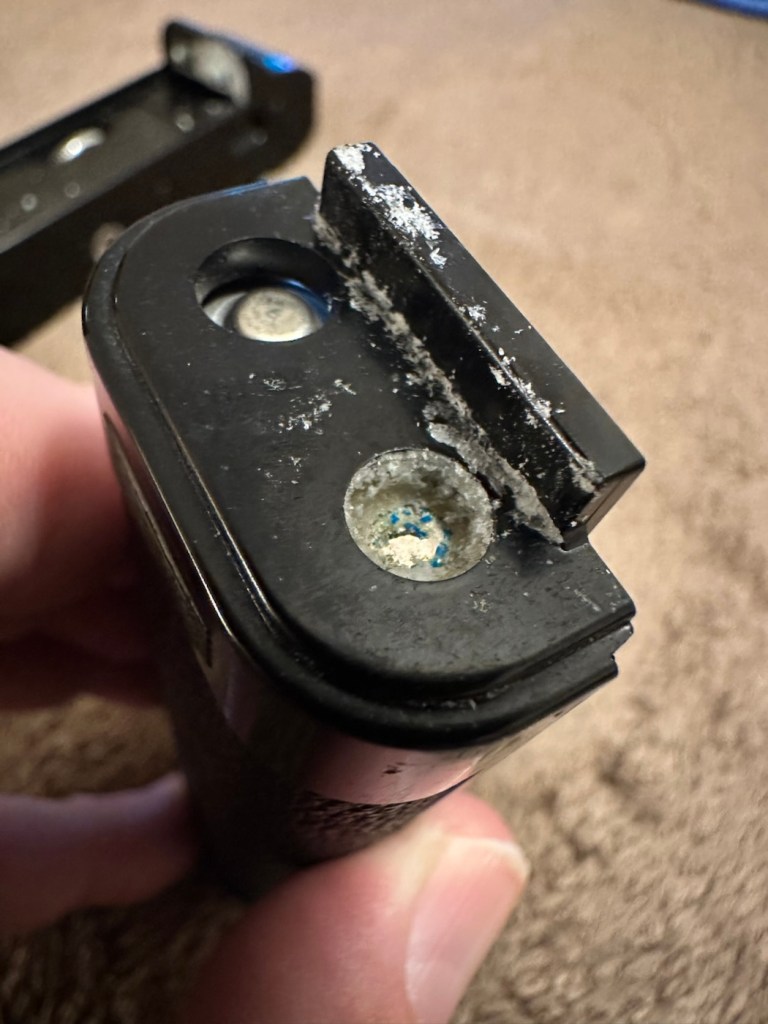
I attack the contact end of the winder with a sonic brush and some IPA. After about 10 minutes and multiple applications, using a small scraping tool i was able to remove the corrosion that had started to eat away at the chrome on the contacts, a small rub with some fine sanding paper restored the metal as best I could. I’m not going too over the top here as the corrosion could have well gone past this point into the internal workings, I’ll tidy up once I can get it working as it should.
Before AfterThe battery compartment
The battery compartment was cleaned using a similar process. However the contact end that used to have springs mounted for the batteries, have all rotted and the springs have had to be removed. I will replace the springs later, it’s not required for testing purposes just yet. All this contamination and blue staining has to be removed completely, if you leave contamination behind, it can start to attack the unit again at a later date, take your time and ensure you get as much off as you can. Clean, clean and clean again. It’s a boring part of the process but essential for long term results.
With everything cleaned and left to dry, I put some power across the winder power contacts and nothing happens. No noise, not any sign of clicking or of any movement at all. Just as previously feared i think the corrosion has gone further. Let’s get it opened.
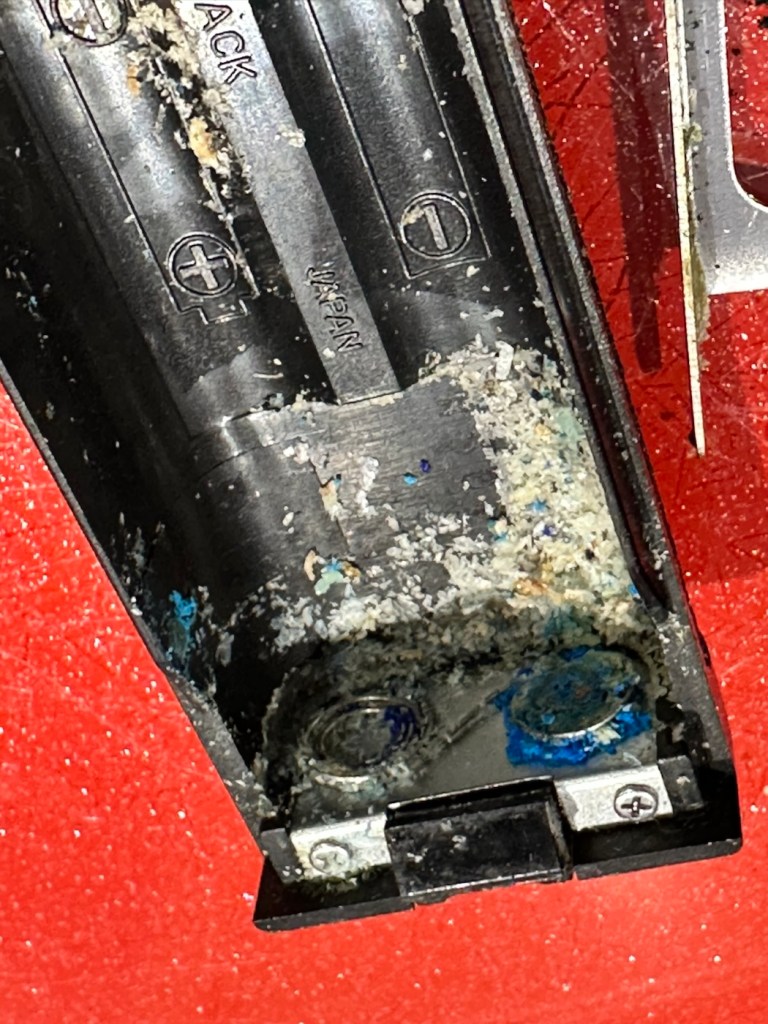
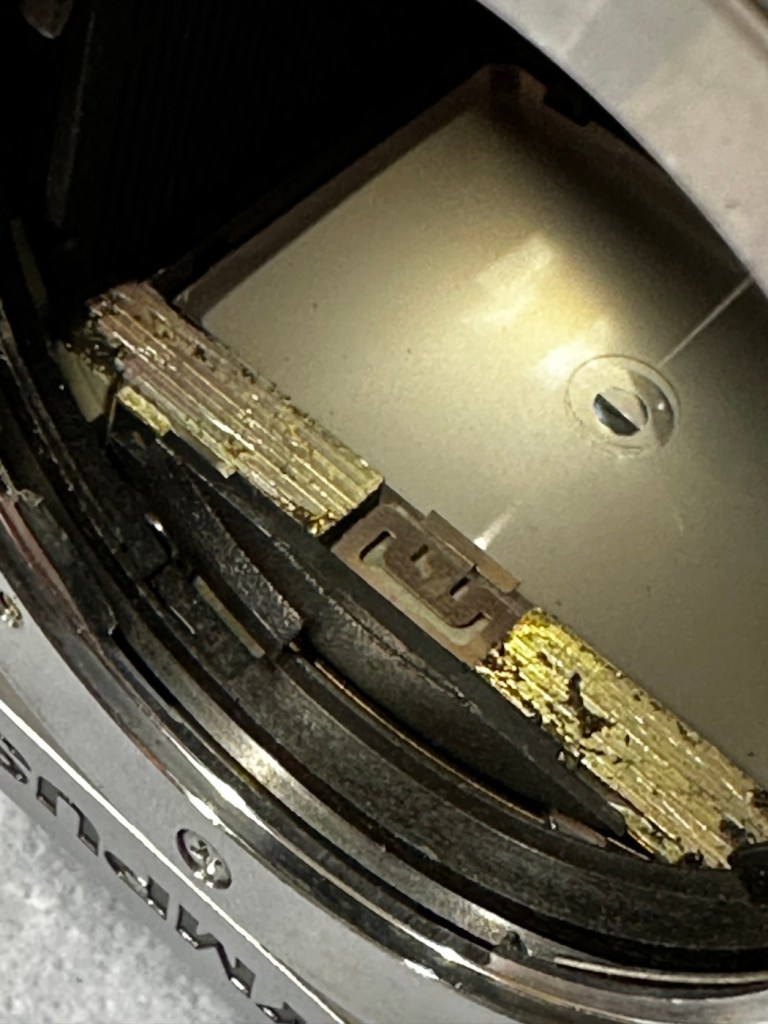
Leatherette removed to access internally
Corrosion has made it inside
And as expected the corrosion has made its way inside, the picture above shows a wire at the contact point rotted due to corrosion, in fact the second wire fell off just after removal, the contamination has eaten the cables and is rotting the connections. The good news is that it seems that the issue hasn’t gone beyond these contacts.
I’ve now cleaned and polished the contacts at the rear in preparation for being re soldered, the issue here is that I may have to extend the cables slightly as they are quite short. This may aid my testing of the unit prior to reassembly, let’s wait and see.
I have now soldered both contacts back into position, without any extra wire, hell, it was really fiddly and I doubt it would be able to be opened again without these wires being extended a bit further. I have also thoroughly cleaned throughout the internal workings removing all signs of contamination. I have reassembled the unit and it now sits in one piece. I have taken a dentist tool to further scrape down the contact point within the battery barrel area.
Further cleaning of the contact in the battery barrel area
Using a little wire wool and IPA to clean the area I now have two good points of contact. Using the multimeter confirms we have continuity over the contacts that we didn’t have previously.
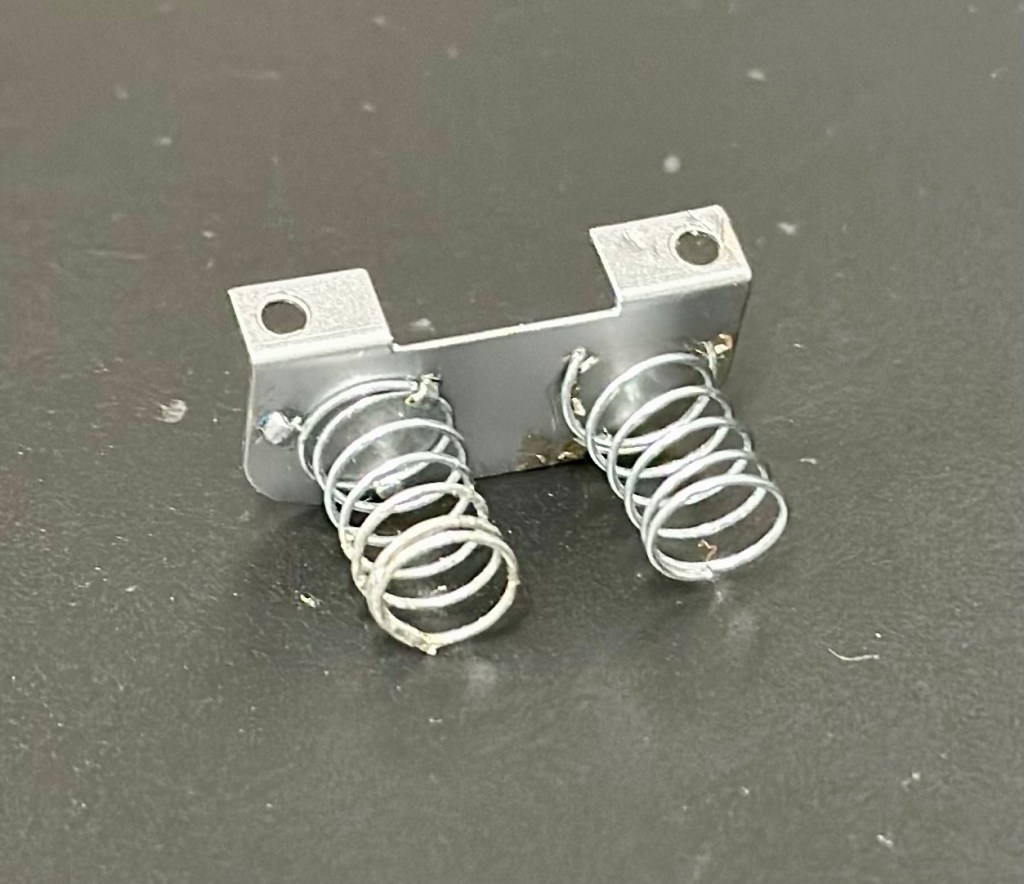
Reading the section above, you will remember that I had to remove the two springs on the battery case as they had totally corroded and broken away. I have some new ones but they are in storage, so for now I will just have to compromise until I can get to the new ones and solder them in place. Here I just obtained an old spring from a waste metal box, split it in two, added a small washer one end for the positive contact and just left the other as it was. Both springs were put in place, just being held there by the four AA batteries. As I stated this is purely for testing purposes and will be corrected once I have confirmed the unit works.
Temporary springsHeld in place by batteries
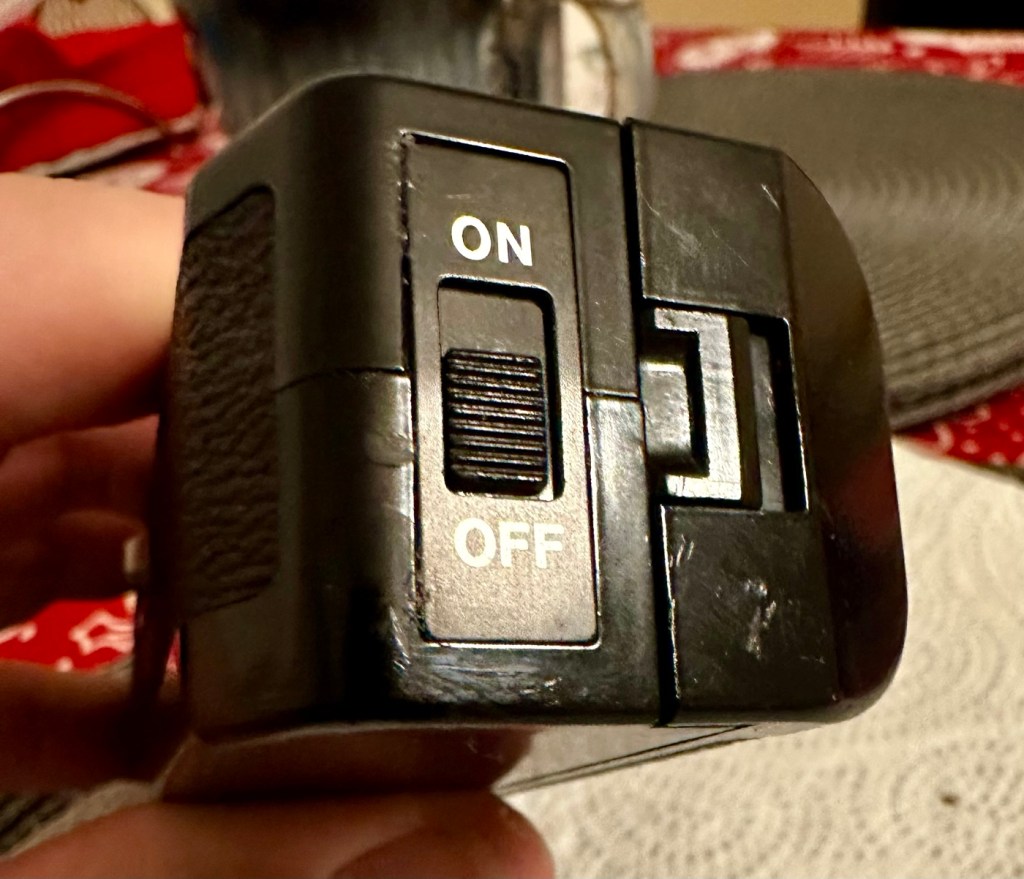
The battery holder was attached and then switched on. Nothing. Then I remembered I have to simulate the signal from the camera and this can be done by putting a metal short across the two raised pins at the power switch end. This worked, and the motor did its quick burst as expected. See the small video below.
The winder, now working. And shorting the pins to simulate the cameras signal
I’m pleased with this, as all the work I have done has been worthwhile. I just need to get the new springs soldered in place, give the whole unit a thorough final clean, ensure the leatherette that was removed is stuck back down and that the on off indicator is stuck back into place. And then we can put it onto the Canon AE1 to see if it works as it should.
Leatherette now glued back in to place
On / Off switch plate glued back in place
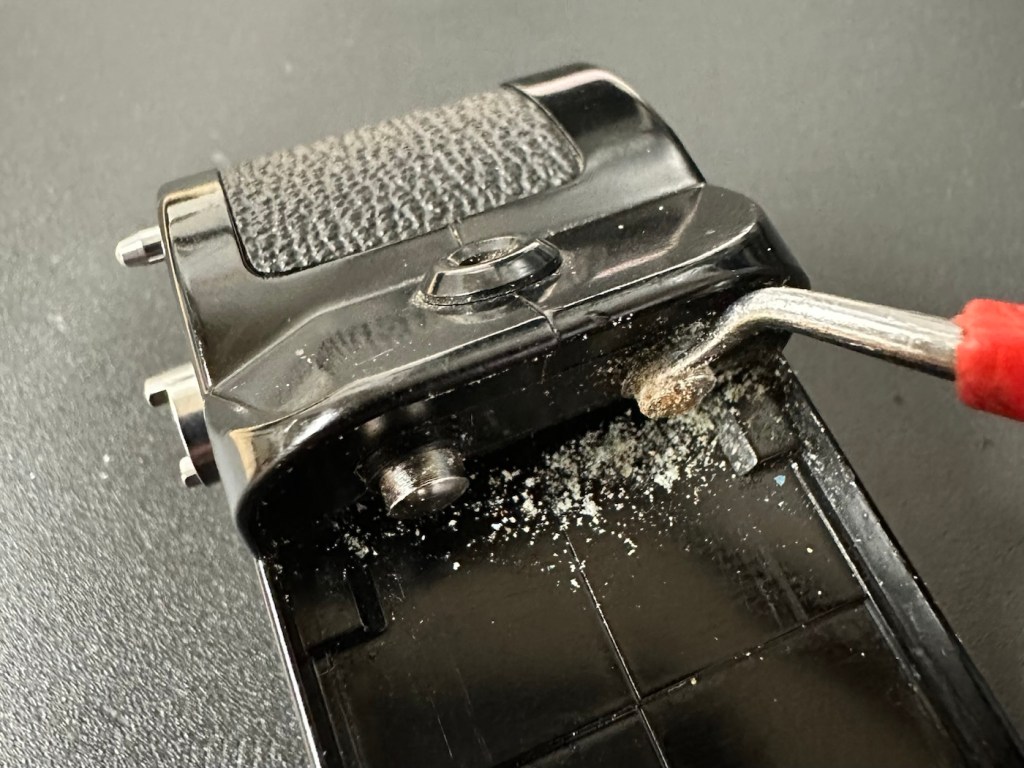
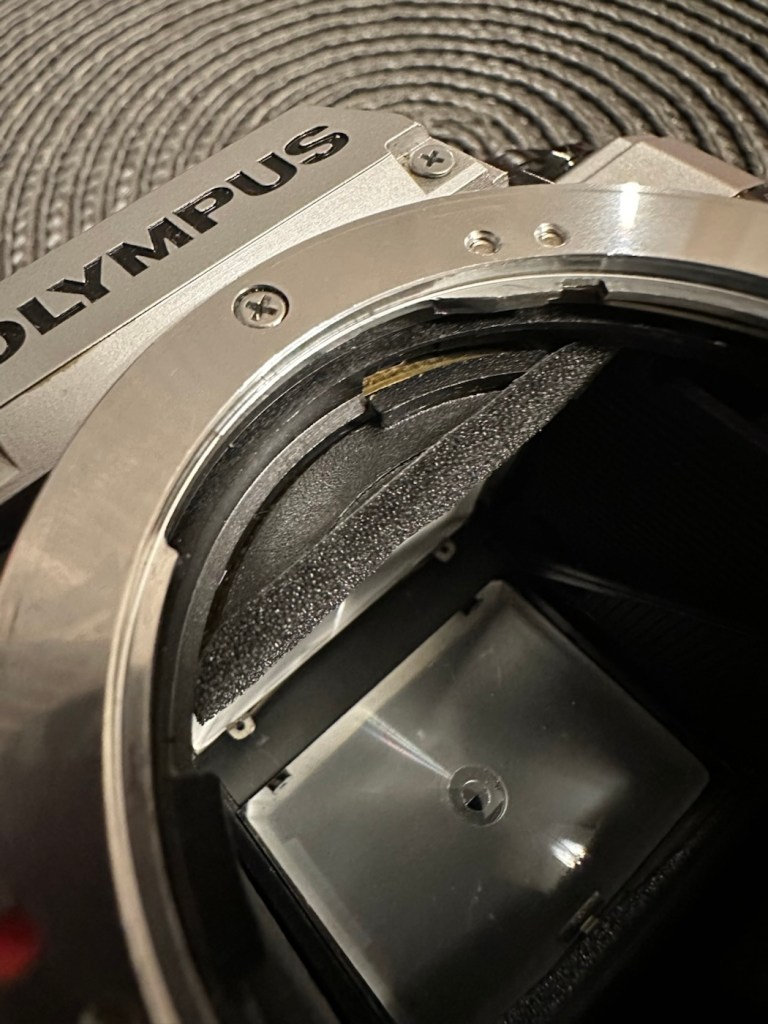
Today I have taken out the battery spring connector and I am about to put the new spring contacts in place. I’ve found even more corrosion behind this plate so this will need to be cleaned before reassembly.
More corrosion found behind the battery spring contact plate
I’ve now fixed the new permanent springs in place, they wouldn’t solder so I’ve had to use a combination of using the old clips that were originally there and weaving the spring though the holes where some clips used to be but had corroded away. Either way it has worked well and both springs are quite solid, and don’t look out of place at all, they probably look better than the originals.
New springs attached to a clean plate
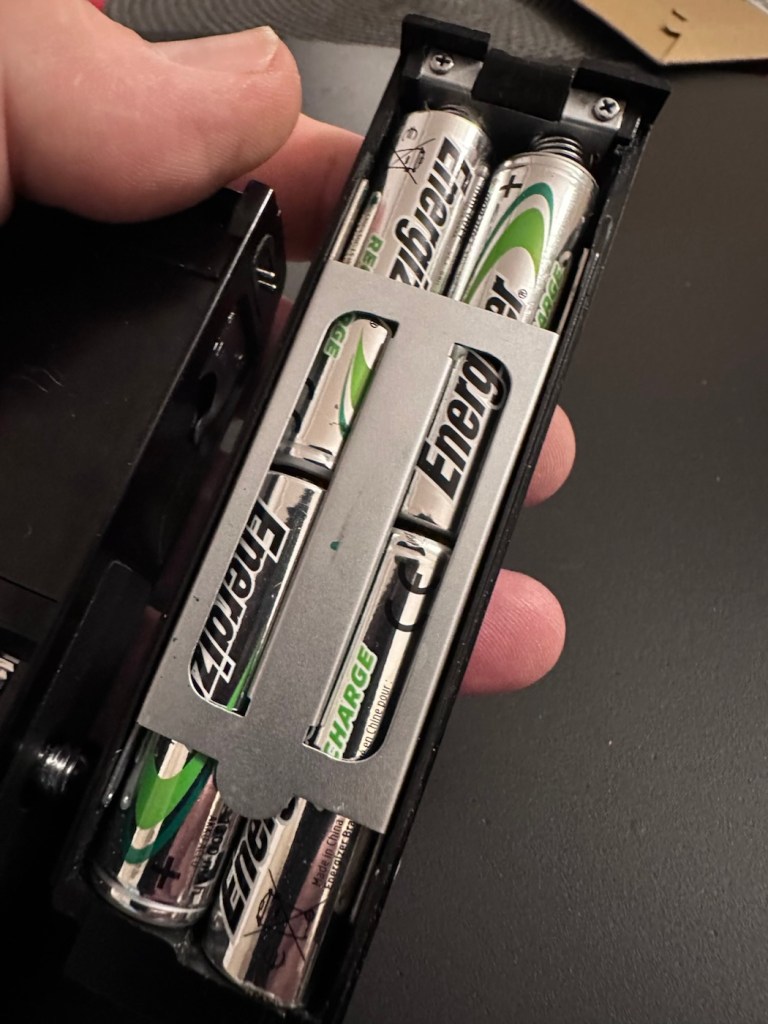
With the battery pack contamination removed I can now reinstall the battery contact back into place.
All cleanedReinstalled Batteries in place
I know that the pack works, and now the final touches have been added, this winder is now back into a good working order, and fit to go back to work doing what it was originally designed to do.
Result:
This is an item you can readily buy on the auction sites at a very reasonable, some would say even very cheap price.
The complete, cleaned and reassembled, working winder
Is it worth the repair you say? Well yes, it is. The trouble is, it is so easy to throw stuff away these days, that in reality, can be given an extended life and purpose for pretty much no cost apart from your time and patience. On top of that, getting these items apart and reassembling them is a great learning circle, and you can never stop Learning. You are preserving the past, and that’s always a good thing.
A very brief video showing it working
As you can see above in this small video I have taken today, here I have my Canon AT-1 with the winder attached, doing what it is meant to do and sounding so retro with that motorised winding sound. Don’t you just love it? I most certainly do.
Thanks for passing by. It’s always very much appreciated.
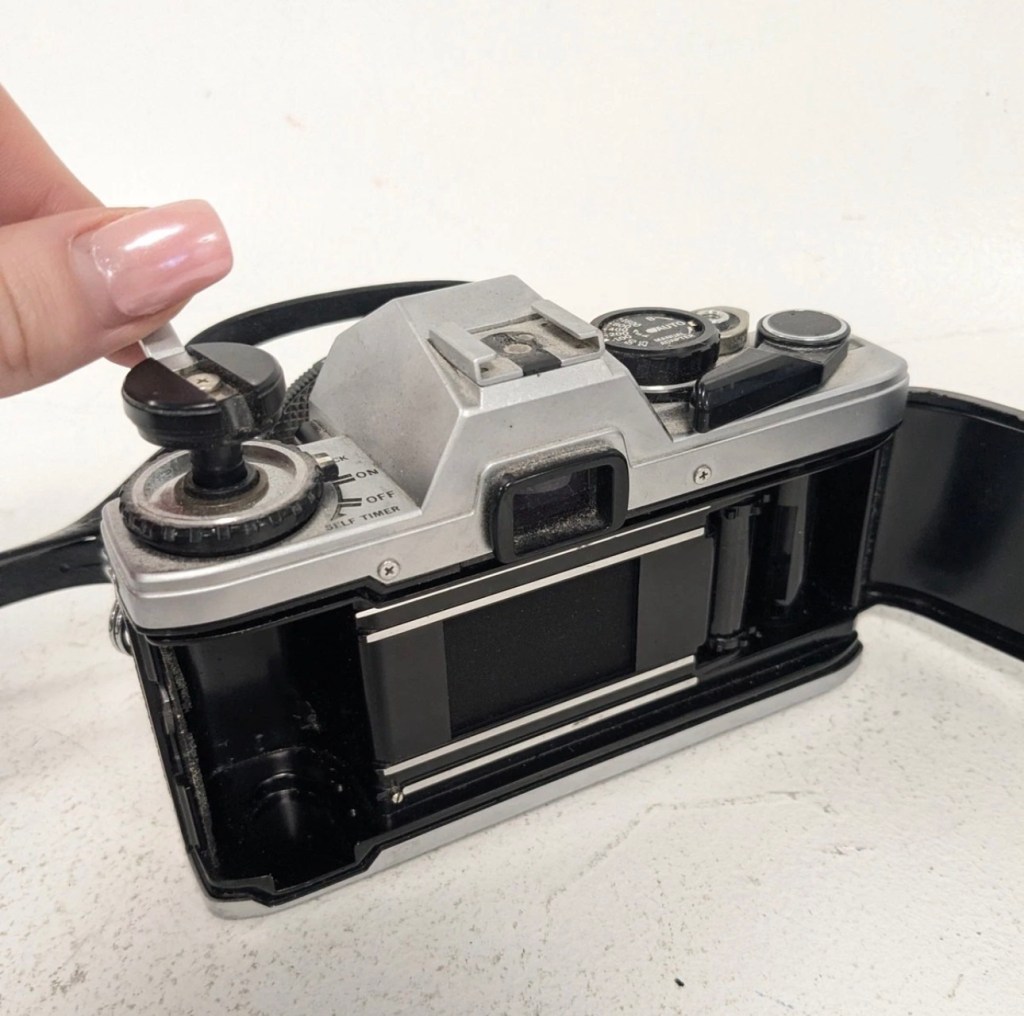
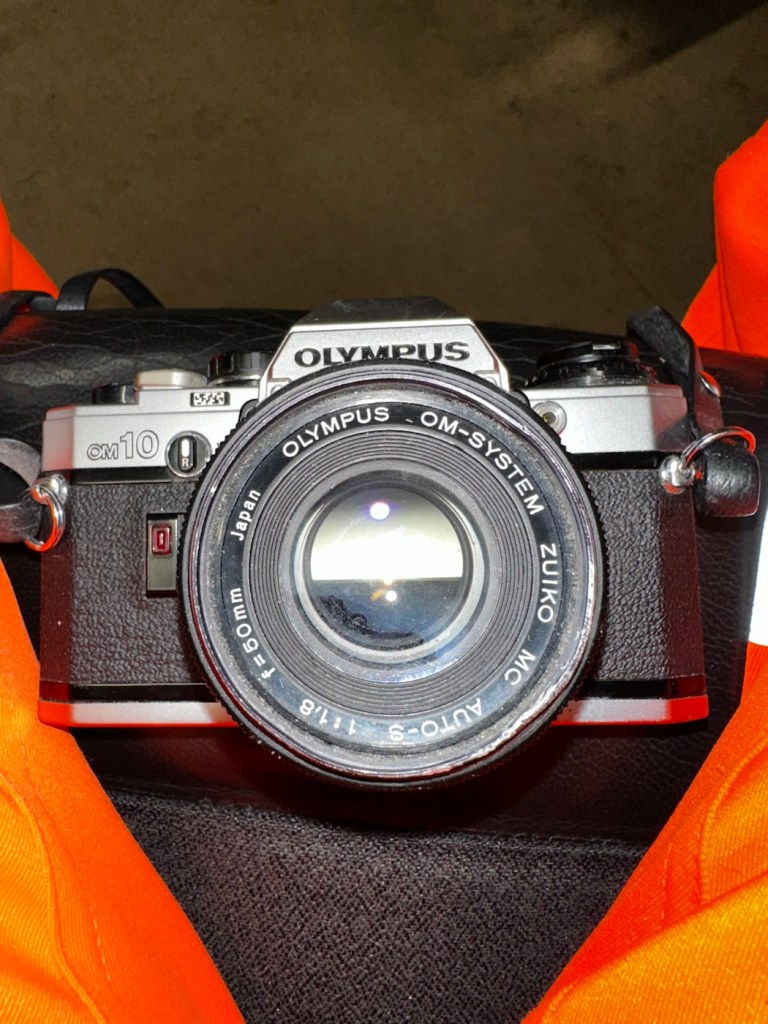
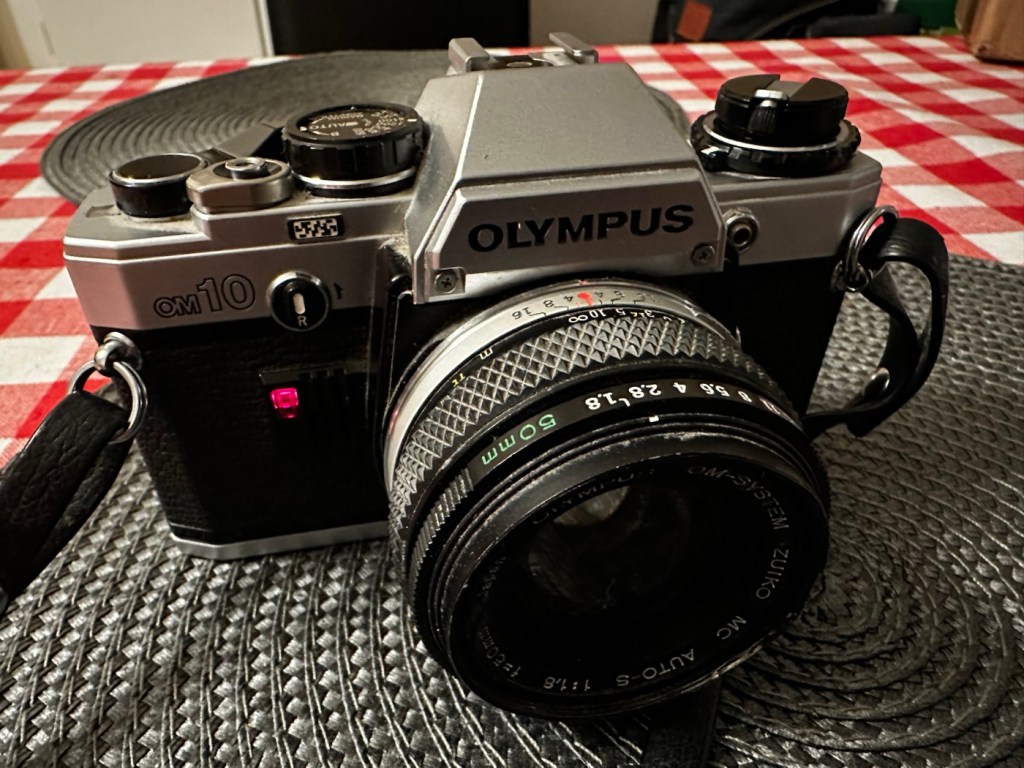
Always liked and wanted an Olympus OM10. 46 years later I now have one. Of course, it needed repair.
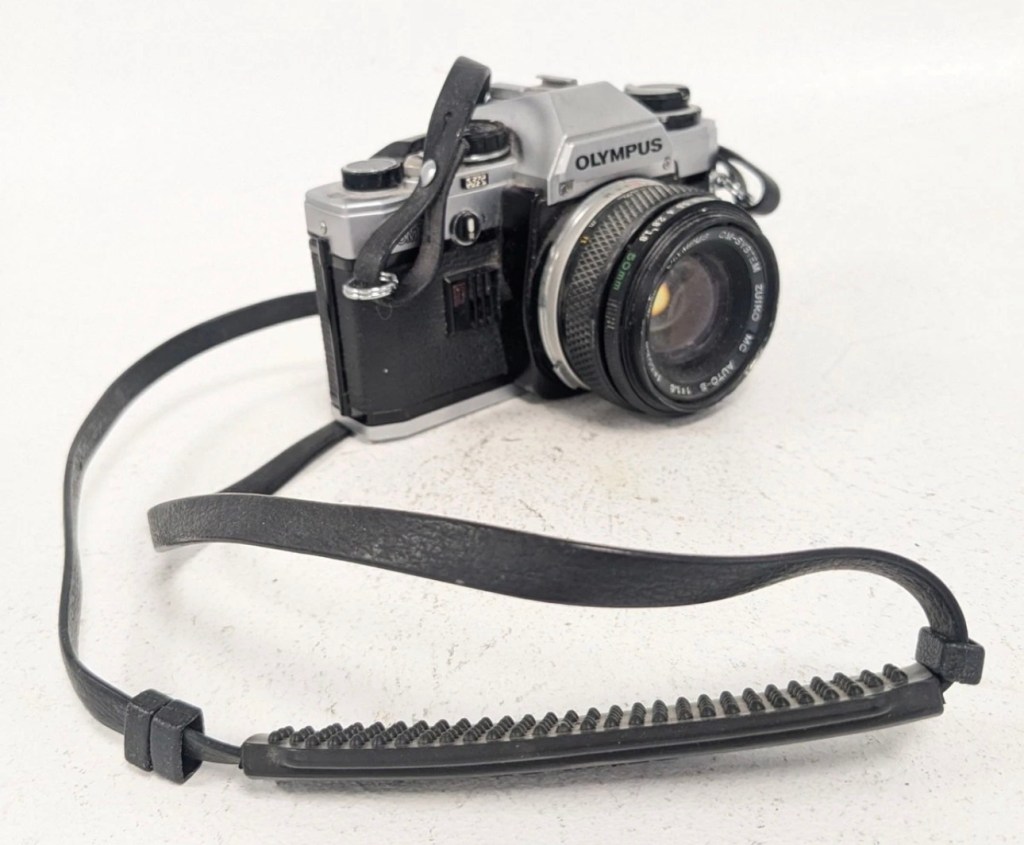
Much to the wife’s annoyance, and because I was feeling a little low and in need of some retail therapy, I’ve purchased this lovely little camera from the Barnardos charity. It looks like it’s been stored in a full Hoover bag, it is so dusty. It has a few dents and dinks, this one is going to be a challenge. I like challenges. I’ve paid the grand total of £17:67GBP for the camera and the standard Zuiko 50MM F1.8 Lens. I think that is an excellent price.
These cameras were produced between 1979 and 1987. I’m hoping I’ll be able to date this actual camera more accurately when I receive it.
This is what the original listing stated:
This listing is for a vintage Olympus OM-10 35mm Single-Lens Reflex (SLR) film camera, bundled with a Zuiko 50mm f/1.8 lens and a leather neck strap. This is a single bundle containing the camera body, lens, and strap, ideal for collectors or film photography enthusiasts.
UNTESTED. This sale is for spares/repairs. There are some marks and cosmetic imperfections. Please see images for more detail.
The standard untested post from the auction sites, but I’m not really bothered to be honest. It’s a charity, and I’m happy to pay for these items as the charity always benefits, and that’s all that matters to be honest.
I have some history around this camera and whenever I see one I think of Bruce Springsteen and here’s why.
1984, Bruce released this Album
Born in the USA was released in 1984, so I can kind of pinpoint the first time I’d ever really heard him, courtesy of my friend David K, when I used to live in a small town in Hertfordshire called Bushey. David had been a school friend, we were now in our mid to late teens, he was working in a restaurant whilst I was in a photographic lab. He introduced Bruce to me and for many months after he first purchased that album, we played it non stop and knew it off by heart, beat for beat, and word for word, we were totally smitten with it. It was the Bruce effect. At this time i would have been about 18-19 years old, and had a very basic Russian Zenit camera, it took some great photos. However, David had recently had a bonus payment at work and purchased himself the Olympus OM10. I was envious, who wouldn’t be? What a camera and this is where it all ties in with our hobby, we loved photography and used to always discuss it with Bruce in the background singing his heart out. It all ties in now, fantastic memories, and a single camera can bring back these memories. Amazing isn’t it?
Anyway here’s some pictures where you can see the amount of dirt, and what looks like some bumps on the outer edge of the lens.
Nice camera, few dinks and dents, and a lot of dirt
Here’s some information regarding this camera:
The OM10 was the first consumer OM series body. Launched in 1979 it accepted the full line of OM lenses and most of the OM accessories for a lower price. The lower price was reflected in the construction of this camera and the features available, however, it was still a very competent performer and it reflected the elegant lines established by the compact OM-1 and 2 designs. Early production runs of the OM10 have known malfunction issues with electronics, metering, and shutter magnets. Olympus later changed the shutter to a ‘Type II’ design to correct the latter problem.
In its standard configuration the OM10 offered aperture priority automatic exposure, simple and accurate enough for a consumer camera in most lighting situations. It also offered exposure compensation for more complicated lighting situations and for more advanced users. A small plug-in manual adaptor was available as an accessory to enable manual control of shutter speed. The manual adaptor is possibly not as easy to use as the typical shutter speed ring around the lens bayonet on the OM-1.
While not well known to consumers, the focusing screen for the OM10 is indeed interchangeable, though not as easily as the OM-1. It shares the same focusing screen as the OM-1, but the extra protruding tab needs to be cut off as the OM10 doesn’t have a placeholder for it.
The OM10 can accept all the lenses of the OM system.
The finder screen is fixed, as well as the back. It can accept the winder but not the motor drive. It existed in chrome and in black finish.
In 1980 the OM10 Quartz was released with a fixed databack (equivalent of a Recordata Back 3) to print the time or date on your pictures. The OM10 Quartz was only released in black finish.
The OM10 was sold in large quantities before production ceased in 1987 and many working examples are still being used today. Largely overlooked in favor of its more professional ‘single digit’ siblings, you can easily pick up a working example for $50. Try to find one that includes the manual adaptor though, as this accessory alone can fetch $30 at auction.
Camera-wiki.org
Assessment:
In a perfect world this camera would just need a clean. But this is me and to be honest I’d like a little bit more of a challenge, as a lot of the cameras I have worked with lately did not need a lot of maintenance because they’d been well looked after. This one may be different.
The camera that has been received
These cameras were renowned for electrical faults especially with their mirror motion magnets, very similar to the issues suffered on Canons earlier EOS cameras such as the 1N. But to be honest I am just surmising at this point as the camera is not yet in my hands. I need to be patient and await its arrival.
Well, it’s arrived so let’s have a look and see what’s good, what’s bad and what’s indifferent. It has dirt, yes, quite a bit of it, so it will require quite a deep clean as we need to get into all those little crevices, where the dust has settled.
Dirt in all the crevices
Cosmetically it looks really good with no dinks, dents or scratches, so that is very much a positive. It’s in not too bad a shape for being 46 years old.
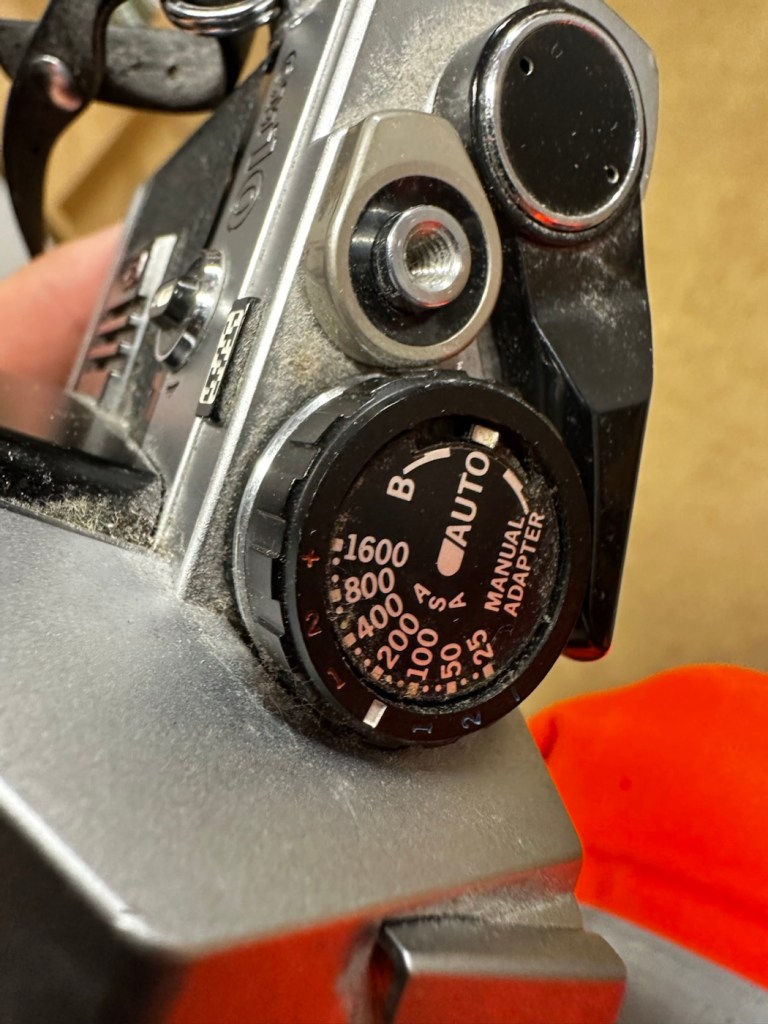
The capstan to open the camera film door, along with the operation dial are a little loose, so they will require tightening.
Loose capstan and controller
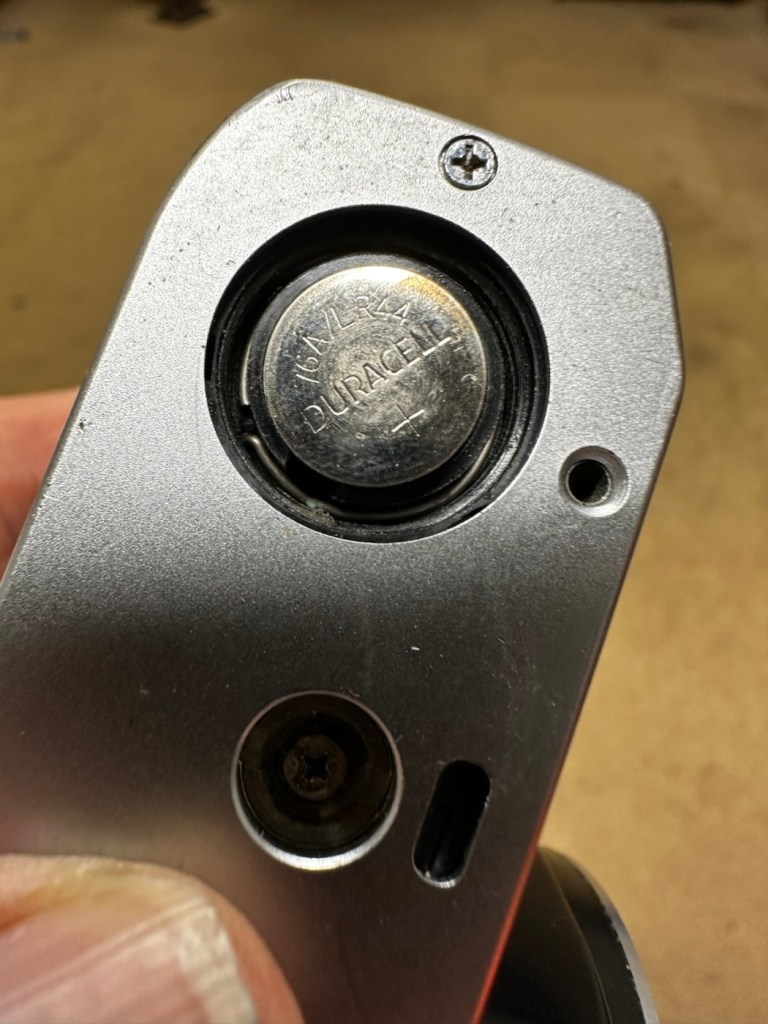
Batteries are long dead, this camera requires two LR44 button batteries to do even the basics, I have tested the batteries with a multimeter and they are so low that they hardly register, they are very dead indeed. The good thing however is that they have not leaked in anyway and the battery chamber is clear of corrosion.
Battery chamber is clean
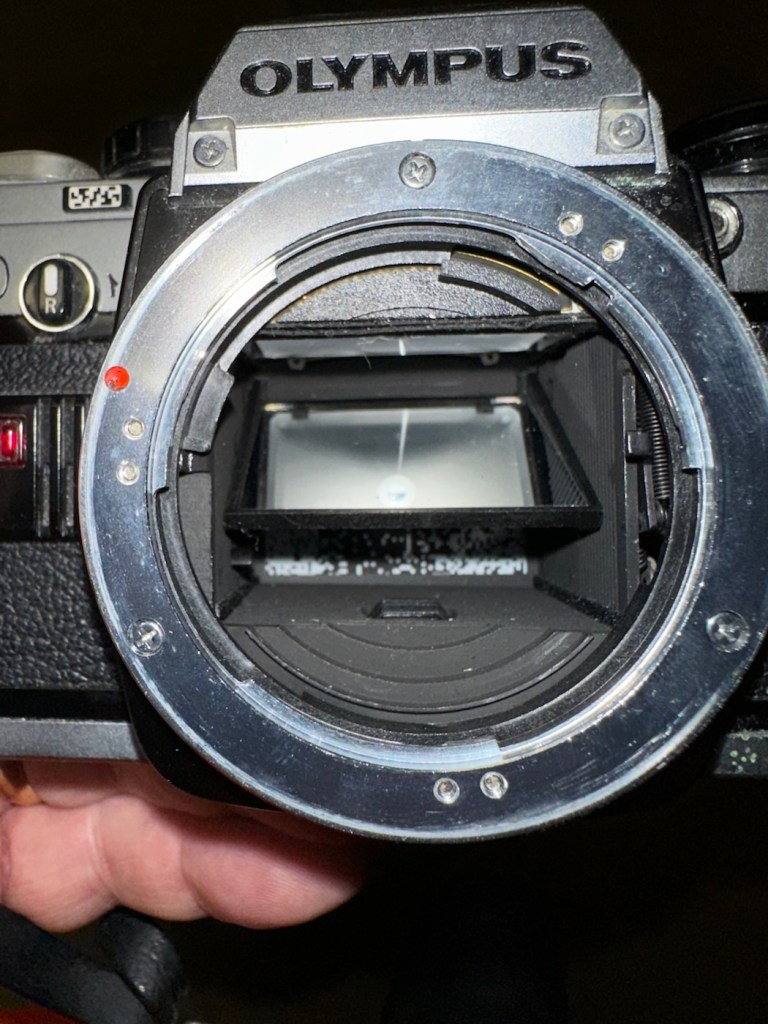
The mirror is stuck in the halfway position, this could be purely to do with there being no battery in the camera. It would be good to see with new batteries installed, if the mirror magnets would then kick in, and then they’d be no further issue. However, knowing my luck they are probably inoperable as well, we will just have to wait. And for this same reason the winder is also stuck, again the batteries may well solve this problem 🤞
Mirror trapped at the halfway point
Good news is though that the mirror and curtain are in really good condition, because the old lens has been kept in place preventing any contamination getting into that area.
Viewfinder looks clear apart from a little dust build up
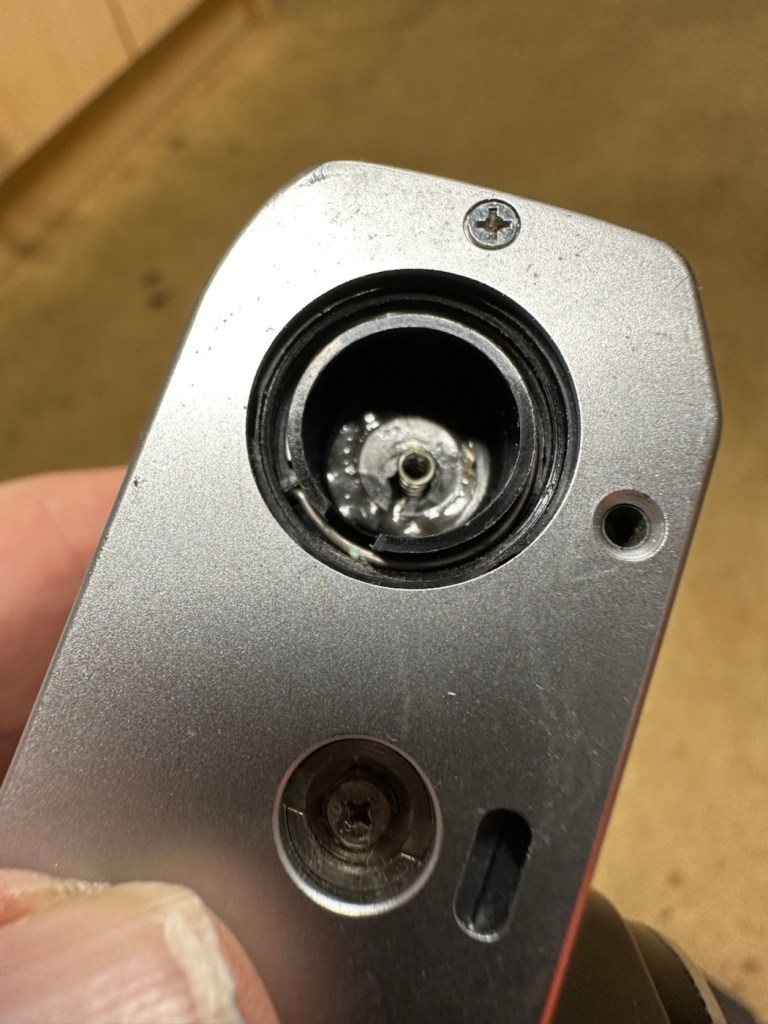
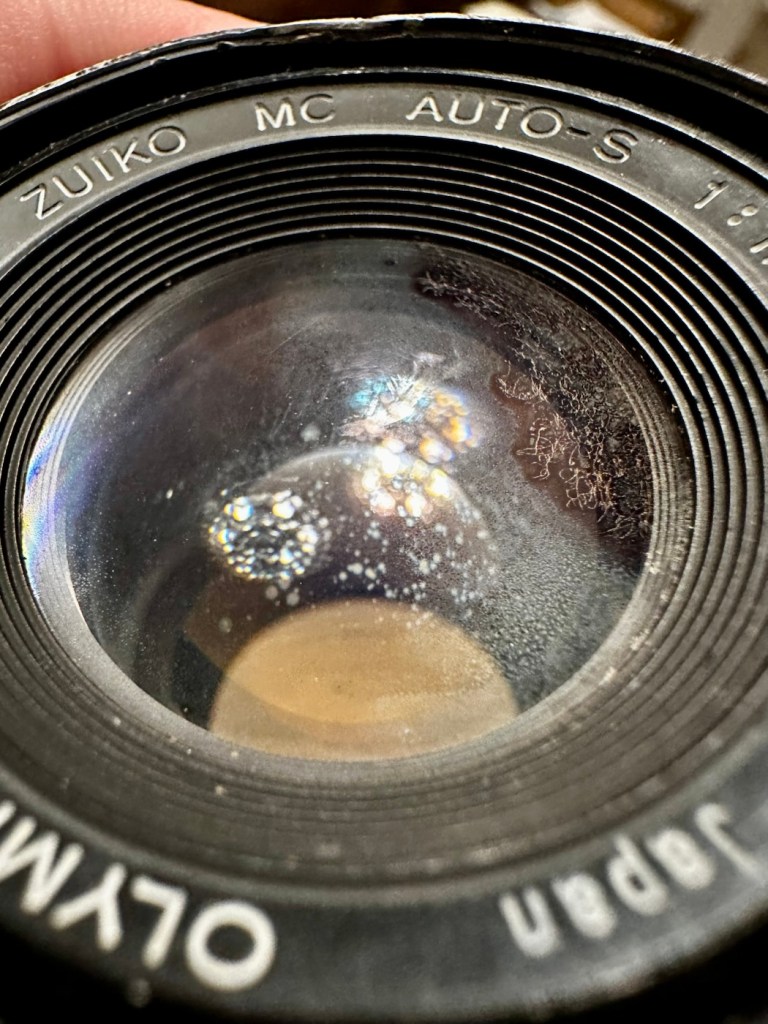
However the lens, does appear to have fungus in it, and will require a clean at some point along the way.
Visible lens fungus
There are also a number of light seals that need replacing as they have perished.
Some light seals need replacing
To be quite honest, the easiest part of this camera to clean will be the standard plastic and rubber neck strap. This can just go in some warm soapy water to rejuvenate it. However, my first priority will be to get some batteries in place and see what occurs. I may have to rethink my approach to this camera dependent on the outcome of this simple action.
Repair:
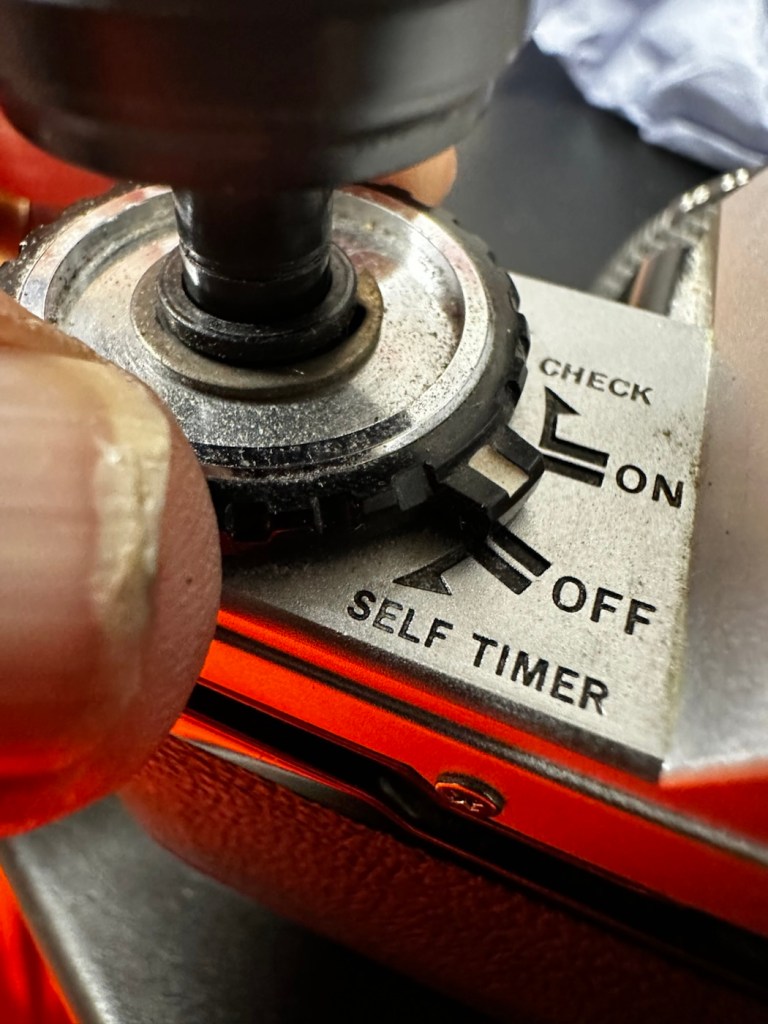
Straight home and I’ve found a couple of LR44 batteries that had a little more power than the old ones. In they go….and nothing. There is a check position on the main dial that should light up and a buzzer should sound to confirm that there is sufficient power, obviously there isn’t in this case. I run all the other LR44 batteries I have through a tester ( I had a packet of 12 ) and they all show as low power, they’ve died during storage. I then pop over the road to see my brother in law who always has a good supply of batteries and bingo, he has a couple of spare LR44s.
We have the check light, and a little buzz…intermittently
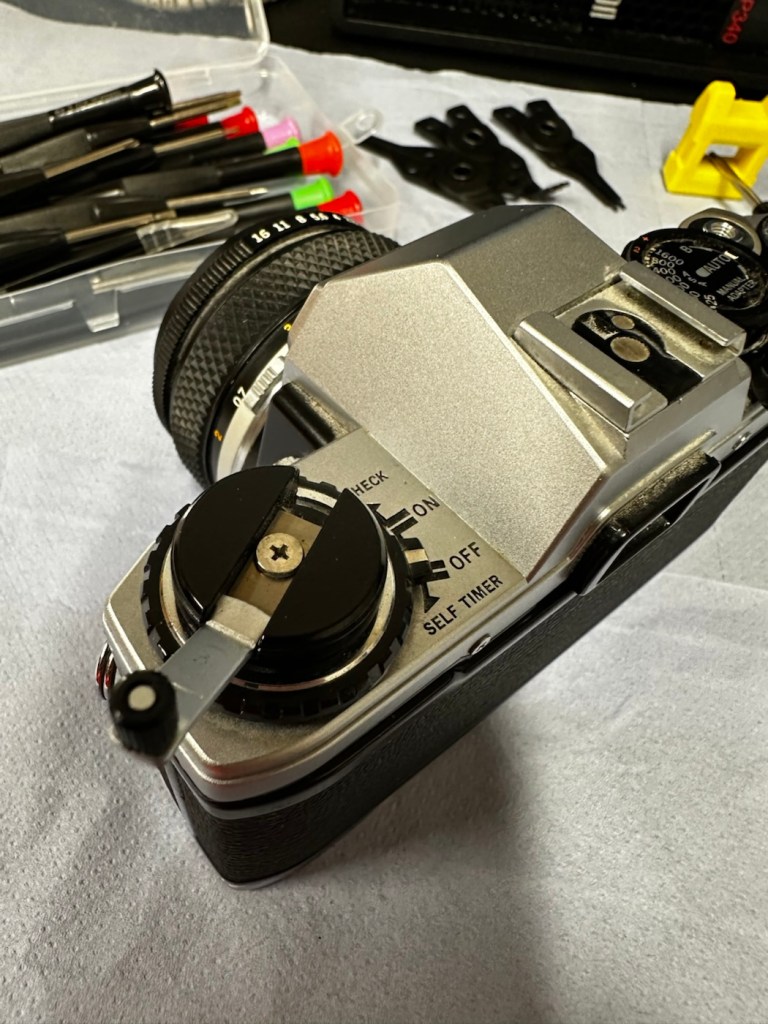
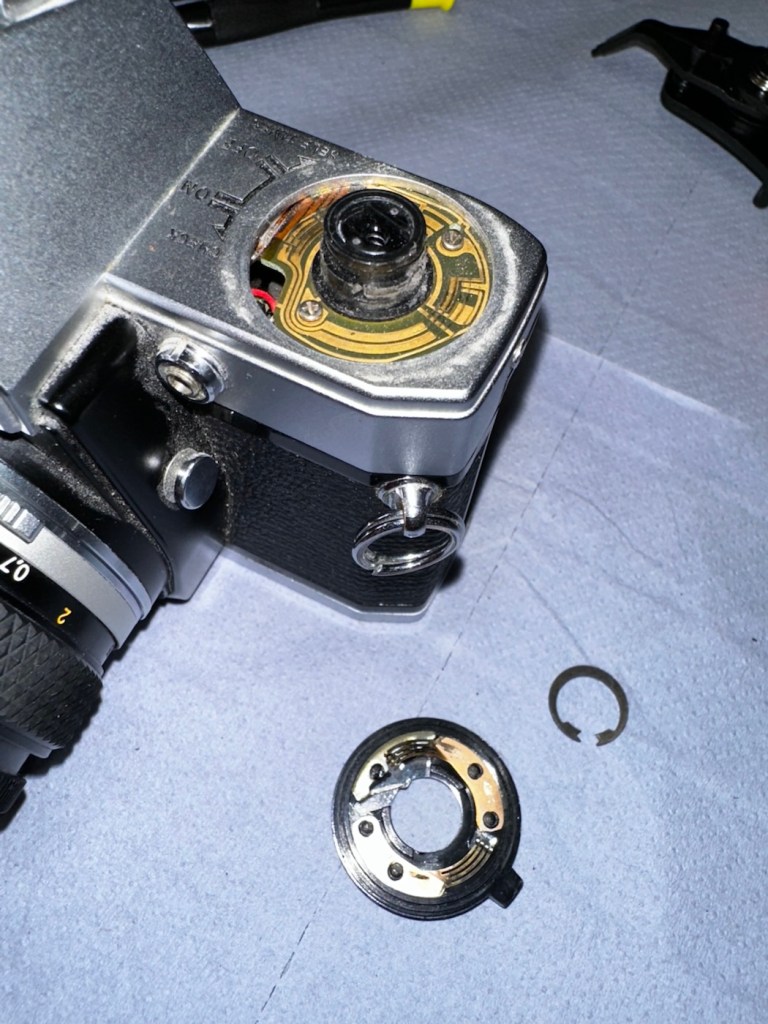
With these in place I get an intermittent buzz and a light, it appears the capstan control and operation dial that I mentioned earlier was loose, and has intermittent contact issues, it will need removing and cleaning then reseating.
If I hold the capstan in place I do get a good signal, with both buzzer and light operating in the check position, and when I move the control to “On” position I can now cock the shutter lever. It will then fire but again only to the half way position as it did earlier. If I gently push the mirror down and let it spring back it will then fire. But you have to do this on every stroke of priming the advance lever. Not good.
This is pointing towards an issue with the magnets and I believe I’m almost there, and that’s when I have a eureka moment.
Eureka moment
In the bottom of the mirror and curtain bay on the base of the camera is where the mirror magnets are situated, along with a light sensor that takes a reading off the shutter curtain behind, that is checkerboard coloured. Something here didn’t look quite right for me as it did not look level, the base seemed quite uneven. I just simply put my finger in here, applied some light pressure on this base and it just clicked into position, nice and level and then the stuck mirror fired, just like that. Every single prime of the shutter and actuation since, has worked just perfectly, I wonder if this camera has been dropped at some time just knocking this part out of true configuration? Or has someone been here before me? I’m going to have to remove the base to check a few things anyway, so I can then make sure this issue doesn’t happen again. For now, I’m satisfied that the shutter and winder are working fine. I just need to make the contacts and the electrical continuity a little bit more reliable.
I’ve dismantled the faulty switch. Inside, the old tracks on the camera and the pickups on the switch were showing signs of tarnish so I used some contact cleaner go get these looking better. I’ve re assembled the switch and used a new circlip to hold it all together. It’s a lot more secure and responsive now with no interruption to the check signal. It’s quite solid as it always should be.
Capstan needs dismantling Circlip needs removing Those tarnished tracks
Here’s a small video regarding the switch repair.
Switch working as it should
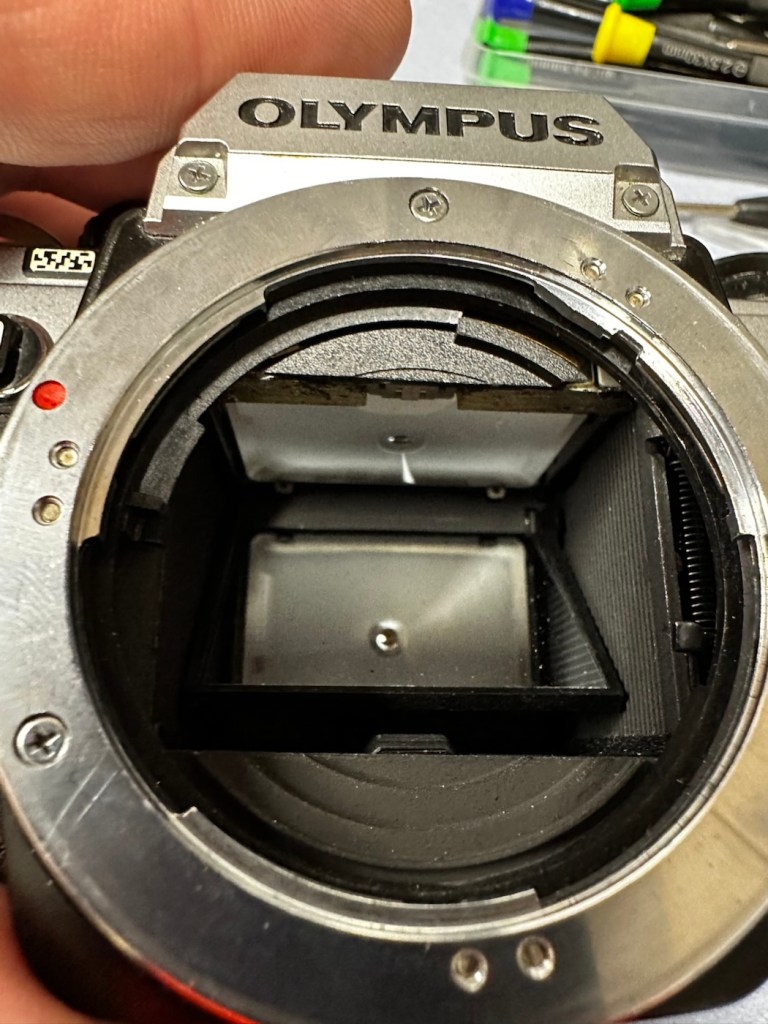
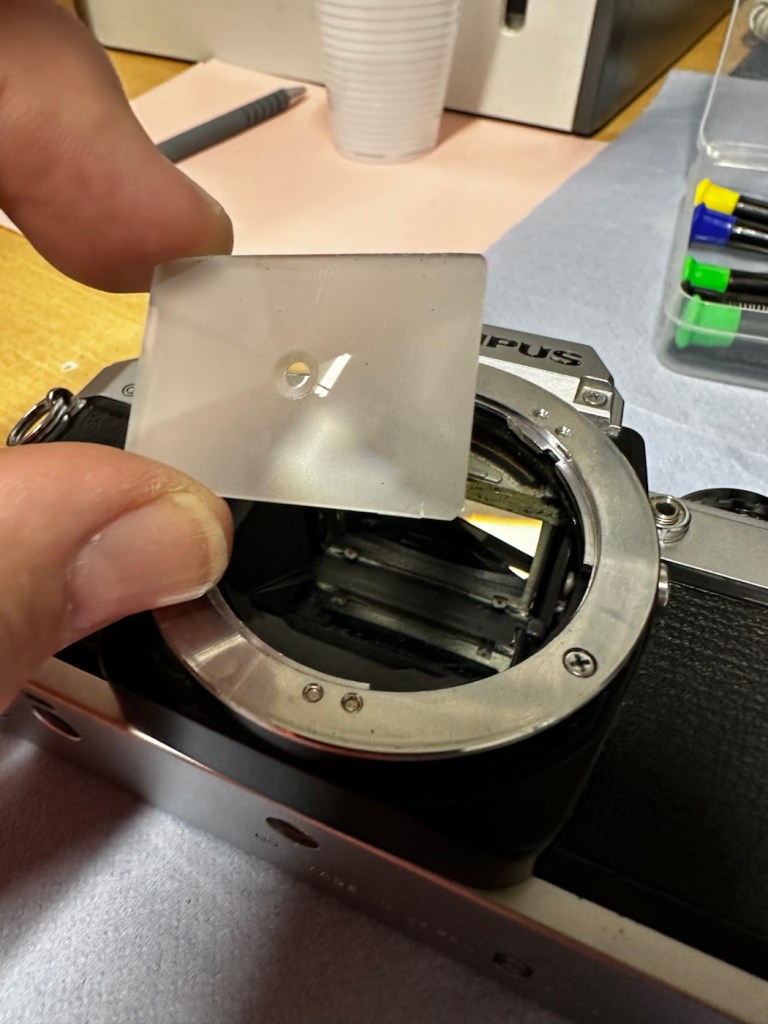
With the switch sorted I’ve now removed the focus screen to give that a bit of a clean.
Focus screen removal, cleaning and replacement
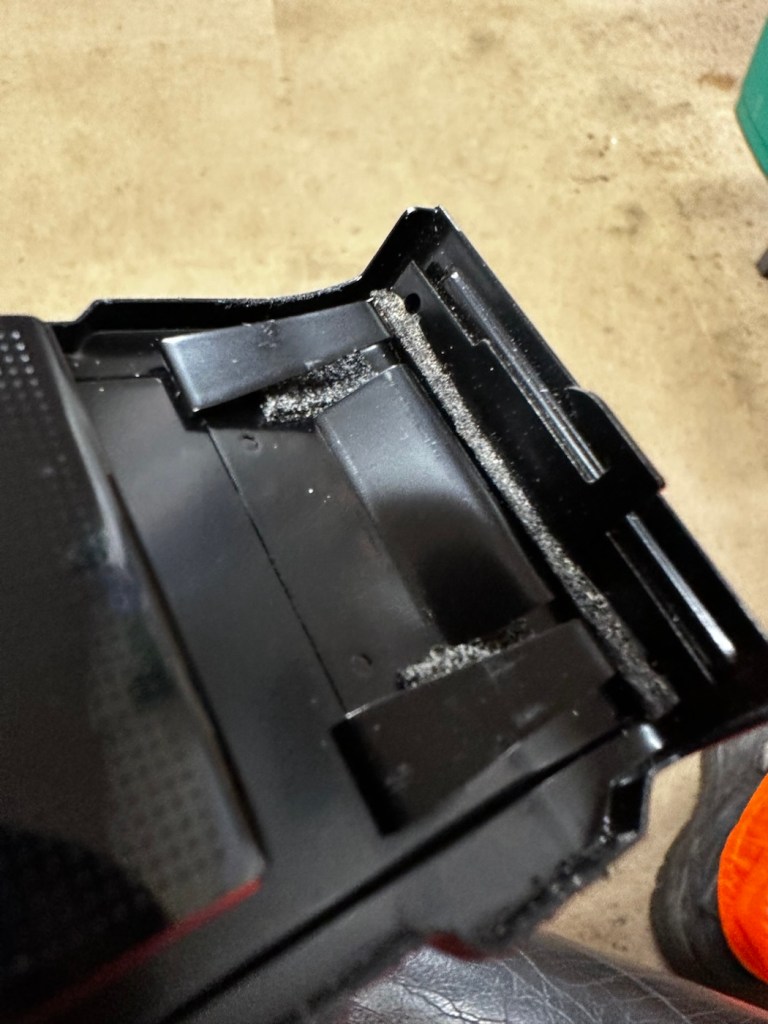
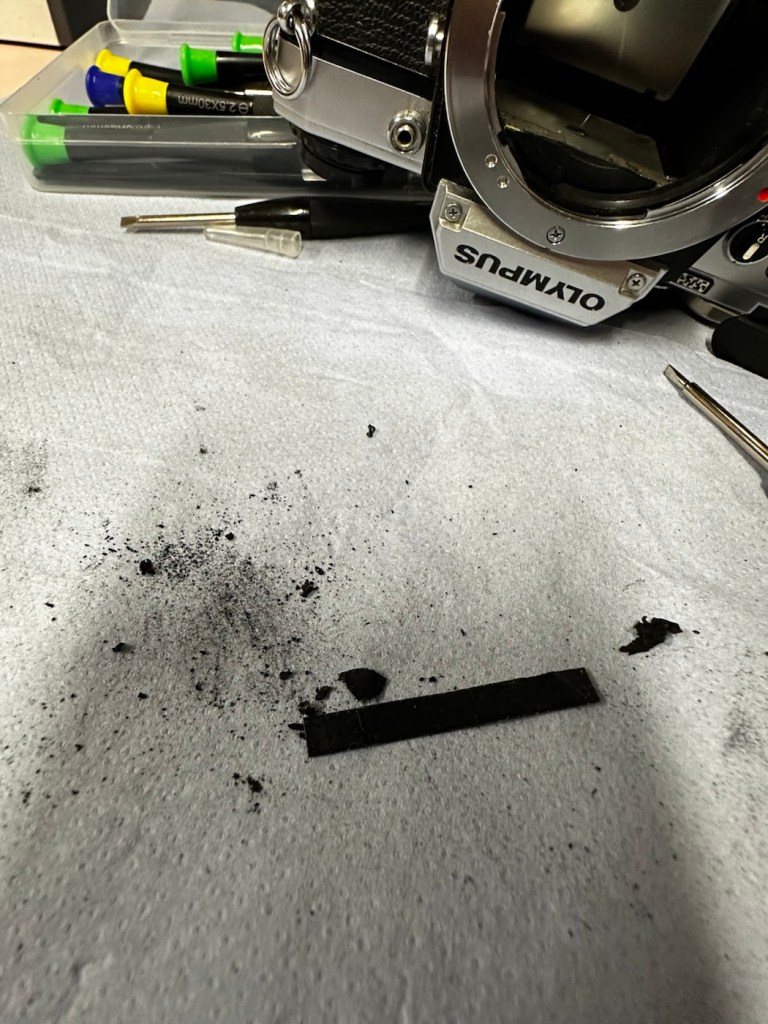
And after this I have gradually started to remove the old light seals in preparation for their replacement. They really are in quite a bad way and creating a lot of dust and dirt as they degrade.
Old light seals removed and degraded Mirror damper seal removed
Now to get the remainder of the old seals removed, clean the troughs they sat in, and then put the new seals in place.
With some IPA, and a large bamboo stick it’s time to remove the old seals
Some seal cut to sizeDoor seal replacedTop seal installed Bottom seal installed
I’ve replaced all the seals on the camera body apart from the mirror damper. I need to get some adhesive first, to secure the plastic plate that sits above the damper. Hence I have to wait for this to be in place before I can finally put the damper in situ, i will do this in the next 24hrs.
Now, the plastic piece that covers the focussing screen access is now secured in place and the mirror damper has been installed, all light proofing has now been completed.
Mirror damper installed
The original lens that was suffering with fungus has been dismantled and given a clean, however because the top two optics are a sealed assembly, guess what? The fungus is within the sealed section and is unable to be accessed. Therefore the lens will never be cured of this issue, it has been improved by cleaning the other optics but it’s not in anyway good enough to use with film in the camera, I will therefore use the old lens purely for testing purposes, it works fine for that and will be just fine for testing other Olympus equipment. In the meantime I have purchased two further OM 50mm std lenses, one is an earlier “Silver nose” model with a single lens protective coating whilst the other is a later production “Black” MC (Multi coated) model. Both are in an excellent clean condition conducive for film photography.
The two new lenses – “Silver nose” to the right
I’m happy that the repairs have now been completed, all that is left now to do, is to give the unit a thorough clean, and to clean that original plastic/rubber camera strap with some warm water.
Result:
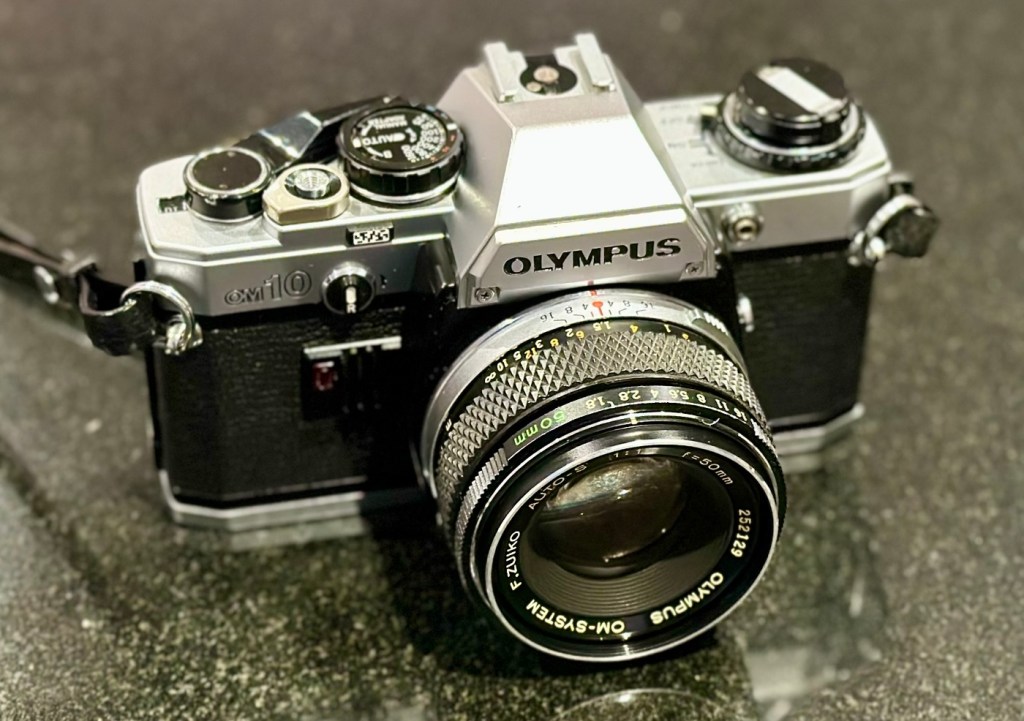
Here we present a fully cleaned and maintained Olympus OM10 35mm SLR camera from the 1980s looking quite resplendent after all the work on it has been completed.
All cleaned
Looking superb with a new lens
Looking fine from all angles
It’s been a lovely camera to work on. The make of this camera is superb, and back in the 80s Olympus were on a high note with the high end advertising, using many well known celebrities, and their cameras as a result became extremely popular. They are very well made and have stood the test of time. This one camera will go on to continue being used, and has many good years of life ahead of it. Another one saved from the scrap heap. As with all my cameras I have an immense backlog of units all awaiting the time when they have a roll of film run through them, and this one is no different. When I do pass a test roll through it I will post a link to the results here.
As always, thank you for passing by and glimpsing this post. It is always very much appreciated.
Can I bring a dead Canon 199a flashgun back to life? You betcha!
I love working with flashguns, but believe me they are highly dangerous and potentially deadly pieces of kit, once you get under the skin otherwise known as its protective casing. I inherited this one from a good friend of mine who is a professional photographer, the post regarding what he passed on to me can be found here: Cameras…i need more!
Now please do not go delving into the back of these things unless you know what you are doing. Yes they might only be powered by 6-9v of power from your batteries, however in the process of getting to the point where they unleash a lightning flash for your photographic opportunity, they have passed through a component called a flash capacitor, this component greatly amplifies the voltage from that measly 6-9v from your batteries up to what is now between 3-400v for the flash. Yes, you read right right, 400 VOLTS.
That can kill, and if it doesn’t, you have been very fortunate, but you will probably bear an entry and exit burn where you made contact with that very component. If it goes across both hands it’s probably going to go right through that pump in your chest that keeps you alive – your heart, and that can be fatal. You have been warned – take heed!
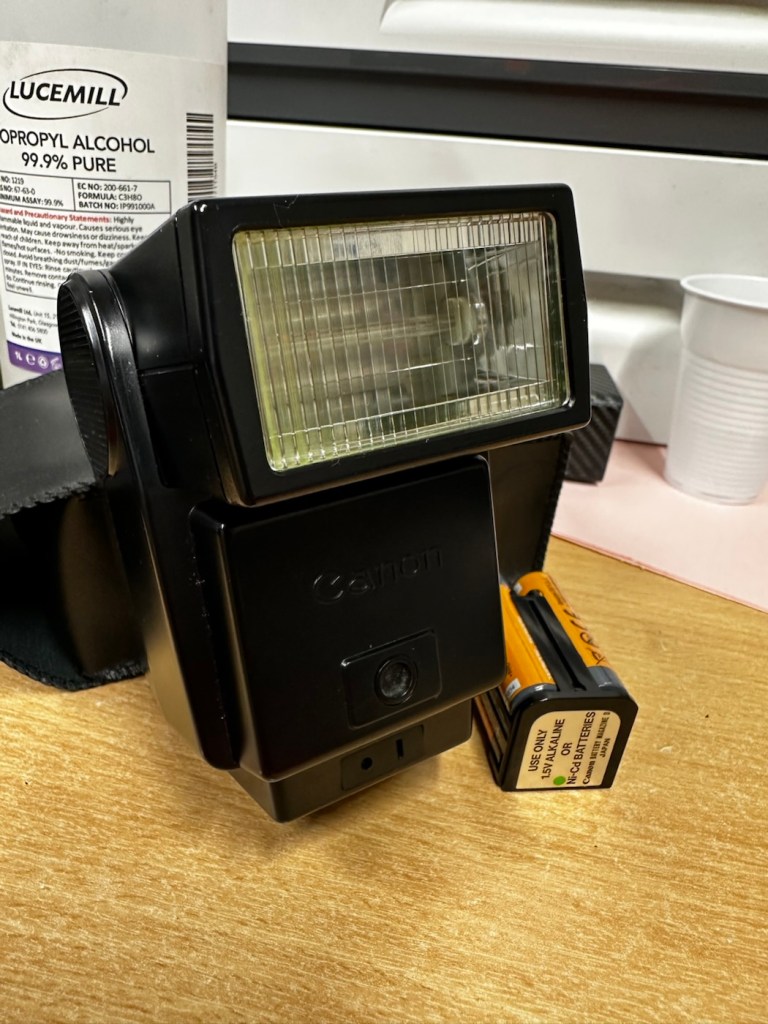
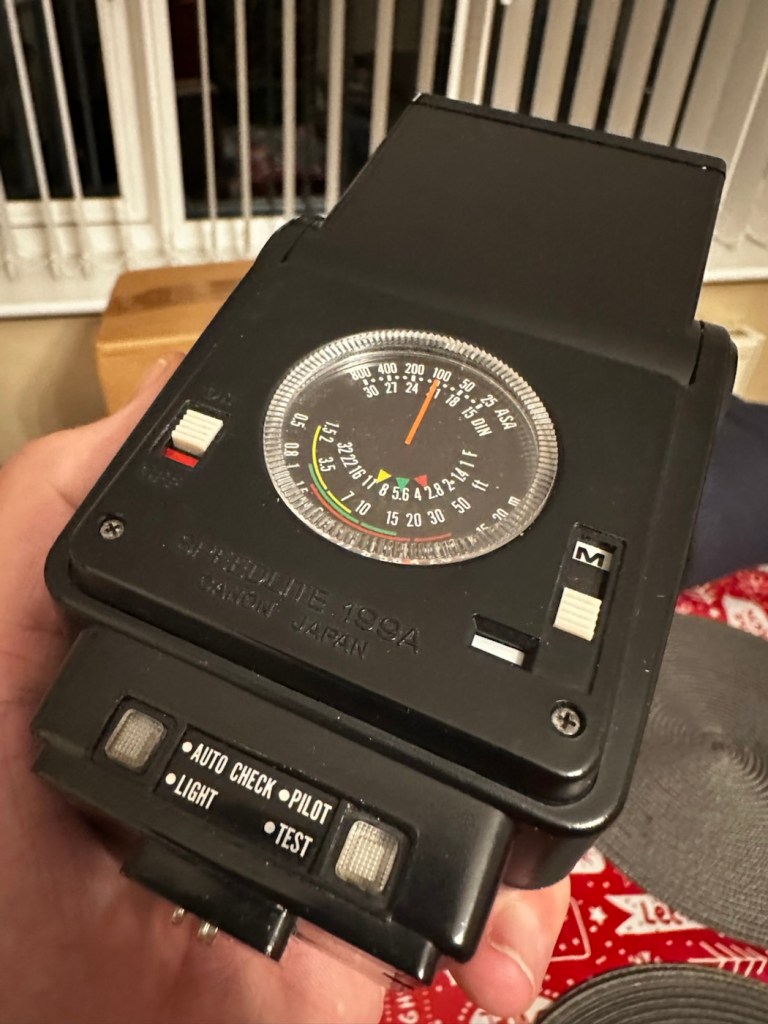
Canon Speedlite 199A
I must admit I’ve done something here I don’t usually do, and that is clean before searching for the problem. This unit had two or three old company stickers on it that I have now removed. I then gave it a quick clean and a buff and I must admit it has come up very well. I will give it another clean when i have finished, as well as a final polish with some cockpit cleaner.
Production of this flash unit commenced in 1978 for use with the Canon “A” range of cameras that were being produced around this time. It can also be used with some other camera ranges. Before we get into exactly what is wrong with this specific unit, let’s look at some information regarding the spec of this flashgun:
The Canon Speedlite 199A is a dedicated, thyristorized flash unit designed for operation with Canon “A” series cameras. The Speedlite 199A features a high Guide Number of 98 with ISO 100 film, three automatic flash ranges plus Manual and automatic bounce flash capability. The most powerful shoe-mount Speedlite in the Canon line, the 199A is recommended for use with the Canon A-1 or any “A” series camera with motor drive or Power Winder A due to its high power and very rapid recycling time.
Technical Specification: –
Type: High-powered shoe-mount flash; automatic, thyristor type Guide Number: 98 (ISO 100, feet), 60 w/wide adaptor Recycling Time: 10 seconds with Alkaline-Manganese batteries 6 seconds w/Ni-Cd batteries Number of Flashes: 100- 1000 w/Alkaline-Manganese batteries 50-500 w/Ni-Cd batteries Auto Flash Ranges: 3 Auto Apertures: (ISO 100) Red-f/2.8 Green-f/5.6 Yellow-f/11 Bounce:Yes Flash Coverage: For 35 mm format, covers angle of view of 35 mm lens; covers 24 mm w/adaptor Color Temperature: Daylight Power Source: 4 “AV size Alkaline or Ni-Cd batteries Dimensions: 3-1/8 x 3-1/4 x 4-1/2 in. Weight: 1 lb., 1-5/16 oz.
Mir.com
Asssesment:
Canon Speedlite 199A
As you can see in the photos above, and as I stated at the beginning, I’ve gone arse about face on this one and cleaned it prior to diagnosing what the actual issue is. Please forgive me as I was in a cleaning mood at the time, and if I’m in that mood everything gets cleaned.
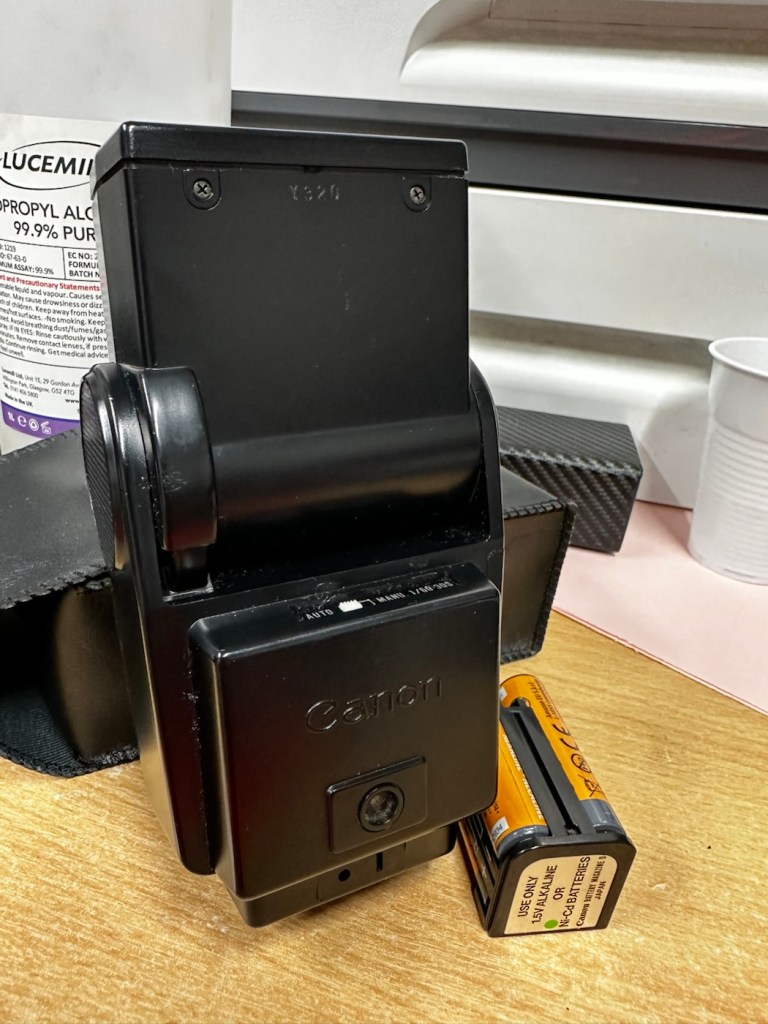
It runs off of four AA type batteries that fit in to a cassette that sits in the side of the unit. All contacts are clean and there is no sign of any battery leakage. You can see the cartridge in the photos above. The flash unit comes in a Canon branded leatherette pouch that is in absolutely perfect condition. Inside the pouch is a diffuser / wide angle lens that slides over the actual flash head. The whole unit looks fantastically clean and tidy, with no signs at all of any damage or wear.
Put the batteries in though, and turn on the switch. And nothing. It’s dead. Kaput.
With these old flash units you were always used to hearing that family high pitched whistle when you turned it on. That was the system telling you that the capacitor inside was taking a charge and getting ready for business. Over time, the capacitor can loose its effectiveness, it semi retires if you like, and on occasions it retires fully, it dies a death. I very much suspect this is what could possibly have happened here, I just hope ours is in a deep sleep and can be woken up.
So as we move on to what we are going to do, the only issue here is that it’s simply not accepting a charge, and we will then discuss the two options on how we may now breathe life into this geriatric flash gun.
One thing that always annoys me when I search for possible ways of approaching the repair, is the attitude of people who have grown use to us all being consumer driven, the attitude stinks. These units can be purchased for very small amounts now and they loudly advise,”Just buy a cheap replacement and throw that one away!” This annoys me as you well know, because that’s not what this site is about, if I can repair something, no matter how inexpensive it is, I will. There is no need for this continuous throw away attitude. It’s a good way to learn just how things work.
Rant over, let’s move on….
Repair:
One of the easiest and least invasive, and therefore safest ways to start investigations, to look for a remedy, is to first get a nice fresh batch of alkaline batteries. With these in place within the unit, turn the flash power switch on and just leave it like that for anywhere between 2-8 hours. It has been known in the past, to act like a trickle charge as that flash capacitor has not been active for god knows how many years, it kind of revives it. It sometimes works, more often than not it doesn’t. But it’s worth giving it a try. So here goes. If this doesn’t work then our only other option is to get the unit opened up and to replace that beast of a flash capacitor.
I’m just coming off of a night shift and will shortly be heading off to bed, what better time to try this method out. So I’ll see you in a few hours 👋
And so the wait begins. Fresh batteries in place and turned on at 06:20….
I’ve arisen from my pit about five hours later, and what do you know….
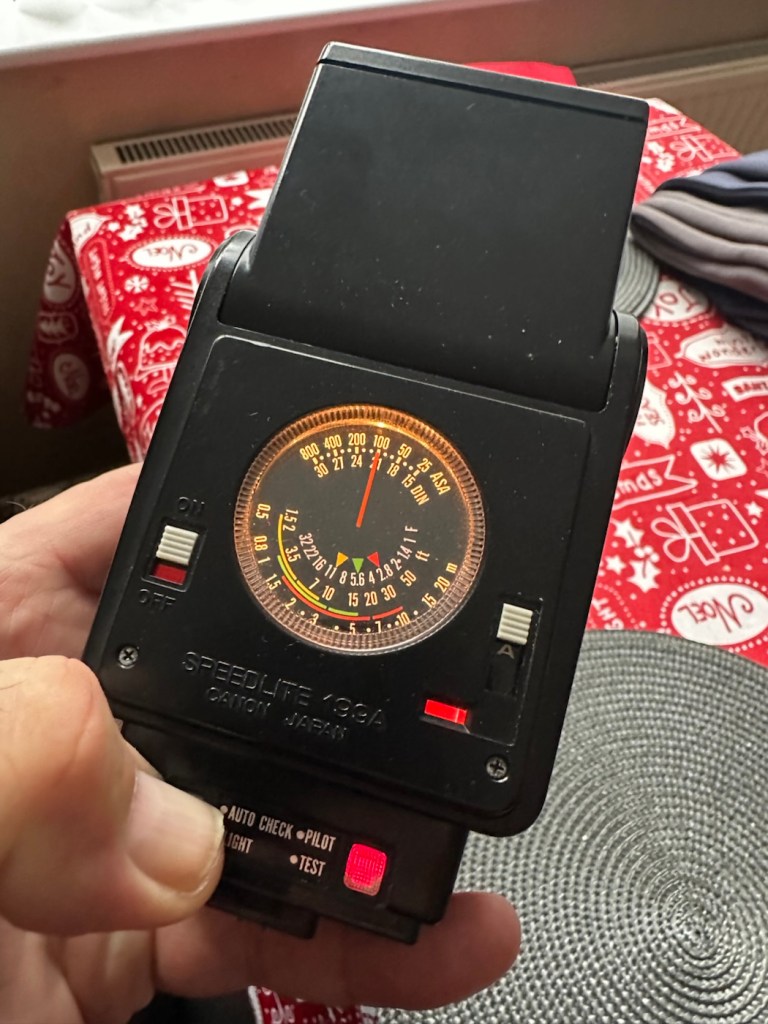
Well, it’s only gone and bloody well worked hasn’t it?
And 5 hours later….it actually works
Sometimes it’s the simplest of procedures that can bring old equipment back to life, and when the fix is non invasive, going no where near those dangerous internal components, it can only be a good thing can’t it? And to think this was just placed in a box for disposal. Well it’s got a new lease of life now.
It really is working
I’m really pleased with this so let’s move on to the final stages and get this little beauty polished and presented.
Result:
And yes it is a result, a result of patience and perseverance and thinking outside of the box as they say, in office inspired corporate management speak.
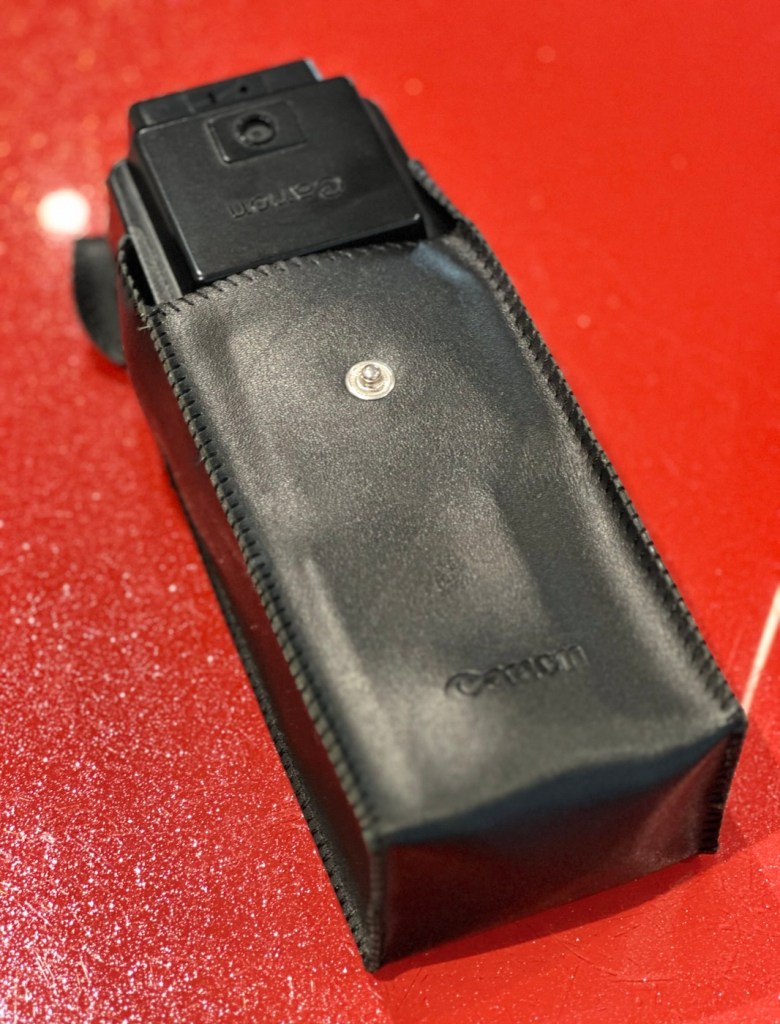
Clean caseAll polished Lights all workHolding a good charge
In a number of these “repairs” it’s best to exhaust all other options prior to getting the screwdrivers out, just like a surgeon explores all options prior to getting the knives out. I’m in no way comparing myself to a surgeon, you wouldn’t want me anywhere near you with a scalpel! I’m just using it as a pretty poor comparison, so I guess it’s best I shut up now and just get on with whatever I’m supposed to be doing.
So that’s another little repair put to bed, and another piece of electrical detritus pulled from the arms of the scrap man. I always feel a great sense of accomplishment when I mange to get these old bits of kit working again. It frightens me to think just how much salvageable tech equipment gets discarded when it could quite easily have its life extended with the minimal amount of intervention.
My plan is to add this flash to my Canon “A” series collection as that is what it was originally designed for. And I may well add a link here, when I get to use it whilst testing any new “A” series cameras that just happen to come my way, as they invariably do, that require my attention.
As always, thanks for passing by. It’s always most appreciated.
A small piece regarding the Canon “A” series camera range. Development and technological advancement.
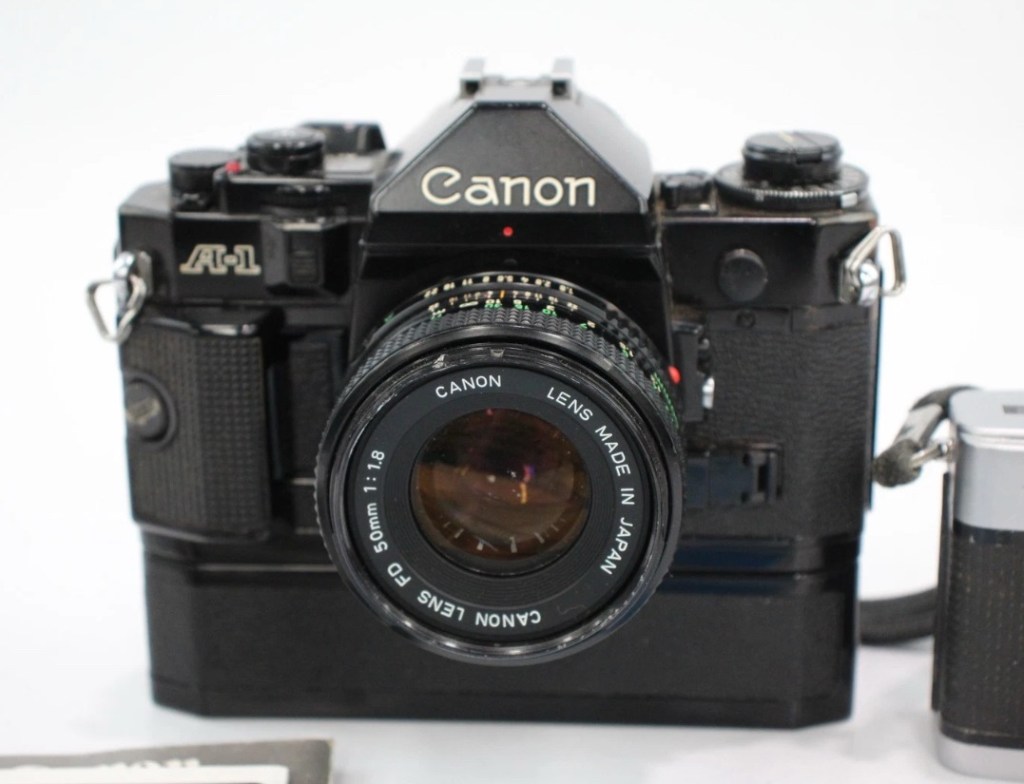
As i seem to be purchasing a number of the old “A” type camera bodies for repair, I have now decided to add the full range of “A” type cameras to my collection. I’m a tad biased as I have used Canon cameras right from the very start of my photographic education, in fact the first one i used was an A1 variant. I’ve put together the following piece to explain why these cameras were so popular, and to highlight their technological advancement along the way, the technology that influenced other manufacturers to up their game and give the consumer just what they wanted out of a camera, options and greater control.
My Canon A1
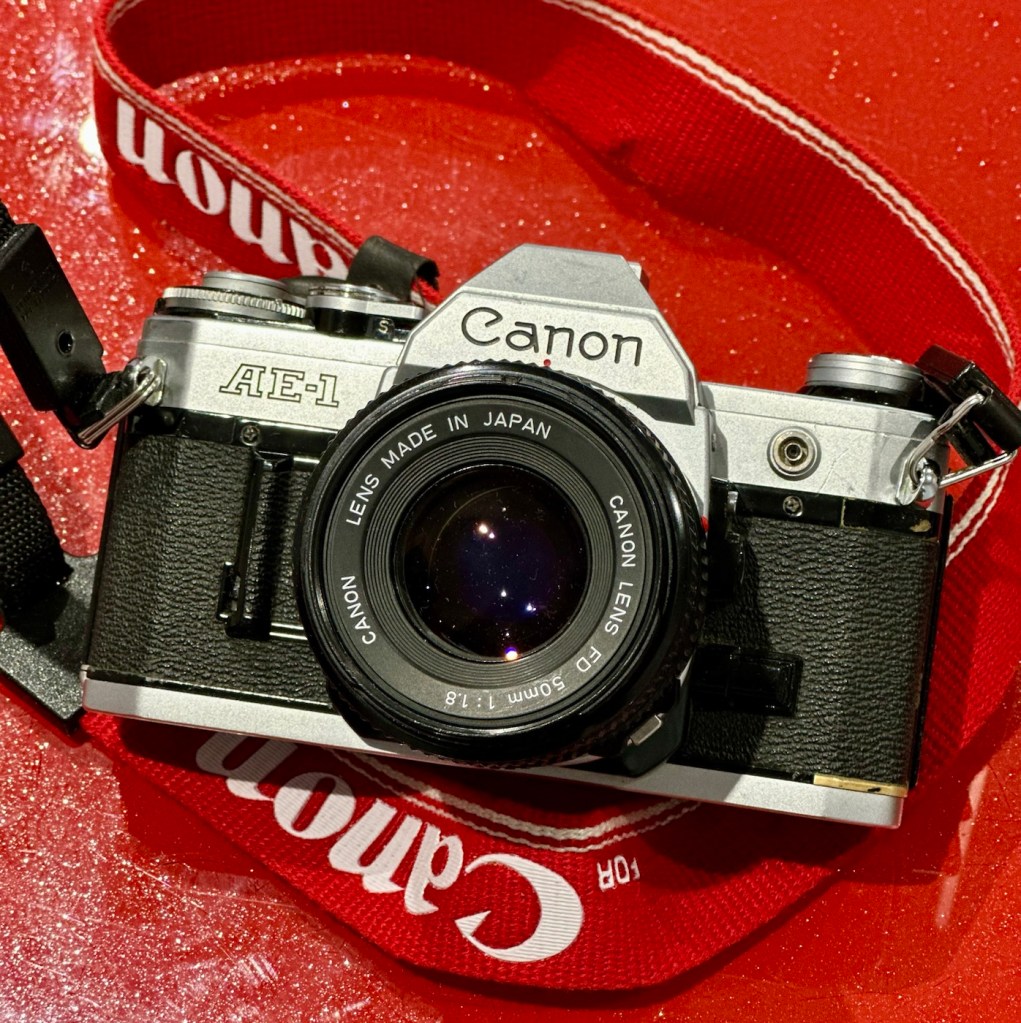
The Canon A-series of 35mm SLR cameras, produced from the mid-1970s through to the early 1980s, represents one of the most influential periods in Canon’s film-camera history. It began with the groundbreaking Canon AE-1 in 1976, a camera that reshaped the industry by integrating a microprocessor – the first mass-market SLR to do so. This innovation allowed Canon to simplify mechanical complexity and reduce manufacturing costs whilst offering features previously found only in higher-end professional bodies. The AE-1’s shutter-priority auto-exposure, bright viewfinder, and strong reliability made it both approachable for beginners and capable enough for enthusiasts, turning it into one of the best-selling SLRs of all time.
My AE-1
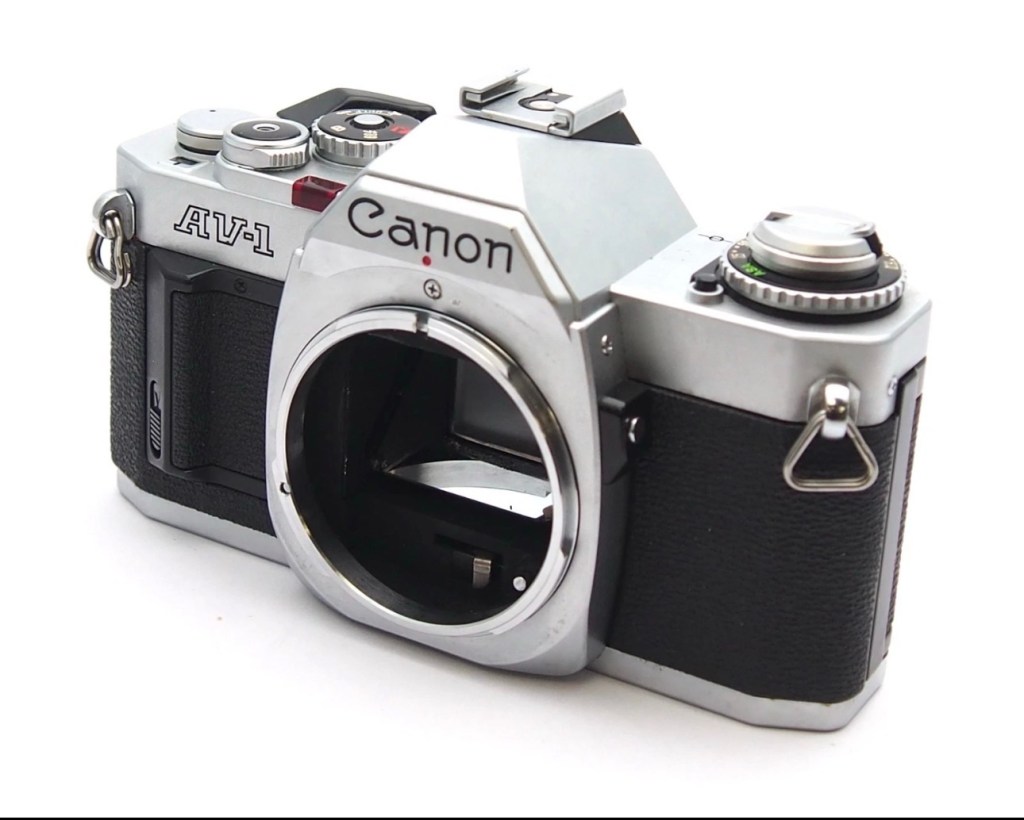
Canon quickly expanded the lineup to address different types of photographers and to test new electronics-driven features. The AT-1 provided a more affordable, all-manual alternative, whilst the AV-1 (1979) offered aperture-priority automation, catering to photographers who preferred creative control over depth of field. The flagship A-1 (1978) pushed the boundaries even further – it became the world’s first SLR to offer full programmed auto-exposure, alongside shutter priority, aperture priority, and manual modes. This versatility foreshadowed the automation and electronic sophistication that would dominate future camera generations.
My AV-1
In the early 1980s, Canon introduced the AE-1 Program, refining the original AE-1 with a more advanced program mode and improved ergonomics. The final notable entry, the AL-1, included an innovative Focus Assist system that used contrast-detection indicators to help users achieve sharp focus – an early technological step toward the autofocus systems that would soon reshape the industry.
Collectively, the Canon A-series brought electronic control, affordability, and ease of use into the mainstream, playing a key role in shifting photography toward the automated, electronically driven era. Decades later, these cameras remain admired for their durability, classic design, and the satisfying, hands-on shooting experience they continue to provide.
At the time of writing, i have in my possession three of the six variants that were produced, and presently I am scouring the sales platforms to acquire suitable candidates for the remaining parts of this collection, to work on. I will update via this site as and when i have another one of this series to feature in a post. My current collection consists of the cameras below marked with an asterisk:
My current cameras in the “A” range marked with an asterisk
I would like to obtain a special mount for this series of cameras so i can display them as a collective sample of this wonderful range. They will all of course, all be fully usable, not museum pieces.
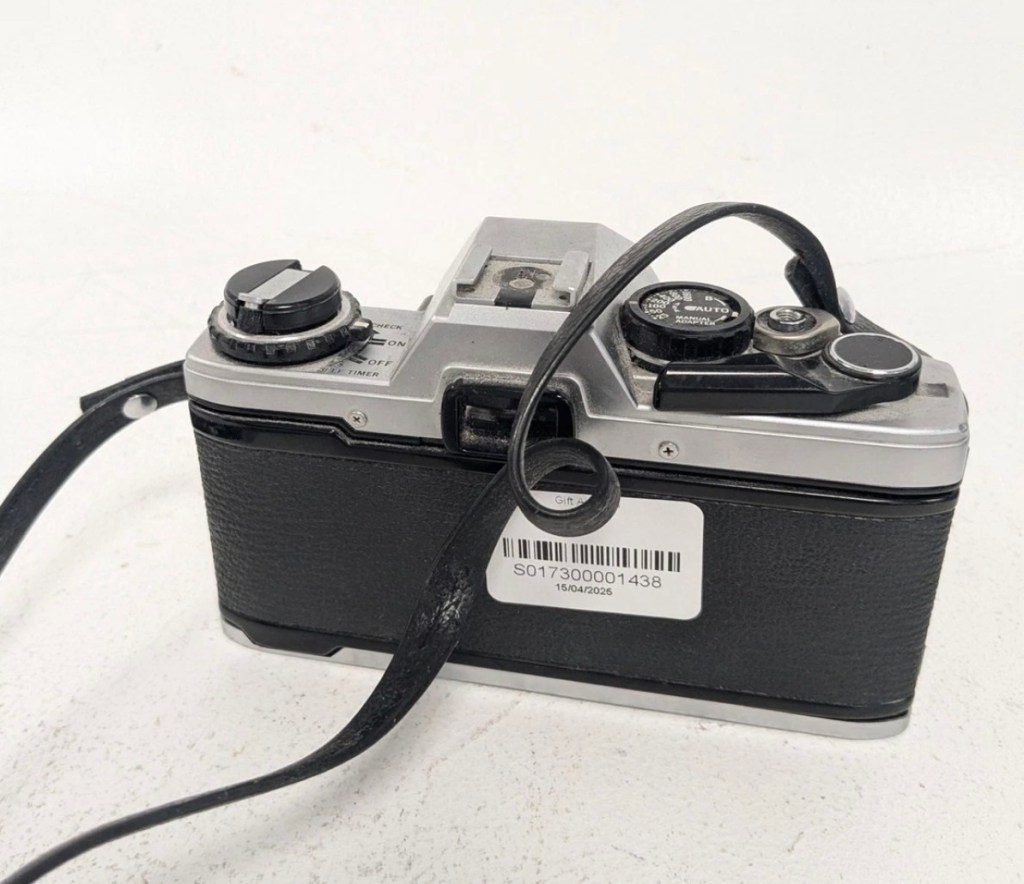
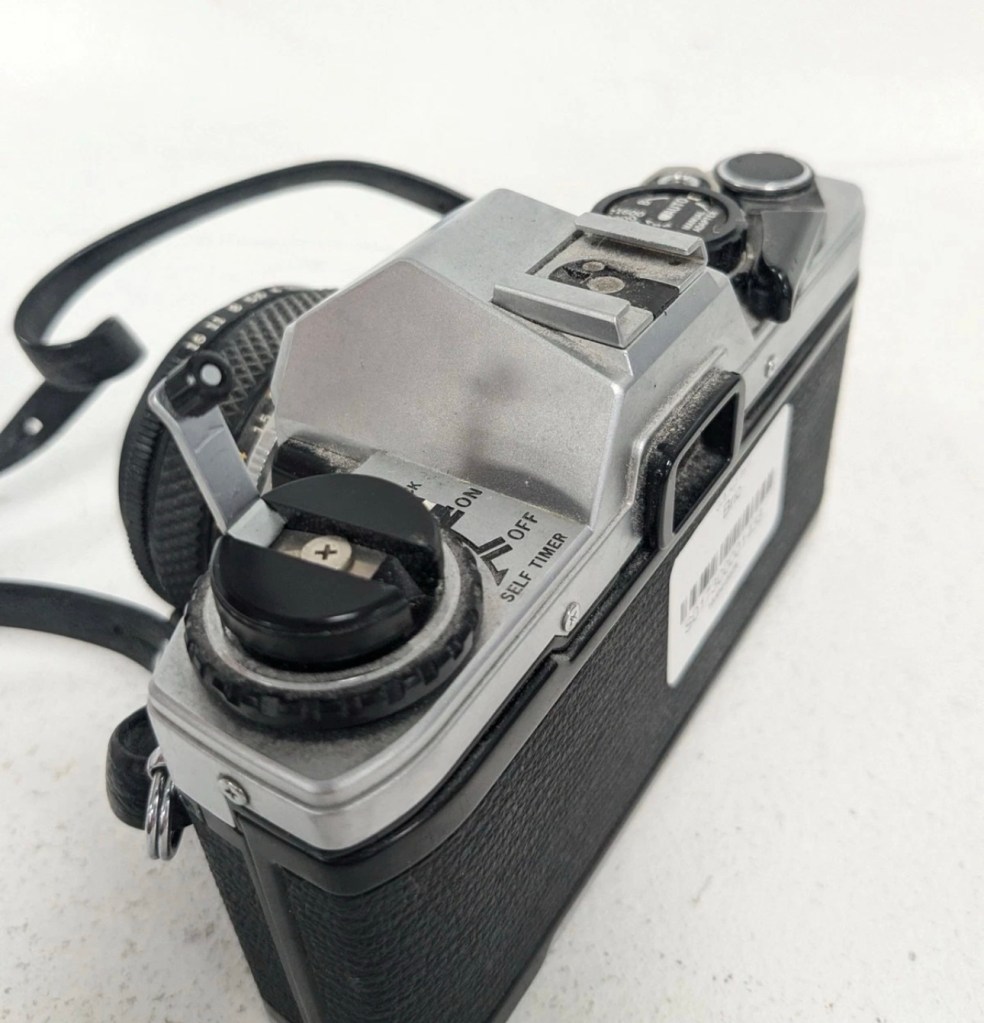
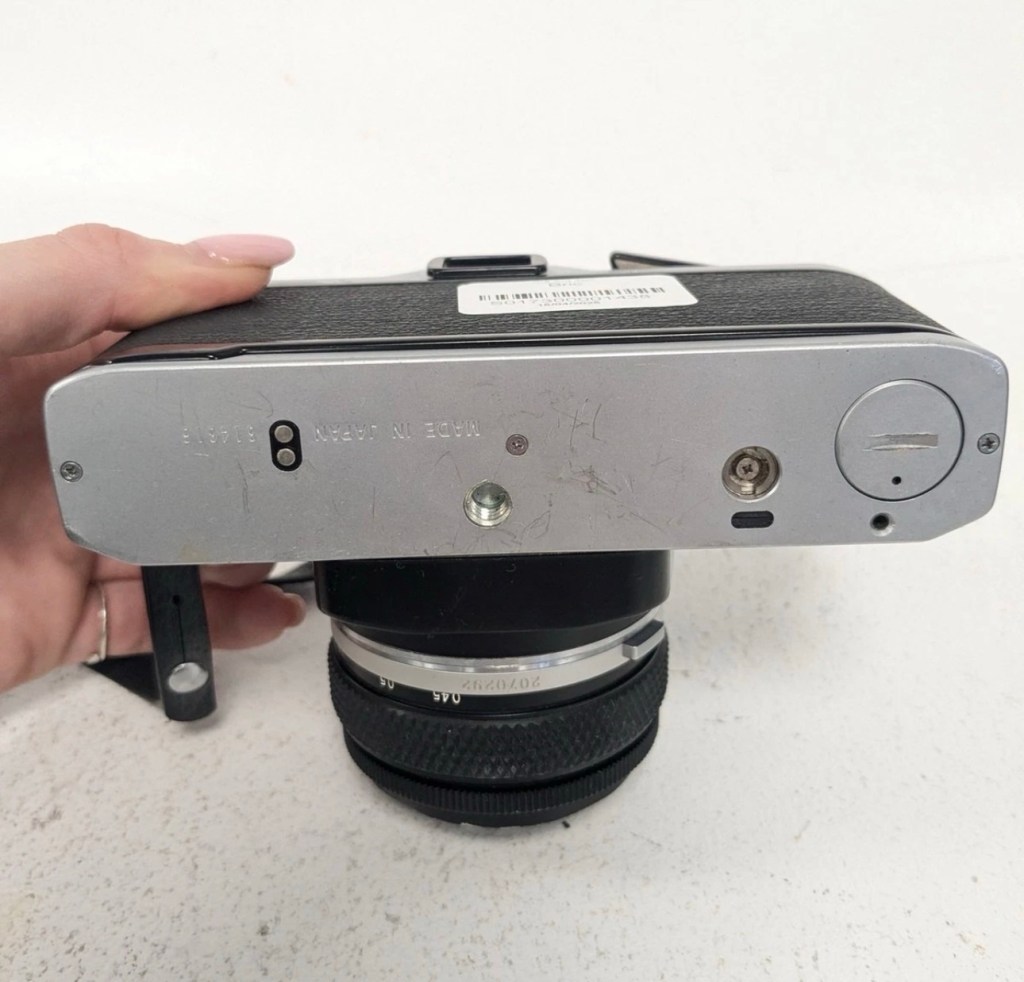
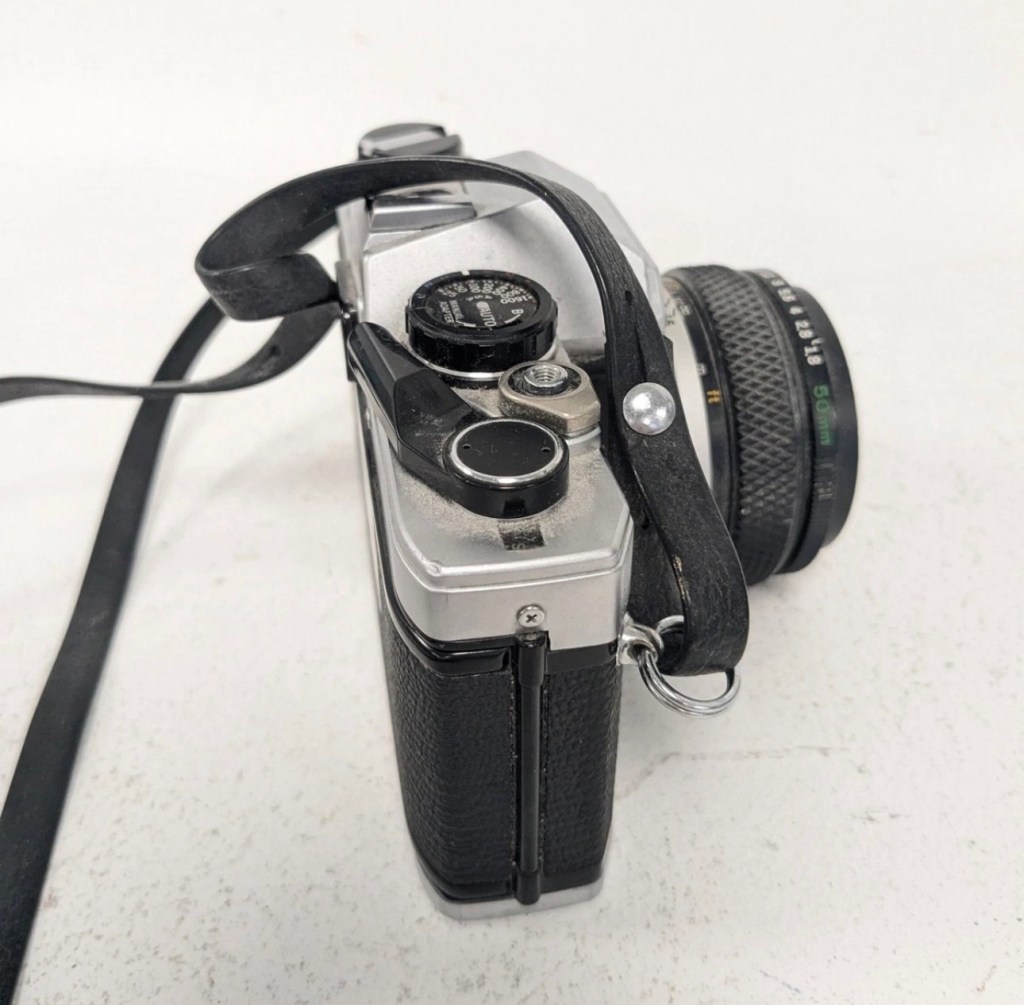
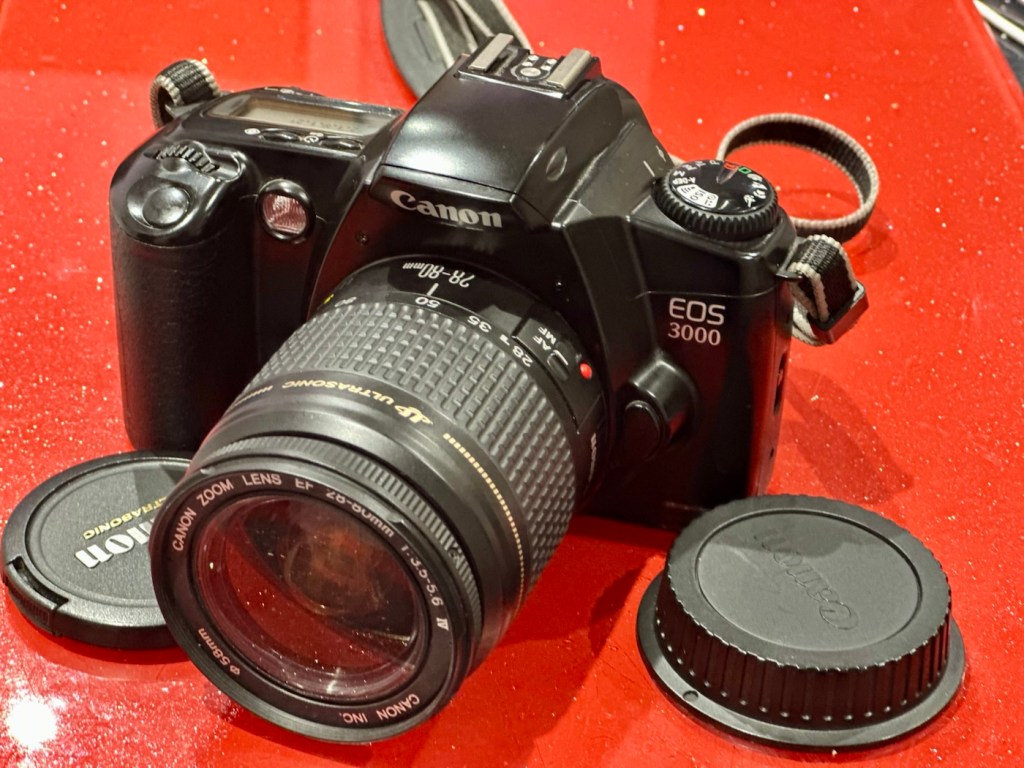
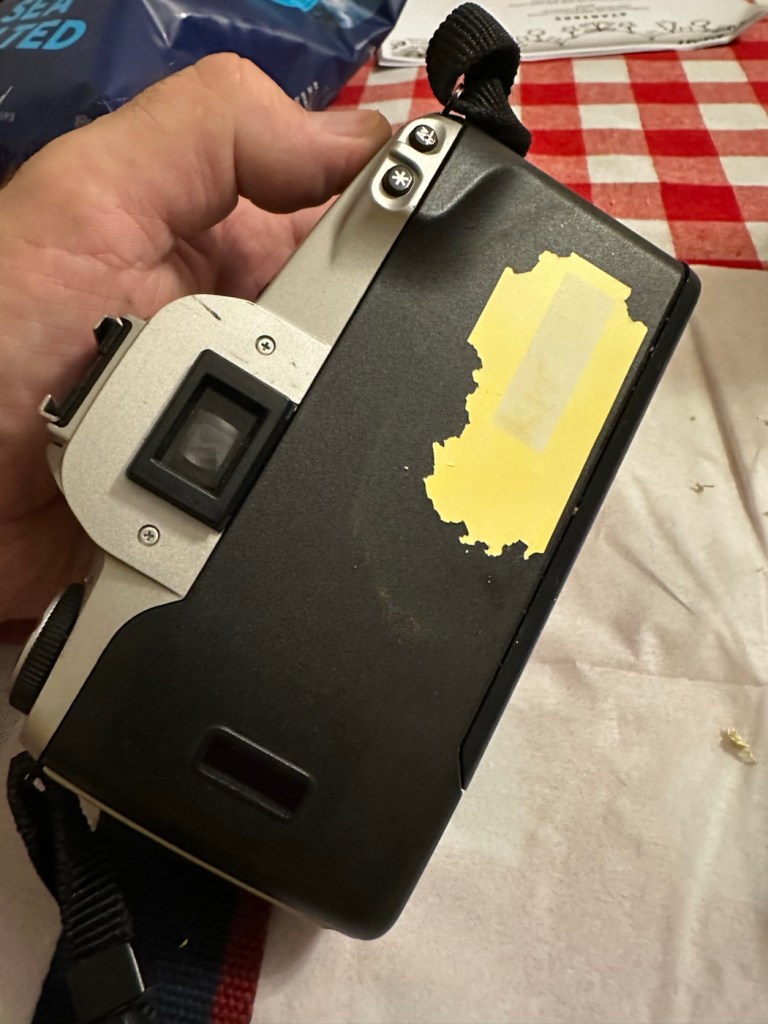
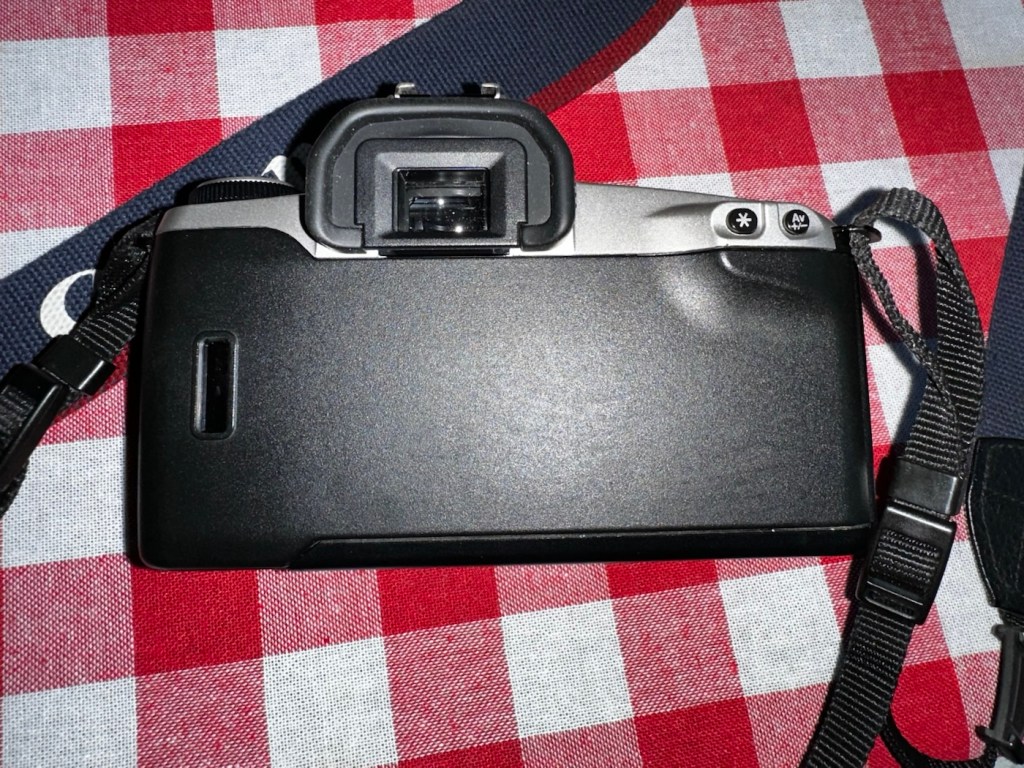
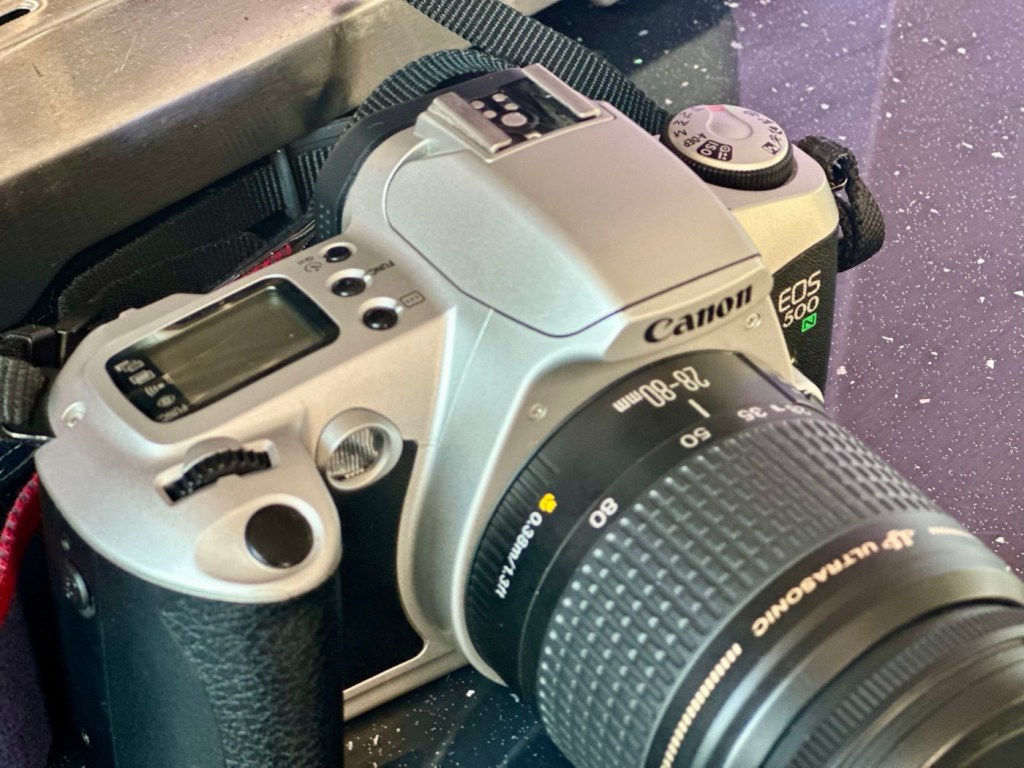
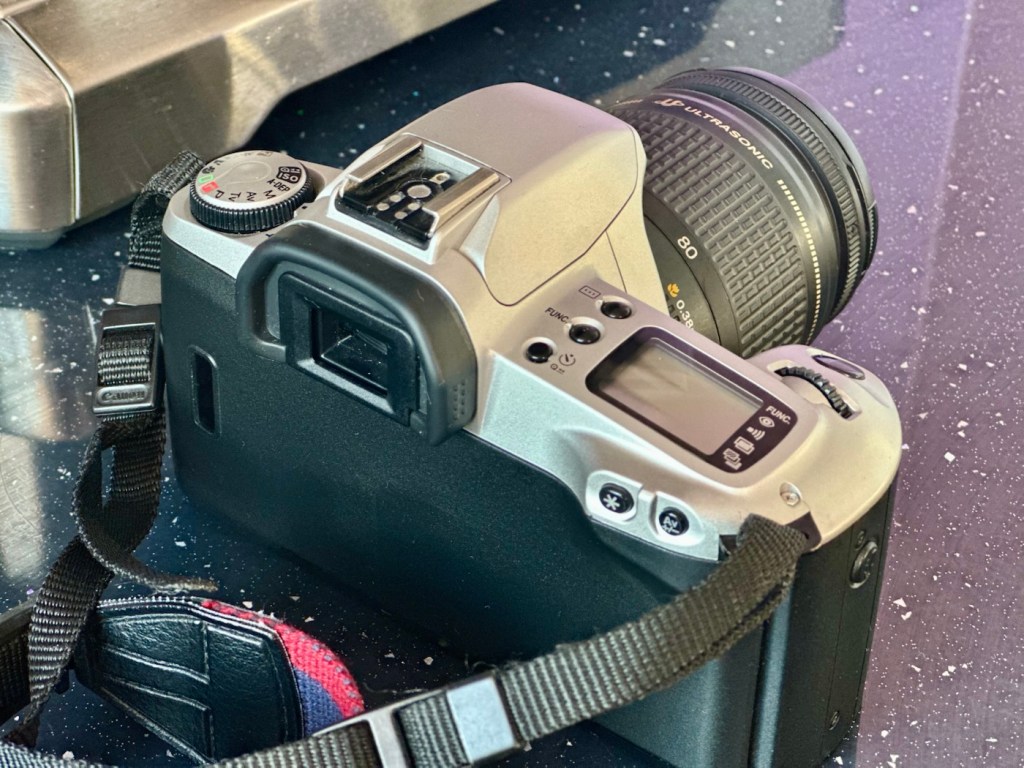
Here I have another basic, entry level camera made by Canon. Produced around 1999? this camera is probably around 26 years old. These cameras don’t have the traditional identification number printed within the film spool holder that the older cameras had, hence the precise manufacturing date is difficult to confirm.
Canon EOS 3000
This is a camera passed onto me by a good friend and professional photographer, Jon, as can be seen in this post: Cameras…i need more!
Here’s a little information about this camera:
The EOS 3000 is an autofocus SLR for 35mm film introduced by Canon in 1999. It was sold as the EOS 88 in Asia. (It was not sold in the US.) The pentamirror viewfinder and manually-activated popup flash helped keep this a lower-cost model; but a full range of autoexposure modes were included, including off-the-film flash exposure setting. Film transport is motorized and the camera requires two 3-volt CR123 lithium batteries to operate.
A compact, lightweight, low-priced SLR camera. Successor to the EOS5000, but with greatly expanded basic functions. The camera incorporates the Mode Dial and most other basic features of the EOS Kiss/EOS REBEL XS/EOS500 and includes six-zone evaluative metering linked to three focusing points. In addition, the flash is linked to the measurement point so that during shooting the flash out-put level is constantly adjusted for optimum exposure control. For reasons of cost, the flash unit is manual pop-up/retractable head type. The EOS3000 is compatible with system accessories for the Kiss and New Kiss. The high-quality design has a feel of genuine elegance.
Canon/ Camera-wiki.org
This camera was pitched at a low cost to attract people into photography, and to encourage those who were just hobbyists to upgrade to something more than the traditional point and shoots/disposables available at the time.
There is not a lot wrong with this camera as far as I can see, let’s have a look and do some tests.
Assessment:
It has a grip that’s starting to develop the sticky issue so that will need cleaning. The mirror and prism are dusty and will need a cleaning.
Sticky grip and dusty internals
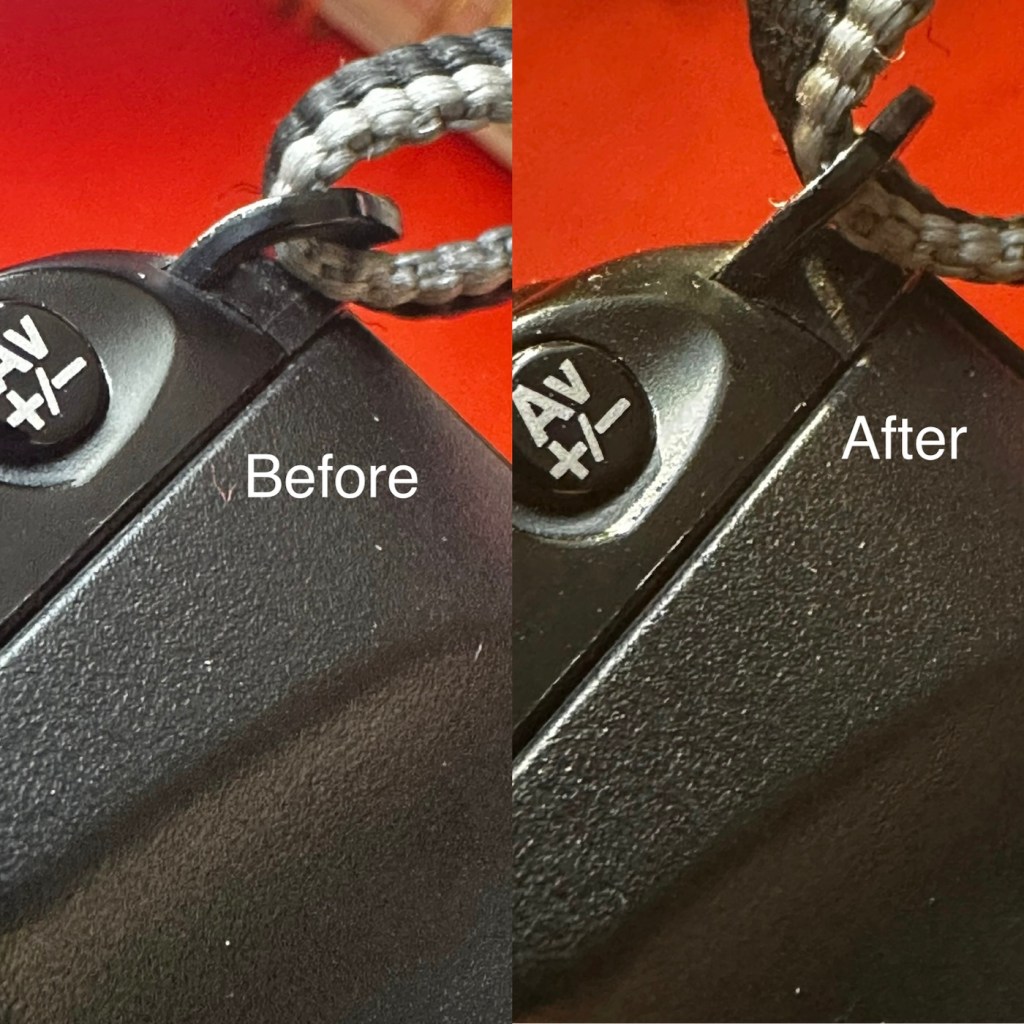
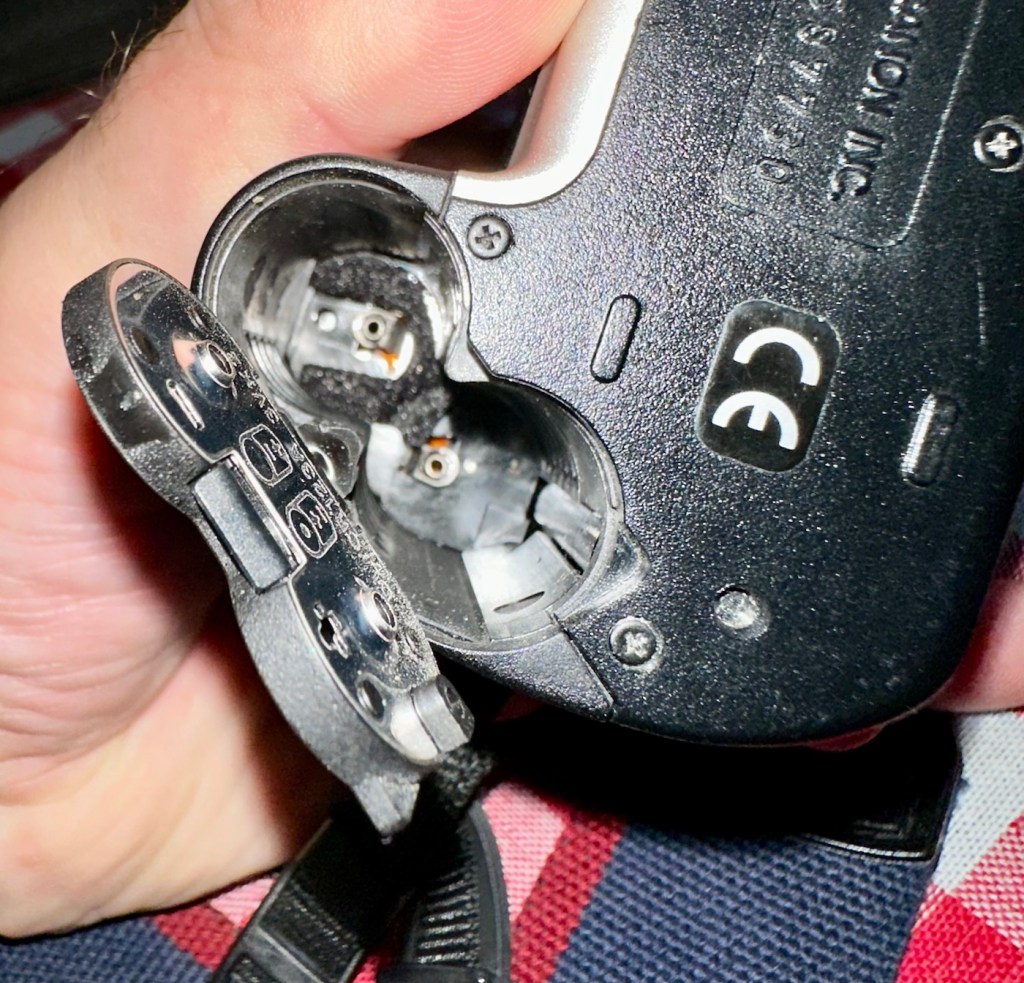
Overall the condition is very good, again this was a training camera, and seems to have had a quite low usage, as there is no scratches or marks. And only one dink as such. That dink happens to be the right hand strap holder that has been bent down to a point where the rear case does not open completely, it restricts its full movement.
Strap holder bent, restricting door opening
Door doesn’t open fully
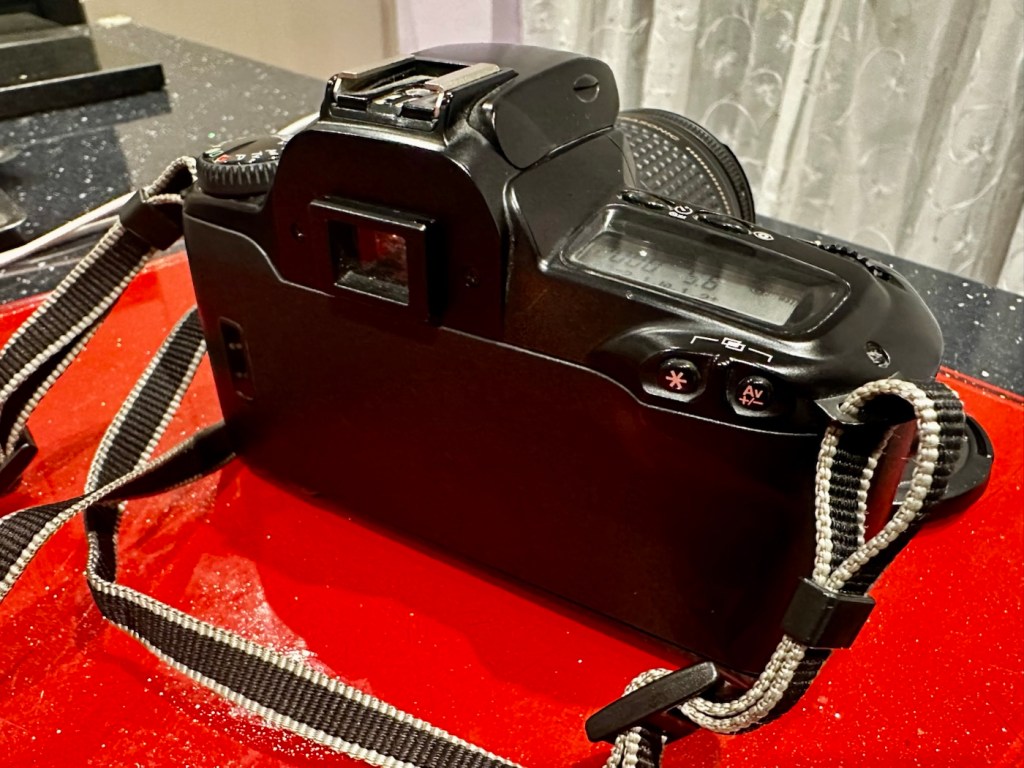
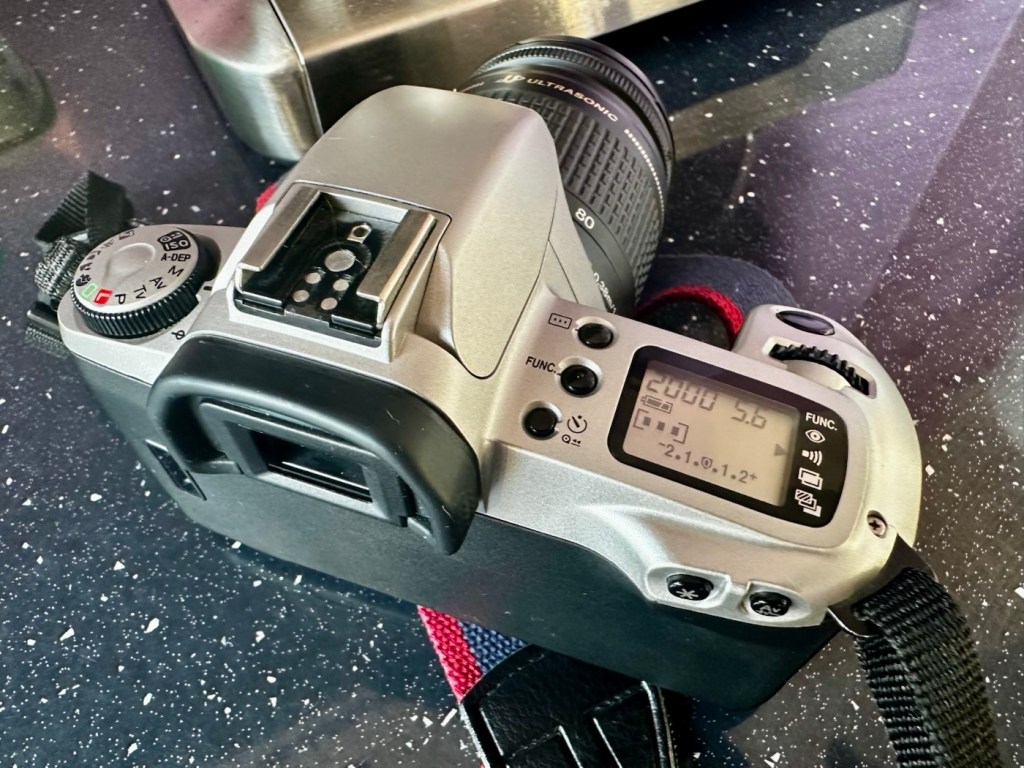
Top and bottom of camera look fine, no bleed on the LCD screen that is always a good sign
No screen bleed Bottom clean
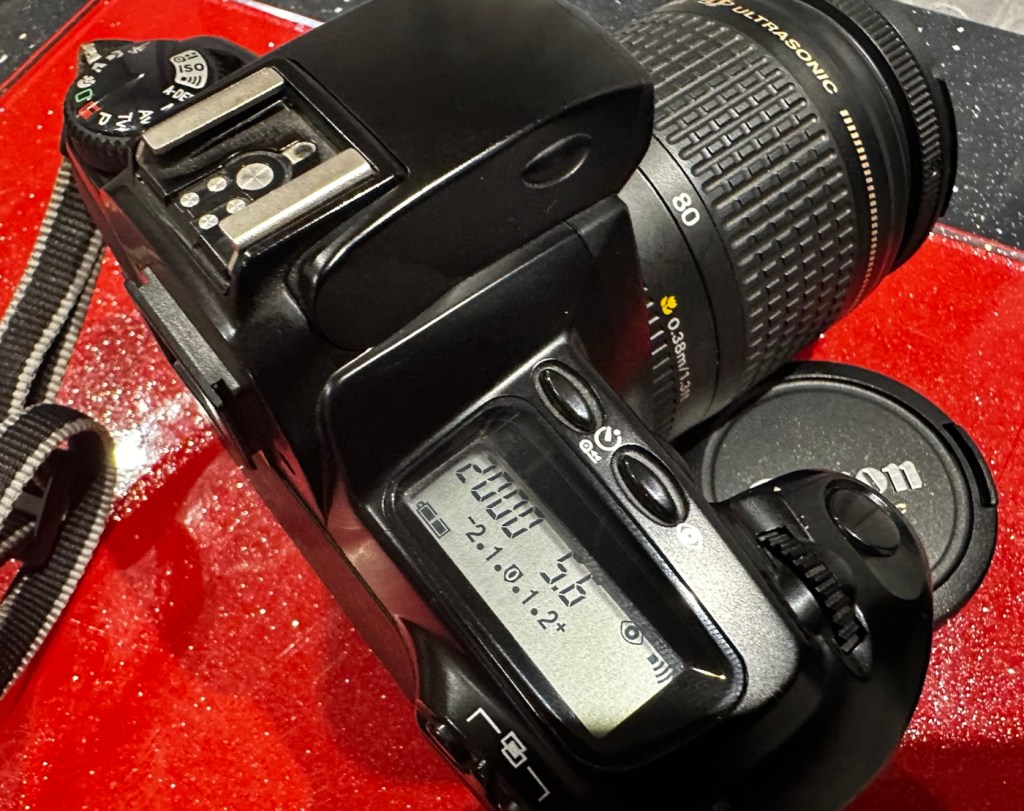
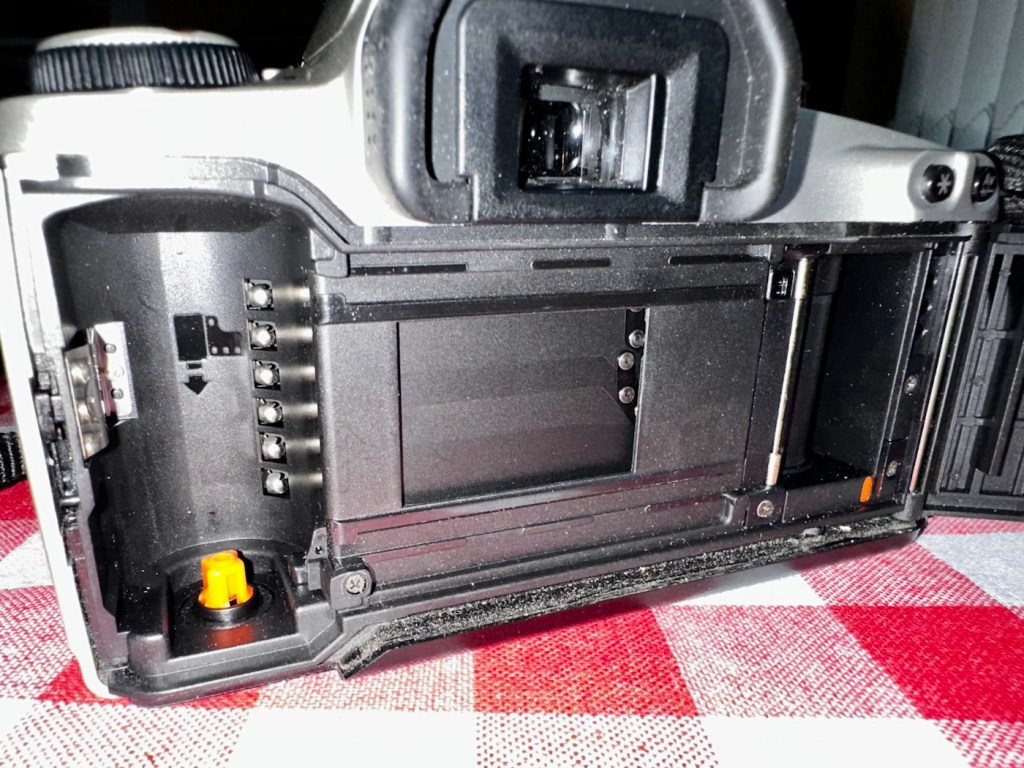
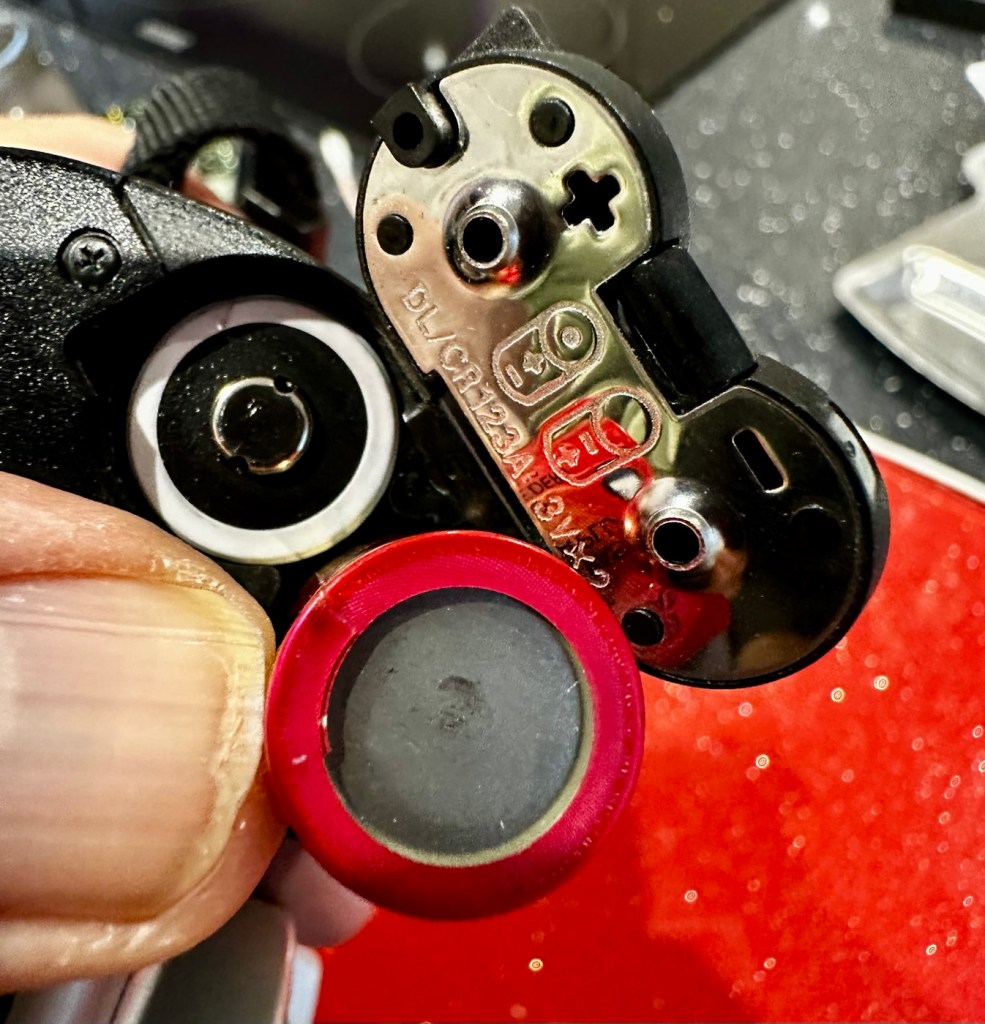
Battery chamber is clean and there is no contamination. This camera takes two 3v Lithium CR123A batteries. Let’s put two in to see if we have any life.
Clean chamberBatteries installed
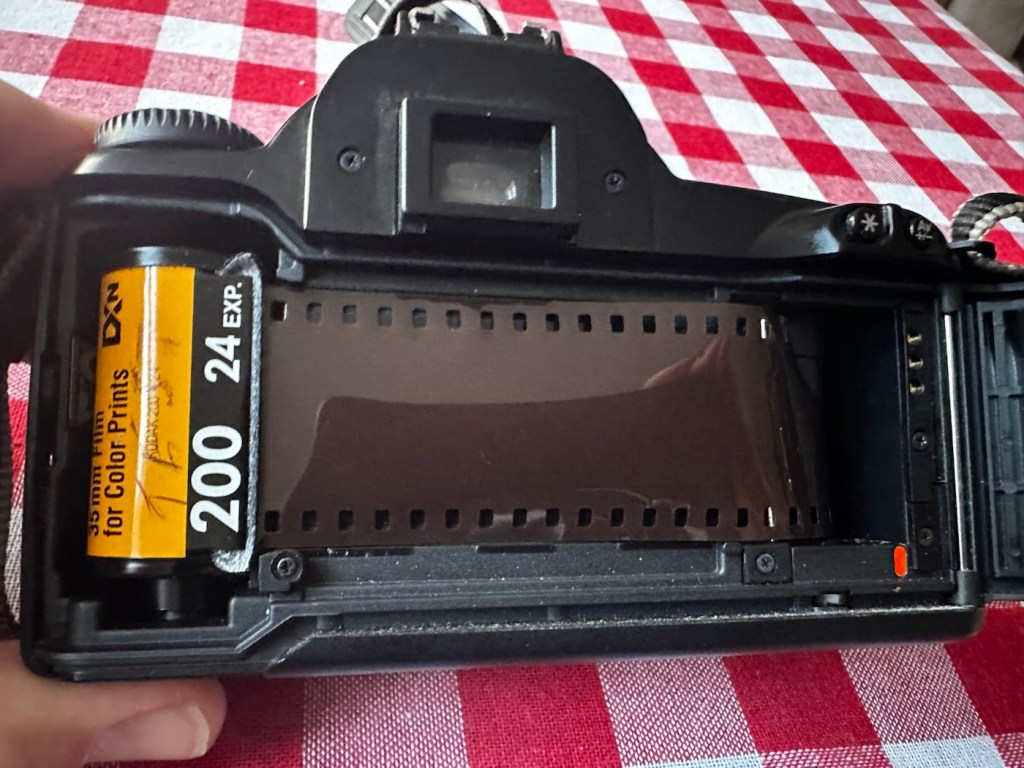
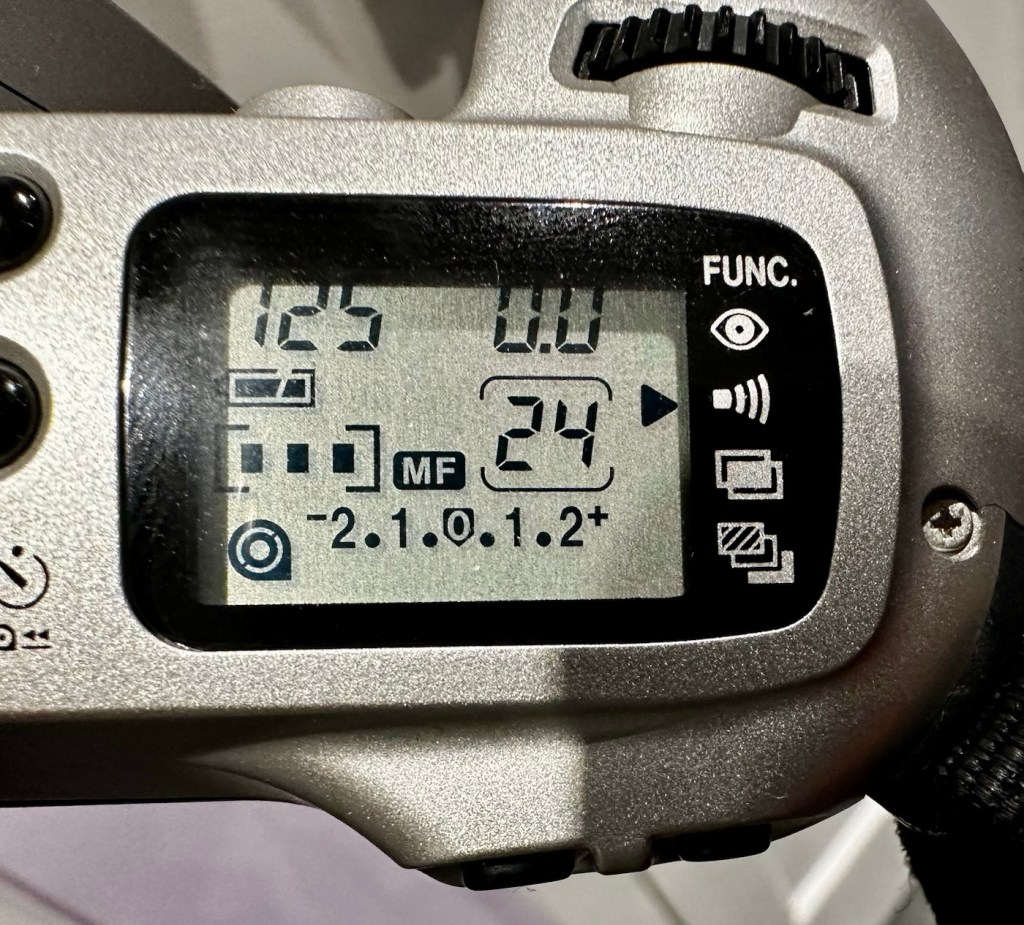
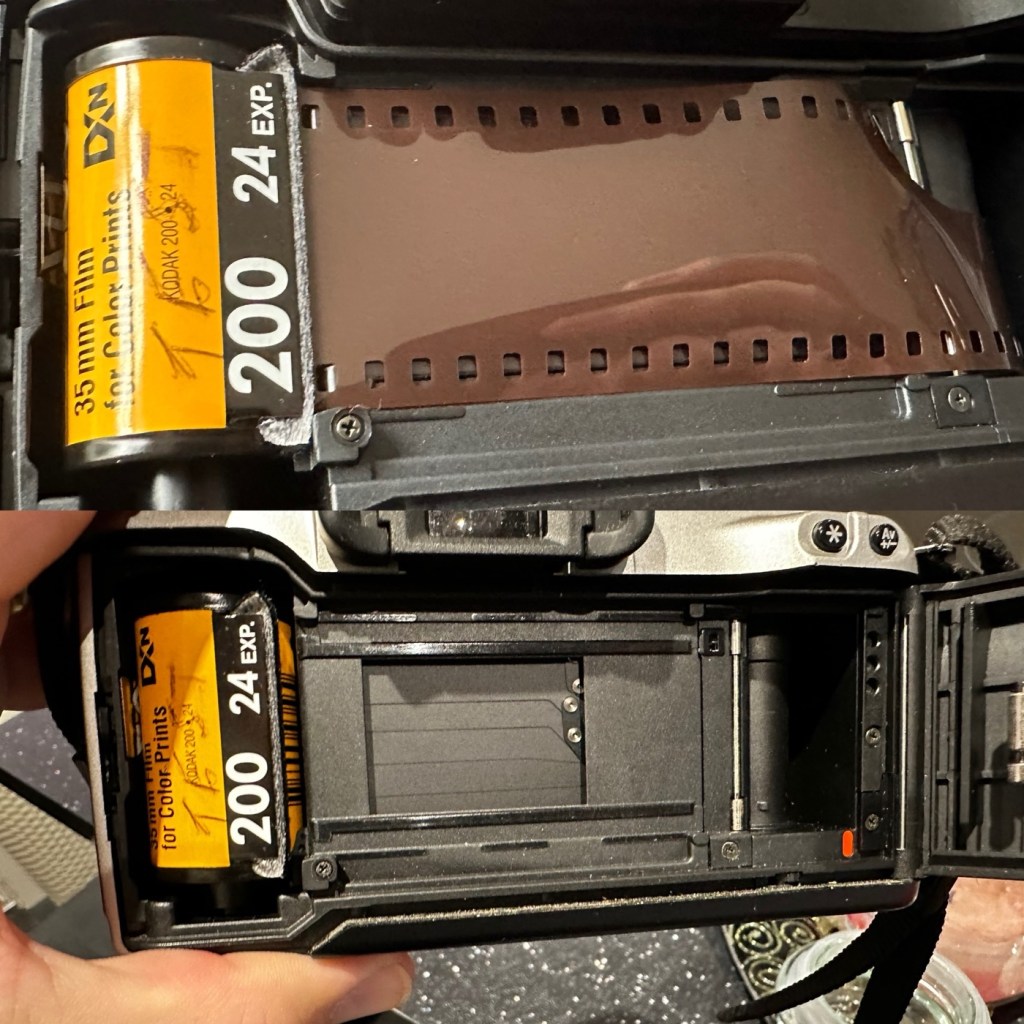
With the batteries installed we have a good display on the screen with no pixelation and it’s nice and clear. I install a roll of test film to see what happens. This camera winds the whole film onto the take up spool and winds back one exposure at a time. The take up when the door is closed works perfectly.
All lights up fineFilm ready to load24 exposures loaded on to the take up spool
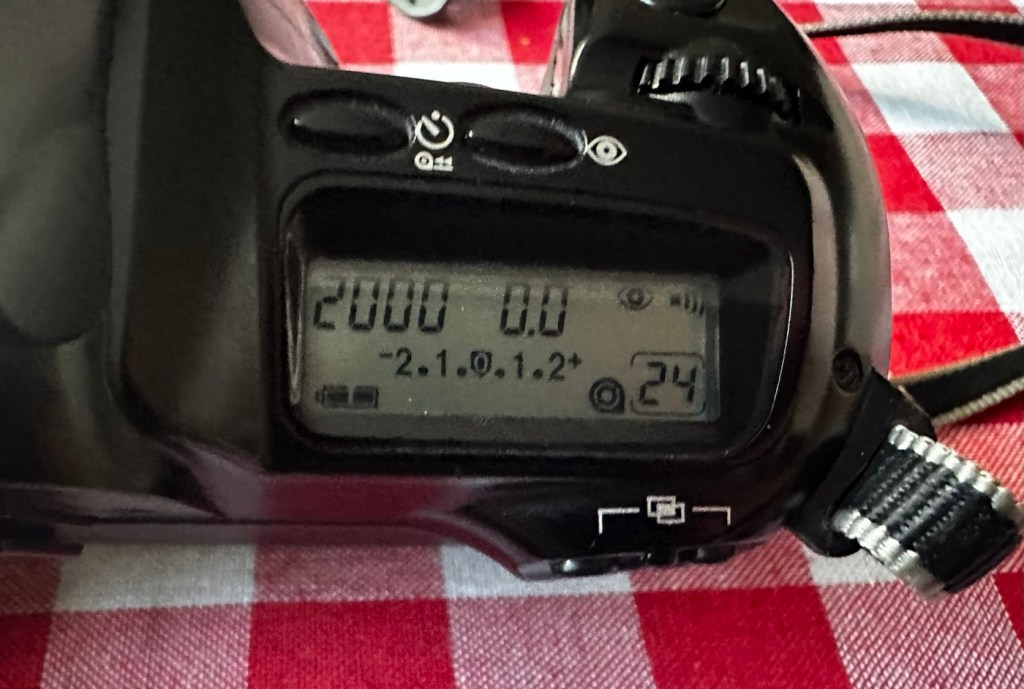
I then operate the shutter, to fire off the 14 exposures, all viewfinder indicators are good, with my 28-90 EF lens attached it focuses well and fires well. When the last exposure has been taken the film rewinds as expected with no issues. In reality the camera is working very well with no internal issues.
Repair:
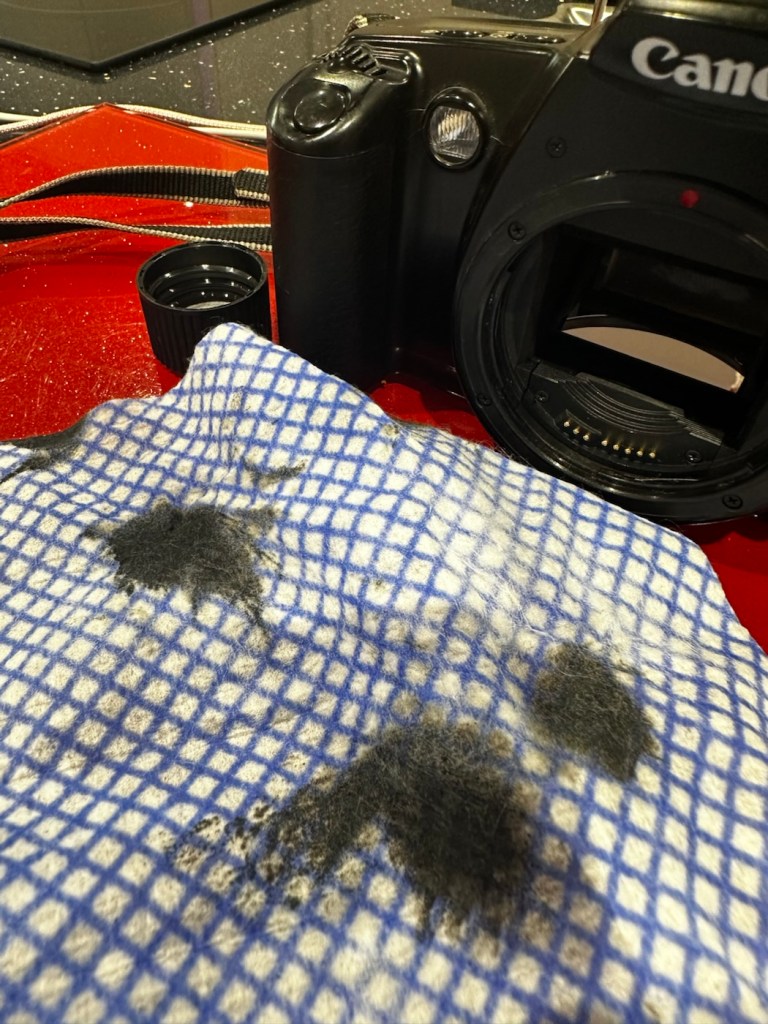
First the dirty stuff. Let’s get that goo off of the sticky grip. I use my IPA and lint free cloth method that I posted about in a previous post here: Sticky, Rubber camera grips. This one is actually worse than I thought and has taken four applications to remove the deterioration on the grip. It feels a lot more pleasant though now that it is done.
The dirt from this grip can be seen on the cloth. Each black blob is one application
The issue with the strap lug restricting the door movement. Quite simply, a gentle movement with a pair of pliers was all that was required. Gently does it as these parts are brittle and easily broken. Don’t over do it, give up when it looks right.
A little gentle coaxing was all that was required
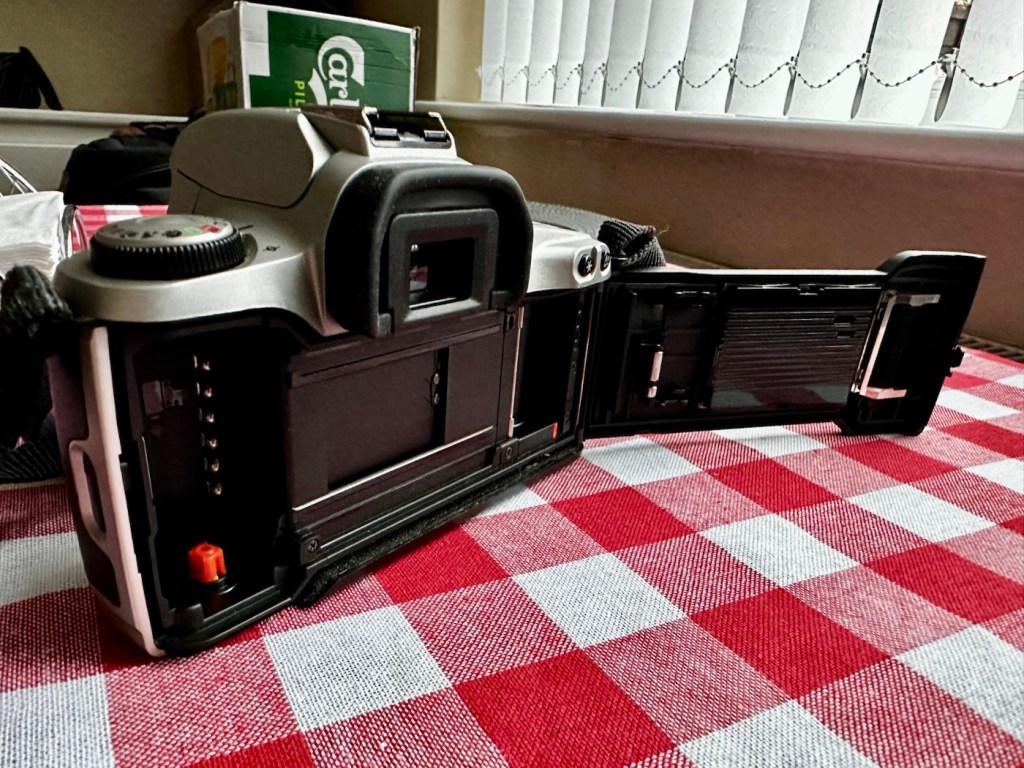
I’ve checked the film pressure pad and this is fine, there are no sharp ridges and the light seals are good. I don’t expect them to be bad as in theory they are not that old, they are in a good healthy condition.
I have cleaned the prism and the mirror with a swab and they are now fine. Using a B setting I have opened the mirror and curtain and used some compressed air to clean throughout. A brush blower was used with the curtain closed to clean around the film spool area and back plate. A quick final blow of the mirror and the aperture is then sealed with a cap to insure no further dirt and dust gets into the internal parts of the camera.
The final action is to use some cockpit polish to finish off the exterior of the camera.
Result:
I’ve cleaned the exterior and used some ceramic cockpit polish to finish it off, I must admit it’s looking very good.
Cleaned up lovely
Looking just gorgeous
Here I have yet another nice little camera packed with features that will make a great camera for someone to learn the basics of traditional photography with. However, it’s remaining in my collection for the while.
It’s yet another camera that I need to test, another one that needs to have a film put through it for its final test, however I am 100% confident of it’s capabilities and the fact that it operates just fine and all its settings, buttons and controls are doing exactly what they should. When I do get to put a film through, I will link to it here.
Another successful restoration and return to use of another old camera that had been put to one side. Not that this one really required a lot of attention, just a bit of servicing and tlc.
Thanks for passing by. It’s always very much appreciated
A nice entry level camera, from the mid 90s, now back in working order
Here I have a very basic, entry level camera made by Canon. Produced between 1996-9 this camera is currentlybetween 26 – 29 years old. These cameras don’t have the traditional identification number printed within the film spool holder that the older cameras had, hence the precise manufacturing date is difficult to confirm.
Canon EOS 500N
This is a camera passed onto me by a good friend and professional photographer, Jon, as can be seen in this post: Cameras…i need more!
I believe this camera was previously used by a large photographic organisation, to teach staff and students wishing to learn traditional 35mm film photography techniques. It was a training camera, at entry level specs.
It is a very good example of this model of camera, and despite its simplicity, low cost appearance and feel, it is in a very good condition cosmetically.
Here’s a little information about this camera:
The Canon EOS 500N is also known as the EOS Rebel G in the Americas or the New EOS Kiss in Japan. Sometimes it’s referred to as the EOS Kiss 2 as it followed the release of the EOS Kiss in Japan. This camera was released in 1996 and replaced the EOS 500. The Japanese version of the camera had the date back as standard. Its successor was the EOS-300 / REBEL2000 / Kiss III, released in 1999.
The body of the Rebel G is plastic, weighing 370 g (13 oz). The only colors available were black or a mix of silver and black. The Rebel G has an EF lens mount making it compatible with any EF lens. The viewfinder offers a 0.7x magnification, 90% coverage, center auto focus, wide auto focus and many more. The Rebel G shooting modes consisted of 6 basic modes, full auto, portrait, landscape, macro, sports and night scene. It also has 5 advanced modes, P, Av, Tv, M, A-DEP. These modes would continue on in the Rebel G series. The camera features a built in flash, and can shoot at 1 fps. The fastest shutter speed with flash was measured at 1/90 of a second.
A few new features include compatibility with ETTL type flash. It still has the same 1/90 of a sec sync speed of the previous model, but when equipped with a Canon Speedlight such as the 380EX, 220EX it can be used at 1/2000 of a sec. Focus has improved a bit as as a AF assist light is now available. Auto Exposure Bracketing (AEB) can be use from -2 to ++2 in 1/2 stop increments. The command dial now has an easier to access night scene mode. The body is able to use the BP-8 vertical grip that can also accept four AA batteries.
Camera-Wiki.org / Wikipedia
Assessment:
As Stated, this camera is in a good cosmetic condition with no sign of dents, dinks or wear. Considering this was a camera used in training I can only presume the students were extremely careful and respectful, or it was lightly used. Having worked with some of these students myself, i very much suspect, it’s more than likely going to be the latter option.
There is another such unit I have of this very same camera however that is damaged with a faulty screen that requires replacement and that will be dealt with in a future post. Meanwhile, let’s get back to this one.
A sticker on the rear
There is an old ownership sticker on the rear and this is one of those old vinyl type ones that will be able to be removed, but just may take a little while, as they are brittle and break off into lots of little pieces that go everywhere.
The battery chamber is clean and there are no signs of contamination. The screen is clear and does not show any bleed, though I haven’t powered it up just yet.
Clean battery chamberNo screen bleed
The film chamber, back pressure plate and shutter curtain all appear to be in good order. Again I will further test this when I put some batteries in and run a dummy film to check transport.
Curtain and film chamber appear fine Back pressure plate and door working fine
The unit is quite grubby and dusty, the mirror is dirty and the prism is as well. initially all looks good. Batteries, and the dummy film might tell us something different.
Repair:
Let’s get that sticker off the rear, a little soak in IPA to soften things up, and then using a small plastic modelling spatula to gently get under the label, I was able to remove the sticker relatively easily. If I’d used the metallic option I may well have scratched the casing. I’m happy that this option has worked well for me. A final clean at the end with some car cockpit cleaner should bring the detail out nicely.
Sticker now removed
Let’s get some power in, and fire this unit up. It takes two CR123A 3v lithium batteries.
CR123A batteries
We have power
Batteries in, and everything lights up, all menus function and as stated earlier their is no bleed from the LCD screen.
I load the film in and it instantly winds the whole film on to the take up spool. Here on the display, you can see that this roll is 24 exp and it has wound fully on to the take up spool. I fire off these 24 exposures to check the shutter and that fires fine, film transport also works well and the final rewind of the film at the end also works. In a nutshell, this camera works!
Film in and film out
I clean the prism and the mirror with a soft swab and you can just see the dust and dirt lift. A final brush over with a bulb blower completes this task. The internals are now clean.
It just needs a very thorough exterior clean and polish.
Result:
I’ve cleaned the exterior and used some ceramic cockpit polish to finish it off, I must admit it’s looking very good.
Here I have a nice little camera packed with features that will make a great camera for someone to learn the basics of traditional photography with. However, it’s remaining in my collection for the while.
Looking clean and presentable
From all angles a lovely clean example, operating just as it should
I’ve cleaned the camera throughout and used compressed air to finish the clean prior to sealing it from the elements. It’s yet another camera that I need to test, another one that needs to have a film put through it for its final test, however I am 100% confident of it’s capabilities and the fact that it operates just fine and all its settings, buttons and controls are doing exactly what they should. When I do get to put a film through, I will link to it here.
Another successful restoration and return to use of another old camera that had been put to one side. Not that this one really required a lot of attention, just a bit of servicing and tlc.
Thanks for passing by. It’s always very much appreciated.


You must be logged in to post a comment.