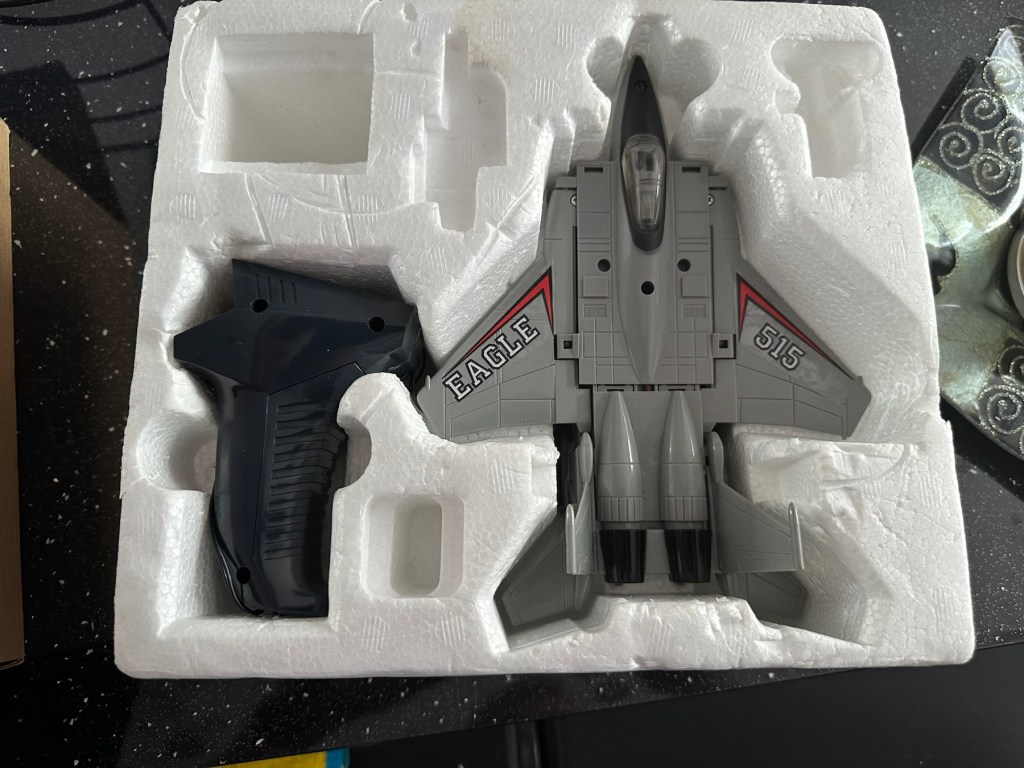
I arrived home from work last evening to find my nephew at home. He’d been looking around his mum and dad’s attic to find his old star wars toy collection he had from the 80s-90s. Whilst in the loft he found this old toy from 1985 by a company called Yonezawa being sold under the Grandstand branding, and it isn’t working. Here is where it passes over to uncle Dave.
Uncle Dave, it’s not working
There’s no real value to these toys as they were produced in massive quantities off the back of all the transformer type toys that were available at the time. There are some accessories missing from this one that are obtainable via the auction sites, he may well ask me to source these, but at the moment he just wants me to get it working to pass onto his boys. The video below shows just what it does….and that’s not a lot. But the one I have here is totally dead and needs reviving just like Frankenstein.
Deltatron what it should do
So here we go…
Assessment:
My overriding surprise is that this has been in a loft space for close to 30 yrs and does not have that expected damp mustiness that usually comes with such an item. I must say, my brother in laws loft space is an exception, it’s obviously free from excessive moisture, mind you it’s only about 40 yrs old so building standards had probably advanced somewhat from when ours was built about 90 yrs ago.
It’s in a good condition and all its parts are there minus a few little additions that originally came with the toy. But as I have stated earlier these parts can be obtained on line if required.
Right, let’s have a look at what is or isn’t happening here…
Repair:
When batteries are installed and the remote control is operated, all that happens is that a light comes on in the toy. The motion that is required is non existent.
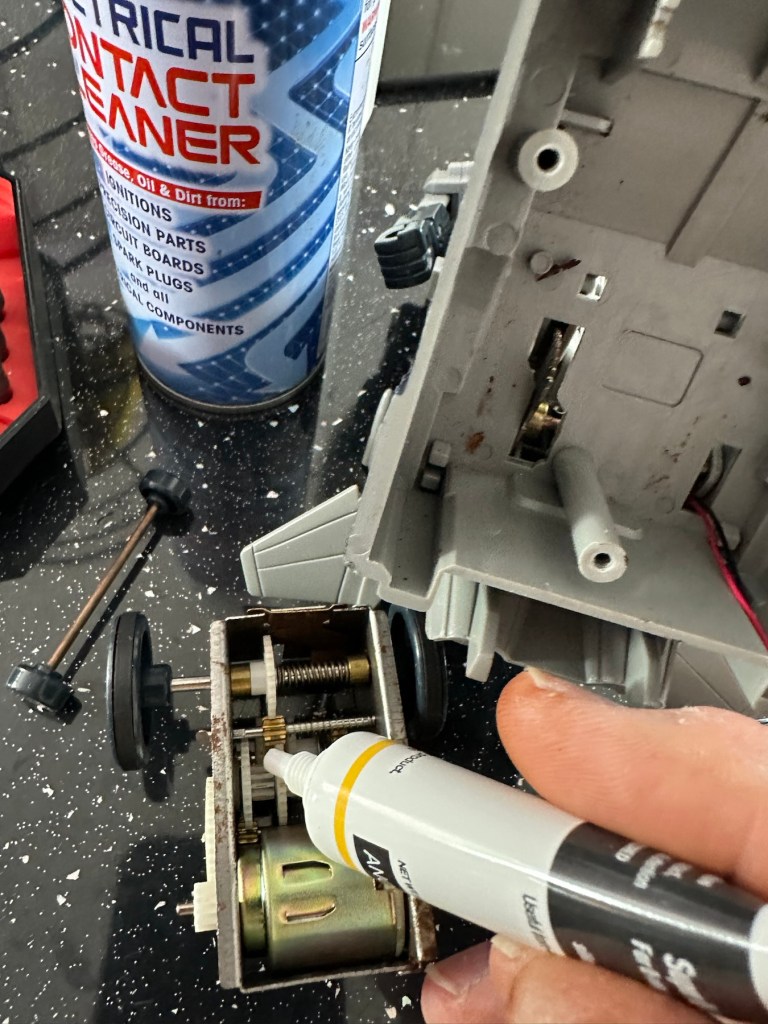
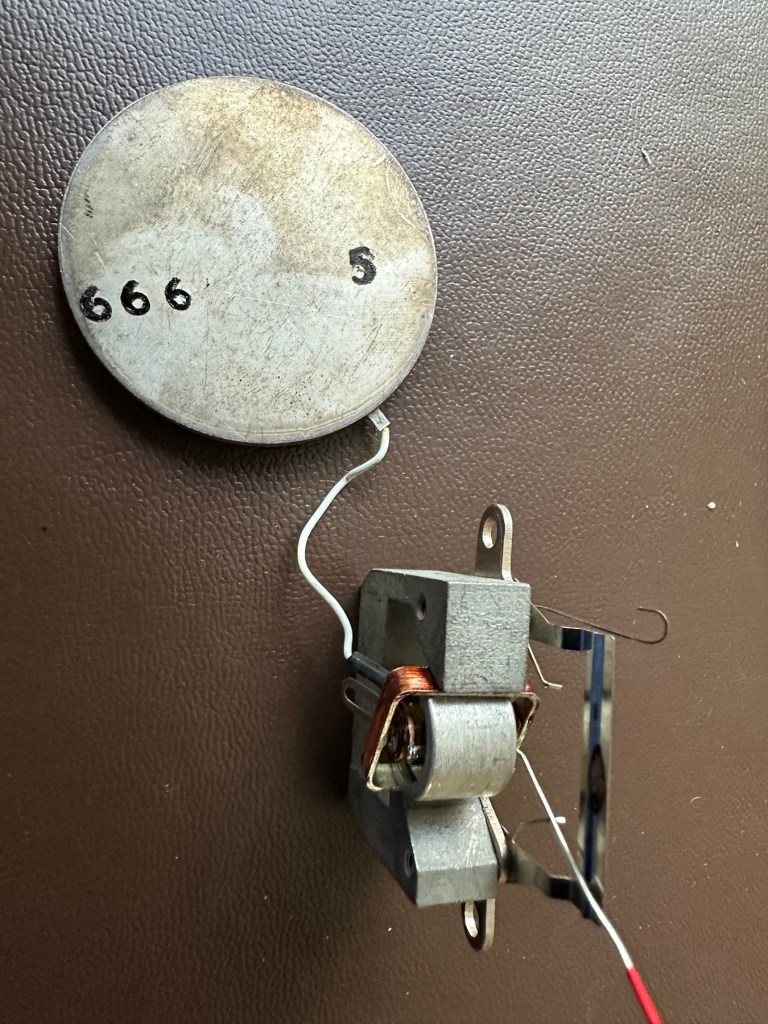
The motor unitMotor removed, there is a cog mechanism to move the unitThe motor unit removed
When examined closer you can see there is a lot of surface rust on the side of the motor where the contacts go into the unit.
Really rustyQuick clean later
The contacts were so rusty inside the motor unit that you’d get an intermittent running of the motor if you moved them. I’ve checked continuity and solder joints and they were fine. I’ve injected some contact cleaning spray into the motor and sat there manipulating the motor in both directions for about 5 minutes, this was sufficient to get the motor running freely once power was reapplied. The contacts were dirty and restricting the flow of power to the motor. I decided to use some IPA around the area to give it all a good clean and once again sprayed more contact cleaner through the motor.
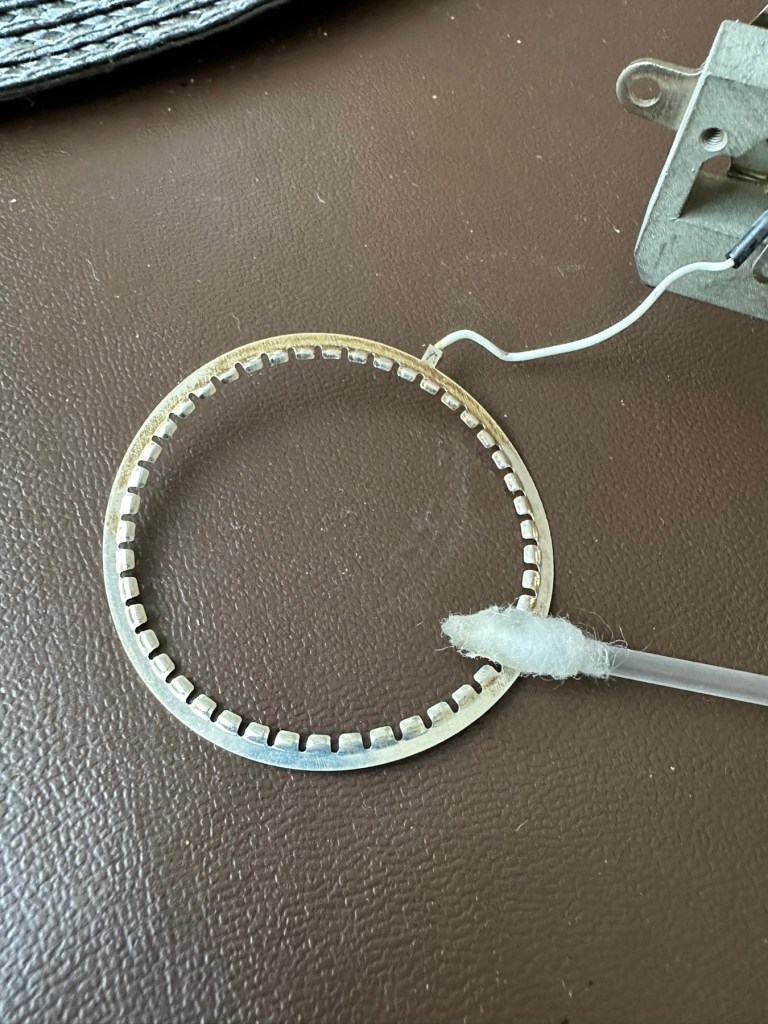
Contact cleaner and silicone grease
Once I’d run the motor for a few minutes in both directions I then applied some silicone grease to the cogs and moving parts to allow a smoother operation. It’s worked. A nice simple fix.
Result:
It’s working and here’s a small video to prove it.
It’s now working
I’ve already handed it back and it’s a joy to see the smiles on my nephew and his dad’s face when they watched it working. Such a simple thing, bringing back treasured memories and laughs. Another old toy saved for another generation and best of all another item not going to a landfill.
Thanks for passing by, as always it is very much appreciated.
I’ve had this camera sitting around since March 2023, when I first wrote about its purchase along with a couple of other cameras here: New old stock 📸
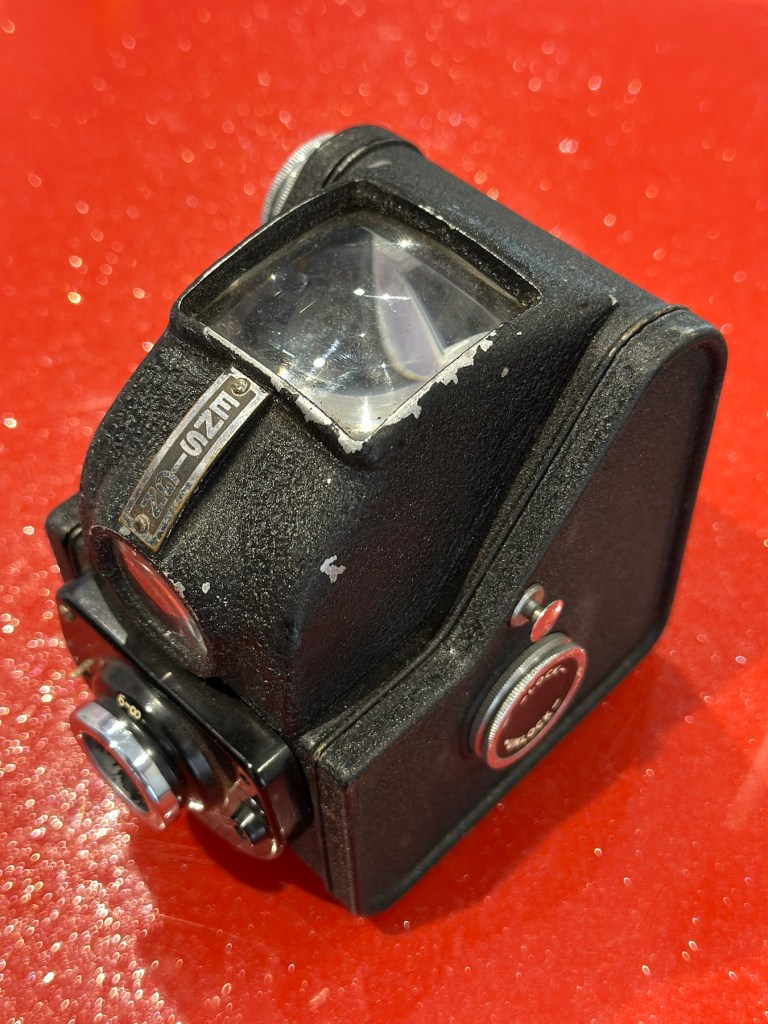
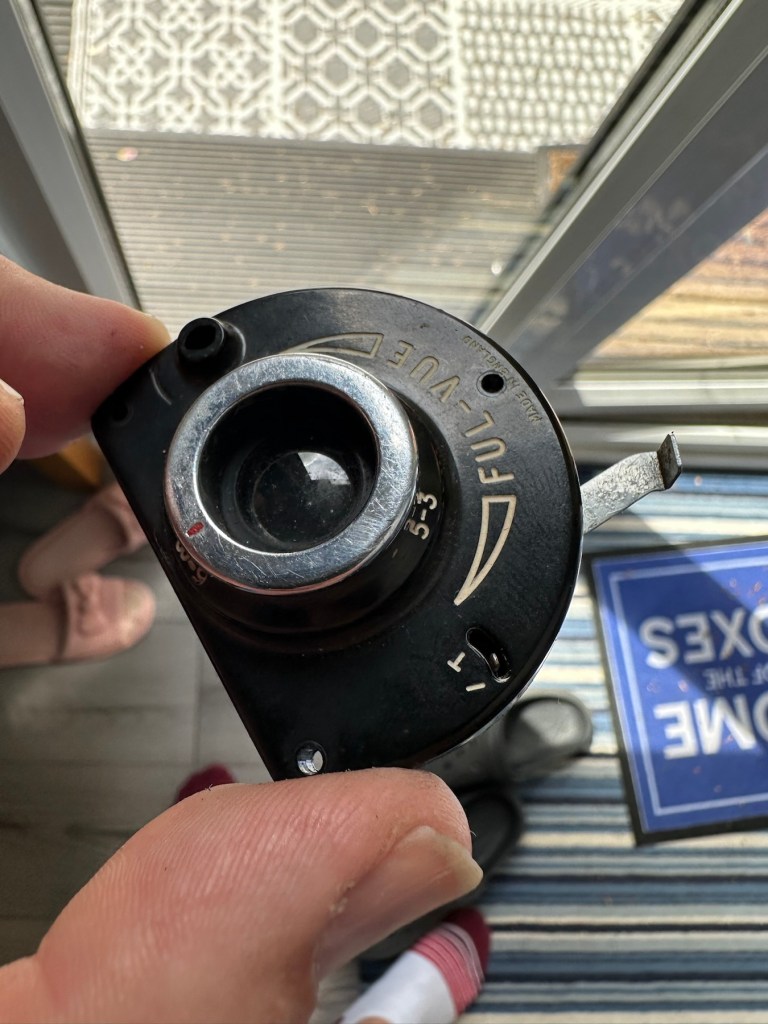
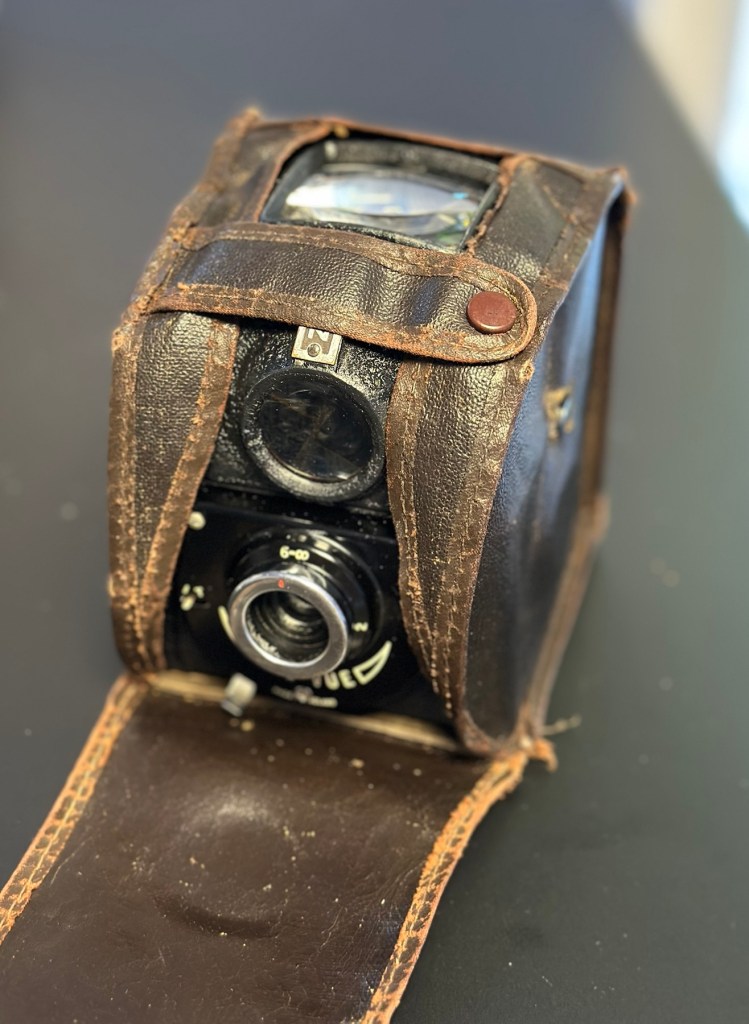
Barnet Ensign Ful-Vue II
I’m not sure what I paid for these cameras but it wouldn’t have been a great deal. I love the Ful-Vue due to its looks and the kind of Art Nouveau feel it has about it. It’s a very basic mass produced camera of its time and It is an old 120 film camera, and the bonus is that this film type is still readily available, in fact I still have a few rolls in my fridge at home today.
The shutter is an all mechanical, spring loaded system which swings a piece of metal over a hole to create the exposure. The approximate timing is 1/30th of a second and that’s slow. It is understandable when taking in to account that ISO 400 wasn’t that common in the 50s and would have produced very noisy results. It was far more common to use ISO 50-100 film and that would’ve required a slower shutter speed at the approximate f11 of the lens of this unit.
I obviously want to get it back into full working order. And want to do as sympathetic a restoration as possible. It’s a 120 roll film camera with a 6cm x 6cm frame inside, it was a cheap and cheerful camera of its day, sold as, “Easy, even for a child to use.”
In the meantime, here’s some history about this little camera:
Barnet Ensign Ross Ful-Vue II
Originally released in its initial form in 1939, this version was introduced in 1950 after further improvements were made. The new flash synchronised shutter, the turn-able lens barrel allowing three different distance settings instead of two, an all-plastic front panel, and an optional flashgun. The improved version was called Ful-Vue II. Pictures were 6×6cm on 120 film. It has been stated that colored models (red, white and blue) were sold in 1952-3, to celebrate the coronation of Queen Elizabeth II; However, no other evidence for these cameras has been seen: in particular, the Ful-Vue is not mentioned in a coronation advertising supplement to the BJP Almanac of 1953. Colored Ful-Vues were advertised as ‘Ful-Vue à la Mode’ in late 1952. Examples of the regular Ful-Vue II, repainted and presented as the colored model, have been seen in online auctions.
Camera wiki.org
So I estimate this camera to have been produced sometime between 1950-54 when this particular model had its production run, just prior to yet another version becoming available. Making this particular camera approx 70+ years old. Let’s have a look at the unit that I am now in possession of.
Assessment:
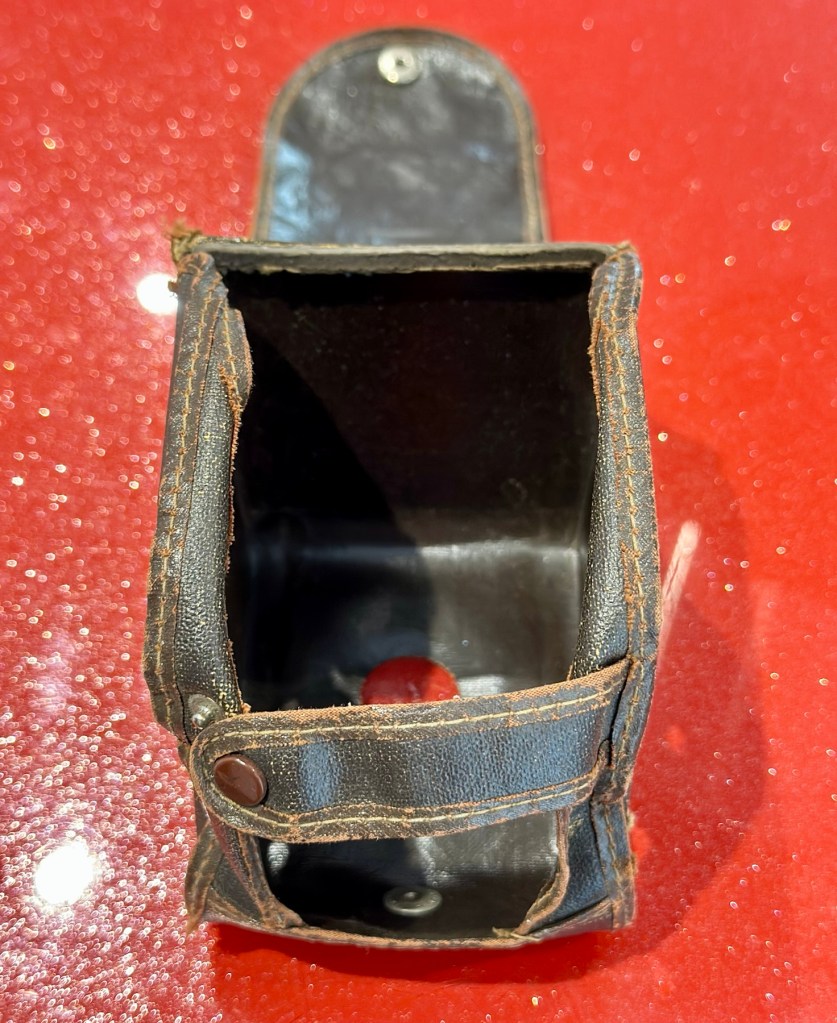
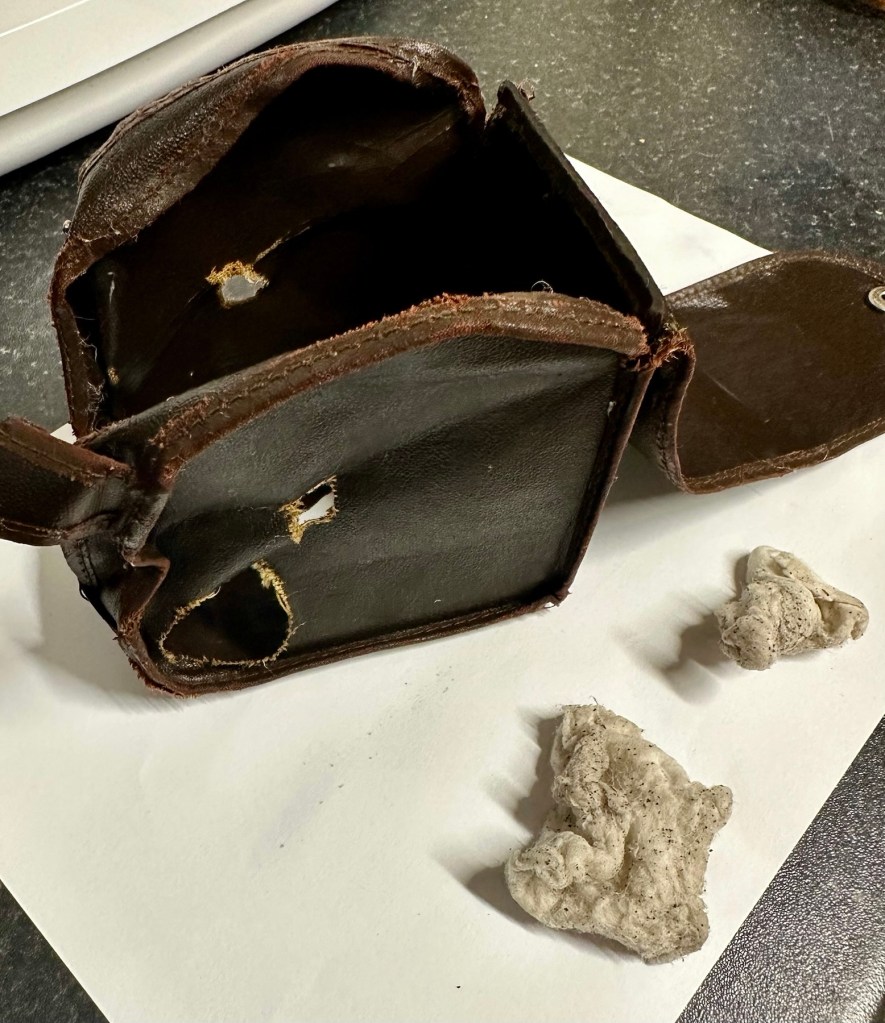
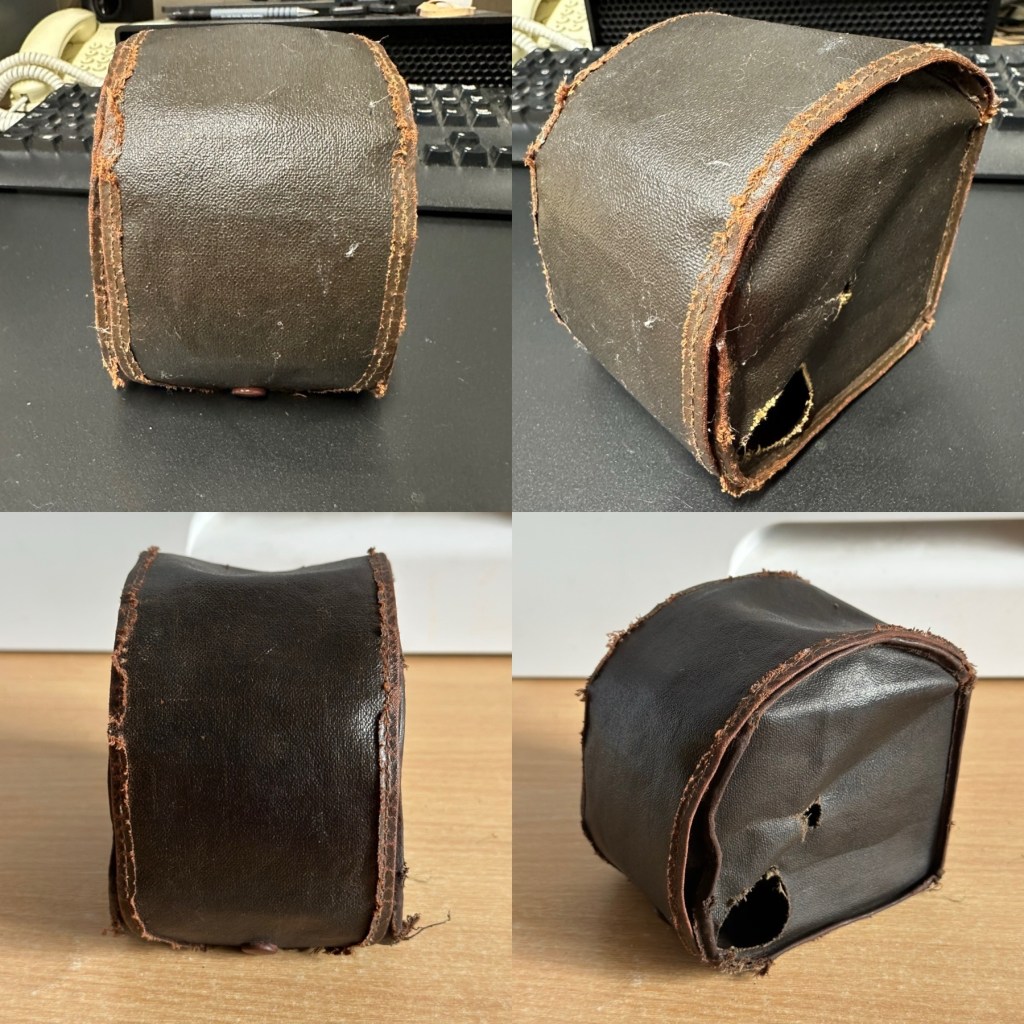
The case is leather and is very dry and brittle, it’s complete, so I may well look at revitalising this one just as I did to an old Kodak camera in this old post: Kodak Brownie reflex. If I do, I will cover its repair in the following section.
The old leather case, very dry and brittle
The camera itself is in quite a good condition cosmetically, it has chips off the paint and a little wear and tear that will require some attention. There appears to be a screw missing on the front plate, this will be replaced.
A little wear and tear, nothing too worrying
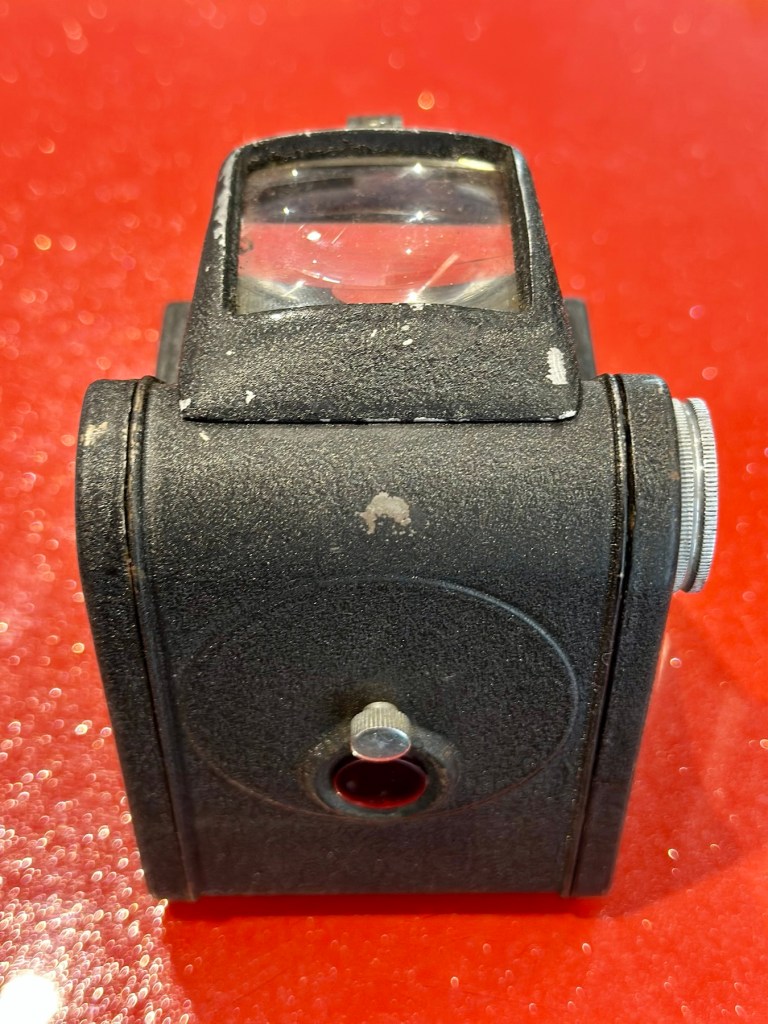
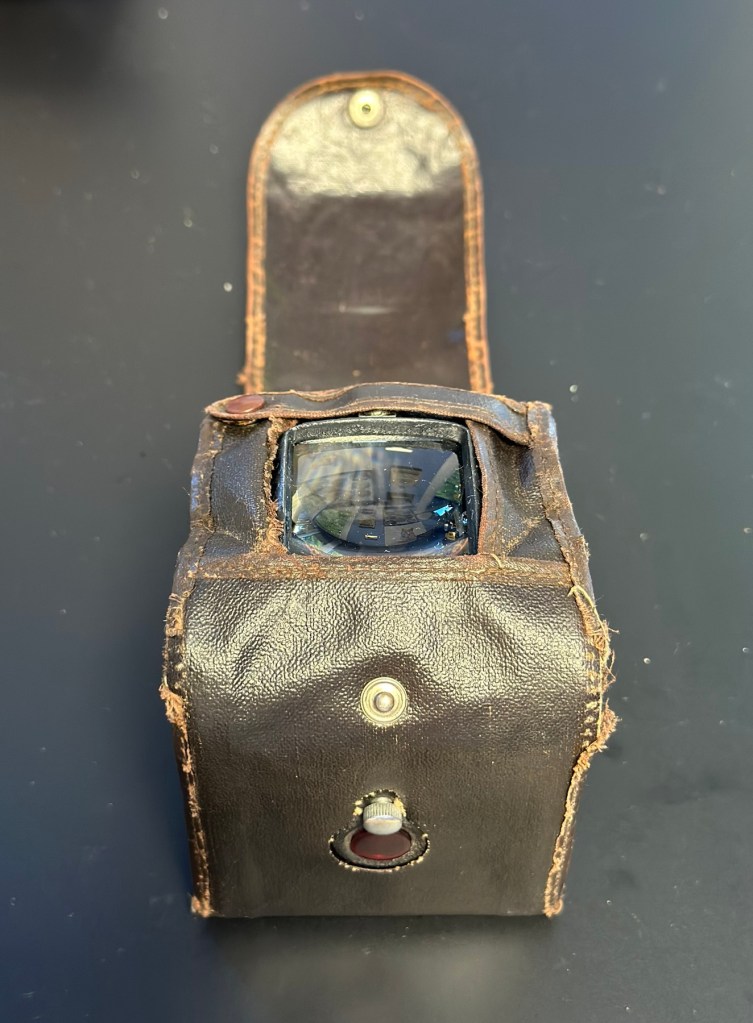
The mirror inside the viewfinder seems to have moved and will need reseating, all glass and mirrors appear quite foggy and need a good clean, all workings within the camera inside appear ok. Light seals appear ok but may well need replacing purely due to their age.
Glass dirty and mirror has movedInternals all okNo issues on the winding mechanism
The lens barrel and shutter mechanism will be checked over to check correct operation, however at first glance, all seems to be ok. There is a little red window on the rear panel where you can see the film exposure numbers. A little thumbscrew can be turned to blacken this window out, this will be very handy for when we try to install a colour film to prevent any fogging issues.
Repair:
I want this to be a sympathetic restoration, so I will endeavour to keep the look and feel of the unit as original as possible.
The case:
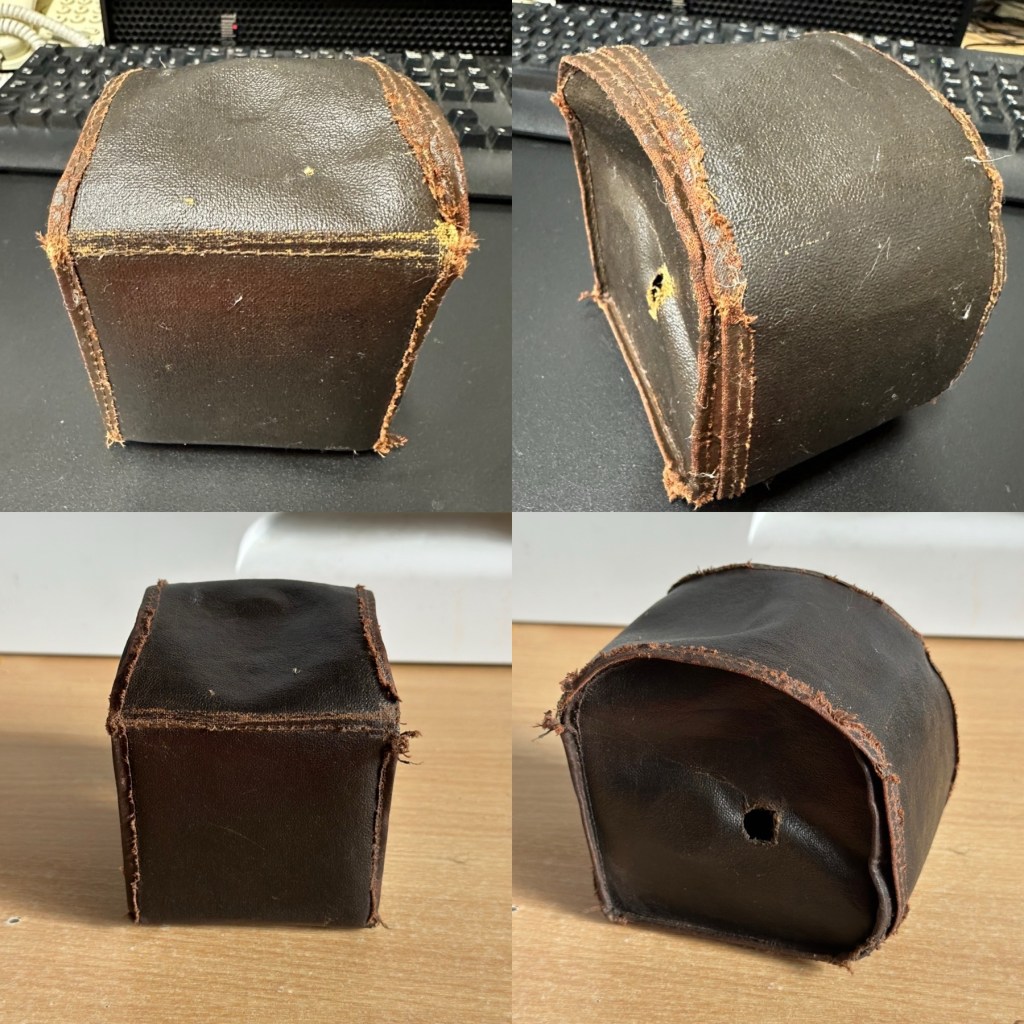
I’m starting with the case as this is probably going to be the most time consuming and will require numerous periods of drying and moisturising, it’s probably about 70 years old now and to be honest has probably had no care taken of it during that time.
Mild soap sud wash to clean and introduce some moisture – see the dirt on the used cotton pads
Using some mild detergent, but just the soap suds on a cotton pad I have gently wiped all over the case, paying special attention to any old folds in the material. This has had a dual purpose of removing ing a lot of age related dirt (As you can see in the photos above, that show the dirty cotton pads) as well as adding a little bit of moisture but not too much. I want to do this in stages to minimise any more damage. I will now let this dry for 24 hrs and I will then do the same again.
24hrs later I have cleaned the case again, in exactly the same manner. let’s leave it another 24hrs and then apply a little polish to give it back some colour and a little bit more moisture. I’m keeping it as low cost as I can, no doubt a brown shoe polish will suffice for the result I’m looking for.
I’ve treated the leather and polished it twice using a black shoe polish. The third coat I have given is a tan regimental high gloss polish. I’m leaving this for a few hours and then I will buff the case up. I’m not repairing stitching or holes as I want it to retain age and it’s old look. I just want the leather to look healthier, last a while longer and to get some moisture back into what was a very brittle leather case.
Before and after treatment
I have today buffed the case up after all the treatments of the last couple of days. The case feels lovely and soft and much more pliable than when I first started on it. I’m now going to bring this part of the repair to an end as that’s as far as I wish to take it at this time. I want it to still carry its signs of age. Without further a do, let’s move on to the camera.
The camera:
I have decided to totally dismantle the camera and work on it bit by bit. In this case there is not a great deal to dismantle.
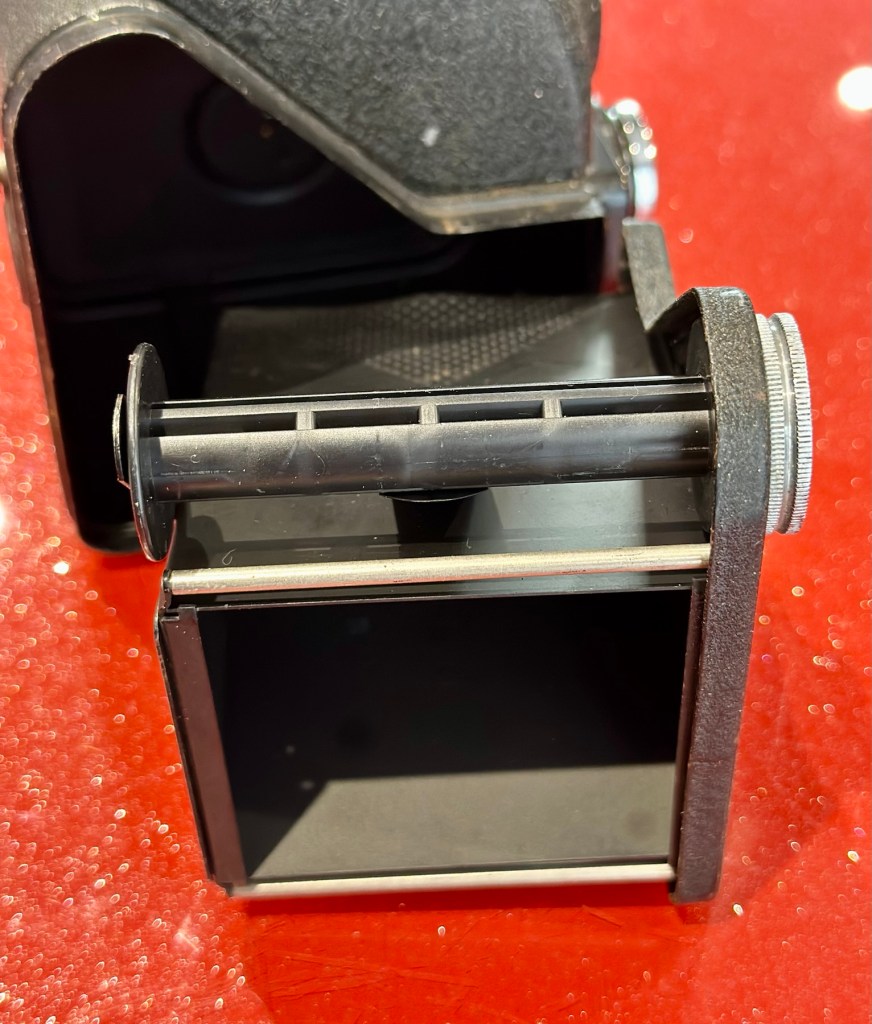
Unclip this spring inside the body Off pops the entire mirror and optics headLoosen the spring to release both optics
Firstly I release a retaining clip inside of the main body and this releases the “Viewing head” on top of the camera. This part of the camera contains the mirror that has become detached, and two glass optics that complete the viewer section of the camera. There is a single spring structure that holds both pieces of glass in place, release this and they just fall out. Easy.
All the glass and mirror removed Rear of the mirror, caked in muckRear of mirror has cleaned up nicely
I’ve started by placing the three optical items above in a mild warm detergent soak. I will leave these there for about an hour, in hope that a soak will help in cleaning that muck off the back of the mirror. The two other optics are in great condition and I’m sure the soak and then a final rinse will be all that they require. This treatment worked just fine, and now onto the next part.
Next I’ve removed the shutter mechanism from the camera body.
Front viewRear viewTaken apart The camera has a beautifully simple mechanism that is a work of art to look at
Here is a very small video showing the simplicity of this shutter mechanism
A The mechanism is beautifully simple and is such a lovely piece of work to look at. To think im probably the first person to look in here in the last 70 years is special. All I’m going to do here is very carefully get rid of as much old ingrained dirt as possible and very gently clean the shutter leaf. I will use a minuscule amount of clock oil on the mechanism only, I will use some fine graphite dust on the actual leaf part of the shutter.
Gently does it, in minute quantities
The lens and mechanism have been cleaned now and reassembled, all tested, and working as expected.
The body work is fine apart from some small chips and paint flakiness. I’m going to retouch these missing areas with some enamel paint and a bit of thickener to enable me to obtain the stipple effect of the original paint job. Then I will finish with a nice black polish.
Touching up missing paintwork, mechanism now attached to body
Let’s now get the mirror back in place and the head back on the camera unit.
Mirror and optics all in place
And that’s it. Apart from a little polish we are now done here
Before and after
Result:
I’ve put quite a bit of work into this little camera. Some people will ask why bother as it was only a cheap mass produced camera? Well, I like it, it’s a lovely little camera and it deserves to be displayed. Now, as it’s also working it’s a big bonus. It gives me something to do, and it’s how I relax, as I’ve been shoulders deep in DIY at home recently and doing my shifts at work, so this is a welcome distraction for me.
All done, just needs a polish once the paint is dryIn its 70 year old leather jacket – nice
So that’s another one saved from scrap. This camera will now go into storage where I will vacuum pack it with some silica packets to prevent it from getting damp. I’m surprised just how good this camera “smells” considering its age, there is no mustiness at all compared to some cameras I get from this era.
Many thanks for popping by, you know it is always very much appreciated.
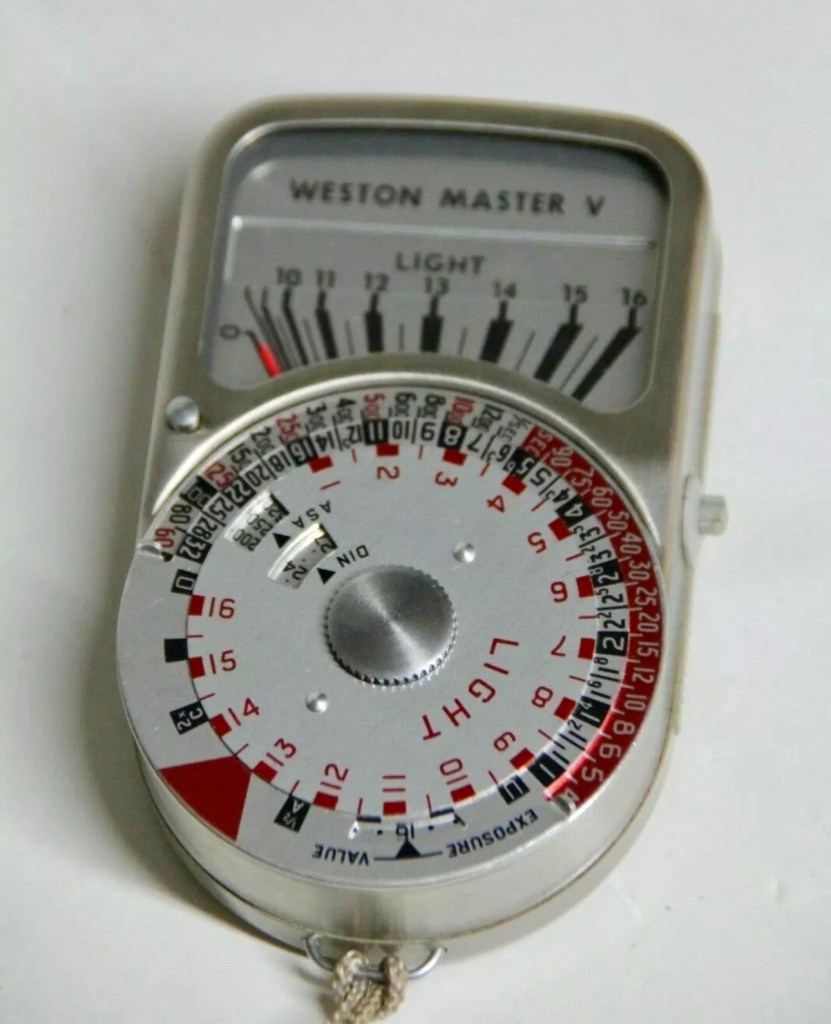
Sangamo Weston Master V Exposure Light Meter includes Invercone & Cases The exposure meter is not working The invercone will also fit the Weston IV
EBay
Weston V light meter and Invercone
I have brought a little item from my past history here, going way back to the days when you had to work out the light levels in photography for yourself. The exact date of this unit is unknown, however it was manufactured between 1963 and 1972. That’s two years prior to my birth and up to the age of when i was 7 years old. And I was using them when I went into photographic work approximately ten years later. These units were made to last and did their job well, hence their longevity. I’ve paid the total cost of £8:40GBP and that includes postage. I’m surprised to be honest as not only is it the light meter, but also an Invercone (I’ll explain later) and two cases. An absolute bargain in my eyes as the Invercone itself, in a case can sell for more than I’ve paid for the entire package today. Oh, and it doesn’t work and to be totally honest I don’t think I will be able to get it working ever again, as the suspected component fault is one of those little things that are only dealt with by specialist craftsmen. Add to that the problem of locating a replacement piece, as they are nigh on impossible to obtain, or in layman’s terms, as rare as hens teeth.
But I have read about people reviving these parts and I’m going to give that a try. If I’m unsuccessful it will be a nice piece to get mounted into one of those box frames as a historic photographic memento.
What is this part you’re referring to?
A light meters main purpose is to react to available light and direct the photographer toward making a decision regarding the settings for his camera. Things like ASA, shutter speed and f stop settings.
Therefore it needs something to sense the light. It’s not a solar panel, these were not invented back then, but it was a similar system and it was called a selenium light sensitive cell. When exposed to light, the cell generates a small electric current that deflects the needle of an ammeter coil within a strong magnetic field. The whole system is basically a Selenium cell, a resistor and the ammeter coil. The lightmeter is entirely dependent on the light sensitivity of the selenium cell for accuracy. Over many years the selenium cell ages and degrades to the point that it just stops working. It dies. Its main cause for demise is usually moisture getting into the workings and causing degradation at the contact points on the Selenium cell.
There are a number of posts/sites I have visited that claim you can revitalise these items, however I am sceptical at this. There seems to be only one person in the uk that seems to totally replace these items and that is a guy called Ian Partridge, who I believe charges around £90GBP for a repair and his site can be found Here. A fully working serviced unit can sell for up to £189:00GBP.
I’m not doing that. No way. I’m going to see if I can even get it slightly working, I’m never going to use it seriously again but I’d at least like to see the needle moving without causing any damage to its original design.
Is that the only potential issue?
No of course not. There is one other potential reason why it is not working and that is related to the ammeter coil, the axis on which the needle moves, sometimes it can become stuck, if this is the issue then happy days, the fix would be a lot easier. However this is me, and things are never that easy for me 😂
There is also a fine tuning screw on the rear that someone may have been a little bit too enthusiastic with, in the past.
And of course. The pointer lock on the side of the unit could have been simply left on. Now wouldn’t that be nice and easy?
So what’s this Invercone thing you’re going on about at the beginning?
It’s that weird shaped piece of plastic with a bit of metal on it, in the pictures above.. it assists greatly in incidental lighting conditions where there is a back lit scenario.
The inverted cone shape is designed so that as the meter is angled to the light source, the readings remain accurate which they would not do if it were a dome. And because backlight effects the exposure, a small part of the invercone sticks-out beyond the top of the meter case to pick any such light up.
Sangamo Weston was a company that made light meters, among much other electrical equipment. It is particularly known for the Weston Master series of selenium meters.
The Weston Master V was produced in the UK from 1963 to 1972. It was Model S461 in the UK and Model 748 in the US
Weston was founded by chemist Edward Weston—no relation to the famous photographer—who held many patents for electrical inventions, from permanent magnets through cellulose manufacturing, dynamos, arc and filament lights and the magnetic-drag speedometer to electrical measurement instruments (and even US 895218 – a fruit box!). Weston’s son, Edward Faraday Weston, applied for a U.S. patent on the first Weston exposure meter, granted as No.2016469 in October 1935. This was a cylindrical case with an electrical meter at one end, and an iris at the other; an adjustable scale around the meter opened and closed the iris, and showed the exposure.
Sangamo was originally “Sangamo Electric Co.”, in Springfield, Illinois. It set up a British subsidiary in 1921. Sangamo acquired the Weston Electrical Instrument Co. in 1936.
Since Weston was one of the first makers of light meters, before film speeds were standardised, Weston had its own film speed scales.
At some point, Weston products were distributed by Ilford in the UK. The company was bought out by Schlumberger in 1976, but still exists, making electrical timers.
The EuroMaster light meter, very close to a Weston design, was later made by a company called Megatron.
For those who have made it this far, well done and thank you. Let’s have a look at what has arrived and assess the overall condition. It’s taken some time to arrive what with there being two recent bank holidays closely placed in proximity to each other in the calendar. Translated that means the UK comes to a halt during this period, whilst everyone gorges on poorly cooked barbecued food in bad weather whilst drinking too much alcohol.
And some of us are just working. Most annoying.
Anyway enough of the whining, here’s the assessment:
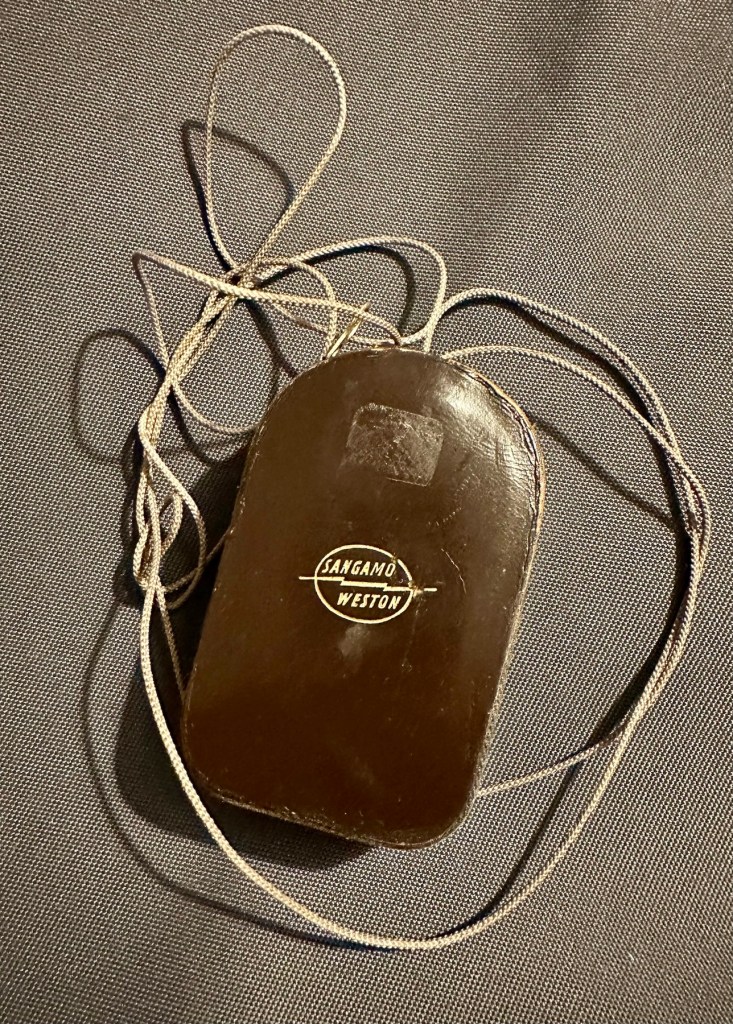
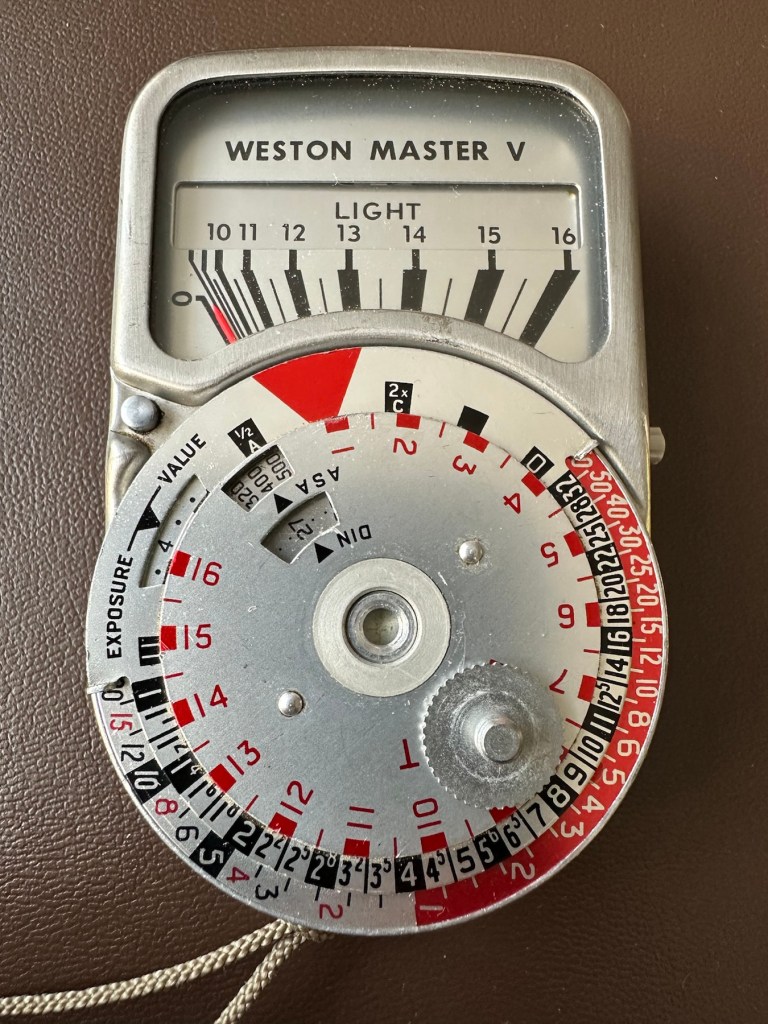
The meter has arrived and is in an excellent cosmetic condition, it came in a small leather case with a lengthy string neck strap. It’s all original and is still marked up with the original owners details on a small label. The Invercone is just what it is, a piece of shaped nylon/plastic and not much to rave on about. It is as it is, in good condition and also in a small leather case.
Original caseExcellent cosmetic condition
The calculator panel on the front is undamaged and in full working order, the light baffle on the rear is also operating as it should and the info panel under the viewing glass changes as the baffle is operated. The pointer lock is operating as is the fine tuning screw on the rear.
Baffle closedBaffle open
There is a very slight movement when exposed to intense sunlight with the baffle open or closed however it is only very slight. It struggles to move past the zero indicator on the scale, hence as described it is safe to say that it is not operating as it should. We will have to look inside to see if there are any obvious issues, however I strongly suspect it is related to the Selenium cell. I would like to see if we can get this operating, I’m not overly worried about its accuracy as I’d just like to see it move through its entire range. It would be good to see if it is at all possible to revive a “dead” light meter. We can only learn from dismantling and investigating such items.
Repair:
I’ve left the unit in sunlight for a few days, as this has been known in some rare cases to just kick start it back into life. That doesn’t seem to have worked in this case so let’s have a look inside.
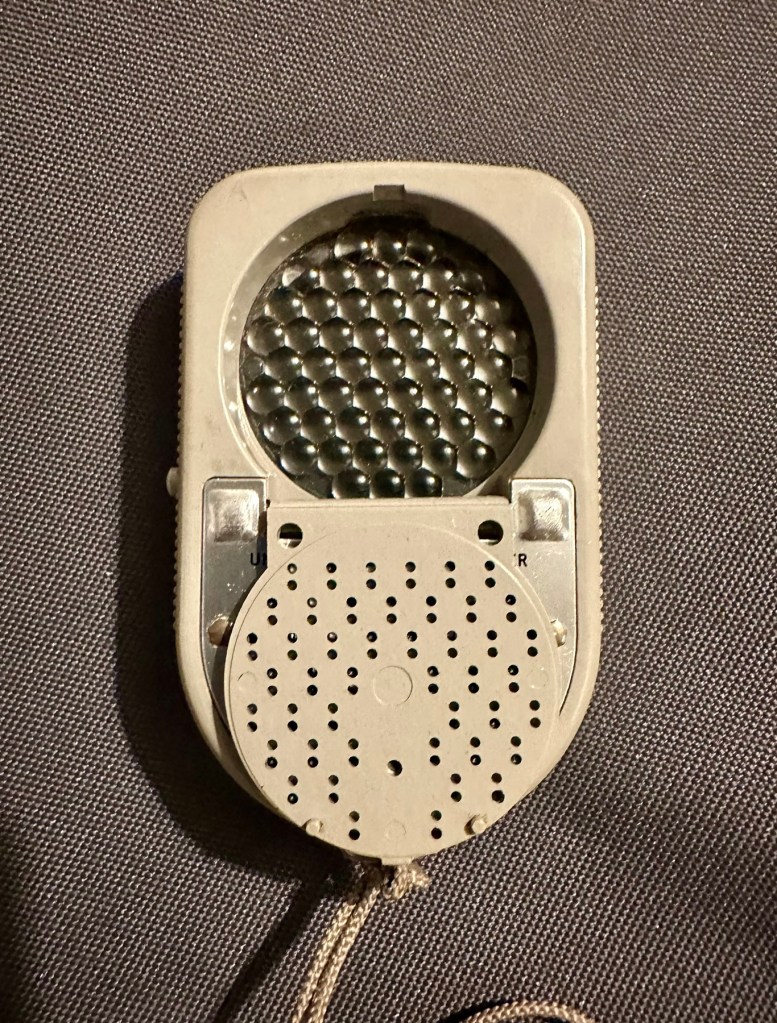
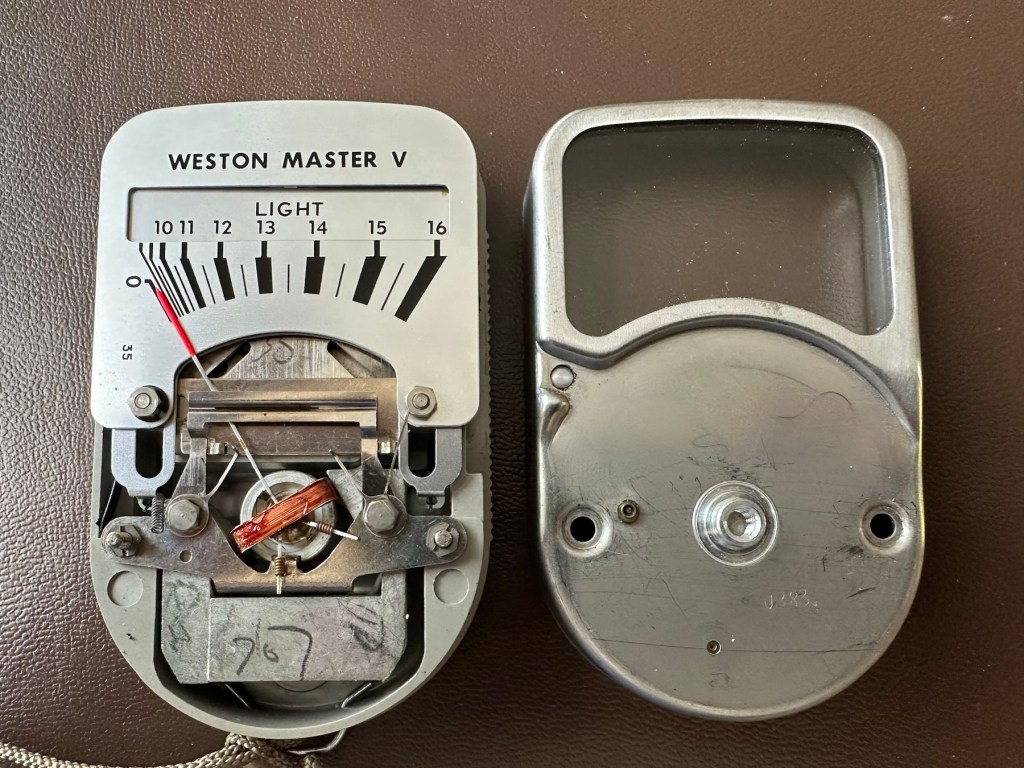
Remove securing thumb screwRemove two nuts Case lid lifts offCarefully remove fascia platesRemove sliding needle lift mechanism and expose selenium cellCell, armature ring and ammeter coil removedCell connecting ring cleanedCell contact ring, cleaned and renewed
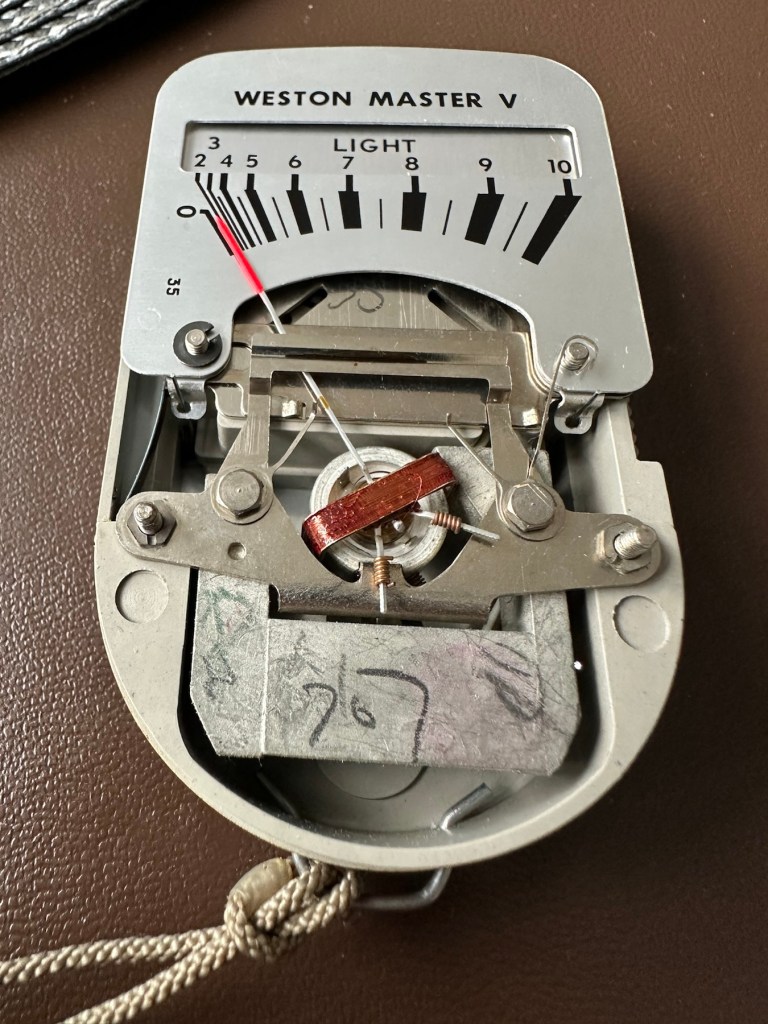
The whole unit came apart quite easily to expose the selenium cell deep in its workings. Using a multimeter on the cell, indicated life in the item as values changed as the cell was moved from the dark into the light and vice versa so I am confident there is some life still present in this cell, but is it sufficient to power the meter? I have then used the lowest Ohms setting available and put the negative lead on the magnetic case (Ground) of the ammeter coil and the positive lead on the wire connected to it and there is no movement at all. This indicates to me that the ammeter coil is at fault and unresponsive to any voltage, I believe this is the problem and at this point the repair is not possible. I have cleaned the cell connecting ring to the point that it is now shining and free of any age related contamination. The contact ring on the cell itself I have revitalised with a metallic silver pen. I have checked continuity and that is also good and acceptable. One thing I did not see in this model was the use of a resistor that is used in most selenium cell light meters between the cell and the ammeter coil, maybe there was never one used within this range of meters, I’ll have to check that out. I have checked this out via numerous sources and it appears the Weston light meters never had a resistor placed in line at any point, so that has cleared that question up. This unit is dead due to a faulty ammeter coil.
Result:
The unit is cosmetically very good and I believe the actual selenium cell is functioning but at an exceptionally low level. The tests on the meter ammeter coil have come back negative indicating that there is no life in this part of the meter. I suspect the fine wires on the coil are possibly damaged. The only way I can get a working unit would probably be to obtain another faulty unit to transplant parts, I may well do that in a later post.
I hate not getting the fix done, however this unit is in excess of 50 years old and to be honest the odds were stacked against me from the start. I did state that I may actually mount this item in a frame as a photographic art piece, that may still happen but I’d love to prove the original cell is still functional if I can. Maybe I just might buy a donor unit to test my theory on.
I’ve learned a lot from this post on the repair and dismantling of these units so that is a big positive. Knowledge is always king as they say.
It will not go to landfill. It will be reused in some form, you may even yet see a follow up post regarding it.
Thanks for passing by, it is always very much appreciated.
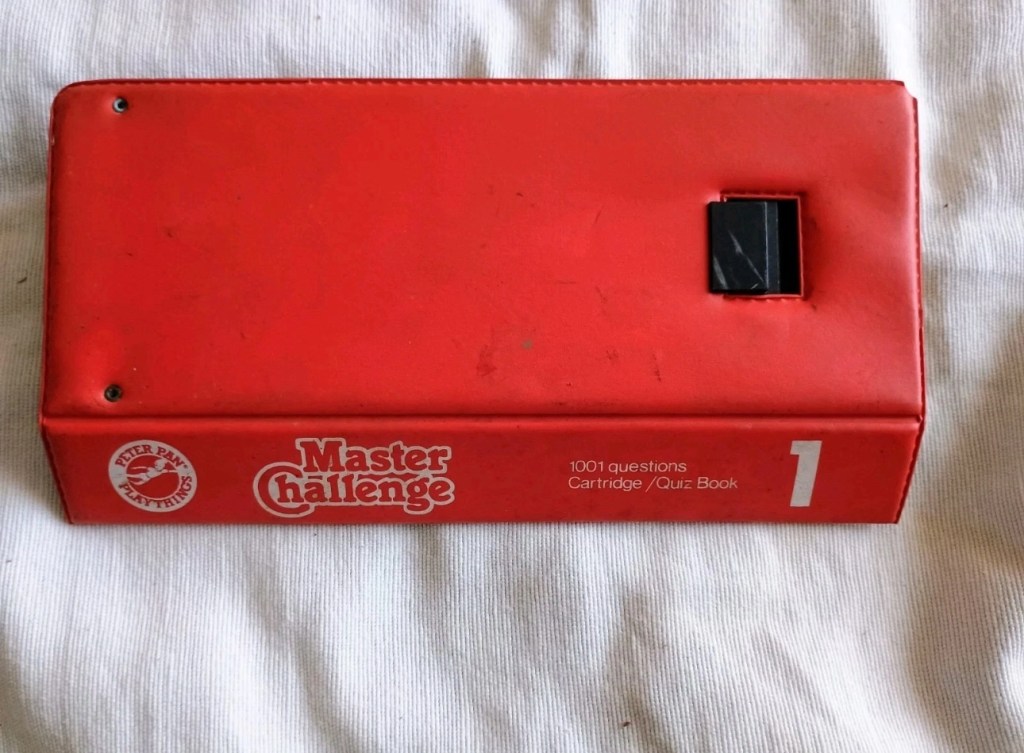
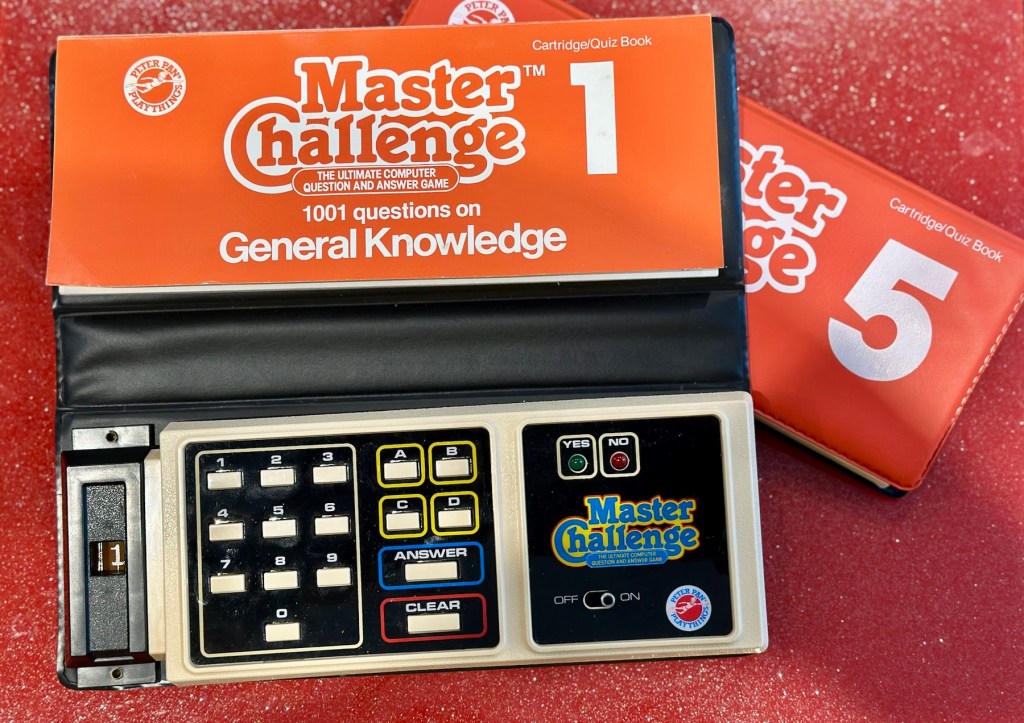
Embark on a journey down memory lane with the vintage Master Challenge Computer Electronic Quiz Game by Peter Pan. This handheld electronic game offers a test of knowledge and skill, making it a splendid addition to any game’s collection. Ideal for enthusiasts of retro gaming, it provides hours of entertainment as you tackle a variety of questions and challenges.
As a sought-after piece amongst collectors, this game is a testament to the era of classic toys and games. Whether you’re looking to complete your set of electronic games or seeking a unique gift for a vintage game aficionado, the Master Challenge game promises to be a talking point at any gathering.
This item is sold as spares and repairs as not working. Please send offers or ask any questions.
EBay
The seller here has obviously used the wonderful AI assistant to write this post as it is so false. The unit is incomplete, it is probably not sought after, as it was not that well received back in the day, and in its current state is probably only fit to be disposed of, also an important part of it is missing. However I’m not for disposing of items such as this and will endeavour to get it back into a working state, it’s just going to take a little time and patience.
I’m missing a fair bit, and it doesn’t work
What my unit looks like
What the unit should look like
Some history:
Peter Pan Playthings Ltd was a British toy company founded in 1963. It bought Salter Science and other assets from the receivers of Thomas Salter Ltd. In 1972 the company reported a £80,000 profit. The following year it was acquired by Berwick Timpo.
The company was sold on to Bluebird Toys in 1987, which continued to use the Peter Pan Playthings brand for several years.
Produced around 1980, the Master Challenge system was licensed from Coleco (Coleco’s Quiz Wiz system), this was released in the U.K. by Peter Pan Playthings. There were 30 different cartridges for Coleco’s version. The unit comes with a question book and the system is used to answer those questions. It is currently unknown how many cartridges were made for the UK version.
T’internet
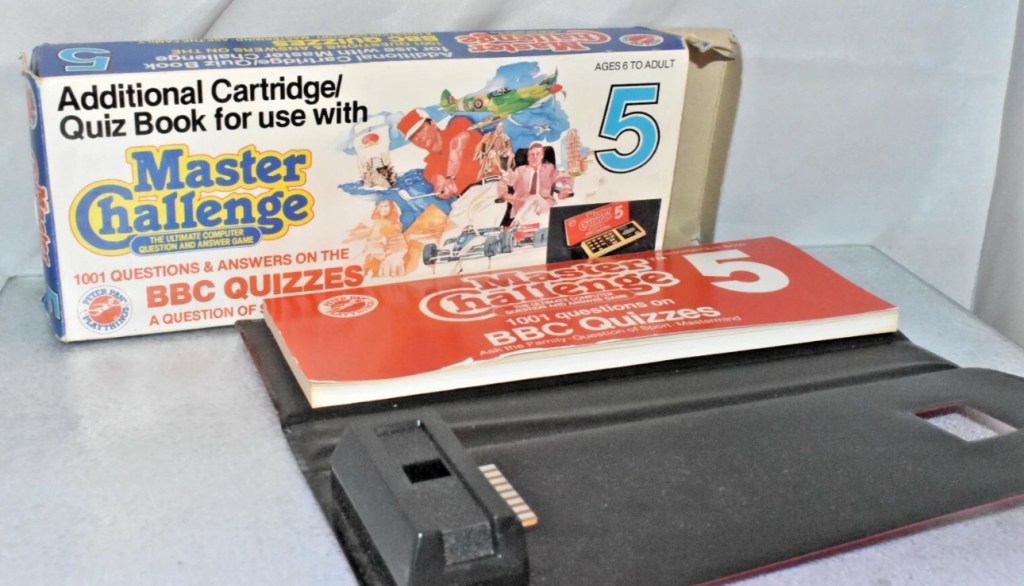
So for some unknown reason I have purchased this 45yr old piece of retro nonsense because I just can’t keep my bidding finger still. That’ll teach me a lesson. I’ve paid the grand total including postage of £5:69GBP, and I think it is missing the most important part, the book of questions that go with the cartridge, usually attached to the binder that encompasses the unit. It’s also broken, so it needs fixing anyway, and I believe extra cartridges can be purchased, so if I can get it working, and I can obtain further cartridges then no problem. If I can’t, then there is a problem. The battery cover is also missing. I’m a fool, honestly I am.
Whereas the Coleco Wiz system had 30 different cartridges available I believe the Uk version only had the 6 as listed below:
1 – General knowledge
2 – World of sport
3 – Music
4 – The bible
5 – BBC quizzes
6 – BBCs Top of the form
And back in the 1980 these additional cartridges and quiz books could be purchased for £6:99 GBP and 50 pence postage! Quite pricey for the time.
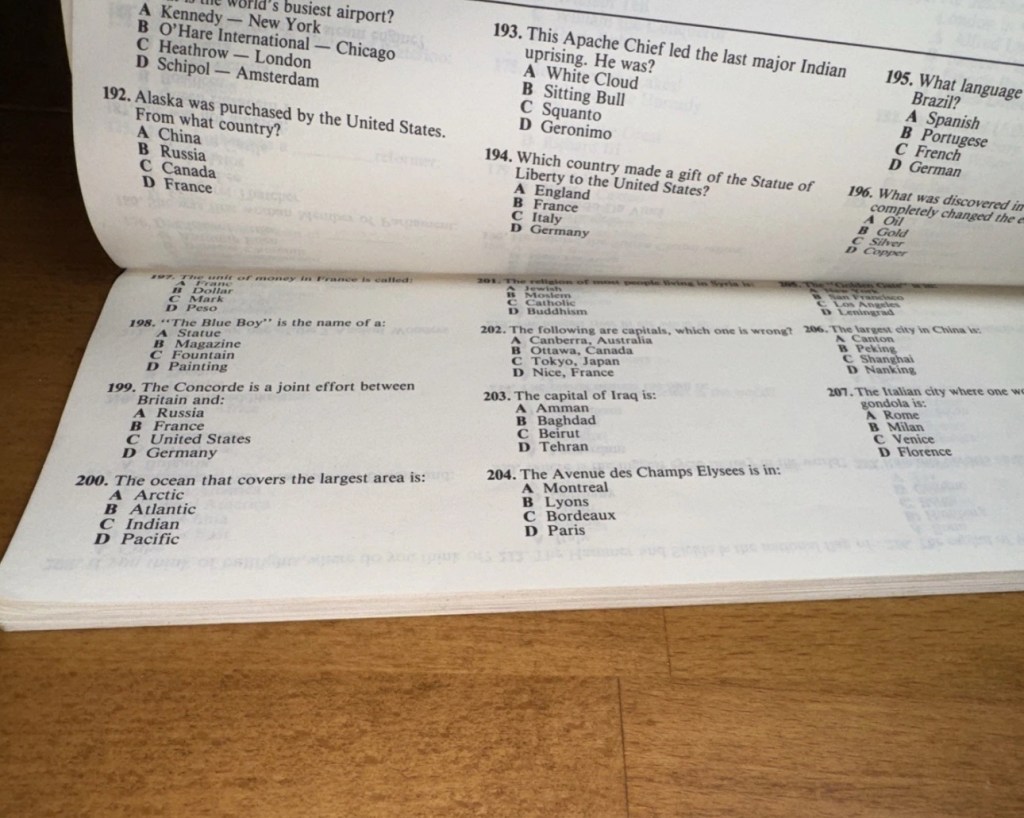
On this particular cartridge or what remains of it are the pre programmed answers to 1001 questions that I’m not in possession of. How novel. I have managed to find a photo on line that has some questions showing on it, these would have been in the original book that would normally be attached to the binder of this unit, so this should be sufficient to at least test the game in its current form.
Some questions to test the unit.
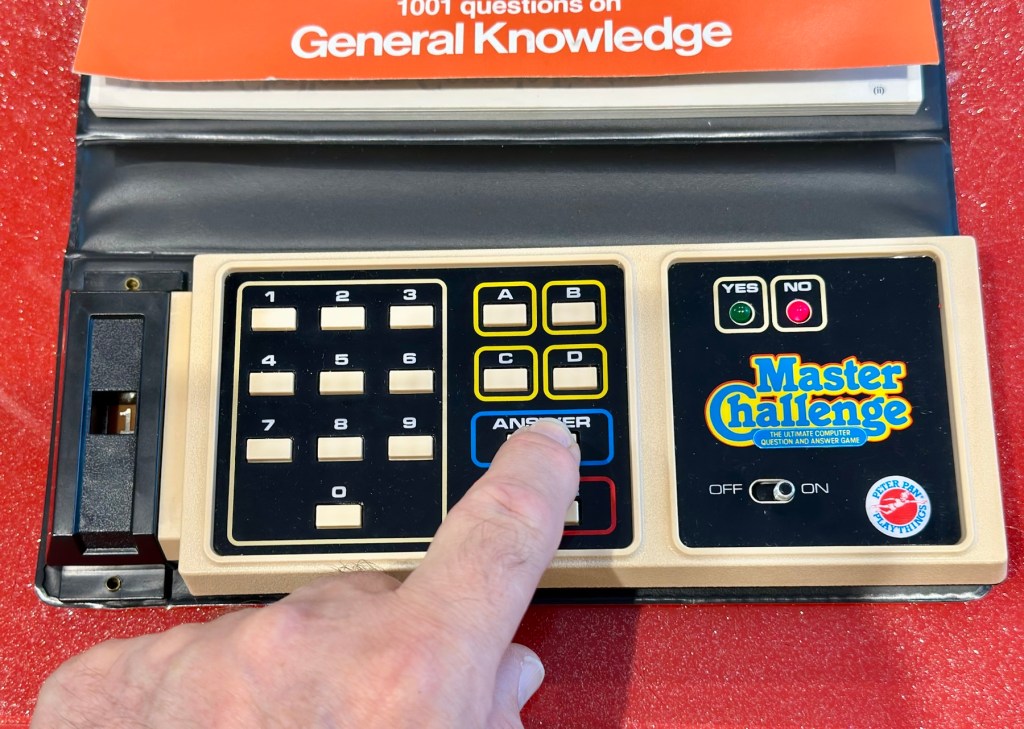
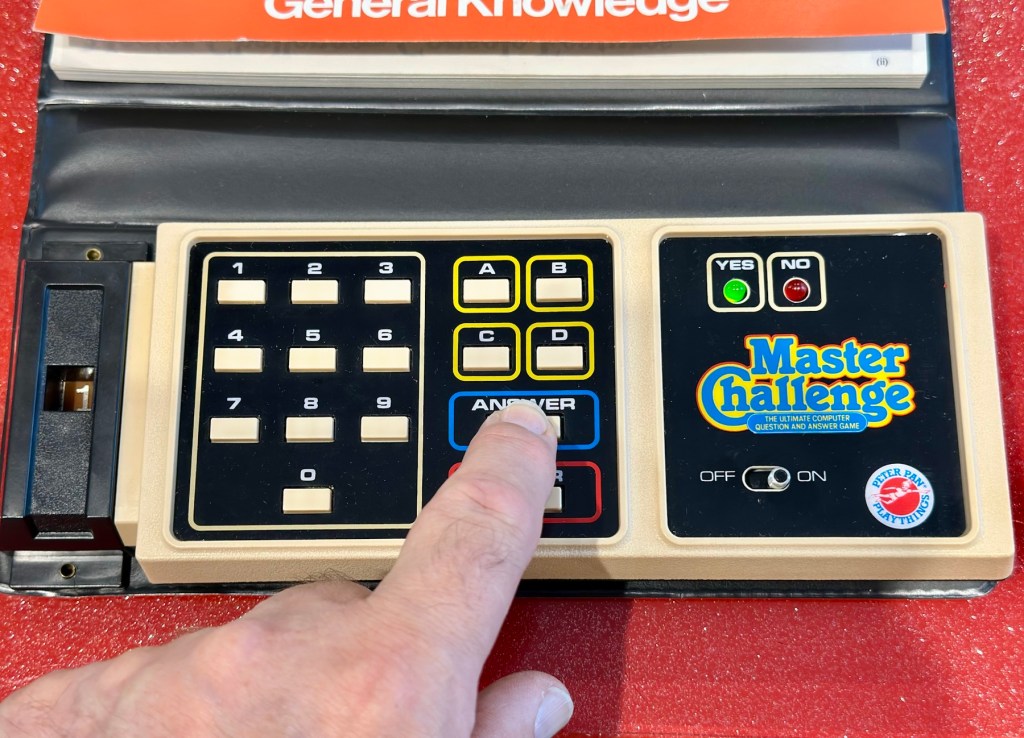
The game works in such a way that you choose a question from the book, you then use the unit to give your answers. If the answer is wrong you hear a corresponding low pitched sound and get a red light. If you are right you hear a high pitch sound and see a green light.
Score sheets in the back of the booklet
So basic in its operation, many thought it was totally pointless back in the day. However this was computerised technology in its earliest and most basic form and was at the dawn of a new era of personal entertainment. It deserves to be preserved.
To cover my apparent foolishness I have found another cartridge that I’m going to purchase to make this unit complete.
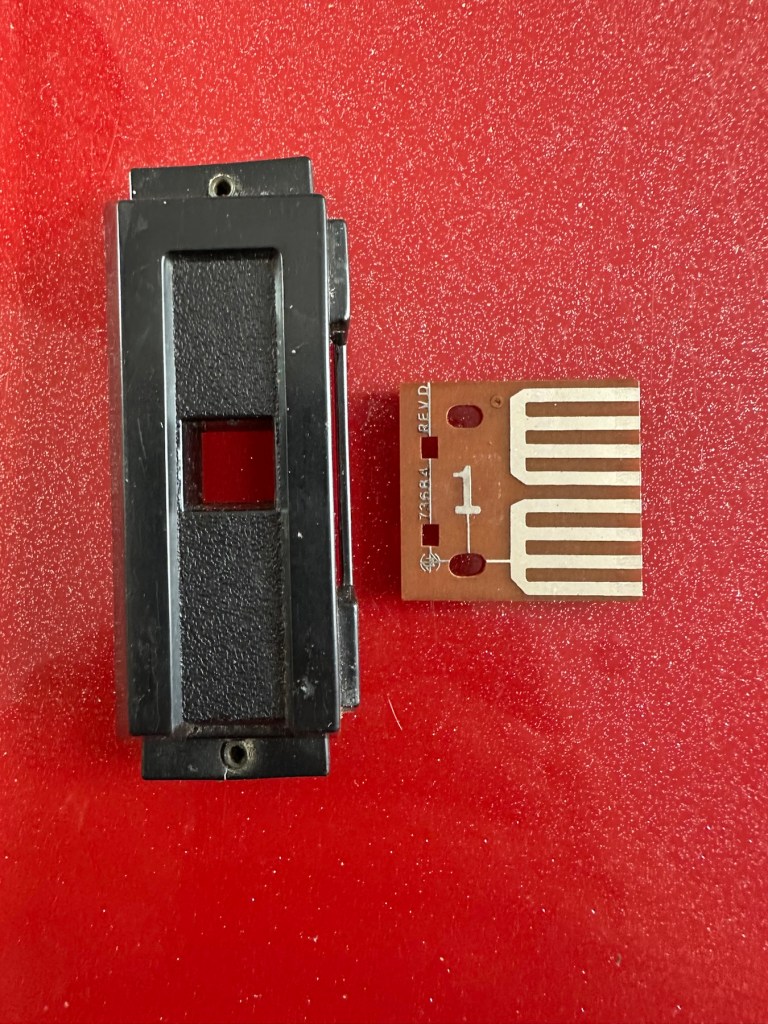
These plug in units come in a binder format with the brains of the game situated in an enclosed plastic block on the base of the binder, i suspect it is something along the lines of an integrated circuit. I can’t open this one as it is sealed, however when the old one arrives i will open it up as that one doesn’t have a quiz book with it. It will be good to see just what is inside. This little unit contains all the answers to the 1001 questions that are provided in the attached quiz book that slots into the top of the binder. The number inside the block indicates the quiz book reference.
Challenge quiz book and questions
The “Brains” and the quiz book reference number
The faulty computer unit I am awaiting, then slots into the binder and block by the pins you see in the photo above. The computer then simply has to decide whether your answer choices are right or wrong. And that’s the crux of the game in a nutshell.
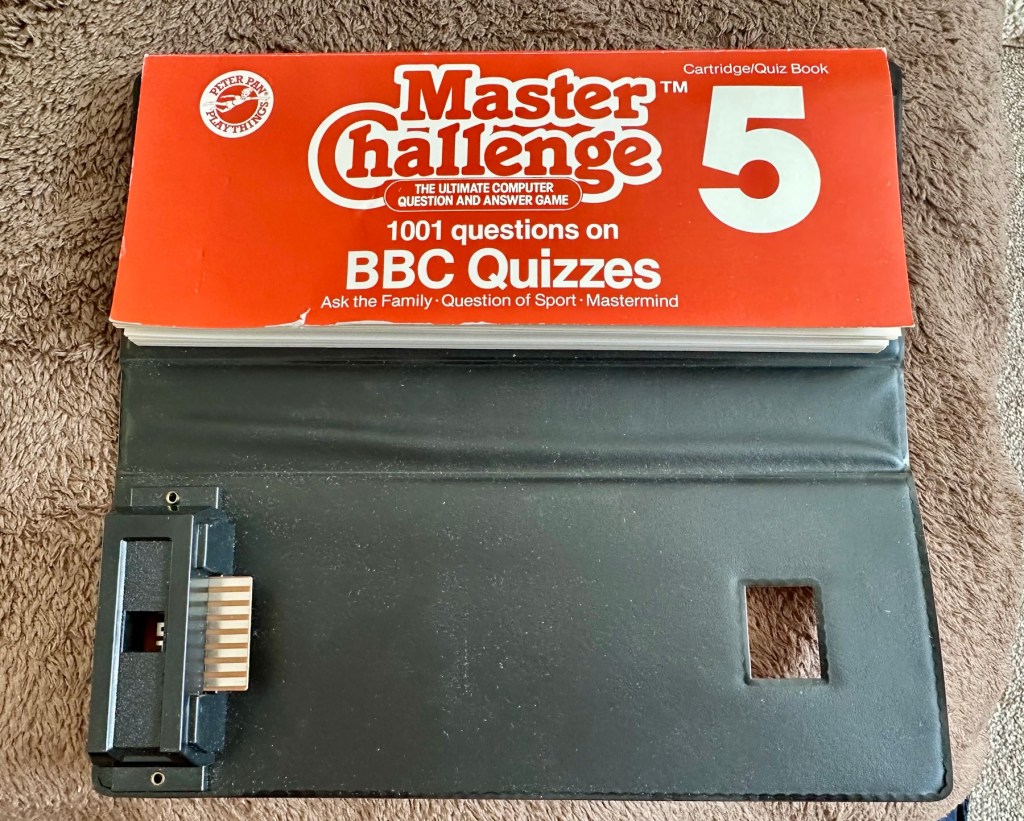
Whilst awaiting this broken units arrival, I’ve purchased the additional set of plug in questions seen in the pictures above. This is an additional 1001 questions set, based on all the old BBC quizzes. It’s complete with answer book and the complete surrounding binder. It has arrived ahead of the faulty unit and is in an exceptionally good condition considering its age. None of the mustiness you’d expect from an item that is 45 years old. It must have been stored with great consideration. It’s cost me more than the broken unit, this cost a total of £8:15GBP, so that makes a running total of £13:84. I do have another game cartridge on order that I picked up for another £7:83GBP but I’m quite happy with this. It will be a nice addition to the games box that comes out when the family or guests come around, and everyone loves an old retro style game. It will certainly be a talking point, that’s for sure.
My additional plug in cartridge
Assessment:
I’ve not even received the unit yet and I’m getting a bit ahead of myself wondering just what could be wrong with it. Its operation is so basic, think it could only be one of five things possibly be at fault.
Pins that read the cartridge are dirty/damaged
Contamination in the battery area
Loose wires
Faulty switch
Cold solder joints
I guess we will just have to await its arrival when we can make an accurate assessment.
The unit has arrived and it’s a tatty looking piece. Dirty, and only the remains of the binder that used to accompany it.
What has arrived
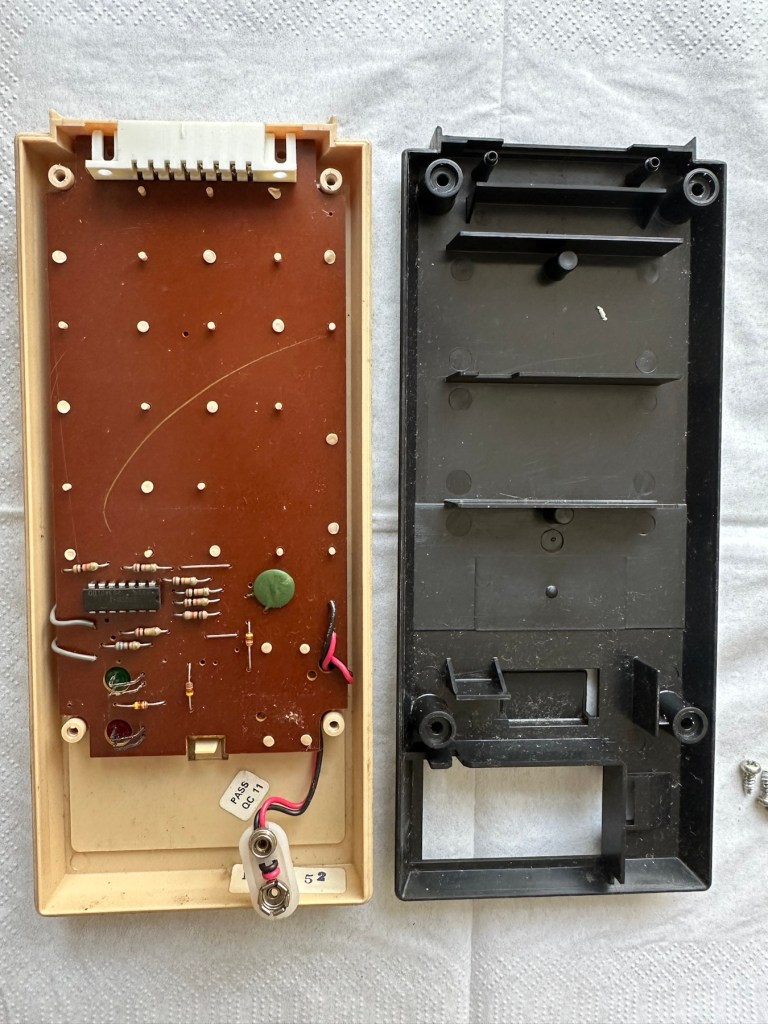
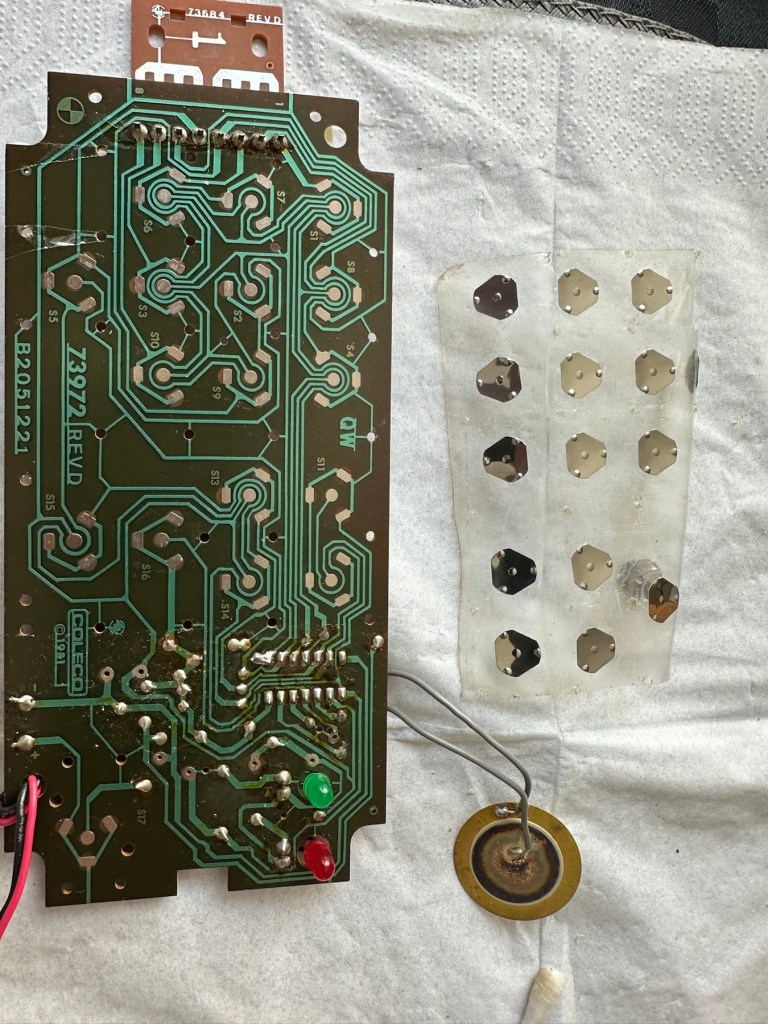
I’ve put in some batteries and there is very dead. There is the occasional buzz when the switch is slowly moved but nothing else. It could be a faulty switch, it could be the contacts. I’m going to have to open it up and get down to board level.
Inside – all posts welded
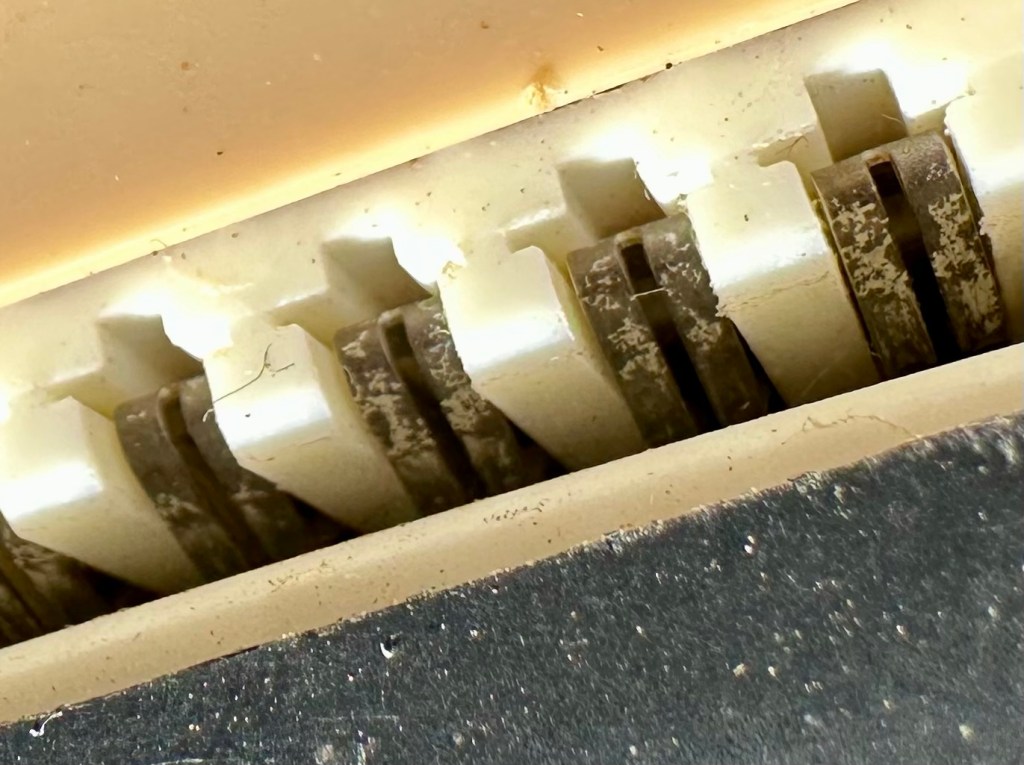
The problem here is that inside there are no screws attached to the inside support posts. The whole unit has been welded, all plastic posts have had heat applied to moulding the post tops. I’m going to have to break these off and try to re-weld them when we’ve got it all working again….if we can.
In the meantime I’m going to open up the the plug in module that’s attached to what is left of the old binder, i might as well sacrifice that piece as it’s of no use to me and it’s in the name of research.
How the unopened board looksBoard removed front viewBoard removed rear view
Now I thought they’d be some kind of integrated circuit in here but there is not. It appears to be just a board with two sets of comb like traces that would appear to just short together in the unit. Makes you wonder if the questions in the book follow some simple kind of algorithm that the unit just adheres to. Maybe every so many questions, they all have the same answer, there must be some simple and basic way that the unit knows the preprogrammed answers. Maybe I’ll find out more when I look inside the actual “Computer” unit.
Repair:
Inside the unit there is not a great deal of components apart from a single IC a capacitor and a number of diodes and resistors.
I’ve used a very fine emery board I borrowed off of my wife (don’t tell her) to try to get in and clean these contacts, as I believe this is what is causing the issue.
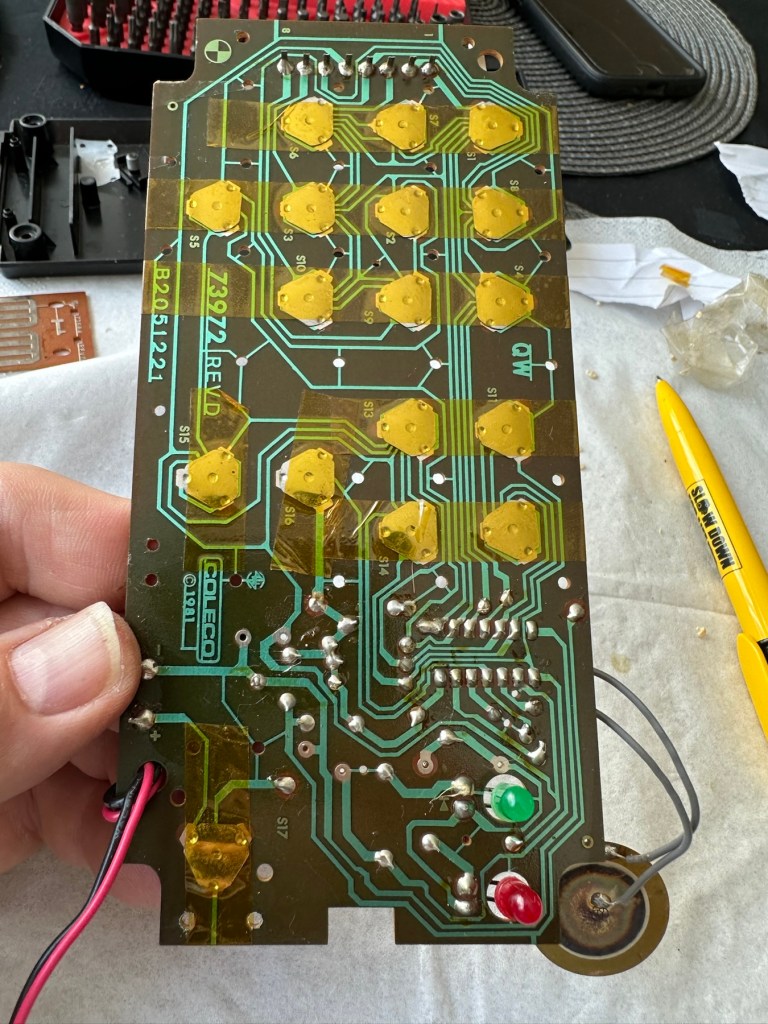
All buttons under a sheet of tape
All buttons are under a sheet of tape. I have removed this tape, cleaned all the contacts with IPA and repositioned them and re taped them using Kapton tape. They are a lot cleaner and are clicking nicely.
Button removalAll buttons removedAll cleaned and sealed down with Kapton tape
The contacts where the game cartridge is inserted are quite contaminated so these also have to be cleaned.
Contacts are contaminated
I’ve used an emery board to clean the contacts up on the unit, and when the cartridge is inserted we have a result. The first ten questions I have input have had correct answers only and no duplicates, so it really does really look as if the contacts were contaminated causing some kind of issue with the two parts of the game communicating.
Result:
It’s had a good clean both inside and out and a few of the old items inside replaced and given a new lease of life. The unit is now fully working and can be seen doing so in the little video below.
A little test example
I’ve since purchased a new binder for question set 1, so I now have that along with question set number 5. I’ll keep an eye on the auction sites to see if any of the other sets become available, and who knows I may try to get a full set. Now that would be quite rare I’d imagine.
A nice clean and working unit
I love digging around in these 80s units and just wonder at how basic the technology was back then, it’s just amazingly simple and so well put together. Anyway, this one is now working and good to go for a few more years yet. Saved from landfill we have another successful repair under the belt.
Thanks as usual for popping by. It’s most appreciated.
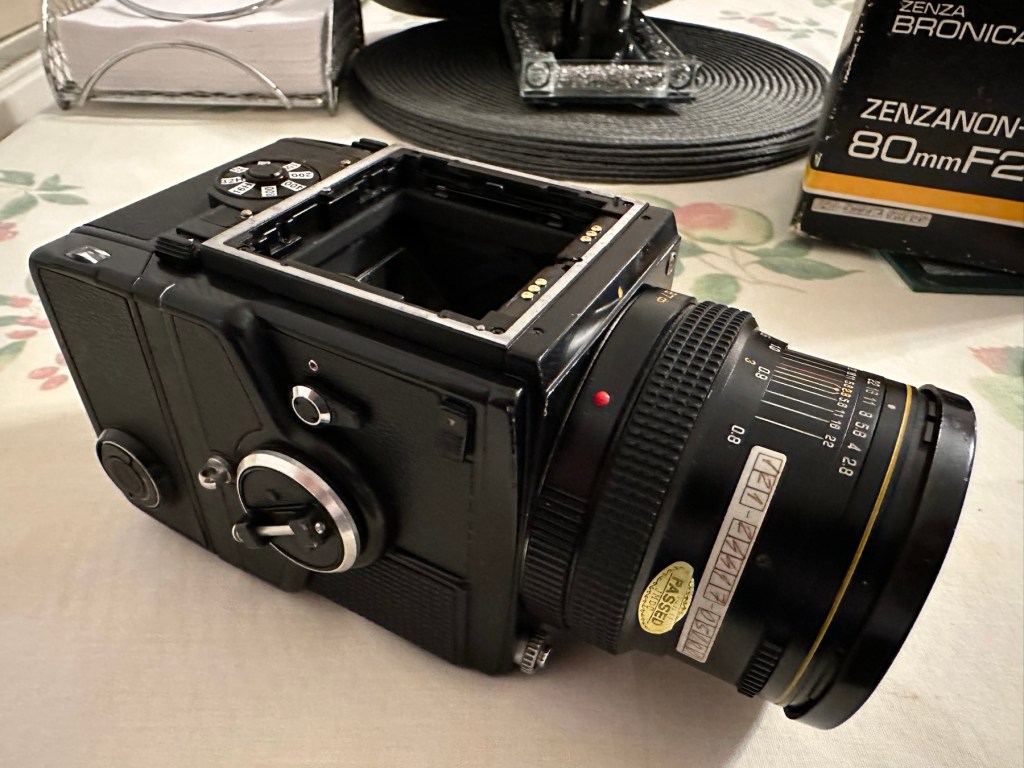
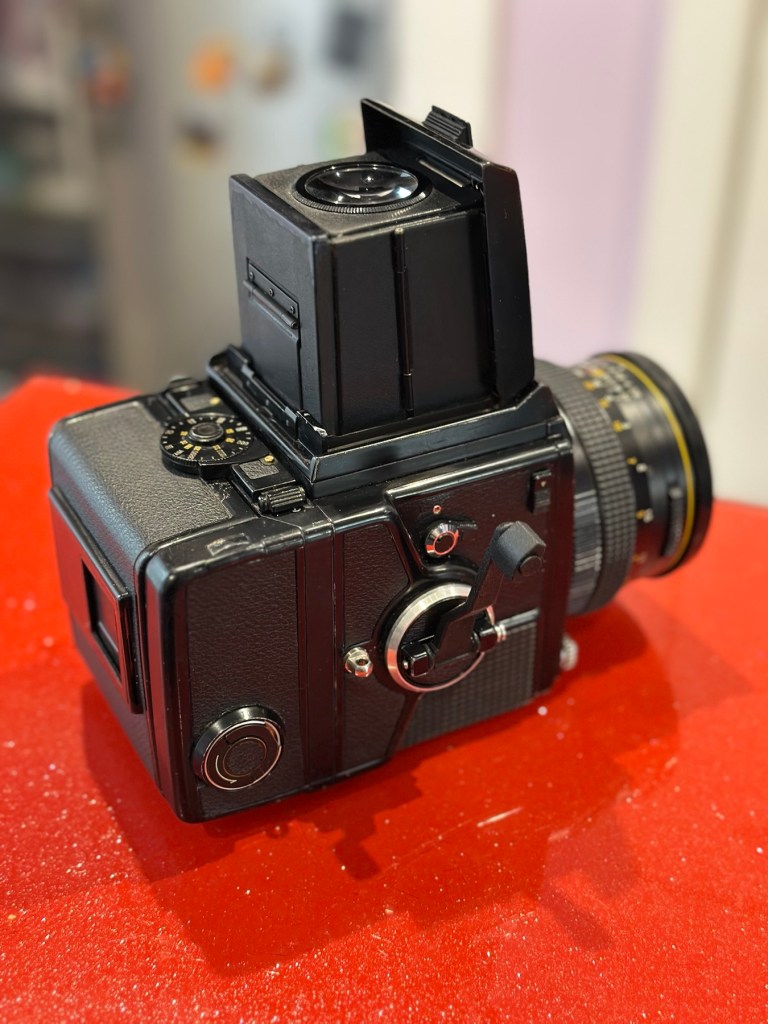
To build a usable, basic issue, medium format camera (Bronica SQ-A) from damaged items and spare parts, for as little outlay as possible and shoot one black and white, and one colour roll of film as proof of its successful completion.
Getting started:
Building a camera from damaged parts is no easy task when the name happens to be a high end brand and any parts that are available, are being snapped up by others to service their own stock or to break up for sellable parts. I’m going to keep a running total to try and build this as cheaply as possible, and to keep track of this total I’m going to use my trusty Psion Organiser II LZ from 1989 to keep a tally.
How the project currently looks.
Fourth purchases:
Now we have the bulk of the camera, we just need those annoying little bits to finish off. I’m calling them annoying, because if I was just to pay out for the 5 or 6 little finishing touches I need they would cost more than the total amount I have paid so far for the camera itself. I would be paying a premium for items that will in the end have no effect on the result I require to complete this project, that being two properly exposed rolls of film.
So here we go.
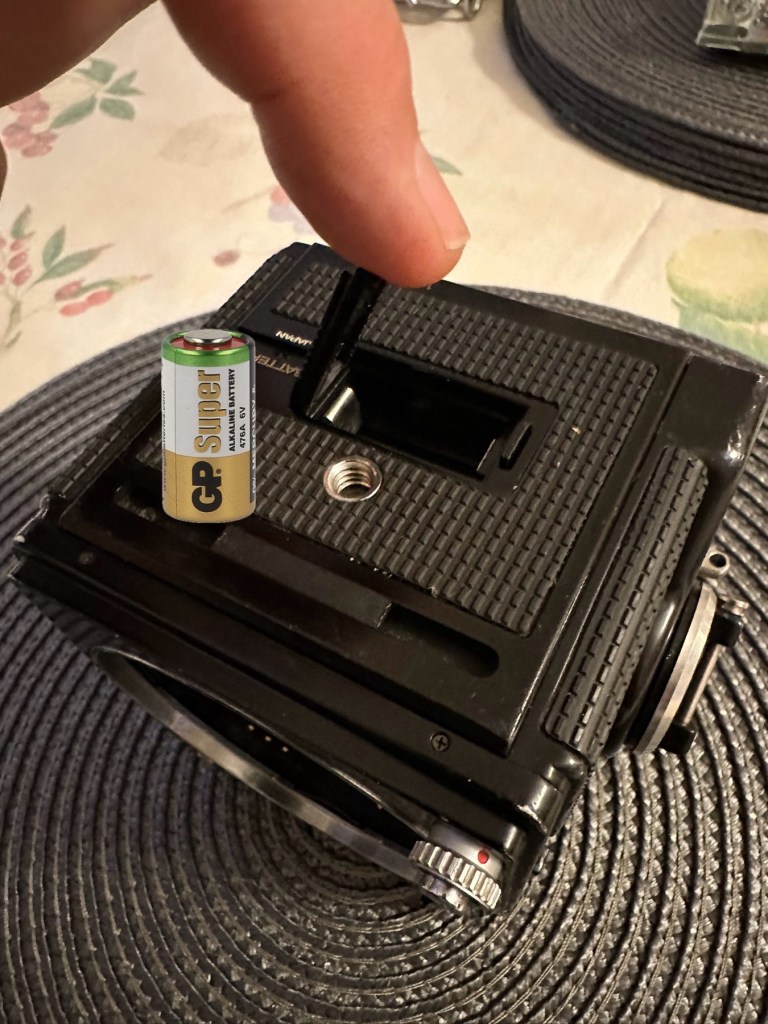
Battery:
Probably the cheapest item you will buy for this camera. The camera requires a single 6v alkaline battery and is quite important. Without it the mechanical shutter still works but at only 1/500 second. To obtain all the other available shutter speeds you need the battery to work the system electronically. This has cost me only £3:50GBP. After testing I can confirm that the battery works fine and all shutter speeds are as expected. Perfect.
Winding handle/Crank:
For some reason sellers always remove the crank prior to selling. That’s because the original Bronica crank is currently being sold at between £70-£80GBP and it really isn’t worth it. Everyone is after a quick buck and some people are willing to pay it. I’m not however, and my handle here is a special strength 3D printed version that I have paid the grand total of £11:20GBP for. It will need a couple of small “O” rings just to pad the handle on the spindle as it’s a tiny bit narrower than the original over priced one. It’s more than capable for the job in hand though, looks absolutely fine and has saved me around £65:00GBP of money.
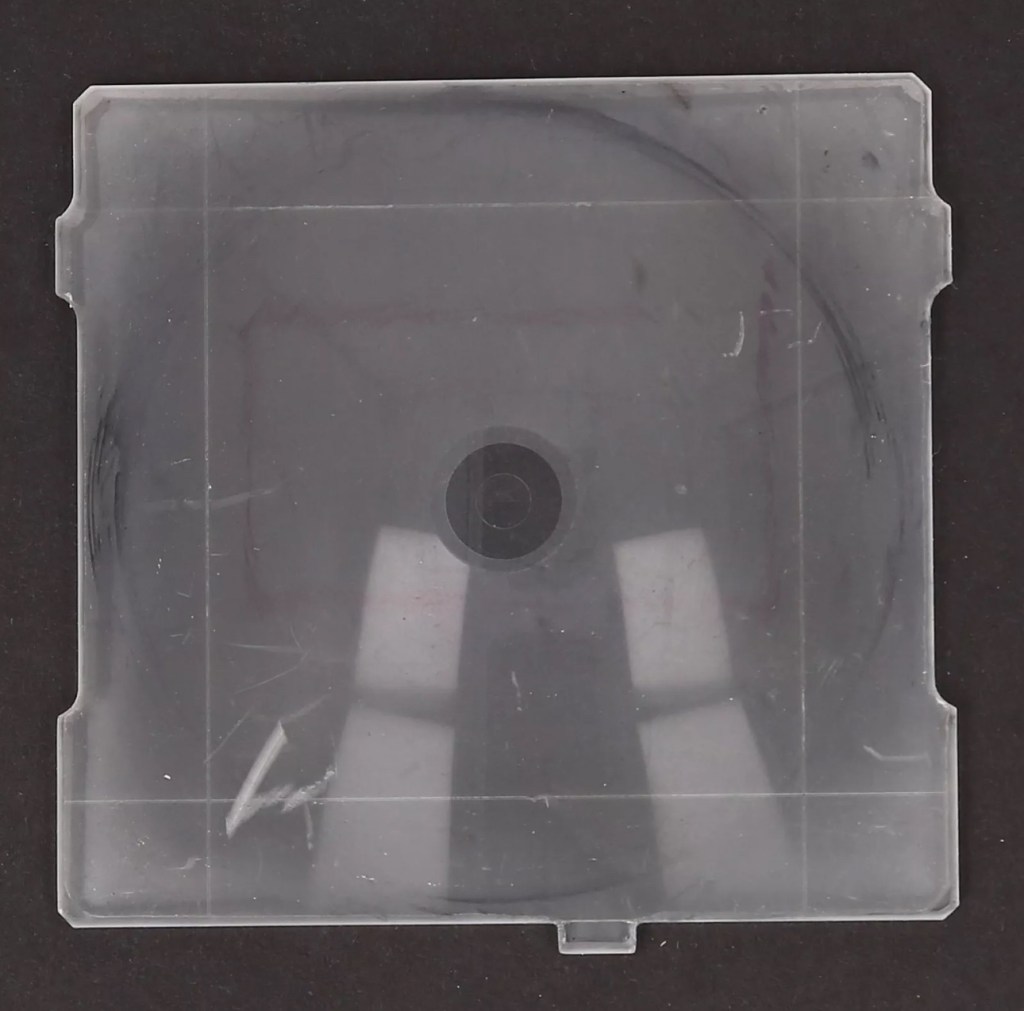
The focussing glass:
This is another item that the sellers withold for individual sale. I wonder why? Yes a standard focussing glass is going to set you back anything up to £150:00GBP and again it’s not worth it. However my one is a “damaged” one in that it has handling and pen marks on it. It looks as if some has sadistically drawn their own frame on the glass, the fool! I’m hoping this will clean up a bit but as long as I can see the focussed image I’m not all that fussed. I only paid £11:75GBP for this so yet again a further saving of around £140:00. See, savings can be made, if you are happy to make the trade for a lower quality item.
Camera aperture covers:
Not really essential at this point, but to be honest you need to protect the fragile equipment you now have so it is really worth investing. I’m not purchasing these just yet, that’s a later purchase, I have a lens cover and hood cover now, so that is all I really need to start the real testing.
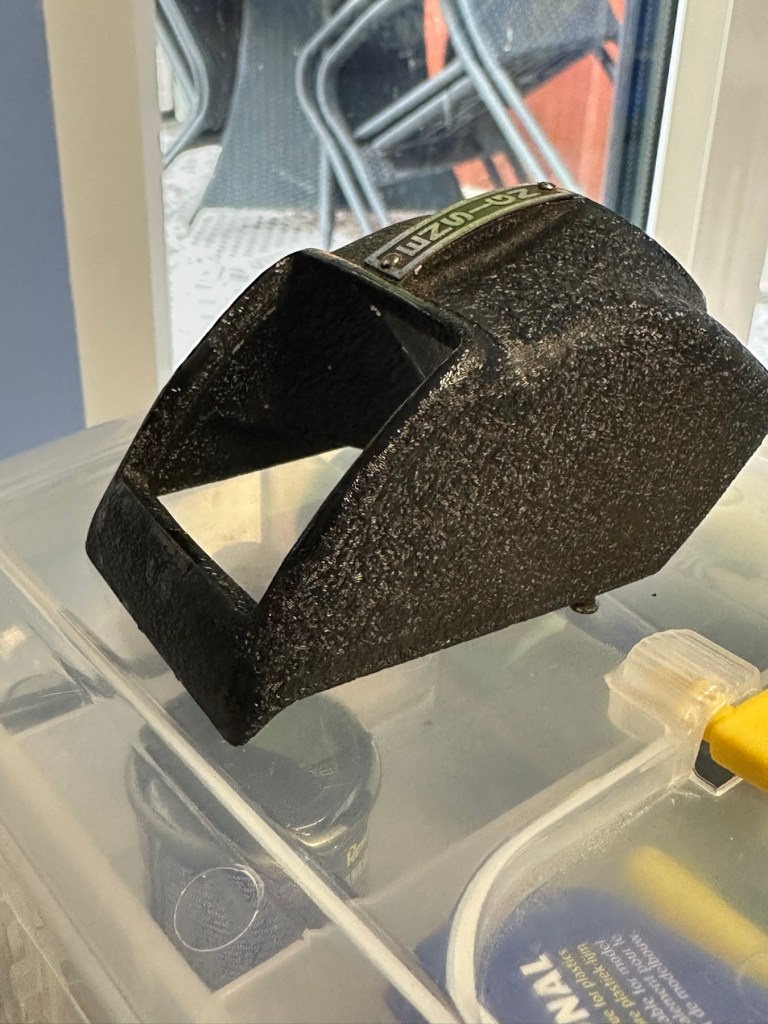
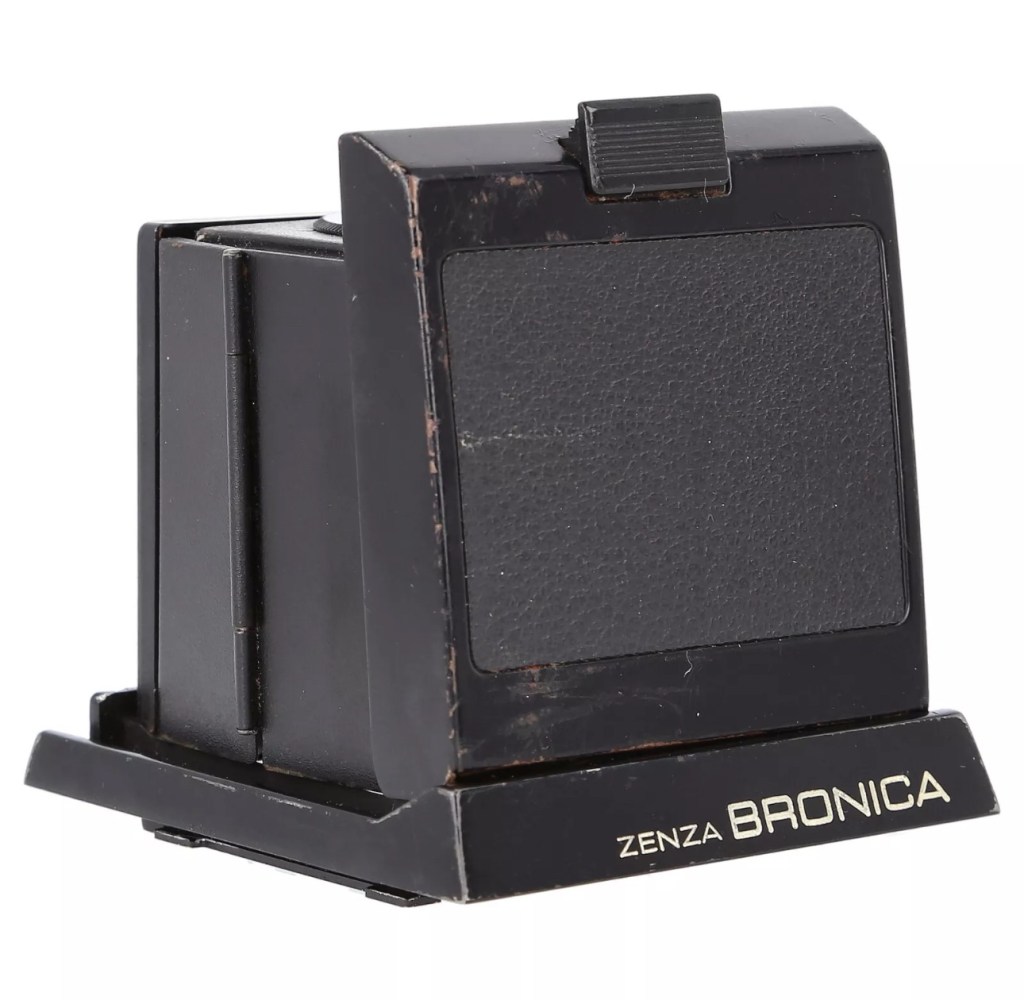
Waist level viewfinder:
Now this is a real bone of contention for me. Individually it is probably the most overpriced single item you could buy. It’s basically just a flip up hood that acts as a cover for the focussing glass, that affords a bit of light protection, as has been common on old twin lens cameras over the last century. But because the sellers again sell these as “additional items” they control the price and at an average of £150:00GBP (Recent eBay sales data) again the consumer is being ripped off. I’m currently monitoring some damaged ones for repair on the sale sites.
And as of the 4th May 2025 I am now the proud owner of one of these items. I’ve paid a total including postage of £39:75GBP and that’s a very fair price. I’ve been searching the sale sites for quite a time before coming across this one. There is one caveat though, it has some slight damage, but that’s what this site is all about and it ties in nicely with the Frankenstein aspect of this post.
Assessment:
I’m going to be very brief with the assessment, as you will see this project is made from a selection of parts that at time of purchase all had their own faults. Each part that has required repair has been highlighted in the relevant posts associated with this series. Links to those posts can be found in the link supplied in the first paragraph of this post. There are five parts in total. I’m generally pleased that the parts I have obtained have combined to make a very nice “Frankenstein” camera from a brand of camera that is becoming increasingly expensive as an “Antiquity”. Not that it was ever a cheap option for a camera in the first instance. Let’s move on to cover some repairs that have occurred for some of the pieces covered in this particular post.
Repairs:
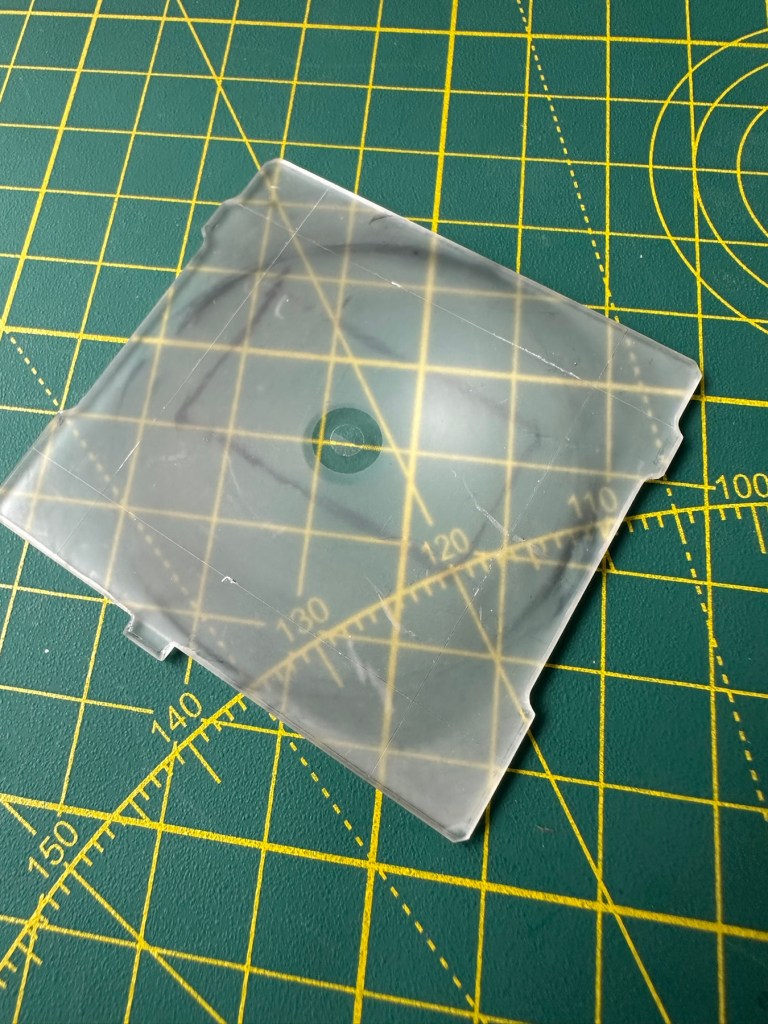
The focussing glass as you will see above was in quite a poor state on its arrival. This one had some scars and it looks as if someone has used pen to draw their own frame in the glass, to be quite fair it was in quite a state, but it was purchased for a really low price and i believe it can be made to look a lot better. Listen to anyone who is,”in the know” and you will always be told to not handle these screens. A load of tosh, I’ve been handling these ground plane glass screens for years and sometimes you just need to get hands on and this is one of those cases. Yes, if it’s in a pristine condition then cotton gloves would be the order of the day, but this example bypassed pristine conditions many years ago.
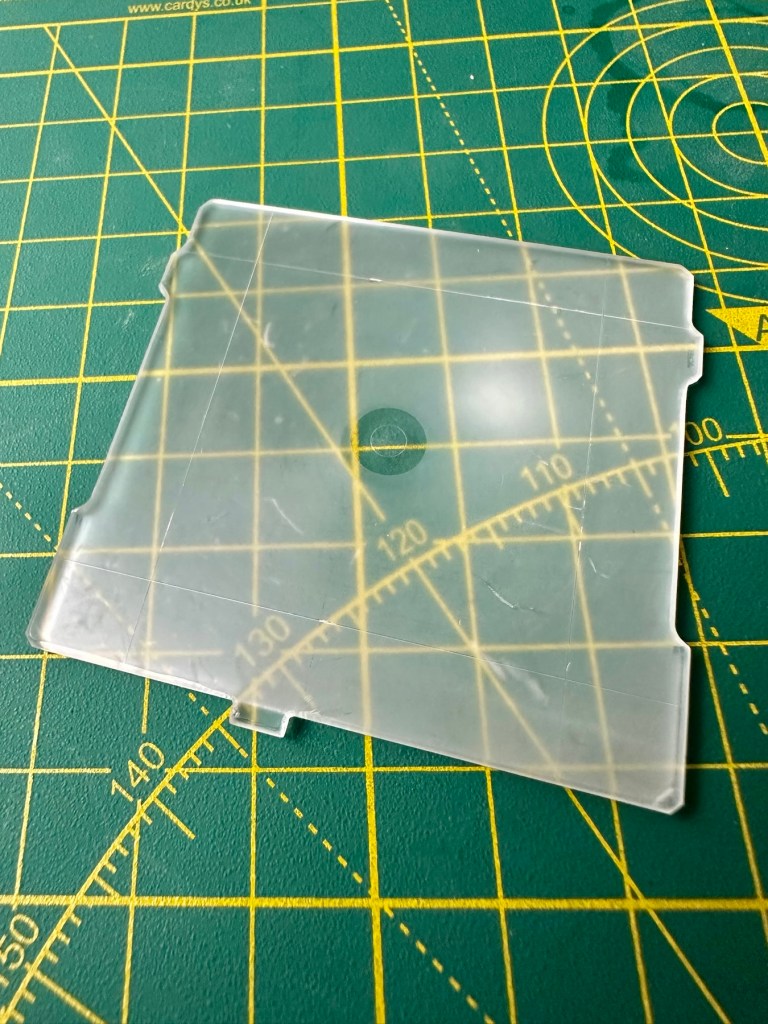
Before: How the glass was received with scratches and ingrained ink
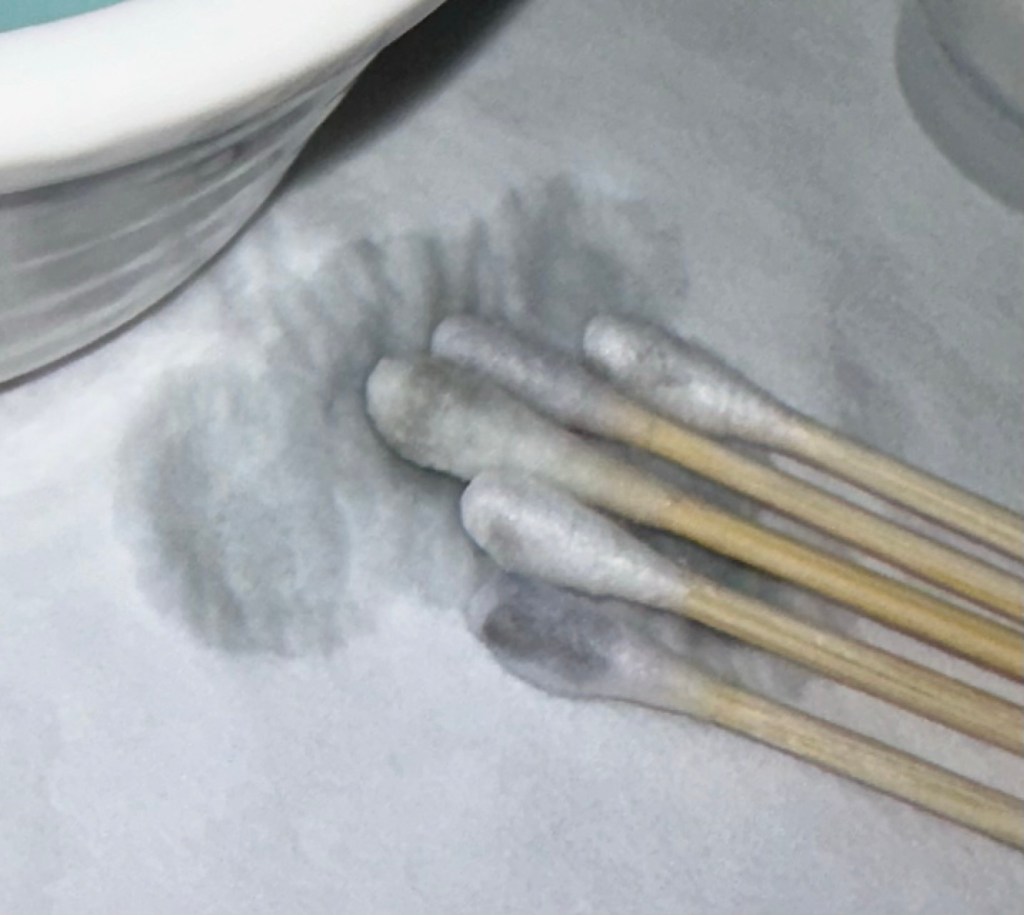
I started off with a good clean using IPA and cotton buds, I used about six cotton buds in this process using a new one every time the cotton was overrun with dirt.
Dirt from the IPA clean
Once the IPA clean had been done I then soaked the glass in a detergent solution and then again used cotton buds to get the solution into the scratched areas of the glass.
Detergent bath
I’ve finished the clean with a rinse of hot water to remove all the solutions, and left the glass to dry on some paper roll. A light polish with a lint free cloth finishes the job.
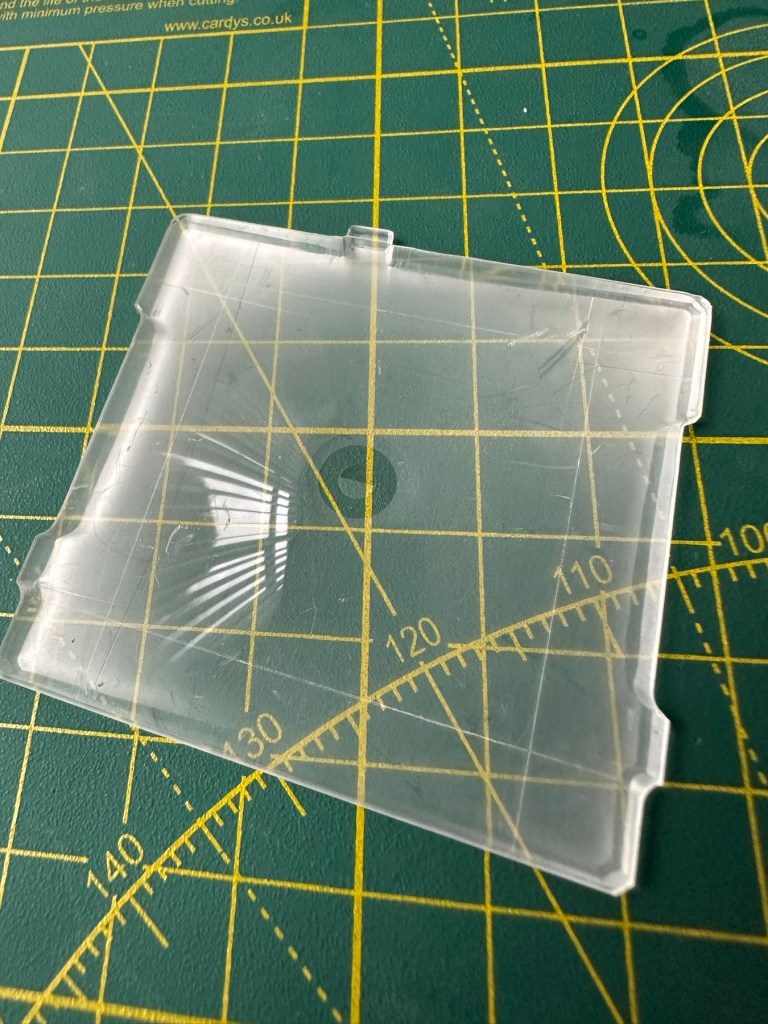
After: all ink and dirt removed, only deep scratch remains but does not cause any issue with use
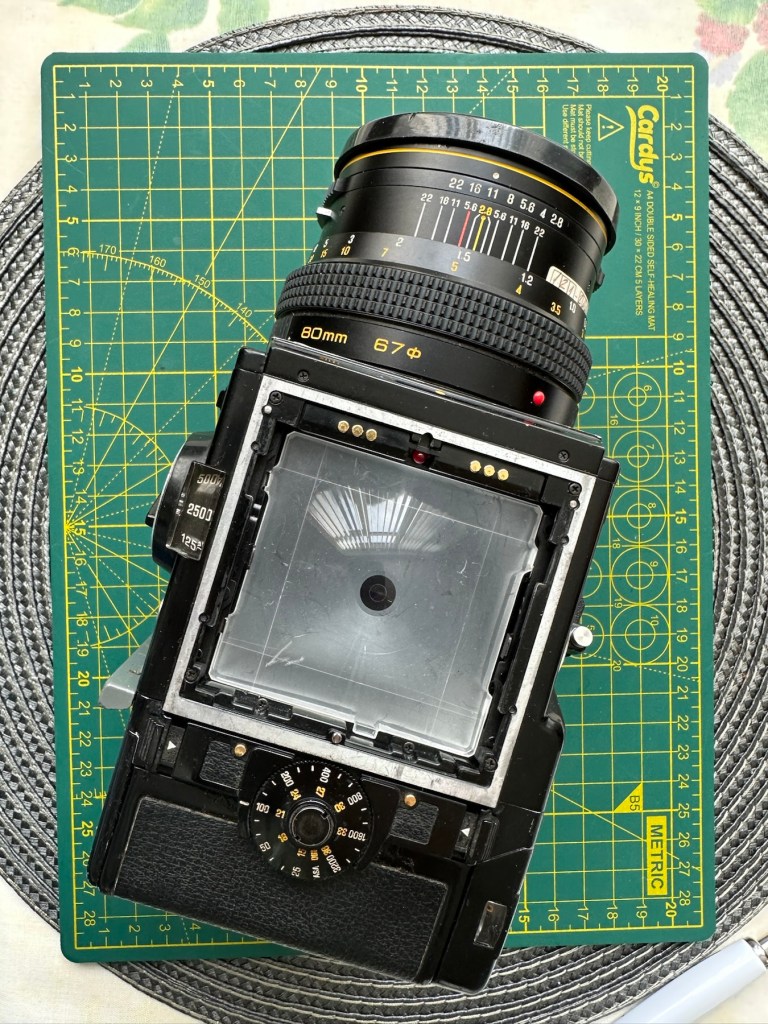
And this is how it all looks in the camera.
All looking fine in position in the camera
I’m extremely happy with the outcome with the glass, it does its job and works really well. With no distractions on the screen apart from a couple of scratches this item has been transformed. Just a little TLC and patience was all that was required.
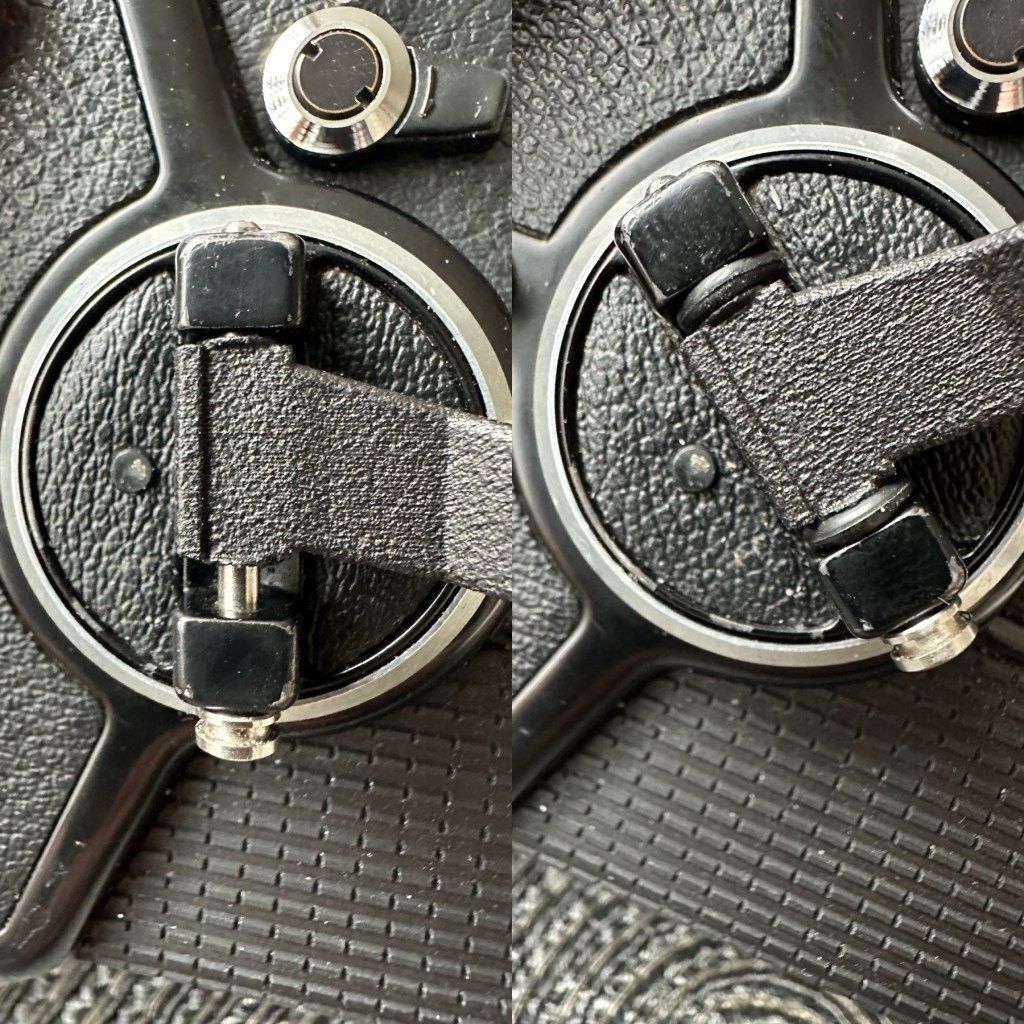
The Winding handle crank doesn’t really have any issues, it just needs some aesthetic teasing. This crank was 3D printed for the ETRS version of the camera and as such the actual base of the crank shaft is slightly slimmer than that of the SQ model here. It works fine. I’m just being a bit of an OCD freak and want it to look better.
Before and after. “O” rings in place in the winder
Not a problem though as I only have to pack out about 4mm of space and I have just the thing to use. Two perfectly fitting minuscule “O”rings. Job done, let’s move on.
The Waist level viewfinder has one particular issue in that the folding action is slightly affected by an issue with the spring. Again it is fully usable and does not cause any issues operating wise, it is purely an aesthetic issue that I will get around to sorting once the camera has been tested.
Age related wear and tearThe spring “issue”My waist level finder just showing signs of age
This is one of those parts that has signs of age with small signs of wear and tear, however that adds to it’s character and shows it was once a very much loved item that saw some good usage.
I think, we are now ready to get the entire unit assembled and ready for the testing phase of this build.
Total Outlay:
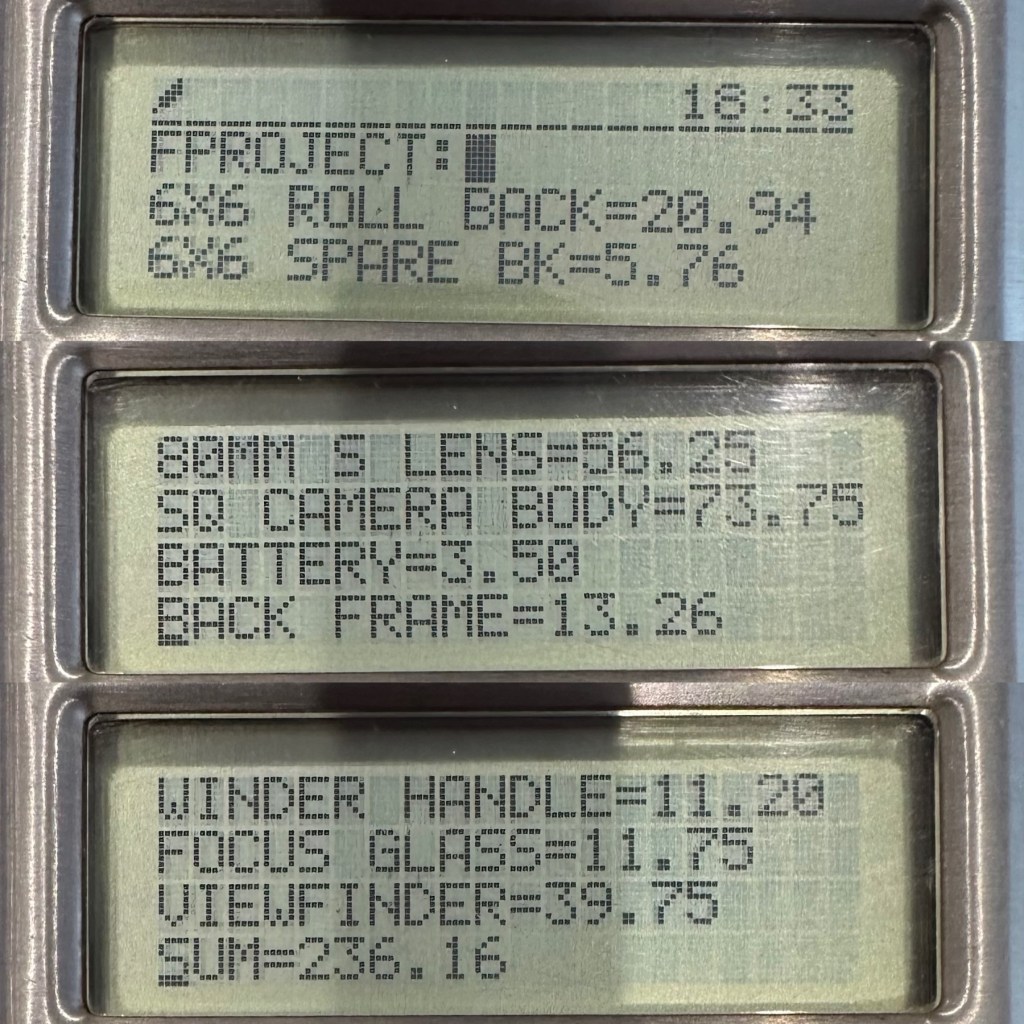
So just how much has this little project actually cost? Over to my trusty Psion Organiser 2 LZ for a final update.
Running total of £236.16 GBP
So the total cost of this project is £236.16GBP and I’m very pleased with that considering that sales for fully working similar cameras command prices similar to those seen in the picture below.
Recent sale prices
So taking this evidence into consideration, the route I have taken of building from damaged stock has saved me between £100-£350GBP. And as it is now a fully operational camera, I could probably command a price that would make a quite nice profit. But I’m not selling. This stays in my collection.
Outcome:
I want to take some pictures with both colour and Black and white film, to prove this camera is capable of this function considering it was constructed with broken or discarded parts.
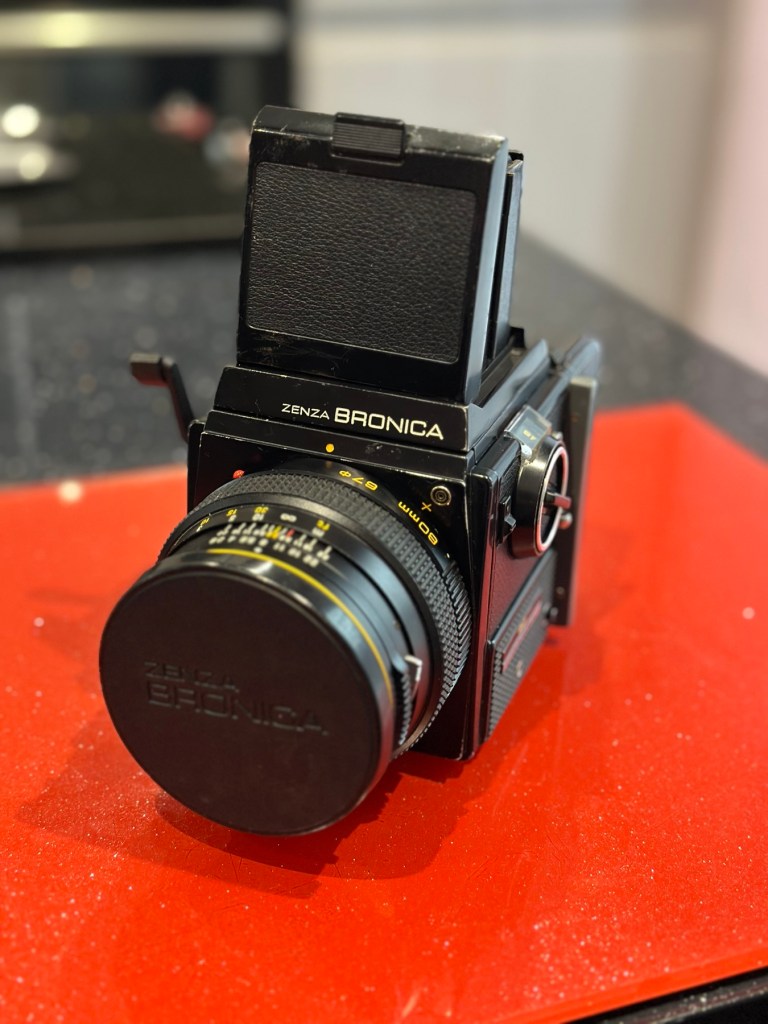
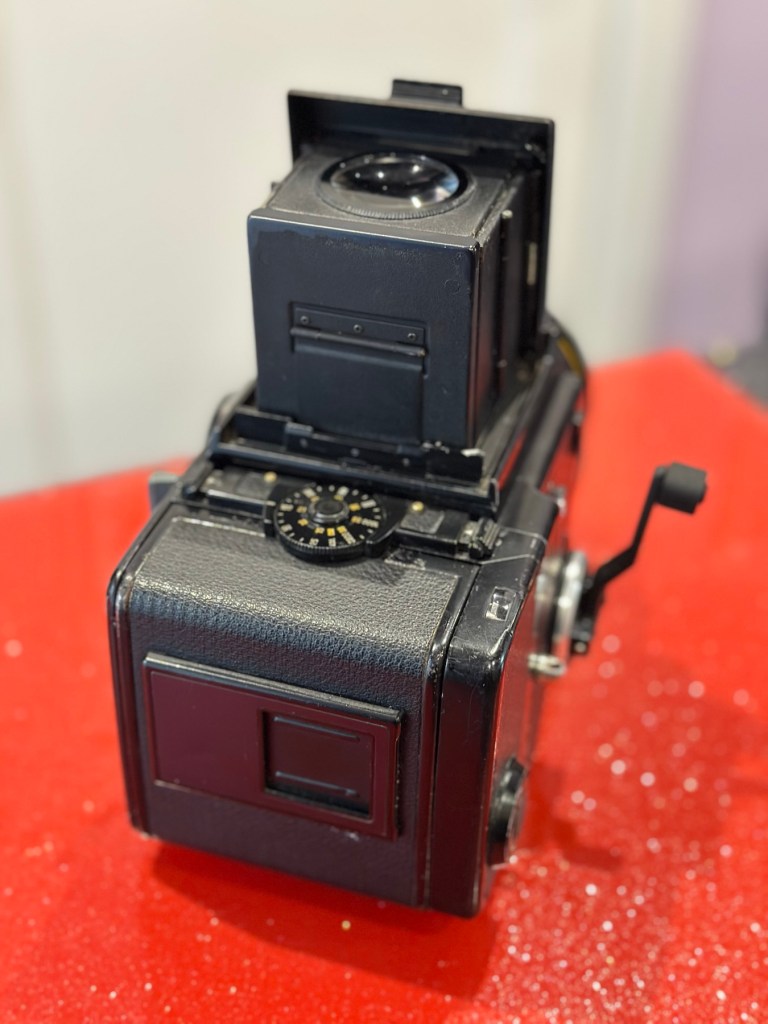
Now complete, I have restored a beautiful piece of camera history
I will post some sample photos of the tests, and will also produce a couple of galleries to link to within this site. First I will try my luck with the Black and white film, as I have one here currently, though out of date it should suffice as it has been kept refrigerated during my ownership. I also have the chemicals and ability to develop film at home, so this should not be an altogether time consuming process.
This has been a satisfying build making a working piece of camera history entirely with damaged and alternative parts logged throughout all of these posts.
Look out for part 5 of this project that will cover the final testing and the results gained from these tests. Hopefully we will have some good photos and will then be able to wrap this project up.
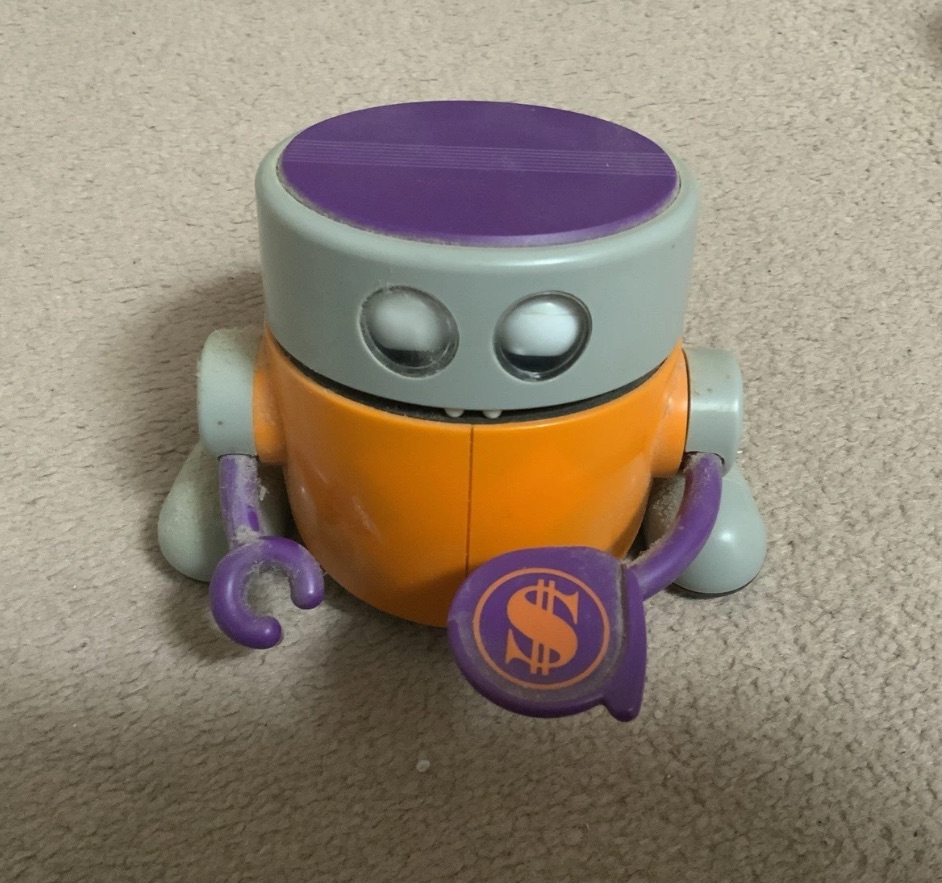
One yellow with pound coin on hand and one orange with a dollar on his hand.
I don’t think either are working and the yellow one is missing the battery cover so selling as spares or repairs.
EBay
Two more heading home
Dirty boys – Missing battery cover
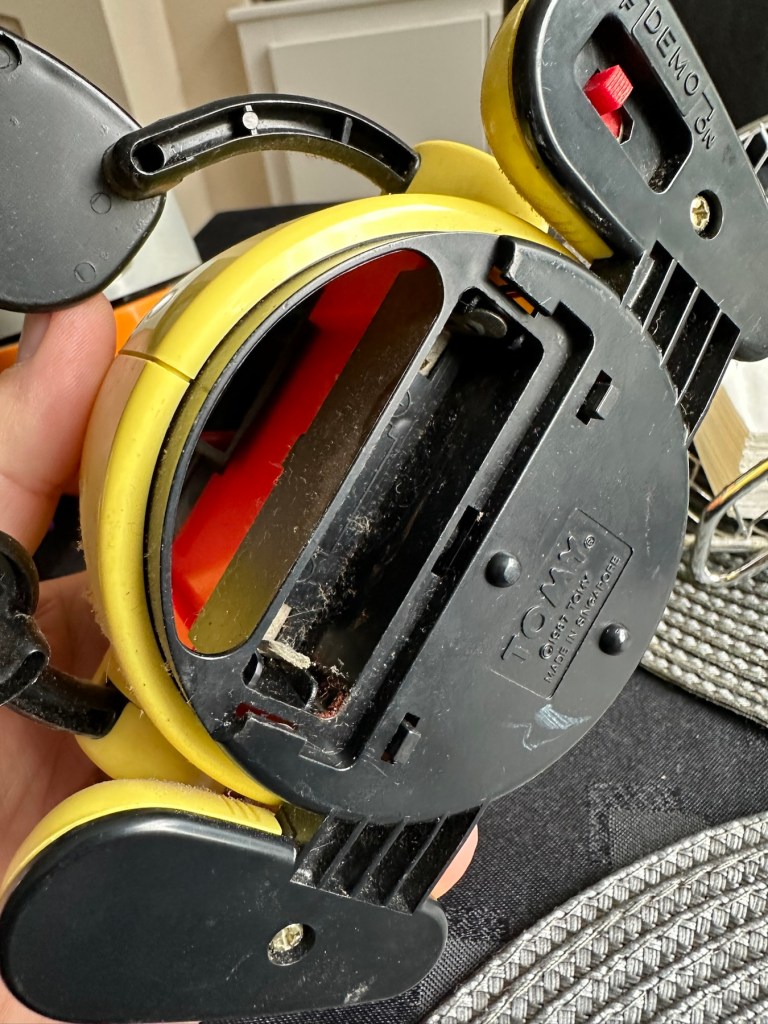
Those of you who follow this site will realise I purchased one of these a while back and did the repair here: Tomy – Mr.Money bank
I paid a total of £10:20GBP for the one in that repair post, and he is currently earning his keep at work collecting money for our local hospice charity – LOROS.
These two I have managed to get for a total of £19:26, so in theory these two are in the similarly price range as the other two. These were produced in 1987 to encourage children to save, with the element on a little bit of fun. These money boxes, when in a good, working condition do command a fair price. Just look at the screen grab of the latest prices being charged on the sale sites.
Latest prices
Both apparently, are not working and they do look quite disgustingly dirty, I’ve no idea what the actual faults are but I’d bet they centre around the switch area as that is a common issue. Add to that one of the battery covers is missing, and the price will rise by about another £5:86GBP as I get a new cover 3D printed, that will mean a total outlay of £25:14GBP or to be specific £12:57GBP per unit.
I more than likely will keep one of them and move the other one on. Let’s wait and see what arrives for us to begin the assessment.
Assessment:
Well, have a look at these two scruffy urchins that turned up today. Both in an absolutely filthy state, need a really good clean. It really surprises me that anyone can send such a filthy item through the post. Does it really take too long to just dust an item down with some furniture polish? Thankfully the wife wasn’t here when they arrived or else she wouldn’t have let them through the door 😂
That said they are as described. Everything is in place apart from the battery cover that I have already ordered as a new 3D print.
Two scruffy urchins
First thing to do is to clean them. They are filthyOne missing battery cover, a 3D replacement has been ordered
Setting a good example. My perfectly clean, and working example at the front
Apart from the above all seems fine. I have put a battery in each and turned them on, nothing happens. On the yellow example there is a little contamination on the battery contacts and when I move the battery I do get some motion but it sounds as if there is a sticking or broken gear inside. The orange example is totally dead but the contacts are clean. This could be the classic switch issue. So the order of the day is to get these both cleaned before dismantling just to keep any mess to a minimum, open them up, clean inside and check the gearings and then lubricate with some silicone grease. I’m hoping these will not be too labour intensive as I have been inside one of these before, and I’m more than aware of the issues of small parts falling out.
Repair:
First a clean with some polish.
A quick clean and they come up lovely
Cleaning done, they’ve come up lovely, I’ll give them a final clean at the end after we’ve attended to the internal issues. So let’s get on.
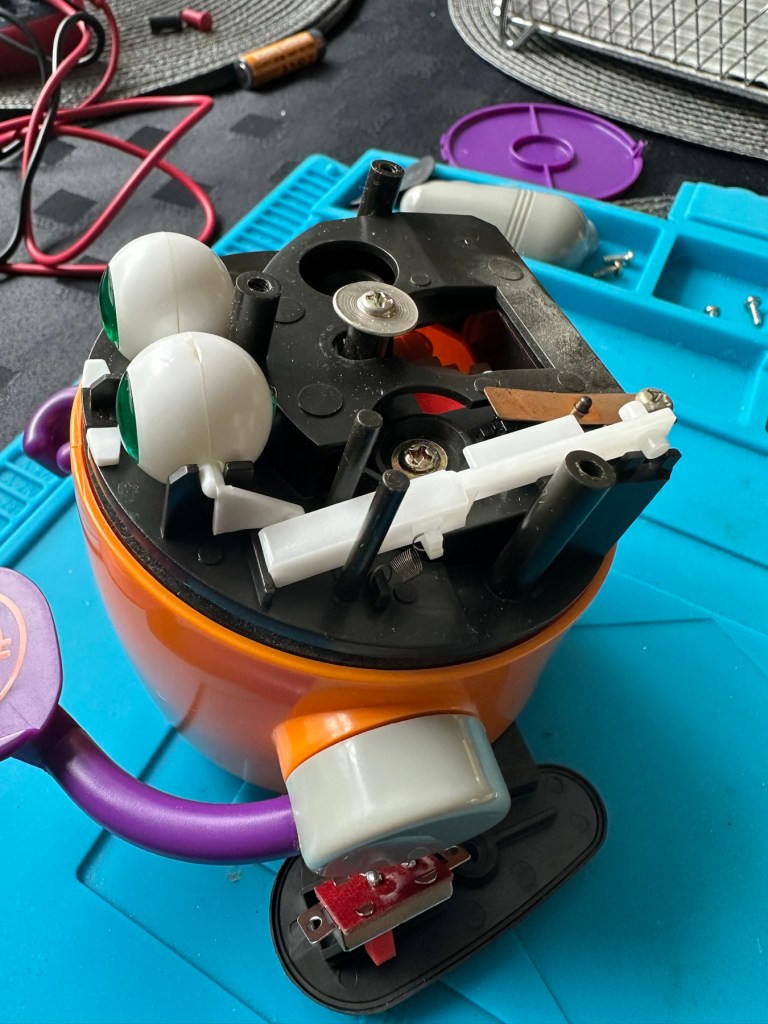
I’ve chosen the orange chap first, however my suspicions about the faulty switch are wrong. The switch tests fine and I then go a bit deeper into its soul 😂
Off with his head and down into the cogs and sprockets
I get down to the motor and the cogs and sprockets and realise the motion has ceased. A little silicon grease over all the moving parts and a little bit of teasing and the unit springs into life. I let it run for a few minutes and then reassemble, cleaning everything along the way. This unit is now working.
The second unit, the yellow one, was working sort of. So as I have done above, this one was also stripped down, cleaned along the way and also had all cogs and sprockets greased accordingly. It also is now working fine.
I have already purchased a 3D printed battery cover to replace the missing one, and this is now installed, so we now have two complete units. For what I’ve paid for 3D printed pieces over the last year, it would probably be worth investing in my very own 3D printer.
The new replacement, 3D printed battery cover
Result:
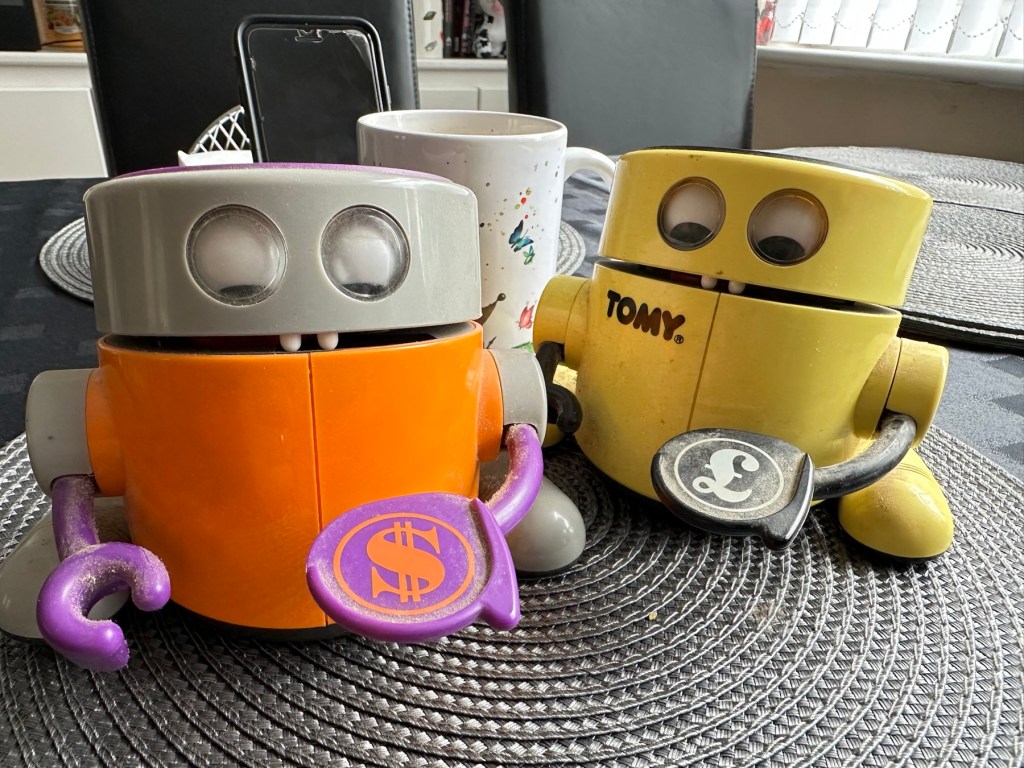
Well I now have three absolutely perfect working examples of this fun piece of 1980s technology. One is in use earning money for the local hospice.
The Orange one is going to be used by a work colleague to raise money for the British Heart Foundation.
Earning his keep
He is selling candles and I’m going to brand this one with a BHF logo to add some fun to his fundraising.
The three amigos
I have put together this little video regarding feeding time for these three . Enjoy!
Feeding time
The third unit will probably be sold on unless I can find someone else who can put it to good use.
Thanks for visiting, as you know it is always very much, appreciated.
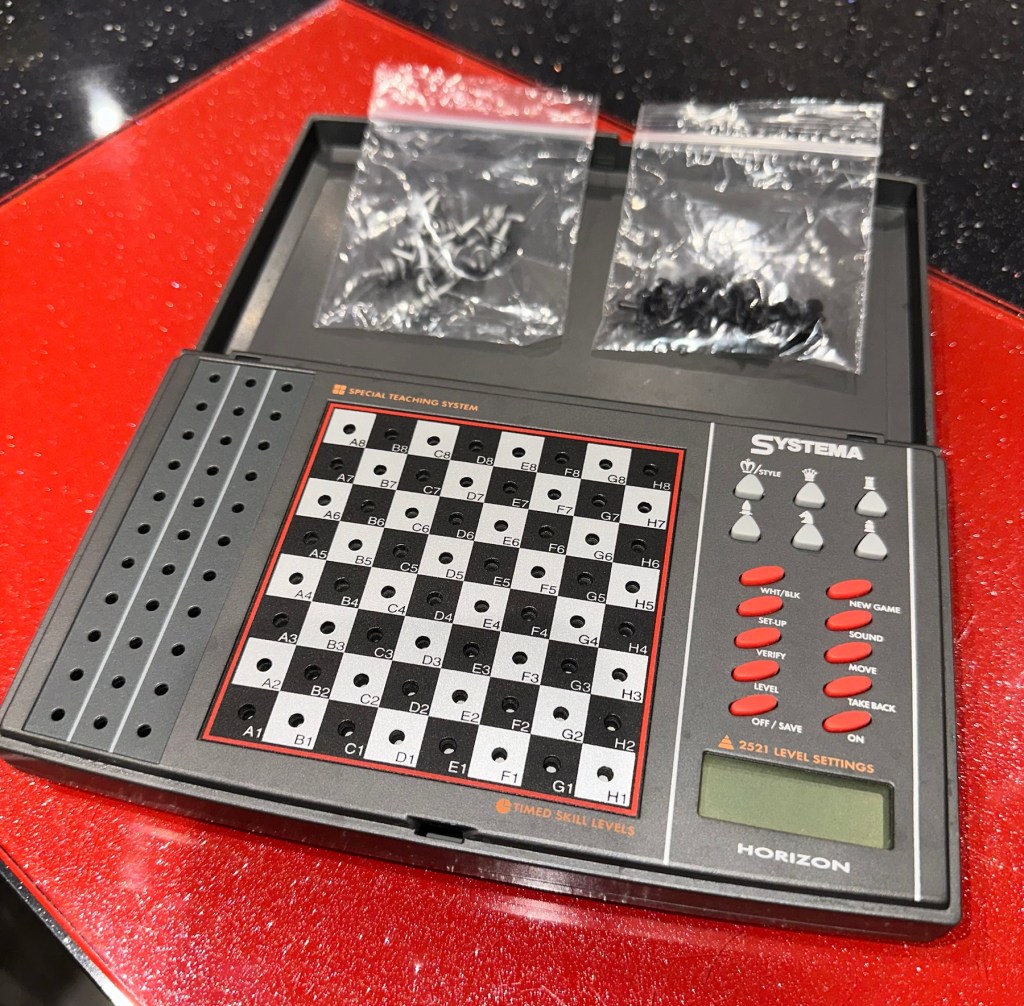
The item has previously been owned before and unfortunately the batteries were left inside to corrode. When tested the computer part does not work.The pieces are a complete set for playing without the computer. Please see photos.
EBay
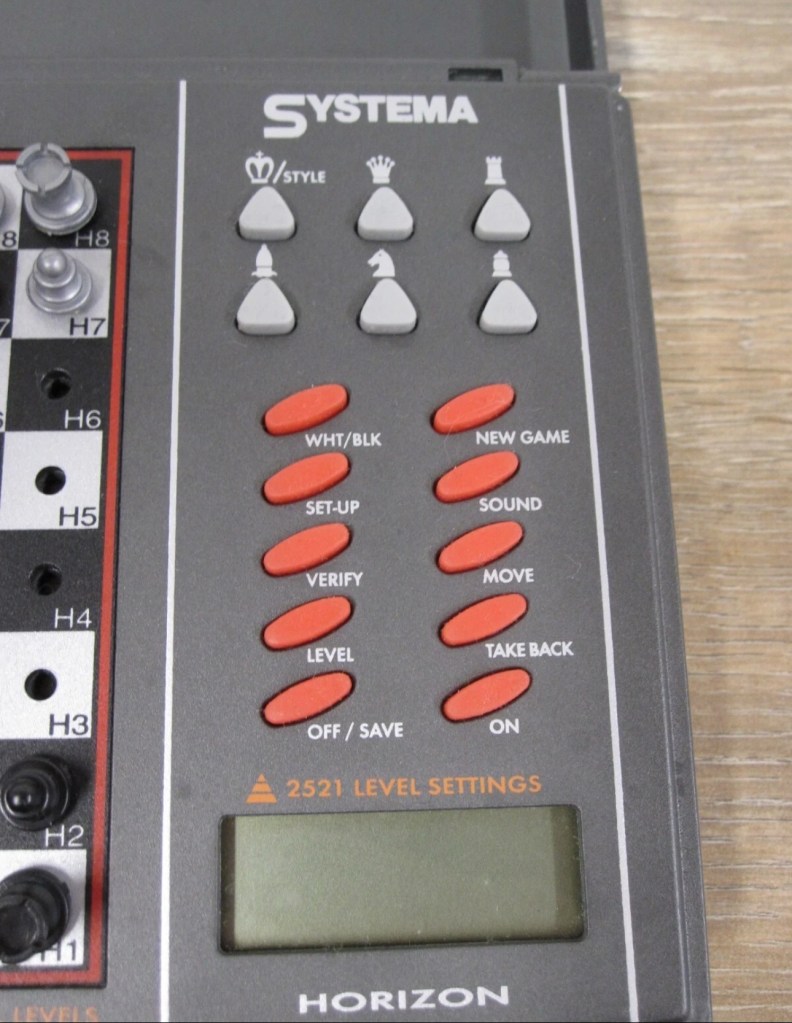
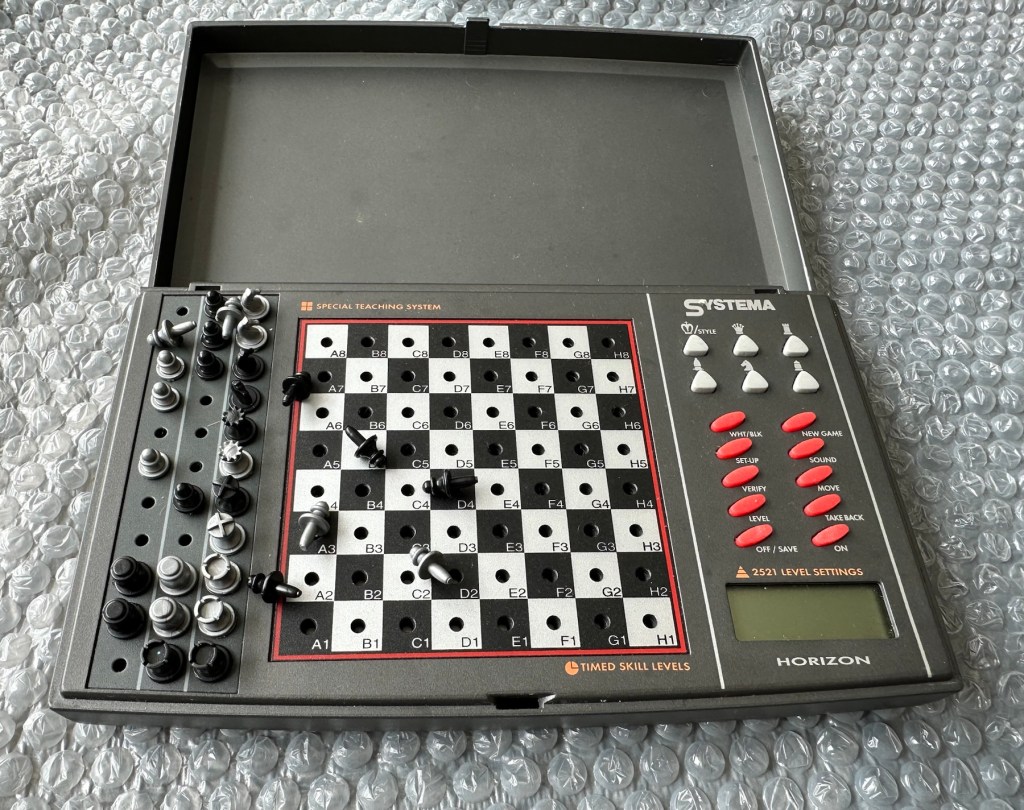
Systema Horizon Computerised Battery corrosion
The unit looks clean cosmetically, and all the pieces are present. The computer side is not working probably as a result of the corrosion that is present in the battery compartment.
So I’ve paid a grand total of £11:49GBP for this unit which is probably slightly above its value. However it was from the St.Helena Hospice in Colchester, so I do not have an issue with this. In fact if I can get it working it will be donated straight back to a hospice I support here in Leicester – LOROS hospice. So all around, everyone benefits. I don’t play chess so it will not be used by me, I believe this unit was originally released circa 1996, so it is roughly 29 years old.
A really simple video, regarding how this unit works
Not much in the form of instructions online, however I have managed to get hold of some pictures of a quick start guide that should suffice for the moment. I’ll try and get full instructions from somewhere. In the meantime, the video above shows how easy it is to setup and use.
Let’s wait for its arrival to make an assessment.
Assessment:
The item has arrived and cosmetically it’s not too bad. There is some writing ink on the lid, and some staining on the base. but nothing that a good clean wouldn’t see to.
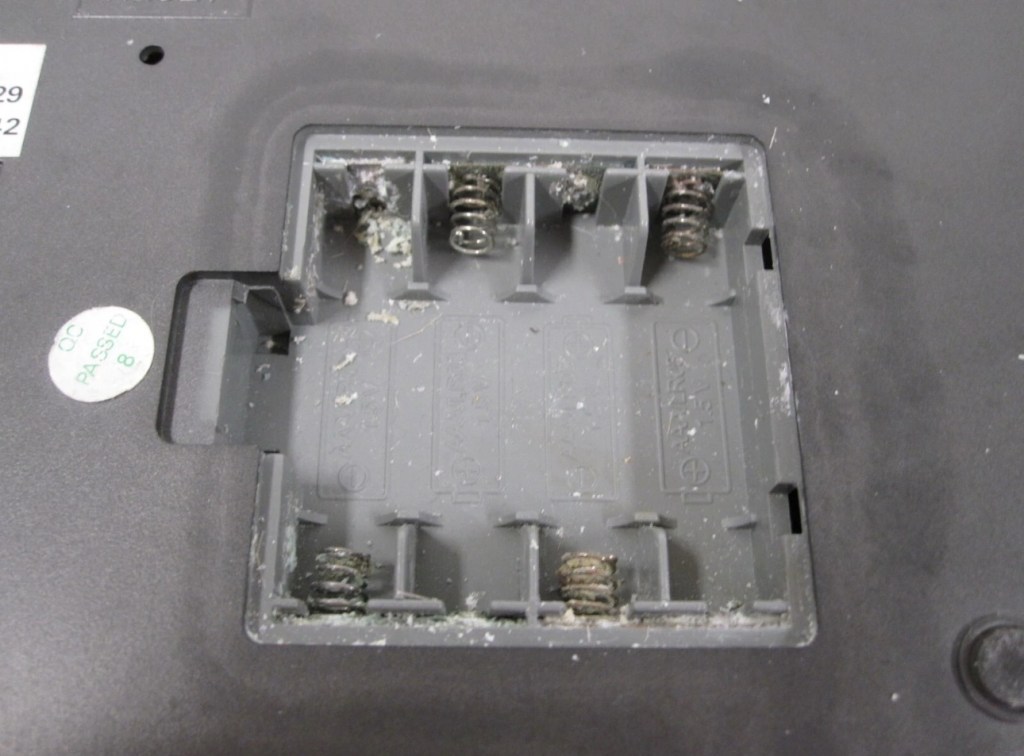
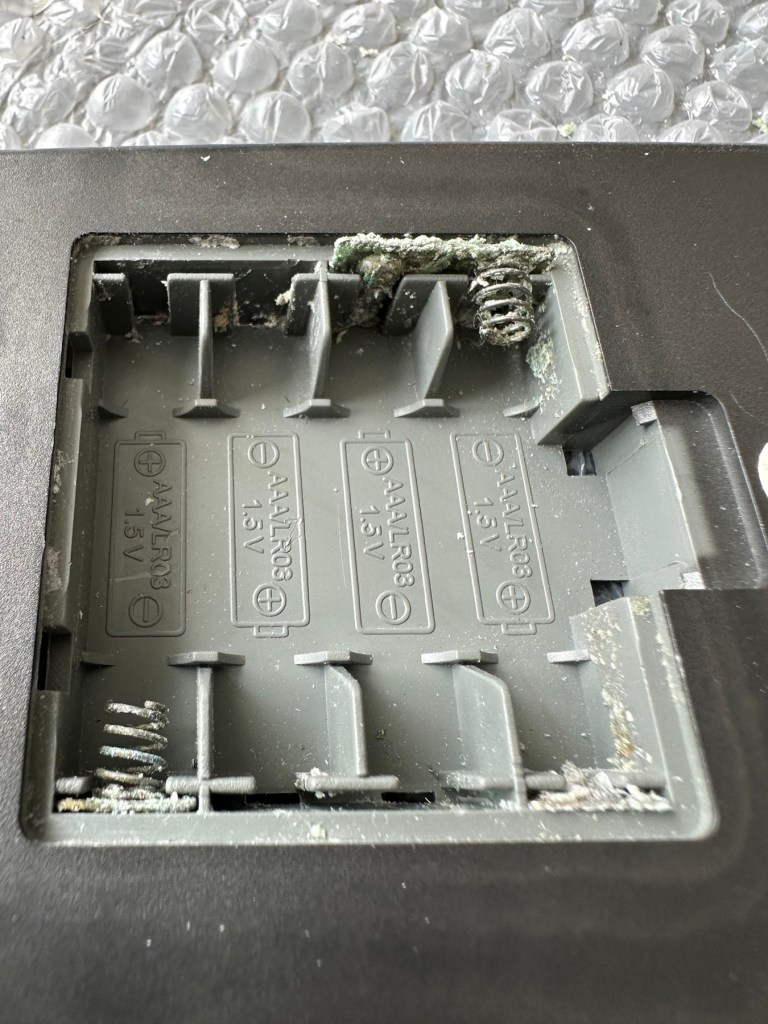
Outside goodInside bad
Open the battery compartment and all contacts are in serious need of a good clean or replacement. Battery corrosion is bad. All playing pieces are included and that’s always a bonus. I do believe that the issue here is purely to do with the acid corrosion, as when tested with a multimeter there is no continuity through the contacts. If the corrosion hasn’t gone too deep this should not be too much of a problematic repair.
Repair:
Now inside of the unit we can see the extent of the corrosion and thankfully it hasn’t reached the circuit board as the battery compartment sits just to the side of it.
Circuit board has no visible issuesYou can see the contamination on the rear of the battery compartment
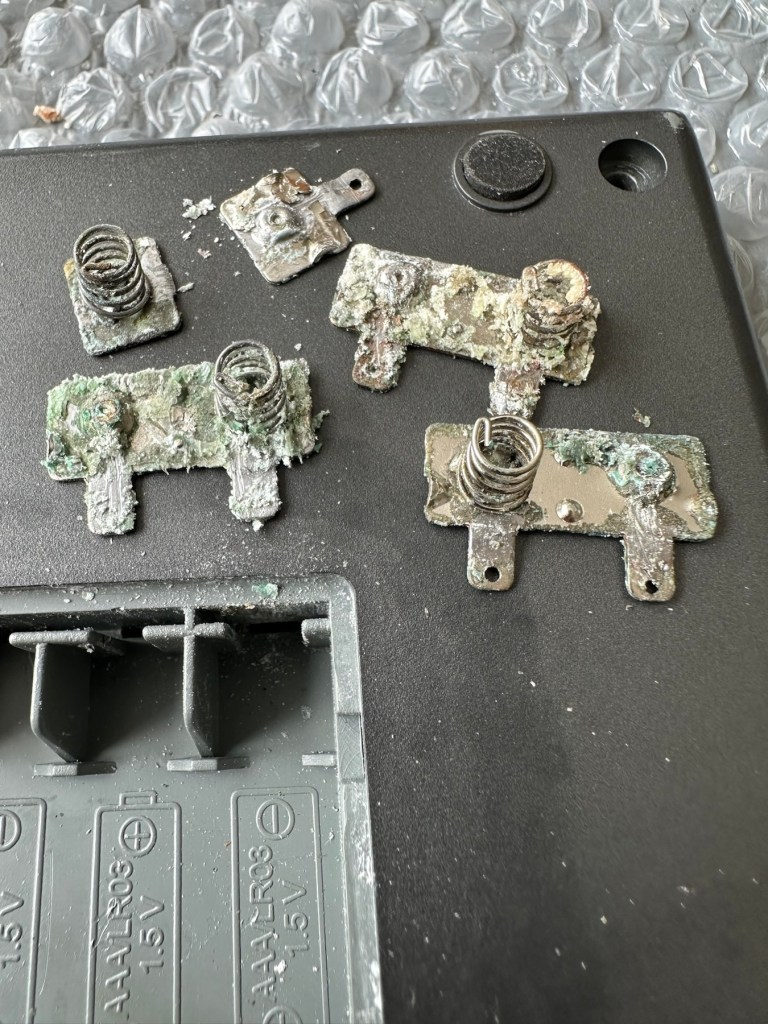
I’ve disconnected the wires from the battery compartment so i can it take it away and concentrate on removing the contacts and cleaning them, or completely replacing them.
Removal of the contaminated battery contacts
The contacts are in such a poor state and so far beyond recovery that I have decided to replace them all. I need two single and three double AAA size contacts. Luckily I do have plenty of these in my current stock.
Prior to fitting the new contacts I will give the entire battery compartment a good clean with some IPA to remove the residual contamination. I will then dry the unit and just use some furniture polish to buff it all up and make sure it’s as clean as the day it left the factory. Once this is done the new battery contacts can be put in place. I can then re-solder the two internal battery wires back into place.
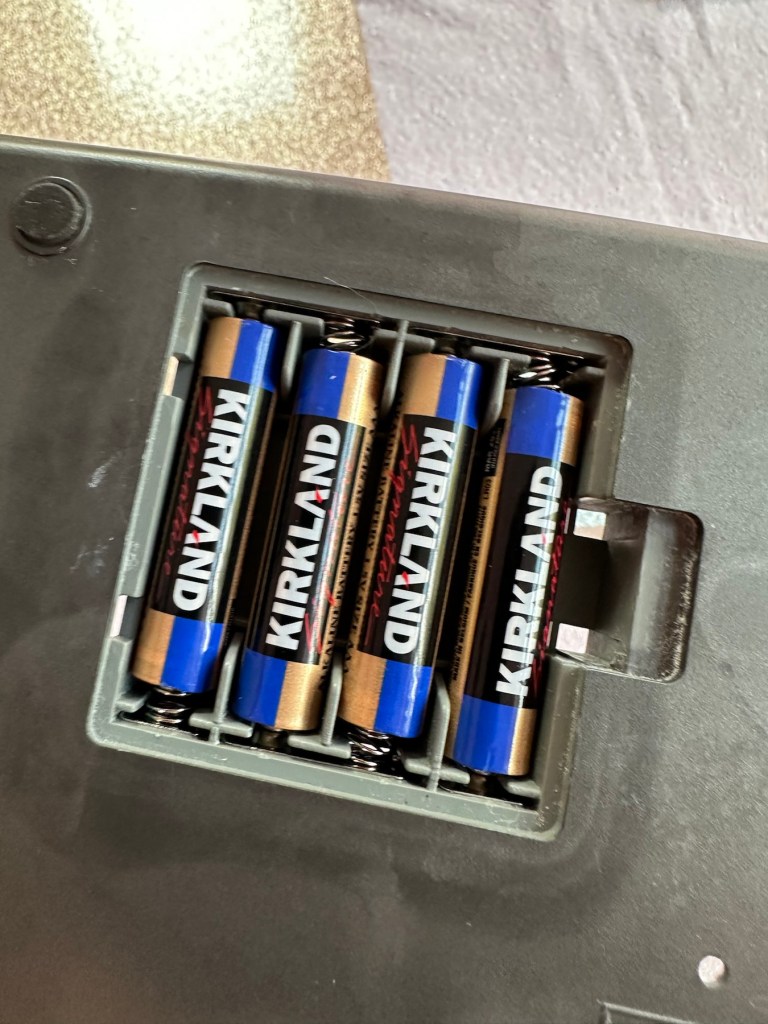
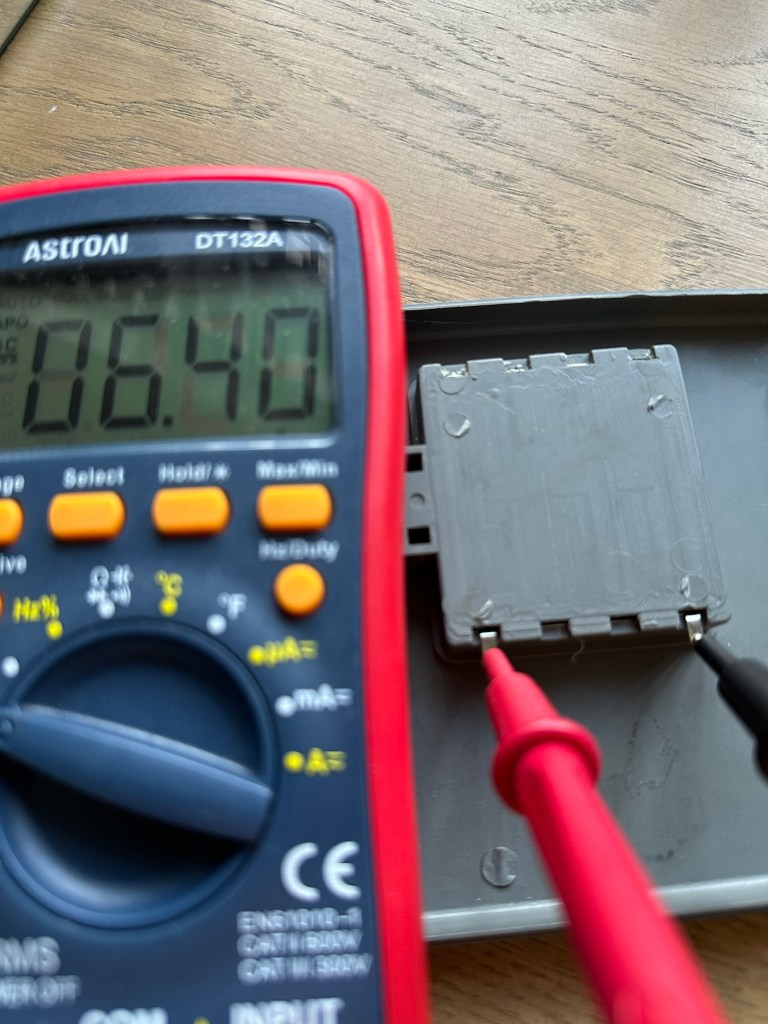
New contacts installed Batteries fit ok
Contacts checked to see power is a available
New AAA battery contacts in place I just put in the batteries, to confirm continuity with the multimeter. A good 6.4v indicates this part of the repair is good and that the contacts are all working.
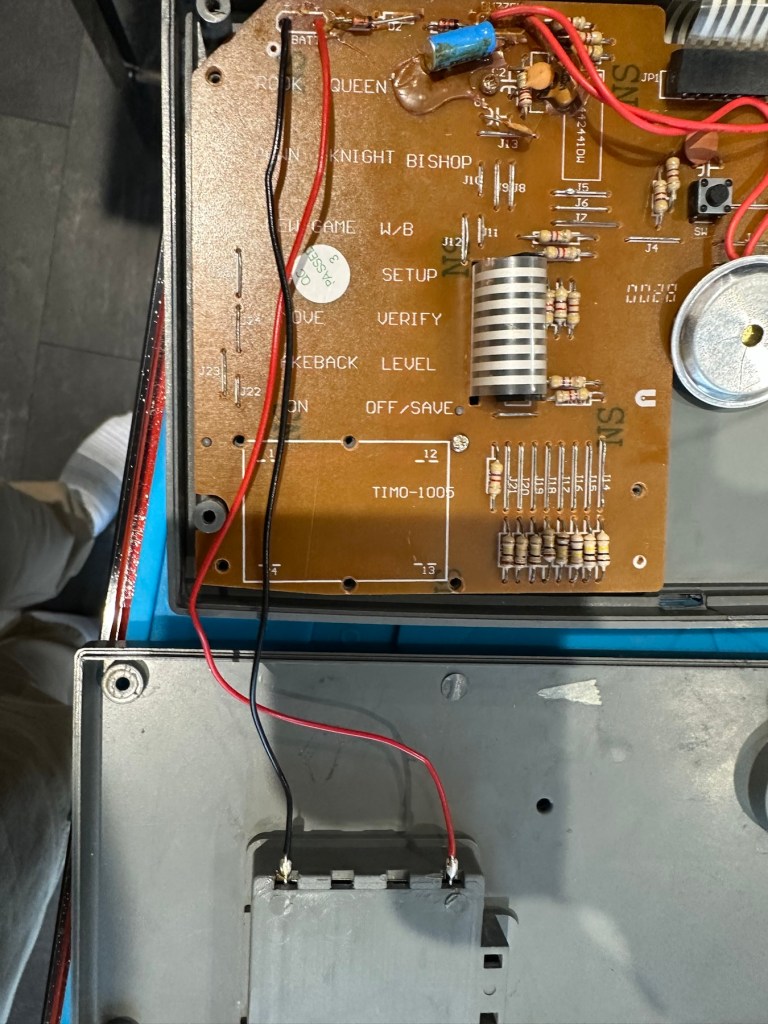
Next I’ve decided to replace the two wires from the battery compartment to the circuit board, as the wires, especially the negative one appears very brittle, probably a combination of age and the battery acid contamination.
Two new power wires
I’ve tidied the wire run up by using some Kapton tape to secure it to the shell so there is no chance of a wire pinch.
Before closing the shell up, I use some hot glue to put the speaker back into place.
A bit of hot glue to secure
Now we can get the last four screws in place to secure everything together.
Then switch on…does it work? You betcha, it does everything that it’s meant to, and even though I don’t really know how to play, I do manage to challenge the computer for a good ten minutes. It’s been a great test run and even though I’m not that clued up it is working how it should and is now back in a perfect working order. I’ve created this little video below.
It’s working
Now just a little spit and polish and we can bring this repair to a close.
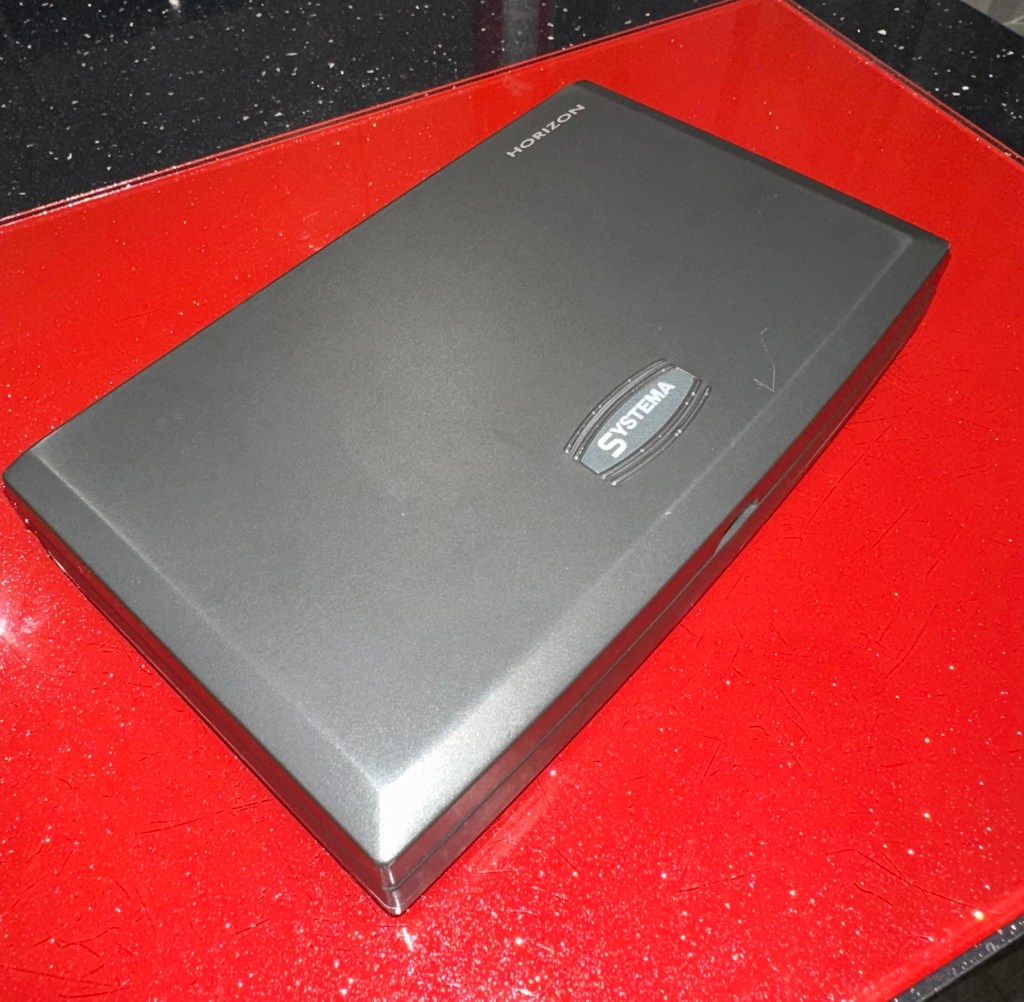
Result:
It’s polished up well apart from a bit of age staining on the rear, this makes no difference as it’s only the hidden part of the case and every game related part of the unit looks fantastic and it works just fine.
Good working unit, looking superb
Really pleased with this especially as it’s going straight to our local hospice for them to sell on. It was brought from a hospice, and is going back to another, what better way to generate funds for them. I can’t play chess so this unit is wasted on me. Might as well pass it on to someone who’d appreciate it whilst giving some much needed financial support to a most worthy cause.
Another one saved from landfill. Win win all around.
Thanks for passing by and reading this post. It’s always very much appreciated.
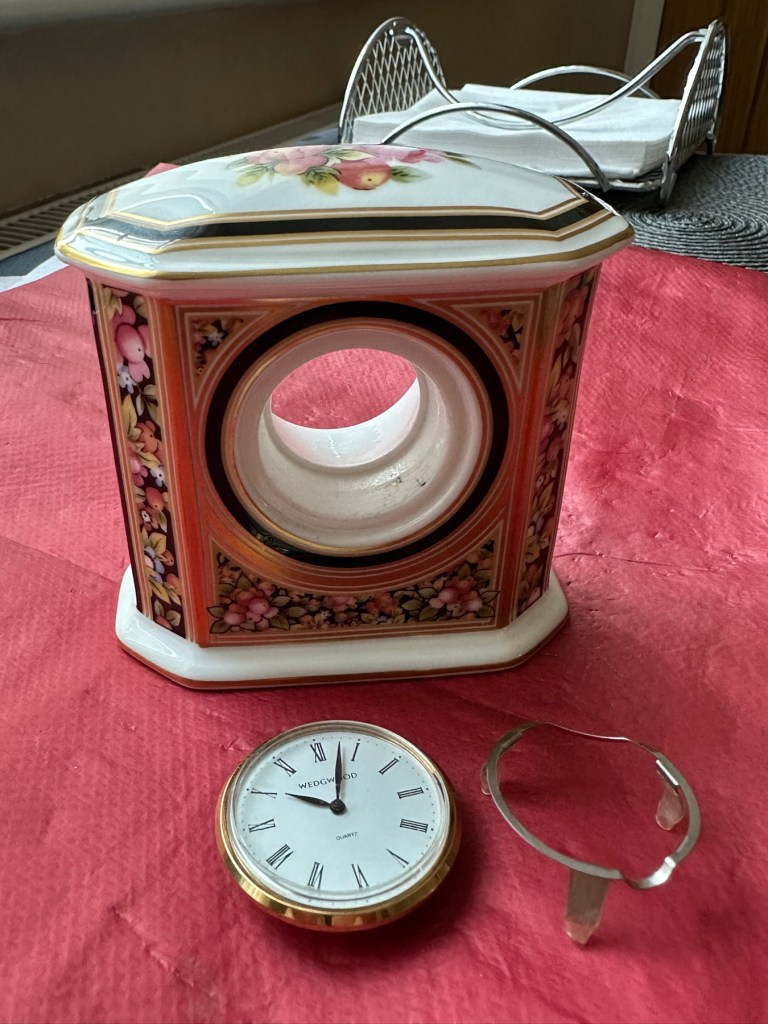
Wedgwood Clio style Ceramic Clock Casing – Clock not working. Attractive casing showing fruit and berries. About 20 years old. Unfortunately, the clock is not working and has battery corrosion making it uneconomic to repair.
One of the photos shows the casing with the clock inserted and I will include this clock for information purposes. The casing is 90mm high and 90mm wide with a depth of 50mm.
EBay
With and without clock The faulty time piece
This had just been listed and had a really low buy now price so I took it. With postage and all costs it’s cost a total of £8:32GBP, and I think that’s a good price for late issue mass produced Wedgwood piece. I’ve always fancied having a go at fixing a timepiece so I’m happy to trawl around at the low price end to give it a go. This will my second piece I have attempted, the first one being even cheaper and very tacky that i passed on to my older sister, and she just loves it : Rock & Roll clock
The Wedgwood Clio style was introduced in 1992 and ceased production in 2005. The fact that the seller dates this clock as around twenty years old would tie in nicely with this piece being part of the last production run of this range.
You can buy replacement Clio design clock inserts from Wedgwood direct at about £27GBP per item, but that’s not the purpose of this site, so I will attempt to make the repair. If all else fails and it is actually beyond repair, then I will source something similar to replace it with. This is a 36mm fitting clock insert.
Anyway, let’s await its arrival so we can fully assess things.
Assessment:
A lovely piece of my favourite pottery in just as good condition as described in the listing.
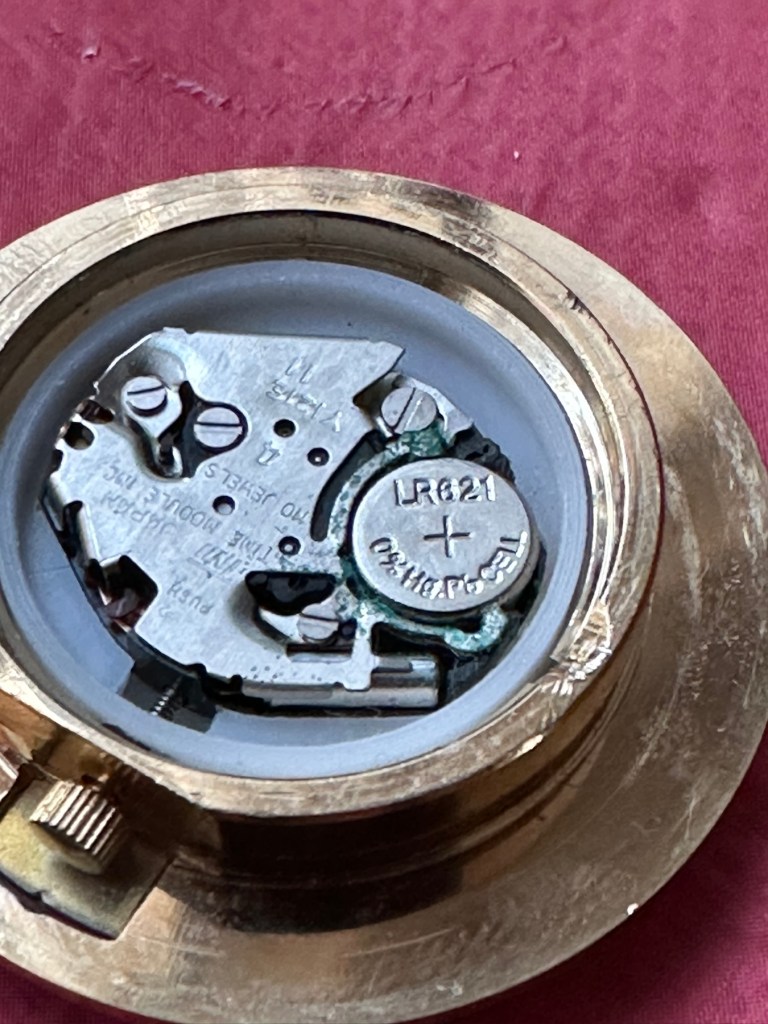
Here I’ve removed the timepiece My old favourite, battery corrosion
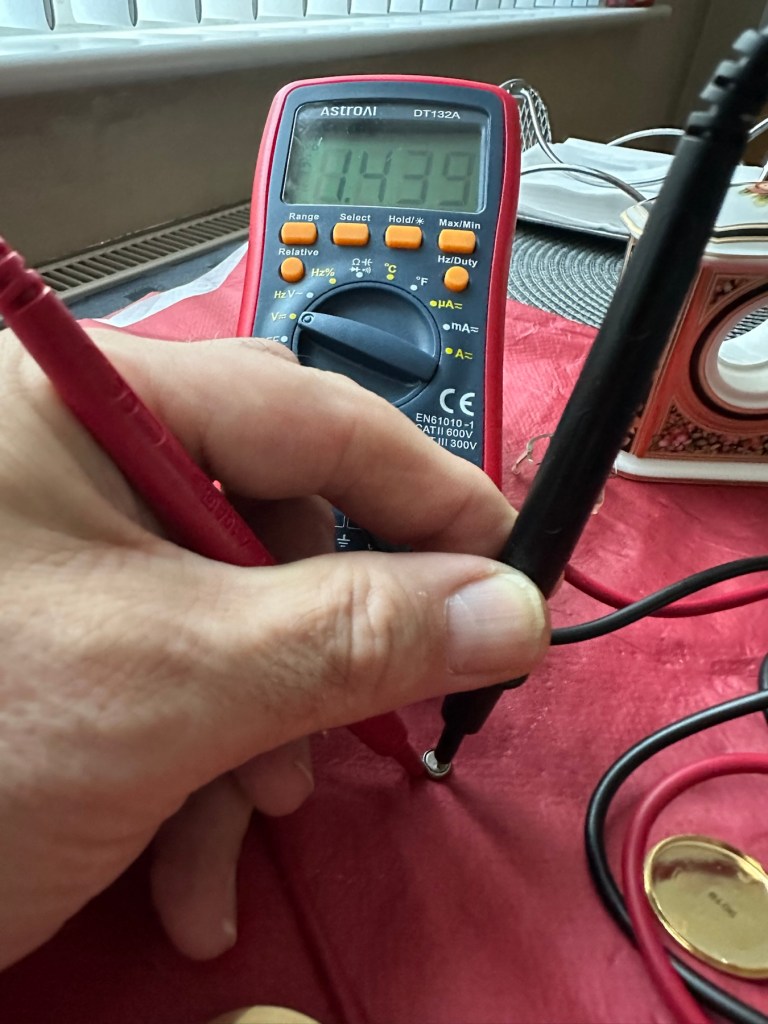
If you remove the timepiece and crack the back open there is definitely signs of battery corrosion around the battery connectors. Measuring the battery voltage it is registering 1.4v, I may well replace this as I don’t know if this is the one that caused the issue or whether it is depleting under load, and I wouldn’t expect that load to be too excessive. But you never know so I will source a fresh battery.
Battery registering 1.4 volts
Repair:
The internals are contaminated with green/blue corrosion from an old battery, using my magnifier and a small grinding pen I am able to remove all the visible corrosion.
Grinding pen to remove corrosion A good clean after with some IPA
After I’d used the grinding pen, I cleaned the timepiece with some compressed air and then cleaned the workings with some Isopropyl Alcohol to remove any residual contamination.
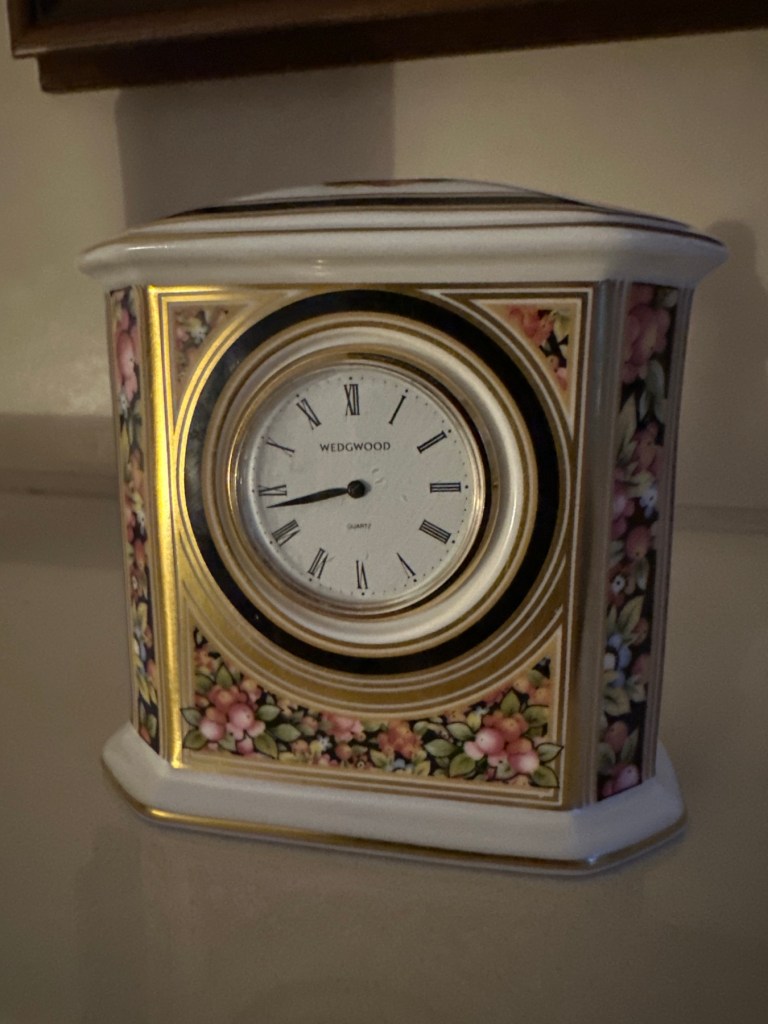
With the unit now reassembled, i can confirm the unit is ticking along quite nicely.
It’s just gone 8pm and keeping good time
20’minutes later still going well. You’ll just have to take my word for it.
Result:
It amazes me that someone sells a unit as lovely as this stating that it’s “Beyond economical repair”. What nonsense, this has cost me the grand total of “Zero” to get fixed. At the very most it’s taken 15 minutes of my time. I love easy repairs such as this, the fact that I purchased such a charming little timepiece at pretty much no cost at all makes it all the more satisfying. An item such as this needs to be looked at as it’s too nice to just be stuffed in the back of a cupboard until it’s thrown out with the junk.
Still quietly ticking away after being repaired
Again, some things are just so easy to repair if you just commit some time and patience to it. This clock now has many years of good use ahead of it. On display, right where it belongs.
Another item saved from waste.
A positive outcome in my personal point of view.
Thanks for passing by. It’s always very much appreciated.
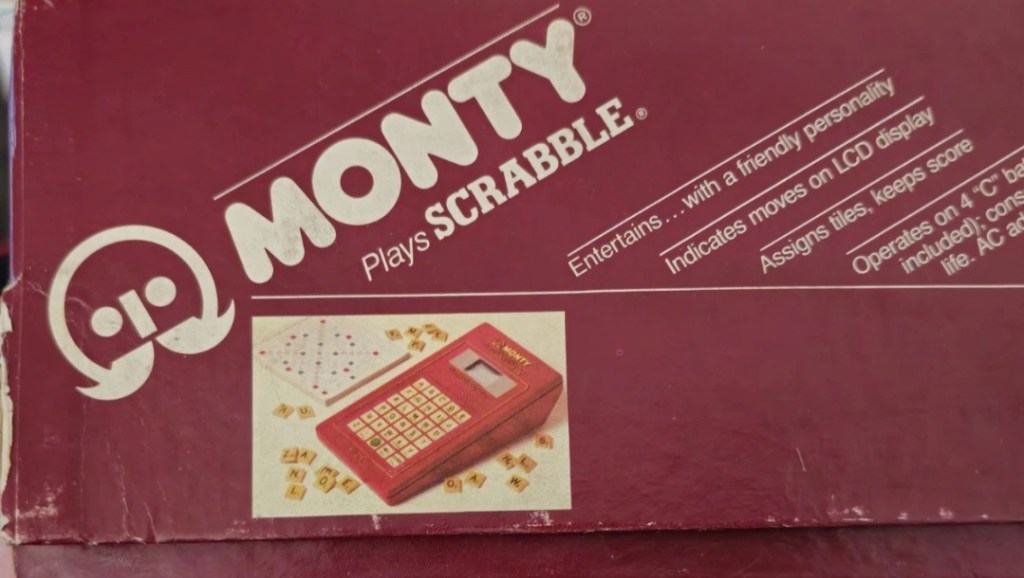
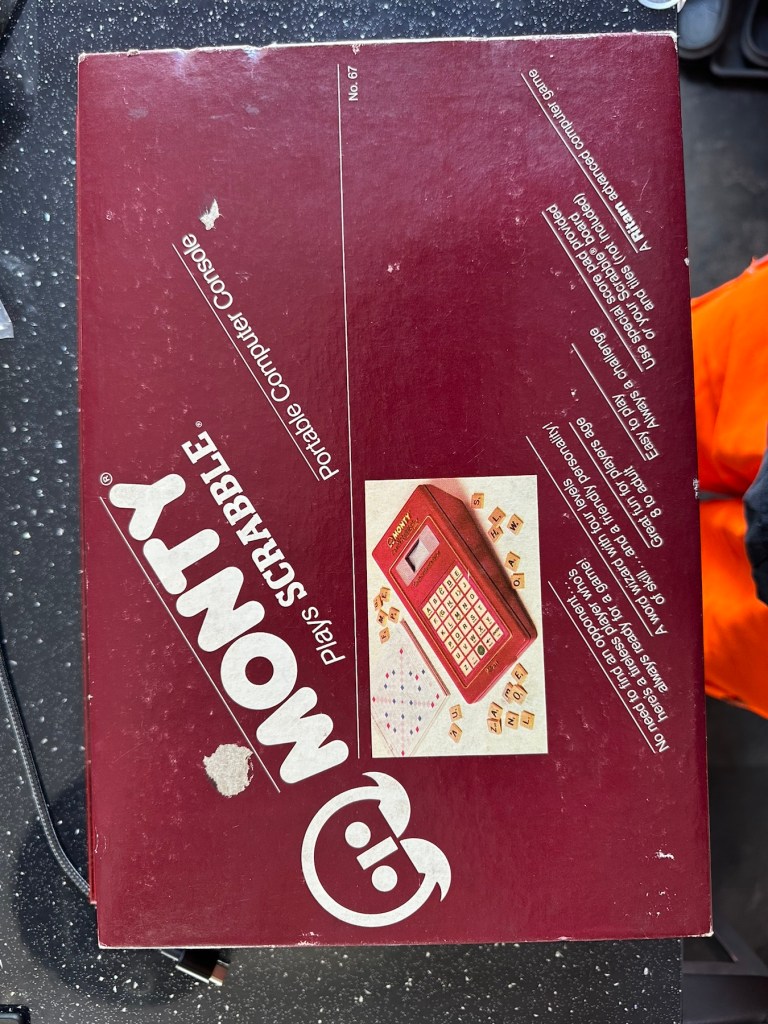
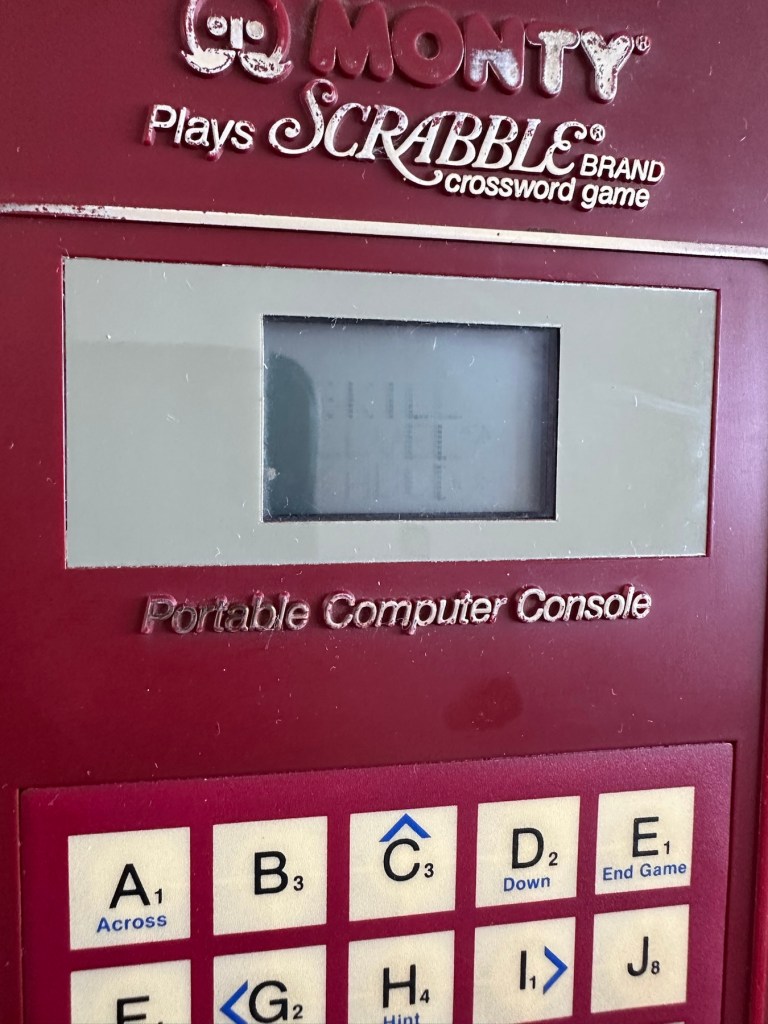
The product is a vintage Scrabble game titled “Monty Plays Scrabble,” released in 1984. It is a rare find and comes in its original boxed packaging. The game is a portable computer console version of the classic Scrabble game, making it unique and collectible. Please note that the functionality of the game is untested.
EBay
Why did i buy? I don’t know, maybe because its from 1984 and fits my modus operandi. To be truthful i looked at it, saw the wear and tear on it and thought to myself that i can make it look better. It also states it’s a rare find….its not. In good old EBay style its “Untested” which probably means they have put some batteries in, it doesn’t work, so let us use the get out clause of selling it as untested. I could however be very wrong, and just be using unnecessary sarcastic commentary, i suspect it’s very much the latter.
And it has a battery cover. Splendid
Here’s a little history:
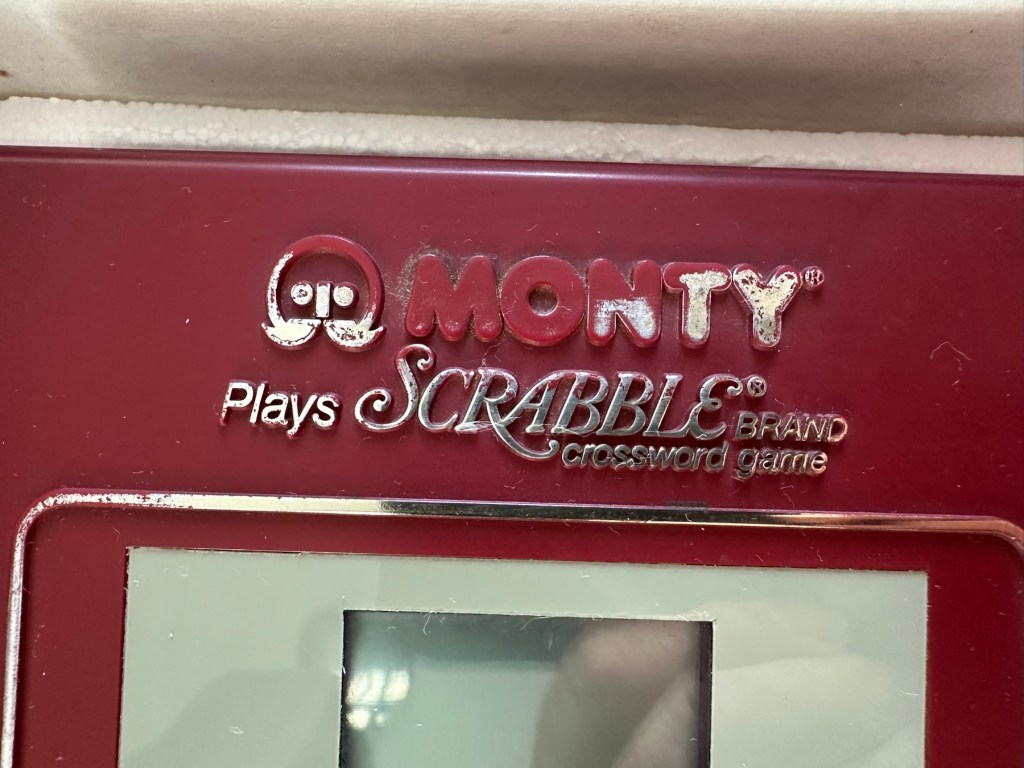
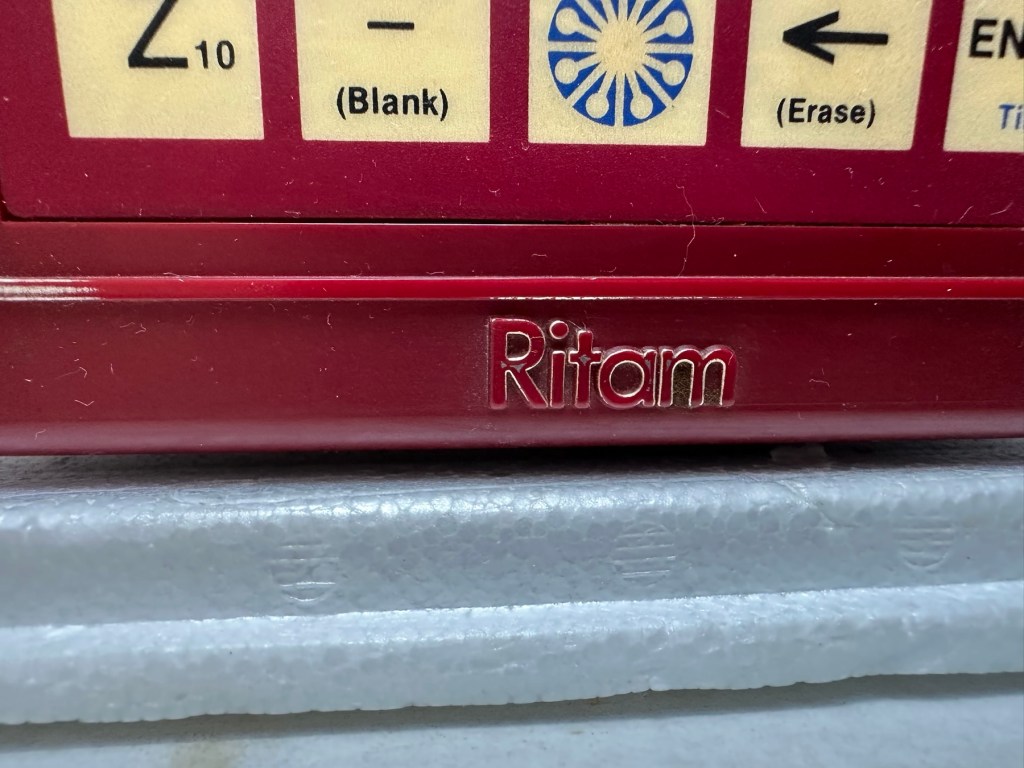
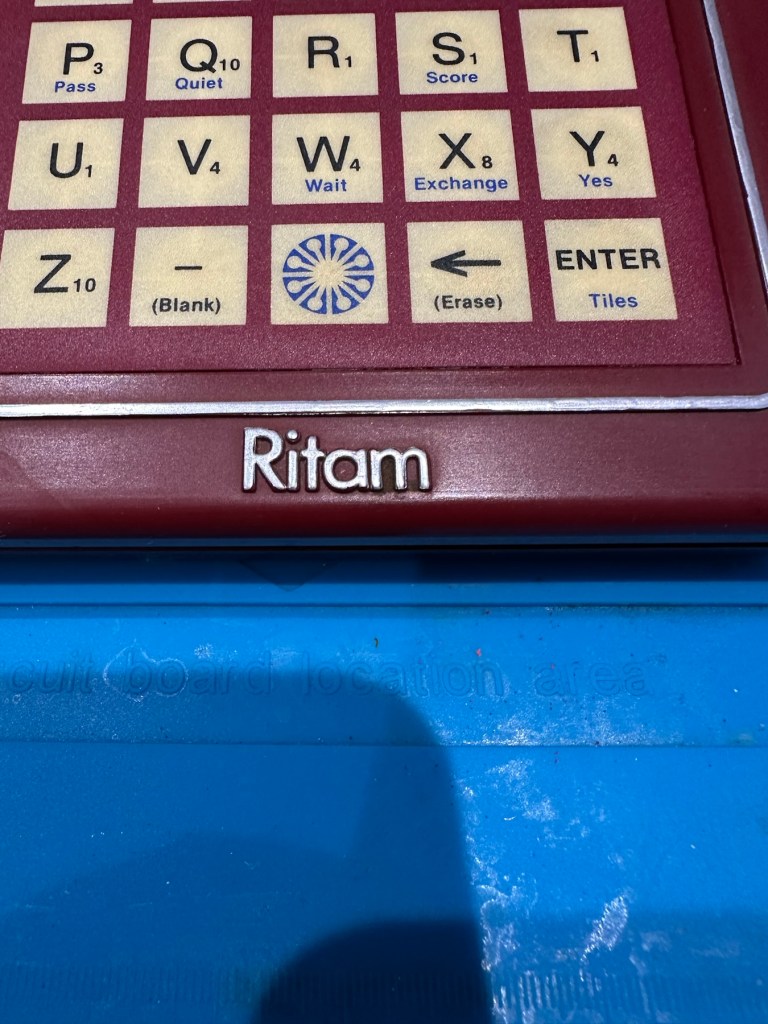
Manufactured by Ritam Corp, under licence from J.W Spear and sons PLC 1984
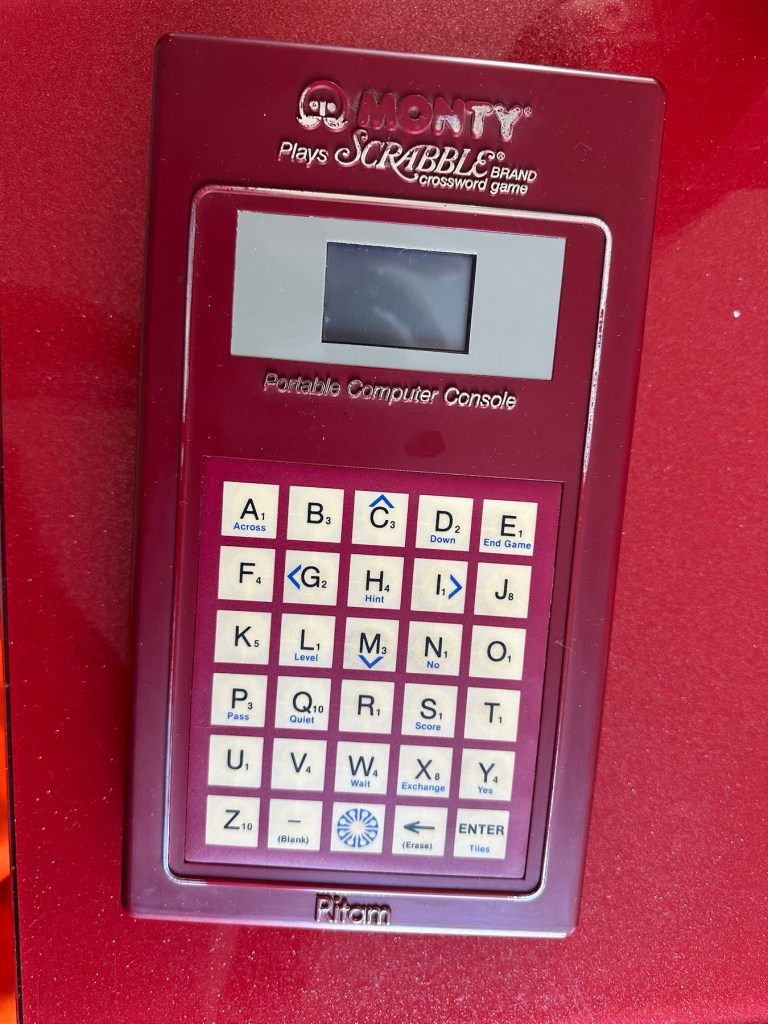
A portable electronic device that plays a competent game of Scrabble. Up to three players may challenge the device. Each player enters one’s own name and subsequently the turn order in which they will play. The players can decide to draw their own tiles or let the device do the randomizing. If the device assigns the tiles, the players may ask the device to suggest a play by using the “Hint” option.
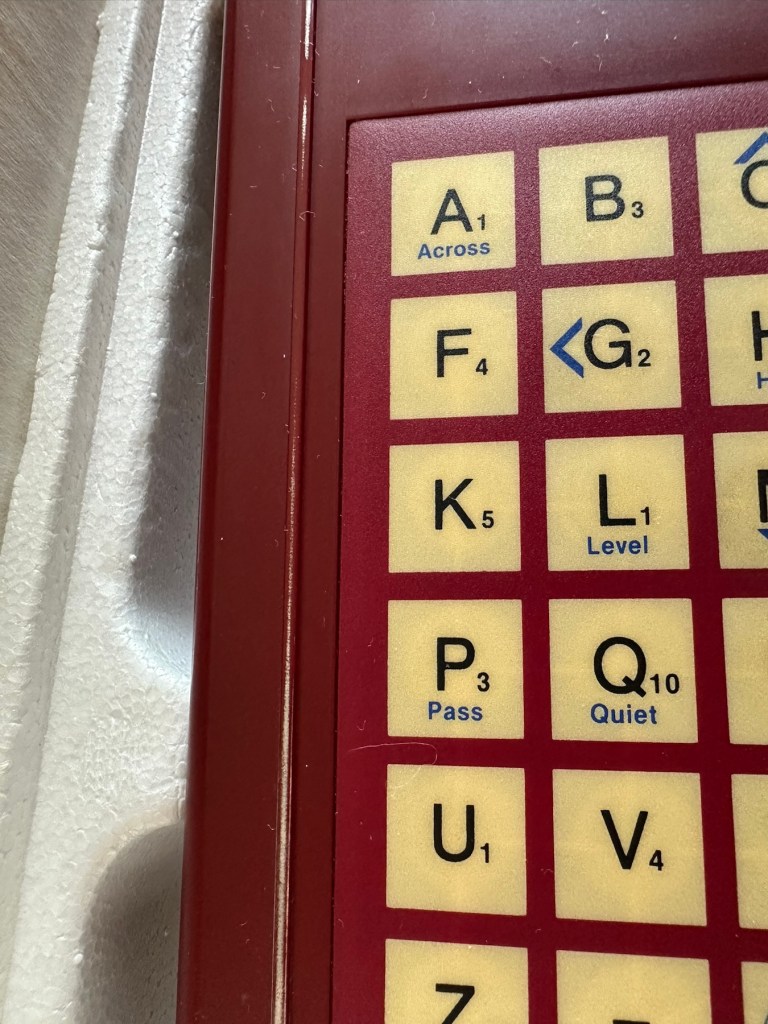
Players keep track of the gameboard using the paper pad provided or use their own gameboard. The device has a LCD readout that is only eight characters by four characters and cannot display the entire board. Players use the arrow keys of the membrane keyboard to scroll around.
All standard Scrabble rules apply. The device will challenge any word played that is not in its 12,000 word vocabulary. The human player is final arbiter however.
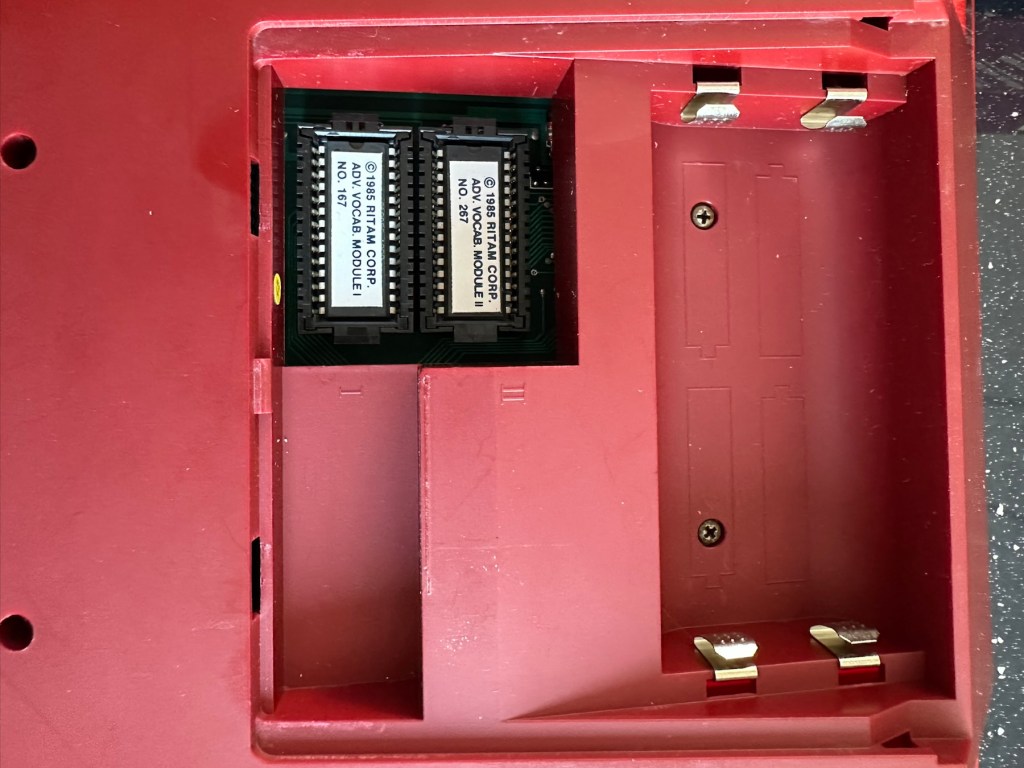
The device is powered by four “C” batteries or an AC adapter. Two Advanced Vocabulary Modules were available. Each module added 16,000 words to the machine’s vocabulary to bring the total to 44,000.
Boardgamesgeek.com
And I’m fortunate to have those two advanced vocabulary modules already installed, so this unit has the full vocabulary range of 44000 words. Lucky me. Apparently the unit is able to do 2 million calculations a second, but can take up to 3 minutes to make a move! With a vocabulary built in of 12,000 words that must mean it does a lot of questioning of itself prior to making a decision. I love a computer system that constantly doubts itself, it’s such a human trait.
Anyway, what’s arrived and how does it look. And is it working?
Assessment:
The parcel has arrived and been unpacked.
Fully boxed All original packaging The unit in its boxFront of unitRear of unit
On taking the unit from the box there is no damage cosmetically, the keyboard is a bit dirty and the silver lettering and edging has worn a little.
Silver lettering and edging worn away
Great news is that the battery contacts are in a perfectly clean condition with no sign of corrosion
Super clean and the two extra vocabulary modulesBatteries added
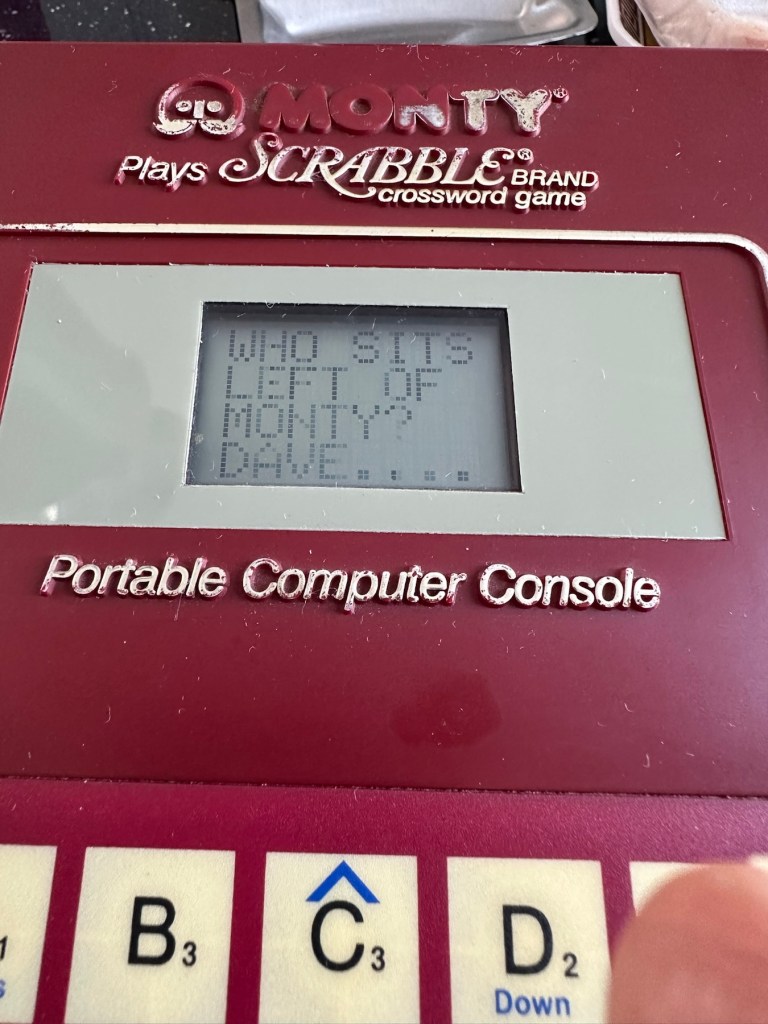
With no corrosion visible, I put some batteries in. I switch the unit on and it makes sound, great. Looking from directly above it looks as if there is some writing on the screen but this doesn’t become visible until you move to about 60 degrees away, a bit closer to the base of the unit.
When viewed from aboveWhen views at about 60 degrees away
So the pleasing thing is that it works. In general it is in a very good condition, coming with instructions and playing sheets. As always with items such as this from this time period, there is the expected smell of age induced mustiness, and there isn’t a great deal I can do about this. But I do seem to have a working unit that just requires a little maintenance and cleaning.
Repair:
I’ve had a quick clean of the front keypad and it was quite dirty.
Bit dirty just after a very brief clean of the keyboard
I’m not sure but I might open up the unit and give it a proper wash, I’ve got to have a look at the screen inside as I suspect the screen quality might be improved by replacing some old electrolytic capacitors that I suspect may be around that area. I could however be wrong. Let’s get it opened up then.
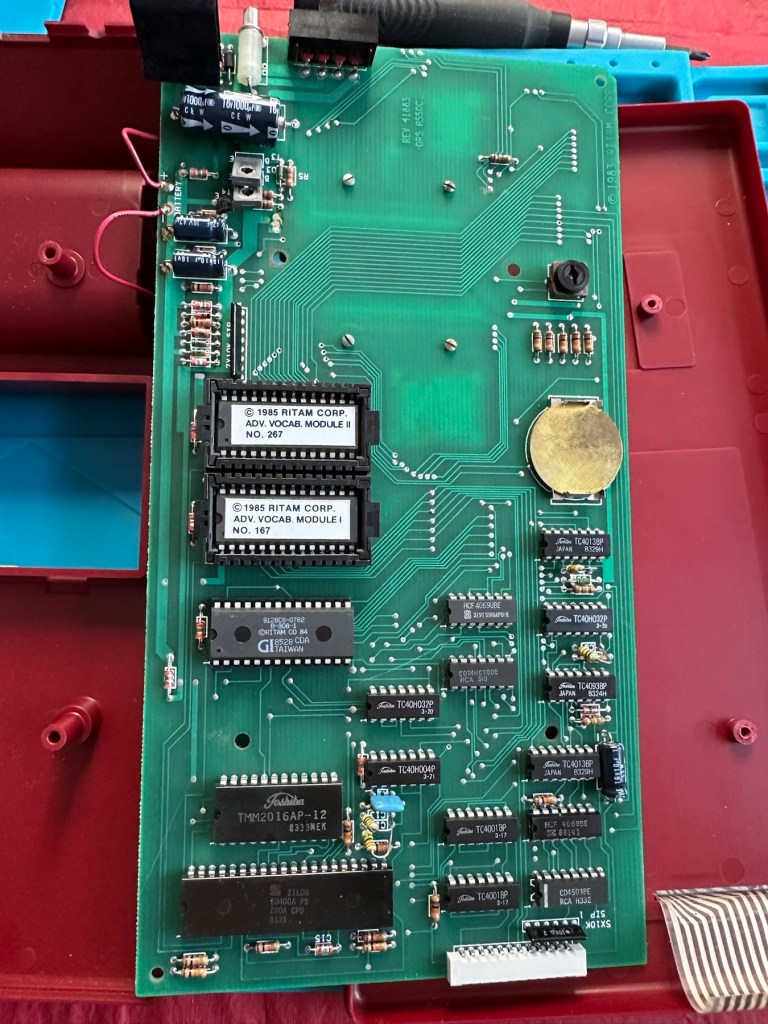
The board looks really clean on both sides, all capacitors (and there were only three of note) look good.
FrontRear
I have taken all three capacitors in the immediate screen area off, I’ve measured them out of circuit and they are all within the 10% tolerance of their indicated ratings so in my eyes there is no issues here. They are working fine.
All capacitors tested and within tolerance
On the rear of the board behind the display is a small variable capacitor. I turned this slightly to the left whilst under power and the screen quality has improved sufficiently be able to view the display from a more natural position. It can’t be adjusted any more though so it is now at its limits, probably a result of its age and limits of performance being reached for that particular component.
The variable capacitor Improved display performance
To be honest I’m satisfied everything inside the unit is fine, and the slight improvement to the display is more than adequate, I’m now going to close the unit back up and will concentrate on the exterior.
I’ve given the exterior a good polish, and then in my art box I have a silver permanent marker that will be great for touching up the worn out lettering and surrounds, so I will use this just to make the unit look a little more aesthetically pleasing.
Silver penAll lettering retouchedManufacturers name now visibleFinished unit
And boy has that made it look better
BeforeAfter
Looking good as new, and with that result we can say the repair is complete.
Result:
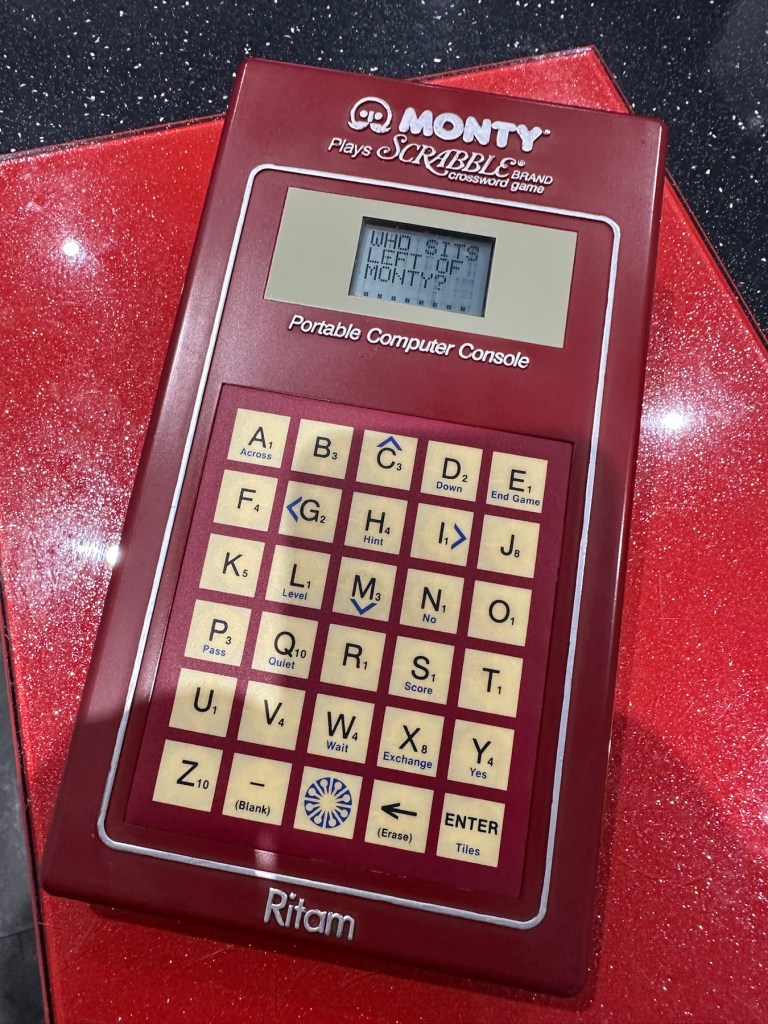
We now have a good looking fully restored and fully working unit. It looks as good as the day it was sold and still does what it was made to do. The screen is at its limits but should last a good while yet. A smart looking 41 year old unit that has been saved from the scrap heap and will be around for a good time yet.
All clean, look at the restored lettering
Here we have a small video of its basic operation
Easy to operate even without instructions
All in all another satisfying repair, and yet another item saved from landfill. If it’s damaged, 9 times out of ten it can be repaired and reused. We don’t need to be so wasteful.
Thanks for following the repair, it’s always very much appreciated.
Item is for spares repair only. Powers on but appears to be stuck on game.
Please view photos for details of listing
Any questions please message me
EBay
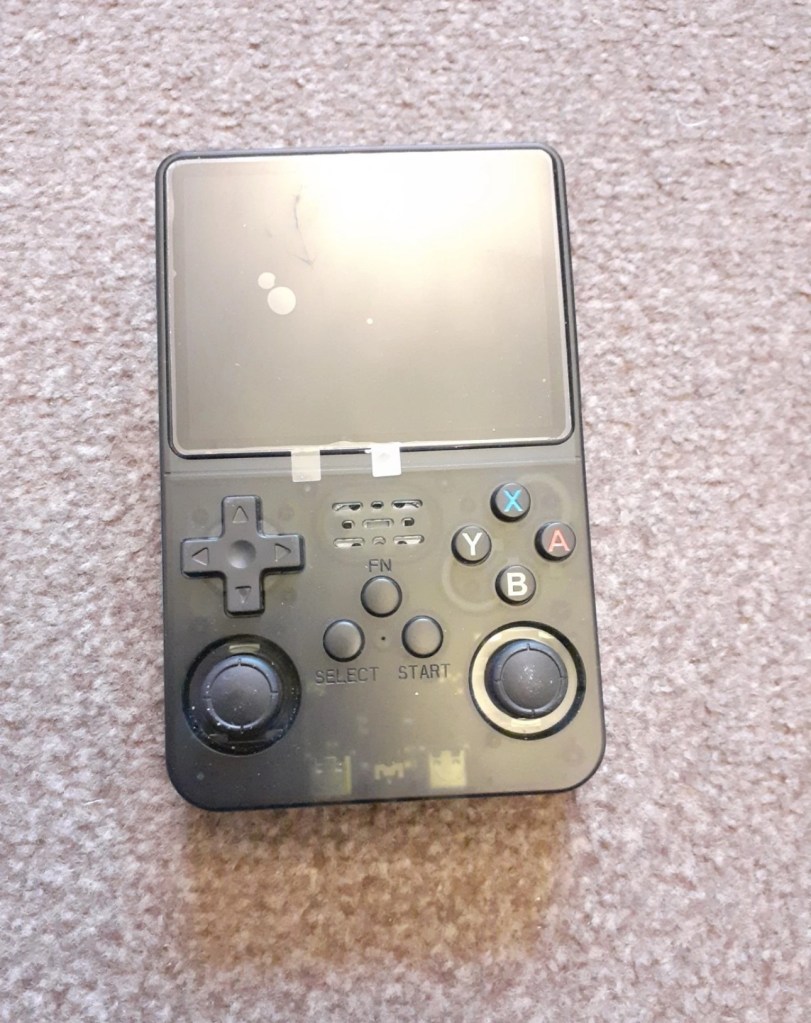
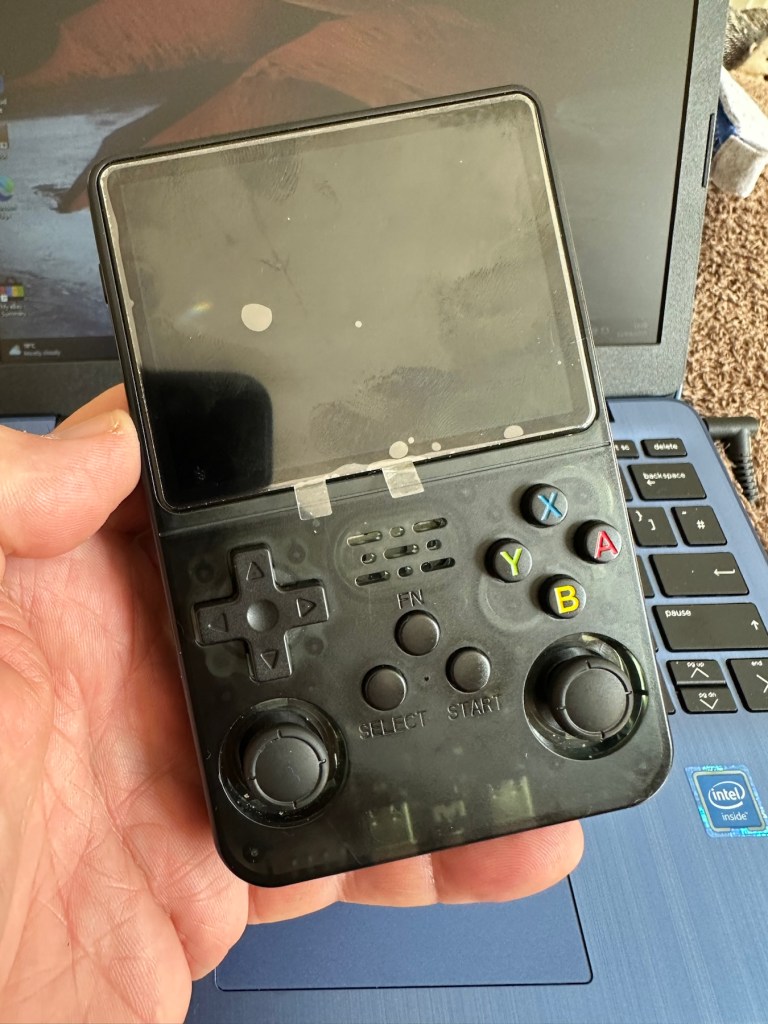
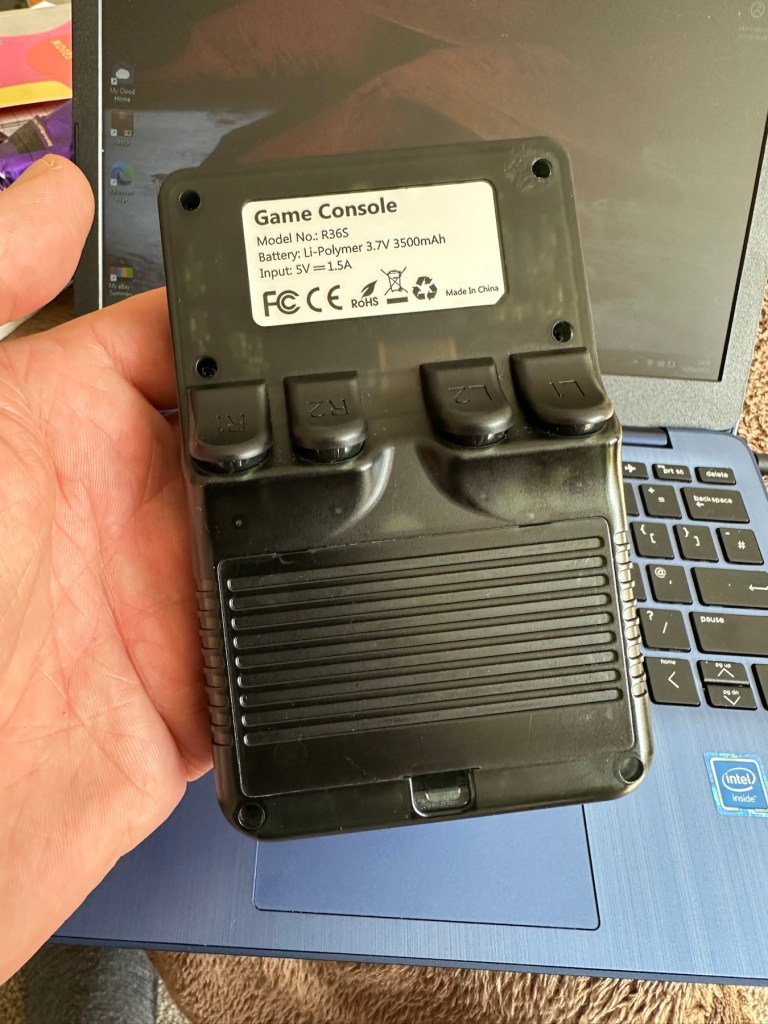
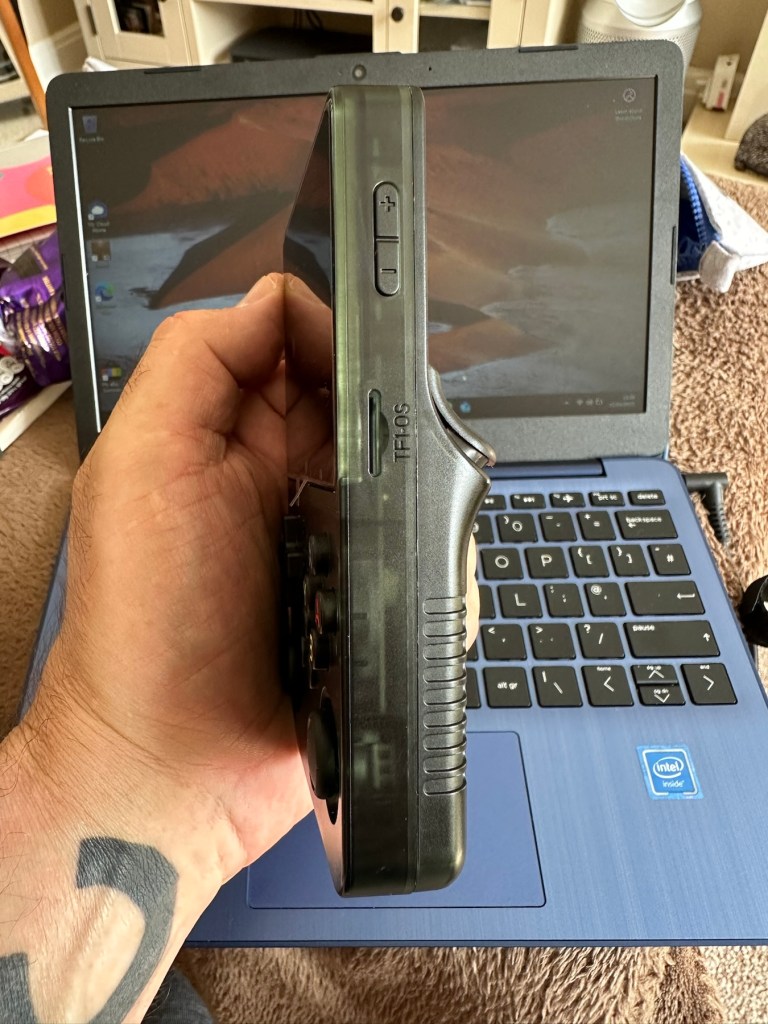
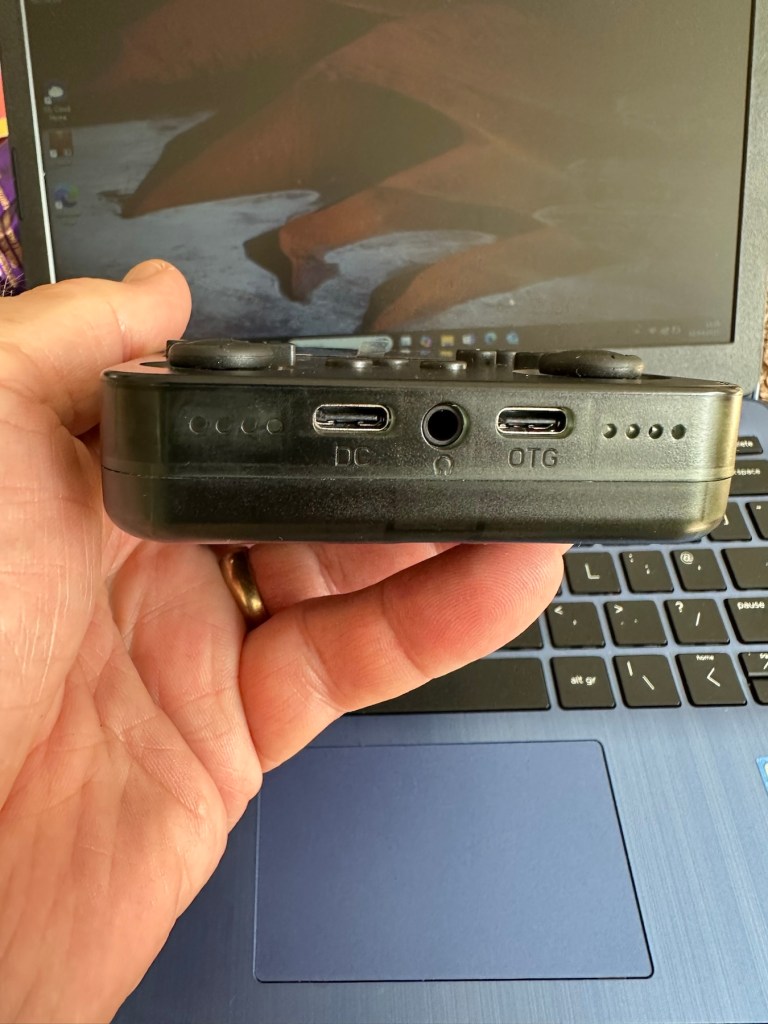
R36S game console. Boxed. Good condition externally
Here’s the info:
Whether you missed out on the gaming golden age of the 2000s or want to introduce your kids to those unforgettable classics, the R36S Retro Handheld Video Game Console supports 15,000 iconic games, making it your gateway to reliving the magic. It’s the perfect way to take a nostalgic trip back and rediscover the joy of childhood favorites.
Revisit your childhood memories with the R36S. Whether you’re rediscovering the excitement of Super Mario, the thrill of Pokémon, or the challenge of Zelda, the R36S brings your favorite games back to life.
Perfect for those who want to experience the magic of the 80s and 90s games all over again.
Equipped with dual joysticks, L/R bumpers, and a vibrant 3.5″ HD IPS display at 640×480 resolution, the R36S Retro Handheld Video Game Console delivers precise control over gameplay mechanics and stunning visual clarity. Enjoy enhanced color accuracy and fine details for a gaming experience that perfectly blends nostalgia with modern innovation.
r36s.co.uk
I’ve managed to secure this item for an all in price of £16:25GBP and thats including the postage. The seller had a number of these selling, I suspect they are customer returns as they still have screen protection, they are in original boxes with stickers on them, and that makes me suspect they are returns.
I think I may have paid over the odds for this unit.
The fact that as soon as this batch were purchased, another set had taken their place on the selling platform confirms this. On the r36s.co.uk site, these consoles retail at around £65:00GBP, you can get similar items from other Chinese outlets that are considerably cheaper. This is an emulator unit that runs via the Linux operating system, and is supplied ready installed with around 15,000 games already on the unit utilising a number of gaming system platforms. As the operating system is open source, you can also add additional games should you wish to do so. The one I have purchased is stuck on just the one particular game i believe. I think I have some work to do.
I very much suspect the issues with this unit lays solely with the software and are not in anyway hardware related. I could however be very wrong. My knowledge on these systems is very limited so I’m going to be very reliant on information and tutorials that i can find on line.
And i may as well download some operating instructions prior to its arrival, just to be a step ahead and furnished with the most basic knowledge of its operation, maybe then i won’t come across as a totally clueless clown.
Assessment:
It’s arrived and cosmetically it’s fine. It just doesn’t work. It doesn’t even do what is stated in the listing. More EBay untruths.
Looks nice. Just doesn’t work
Powers on, charges ok and that’s about it. Box looks nice. Finding it hard to talk of anything else positive. Oh, and it’s not an original it’s a clone machine… cheapo copy. Any way, let’s have a look at getting it to work.
Repair:
So first thing was to download a new OS for the unit, unzip it, and download it to the removable sd card, easier said than done. I think I’ve probably lost all the games that were installed, but without a system to run it all, what’s the point. I can always download games later, I have however backed up a number of files as suggested so let’s just wait and see.
Trying to prepare the new volumes on the drive
The first operating system downloaded did not work, because now I’ve been informed that this machine is one of many clones out there, it’s not original. Lovely. Not a problem, we can still get another operating system, it’s just going to take a bit more of my time to do so, and god knows how long it will take to download the games. This is the biggest pain in the ass with these systems, the sourcing of the programs to ensure the system runs smoothly.
But it will be repaired. And I’m in no rush. I’m off out for a while.
I have had to download an alternative operating system ArKos_K36_v2.0 to my computer. It then has to be run through a disc imager programme to prepare the disc and install the correct partitions and system information, onto the micro SD card used by the unit.
That all done, time to plug the card into the unit and see if it turns on.
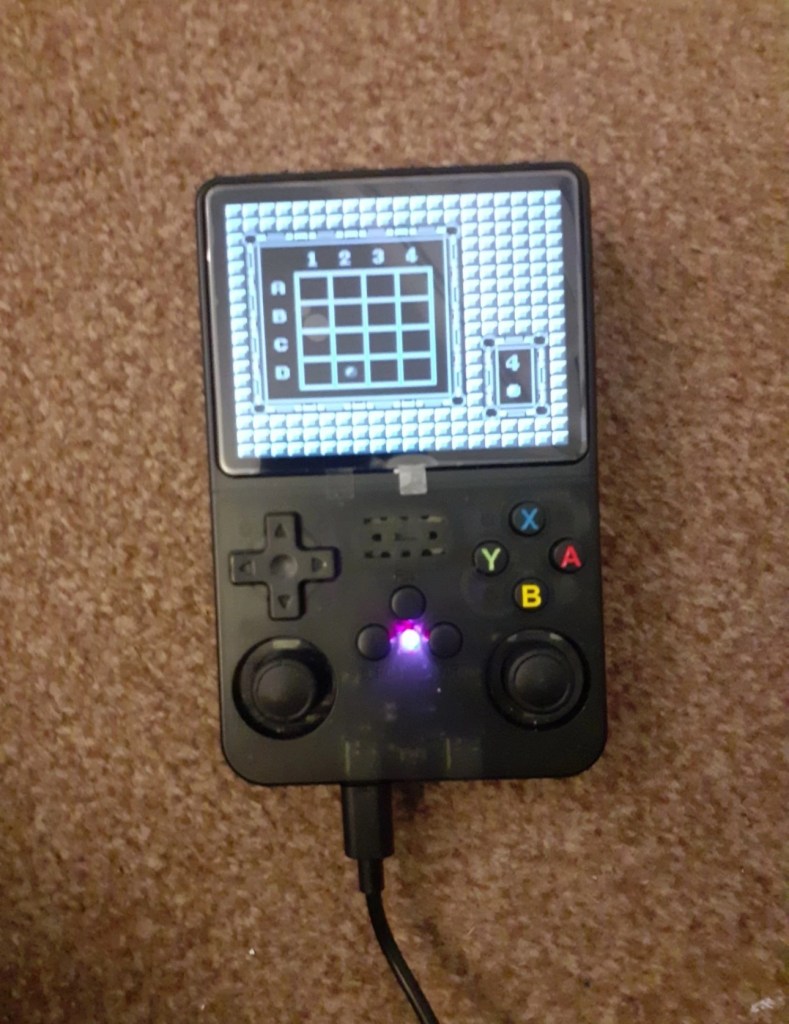
Hallelujah! It works.
The operating system successfully installed
Having to format the original card obviously erased all the games that were originally on the card. There were around 15000 games on this unit, but let’s be honest most of them would have been games that were either inferior, similar to others, or just used to bloat the card out. I’m now in a position where I can be choosy about the games I load on the system, and this will allow me to not have it so cluttered.
This is where it gets a little more tricky.
There are a number of people and sites I have spoken with or looked to, to find out the information required to carry out these tasks. And for someone who hasn’t messed about with computer and program files and structures for many a year it is quite daunting to say the least.
I have downloaded a file that is recommended and contains many of the 15000 games originally on the card but with a lot of the bloatware removed to make it a more structurally pleasing and easier to handle package. It’s called the Tiny best set go package and is downloaded from GitHub.
These games are broken down into Rom packages and have to be removed from the download and placed into the easyrom folder on your operating system, it’s a little more complex that that but that is the crux of the task. I won’t go into finite detail as it will bore your asses off and there is plenty of information on how to do it already out there.
I will recommend this one guy as having a superb little site regarding hand held consoles such as this and their issues: Handheld database
Anyway the task has been completed. I’m probably not going to get involved with such time consuming repairs as this again. It’s been a learning curve, but just too time consuming for me. I’ll leave these issues for the younger generation.
Result:
It works. It’s been saved from landfill and there is no better outcome than that. To be honest it’s unbelievable that so many games and so much information can be held on such a small memory card.
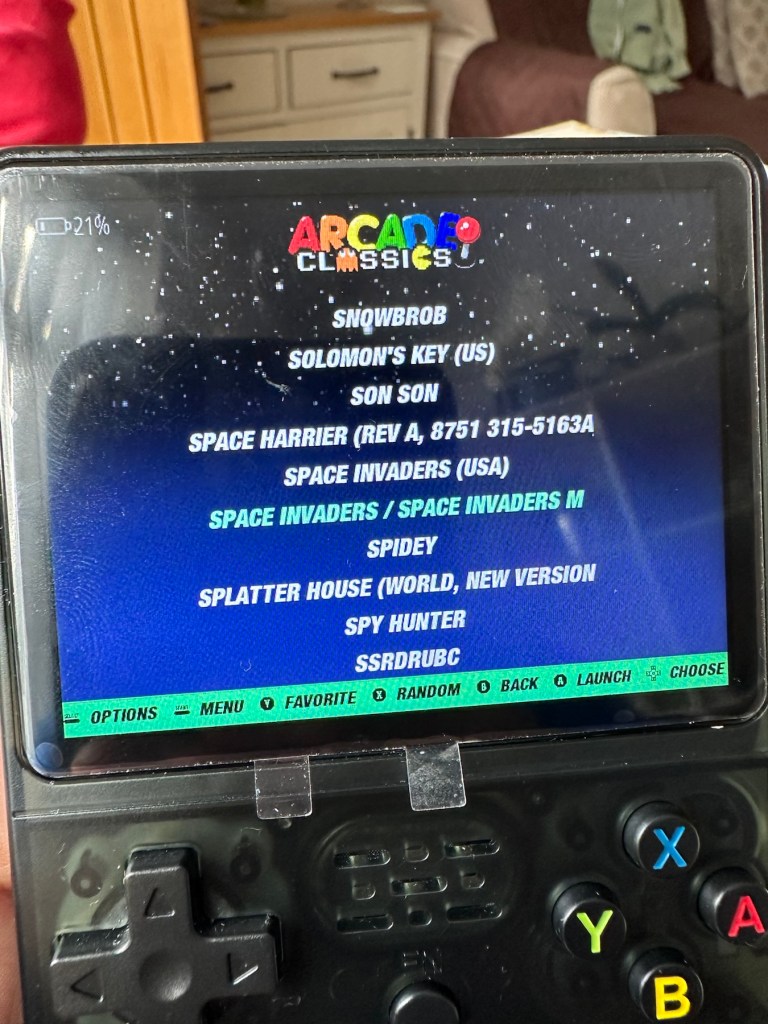
Space invaders….im now content
In general the game quality is really good, only let down sometimes by the way that the emulator software interprets the program in question. There is more than enough on here to keep anyone occupied during some downtime. There are many classic old school games on here that will also keep the old farts like me amused as well.
Overall it’s been a tough repair, I pretty much knew from the start what the issue would be and went into this repair totally blinkered. I have learned a lot from it, but will I be working on these again? I doubt it unless one of the younger members wants one then I might have another go. But until then it’s job done, another bit of throwaway hardware saved from the scrap heap.
Edit: I couldn’t keep away could i? I found a chap local to me who works on these units, and he has kindly offered to assist me if I should ever need anything clearing up. Well I couldn’t resist that offer and in two emails he has shown me just how to get these games downloaded, it’s simple when you know how.
19939 games now. Blimey.
So simple that rather than download a few games I’ve gone a tad over the top and now have 19939 of them. That should see me right beyond my natural existence and into the afterlife. What a lovely fellow. There are still lots of nice and helpful souls around.


You must be logged in to post a comment.