Sharp OZ-7000 Wizard

The Sharp OZ-7000, Amongst one of the first electronic organisers and precursor the PDA. Needs repair. Or does it?

What the listing stated:

Not working. I have replaced the two batteries and cannot get it to work. I have not touched the memory battery. See picture for actual item. Case is a bit sticky unfortunately with age.

EBay

First of all, what is it?

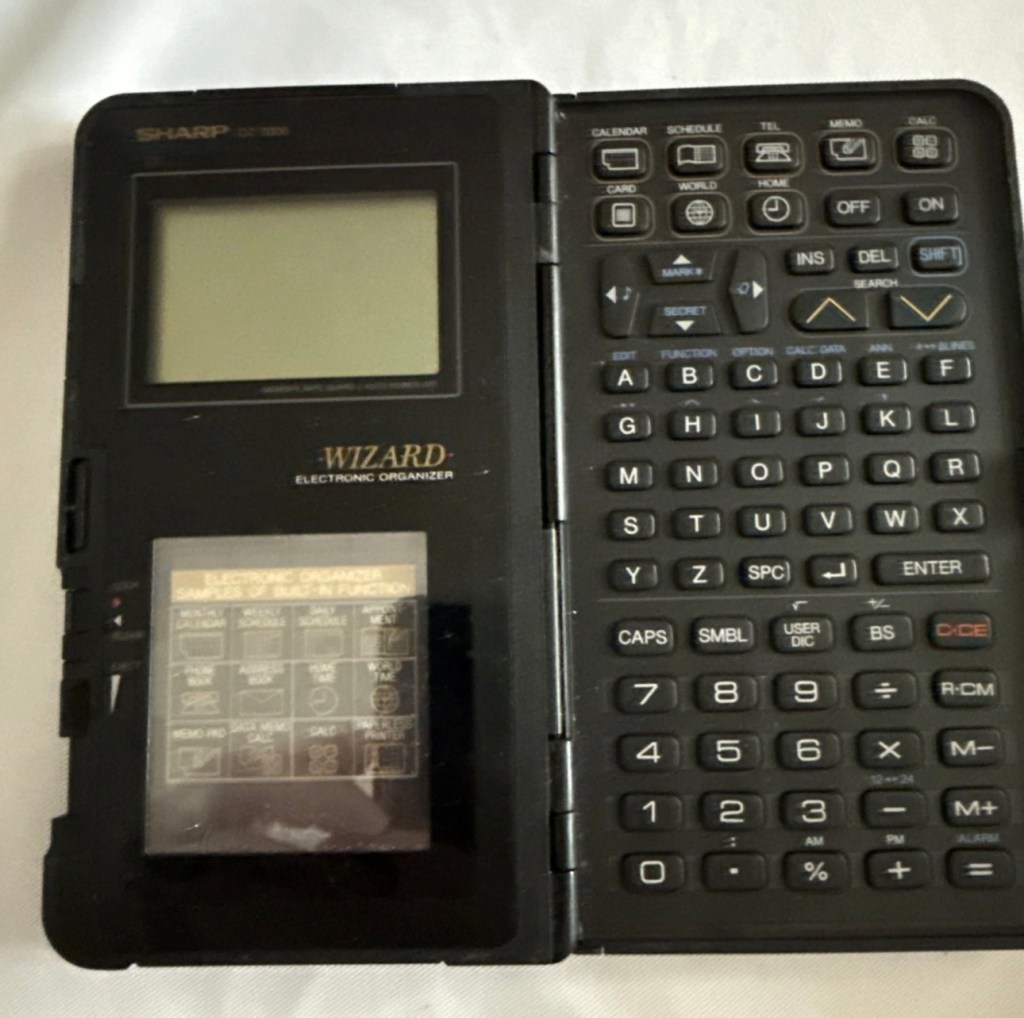
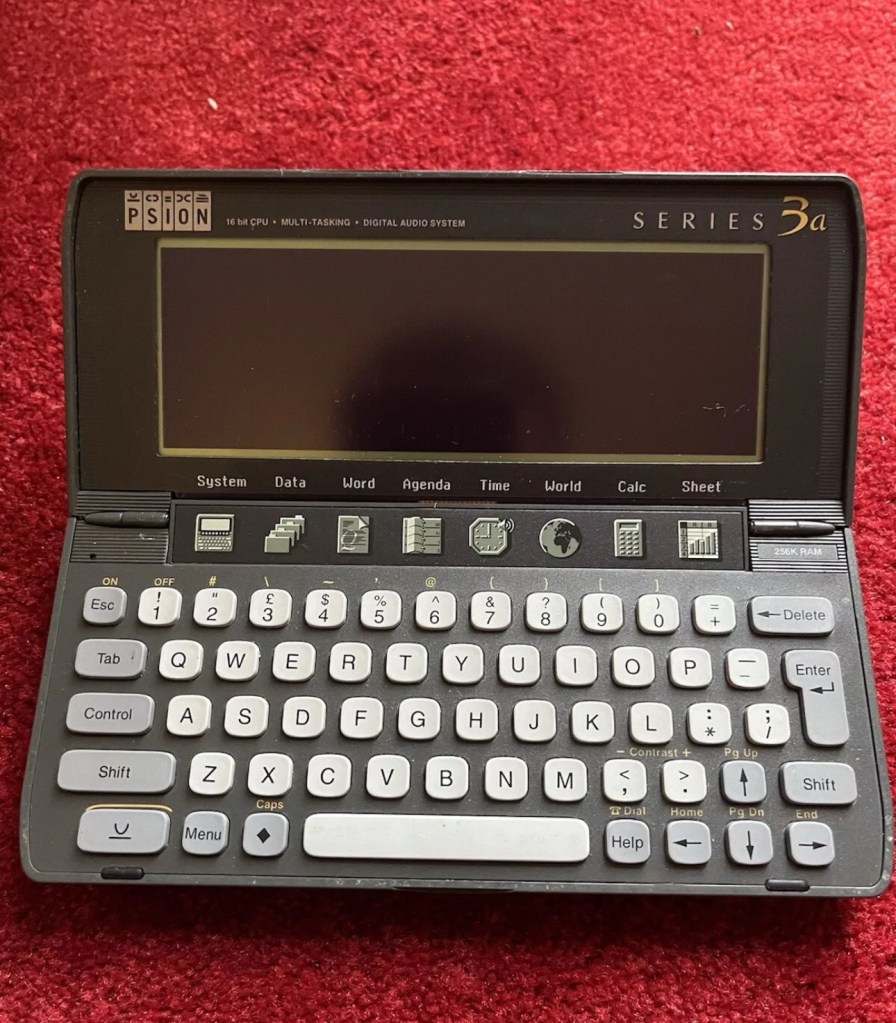
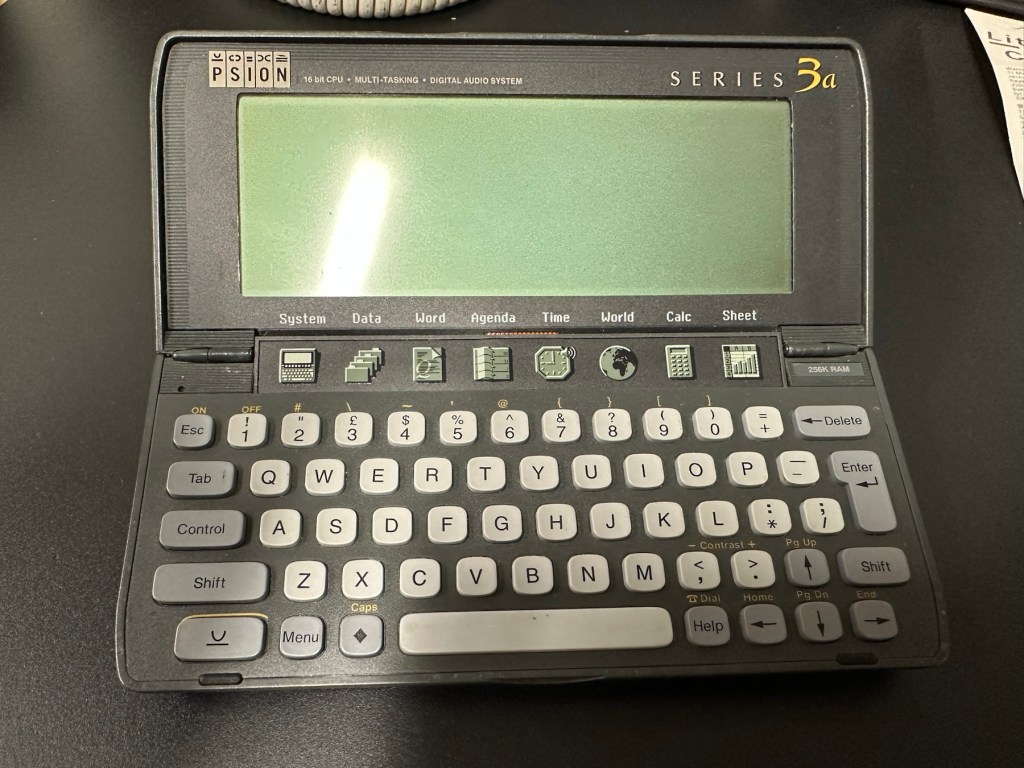
The Sharp Wizard series, introduced by the Sharp Corporation in 1989, was among the first electronic organizers and a precursor to personal digital assistants (PDAs). The debut model, the OZ-7000 (known as the IQ-7000 in Europe), combined organizer functions with an IC Card expansion system, allowing users to install software and memory cards. Over time, Sharp refined the series with larger displays, increased memory, and enhanced features, such as infrared communications port for wireless data transfer, touch-sensitive displays, and clamshell designs.

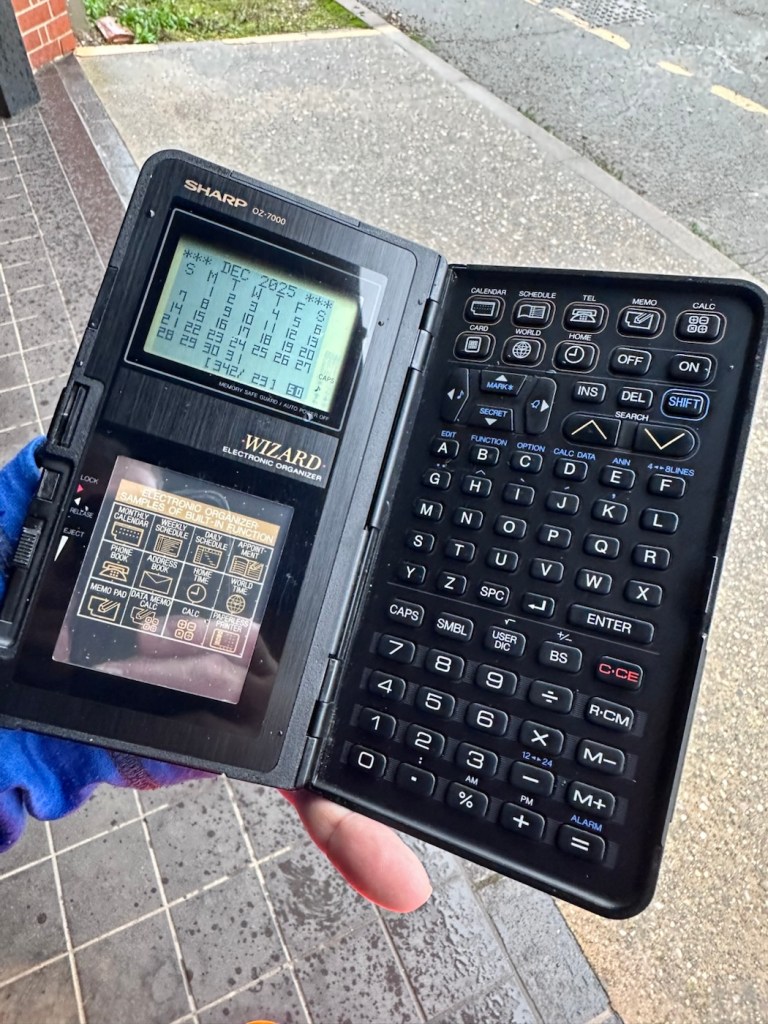
The out-of-the-box functionality of the OZ-7000/IQ-7000 included a memo pad, a telephone pad, calendar and scheduling with alarms and repeating events, multi-time zone clocks, and a calculator, thus covering all the basic functions found in PDAs since. The keyboard was not QWERTY, although later models, starting with OZ/IQ-8000, changed the orientation of the screen and keyboard layout.

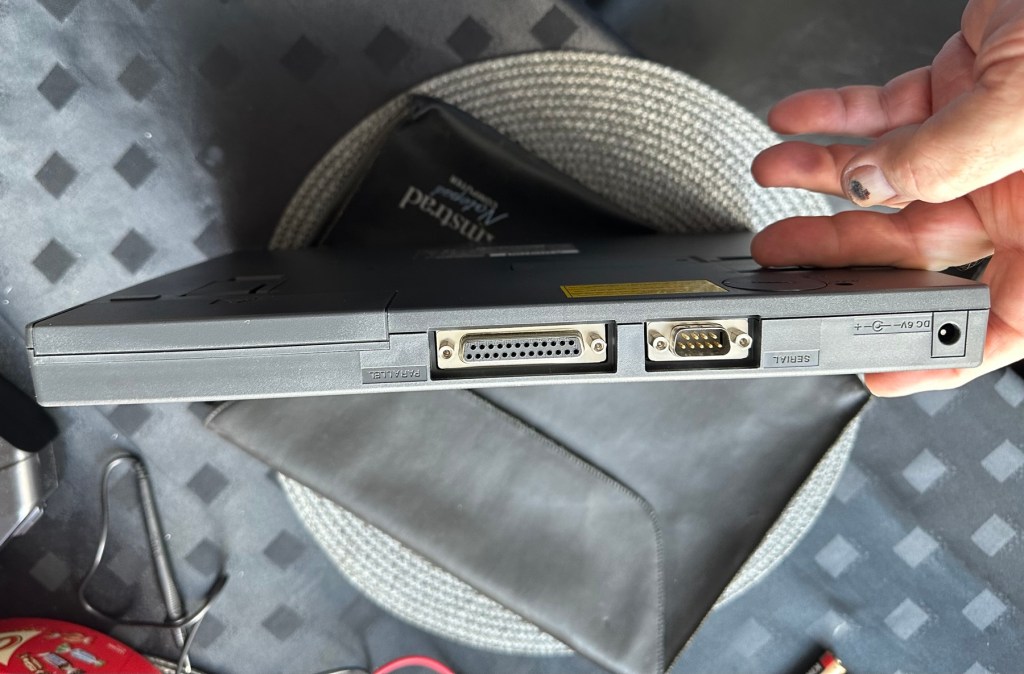
The OZ-7000 was about 6.3 inches (163 mm) tall, 3.7 inches (94 mm) wide closed, 7.25 inches (184 mm) open, and 0.85 inches (21.5 mm) thick closed, making it much larger than later PDAs. It featured a serial port (proprietary connector) to attach to a Windows PC or Macintosh or another OZ-7xxx/OZ-8xxx device, an optional thermal printer port and a cassette tape backup. The OZ-7000/IQ-7000 model featured 32 kilobytes of internal memory and a 96 x 64 dot (8 lines x 16 characters or 4 lines x 12 characters) black and white LCD with controllable contrast but without a back light. A major advertised feature of the model was the IC Cards expansion slot for accessory cards developed by Sharp.

Wikipedia

A bit of a break from the mountain of photographic equipment I have been dealing with lately, I thought I’d take a bit of a detour and have a look at some prehistoric PDA gear, as I have also done in the past, as you will no doubt be aware of, if you have ever read any of my posts on Psion organisers.

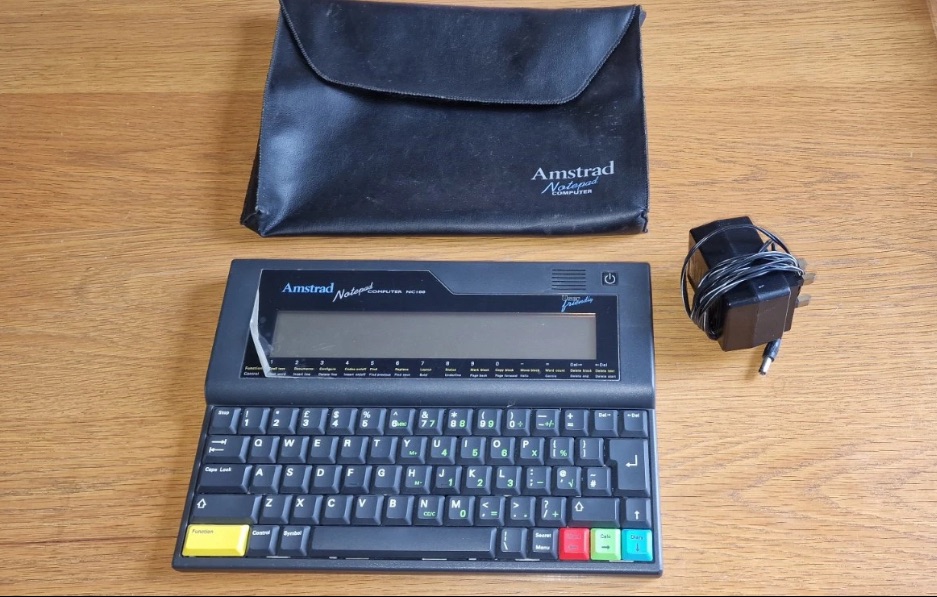
From what I can gather, this one is a little beaten up and battle scarred, and quite simply does not work. I’ve paid the princely sum of £8:54GBP after i managed to knock the seller down by a few pounds. I just now have to await its arrival before we can carry out a thorough assessment.

Assessment:

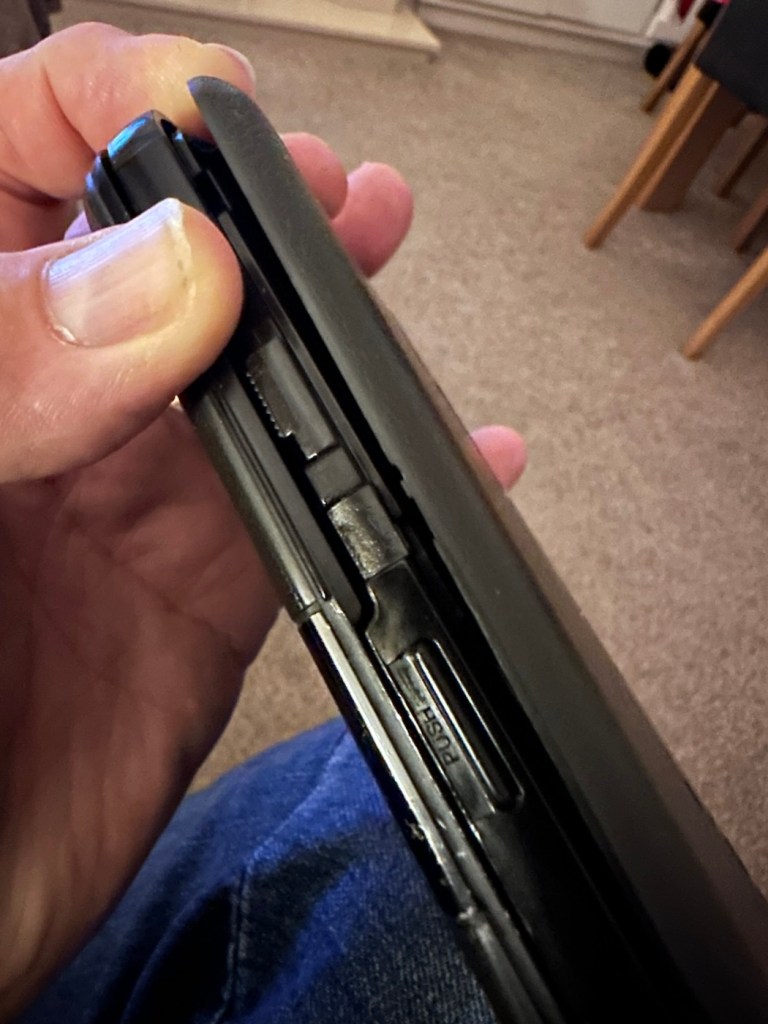
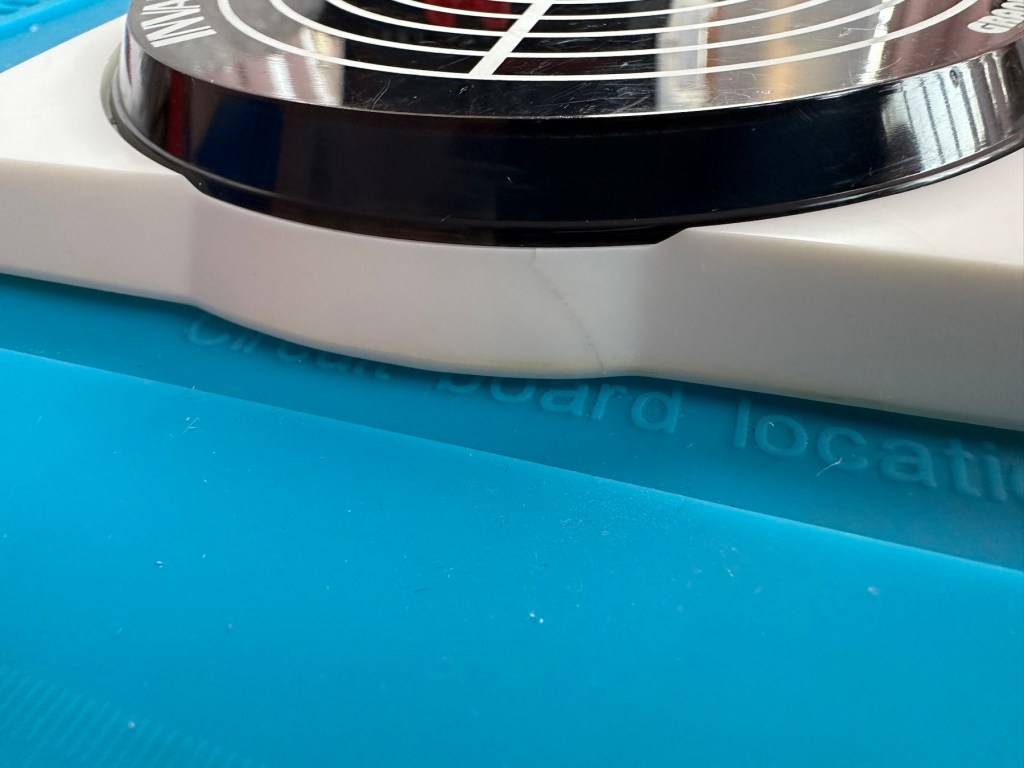
Its here, everything is as it should be apart from the base being a bit loose in one corner where the clip inside has broken, however that’s not an issue and can probably be repaired.

The broken clip

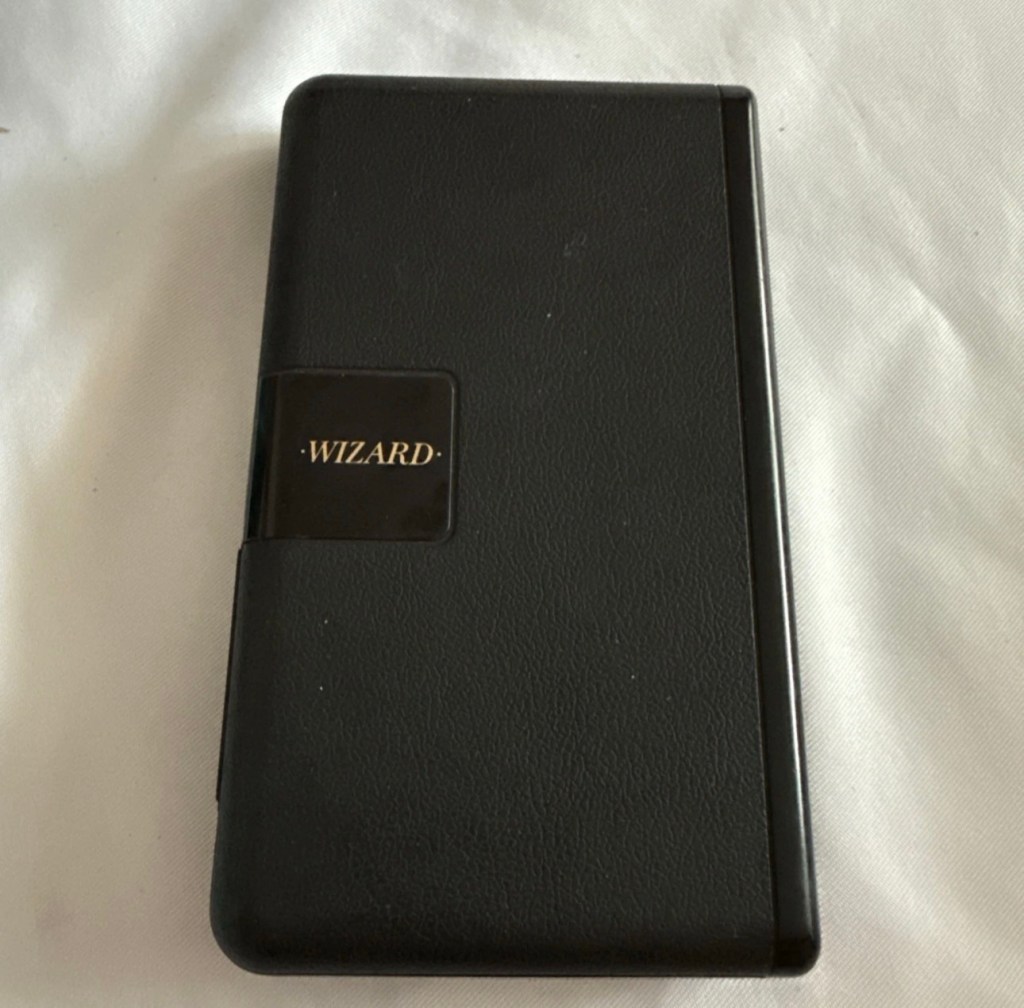
The exterior is a little sticky but again, this is just one of those 1989 rubber enhanced products where the vulcanised rubber coating has started to degrade. A post I previously published shows how I deal with these 80’s degrading rubber issues: Sticky, Rubber camera grips

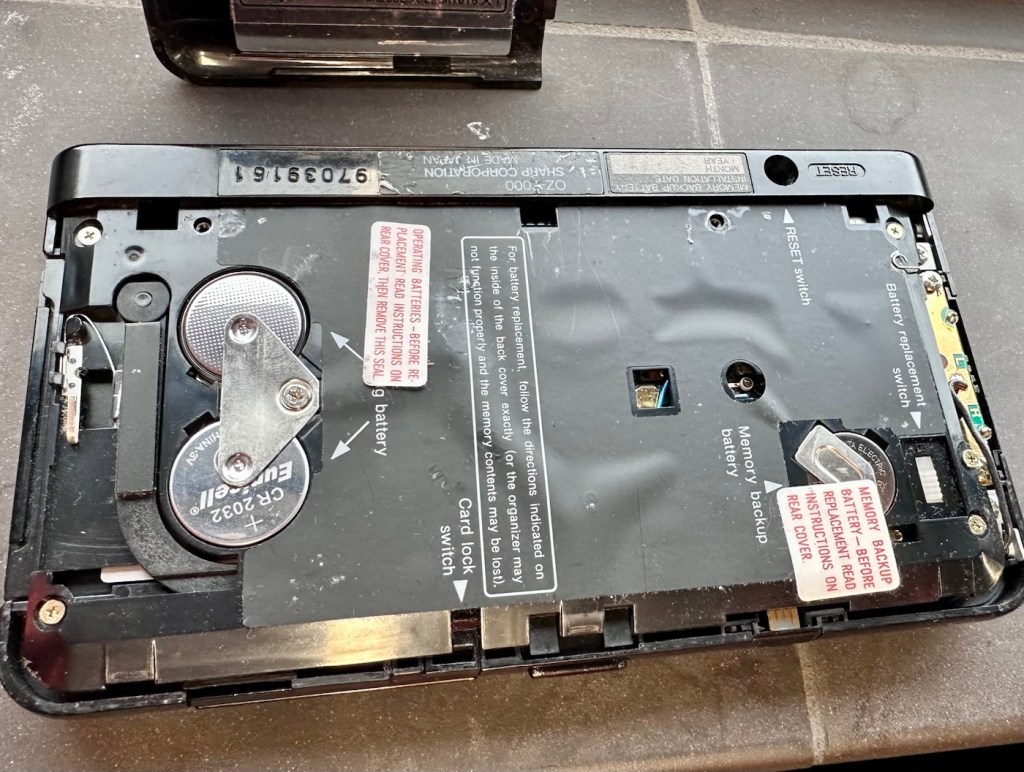
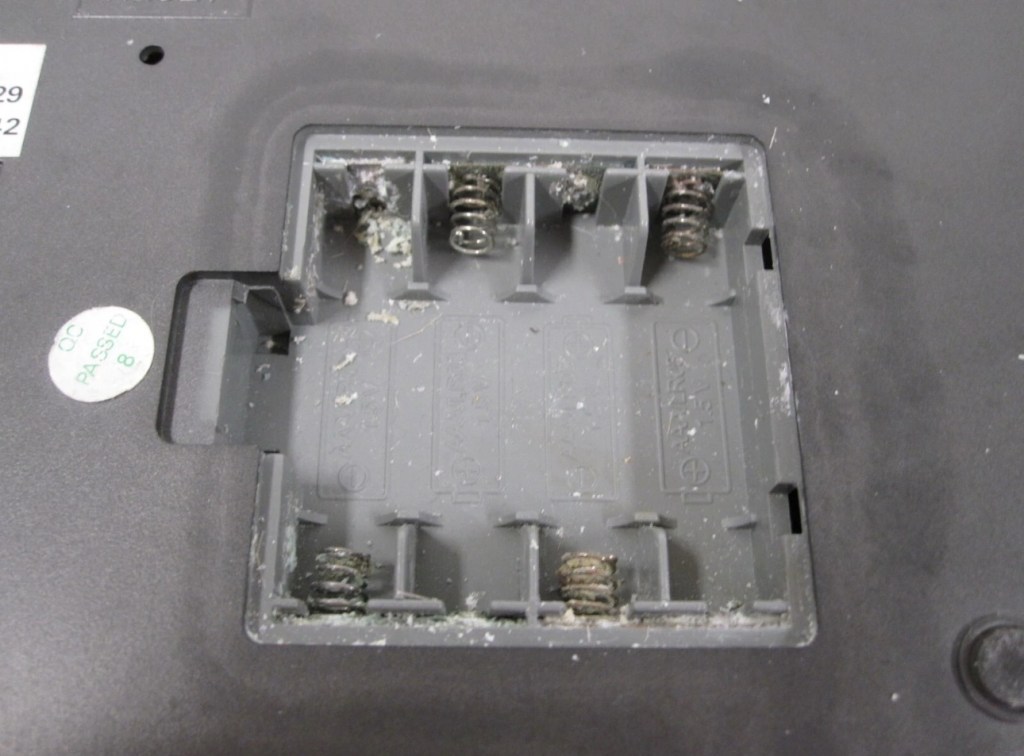
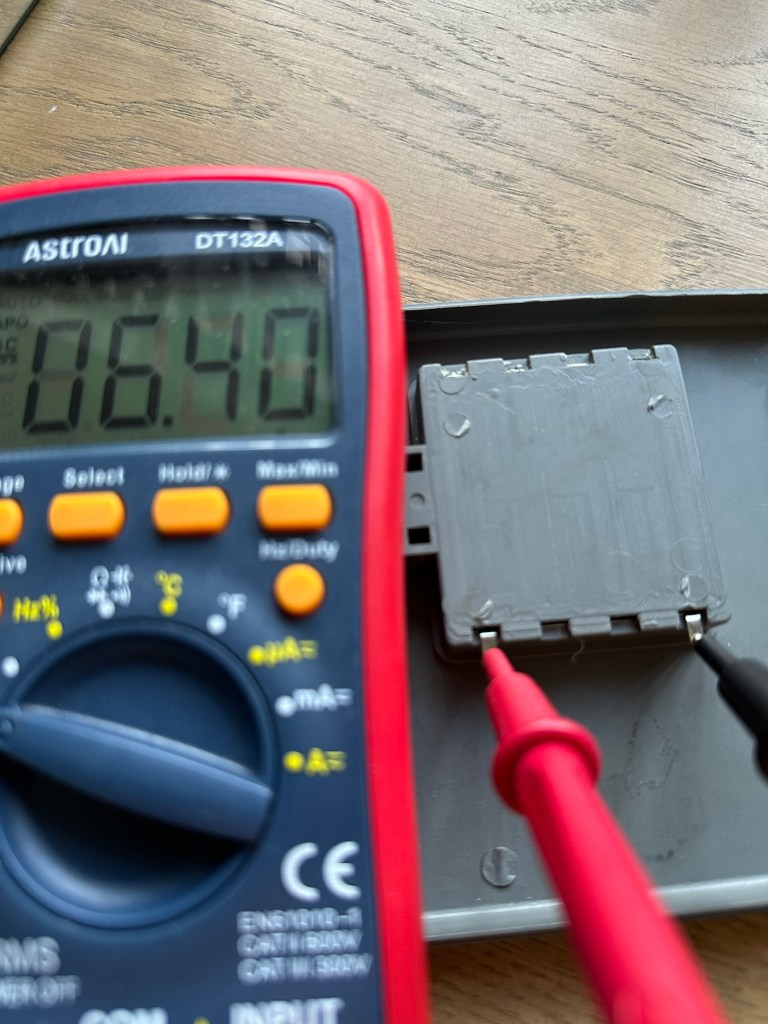
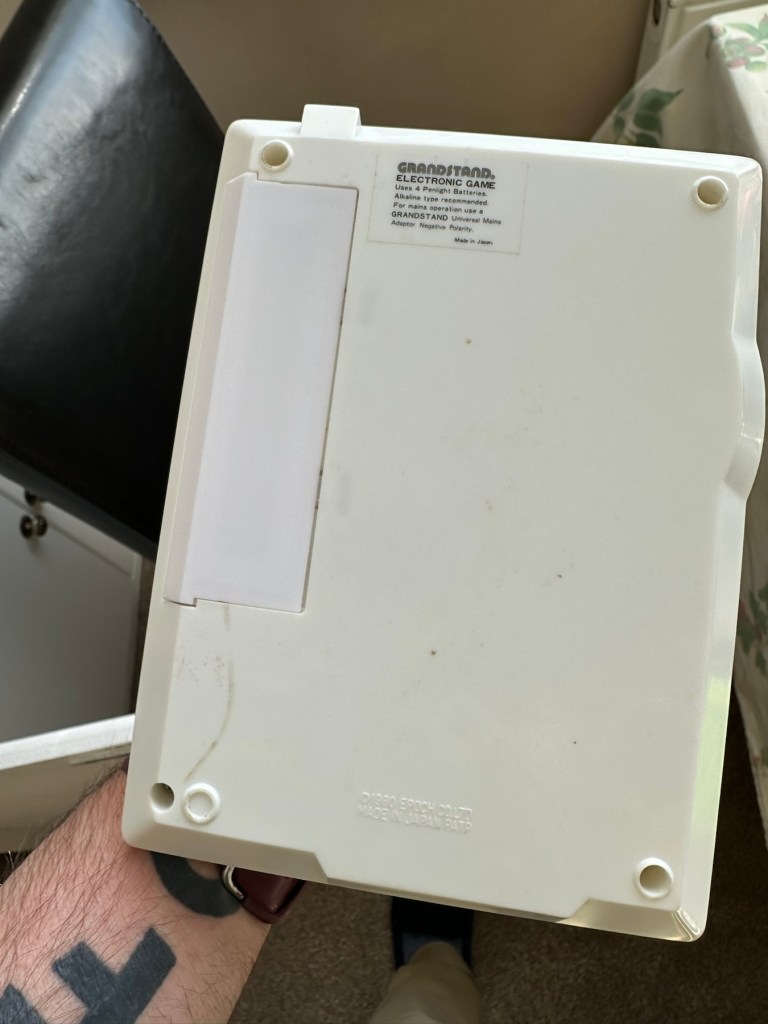
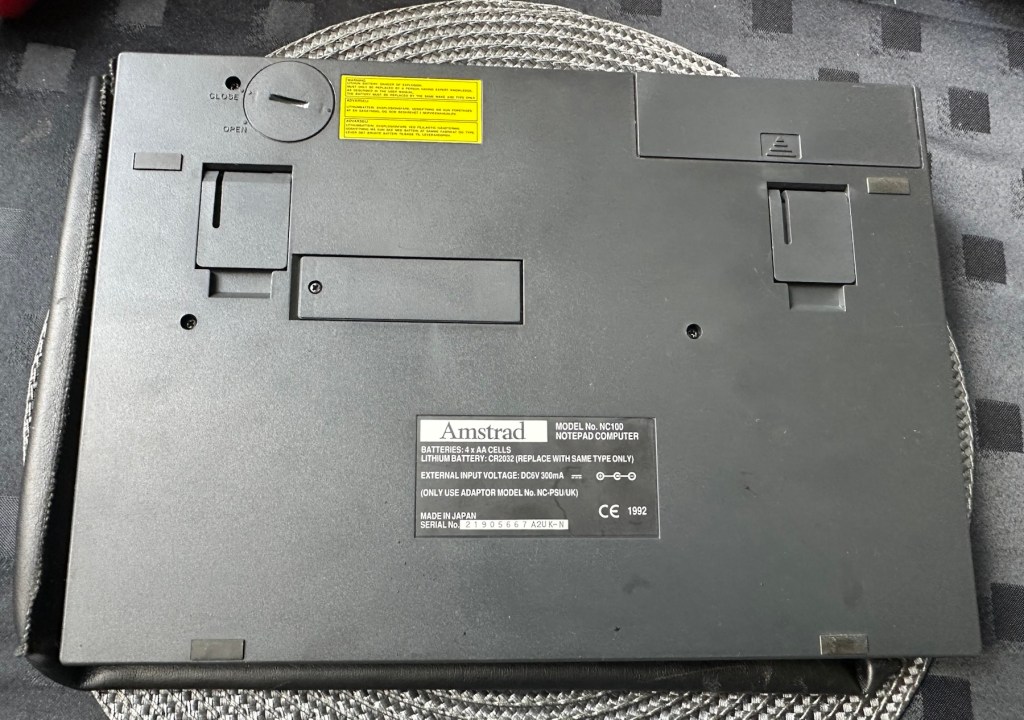
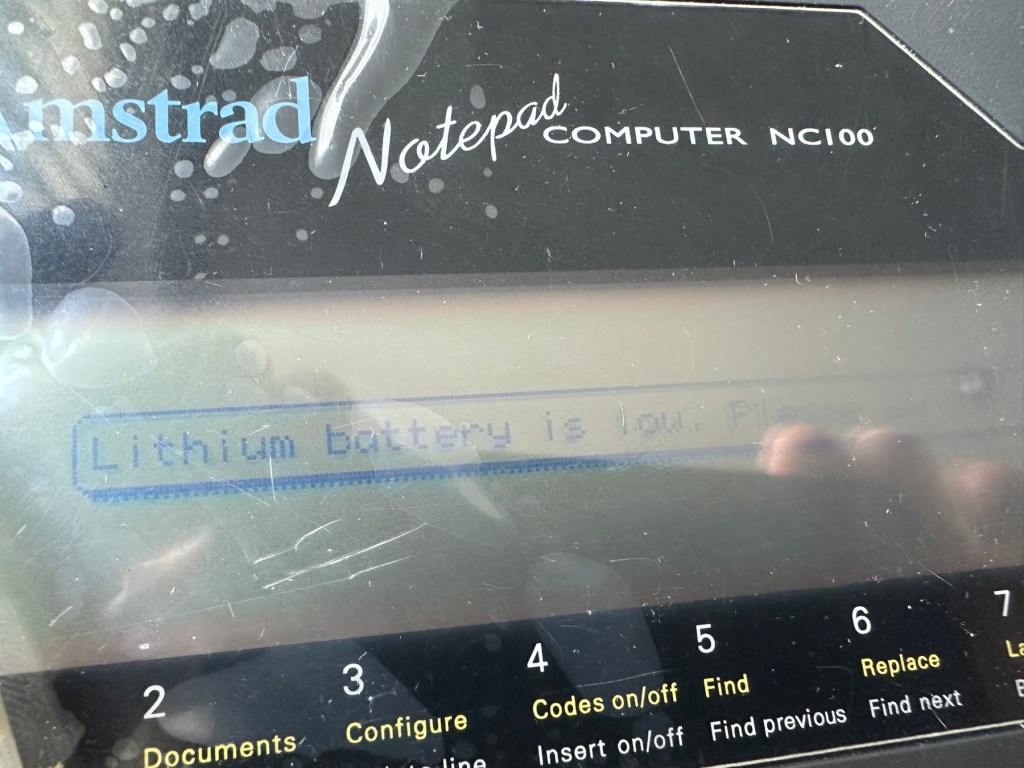
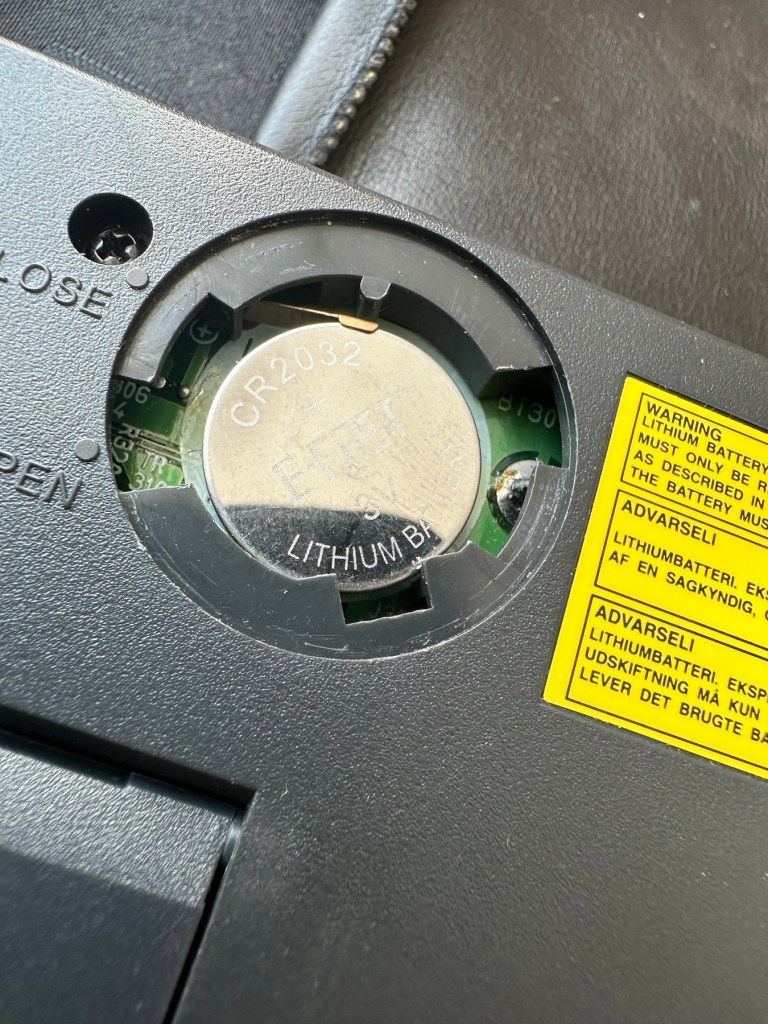
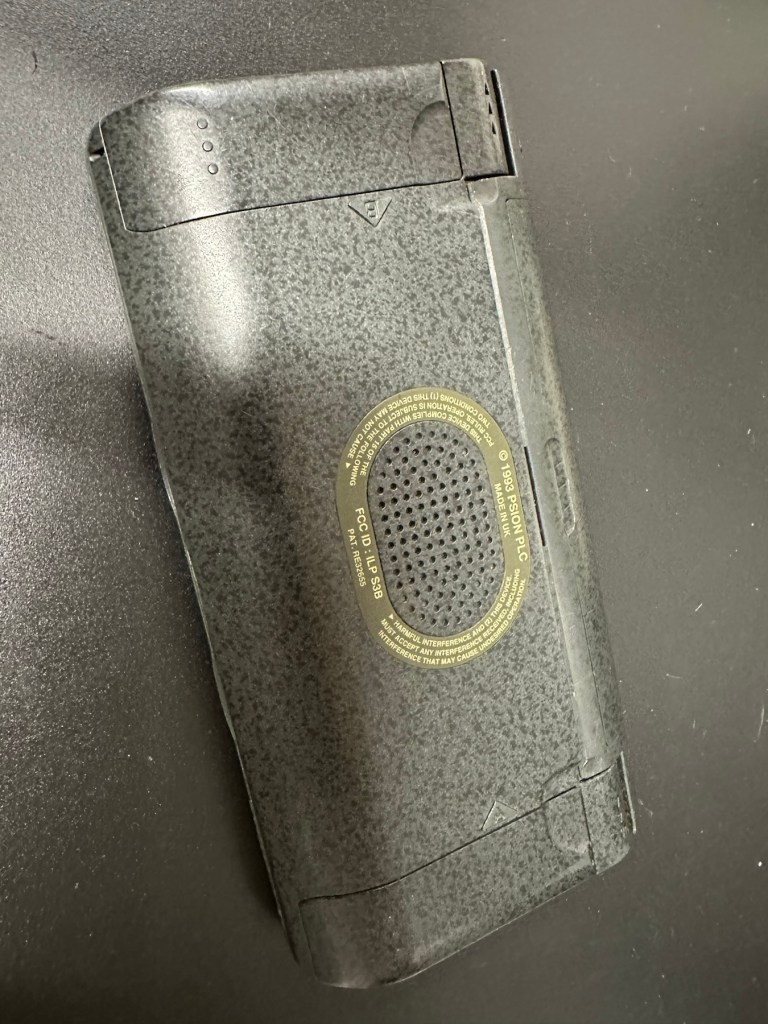
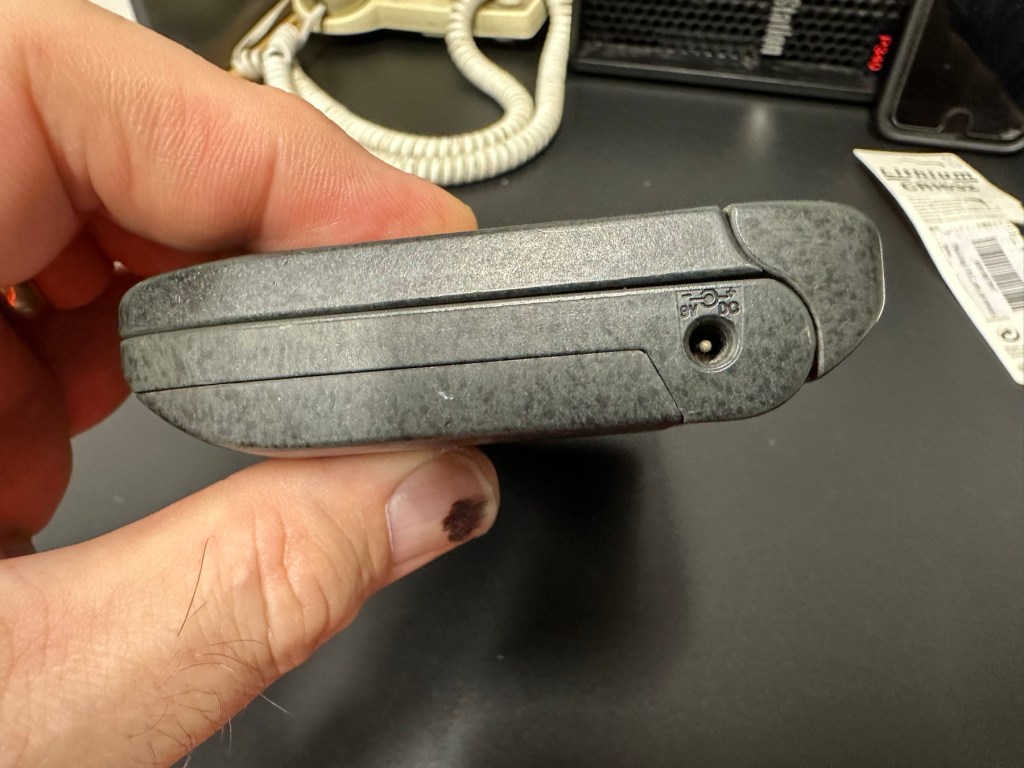
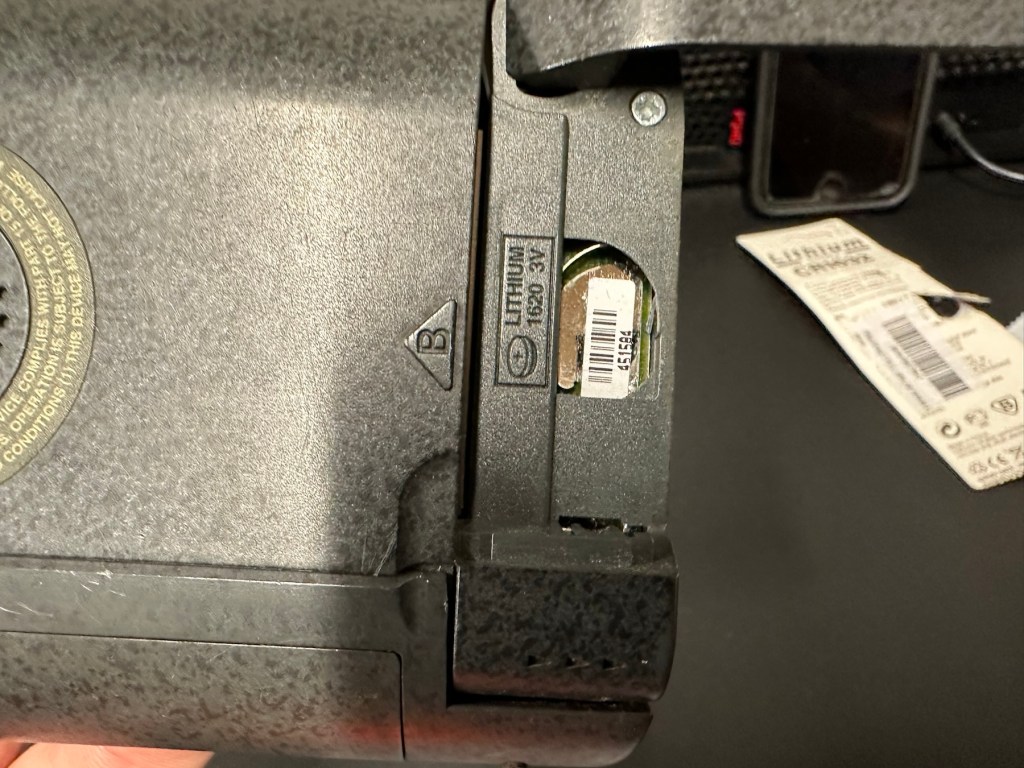
The unit has three batteries, under the rear shell. These are two CR2032 and one C1616 coin cell, with the C1616 being the units memory battery. These batteries will need to be tested as this unit does not start up, the whole unit is dead. The previous owner has stated that they have changed the two main batteries but not the memory battery, testing them will tell.

The three batteries

Beyond that, all catches, buttons and switches seem to be performing as expected, no cracks or major damage to the external shell, or screen area. Naturally there are signs of usage as you would expect on an item that is now 36 years old, light signs of age related wear and tear, nothing of concern that is detrimental to its operation.

Repair:

I’m leaving the broken clip on the rear shell as it is, it’s not visibly exposing anything of the interior and to be honest needs quite a bit of force to show the gap, it’s not a problem and not necessarily requiring a repair. In normal handling it is not even noticeable, so it will remain as it is.

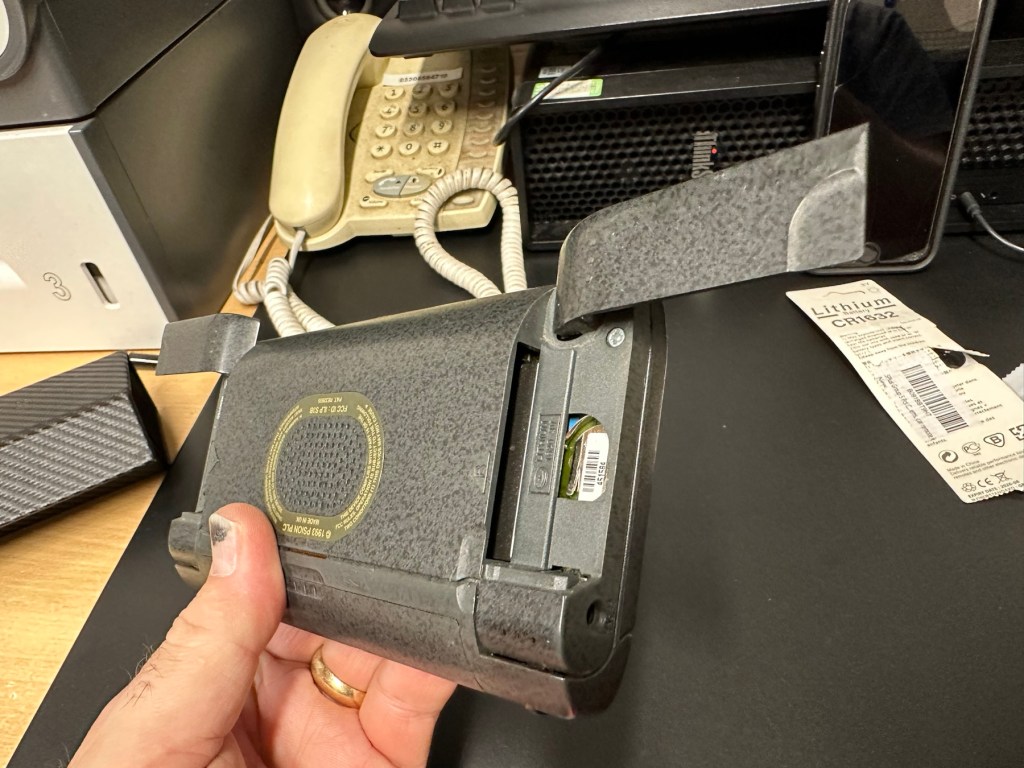
The main fault, and I apologise in advance, as it was not really a fault, was a misunderstanding of the unit’s operation by the previous owner. When you take the back off and change the batteries, you have to operate a switch so as to not interrupt the backup of the system.

Battery backup switch there is a “B” and a “A” setting

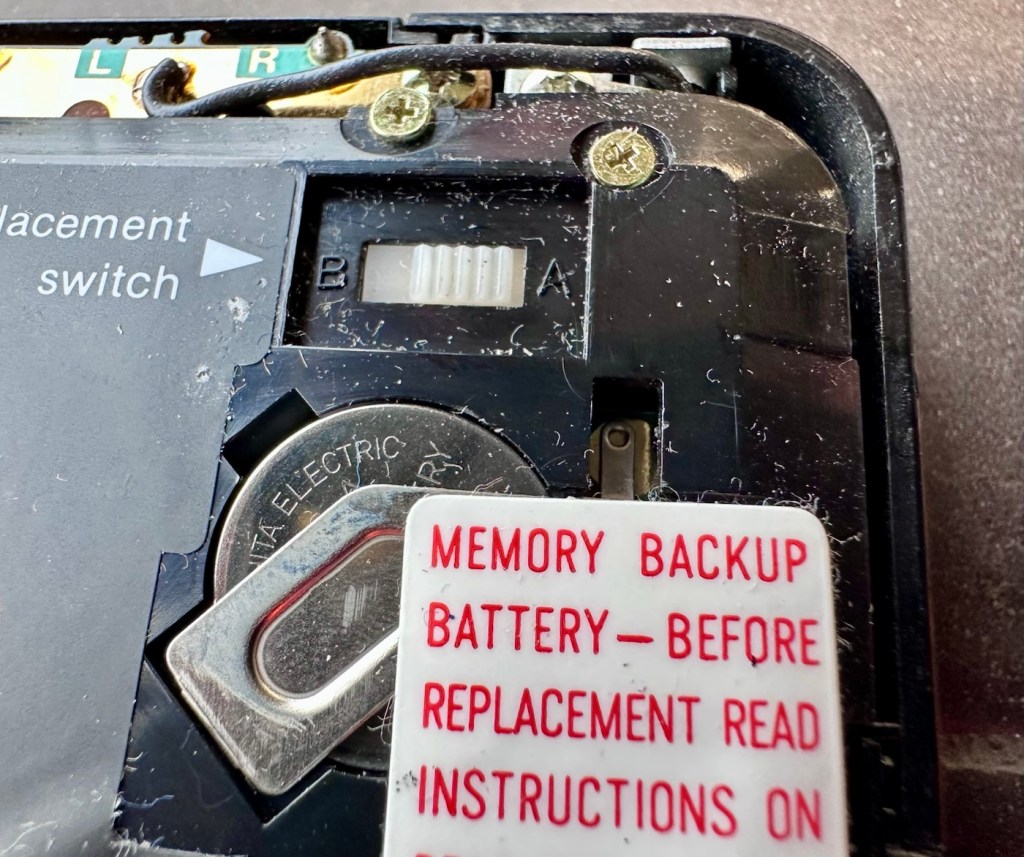
There are two modes and these are explained below. This switch is located inside the battery compartment and is used when replacing the main batteries to prevent data loss.

  • B stands for Backup, a setting used during the battery replacement process. The device relies on a small, separate backup battery (often a C1616 coin cell) to maintain memory while the main batteries are removed, provided the switch is in this position.
  • A stands for Active (or simply the normal operational position), which is the standard setting for everyday use once new batteries have been installed. 

To replace the main batteries safely and avoid losing your data, you must follow a specific procedure that involves setting this switch to “B”, changing the main batteries, and then switching it back to “A” after the new batteries are inserted. 

The issue here was that the batteries had been changed and the switch was put into the correct “Backup” mode. However the previous owner had not placed the switch back into the ”Active” mode when the batteries were changed and the back of the shell was put back in place. Hence the unit would not work as in theory the batteries were locked out of use. On opening the shell up, this was the first thing I looked at, and when the switch was put into the correct position the unit sprung into life once the “On” button was pushed.

When the switch was set, power applied and the unit reset to 1989

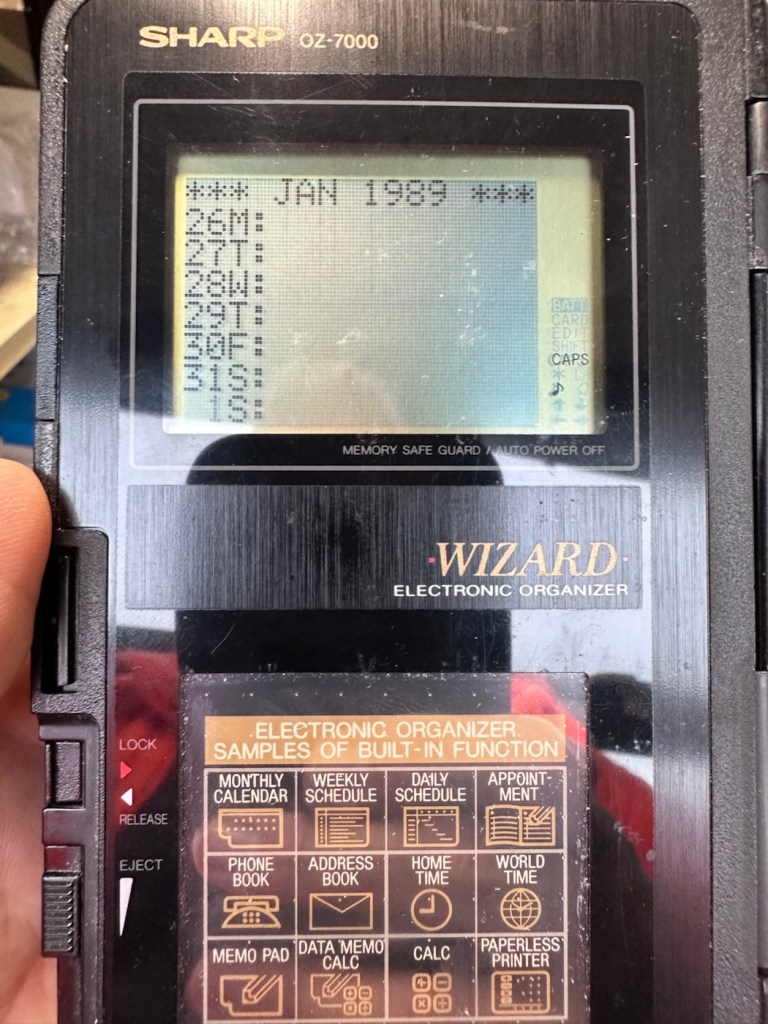
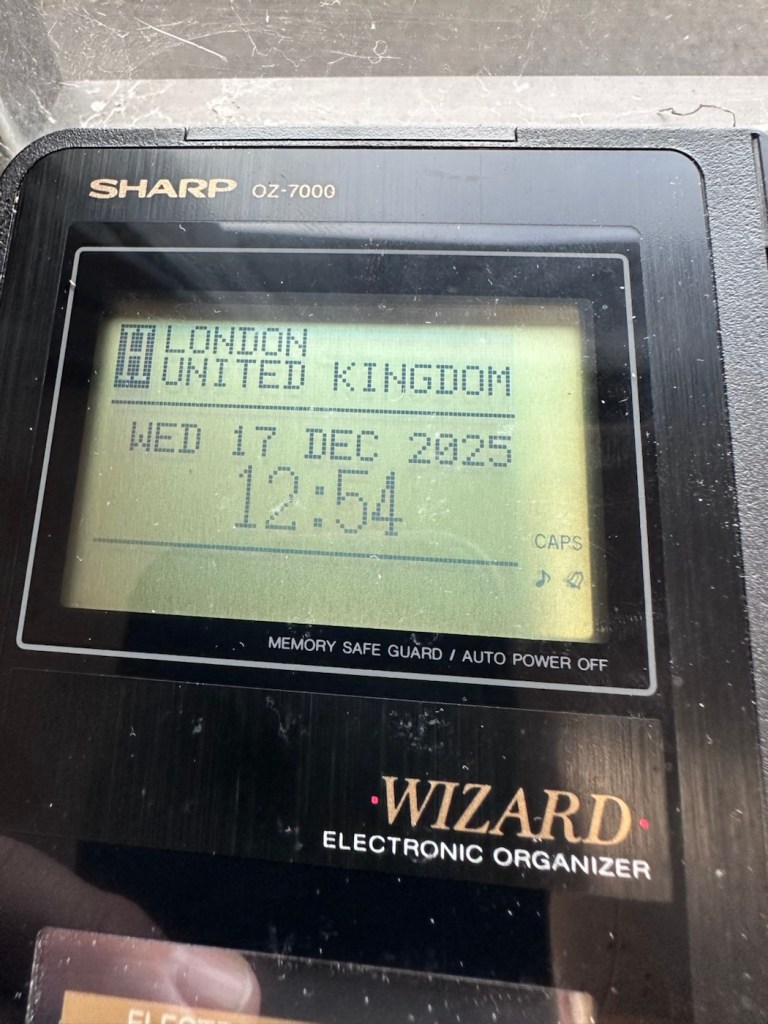
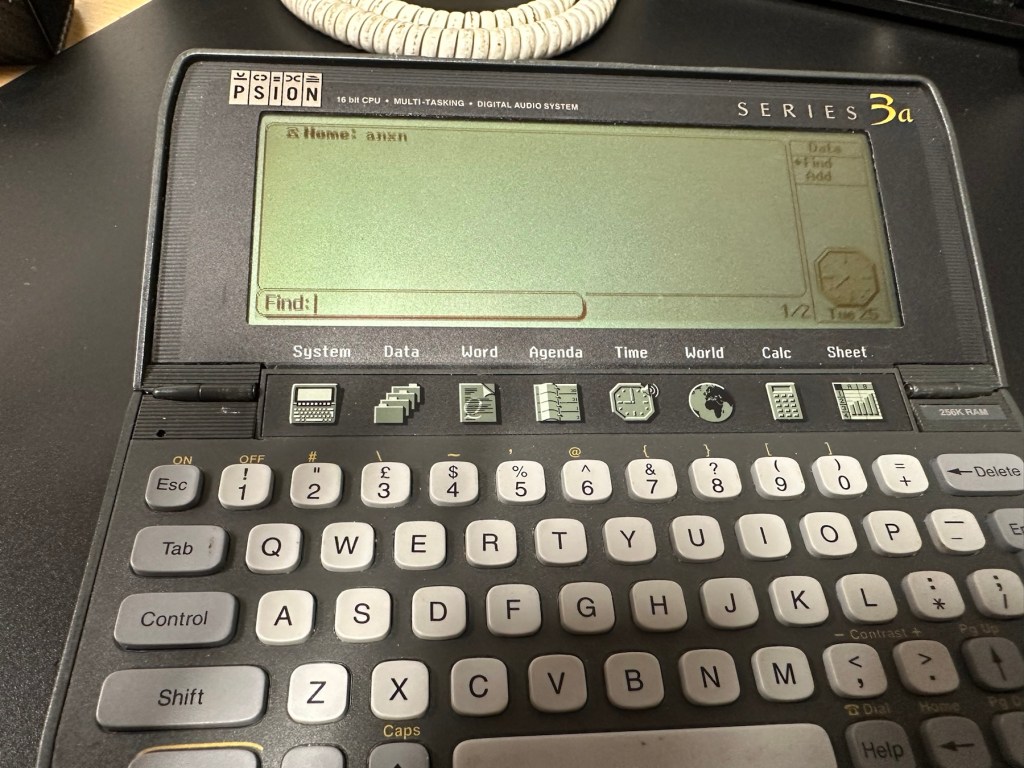
When the unit was turned on it then reset to 1989, I was able to change the times and date, and I was pleasantly surprised to find out that the date range on this unit covered the years 1901-2099. Considering this unit was released 11 years prior to the Y2K bug of 2000, it showed some advanced thinking in the implementation of these units.

One of the issues with this particular unit is that there is no backlight on the display, the display is black and white and the only change that can be made is to the contrast. Back lights eventually arrived with later models. So use of these units was pretty much limited to daylight hours, or whilst under a light source of some kind, that said the display is very good and has a good contrast range.

The unit with an example function card installed
In use in the carpark at work

The last thing I have done is clean with some IPA to remove the years of gunk and I think this was quite successful

The IPA certainly lifted some dirt

After this I have finished off with a nice polish with some car cockpit cleaner. It’s finished this repair off just nicely.

Result:

Here we have a nicely presented, clean and fully working example of a nice little bit of personal computing history.

Has come up lovely

So. With these older items, it’s sometimes good to just have an awareness of how these old timers operate. Get an instruction manual, study how it works, it can make the difference between selling it as damaged, when in fact there really was nothing really wrong with it. The seller could have sold this for 3 or 4 times the value that I purchased it for, but I’m not worried about that, as far as I’m concerned I got myself a bargain and to be honest, that doesn’t happen that often.

It’s a win win situation as far as I’m concerned, I win as I now have a lovely example of pre PDA technology, and it’s a small win for the environment as another piece of “Waste” has been saved from landfill.

Thanks for passing. Thanks for being there. Always appreciated 🙏

Canon Speedlite 199A flashgun

Can I bring a dead Canon 199a flashgun back to life? You betcha!

I love working with flashguns, but believe me they are highly dangerous and potentially deadly pieces of kit, once you get under the skin otherwise known as its protective casing. I inherited this one from a good friend of mine who is a professional photographer, the post regarding what he passed on to me can be found here: Cameras…i need more!

Now please do not go delving into the back of these things unless you know what you are doing. Yes they might only be powered by 6-9v of power from your batteries, however in the process of getting to the point where they unleash a lightning flash for your photographic opportunity, they have passed through a component called a flash capacitor, this component greatly amplifies the voltage from that measly 6-9v from your batteries up to what is now between 3-400v for the flash. Yes, you read right right, 400 VOLTS.

That can kill, and if it doesn’t, you have been very fortunate, but you will probably bear an entry and exit burn where you made contact with that very component. If it goes across both hands it’s probably going to go right through that pump in your chest that keeps you alive – your heart, and that can be fatal. You have been warned – take heed!

I must admit I’ve done something here I don’t usually do, and that is clean before searching for the problem. This unit had two or three old company stickers on it that I have now removed. I then gave it a quick clean and a buff and I must admit it has come up very well. I will give it another clean when i have finished, as well as a final polish with some cockpit cleaner.

Production of this flash unit commenced in 1978 for use with the Canon “A” range of cameras that were being produced around this time. It can also be used with some other camera ranges. Before we get into exactly what is wrong with this specific unit, let’s look at some information regarding the spec of this flashgun:

The Canon Speedlite 199A is a dedicated, thyristorized flash unit designed for operation with Canon “A” series cameras. The Speedlite 199A features a high Guide Number of 98 with ISO 100 film, three automatic flash ranges plus Manual and automatic bounce flash capability. The most powerful shoe-mount Speedlite in the Canon line, the 199A is recommended for use with the Canon A-1 or any “A” series camera with motor drive or Power Winder A due to its high power and very rapid recycling time.

Technical Specification: –

Type: High-powered shoe-mount flash; automatic, thyristor type
Guide Number: 98 (ISO 100, feet), 60 w/wide adaptor
Recycling Time: 10 seconds with Alkaline-Manganese batteries 6 seconds w/Ni-Cd batteries
Number of Flashes: 100- 1000 w/Alkaline-Manganese batteries 50-500 w/Ni-Cd batteries
Auto Flash Ranges: 3
Auto Apertures: (ISO 100) Red-f/2.8 Green-f/5.6 Yellow-f/11
Bounce:Yes
Flash Coverage: For 35 mm format, covers angle of view of 35 mm lens; covers 24 mm w/adaptor
Color Temperature: Daylight
Power Source: 4 “AV size Alkaline or Ni-Cd batteries
Dimensions: 3-1/8 x 3-1/4 x 4-1/2 in.
Weight: 1 lb., 1-5/16 oz.

Mir.com

Asssesment:

As you can see in the photos above, and as I stated at the beginning, I’ve gone arse about face on this one and cleaned it prior to diagnosing what the actual issue is. Please forgive me as I was in a cleaning mood at the time, and if I’m in that mood everything gets cleaned.

It runs off of four AA type batteries that fit in to a cassette that sits in the side of the unit. All contacts are clean and there is no sign of any battery leakage. You can see the cartridge in the photos above. The flash unit comes in a Canon branded leatherette pouch that is in absolutely perfect condition. Inside the pouch is a diffuser / wide angle lens that slides over the actual flash head. The whole unit looks fantastically clean and tidy, with no signs at all of any damage or wear.

Put the batteries in though, and turn on the switch. And nothing. It’s dead. Kaput.

With these old flash units you were always used to hearing that family high pitched whistle when you turned it on. That was the system telling you that the capacitor inside was taking a charge and getting ready for business. Over time, the capacitor can loose its effectiveness, it semi retires if you like, and on occasions it retires fully, it dies a death. I very much suspect this is what could possibly have happened here, I just hope ours is in a deep sleep and can be woken up.

So as we move on to what we are going to do, the only issue here is that it’s simply not accepting a charge, and we will then discuss the two options on how we may now breathe life into this geriatric flash gun.

One thing that always annoys me when I search for possible ways of approaching the repair, is the attitude of people who have grown use to us all being consumer driven, the attitude stinks. These units can be purchased for very small amounts now and they loudly advise,”Just buy a cheap replacement and throw that one away!” This annoys me as you well know, because that’s not what this site is about, if I can repair something, no matter how inexpensive it is, I will. There is no need for this continuous throw away attitude. It’s a good way to learn just how things work.

Rant over, let’s move on….

Repair:

One of the easiest and least invasive, and therefore safest ways to start investigations, to look for a remedy, is to first get a nice fresh batch of alkaline batteries. With these in place within the unit, turn the flash power switch on and just leave it like that for anywhere between 2-8 hours. It has been known in the past, to act like a trickle charge as that flash capacitor has not been active for god knows how many years, it kind of revives it. It sometimes works, more often than not it doesn’t. But it’s worth giving it a try. So here goes. If this doesn’t work then our only other option is to get the unit opened up and to replace that beast of a flash capacitor.

I’m just coming off of a night shift and will shortly be heading off to bed, what better time to try this method out. So I’ll see you in a few hours 👋

And so the wait begins. Fresh batteries in place and turned on at 06:20….

I’ve arisen from my pit about five hours later, and what do you know….

Well, it’s only gone and bloody well worked hasn’t it?

And 5 hours later….it actually works

Sometimes it’s the simplest of procedures that can bring old equipment back to life, and when the fix is non invasive, going no where near those dangerous internal components, it can only be a good thing can’t it? And to think this was just placed in a box for disposal. Well it’s got a new lease of life now.

It really is working

I’m really pleased with this so let’s move on to the final stages and get this little beauty polished and presented.

Result:

And yes it is a result, a result of patience and perseverance and thinking outside of the box as they say, in office inspired corporate management speak.

In a number of these “repairs” it’s best to exhaust all other options prior to getting the screwdrivers out, just like a surgeon explores all options prior to getting the knives out. I’m in no way comparing myself to a surgeon, you wouldn’t want me anywhere near you with a scalpel! I’m just using it as a pretty poor comparison, so I guess it’s best I shut up now and just get on with whatever I’m supposed to be doing.

So that’s another little repair put to bed, and another piece of electrical detritus pulled from the arms of the scrap man. I always feel a great sense of accomplishment when I mange to get these old bits of kit working again. It frightens me to think just how much salvageable tech equipment gets discarded when it could quite easily have its life extended with the minimal amount of intervention.

My plan is to add this flash to my Canon “A” series collection as that is what it was originally designed for. And I may well add a link here, when I get to use it whilst testing any new “A” series cameras that just happen to come my way, as they invariably do, that require my attention.

As always, thanks for passing by. It’s always most appreciated.

Always the radio

What do you listen to while you work?

As a child of the 60s, Tv was very much still in its infancy and has never really had a hold on me. To this day I watch very little Tv whereas my wife is the total opposite, and all those Tv subscriptions really add up.

I however prefer the radio, always have done and always will do, you can take the Tv away and I truly would not miss it for a single second.

I was brought up on radio, the excitement of owning your very own transistor radio that went everywhere with you. In bed late at night listening to those old sports broadcasts as well as walking the streets with it permanently held to your ear listening to your favourite channel, way before Walkmans and MP3 players got in on the act.

The radio I always have on in my workspace

I learnt about radio at an early age, how it worked, who invented it as well as participating in its experimental usage as I grew up, I even took the RAE exam and got my City and guilds qualification in radio, I became a radio Amateur and the experimentation went up a few notches. I think this is where my fascination in repairing all these devices comes from, an incessant, absolute thirst for knowledge and a fascination in just knowing how things work.

I sit in my little work area and have a simple radio I recently repaired, set on my station of choice, and in the Uk that is “Boom radio”. It plays my type of music and still has familiar DJs I grew up with as a child, I’m stuck in a fantastical time warp.

Radio, I use it all the time, and to me it will always be the premier medium of entertainment that i will always turn to.

Have a great day.

Panasonic Walkman cassette player RQ-P250

At a family gathering this weekend, an elderly family member approached me and asked if I could take a look at his Panasonic personal tape player, and maybe get it back up and working.

Who am I, to turn down such an invitation, so I took it on and promised him I’d have a look into it. There is, “No rush“ I was told. Just as well, as it’s busy in every aspect of my life at the moment.

Here’s the spec:

Type: Auto Reverse Cassette Player

Tape Type: type I, CrO2, Metal

Output: 20mW

Battery: 2 x AA

Power Supply: RP-AC33 (3V DC)

Dimensions: 114.2 x 84.4 x 33.1mm

Weight: 156g

Finish: black

Year: 1993

Hifiengine

Panasonic RQ-P250

Assessment:

It’s well used, and has always been and if I can get it working, will continue to be so. At the grand old age of 79 my brother in law is not about to change his ways and is quite comfortable listening to his old Cassette collection whilst out and about, on trains quite a bit of the time, as he travels up and down the country. He’s a lovely old fashioned set in his ways guy and we wouldn’t have him any other way. It would be blooming lovely to get this back to him working again.

It’s scarred, been well used but looked after, apparently it’s gone from playing quite well, to slowing down and dying completely. I think I know what the issue is but I’m not going to curse myself by saying I know what is wrong, when it actually turns out to be something totally different.

On the Beach – Chris Rea

And I love his choice of music. Let’s get this repair underway so we can listen to Mr. Rea in a lovely crisp sounding manner befitting of an 80s rock star.

Repair:

Batteries in place, earphones connected, push play. No movement from the capstans, and even when put in forward and reverse there is no movement from either capstan. I can hear all the electrical noises such as the tape head picking, and I suspect at the grand old age of 32 years old that the drive belts have probably given in. Let’s open it up and have a look.

And just as I thought. Two drive belts in here, they are both loose, one though is so loose that it has wrapped itself around the two capstans, no wonder it wouldn’t start up.

I have plenty of these belts spare, I just had to sort out the two closest matching in size. Too slack and you introduce warble, too tight and it will be off speed, you need to get it just right. Adjustments can be made to the motor speed but this will only come back to bite you once the belts wear in.

I’ve put two new belts in place, and at some frequencies there is a little wobble, but with Dolby switched in place this can be removed digitally, this will settle over the coming weeks after more use.

I have used some silicon grease on the cogs, I have put contact spray in the motor and the volume controls, and used IPA to clean all the tape contacts and capstan wheels and posts, it’s basically been given a little service to see it forward for a while longer.

Body now reassembled, new batteries put in place, it’s time to test it.

Result:

A quick polish, to tidy up, won’t get rid of the deep scuffs, just makes it a little more presentable. Cassette inserted, headphones plugged in and as expected it’s working just fine, we can hear Mr.Rea in all his gravel voiced glory. So can you, in this video snippet below, that hopefully won’t get a copyright strike 🤞

🎶 On the beach 🎵

So there we have it. Another item brought back to life with about 30 minutes work. It’s going to make someone’s day, and I’m as pleased as punch that I could play a part in contributing to that.

There you go. Hope you enjoyed this quick fix.

Many thanks for passing by. Always most appreciated.

Fujifilm Finepix S2 Pro

What the listing stated:

ALL ITEMS IN THIS LISTING ARE FAULTY 
FAULTS MAY VARY BETWEENS ITEMS

SOLD AS IS 

NO RETURNS

EBay

I’ve purchased three cameras as a job lot in an auction. All of them have issues but the issues have not been clarified. This is very much a “Suck it and see” auction where I get what I’m given. I’ve paid £24:22GBP for all three and that includes free postage. I’ve purchased from this seller before who is a bonafide Camera business based in South Wales. He has no time for faulty items though, quick in and out is his way of working, no time to fix stuff. I’ve got three good cameras in this bundle and this works out at just about £8:00GBP per camera. And where can you get cameras like this for those prices nowadays.

I’ve just read a blog where a guy had one of these cameras from new, and in 2002 he had paid £1550.00GBP for this camera. Wow, and here i am 23 years later paying the grand total of £8:00GBP for one. Even if I don’t get it working, I’m happy with that.

Now this particular camera had two issues in its lifetime that caused concern, and one of them meant it was pretty much game over, and that one was the CCD issue that used to plague this range of cameras. Fuji released a whole bunch of these cameras with a faulty CCD that had to be fixed under a recall. They built sufficient replacement CCDs to cover the recall and that was about it. There were no remaining CCDs left and at that point what was left had become as rare as hens teeth. If you suddenly developed that faulty a later date, then tough…you were stuffed.

Serial numbers affecting CCD problems are listed below:

Model Serial Number Range 

FinePix S2 Pro 31A127**~31A143** 

32A000**~32A039** 

33A000**~33A007** 

34A000**~34A004**

Fujifilm

The second issue was with a batch of these models that had a “bad” resistor in the power circuit that prevented lock up if there was a power spike, if this failed then the camera just stopped and you were stuck. There was another recall on the second issue but there is probably a lot of cameras out there that again weren’t part of this recall. And I guess owners were pretty fed up of recalls at this point and were off loading their equipment as quick as they could.

The serial numbers regarding the lock up problem are listed below:

Between serial numbers 24L00441 and 24L00680
Between serial numbers 24L01057 and 24L01256
Between serial numbers 24L01553 and 24L01863
Between serial numbers 24L10257 and 24L10608

Fujifilm

My camera serial number

Above you can see the serial number for my camera. Thankfully my number falls outside the range of any of the cameras inflicted with either problem, so it’s fair to say (Fingers crossed 🤞) that I shouldn’t suffer with any of the known issues with this unit. In layman’s terms I think i may well have dodged a bullet here.

I did speak to the seller regarding the fault on this camera and he stated it was just a general error code on the top screen. There is a general error that arises occasionally regarding certain lenses where they have to be locked on their minimum aperture for the camera to work properly, however I’ve not attached a lens yet so this cannot be confirmed.

Here’s some history:

The Fujifilm FinePix S2 Pro is an interchangeable lens digital single-lens reflex camera introduced in January 2002. It is based on a Nikon F80 (N80 in the U.S.) film camera body that was modified by Fujifilm to include its own proprietary image sensor and electronics. Because of the Nikon body, it has a Nikon AF lens mount and so can use most lenses made for Nikon 35 mm cameras. It is autofocusing, with an electronically controlled focal plane shutter with speeds from 30 sec. to 1/4000 sec., built-in exposure metering and pop-up flash. Its ISO film speed equivalents range from 100 – 1600. The S2 Pro also has sound recording capability. The camera is no longer in production, having been superseded by the Fujifilm FinePix S3 Pro in February 2004.

Aside from the Nikon lens mount, the camera’s principal distinction is its 6.17 megapixel photo sensor. Known as the Super CCD, it is unique in having its photodiodes oriented diagonally rather than horizontally and vertically as in all other DSLR cameras. This allows the use of a sophisticated interpolation system that produces an output image equivalent to 12.1 megapixels. The apparent resolution of images in this interpolated mode lies somewhere between 6.17 megapixels and the 12.1 megapixel interpolated output.

A huge number of these cameras were built using a Sony sourced defective CCD that was subject to a recall by Fuji. The recall ended when the stock of these replacement CCD’s was depleted. There is word that no other stockpiles exist of this Super HAD CCD, making these cameras that are found with the purple or black tinted image problems extinct, only usable for parts. The Fuji F700 used a similar defective HAD CCD, but in 3.1/6.2Mp size. That camera has met a similar fate.

Wikipedia

So let’s hope that we can get some pictures out of this unit. We just have to wait and see what arrives.

Assessment:

Well the camera has now arrived, and I must say it is in an absolutely beautiful condition. Cosmetically there isn’t a scrape or scratch, all screens are scuff free and it looks as if this unit has been well cared for. It just needs a wipe over to clean. The package is just the camera body with no extras such as a body aperture cover or neck strap, but who’s worried about that, they can be procured at a later date.

These units are quite power hungry requiring a total of six batteries. 4 AA cells go in the base and two Lithium CR123A batteries go in the grip. These batteries work in unison, one set handling the basic camera functions whilst the other deals with the capture and processing of images. It’s a strange affair, loosely based around the same setup that was originally on their film based camera counterparts.

I’ve had to order the lithium batteries, however I can still get displays and Information using just the AA batteries in the base, basically it is semi functional in this situation.

The lens mount is a standard Nikon F mount, I’m going to have to search through my equipment to see if I have such a lens, I suspect I don’t, so I may well have to purchase a small lens purely for test purposes. I have some other Nikon repairs in the queue, so a lens to have for test purposes wouldn’t really go amiss.

The unit takes either a CF card type II or a Smart-media card (Max size of 2Gb on both) that is located behind a hinged section on the rear of the camera, these work fine and have no bent pins.

Media card ports at the rear

With batteries in place I get the full range of menus, and nothing comes across as suspect at all at this stage in the assessment.

The top menu – no lens attached to test

The top menu by the exposure button is the only “F” indication showing, I have no lens attached so this might be the reasoning for that, but if I do put the menu into manual mode I get the full range of shutter speeds and can even operate the shutter, the shutter seems to be working at all selected speeds with no issues as far as I can see.

Some of the shutter speeds available in manual mode

All other menus are available and I’m even able to format the CF card via the cameras menu. The picture you see on the screen was taken on another camera. It wiped fine so no issues here.

Various menus and the screen after a format was completed through the cameras menu controls

The camera seems to be working with no apparent communication issues as yet. When you try to use the flash it even informs you that you need to insert the correct batteries to test. As I’m awaiting the CR123A batteries I won’t be able to test the flash functionality until they arrive.

No CR123A batteries installed? – You can’t use the flash

As I have stated the testing can only go so far until I have the missing items in my possession, for me that is the two missing batteries and a suitable lens. I’m currently in the process of procuring both. Physically there is nothing wrong with this camera after spending a good couple of hours going over it. I’m quite comfortable with it and believe it could be a lens communication error or just a failure to read the instructions properly by the previous owner. All I need now is that lens. I’ll let you know what occurs in the repair section.

Repair:

To be quite honest it’s not really been a repair, it’s been more of a “pre flight check” to collar a phrase, going through all of the cameras capabilities and ensuring that they are all functioning correctly. As the camera was listed as faulty, and the fault was not identified, I have had to do many hours of testing and Investigation to get to this point.

I’ve done a bit of shopping and managed to buy a nice little lens from the Southern hospice group. Always happy to help a charity and secured this at a good price of £15:50GBP, and that includes the postage, for a Sigma 28-200 f/3.8-5.6 Ø72 Zoom Lens Nikon F Mount. There looks like a bit of fungus on the outermost optic, however I can always clean this if it’s too bad. If not I’ll just leave as is for the moment and keep it vacuum bagged between uses, I can always do a separate post on cleaning up fungus in a lens at a later date. (I have done a basic fungus clean in the past : Canon EF lens 35-80mm)

My new – old test lens

I wasn’t looking at spending too much here, as I only wanted a lens to test a number of Nikon repairs I have upcoming as well as this S2 Pro. This lens will fit that role perfectly, and be added to my collection of other lenses that I have that allows me to test a range of different camera products. I have also purchased an “F” mount body cover for the camera to protect the unit when there isn’t a lens attached to it.

The two CR123A batteries have arrived and have been placed in the handle grip. The warning that was there before the batteries were installed (see picture above) has disappeared and when placed in manual mode the flash fires just perfectly, no issues here.

The Lens has arrived. Good point is that it fits fine and looks good, and all electrical contacts are good. Bad point is it has severe fungus throughout, and is just like looking through a fog.

I will do a separate post on cleaning this problem up in a later post. However I’m not overly worried at this point, I paid a very low price so it was to be expected, I’m not complaining to the seller who was a Hospice, they need the money and I can fix it so there really is no problem.

The excellent news is that the lens does exactly what it should. The camera indications are good, all working exactly as expected . However the pictures via the screen are extremely hazy due to the fungus infection on the lens. There are no black or purple casts on the pictures so I am quite happy that we haven’t inherited the dreaded CCD issue discussed earlier in this post.

If I use the lens wide open and pop the camera into auto mode I do get an “ERR33” code and that is a communication issue between the lens and the camera. As I have stated earlier in this post, you have to have the lens set at its lowest aperture and locked for the error code to go. Fortunately this lens allows you to lock the aperture and once this is done the camera takes over the exposure when it is working in automatic mode. So as I also stated earlier, it appears the seller was probably not aware of this requirement/issue.

Result:

We have a fantastic working camera, it does all it was produced to do, it has its little quirks and oddities, but being familiar with these cameras and at least having some knowledge and awareness of how they operate is always a wise thing. Read the instructions and don’t just throw them in the drawer until you eventually sell the camera on as a damaged item, when in fact you were just lacking the knowledge on how it operates in the first place. Instruction manuals are good, they serve a purpose. Knowledge is king.

The complete camera with lens

This camera cost me £8:00GBP. That is a superb price for a camera of this quality even though it is now 23 years old. It has a lot of life left in it, and I can’t wait to get it out and give it a real test.

It’s a little beauty – And the lens that needs attention

So in theory I’m confident and happy that this camera is now in a fully operational order, it’s needed a clean, it’s needed a lot of research to find out how it works, and I’ve also downloaded the operating instructions and repair pack should they be required.

It’s taking pictures and storing them. It’s just the lens at the moment isn’t performing at its best due to its fungus on the optics issue. I’m keeping the pictures stored on the card to compare them with the new pictures that will be taken once I have another lens to use.

Once the lens clean up is complete, if I ever get around to it, I will link it through this post.

Edit:

As 12/7/25 I have purchased a newer higher quality lens without any of the above issues to be able to get some instantaneous results, and as I have about seven other Nikon cameras requiring testing, some with sensor issues, it was wise to invest in a better quality lens. I have purchased a Nikon 28-100mm AF Zoom Nikkor Lens G AF-d, in perfect condition and the post regarding it can be found here: Nikon 28-100mm AF Zoom Nikkor Lens G AF-D

A newer – old lens, much superior quality

As previously stated I will add photos in this post once the new lens arrives, to show the difference from the fungus infected lens to a decent lens. The old lens is still a work in progress and I will post about it again as a separate post once the clean up is complete. It will probably be a job completed once the long winter nights are back in situ.

Below are comparison photos between the old lens with fungal issues and this new lens:

It’s just typical for me to manage to make another post from an issue that has arisen from fixing a different item. But isn’t that life? Continuous improvement is a factor we come across on an almost daily basis, and if you deal with old items as much as I do, then there is always something else that needs repairing, something that requires your attention and I just love that. The ability to improve or make something better, gives such a feeling of achievement and accomplishment, and total satisfaction. And that’s why I write this drivel. It’s for me, it’s what this blog was originally set up for. It’s my journal of what I do.

Many thanks for following this post. You know it is always very much appreciated.

Systema/Krypton – Horizon computerised travel chess set

What the listing stated:

The item has previously been owned before and unfortunately the batteries were left inside to corrode. When tested the computer part does not work.The pieces are a complete set for playing without the computer. Please see photos.

EBay

The unit looks clean cosmetically, and all the pieces are present. The computer side is not working probably as a result of the corrosion that is present in the battery compartment.

So I’ve paid a grand total of £11:49GBP for this unit which is probably slightly above its value. However it was from the St.Helena Hospice in Colchester, so I do not have an issue with this. In fact if I can get it working it will be donated straight back to a hospice I support here in Leicester – LOROS hospice. So all around, everyone benefits. I don’t play chess so it will not be used by me, I believe this unit was originally released circa 1996, so it is roughly 29 years old.

A really simple video, regarding how this unit works

Not much in the form of instructions online, however I have managed to get hold of some pictures of a quick start guide that should suffice for the moment. I’ll try and get full instructions from somewhere. In the meantime, the video above shows how easy it is to setup and use.

Let’s wait for its arrival to make an assessment.

Assessment:

The item has arrived and cosmetically it’s not too bad. There is some writing ink on the lid, and some staining on the base. but nothing that a good clean wouldn’t see to.

Open the battery compartment and all contacts are in serious need of a good clean or replacement. Battery corrosion is bad. All playing pieces are included and that’s always a bonus. I do believe that the issue here is purely to do with the acid corrosion, as when tested with a multimeter there is no continuity through the contacts. If the corrosion hasn’t gone too deep this should not be too much of a problematic repair.

Repair:

Now inside of the unit we can see the extent of the corrosion and thankfully it hasn’t reached the circuit board as the battery compartment sits just to the side of it.

I’ve disconnected the wires from the battery compartment so i can it take it away and concentrate on removing the contacts and cleaning them, or completely replacing them.

The contacts are in such a poor state and so far beyond recovery that I have decided to replace them all. I need two single and three double AAA size contacts. Luckily I do have plenty of these in my current stock.

Prior to fitting the new contacts I will give the entire battery compartment a good clean with some IPA to remove the residual contamination. I will then dry the unit and just use some furniture polish to buff it all up and make sure it’s as clean as the day it left the factory. Once this is done the new battery contacts can be put in place. I can then re-solder the two internal battery wires back into place.

Contacts checked to see power is a available

New AAA battery contacts in place I just put in the batteries, to confirm continuity with the multimeter. A good 6.4v indicates this part of the repair is good and that the contacts are all working.

Next I’ve decided to replace the two wires from the battery compartment to the circuit board, as the wires, especially the negative one appears very brittle, probably a combination of age and the battery acid contamination.

Two new power wires

I’ve tidied the wire run up by using some Kapton tape to secure it to the shell so there is no chance of a wire pinch.

Before closing the shell up, I use some hot glue to put the speaker back into place.

A bit of hot glue to secure

Now we can get the last four screws in place to secure everything together.

Then switch on…does it work? You betcha, it does everything that it’s meant to, and even though I don’t really know how to play, I do manage to challenge the computer for a good ten minutes. It’s been a great test run and even though I’m not that clued up it is working how it should and is now back in a perfect working order. I’ve created this little video below.

It’s working

Now just a little spit and polish and we can bring this repair to a close.

Result:

It’s polished up well apart from a bit of age staining on the rear, this makes no difference as it’s only the hidden part of the case and every game related part of the unit looks fantastic and it works just fine.

Really pleased with this especially as it’s going straight to our local hospice for them to sell on. It was brought from a hospice, and is going back to another, what better way to generate funds for them. I can’t play chess so this unit is wasted on me. Might as well pass it on to someone who’d appreciate it whilst giving some much needed financial support to a most worthy cause.

Another one saved from landfill. Win win all around.

Thanks for passing by and reading this post. It’s always very much appreciated.

Grandstand Invaders from space game

What the listing stated:

Can’t get to turn on unfortunately. No battery cover. Any questions please ask

EBay

I know, there is no battery cover, however I have already sourced a seller of one if needed. This item looks quite dirty so a good soak might be the order of the day to get started. I’ll wait for its arrival before I jump to order any other bits for it.

Now as I’ve said in the past these units fall into that crazy price category on the selling platforms as the “New Antiques” of today. For an item that was low cost, somewhere between £25-40GBP when it came on the market, they can certainly command a wide range of crazy prices, here is an example of price ranges from today:

The massive range in prices for these units

This one I purchased today only came up for sale about 3 hrs ago and I thought it would have been snapped up by now, it hadn’t so I didn’t hang around any longer and purchased it for a total of £16:38GBP including its delivery. I’m not going to get too smug yet, as for all I know I may have just purchased an empty shell. Let’s wait until it arrives.

Here’s a little history of this unit:

Grandstand “Invader from Space” is a tabletop LED game dating back 45 years to 1980. Four ‘AA’ batteries power the unit or, alternatively, the Grandstand 5.5V@300mA power adapter (or an equivalent power pack) sold separately. The game, licensed to Grandstand, is a copy of Epoch’s “Invader from Space”

The company initially behind the “Grandstand” label was Adam Imports Ltd., (from 1980 Adam Leisure Group Ltd. and by 1983 Adam Leisure Group PLC) founded in 1973 by Chris Rycroft and Les Kenyon of Harrogate, UK. The company initially started as a mail order company and was the single largest supplier of calculators in the UK by 1974. By August 1978, George Bassett had acquired a 75% holding in the capital of Adam Imports for £750,000 cash, plus 60p in the pound of profits before tax in excess of £500,000 for year to December 31, 1978. Adam Imports was re-acquired from George Bassett by Chris Rycroft in 1980. It chiefly imported electronic products from other manufacturers such as VTech, Epoch, Tomy & Entex, selling them in the UK re-branded under the Grandstand name.

Wikipedia and others

So that’s the history

There is a good link to a similar repair on YouTube from a guy I follow named Stez Stix Fix, it’s very much worth a look and he has a great if not sometimes crazy way of diagnosing and repairing items. A cool guy though.

The Grandstand invaders from space game

Anyway back to my own purchase.

Assessment:

I must admit the unit doesn’t look as dirty as in the original pictures. The battery cover is missing and there is a crack in the side and a deep scar at the bottom, this won’t be too much of an issue if I can weld it all back together. I will still give it a good soak to clean it all up though. I’ve put four batteries in place, and the unit is definitely dead. There are no loose wires, voltages are getting around the board according to the multimeter and nothing is getting hot. There appears to be no short circuits, and then I notice this, capacitor CO7, slight bulge on top and what looks like leakage from the bottom. We have a candidate as to why this unit is not working.

CO7 looking unhealthy to me, you can see the component to the left that looks like it’s covered in a fur ball. The result of the old capacitor “coughing”

I’ll whip this out and see what we have but I suspect this old capacitor has failed and is causing an issue, heres hoping I have a suitable replacement.

Repair:

This little beast is a 330uf 10v electrolytic capacitor. I have none available so have had to purchase a pack of ten. These should be here in the next few days. There are three other old electrolytic capacitors that I will also change whilst I’m in there, as these are all likely to fail at some point soon. These components are now all around 45 years old, it’s a wise move to change them out.

One very dead capacitor removed.

I’ve ordered a 3D printed battery cover to replace the one that is missing. This should be here in a couple of weeks.

Whilst waiting I have cleaned the inside and outside of the casing as best I can. I still have a piece of broken surround to repair, however this is just a simple glue and a little bit of support job.

Broken surround repaired

The surround that was broken has been repaired and secured with some nylon soaked in a superglue compound inside the casing. It’s rock solid. Outside the break is hardly noticeable. The break is secure and much stronger now.

New capacitor here

I’ve replaced all the offending capacitors and the unit remains dead. I’ve reflowed most of the board as there were some dry solder joints. I’ve also rewired the bridge from the control panel to the main board as one of the wires here had broken.

Bridge required resoldering

After using the multimeter to check some traces and components it’s now pointing to this component (a power transistor D882) being the cause of this catastrophic breakdown as its readings are all over the place. I suspect this item has overheated, the capacitor has blown and then it’s just died itself. I’m probably wrong, but I know what I mean. Probably just a catastrophic chain of events that all contributed to the units demise.

D882 transistor – power regulator

And as usual I have none available so will have to send for some new ones. The new components have arrived and the new power transistor has taken its place on the board. Now reassembled I place some new batteries in and the unit comes to life. It was the power transistor at fault, I should have really checked here first after seeing that damaged capacitor at the beginning.

All old components removed and replaced in this unit

Not to worry though as it’s had a good overhaul and has been totally recapped as a precaution. I’ve used some conformal coating on a few tracks that had some copper exposed after a good clean, to ensure they don’t deteriorate any further.

It has life

The unit is looking really good and these items were traditionally very loud and this certainly is. It’s working well just as it should do and I’m exceptionally happy with this repair. I’m still awaiting the battery cover that I have had 3D printed and this should be here in the next week to complete the fix.

So with that I will bring this build to a conclusion. It has been a fun project, I’ve learned a number of things about this circuit board and gained valuable knowledge.

But best of all we have rescued another item and saved it from landfill.

Winner 🥇 👍

Thanks for passing by

Amstrad Notepad NC100

What the listing said:

Amstrad Notepad NC100+ Vinyl Case 

Not working not powering on, the vinyl case has some marks and scratches.

EBay

I’ve been after one of these for a little while, I’ve just been awaiting one at a good price and this one became available, post included at £30GBP, they retailed for £199Gbp back in 1992. It says it is not working but that’s good in my eyes as it makes these posts more appealing, as it gives me something to repair. I don’t know what the issue is off hand as the post didn’t state that, but I do know these items have suffered with capacitor problems over time, but that is not necessarily the case here. We will just have to wait until we do the assessment on its arrival. And as it comes from around the early 90s it fits right in with my modus operandi. And this little cutie dates from 1992.

Here’s a little history behind this unit courtesy of Wikipedia:

The Amstrad NC100 Notepad is an A4-size, portable Z80-based notebook computer, released by Amstrad in July 1992. It featured 64 KB of RAM, 256KB of Rom, the Protextword processor, various organiser-like facilities (diary, address book and time manager), a simple calculator, and a version of the BBC BASIC interpreter. The computer’s design, evocative of the TRS-80 Model 100, features a screen with 80 character columns by eight rows, and not backlit, but this let the NC100 run for up to 20 hours on four standard AA cellbatteries. There was an RS-232serial port, a parallel port for connecting a printer, and a PC card socket, by means of which the computer’s memory could be expanded up to 1 MB.

Assessment

The unit has arrived and cosmetically it is in very good condition apart from the peeling plastic screen cover. A little bit of dust and grime, all keys in good order and no dinks or dents. the vinyl bag is a little tatty but that’s not a problem, it’s obviously done it’s job over the years due to the good condition of the unit.

So down to testing. First thing I’ve done is check the power supply is giving a 6.5 v output and this is ok.

Power supply doing what it should.

Secondly I’ve put 4 AA batteries in place and turned the unit on but then it abruptly stops, displaying a lithium battery issue.

Lithium battery warning

The lithium battery is an old CMOS type battery, a CR2032 coin battery. This is the battery that keeps the info in the system when you turn it off. I thought I’d run this through the multimeter and was surprised with the voltage I saw, the battery seemed fine to me at 2.8v, so I replaced it with a new one measuring 3.4v. And the issue came up again…..head scratching time!

Looking on line it seems there is an issue with the lithium cell battery contacts on these units when they are being resurrected to modern day usage, time has not been good to them. The coin contacts have now been cleaned and slightly bent to ensure a better contact and hey presto it’s operational with no further issues.

Battery contacts needed cleaning and repositioning

The main AA battery contacts are fine and the external supply is doing what it should. Now let’s look at sorting that screen issue.

Quite simply there were two options, use a bit of heat to try and stick the plastic down, but I decided against this as it would not lay flat, it had too many kinks in it. So the only other option was to remove it and this is what I did, it peeled off with no issues. In time I will see if I can get a suitable replacement but to be honest it isn’t really required as I’m not going to be using it that often.

Let’s get that screen cover off

I’ve tried every function and keystroke of the board and all is good there are no issues and I now have a perfectly acceptable unit for my collection. It looks like i have had a second win against the “Untested” brigade who sell on EBay. This was the simplest of repairs and the issues are readily available to research on line. There is no excuse for not looking into the issues, when a good unit like this can now sell for up to three times the amount that I paid for it.

Your loss my win. Another one kept from landfill.

I’ve given the unit a good polish and I think you’ll agree that the project has come up good.

Now to just go and read the user manual on line to see if I’ve missed anything. Thanks for passing by, as always it’s most appreciated.

Psion organiser series 3a

What the listing stated:

It fires up and turns on, then get a black screen. Every time I press a key on the keyboard it makes a beeping sound, so it is registering something.

EBay

From a distance, and in my opinion, the fault could be a simple one such as adjusting the contrast by using the Psion key and either of the <> keys. This was often an issue when first turning on the Psion II, you had to turn the contrast wheel. However it could be a terminal one requiring a donor unit. In layman’s terms it could be knackered, (to coin a phrase). But hey, what do I know 🤦‍♂️

Psion 3a – Faulty

Fingers crossed 🤞 as usual.

I have a what looks like a nice tidy little unit here obtained for a very reasonable price £17:69Gbp including postage. These units retailed between £179-£249 when they first appeared back in 1993. However, there is only the one picture in the advert so the rear, sides and hinges could be wrecked. “Caveat emptor” as they say. It does have a problem that will need some investigation. It runs off of two AA batteries and a CR1620 coin battery as a backup, and these will be the first items to be changed, I’ll also check the voltage of that coin battery and replace that if necessary. This is an early version with 256KB of internal Ram. 3a versions from 1995 either had 1Mb or 2Mb of ram. You can also use an external power supply if required, but the batteries in these units have an excellent long life span, so external power is rarely necessary. I’m looking forward to this project. I’ll make a more detailed analysis when the unit arrives shortly.

The Psion Series 3 range of personal digital assistants were made by Psion PLC. The four main variants are the Psion Series 3 (1991), the Psion Series 3a (1993), the Psion Series 3c (1996), and the Psion Series 3mx (1998), all sized 165 by 85 by 22 millimetres (6.50 in × 3.35 in × 0.87 in). Further, a Psion Series 3a variant with factory installed software for the Russian language was called a Psion Series 3aR, and Acorn Computers sold renamed versions of the Psion Series 3 and 3a marketed as the Acorn Pocket Book and Acorn Pocket Book II.

Wikipedia

A little history:

This particular unit dates from 1993 and was the next in the series of Psion organisers that succeeded the extremely successful Series 2 models. It was a massive step forward in design as the whole PDA market was kicking in big time in the early to mid nineties. More info regarding the series 3 organisers can be found here: Psion series 3

And the strange fact for today is this:

Manufacture of Psion 3s was discontinued in 1998 shortly after the launch of the Psion Series 5 (a Psion Series 4 does not exist, due to Psion’s concern of Tetraphobia in their Asian markets)

Wikipedia

What is Tetraphobia?

The fear of the number four: Tetraphobia is mainly suffered in China, Vietnam, Korea, Japan, because the word for the number four is similar to the word for death in their languages. Tetraphobia results in many people avoiding referring to 4 in phone numbers and so on.

Cambridge dictionary

There you go, question answered and that was why there was no Psion 4.

Onwards…

What has arrived, and what’s the diagnosis?

The unit has arrived and despite my suspicions it is in an excellent cosmetic condition. Just some very light signs of usage, needs a light clean, all hinges are in place and solid. Everything is as it was all those years ago and all the warranty labels are in place, this unit has never been opened.

I placed the new AA batteries in and it came up with the black screen as the seller had stated. Using the contrast adjustment at this stage had no effect but the buttons were sounding so something was happening. Whilst looking in the memory card doors I could see one glaring issue, there was no backup CR1620 battery, so I dropped one in place . When I started the unit up again the screen went from black to clear, over a few seconds and then I operated the contrast buttons, and hey presto it worked. Watch this little video to see what happens.

We have life

I can only surmise that not having the correct batteries in for god knows how long, and then livening up the circuitry must just be like giving Frankenstein a fresh transfusion of blood. “It’s alive!” Well, that’s all I can think it would be.

I’ve run every function on the unit and it all works fine apart from the voice recorder function that seems to have a lot of feedback on the recording. I suspect this might be as I’m using the already full internal memory. It’s not a real problem, I’m just going to have to read up on it, as I could be doing it all wrong. (I have since done a hard reset and deleted old files from the system and this has cured the feedback issue, the voice recorder works fine). However it would still probably work better using an additional drive in the unit, and not the low internal memory.

Just as you could on the Psion II you can write your own programs using OPL language. And it is a lot easier on this unit as you have a full Qwerty keyboard and a much bigger display. There are more applications on this unit than the series II, including word, spreadsheets, DTMF dialler, calculator and others that can be purchased as plug in additions.

I’m really happy with this, if the seller would have just taken a little time to run the unit and have some patience he’d have realised there really is nothing wrong with this unit. Big negative for him, big bonus for me. He could have charged more than double the price for this item, or more, considering current prices on the selling platforms.

Another strange thing i have noticed is that when I’ve left it overnight and started it up the following day it takes a minute or so for the screen icons to appear, just like putting on an old valve radio. So it maybe that a repair is necessary, I’ll have to ask around and see if any else has had this issue.

Valve powered Psion3A

Edit: A few days later and I’ve looked into this a little more. For some unknown reason, probably my rank stupidity, I’ve checked the coin battery and I’ve installed a CR2032 instead of the required CR1620 and have tonight corrected this and installed the CR1620 coin battery. I don’t know if, or why this would have an effect, but after putting the correct battery in place the unit started up in a couple of seconds even after sitting unused for at least a couple of days, instead of the usual 2 minutes as per the video. I can only think it must be something more related to the capacity rather than the size, unless for some reason the contacts were not sitting true. (There is a slight difference of 4mm in width) I remain puzzled as I thought the battery was just for backup purposes, maybe it does perform more as a computer CMOS battery does, but I’m pleased it’s now operating as it should. I can now stop monitoring the sale sites for units to use as spares.

Sometimes your suspicions pay off, and on this occasion I was spot on. EBay untested items can swing either way and most of the time the sellers use it as an easy get out for not accepting any responsibility. But this time I win, and that makes me happy as I have a very good item for my retro collection.

Thanks for passing by.

Old iPad To New Screen

This is a great blog from Hackaday that shows how old iPads that are no longer usable can have their screens used as standalone monitors. Since Apple are openly criticised for their throw away culture it’s a reasonable way of keeping these old units out of landfill, and saving you some money as well. I love the example of using an old screen as an additional screen for an iMac.

Turning surplus LCD panels into stand-alone monitors with the help of a driver board is an established hack, and a search of eBay or AliExpress will …

Old iPad To New Screen